Test Window Fields
The following fields appear in the test window:
Test Information Fields
| Field or Control | Description |
|---|---|
|
Name |
Displays the test name. This field is display-only. |
|
Description |
Brief description of the test. You can enter a detailed description in the Comments. |
Test Information Functions
| Field or Control | Description |
|---|---|
|
|
Test Save As. |
|
|
Click to access the Message Recognition dialog box. Use the Message Recognition dialog box to define how PTF will respond to messages that are encountered during runtime of the test. The Message Recognition icon contains a check mark when the message recognition is enabled for the test. |
|
|
Open the Test Properties dialog. In the Language field, select the language for the PeopleSoft application. The default is English. Changing the value in the Language field only affects the language the test selects at sign in. It does not enable the test to run against a different language. PTF tests should be rund against the same language in which they were recorded. Select the Variable Action to use with this test. The variable action determines whether or not to use persistent variables. By default the action is set to None and persistent variables are not used. See Using Persistent Variables Select the Library Test check box to make the test a library test. See Using Library Tests. |
|
|
Open the Test Comments dialog to enter comments or to insert a timestamp. |


Using the Comments Editor
In the Comments dialog box, you can:
-
Enter a long description using rich text and images.
-
Insert a screen shot using the snapshot icon.
-
Insert timestamp.
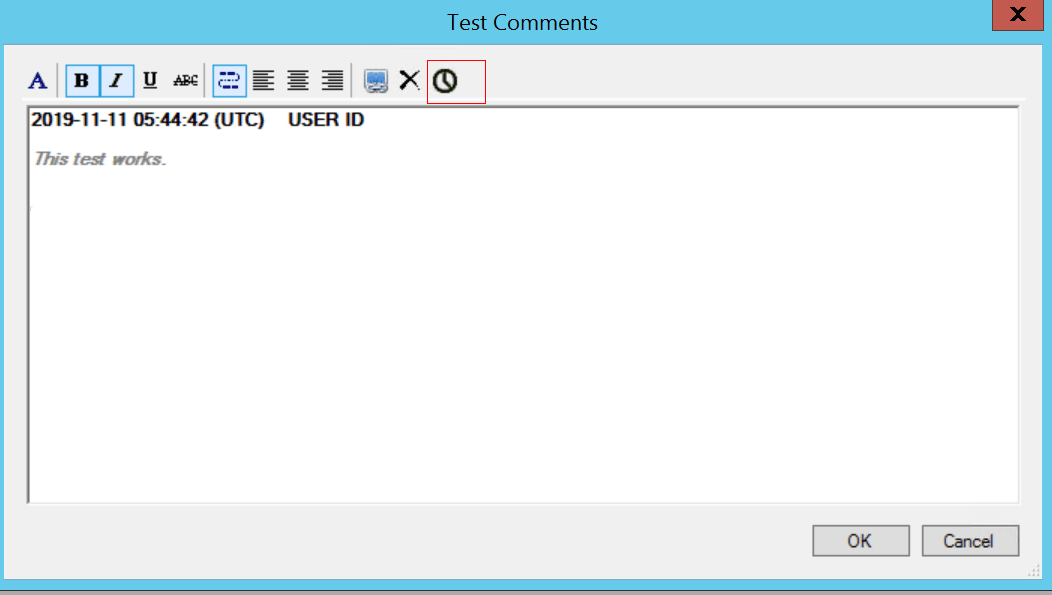
This example highlights the timestamp control on the Test Comments dialog box.
| Field or Control | Description |
|---|---|
|
|
Timestamp displays the current date, time, and user ID. Date and time follows ISO 8601 format, and uses UTC time zone. For example, 2018-12-10 14:30 (UTC) <User ID>. To insert timestamp, click the timestamp icon or press F5. |

Test Case Information Fields
| Field or Control | Description |
|---|---|
|
Name |
Displays the name of the current test case. You can select a different test case using the drop-down list. When you create a test, the system automatically associates it with a test case named DEFAULT. |
|
Description |
Brief description of the test case. You can enter a detailed description in the comments. |
Test Case Information Functions
| Field or Control | Description |
|---|---|
|
|
Test Case Save As. |
|
|
Create a new test case. |
|
|
Delete the selected test case. |
|
|
Open the Test Case Properties dialog. |
|
|
Open the Test Case Comments dialog. You can enter a long description of the test case using Rich Text and images. Apart from entering text, you can insert timestamp. See the preceding section, “Using the Comments Editor,” for details. |


