Download and Use the Mobile Archive File (Admin Task)
Instead of downloading the Siebel app and installing it on a mobile device as
described in Download and Install the Siebel App,
administrators can copy the SiebelMobile.zip file from the Siebel Tools
installed home directory.
Prerequisites for Using This Method
Make sure you have a proper internet connection.
On Mac laptops:
-
Node.js v22.13See: https://nodejs.org/download/release/v22.13.0/. -
JDK 17See: https://www.oracle.com/java/technologies/javase/jdk17-archive-downloads.html. -
Android Studio and Android SDKSee: https://developer.android.com/studio. -
Xcode 26.4See: https://developer.apple.com/xcode.
-
Node.js v22.13See: https://nodejs.org/download/release/v22.13.0/. -
JDK 17See: https://www.oracle.com/java/technologies/javase/jdk17-archive-downloads.html. -
Android Studio and Android SDKSee: https://developer.android.com/studio.Note: Multiple Android SDK versions will get mapped post Android Studio installation in SDK Manager. You need to select API level 35/36.
Set Up the Environment
- Copy the
SiebelMobile.ziparchive file. - Extract the
SiebelMobile.ziparchive file to<PROJECT_ROOT>\RNMobile\.The project root folder becomes
<PROJECT_ROOT>\RNMobile\Siebel.
Prepare the IPA File
On Mac laptops:
- In terminal, navigate to
<PROJECT_ROOT>\RNMobile\Siebel\iosfolder and execute thepod installcommand. - Navigate to
<PROJECT_ROOT>\RNMobile\siebel\ios\siebel\Info.plist.- Change
<string>Release_Version</string>with the appropriate build label.Example:
<string>23.9</string> -
Add a domain list which need to be allowed in the Siebel app:
<key>WKAppBoundDomains</key>
<array>
    <string>*.oracle.com</string>
    <string>domain1</string>
    <string>domain2</string>
  ....
</array>
- Change
-
Open the Xcode application using below command in a terminal and navigate to
<PROJECT_ROOT>\RNMobile\siebel\ios.- Execute command
open siebel.xcworkspace. - With above command it should open the project in Xcode.
- Add the Apple signing profile details matching to your company account details.
- Clean the Build Folder from the Product menu.
- Build from the Product menu.
- Select Any iOS Device option from Product > Destination menu item.
- Archive the project from the Product menu.
A successful archive looks something like this image:
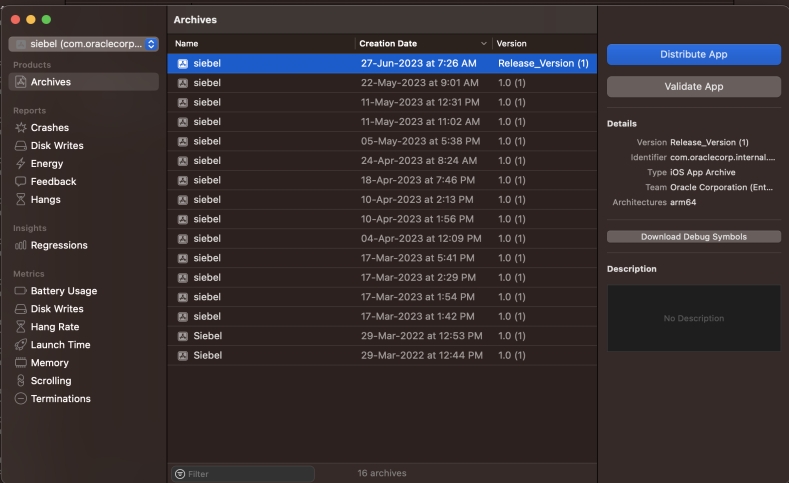
- Select the Distribute App button and select Custom, and then Enterprise option.
- Select the All compatible device variants option from the drop-down menu next to App Thinning.
- Select the IOS in house profile and certificate.
Let the Thinning app package load.
- Select export after successful processing.
- Once you click export, you can see a folder with all the app versions after thinning.
- Pick
siebel.ipafrom the list to use in the devices.
- Execute command
Or, the IPA file can be generated with the below commands.
-
xcodebuild clean archive -scheme siebel -configuration Release -archivePath <PROJECT_ROOT>/siebel/ios/deploy/iOSDebug/Destination_Root/Siebel.xcarchive -workspace siebel.xcworkspace DEVELOPMENT_TEAM=’<value>’ PROVISIONING_PROFILE=’<value>’Example:xcodebuild clean archive -scheme siebel -configuration Release -archivePath <PROJECT_ROOT>/siebel/ios/deploy/iOSDebug/Destination_Root/Siebel.xcarchive -workspace siebel.xcworkspace DEVELOPMENT_TEAM='VYAKS7W7VC' PROVISIONING_PROFILE='Oracle ENT2' CODE_SIGN_IDENTITY='iPhone Distribution: Oracle Corporation (Ent 2)' -
xcodebuild -exportArchive -archivePath<PROJECT_ROOT>/siebel/ios/deploy/iOSDebug/Destination_Root/Siebel.xcarchive -exportPath Siebel.ipa -exportOptionsPlist iosExportOptions.plist -configuration Release
To deploy on an IOS simulator:
In terminal, execute command npx react-native run-ios from
<PROJECT_ROOT>\RNMobile\siebel.
Prepare the APK File
Navigate to and open file
<PROJECT_ROOT>\RNMobile\siebel\android\app\build.gradle.
Search for defaultConfig section and replace Release_Version with appropriate build label.
On Windows laptops:
- Find the
local.propertiesfile in the<PROJECT_ROOT>\RNMobile\siebel\androidfolder. Correct the path value for thesdk.dirparameter. This is required only for Android.Example:
sdk.dir=C:\\Users\\<Username>\\AppData\\Local\\Android\\Sdk - Add following environment variables (the values are for your reference; use the
relevant value, in your case) in the system variables section:
- Variable=ANDROID_HOME
Value=\Users\<Username>\AppData\Local\Android\Sdk - Variable=ANDROID_SDK_ROOT
Value - \Users\<Username>\AppData\Local\Android\Sdk - Variable=JAVA_HOME
Value - C:\Program Files\Java\jdk-11 -
Update Variable=Path with new values:
\Users\<Username>\AppData\Local\Android\Sdk\emulator\\Users\<Username>\AppData\Local\Android\Sdk\platform-tools\
- Variable=ANDROID_HOME
-
Search for the Windows Powershell in WIN programs. Right-click the mouse and open in Administration mode.
- Navigate to the folder path
<PROJECT_ROOT>\RNMobile\siebel\android. - Execute these commands:
./gradlew clean./gradlew build./gradlew assembleReleaseGenerates the apk file in the path
<PROJECT_ROOT>\RNMobile\siebel\android\app\build\outputs\apk\release.
- Navigate to the folder path
To deploy on an Android emulator:
- Execute the command
cd ..(to move back to the root folderC:\RNMobile\siebel). - Execute the command
npx react-native run-android.If you get the error
'react-native' is not recognized as an internal or
                            external command, operable program or batch file
, then, execute the commandnpm install -g react-native-cli.
On Mac laptops:
- Find the
local.propertiesfile in<PROJECT_ROOT>\RNMobile\siebel\androidfolder and correct the path value for thesdk.dirparameter.For example:
sdk.dir=/Users/{mac user}/Library/Android/sdk. - In terminal, navigate to
<PROJECT_ROOT>\RNMobile\siebel\androidfolder and execute these commands:chmod +x gradlew./gradlew clean./gradlew build./gradlew assembleReleaseGenerates apk file under path
<PROJECT_ROOT>\RNMobile\siebel\android\app\build\outputs\apk\release
To deploy on an Android emulator:
In terminal, execute the command npx react-native run-android from
<PROJECT_ROOT>/siebel.