- Using Oracle Big Data Manager
- Transfer and Compare Data
- Copy Data (Including Drag and Drop)
4.1 Copy Data (Including Drag and Drop)
In the Data section of the Oracle Big Data Manager console, you can copy data between storage providers by creating copy jobs.
To copy data from one storage provider to another:
- Click the Data tab at the top of the page, and then click the Explorer tab on the left side of the page.
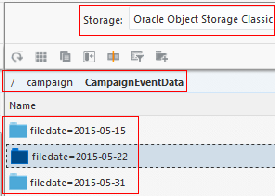
- In one panel, select a destination storage provider for the copy job from the Storage drop-down list, and then navigate to a folder or container by selecting a location in the breadcrumbs or by drilling down in the list below it. For example:
- In the other panel, select a source storage provider from the Storage drop-down list, and then navigate to the folder or container containing the file, folder, or container you want to copy.
- Do any of the following:
- Drag the source file, folder, or container from the source and drop it on the target.
- Right-click the item you want to copy and select Copy from the menu.
- Select the item you want to copy and click Copy
 in the toolbar.
- In the New copy data job dialog box, provide values as described below.
General tab
- Job name: A name is provided for the job, but you can change it if you want.
- Job type: This read-only field describes the type of job. In this case, it’s Data transfer - copy.
- CPU utilization: Use the slider to specify CPU utilization for the job. The proper job configuration will be calculated based on the cluster's shape. This is set to 30 percent by default. If you set this to a higher value, you'll have more CPUs for the job, which can mean better performance when you're copying a large number of files. But assigning more CPUs to a job also means there will be fewer CPUs in the cluster available for other tasks.
- Memory utilization: Use the slider to specify memory utilization for the job. The proper job configuration will be calculated based on the cluster's shape. This is set to 30 percent by default. Assigning more memory to a job can increase its performance, but also leaves less free memory available for other tasks. If the job is given too little memory, it will crash. If the job is given more memory than what's currently available, it remains in a PENDING state until the requested amount of memory becomes available.
- Synchronize destination with sources: Select this option to synchronize the destination with sources so files or parts of files that have already been copied aren't copied again. This check box is deselected by default. Generally, if you're copying data that's not in the destination location at all, it's better to leave this option deselected so faster data transfer takes place. If you're copying data that's already in the destination location and you just want to update some of it, it's better to select this check box so only new and updated data is detected and transferred.
- Overwrite existing files: Select this option to overwrite existing files of the same name in the target destination. This is selected by default.
- Run immediately: Select this option to run the job immediately and only once. This is selected by default.
- Repeated execution: Select this option to schedule the time and frequency of repeated executions of the job. You can specify a simplified entry, or click Advanced entry to enter a cron expression.
Advanced tab
- Block size: Select the file chunk size in HDFS from the drop-down list. This setting defaults to the default block size in Hadoop.
- Number of executors per node: Specify the number of CPU cores. The default is 5. If you want to execute this job in parallel with other Spark or MapReduce jobs, decrease the number of cores to increase performance.
- Memory allocated for driver: Select the memory limit from the drop-down list. Memory allocated for the driver is memory allocated for the Application Driver responsible for task scheduling. The default is 1 GB.
- Custom logging level: Select this option to log the job’s activity and to select the logging level. The default logging level is INFO.
- Click Create.
The Data copy job job_number created dialog box shows minimal status information about the job. When the job completes, click View more details to show more details about the job in the Jobs section of the console. You can also click this link while the job is running.
- Review the job results. The tabs on the left provide different types of information. You can also stop or remove running jobs and rerun or remove completed jobs from the
 menu for the job on each tab.
- The Summary tab shows summary information for the job.
- The Arguments tab shows the parameters passed to the job.
- The Job output tab shows job output, which you can also download.
Also see Manage Jobs in Oracle Big Data Manager.
