Manage Implementations with Programs, Projects, and Milestones
Suucess Navigator gives you tools to guide and track your Oracle Cloud implementation—such as Starter Configuration, Cloud Quality Standards, and the Journey. These tools help you understand what to do. To manage how the work gets done, you'll use programs, projects, and milestones.
This guide walks you through how to set up programs and projects to plan, execute, and report on your implementation effectively.
Step 1: Decide How to Organize Your Implementation
Start by choosing whether to use a single program or a program with multiple projects.
- Use one program if your implementation is small, with a limited scope.
- Use multiple projects under a program if your implementation involves different products, regions, or workstreams.
Example: If you're implementing HCM and ERP across two regions, create one program and add four projects—one for each product/region combination.
Step 2: Assign Program and Project Members
Next, identify who on your team should manage the program and each project. Users need to be added as Members of the programs or projects to make changes or to complete assessments.
- Program Members can:
- Edit the program.
- Update program-level milestones.
- Complete program-level assessments.
- Automatically become Project Members of projects related to the program, but can be removed if needed.
- Project Members can:
- Edit their specific project.
- Update project-level milestones.
- Complete project-level assessments.
You can manage Program Members and Project Members access from the Program and Projects section or the Team Member area where you manage users in your organization.
Note:
Think carefully about who should have access to which programs or projects, especially in large implementations.Step 3: Create Your Program
Now you're ready to create your program in Success Navigator to serve as the high-level structure for your implementation.
For detailed steps, refer to the Programs and Projects topic. Pay close attention to team access when configuring your programs and projects.
Step 4 (Optional): Create Projects Under the Program
After you finish creating your program, you can add one more projects under the program to track specific phases of your implementation. Projects let you manage milestones and assessments for separate workstreams while still rolling up into the overall program.
To create a new project, select New Project and follow the steps in the Programs and Projects topic.
Projects let you manage milestones and assessments for separate workstreams while still rolling up into the overall Program.
Step 5: Define Milestone Dates at the Program Level
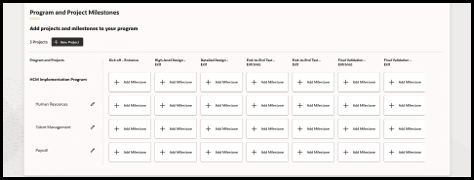
After configuring your program, the Program and Project Milestones section looks like this, with the program at the top and projects underneath it:

Start by selecting Add Milestone to set milestone dates at the program level. Starting with the program sets you up to more easily define the dates for the projects:
- These dates can be shared with associated projects.
- If a shared milestone date changes at the program level, it automatically updates in the projects.
Find detailed steps for adding milestones in the Programs and Projects topic.
Note:
Don't know exact dates yet? Add estimates anyway—you can refine them later.Step 6: Add Milestone Dates to Each Project
Once program-level dates are in place, assign milestone dates to your projects.
When adding milestone dates to projects, use "Share Program Milestone" if the same date applies from the program-level milestone (e.g., a shared Go Live). This keeps your schedule aligned and reduces manual updates later.
Step 7: Adjust Assessment Timeframes
Each milestone includes assessment questions with suggested timeframes (e.g., "T-4 weeks" means 4 weeks before the milestone date).
To customize these timeframes select the ⋯ button on the milestone card and selecting Edit Timeframe. See the Programs and Projects topic in the user guide.
Step 8 (Ongoing): Complete Assessments to Track Progress
Once everything is set up, begin completing milestone assessments to measure your implementation progress. Note the following details about milestones and assessments:
- Assessments are specific to each program and project.
- Only Admins and Members can complete assessments.
- The user must be assigned to the program or project to access its assessments.
Use assessments regularly to stay on track, surface risks, and make informed decisions.
Final Tips
- Set up programs and projects early. They help align your team and establish a shared schedule.
- Keep milestone dates updated and realistic. They drive many of the automated insights in Success Navigator.
- Revisit assessments throughout the implementation to monitor your progress and readiness.