Create User Access Review Campaigns with Oracle Access Governance
Introduction
Oracle Access Governance addresses the growing challenges security owners face in dealing with the increase in advanced security threats and regulations. This cloud-native solution helps meet governance and compliance requirements across many applications, workloads, infrastructures, and identity platforms. One of the key features of Oracle Access Governance is User Access Review Campaigns.
These are run on-demand, and comprise a group of access reviews for members of your enterprise population where individual access to a specific source is checked and either certified or remediated. As a user with the Access Governance Administrator or Campaign Administrator application role, you can create one-time or schedule periodic access review campaigns from the Oracle Access Governance Console. You can define selection criteria for access reviews based on users (who has access), applications (what are they accessing), permissions (which permissions), and roles (which roles).
For more information on Oracle Access Governance, see:
- Oracle Access Governance Product Page
- Access Governance Service Guide
- Access Governance Product Documentation
- Access Governance APIs
- Oracle Access Governance FAQ
Objective
In this tutorial, you will learn to:
- Create access review campaigns for self and user manager review
- Define the approval workflow for review campaign
- Run on-demand or schedule and access review campaign
Intended Audience
This tutorial is specifically for Access Governance Administrators and Access Governance Campaign Administrators so that they can learn to create user access review campaigns.
Prerequisites
You must have:
- Oracle Access Governance service instance with AG Administrator and Campaign Administrator rights. For more info, see Understanding Application Roles.
- Oracle Access Governance service instance connected to Oracle Identity Governance (OIG) system.
Tutorial Scenario
New audit policies have been set up for your division called Support Org to run quarterly access reviews for members of your enterprise population. Gladys Rim is the business owner of this division and a campaign administrator. She needs to create a new campaign that should run every quarter for all users in his division to check, certify or remediate the access privileges. Let’s see how you can create a user access review campaign in Oracle Access Governance.
Task 1: Sign in to Oracle Access Governance Console
- From your browser, go to the Oracle Access Governance Console.
- In the Username field, enter Oracle Access Governance Campaign Administrator or Administrator username.
- In the Password field, enter your password and select Sign In.
You will be navigated to the home page of your Oracle Access Governance Console.
Task 2: Create Access Review Campaign
-
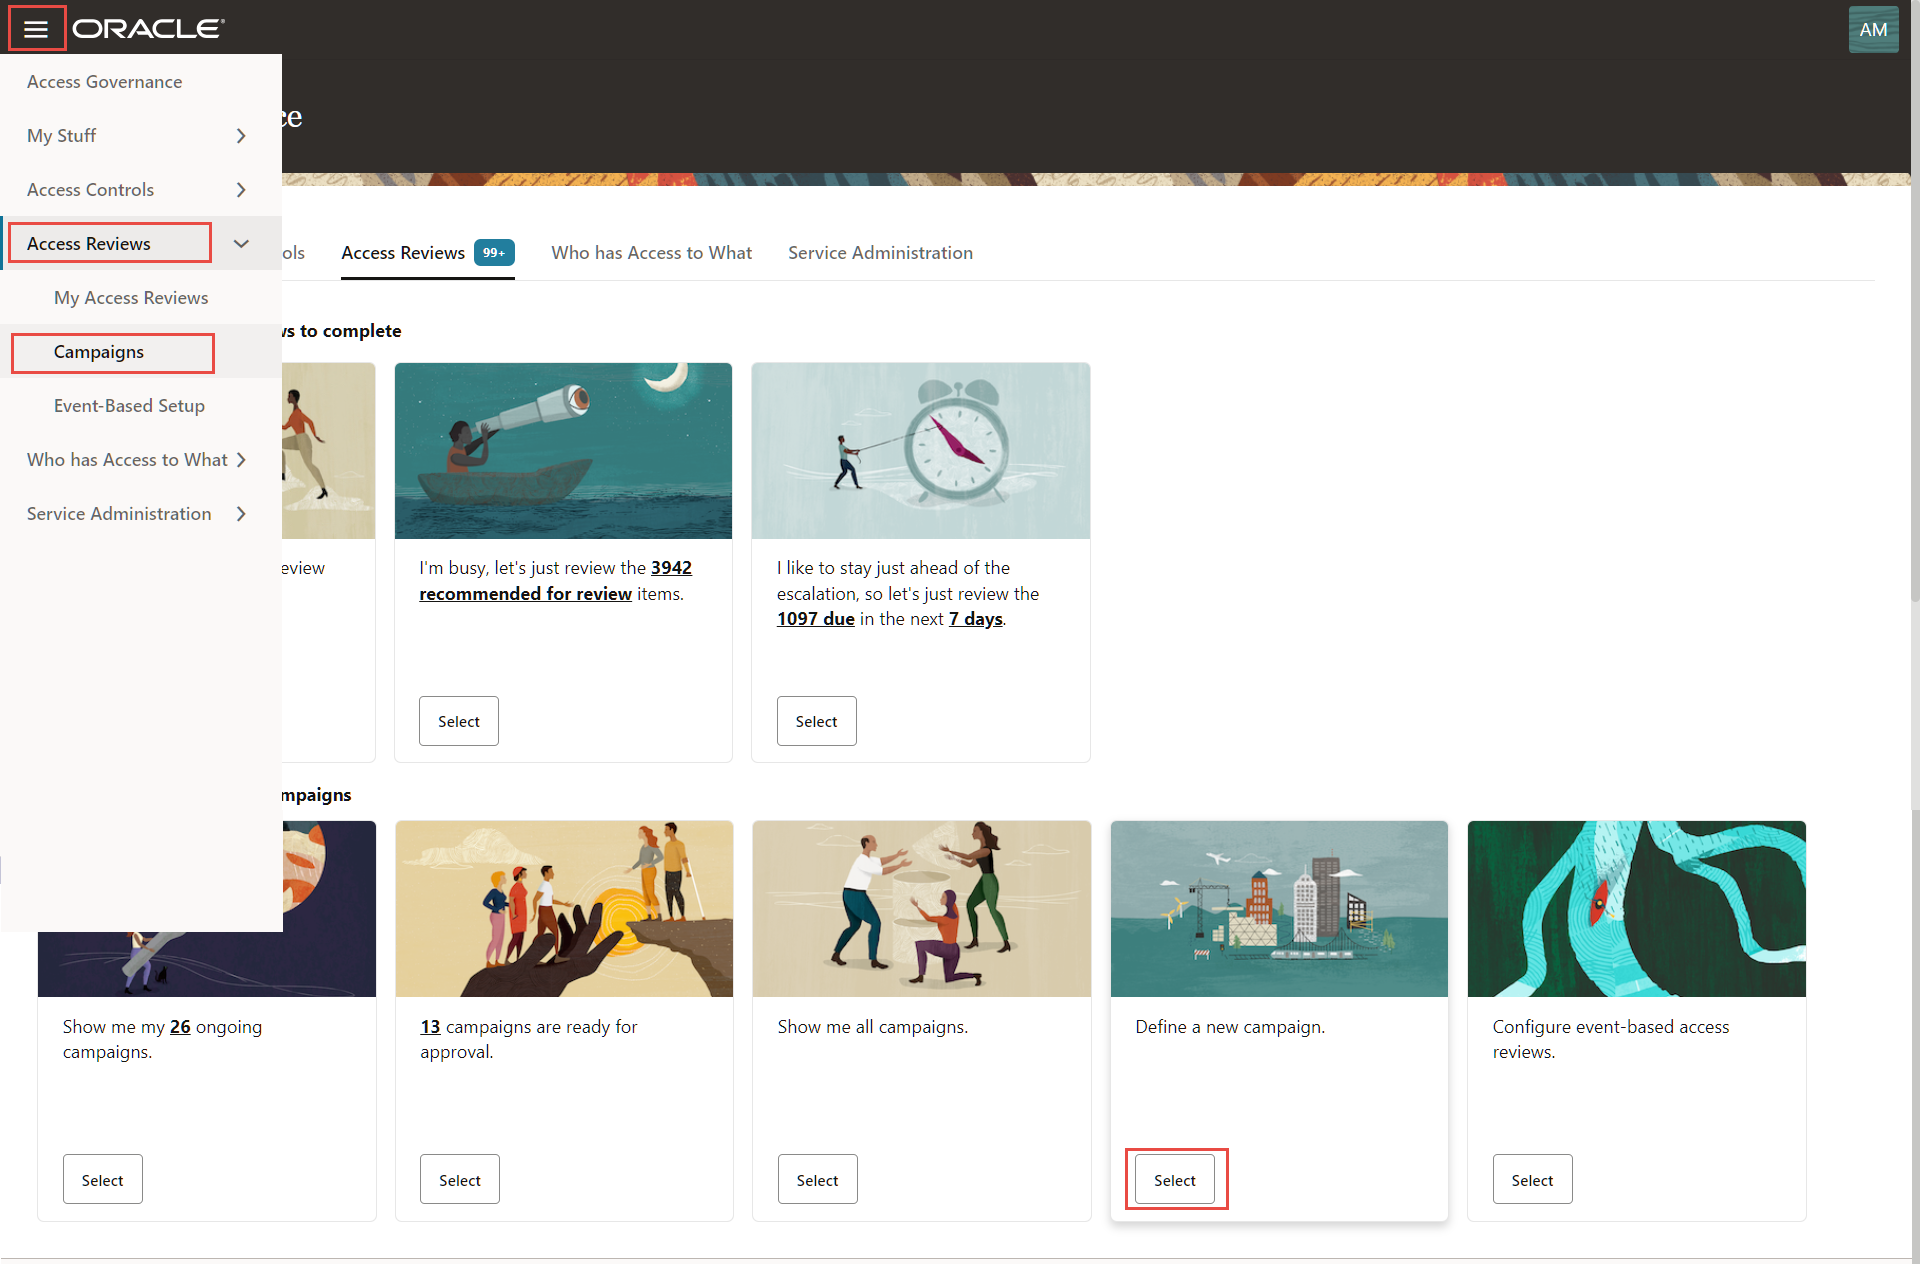
On the Oracle Access Governance console home page, under the Access Reviews tab, scroll down and select the Define a new campaign tile. Alternatively, you can select Navigation Menu -> Access Reviews -> Campaigns. On the Campaigns page, click the Create a campaign button.
-
In the Create a new campaign screen, select any one of the 3 tiles Review access to systems managed by Access Governance, Review access to Oracle Cloud Infrastructure, and Review access to systems managed by Oracle Identity Governance . For this tutorial, select Review access to systems managed by Oracle Identity Governance tile.
-
In the Selection criteria step, select any one of the 4 tiles Who has access? (Users), What are they accessing? (Applications), Which permissions? (Permission), and Which Roles? (Roles). For this tutorial, select Who has access? (Users) tile.
Note: The selection criteria vary based on the ingested data from the connected system. For example, if no roles are available in the schema definition, then you won’t see the Which roles tile.
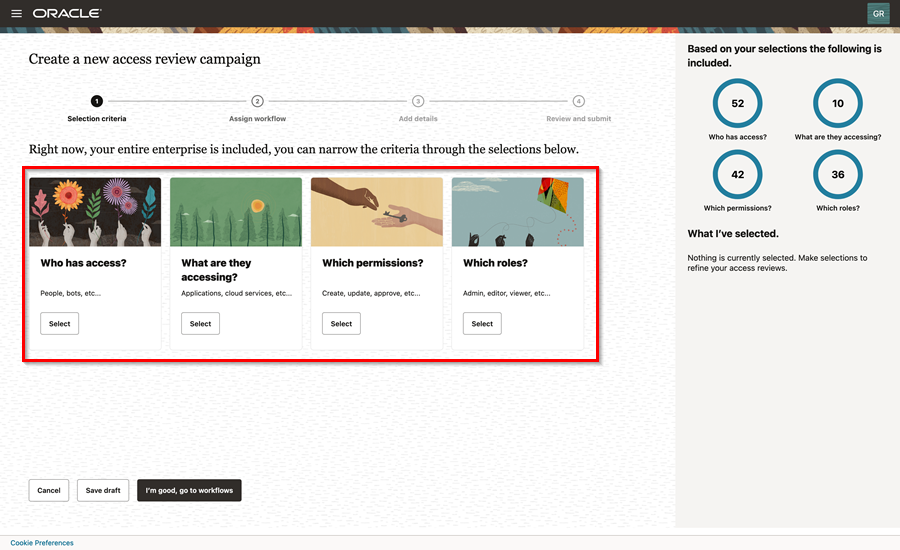
Description of the illustration selectdimensions.png
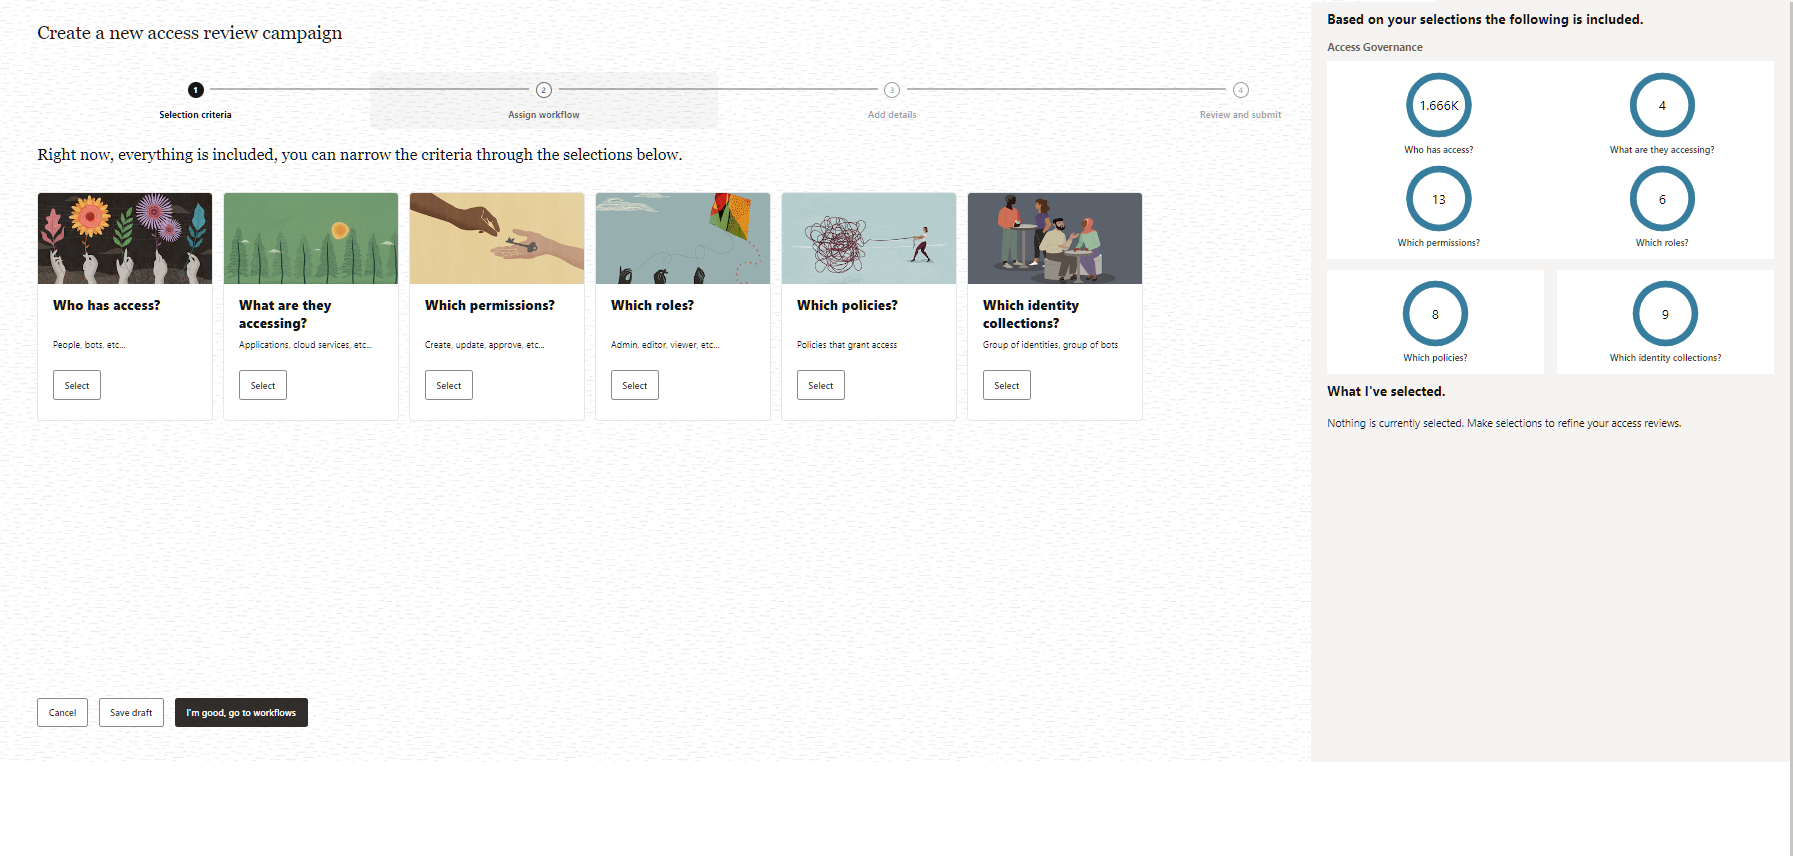
Note: You will have 5 tiles if you are using the access review campaign type as Review access to Oracle Cloud Infrastructure, and 6 tiles if you are using the access review campaign type as Review access to systems managed by Access Governance.
-
Create a new access review screen when campaign screen when campaign type is selected as Review access to Oracle Cloud Infrastructure

-
Create a new access review screen when campaign screen when campaign type is selected as Review access to systems managed by Access Governance
-
-
Select users by the organization, location, or job code. For example, select Support organization and then click Apply my selections.
In the Selection criteria screen, you can display the required attributes by selecting them from the Which attributes do you want to add for selection? field. The selected attributes will display as tabs on the screen.

Description of the illustration selectusers.png
Note: Alternatively, to narrow your search enter a specific organization, location, or job code in the search bar and then press ENTER.
You will then be navigated back to the Create a new access review campaign wizard.
-
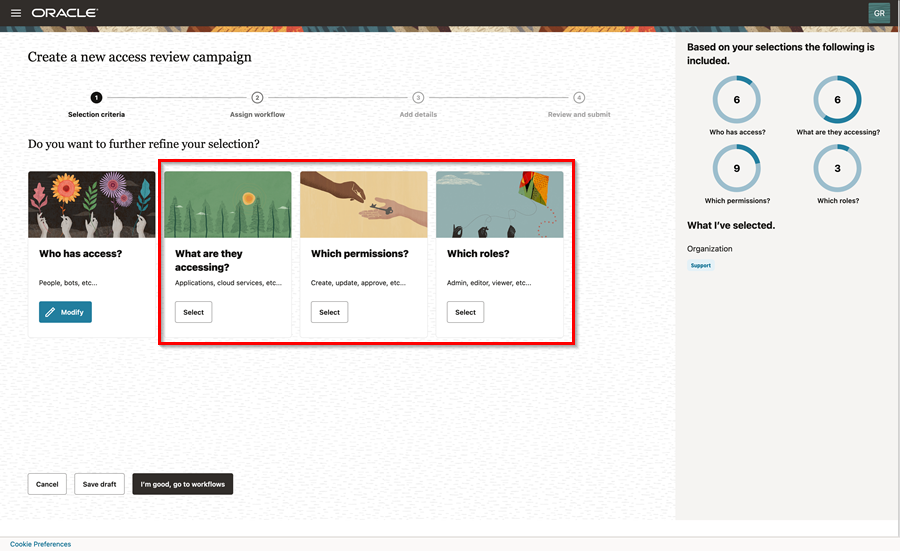
Select any one of the remaining 3 tiles What are they accessing (Applications), Which permissions (Permission), or Which Roles (Roles). For this tutorial, select What are they accessing (Applications) tile.
Note:-
The selection criteria varies based on the ingested data from the connected system. For example, if no roles are available in the schema definition, then you won’t see the Which roles tile.
-
You can select which permissions or which roles while creating a campaign, not both. For example, you can create a campaign by selecting Who has access?, What are they accessing?, and Which roles? but you cannot create a campaign with the combination of Who has access?, Which roles?, and Which permissions?
-
-
Select Applications by name. For this tutorial, select Corporate Badge and Corporate Laptop applications, and then click Apply my selections.
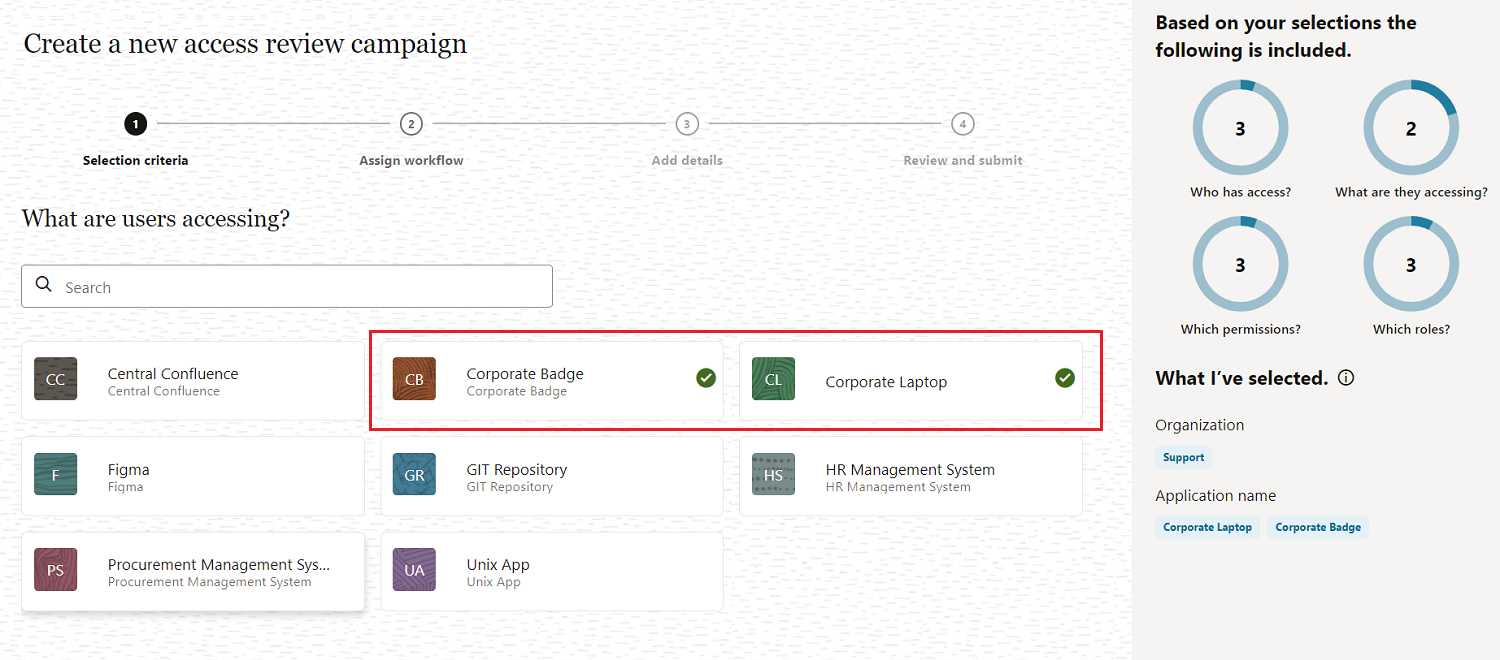
Description of the illustration selectapplications.png
Your applications will be selected and you will be navigated back to the Create a new access review campaign wizard.
-
Towards the right, in the What I’ve selected section, you can review the scope of selected users, applications, permissions, and roles.
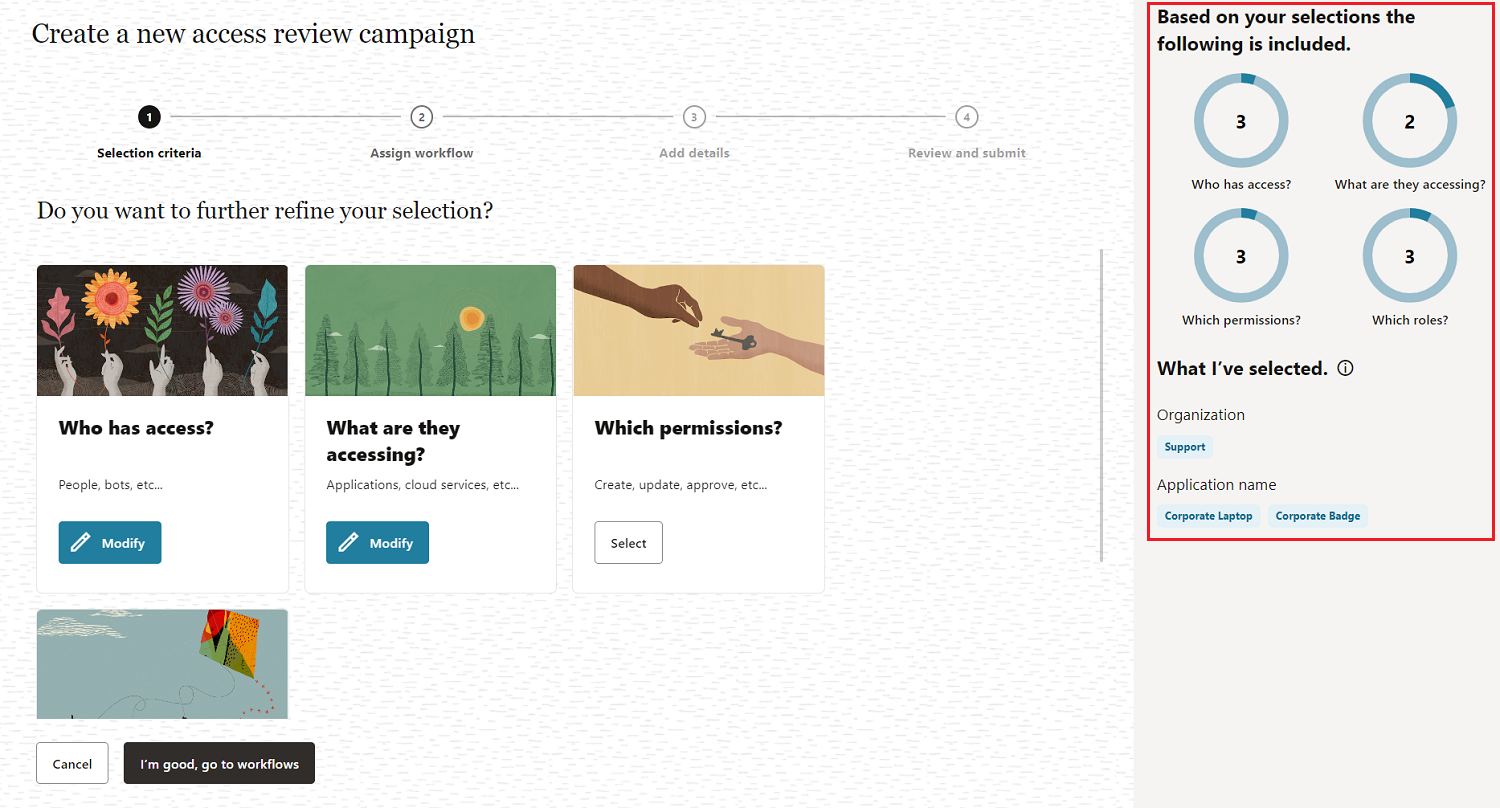
-
After that, go to the Assign Workflow step to review or configure the workflow. In this tutorial, click Back to navigate back to the Create a new access review campaign wizard, and then click I’m good, go to workflows to review the auto-selected workflow and reviewers.
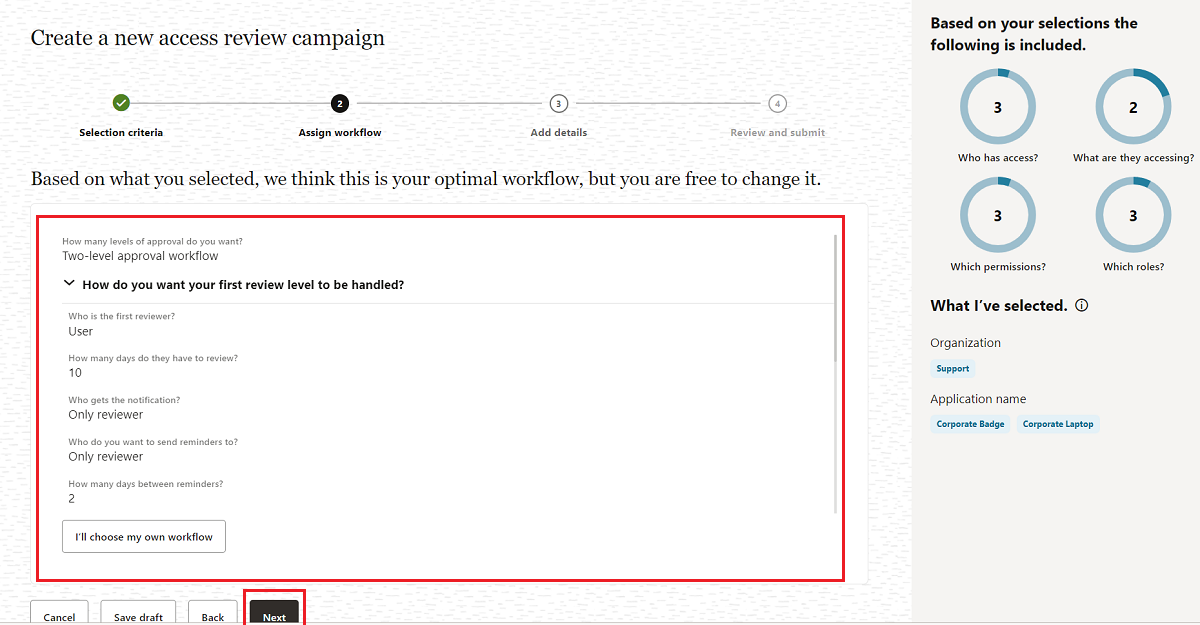
-
If required, click on the I’ll choose my own workflow button to make the required changes.
-
Click Save draft and then click Next.
-
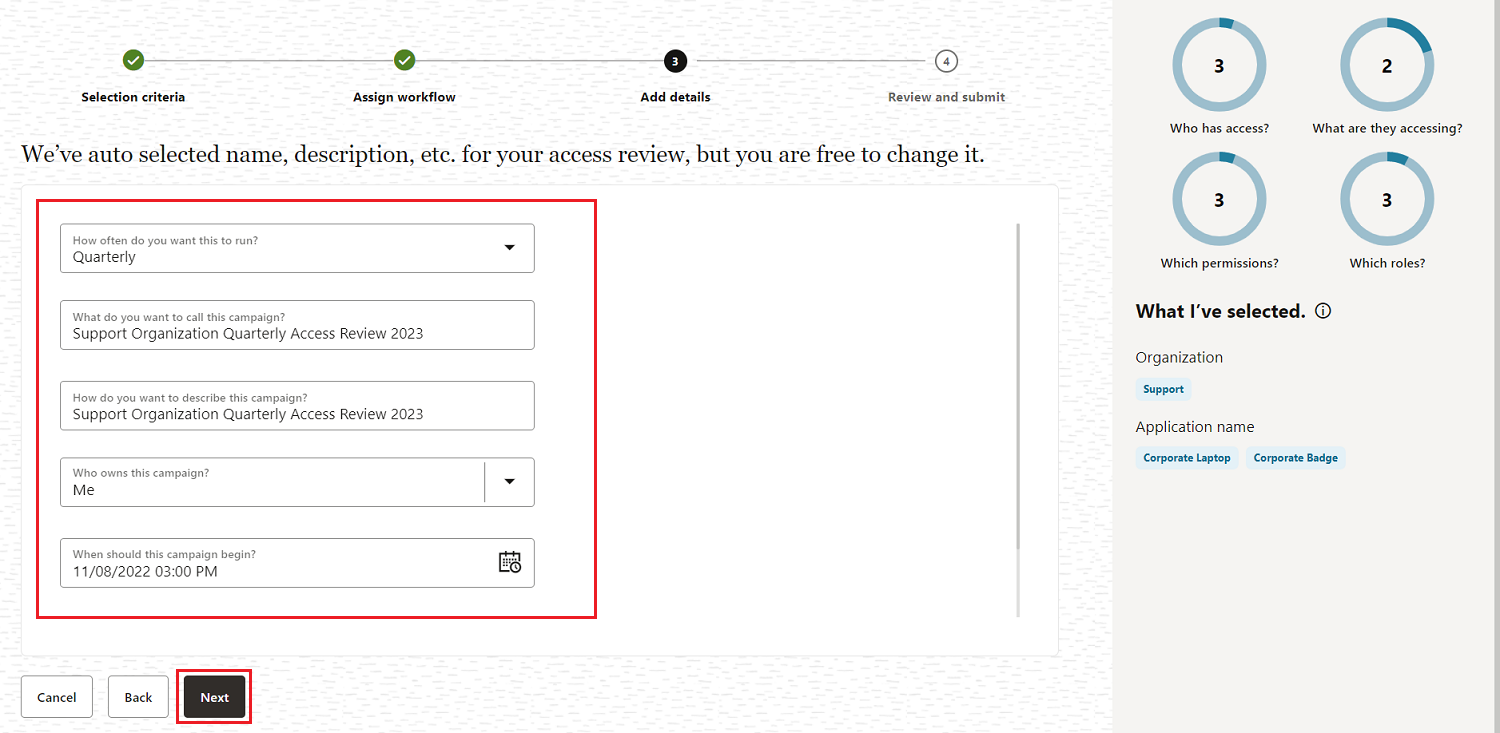
In the Add Details step, you can define the frequency (one-time or periodic) for running the access review campaigns, give a meaningful name to your campaign, add a supporting description, and assign values to additional attributes, such as who owns it and when the campaign should start or end.
-
For this tutorial, in the How often do you want this to run? drop-down field, select Quarterly.
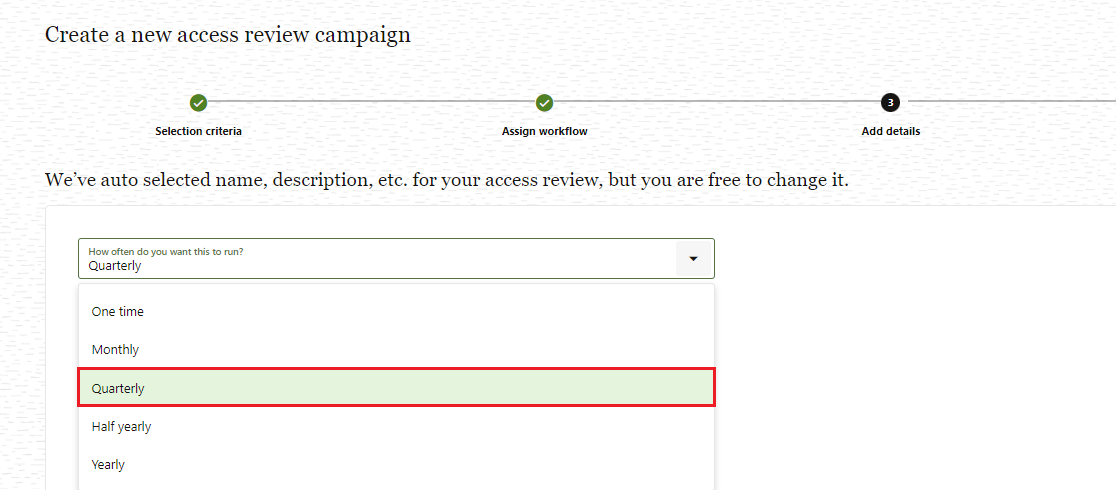
-
Enter the campaign name and description of your choice. For this tutorial, enter Support Organization Quarterly Access Review 2023.
-
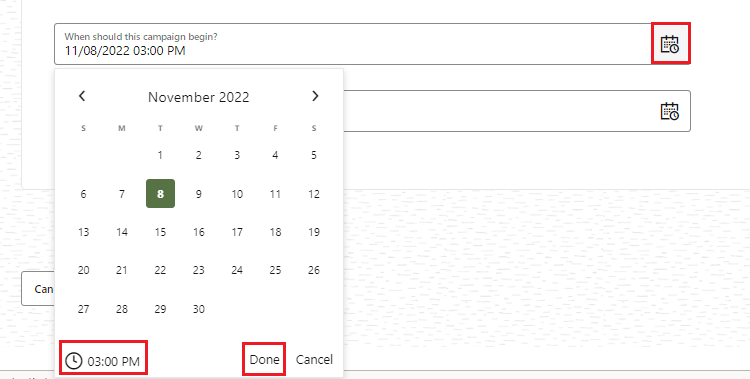
From the Select Date Time icon, select the start and end date for this campaign. Select the time icon to update the time and then click Done. This campaign will run every quarter commencing from the start date and concluding at the end date at the specified time.
-
Verify the selected campaign details and then click Next.
-
Review the selected campaign criteria, workflow, reviewers, and schedule. Click Create to create and schedule the campaign.

Description of the illustration summary.png
The campaign is successfully created, and you can view the campaigns in “My upcoming campaigns” section.
You can also view your campaigns from Navigation Menu -> Access Reviews -> Campaigns. On the top-right corner of the page, apply filters with My upcoming campaigns. Observe that the frequency of the campaign is set to Quarterly and the campaign recurring pattern is set to Yes. This states that the same campaign will run every quarter to review access and permissions for members of your enterprise population.

Acknowledgments
- Author - Komalreet Kaur, Edward Lu
- Contributors - Abhishek Juneja, Mike Howlett, Oracle IAM Product Management
More Learning Resources
Explore other labs on docs.oracle.com/learn or access more free learning content on the Oracle Learning YouTube channel. Additionally, visit education.oracle.com/learning-explorer to become an Oracle Learning Explorer.
For product documentation, visit Oracle Help Center.
Create User Access Review Campaigns with Oracle Access Governance
F70242-07
August 2023
Copyright © 2023, Oracle and/or its affiliates.