Set Up Identity Orchestration between Oracle Access Governance and a Flat File
Introduction
Oracle Access Governance addresses the growing challenges security owners face in dealing with the increase in advanced security threats and regulations. This cloud-native solution helps enterprises meet governance and compliance requirements across multiple applications, workloads, infrastructures, and identity platforms.
Access Governance boosts identity administration efficiency by automating provisioning and access governance processes. This automation covers attribute-based, role-based, and policy-based access control, facilitating the seamless management and granting of access rights.
Oracle Access Governance can be integrated with the identity systems by defining a connected system. A connected system allows you to load identity and access data from the identity system to Oracle Access Governance. Once defined, the connected system enables integration and data synchronization between target identity systems and Oracle Access Governance, through either a direct connection or an agent. You can connect on-premises systems, flat files, and cloud services to Oracle Access Governance.
For more information on Oracle Access Governance, see:
- Oracle Access Governance Product Page
- Access Governance Service Guide
- Access Governance Product Documentation
- Access Governance APIs
- Oracle Access Governance FAQ
Objective
In this tutorial, you will learn to:
- Create a bucket in the OCI object storage
- Use the Connected Systems functionality in the Oracle Access Governance Console to establish a connection between flat files and Oracle Access Governance
- Check the bucket folder structure
- Create CSV files
- Place the CSV flat files in the bucket
- Run dataload and access the integrated flat files
Tutorial Scenario
Flat file integration lets you onboard identities, permissions, service accounts, and user accounts from disconnected applications to Oracle Access Governance.
In this tutorial, you’ll learn to set up identity orchestration between Oracle Access Governance and a flat file. For this tutorial, you’ll use the CSV files stored in the Object storage of your OCI tenancy.
Prerequisite
You must have:
-
Appropriate OCI Administrator rights to manage buckets, manage identities and manage policies in your compartment
-
Access Governance Administrator rights. For more information, see Understanding Application Roles.
Task 1: Create a bucket in the Oracle Cloud Infrastructure (OCI)
To load the data into the Oracle Access Governance you need to place the data files in a bucket created using OCI object storage service. The bucket can be created in any compartment of your OCI tenancy.
Follow these steps to create a bucket and a service user who has manage privileges to the bucket.
- Create a compartment. For example,
accessgov. For details on creating a compartment, see Create a compartment.
Create a bucket
-
Log onto the Oracle Cloud Infrastructure (OCI) console.
-
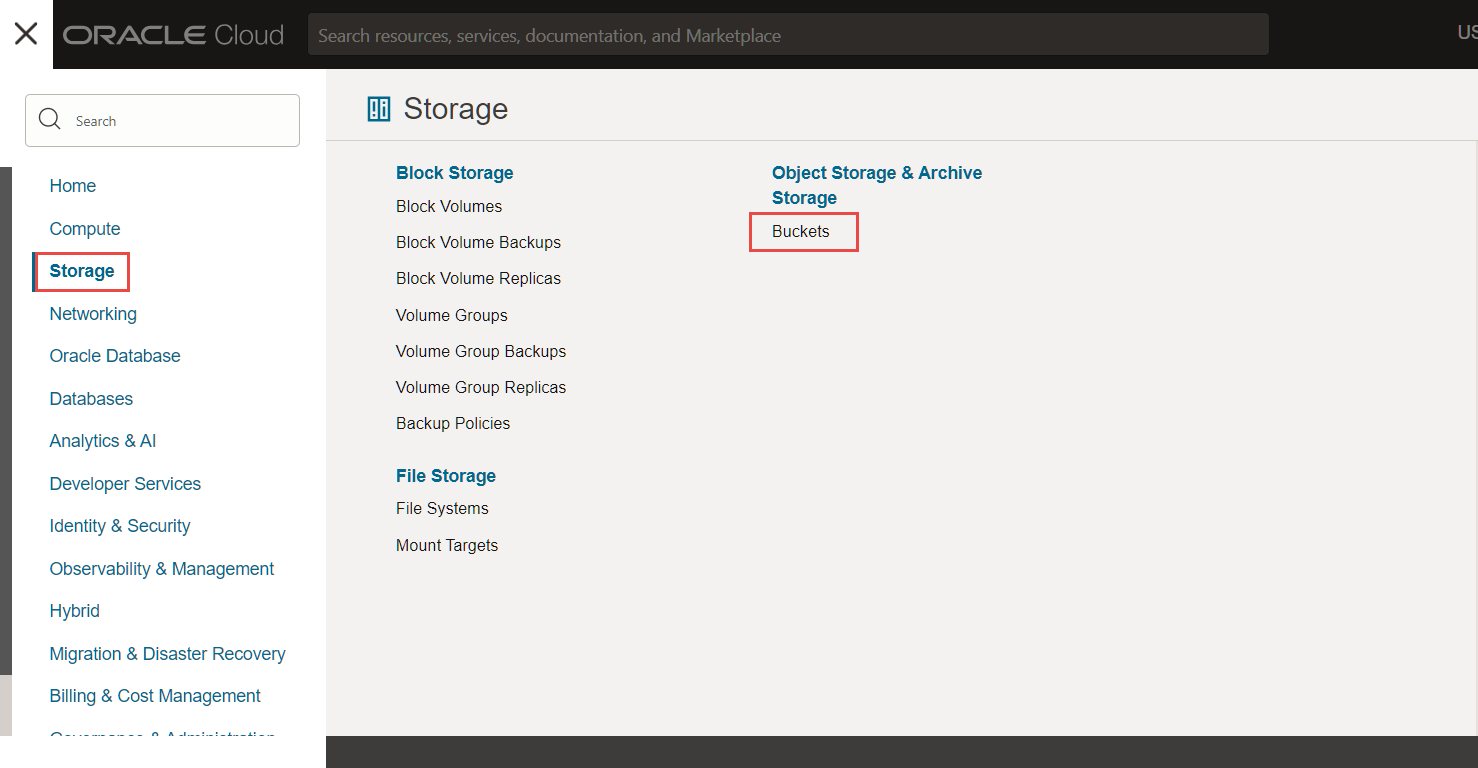
Open the navigation menu icon and click Storage.

-
Under Object Storage & Archive Storage click Buckets.
-
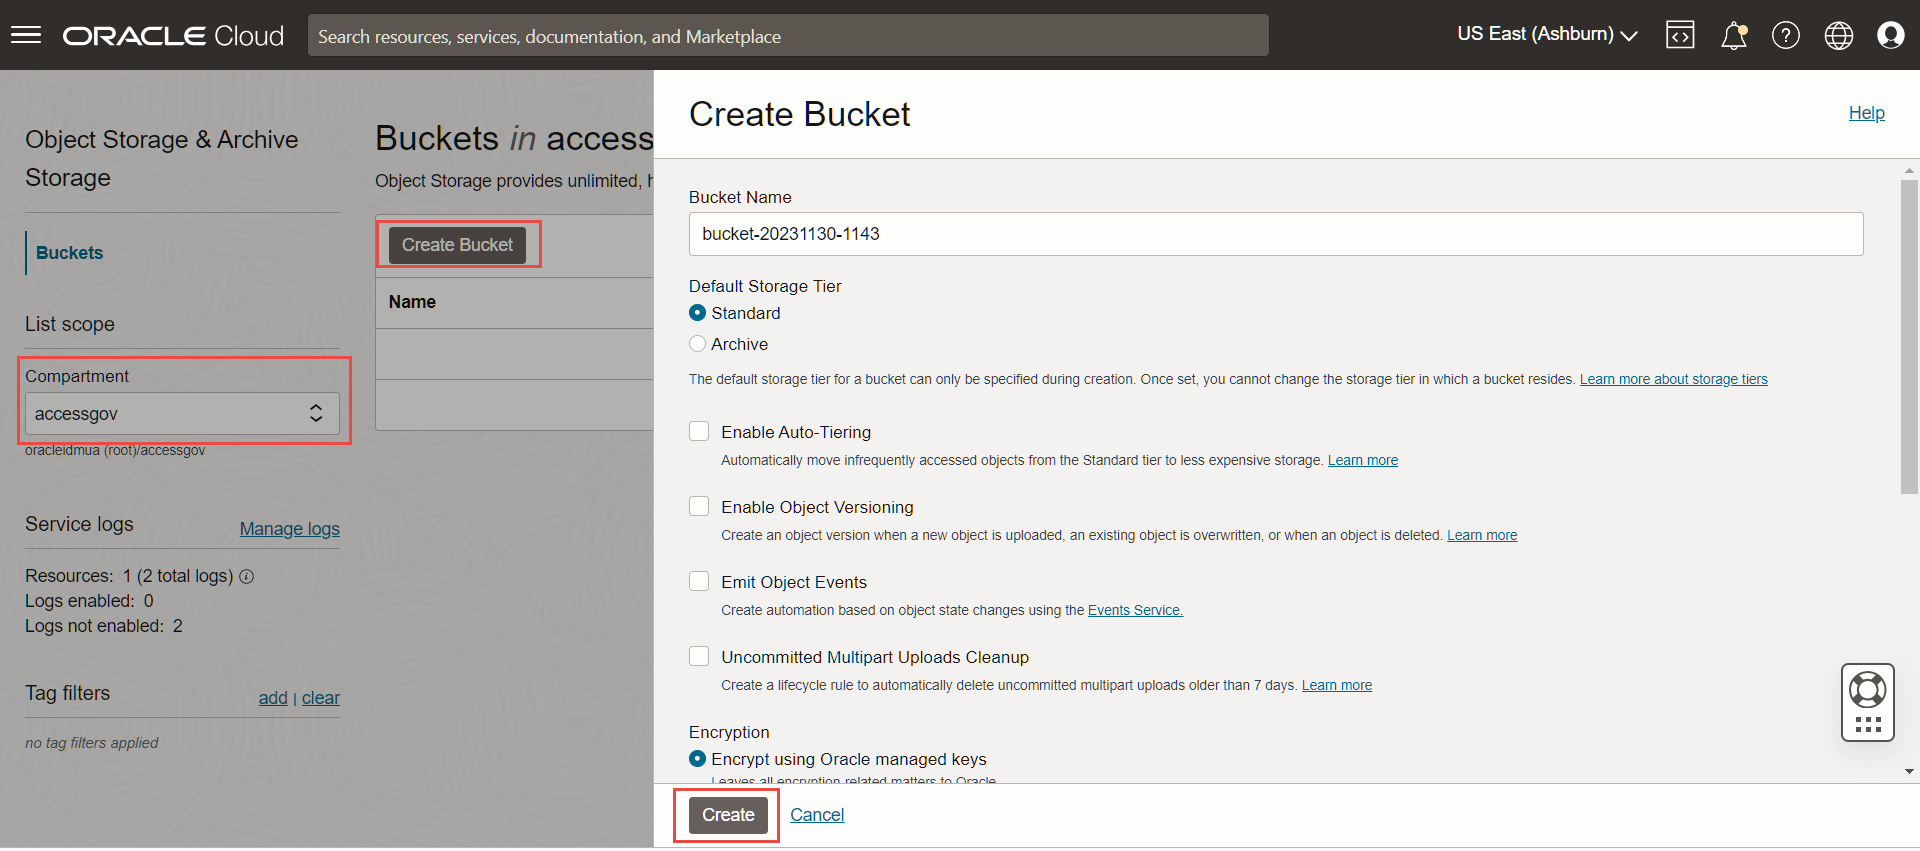
Select the required compartment from the List scope.
-
Click Create Bucket. The Create Bucket dialog box appears.
-
Bucket Name: The system generates a default bucket name that reflects the current year, month, day, and time, for example bucket-2019030620230306-1359. If you change this default to any other bucket name, use letters, numbers, dashes, underscores, and periods. Avoid entering confidential information.
-
Ignore or leave the other settings as is and click Create. To know more information about the different options on the Create Bucket screen, see Creating an Object Storage Bucket.
Create a service user and assign ‘manage’ privileges to the bucket
-
Create a local identity user
agcs_userin the same compartment as that of the bucket. In this example, the bucket is created in theaccessgovcompartment. For details on creating a user, see Creating a User. -
Create an identity group
agcs_flatfilegroupin the same domain and compartment as that of the local identity user. In this example, the domain name isdefaultand the compartment name isaccessgov. For details on creating a group, see Creating a Group. -
Assign the identity user
agcs_userto the identity groupagcs_flatfilegroup. -
Create a policy,
agcs_flatfilepolicy, with the following policy statement:Syntax
allow group <groupname> to manage objects in compartment <compartmentname> where target.bucket.name = <’bucketname’>
For example
allow group agcs_flatfilegroup to manage objects in compartment accessgov where target.bucket.name = ‘bucket-20231130-1143’
For details on creating a policy, see Creating a Policy.
Generate API key for service user
-
In the Oracle Cloud Infrastructure (OCI) console, select Identity & Security, and then Domains -> Default Domain, and then from the left pane, select Users.
-
Select the
agcs_useruser name that was created previously. -
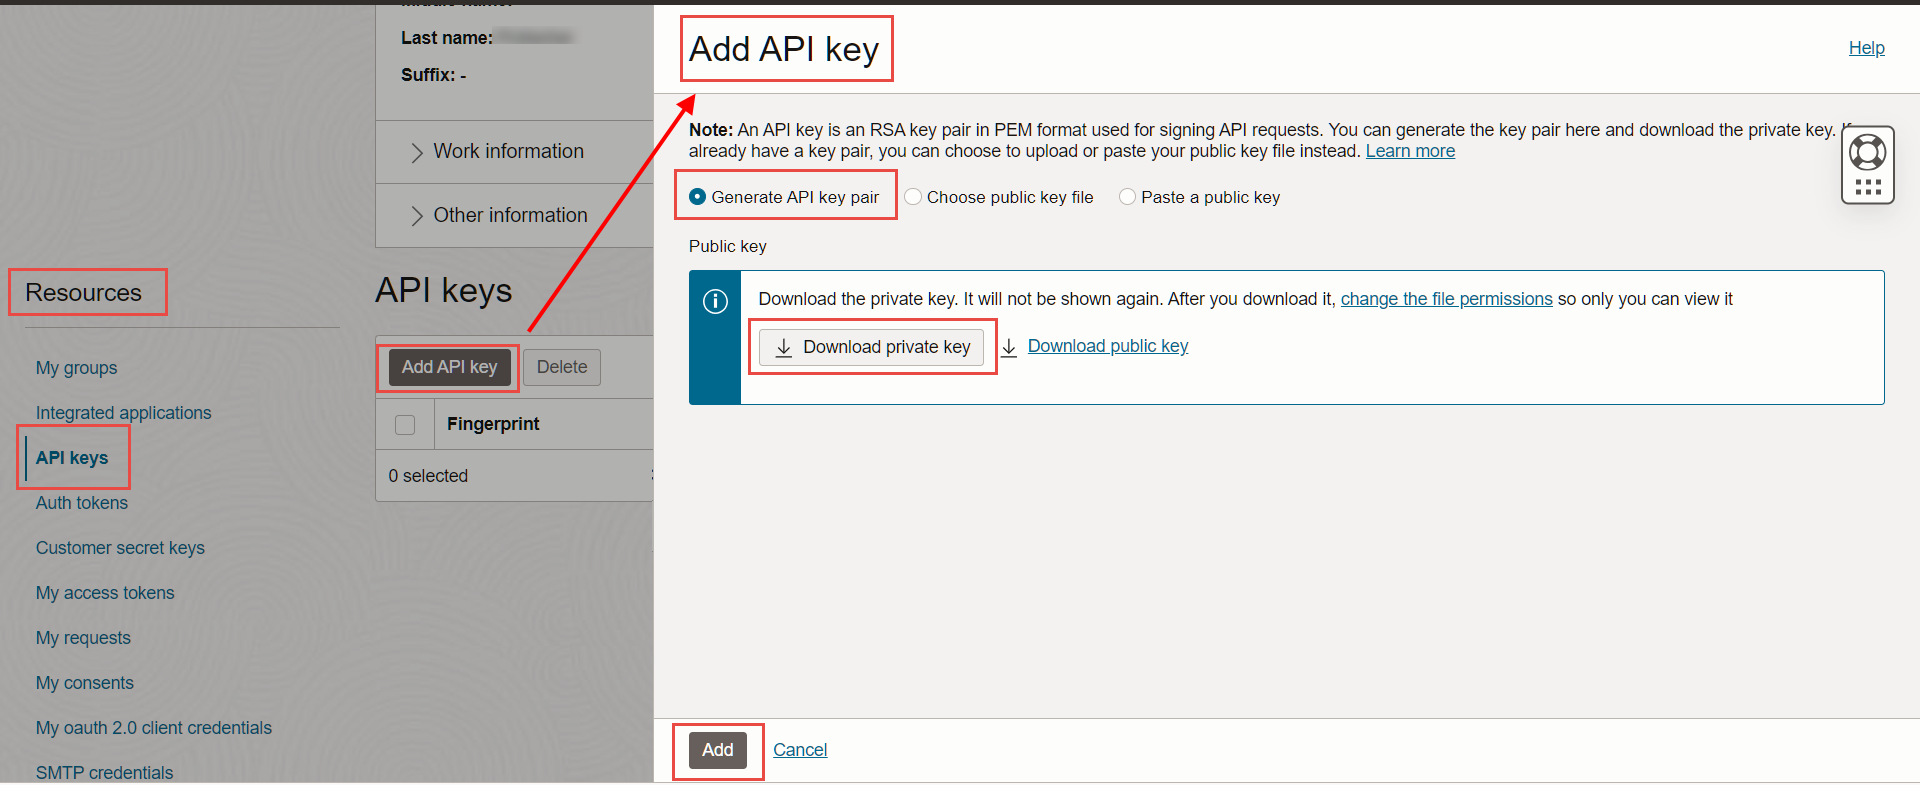
On the left navigation panel, in the Resources section, select API keys.
-
Click Add API key then select Generate API key pair.
-
Click Download private key and save it.
-
Click Add. The configuration file is created displaying fingerprint, and config file details. Save the information available on the configuration file in a separate text file.
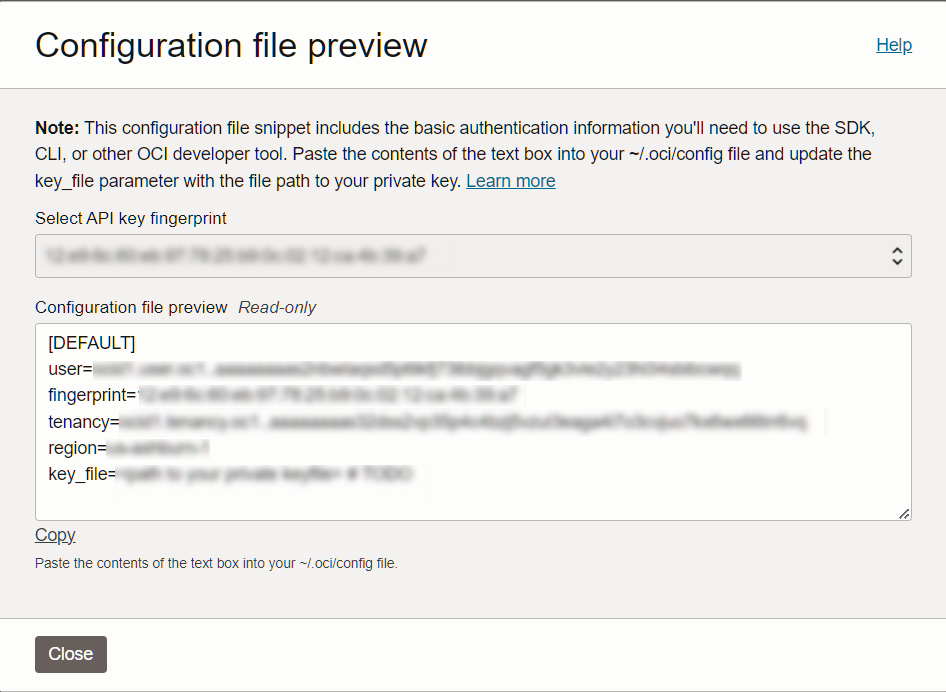
A sample config file is listed here for your reference:
[DEFAULT]
user=abcd1.user.zyx1...
fingerprint=14:b5:a1:90:a1:d3:...
tenancy=abcd1.tenancy.ab1...
region=ab-sample-2..
key_file=<path to your private keyfile> # TODO
Task 2: Establish connection between bucket and Oracle Access Governance
You can establish a connection between your bucket and Oracle Access Governance by entering connection details. To achieve this, use the Connected Systems functionality available in the Oracle Access Governance Console.
-
Log onto an Oracle Access Governance Instance.
-
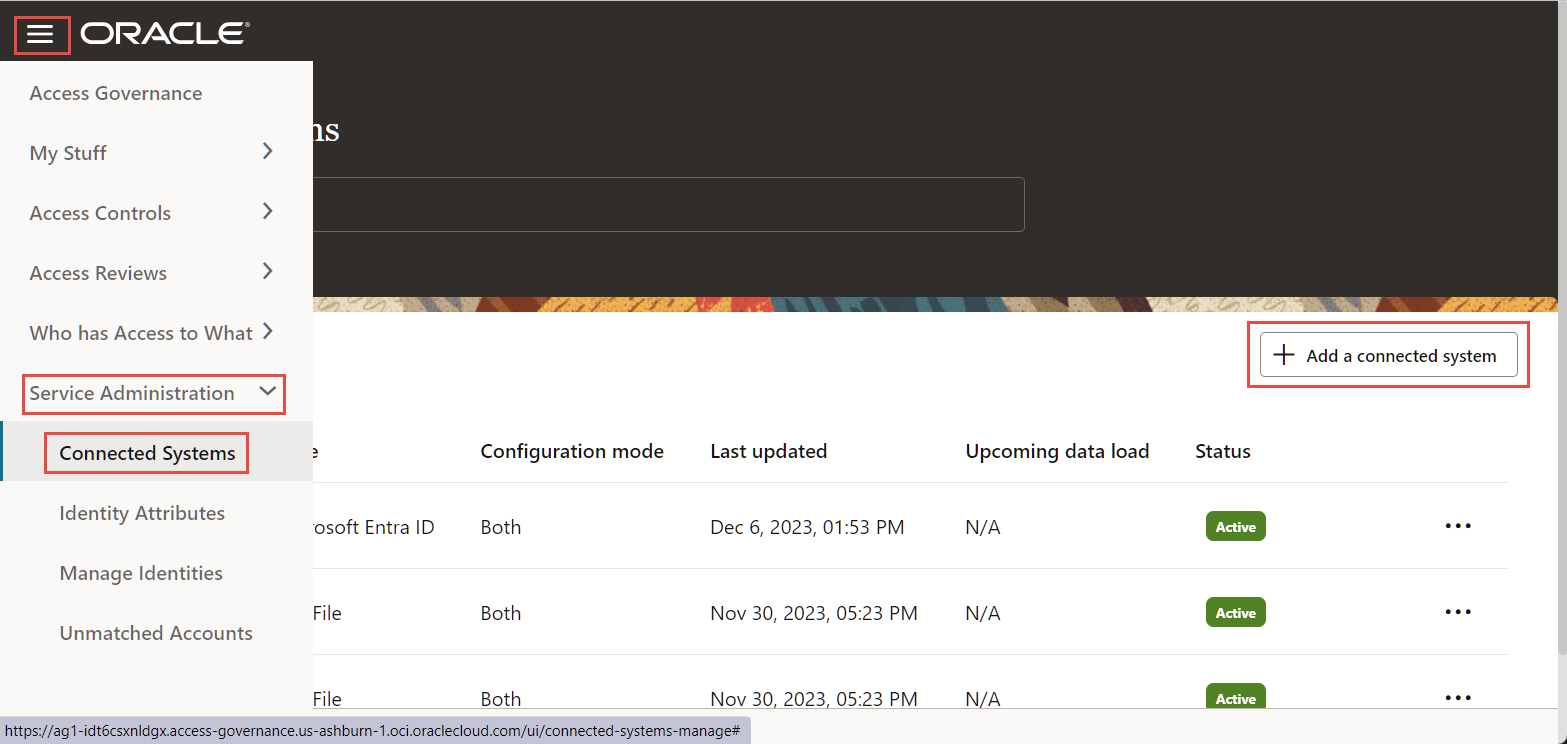
From the Oracle Access Governance navigation menu icon select Service Administration > Connected Systems.
-
Click Add a connected system.
-
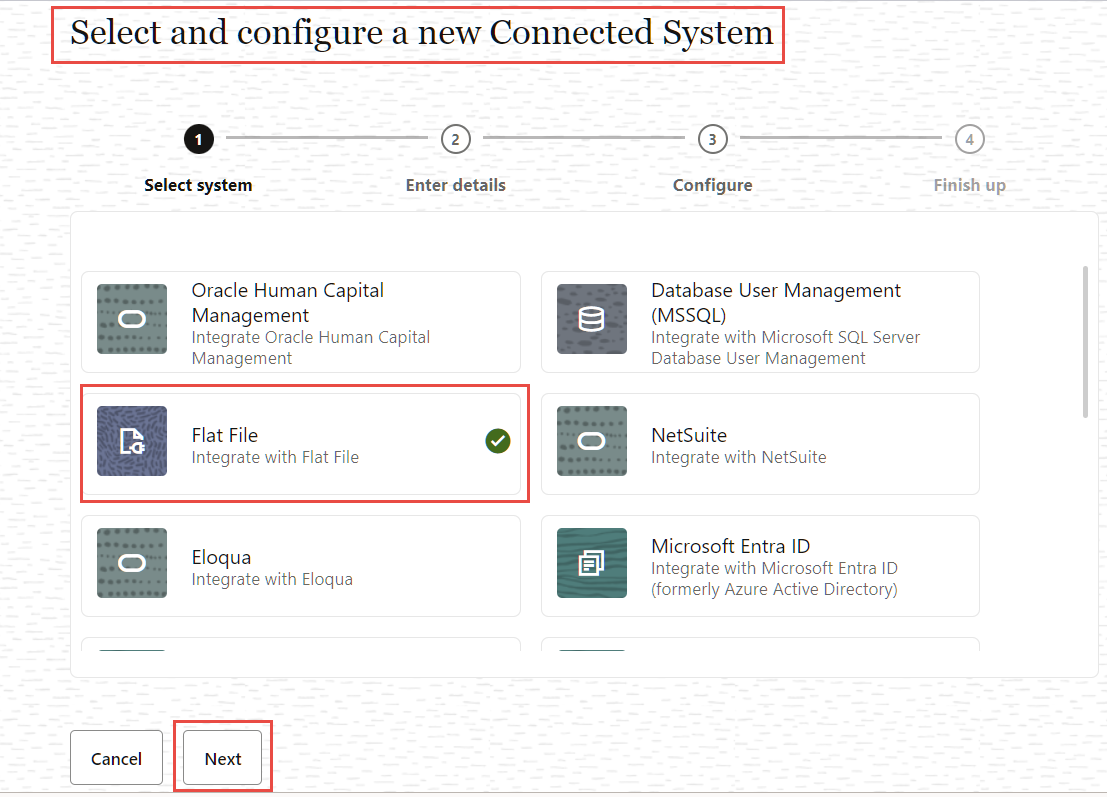
In the Select and configure a new Connected System step, select the Flat File tile and click Next.
-
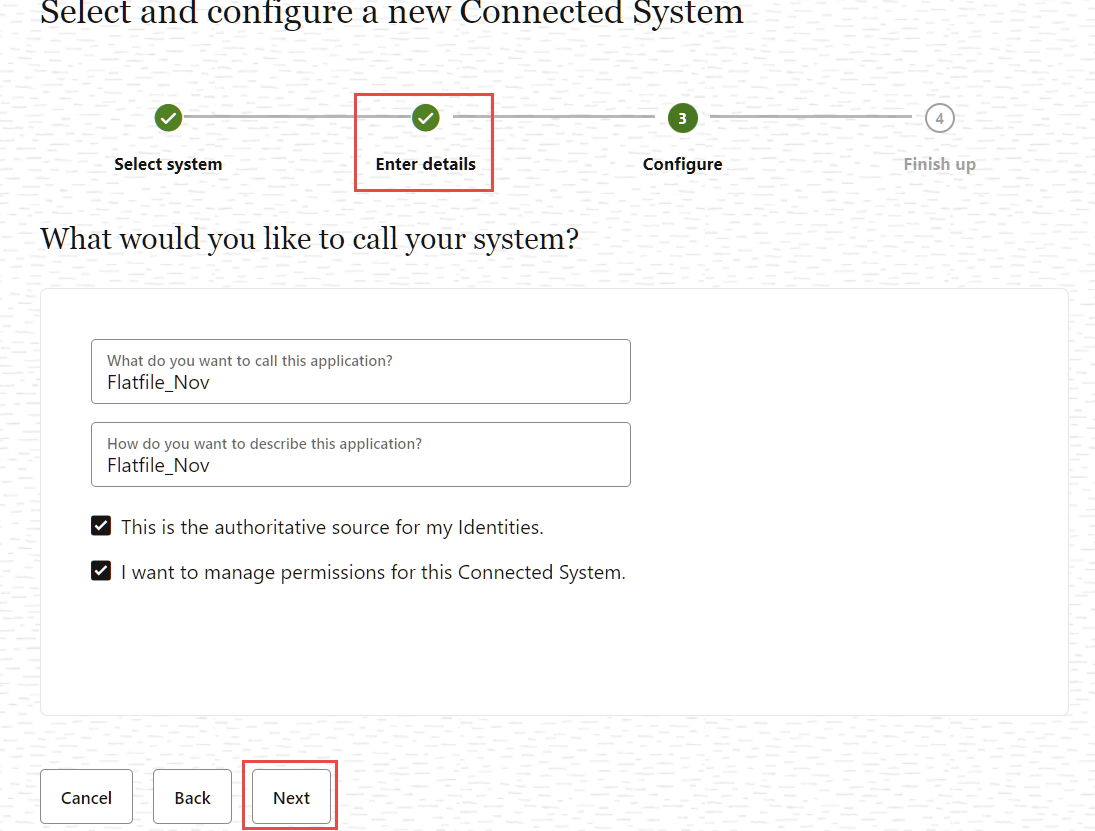
In the Enter details step, enter a name for the application you want to connect to in the What do you want to call your Flat File? field.
-
Enter a description for the application in the How do you want to describe this Flat File? field.
-
Determine if this connected system is an authoritative source, and if Oracle Access Governance can manage permissions for existing users by setting the following checkboxes.
- This is the authoritative source for my Identities - If selected, allows you to load the identities into the Access Governance system as a user.
- I want to manage permissions for this Connected System - If selected, allows you to load the account and permissions into the Access Governance system.
Note: A combination of both options would load the identities into the system, followed by the account details, and will create an interlink between the identities and the accounts.
-
Click Next.
-
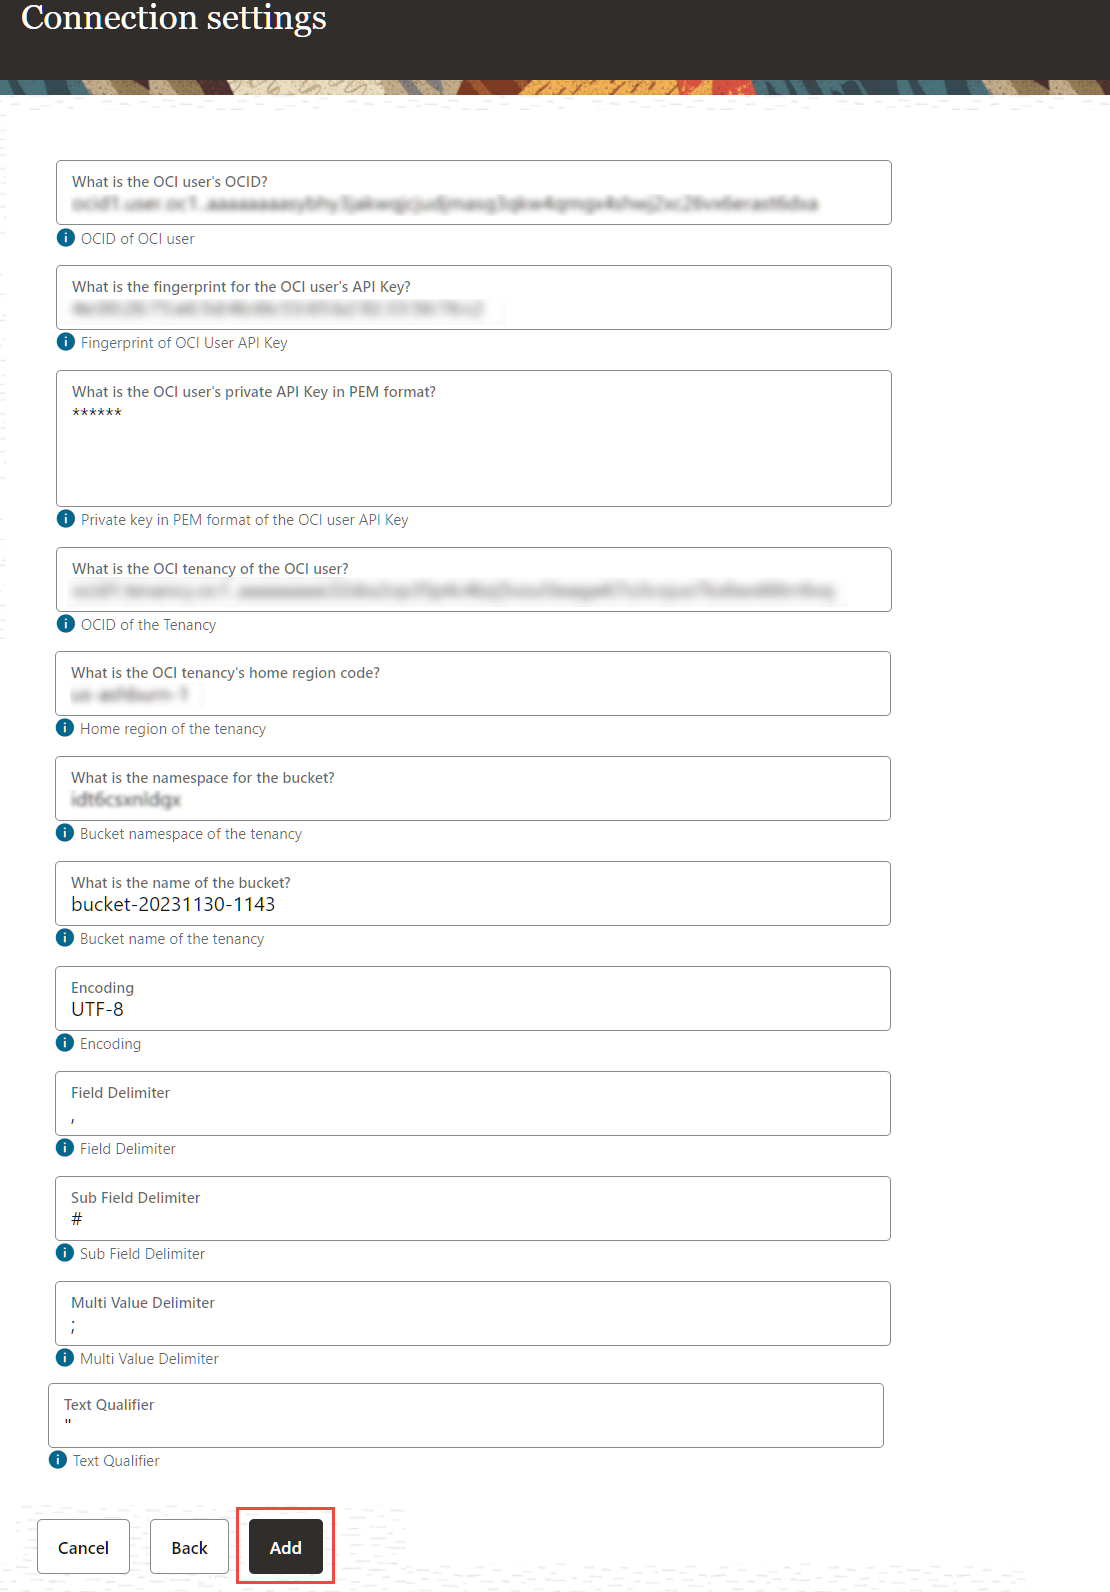
In the Configure step, enter the following details and click Add.
- In the What is the OCI user’s OCID? field, add the OCID for the OCI user owning the bucket containing the flat files you want to integrate. For example, the information in the user field.
user=abcd1.user.zyx1...- In the What is the fingerprint of the OCI user’s API key? field enter the fingerprint for the OCU user’s API key. For example, the information in the fingerprint field.
fingerprint=14:b5:a1:90:a1:d3:...-
Enter the user’s private API key, in PEM format into the What is the OCI user’s private API key in PEM format? field. For example, open the previously downloaded private key in any text editor and copy the content of the file and place it in the What is the OCI user’s private API key in PEM format? field.
-
Enter the tenancy into the What is the tenancy of the OCI user? field. For example, the information present in the tenancy field.
tenancy=abcd1.tenancy.ab1...- Enter the home region code of the tenancy into the What us the OCI tenancy’s home region code? field. For example, the information in the region field.
region=ab-sample-2..-
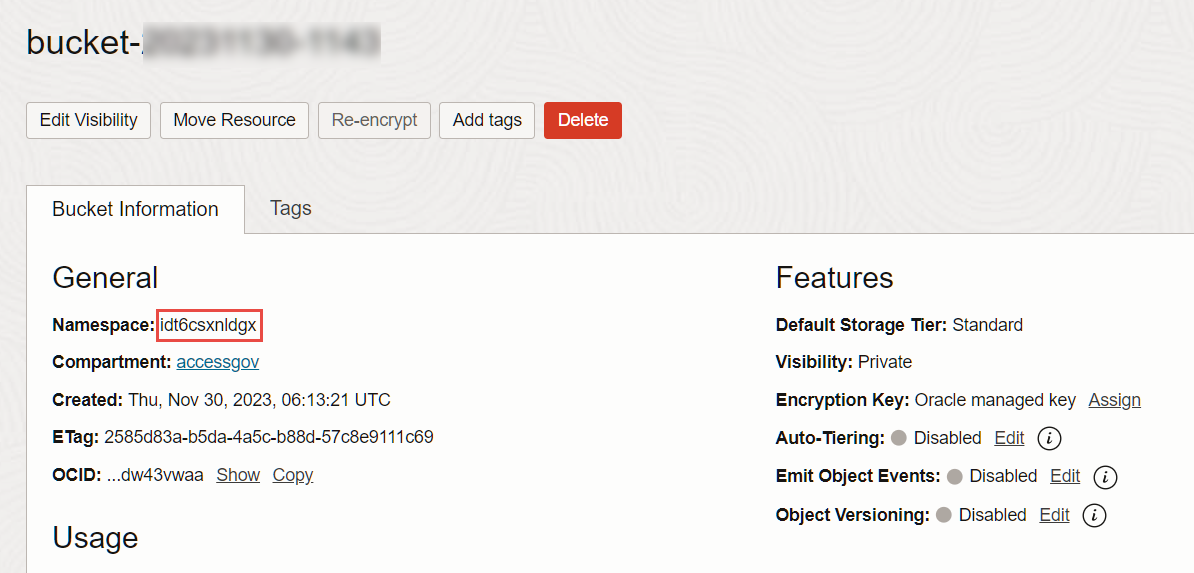
Enter the bucket namespace of the tenancy in the What is the namespace for the bucket? field.
To get the bucket namespace details:
-
In the Oracle Cloud Infrastructure (OCI) console, select Storage and then under Object Storage & Archive Storage click Buckets.
-
Click on the previously created bucket. In this case bucket-2019030620230306-1359.
-
From the Bucket Information tab copy the bucket namespace.
-
-
In the What is the name of the bucket? field, enter the name of the bucket where your flat file is stored in OCI object storage. In this case bucket-2019030620230306-1359.
-
Enter the encoding into the Encoding field. Default is UTF-8.
-
In the Field Delimiter field, enter the field delimiter character used in the flat file. Default is ,.
-
In the Sub Field Delimiter field, enter the sub field delimiter character used in the flat file. Default is #.
-
In the MultiValue Delimiter field, enter the multivalue delimiter character used in the flat file. Default is ;.
-
In the Text Qualifier field, enter the character used in the flat file to act as a text qualifier. Default is “.
-
If you want to check the connectivity to your Flat File, click the Test Connectivity button. Once you have confirmed the connectivity, click Add to save your configuration.
Task 3: Check bucket folder structure
To check the bucket folder structure login to the OCI Console and navigate to Object Storage. Select your connected system bucket. Under the Resources menu, select Objects, and confirm the folder structure.
<ServiceInstanceName>/<ConnectedSystemName>
failed
inbox
outbox
sample
schema
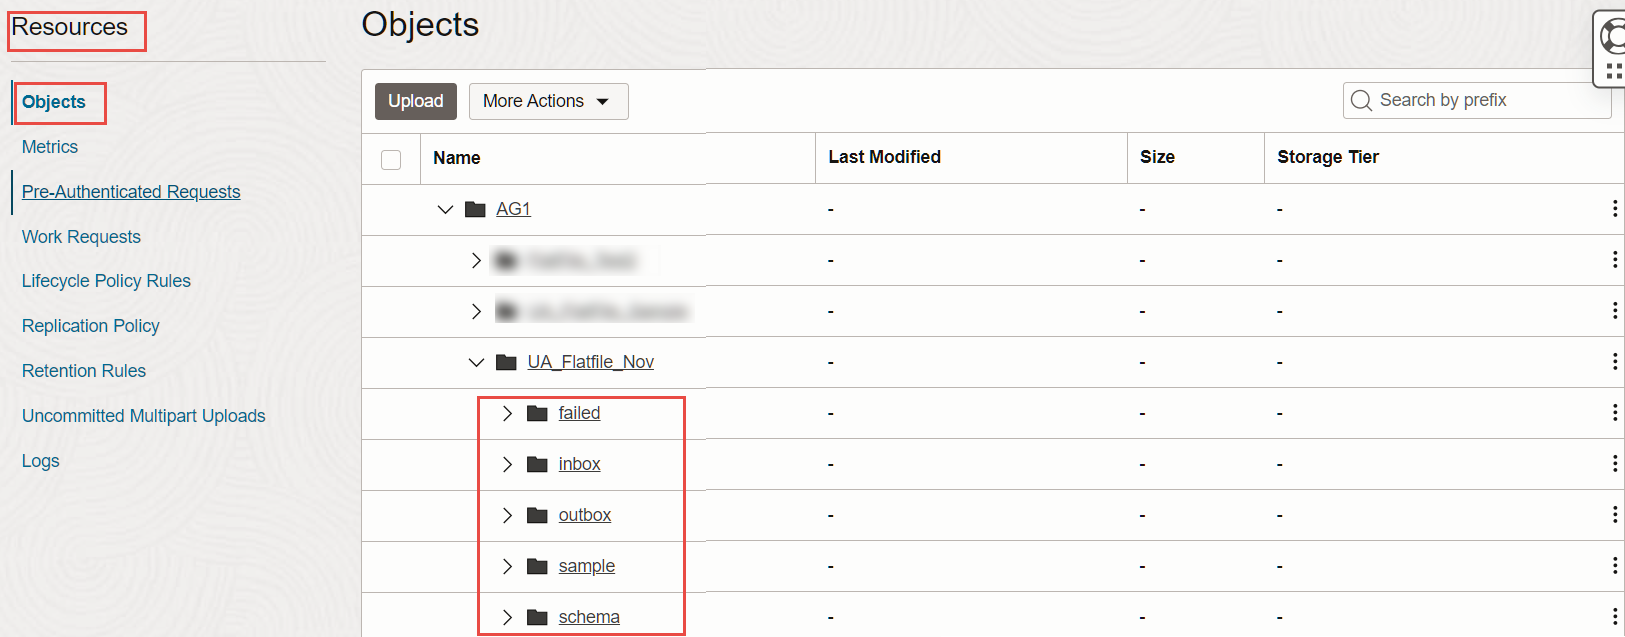
Description of the illustration folderstructure.png
These folders fulfill the following purposes:
- failed: Files with any kind of data issue will be moved to this folder under the respective entity folder, in the event of a data load operation failure.
- inbox: Contains the entity subfolders in which CSV files should be placed to be included in the data load operation.
- outbox: Used to output the provisioning events for each entity.
- sample: Contains example CSVs with the expected header. These can be used as a reference for generating data and putting in the inbox for data load. These files should not be altered.
- schema: Contains the JSON representation of each entity’s schema. This can be referred to for understanding details like:
- datatype
- Mandatory attributes
- Whether an attribute is multivalued or not
- If the attribute is complex and has nested attributes (datatype will be CUSTOM)
- Supported datatypes are:
- TEXT
- NUMBER
- DECIMAL_NUMBER
- DATE
- FLAG
- CUSTOM
Task 4: Create CSV flat files
For this tutorial, we will use sample csv files that you can access from:
- identity.csv - allows you to load identities into the Access Governance system as users
- permission.csv - allows you to manage permissions in the connected system
- targetAccount.csv - allows you to load the target account details into the Access Governance system
Note: To download the files, right-click the file name and select to open link in new tab.
Task 5: Place the CSV flat files in the bucket folder
Perform the following steps to upload the CSV flat files into the bucket object storage.
-
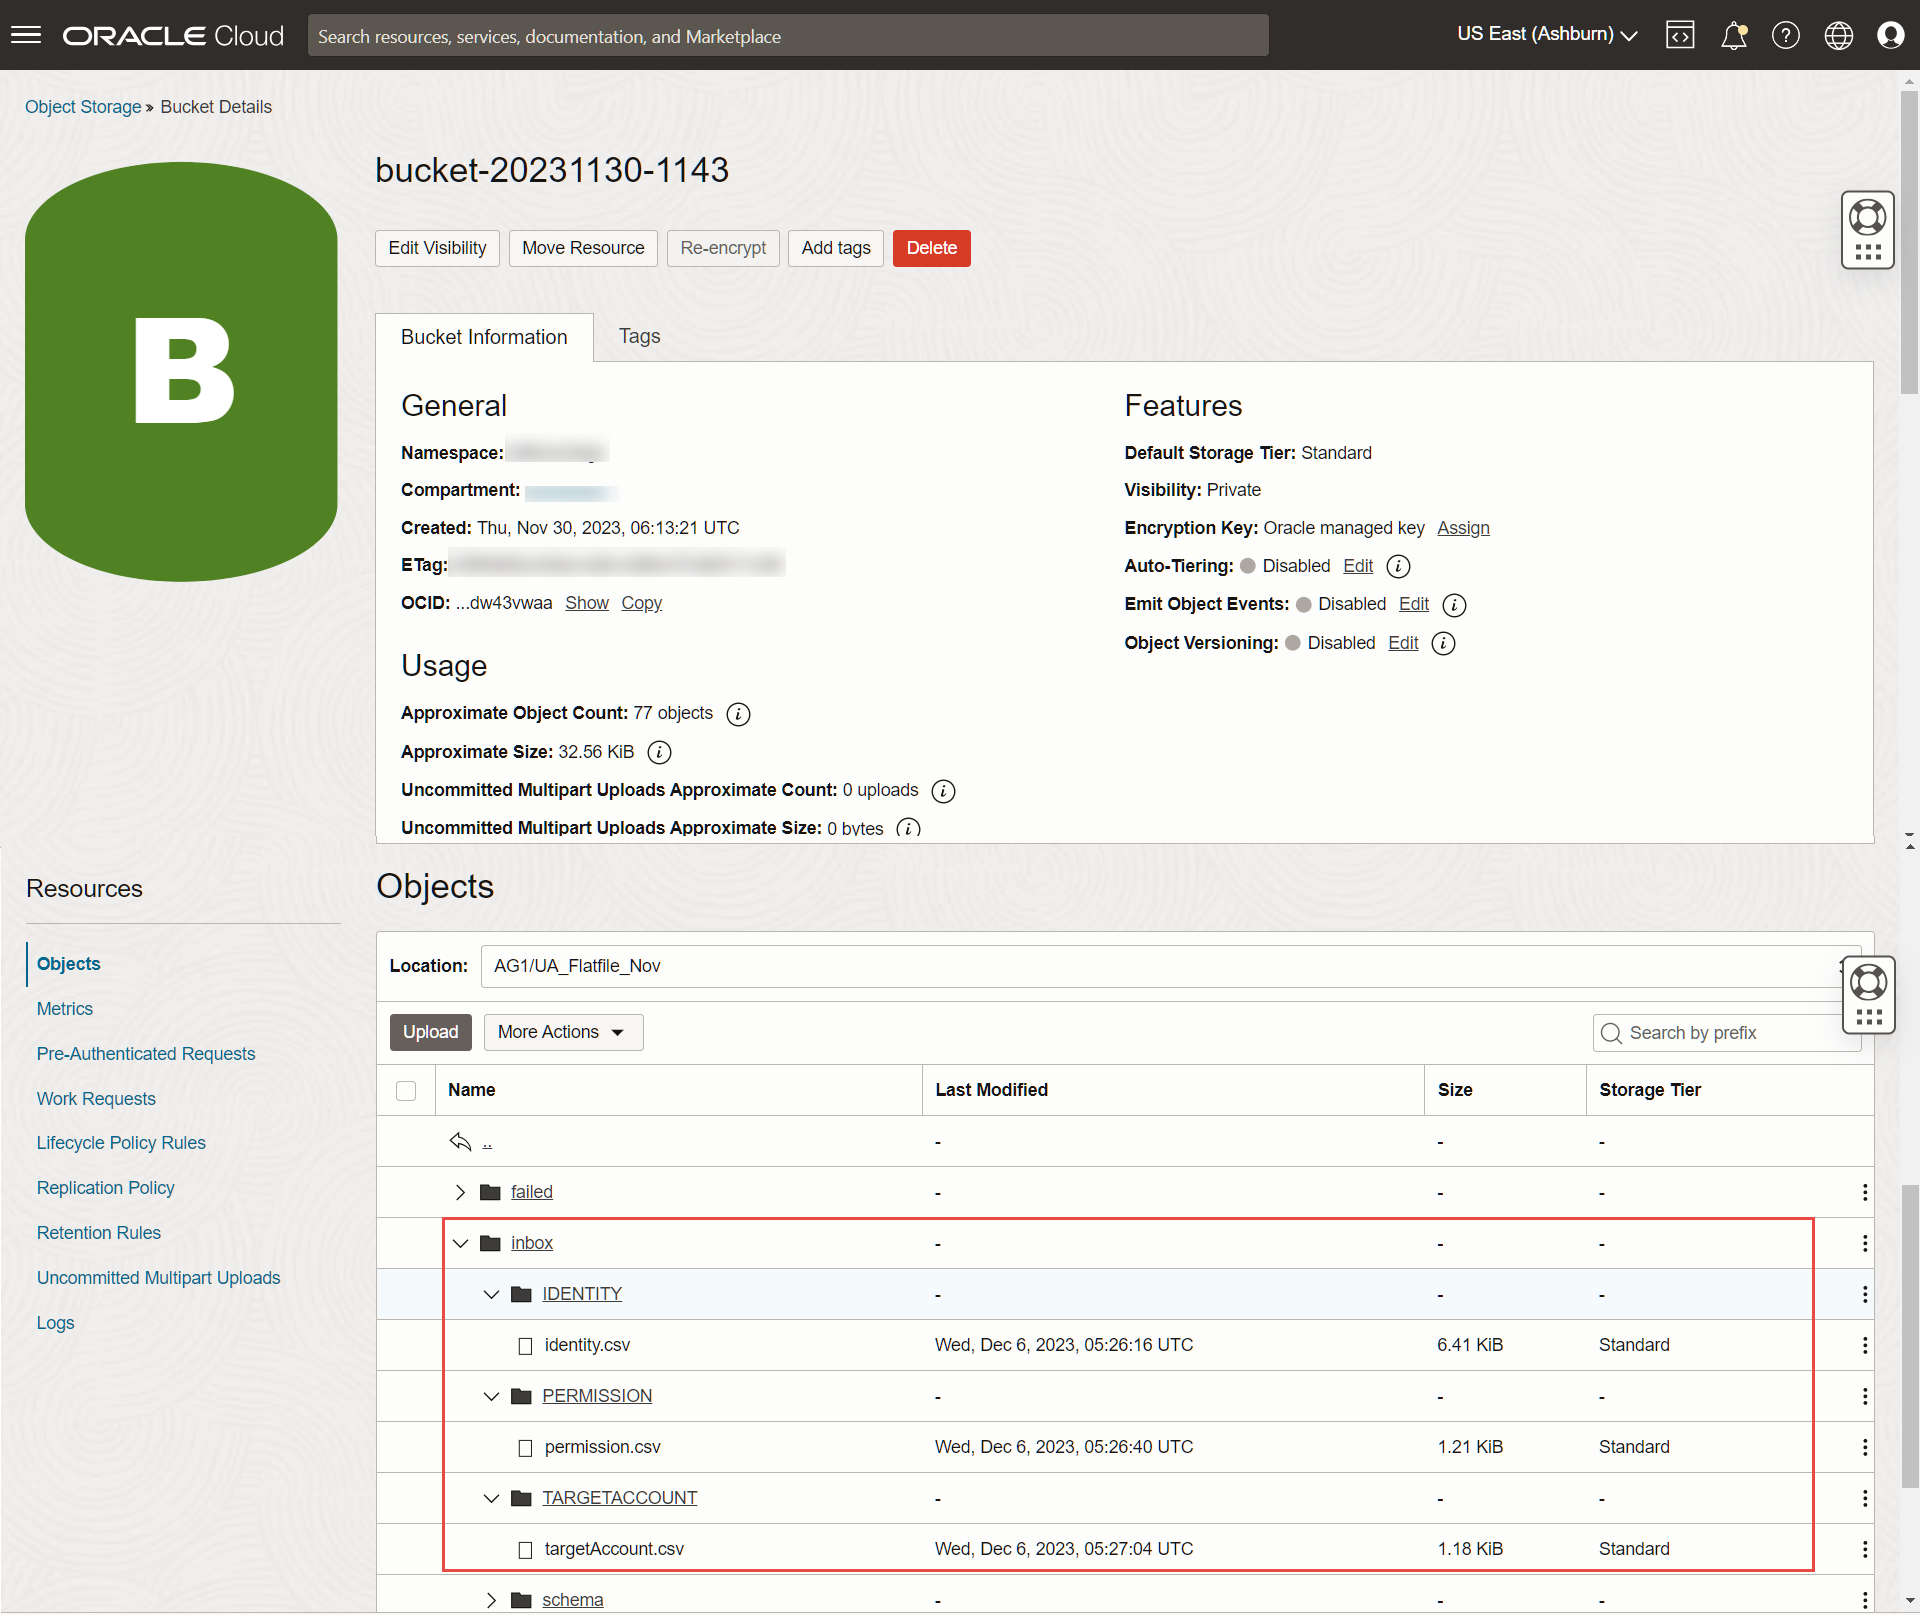
Access the bucket on OCI and click the inbox folder to upload the CSV flat files.
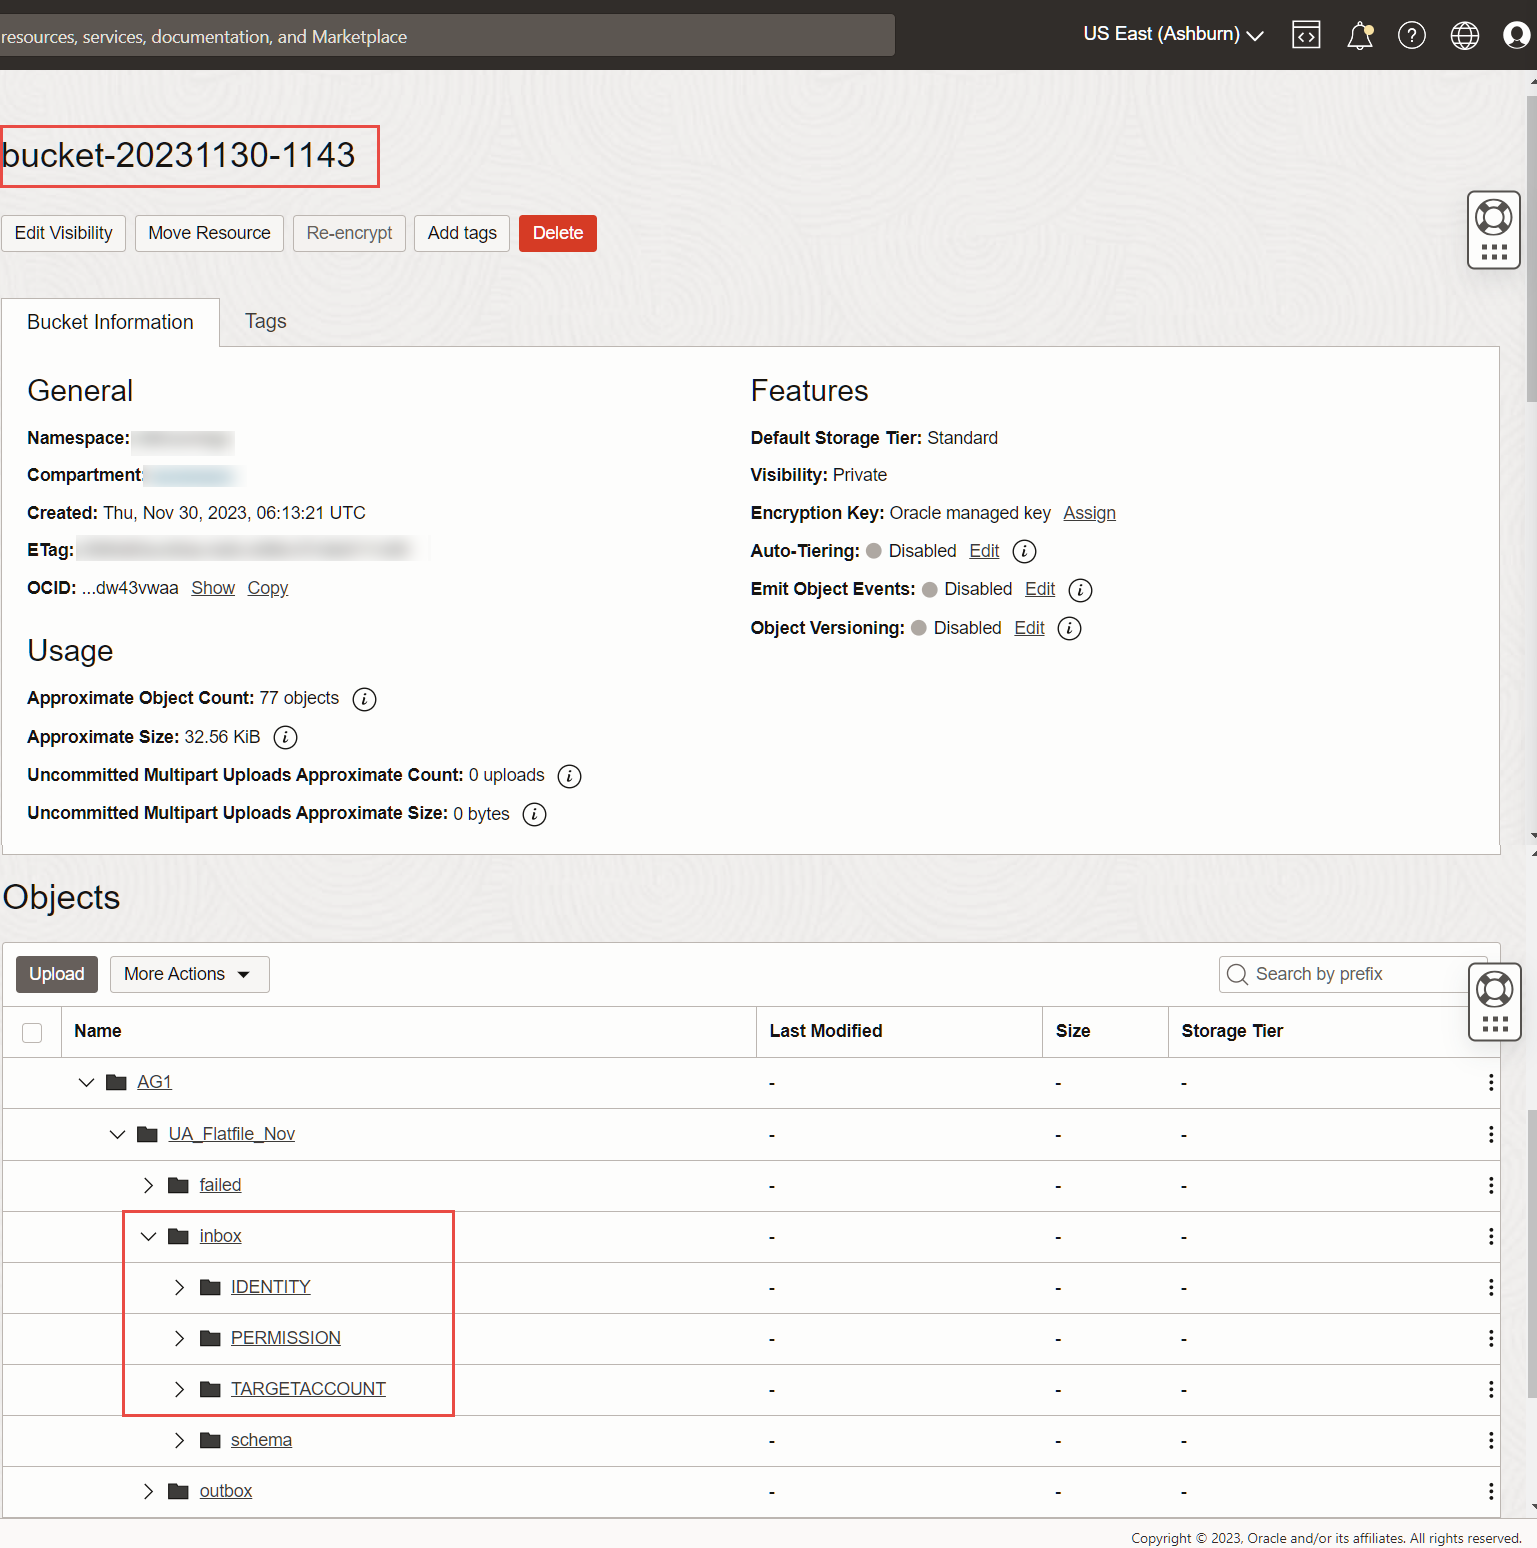
-
Click the three dots corresponding to the folders to upload the CSV flat files:
- IDENTITY - To upload identity.csv
- PERMISSION - To upload permission.csv
- TARGETACCOUNT - To upload targetaccount.csv
-
Click Upload.
-
In the Upload Objects popup screen, click select files link in the Choose Files from your Computer field.
-
Browse and locate the file and click Upload.
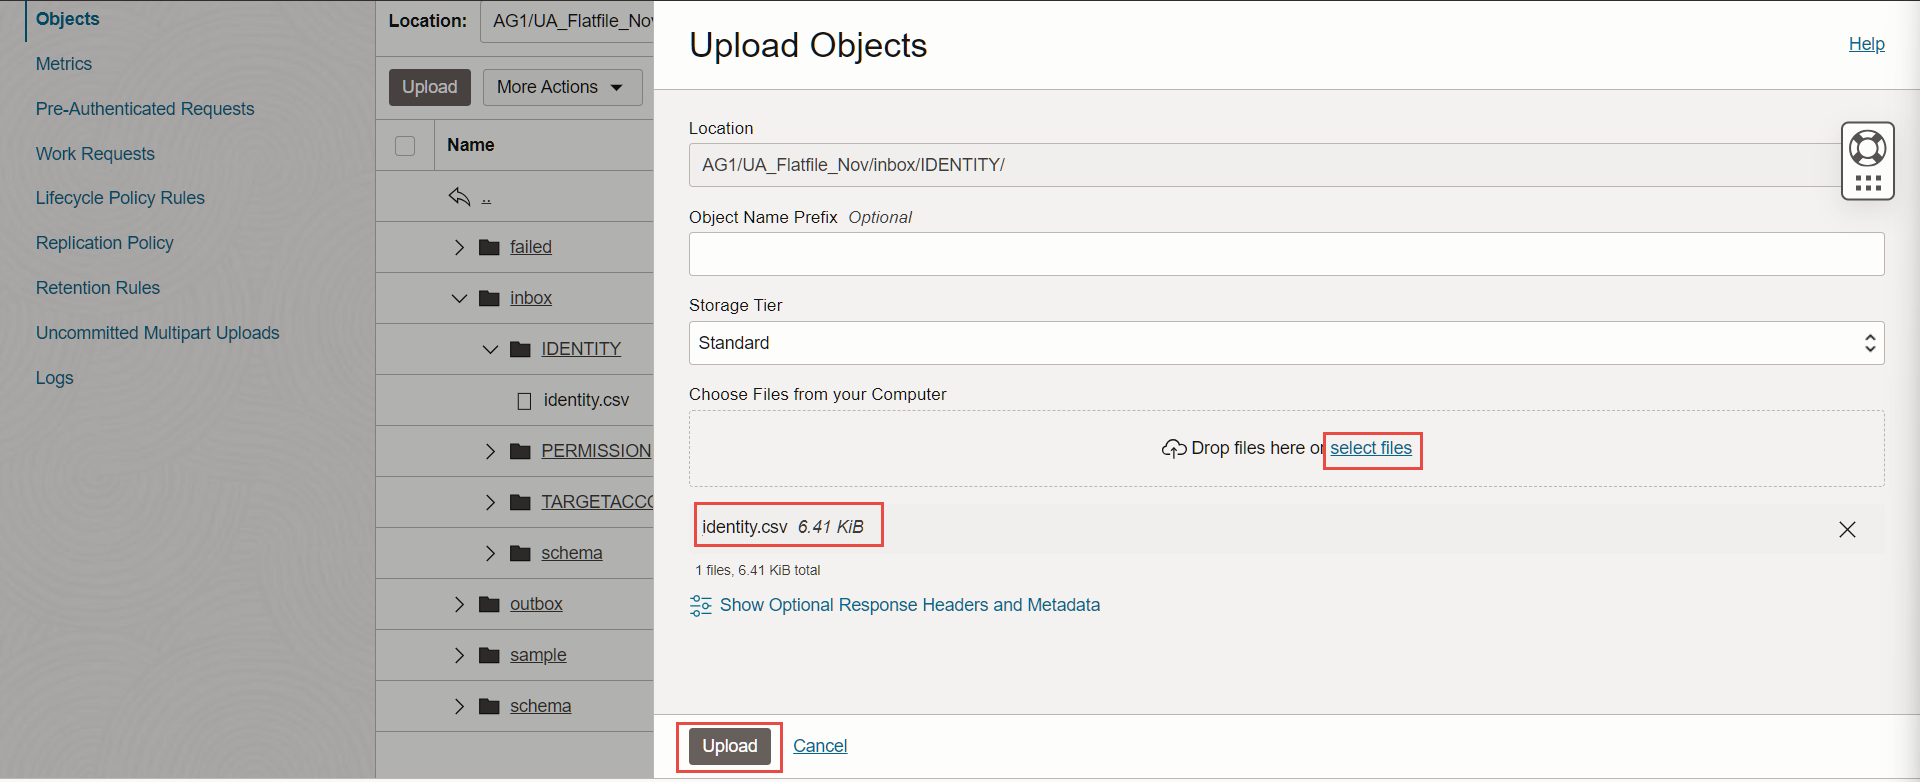
-
Perform the similar steps to upload other required CSV flat files.
Task 6: Run Dataload and Manage Identities in the Oracle Access Governance
After placing the relevant CSV flat files into the inbox folder we must run a dataload on demand. Each time you run a dataload it is always a full data load and there is no incremental data load.
If there is any kind of failure (single record or complete file failure), the data load operation will be marked as failed. The files that have been processed successfully will stay in the inbox while the failed files will be moved to the failed folder. After fixing the data issue, you are expected to put the files back in the inbox again and retry the dataload operation. Data integrity issues, such as a permission being assigned to an account that is missing in the CSV can cause the dataload operation to fail. However, in such cases the CSV files will not be moved to the failed folder. Files will be moved to the failed folder only when there are issues reading the data itself, such as missing mandatory data.
To run dataload
-
Log onto the Oracle Access Governance console.
-
From the Oracle Access Governance navigation menu icon select Service Administration > Connected Systems.
-
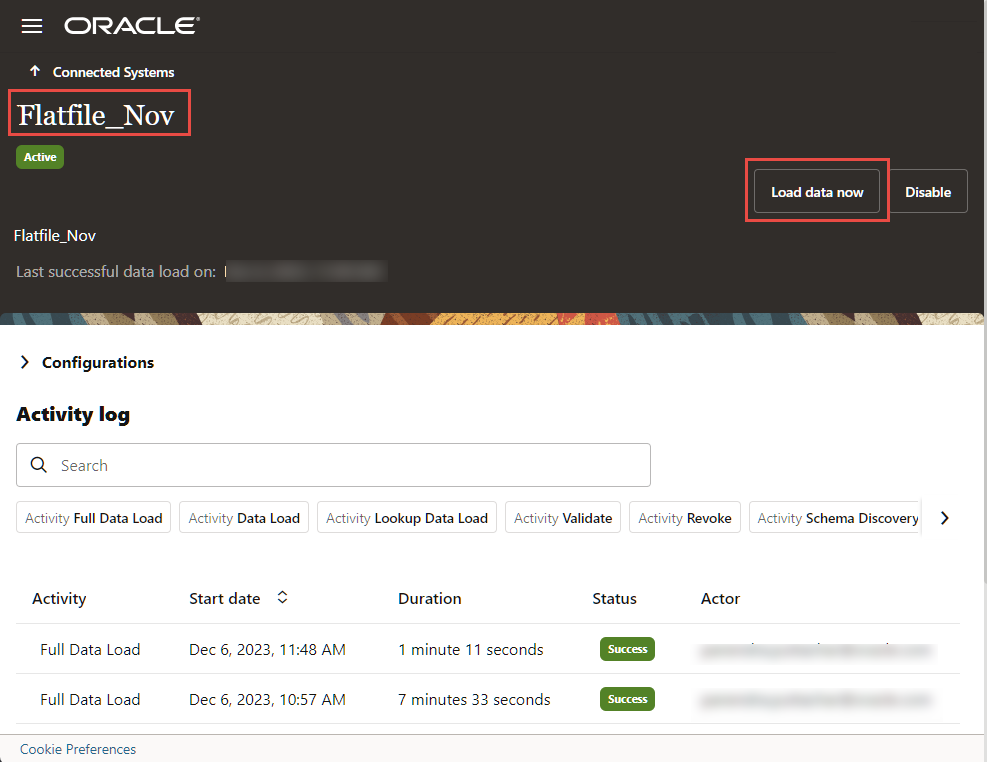
Click the flat file connected system.
-
Click Load data now button.
-
Wait for the data load to complete and then access the integrated files.
To Manage Identities
-
Log onto the Oracle Access Governance console.
-
From the Oracle Access Governance navigation menu icon select Service Administrator > Manage Identities.
-
Select Active from the Manage Identities page.
-
Select Any if any one of the set conditions should be satisfied, or select All if all the set conditions must be satisfied for that identity. For this tutorial, select Any.
-
Select the attribute name Status from the list.
-
Select the Equals conditional operator.
-
Select the Active attribute value.

-
Continue to add the conditional statements or rules for more attributes.
-
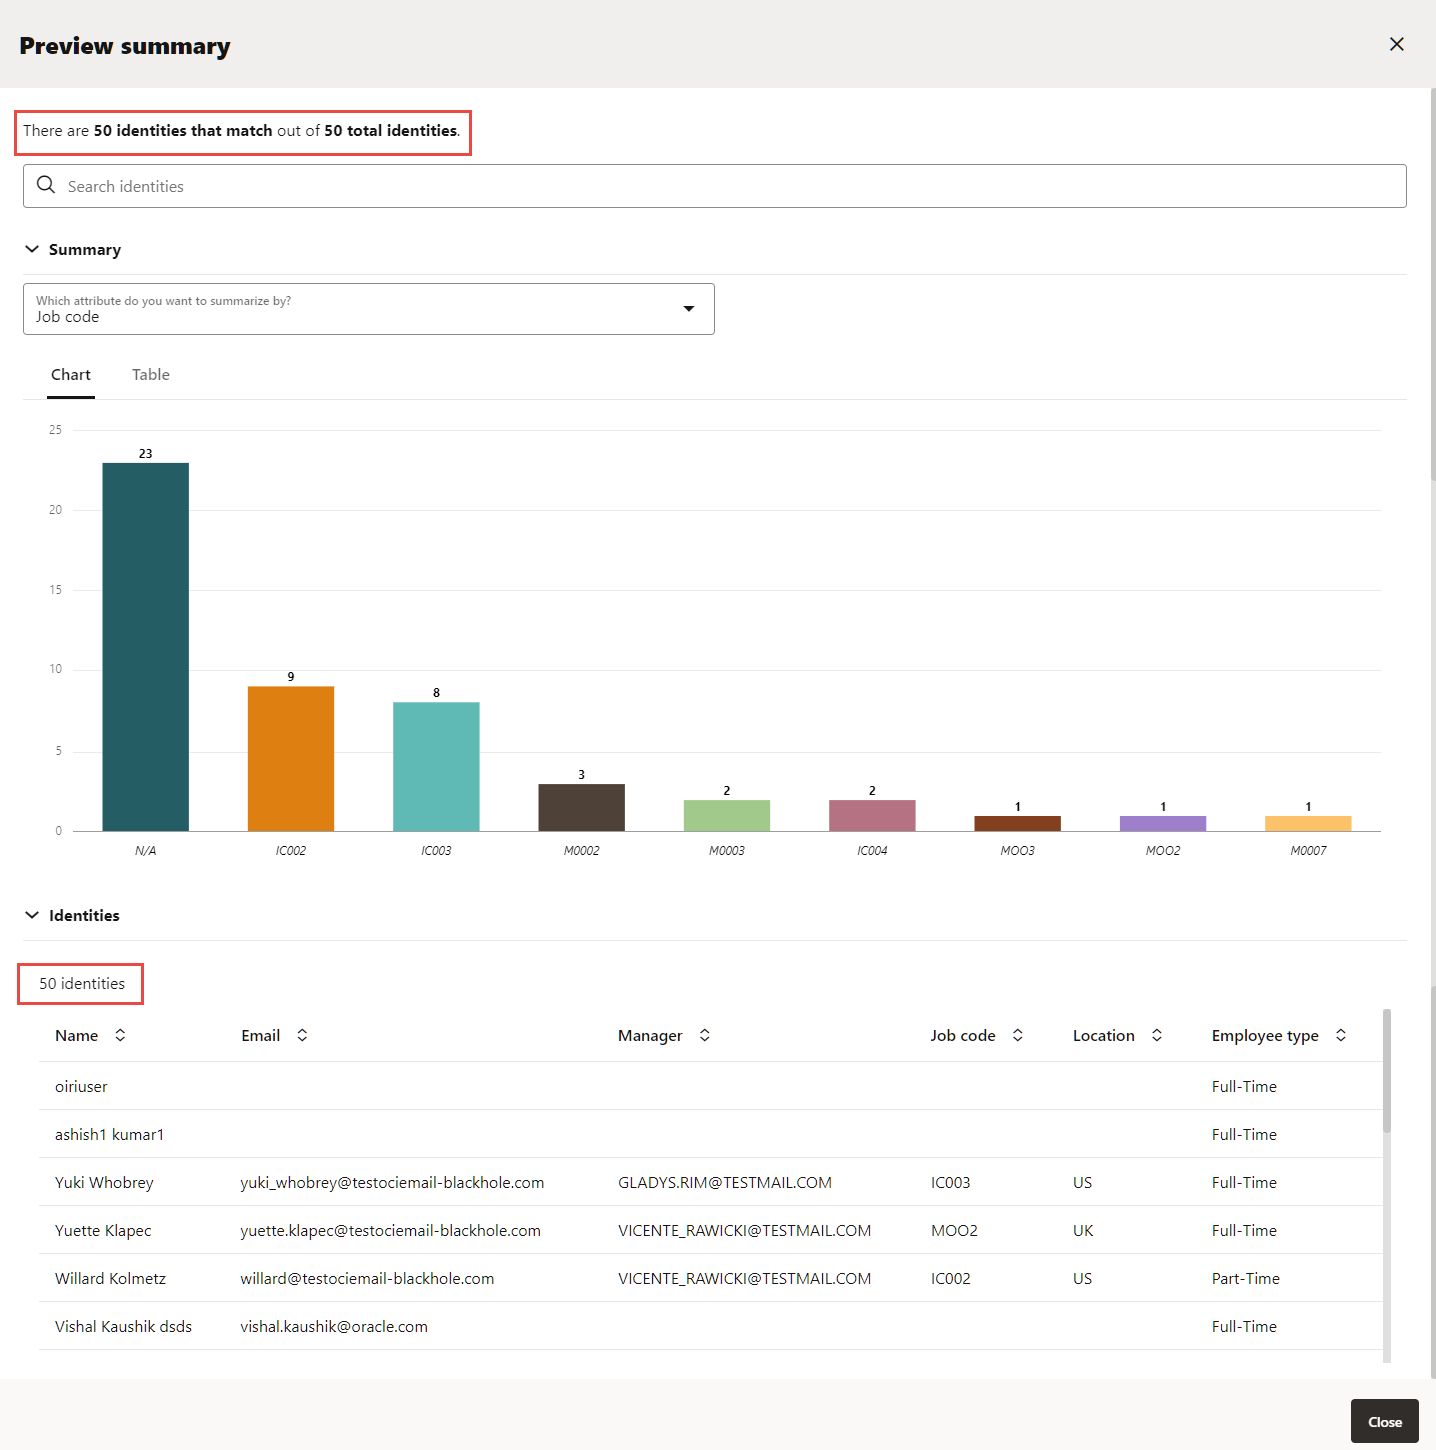
Once you have defined your rules, select Preview summary based on the rule above to go to the Preview Summary popup. This will display the following information, for the top 10 in each category:
- Total number of matches based on the rules you have entered.
- Total number of identities in the service.
- Breakdown of the distribution of included identities based on:
- Job code
- Location
- Employee type
-
Click Save to save your included identities rules.
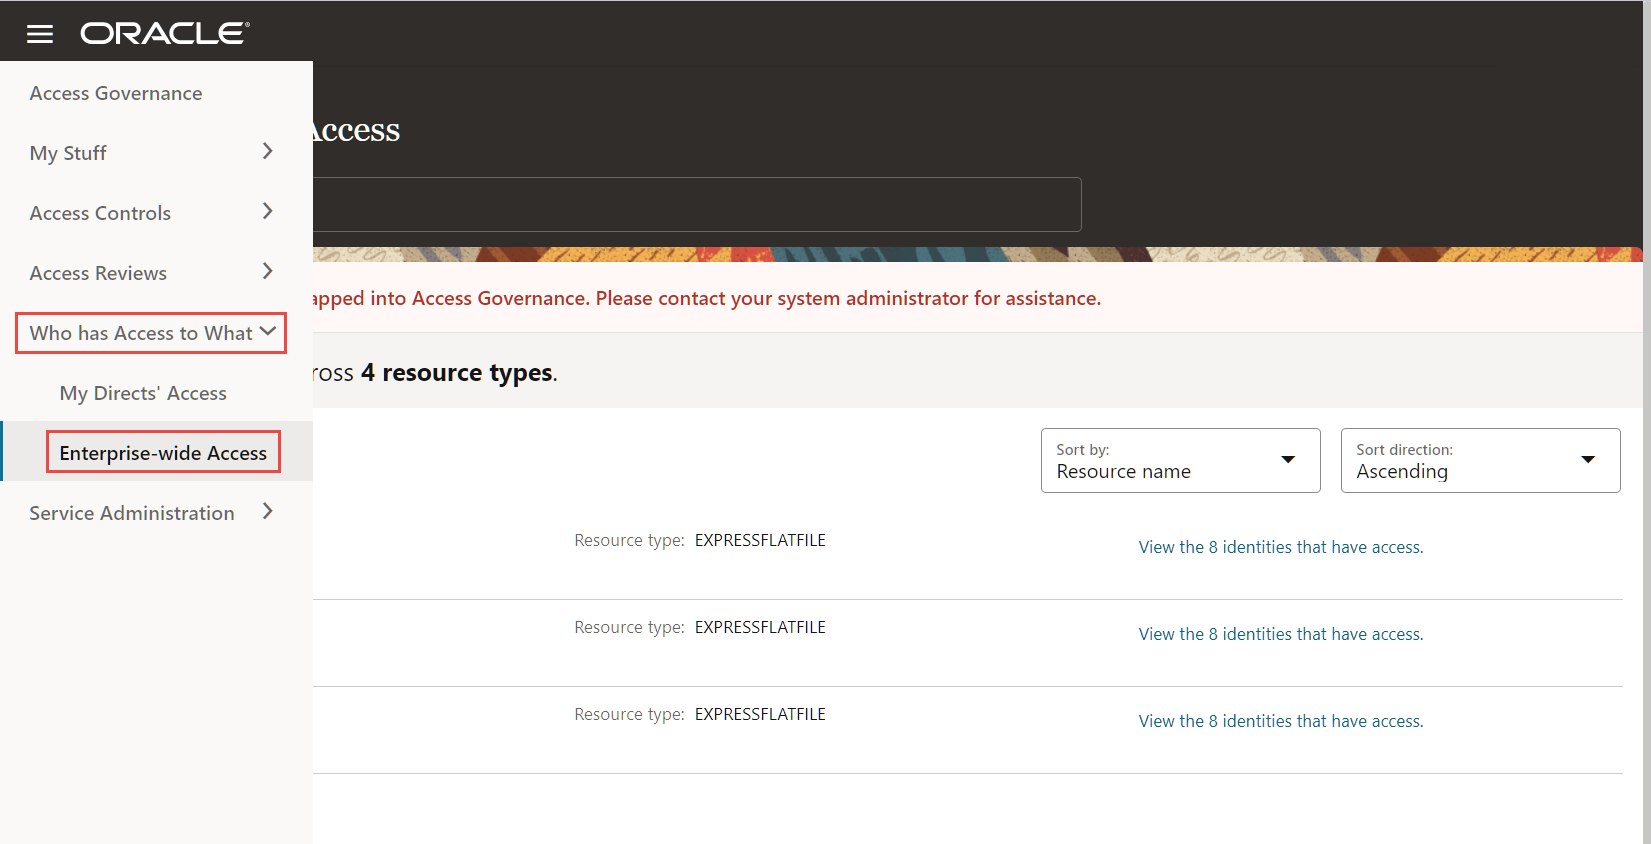
Upon successful execution of this rule, you can see a few more menu options, for example, Identity Attributes, enabled for you. You can verify the identities from Who has access to What > Enterprise-wide access.
To verify Who has access to what
-
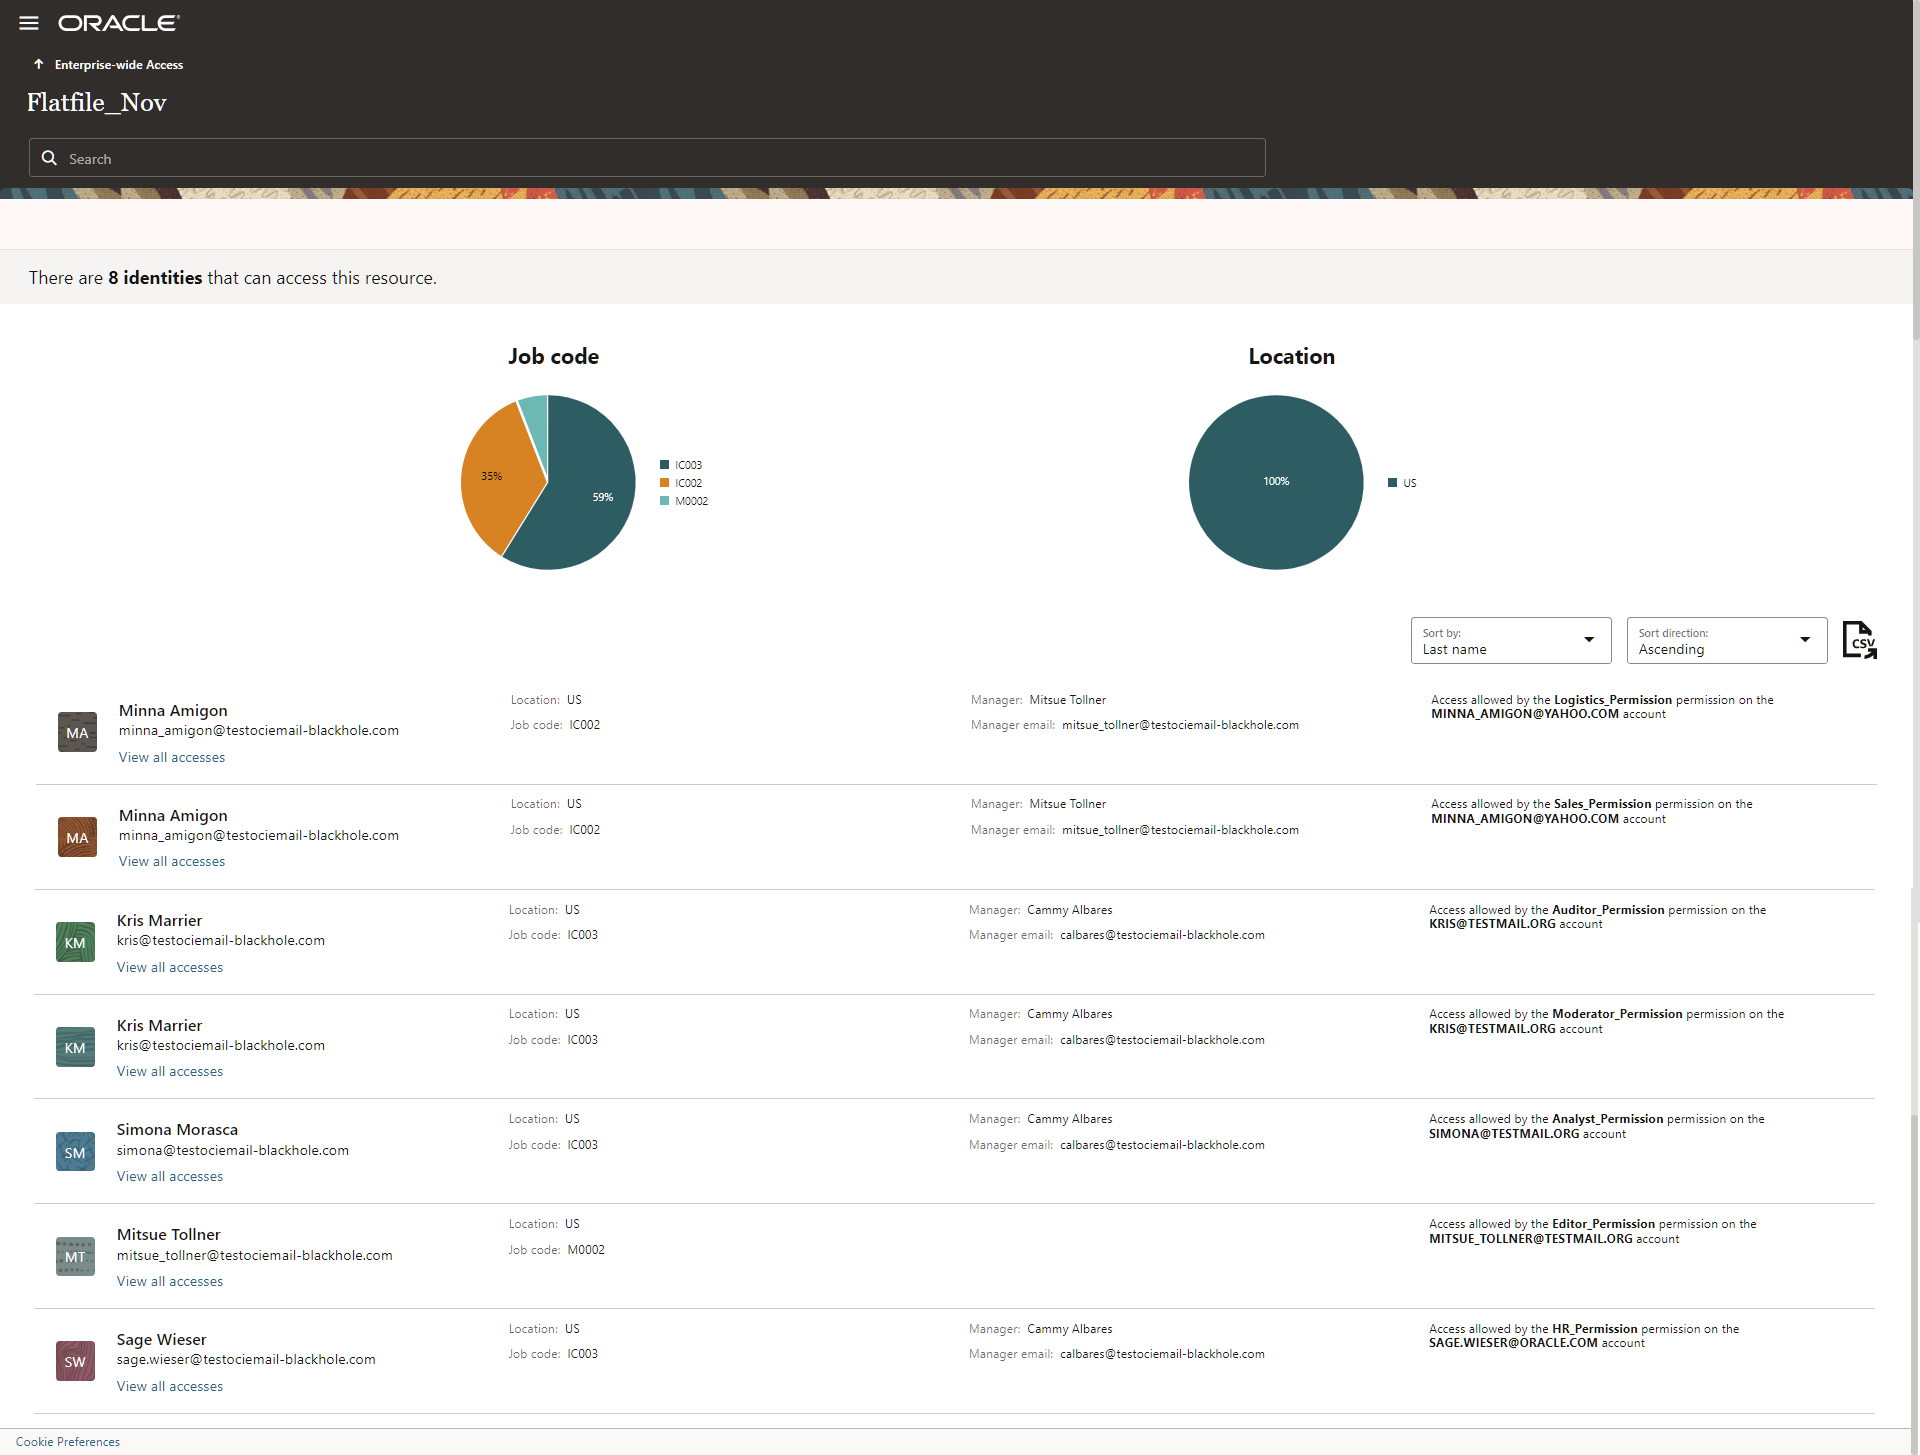
In the Oracle Access Governance console, From the Oracle Access Governance navigation menu icon select Who has Access to What > Enterprise-wide Access.
-
Click the View the identities that have access link corresponding to the connected system to view the data loads.
Acknowledgments
- Author - Panendra Puttachar
- Contributors - Abhishek Juneja, Michael Howlett, Komalreet Kaur, Oracle IAM Product Management
More Learning Resources
Explore other labs on docs.oracle.com/learn or access more free learning content on the Oracle Learning YouTube channel. Additionally, visit education.oracle.com/learning-explorer to become an Oracle Learning Explorer.
For product documentation, visit Oracle Help Center.
Set Up Identity Orchestration between Oracle Access Governance and a Flat File
F90290-01
February 2024
Copyright © 2024, Oracle and/or its affiliates.