Set Up Identity Orchestration between Oracle Access Governance and Oracle Cloud Infrastructure Identity and Access Management (OCI IAM)
Introduction
Oracle Access Governance is a cloud-native Identity Governance and Administration (IGA) solution that provides insights-based access reviews, identity analytics, and intelligence capabilities for businesses. Oracle Access Governance can be integrated with the identity systems by defining a connected system. A connected system allows you to load identity and access data from identity system to Oracle Access Governance. You can connect on-premises systems as well as cloud services to Oracle Access Governance.
For more information on Oracle Access Governance, see:
- Oracle Access Governance Product Page
- Access Governance Service Guide
- Access Governance Product Documentation
- Access Governance APIs
- Oracle Access Governance FAQ
Objective
In this tutorial, you’ll set up Identity Orchestration between Oracle Access Governance(AG) and Oracle Cloud Infrastructure Identity and Access Management (OCI IAM). For this, you’ll need to:
- Set Up Identity Resources on the target OCI instance to enable connection with Oracle Access Governance, including:
- creating an AG identity user with which AG can connect to the target
- creating an AG identity group in the target
- assigning the AG identity user to the AG identity group
- creating policies in the target OCI instance required for integration with Oracle Access Governance
- assigning the policies to the AG identity group
- Configure new connection for a cloud service provider in Oracle Access Governance Console
Intended Audience
This tutorial is specifically for OCI Tenancy Administrators and Access Governance Administrators so that they can learn to integrate Oracle Access Governance with OCI IAM.
Prerequisites
- The target OCI instance must use Identity Domains to manage identities. In the target Oracle Cloud Infrastructure Console, check by navigating to Identity & Security-> Identity. There should be a link for Domains.
- The target OCI administrator must be able to manage identities in the Default domain and manage policies in the root compartment of your tenancy.
- To integrate an Oracle Access Governance service instance with OCI tenancy outside your home region, the target OCI tenancy must be subscribed to the region where Oracle Access Governance is running.
- Your Access Governance user must have Access Governance Administrator rights. For more information, see Understanding Application Roles.
Tutorial Scenario
You want to setup seamless and secure identity orchestration between Oracle Access Governance and Oracle Cloud Infrastructure Identity and Access Management (OCI IAM) to allow you to run Access Governance tasks against the OCI identities.
Task 1: Set Up Identity Resources on OCI to Connect to Oracle Access Governance
To setup the target OCI instance for Oracle Access Governance integration, complete the following:
-
Create an identity user, agcs_user, in the Default domain for Oracle Access Governance access. For more information on creating an identity user, see Managing Users.
-
Edit user capabilities and select API keys for agcs_user:
- API keys: Select the check box for API authentication. For more information on editing user capabilities, see Managing User Credentials.
-
Create an identity group, agcs_group, in the Default domain for Oracle Access Governance API access and user assignment. For more information on creating a group, see Creating a Group.
-
Assign the identity user (agcs_user) to the identity group (agcs_group). For more information on assigning an identity user, see Assigning Identity User.
-
On the OCI Console, open the navigation menu and select Identity & Security -> Policies.
-
On the left pane, select the root compartment of your tenancy.
-
Click Create Policy.
-
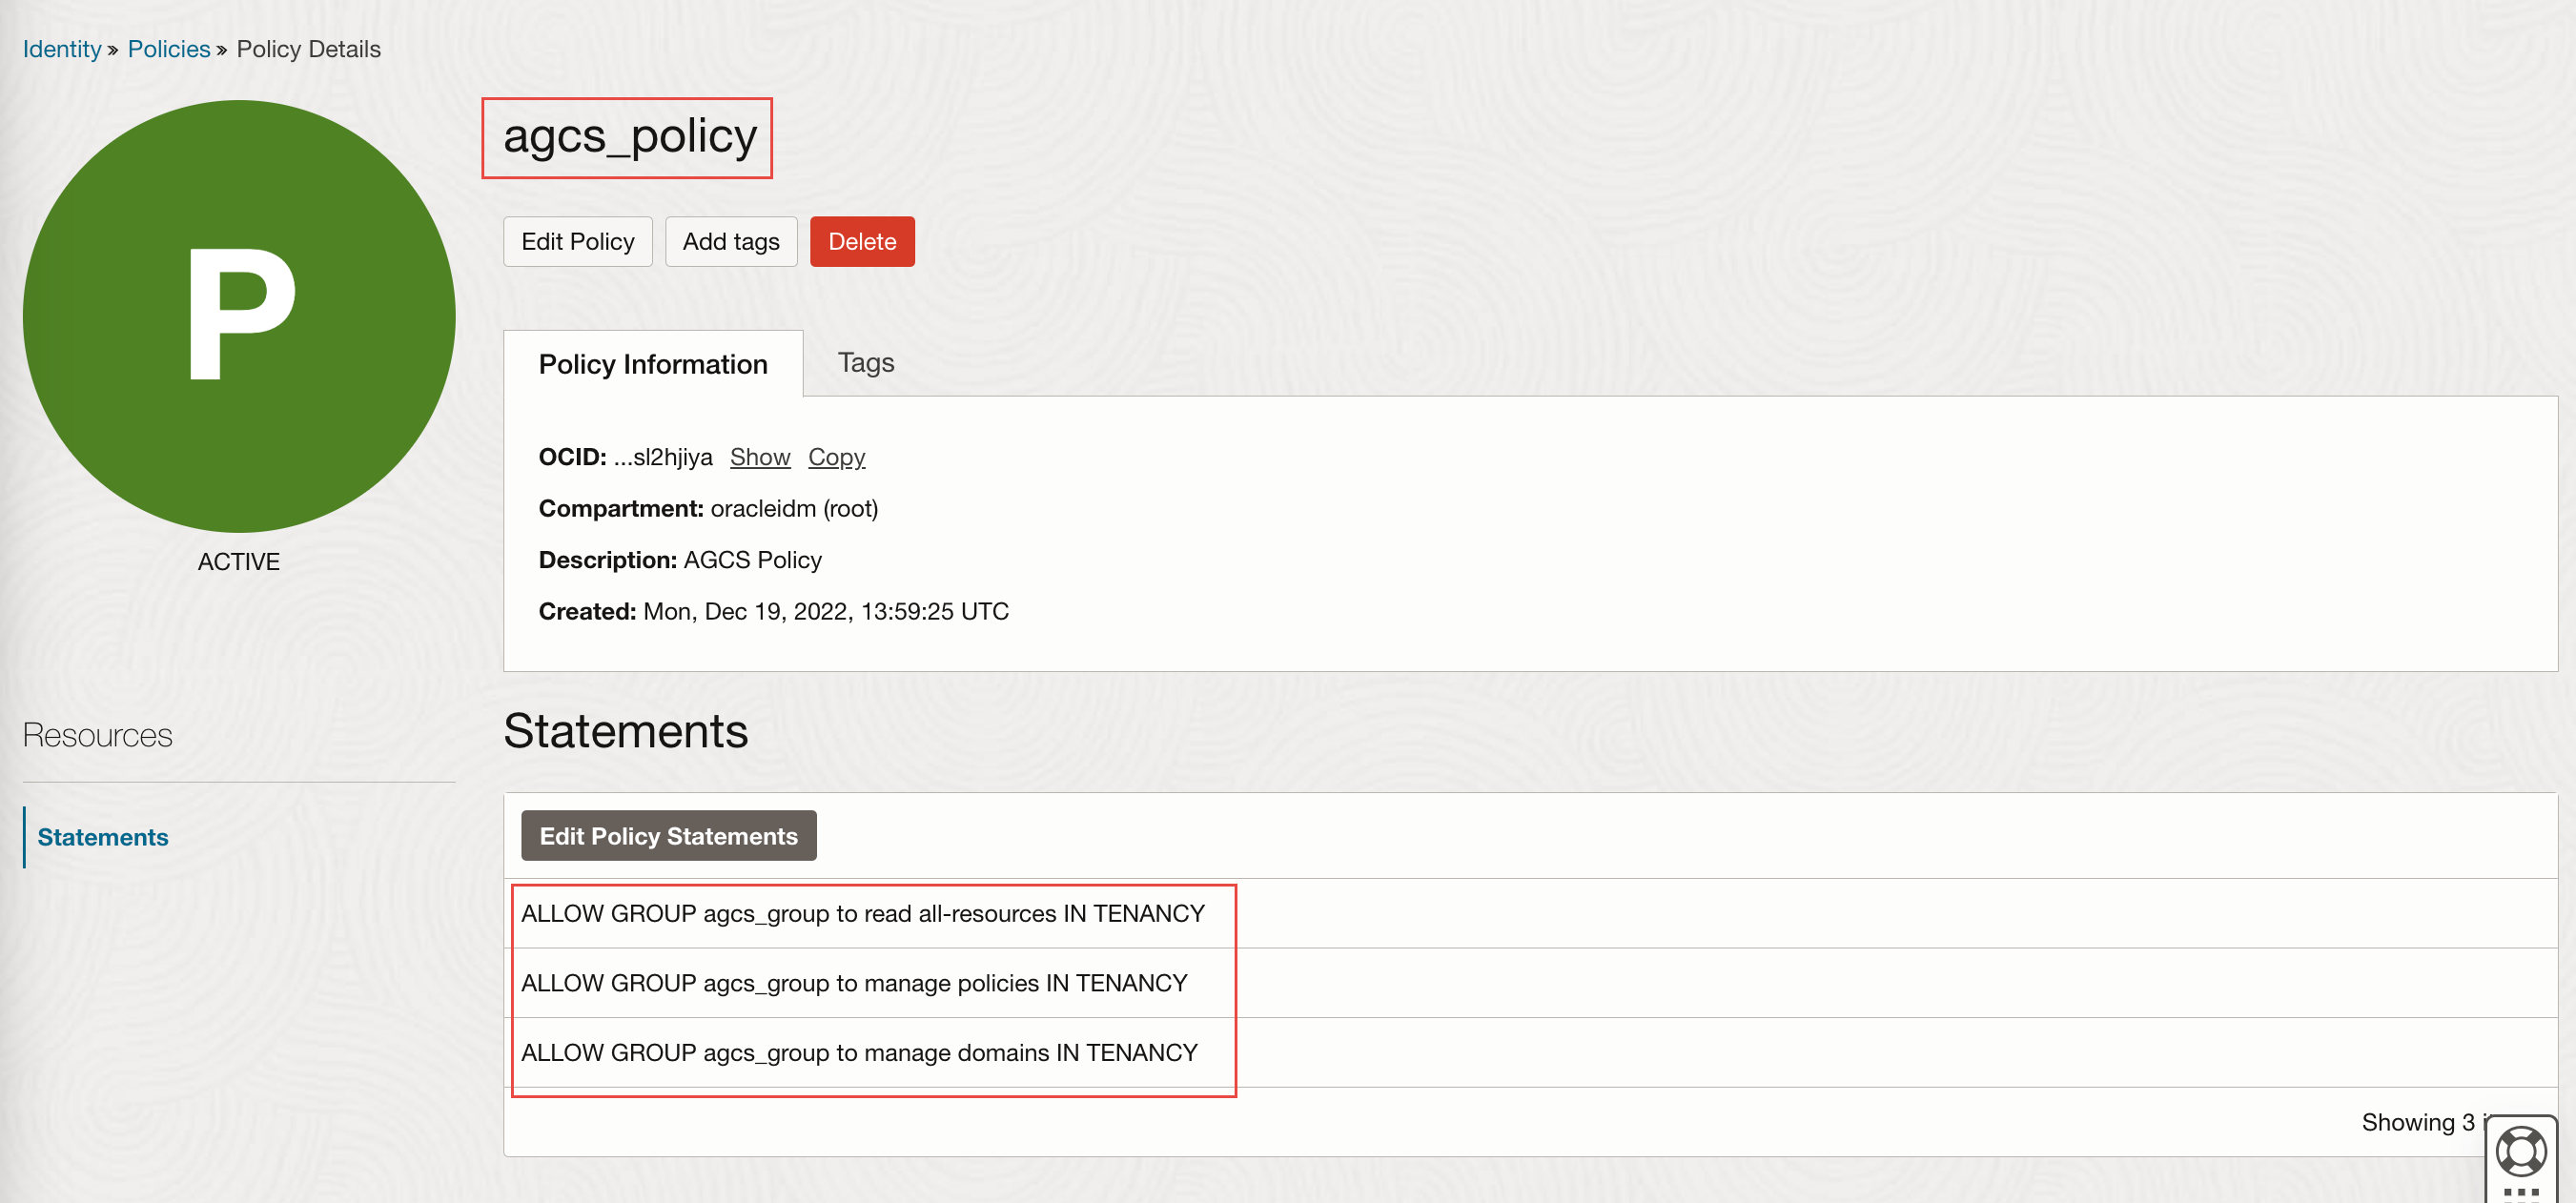
Enter name and description of the policy. In this tutorial, enter name as OCI_AGCS and description as Policies for Access Governance Agent to connect with Access Governance.
-
In the Compartment field, select the root compartment.
-
Turn on the Show manual editor toggle button.
-
Enter the following policy statements:
ALLOW GROUP agcs_group to read all-resources IN TENANCY ALLOW GROUP agcs_group to manage policies IN TENANCY ALLOW GROUP agcs_group to manage domains IN TENANCY -
Click Create.

After you have set up the identity resources, you need to generate API Keys for the identity user (agcs_user) and note OCID for that identity user. You will use it to configure your cloud environment on the Oracle Access Governance Console. For more information on OCID, see OCID
-
In OCI console, from the navigation menu, select Identity & Security, and then Domains -> your compartment, and then from the left pane, select Users.
-
Select the agcs_user that you have created.
-
On the left navigation panel, in the Resources section, select API keys.
-
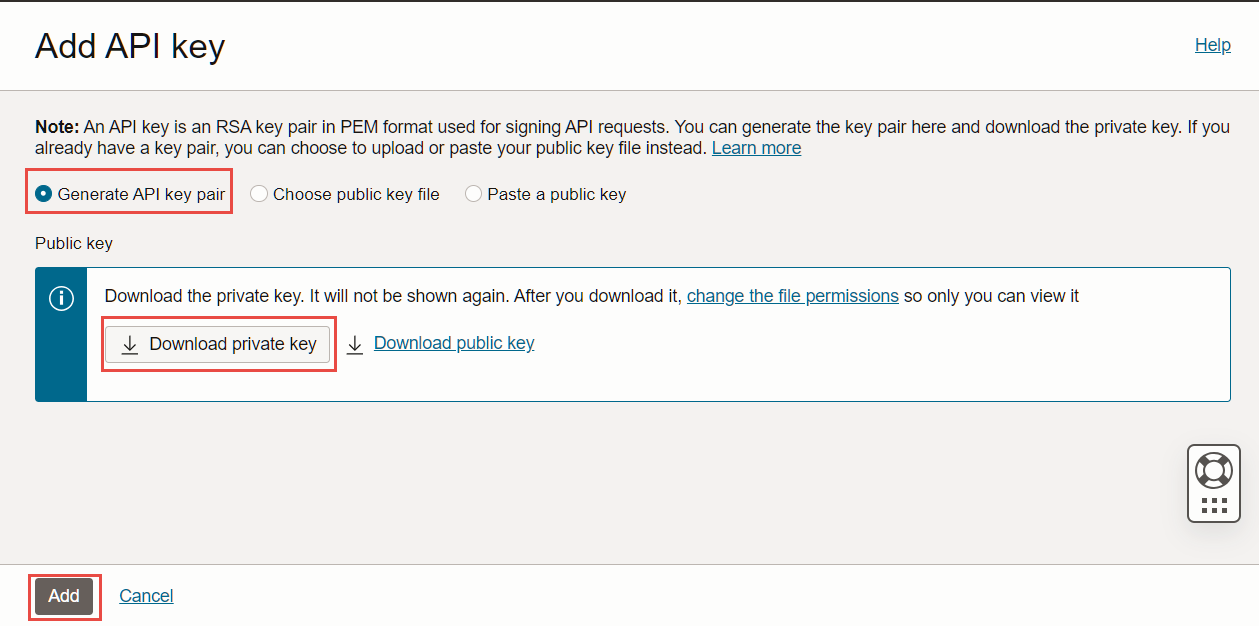
Click Add API key then select Generate API key pair.
-
Click Download private key and save it.
-
Click Add. The configuration file is created displaying ocid, fingerprint, tenancy and region details. Save the information available on the configuration file in a separate text file.

Task 2: Configure a new OCI IAM Cloud Service Connection in Oracle Access Governance Console
-
In a browser, navigate to the Oracle Access Governance service home page and log on as a user with the Administrator application role.
-
On the Oracle Access Governance service home page, click on the Navigation menu icon, and select Service Administration → Connected Systems.
-
Select the Add a connected system button from the Connected Systems page.
-
Select the Oracle Cloud Infrastructure tile and then click Next.
-
In the Enter details step, enter name and description of the connected system, and then click Next.
Note: Do not add space while naming your connected system.
-
In the Configure step, add the connection details:
- Enter the user’s OCID and fingerprint details.
- To fetch the OCID of the user, follow the steps given here
- To fetch fingerprint of the user, follow the steps given here.
- Enter the OCID for target tenancy. To fetch OCID for your tenancy, follow the steps given here.
- Enter the region identifier of the home region for the target OCI tenancy. For this tutorial, enter us-ashburn-1.

-
Click Add. If the connection details are successfully validated, you will see the Success status for the Validate operation. The Full Data Load operation may take upto a few minutes, depending upon the data available in your OCI tenancy. The incremental data load is run every four hours for this connected system to sync the most recent data.

Task 3: Manage Identities in Oracle Access Governance Console
After connecting Oracle Access Governance with OCI IAM, you must activate identities from the Manage Identities page. To learn more about this, read the Activate/Inactivate Identities for License Management article.
A few examples can be:
- If you want active users only from a specific domain, enter the domain OCID of that domain.
- If you want all the users across all domains in your tenancy to participate in Oracle Access Governance, you may add each of the domain OCID or may enter domain ‘ocid’ of each domain or some common text. For example,
<Domain OCID> contains "ocid".
For this tutorial, we will include users from a specific domain only.
-
On the Oracle Access Governance service home page, click the navigation menu icon, and select Service Administration → Manage Identities.
-
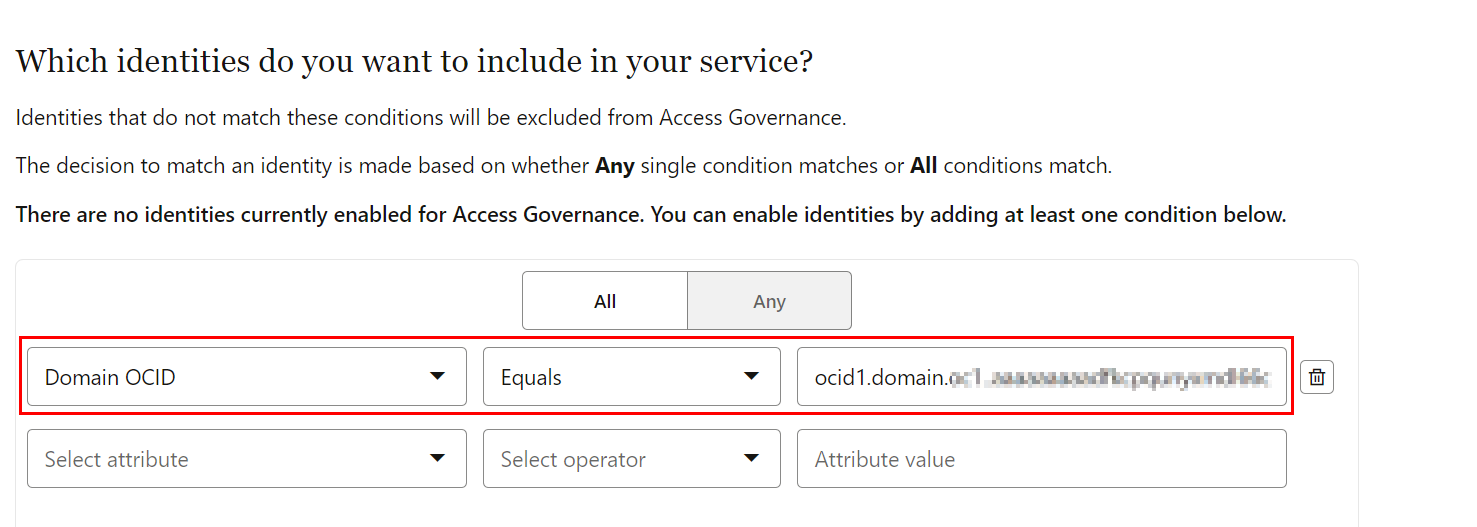
Select Any if any one of the set conditions should be satisfied, or select All if all the set conditions must be satisfied for that identity. For this tutorial, select All.
-
In the attribute list, select Domain OCID.
-
Select an appropriate conditional operator. For this tutorial, select Equals.
-
In the Attribute value field, enter the OCID for the domain that you want to include.
Note: You can see the number of identities included based on the selected rules by clicking the preview link.
-
Click Save and then Confirm.

Upon successful execution of this rule, you can see a few more menu options, for example, Identity Attributess, enabled for you.
You have successfully learnt to set up identity orchestration between Oracle Access Governance and OCI IAM. You have also learnt to manage identities for license management and to utilize Oracle Access Governance features.
Acknowledgments
- Author - Komalreet Kaur
- Contributors - Abhishek Juneja, Joe Gillette, Michael Howlett, Panendra Puttachar
More Learning Resources
Explore other labs on docs.oracle.com/learn or access more free learning content on the Oracle Learning YouTube channel. Additionally, visit education.oracle.com/learning-explorer to become an Oracle Learning Explorer.
For product documentation, visit Oracle Help Center.
Set Up Identity Orchestration between Oracle Access Governance and OCI IAM
F80288-03
November 2023
Copyright © 2023, Oracle and/or its affiliates.