Set Up Users for Access Governance by Performing Provisioning Operations in Oracle Identity Governance (OIG) using the Cloud Identity Service (IDCS) Connector
Introduction
Oracle Access Governance is a cloud-native Identity Governance and Administration (IGA) solution that provides insights-based access reviews, identity analytics, and intelligence capabilities for businesses. You can set up user and group accounts to use Oracle Access Governance. One of the ways is to use Oracle Cloud Infrastructure Identity and Access Management (OCI IAM) Identity Domains. If your Oracle Access Governance instance uses identity domains for identity management, you can use one of the following approaches:
- Configure User provisioning from Oracle Identity Governance with OCI IAM using the IDCS Connector.
- Set Federated Authentication from an External Identity Provider (IDP).
- Self Registration Profiles.
The following image illustrates the architecture view of setting up users for Access Governance by provisioning OIG users with OCI IAM and getting access to the Access Governance service instance on OCI.
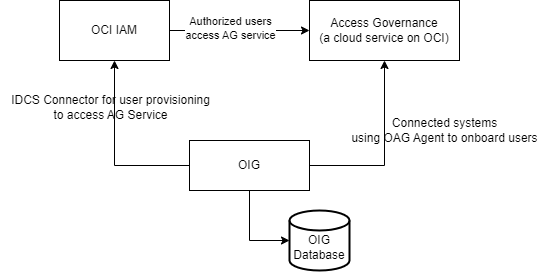
Description of the illustration IDCSIntegration.png
In this tutorial, we will understand approach 1, that is, how to configure user provisioning from OIG with OCI IAM using the IDCS Connector. These users will be assigned to a group, which, when you have completed onboarding, you map to Oracle Access Governance application roles.
For more information on Oracle Access Governance, see:
- Oracle Access Governance Product Page
- Access Governance Service Guide
- Access Governance Product Documentation
- Access Governance APIs
- Oracle Access Governance FAQ
Objective
In this tutorial, you’ll set up users for Oracle Access Governance by performing provisioning from Oracle Identity Governance (OIG) to OCI IAM using the Identity Cloud Service (IDCS) connector. For this, you’ll need to:
- Create a client application in OCI IAM.
- Configure IDCS Connector application in OIG.
- Provision OIG users to OCI IAM identity domain with appropriate Oracle Access Governance application roles.
Intended Audience
This tutorial is for:
- OCI IAM Domain Administrator to create an IDCS Client Application and OCI Groups in OCI IAM
- OIG Administrator to provision IDCS Connector Application to OIG Users in OIG
Prerequisites
You must have:
- OCI IAM Domain Administrator rights
- Access to the OIG URLs with administrative rights and credentials.
- OIG instance must be available and running on a compute instance. The following should be set up on your OIG instance:
- JDK 1.8 or higher and JAVA_HOME must be configured.
- Oracle WebLogic Server should be installed on your OIG compute instance.
- Read and gained understanding on the following topics:
Tutorial Scenario
Acme Corporation is using Oracle Identity Governance as identity management and governance solution. They want to use Oracle Access Governance to perform intelligent access reviews using insights-based access reviews and identity intelligence capabilities. They want to provision all or selected users in their OIG system to use Oracle Access Governance.
Business Owners as the OCI IAM Domain Administrator can configure OIG provisioning with OCI IAM using the IDCS Connector. This connector would help the business owners to automatically create user profiles in OCI IAM, so that they can use Access Governance service. For this tutorial, you will also provision the AG_CampaignAdministrator role to selected users through membership of OCI group.
Task 1: Download and Copy IDCS Connector to OIG ConnectorDefaultDirectory
-
From your browser, go to the Oracle Identity Manager Connector Downloads web page.
-
Search ‘Identity Cloud Service’ and click on the relevant link.
-
In the Platforms drop-down, select the relevant platform.
-
Select the Oracle Identity Manager Connector - Identity Cloud Service checkbox.
-
Accept the Oracle license agreement and then select Download. The zip package gets downloaded in your default downloads directory.
-
Go to your OIG compute instance and open the command-line interface (CLI) terminal.
-
Run the copy command to copy the IDCS Connector package from your downloads folder to the OIG_HOME/server/ConnectorDefaultDirectory directory, where OIG_HOME is the user specific folder where you have installed the OIG instance.
cp source_folder destination_folderFor example to copy the package, run
cp ~/Downloads/IDCS_Connector.zip ./server/ConnectorDefaultDirectory -
Go to the ConnectorDefaultDirectory directory and unzip the package by running:
unzip IDCS_Connector.zip
Task 2: Add Confidential Type Application on OCI
-
Open your Oracle Cloud account and from the navigation menu, select Identity & Security -> Domains
-
Select your domain.
Tip: Alternatively, you can directly access the IDCS console using your Access Governance IDCS service instance URL by replacing signin and adding adminconsole. For example Replace
https://idcs-1234567890.identity.oraclecloud.com/ui/v1/signinwithhttps://idcs-1234567890.identity.oraclecloud.com/ui/v1/adminconsoleWhichever option you opt, you will be navigated to the Identity Cloud Service console.
-
Go to Identity Cloud Service console, and click on Integrated applications.
-
Click Add application.
-
Select Confidential Application option and then click on Launch workflow.
-
In the Add Confidential Application wizard’s details page, use the following table to configure application details:
Section Name Field Name Step Value or Example Add application details Name Enter a name for the confidential application. IDCSApp Add application details Description Enter description for the confidential application. IDCSApp Add application details Display settings -> User can request access Select the checkbox User can request access Configure OAuth Client configuration Select Configure this application as a client now and then select Resource Owner and Client credentials check boxes Configure OAuth Client configuration Select Client type as Confidential Configure OAuth Client configuration -> Token Issuance Policy Select Specific in the Authorized resources section Configure OAuth Client configuration -> Token Issuance Policy Select Add app roles, and then Add Roles Select and add the following roles:
1. Identity Domain Administrator 2. Me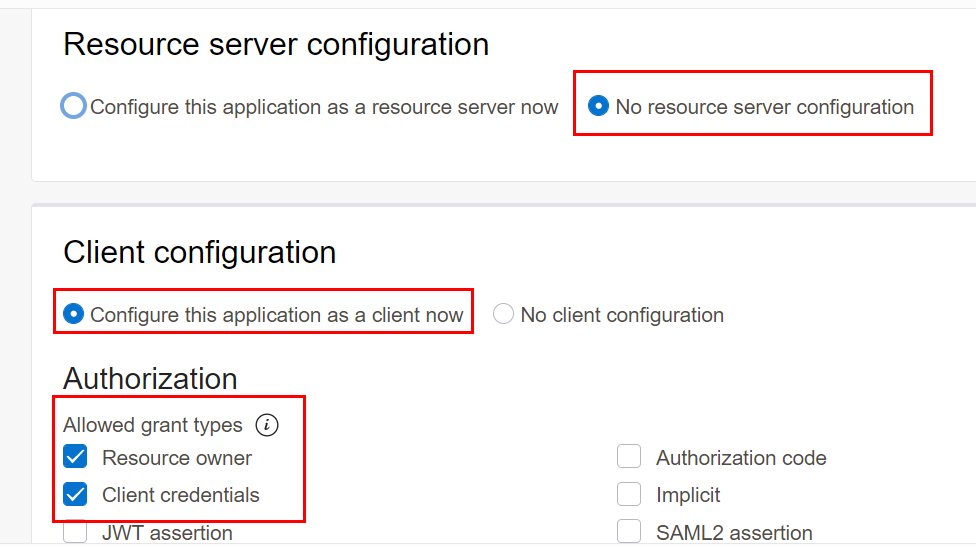
-
Select Save Changes. The application has been added in a deactivated state and the Client ID and the Client secret are also generated.
-
Select Activate to activate the application.

Task 3: Encode Client ID and Client Secret to Base64 Format for Authorization
- Copy the Client ID and Client secret from the application that you just created.
- Go to Base64 Encode Decode website or similar website to generate the Base64 encrypted value.
- Enter
ClientID:Client Secretand generate the value.
Save this encrypted value for later use. It will be used while configuring the IDCS application in OIG.
Task 4: Download SSL Certificate of Target System and Import to OIG JDK and Web Logic Server Home
In this step, you will import the SSL certificate of target system, that is IDCS application, to JDK and Web Logic Server directories. You must have configured JAVA_HOME for this step and Oracle WebLogic Server must be installed on your compute instance. Refer to the Prerequisites section for additional details.
-
Open the Access Governance IDCS instance URL in your browser.
-
Click the View site information or lock icon in the address bar and then select secure connection and certificate details.
-
In the Details tab, export the certificate and save it as .pem file.
-
Copy the certificate from your local system to compute instance. For example:
cp ~/Downloads/SSLcertificate.pem <directory of your choice on compute instance> -
run the following command to set the path to JAVA_HOME:
1. export JAVA_HOME=<jdk location in compute instance> 2. export PATH=$JAVA_HOME/bin:$PATH 3. echo $PATH -
In the same session, run the command to import certificate to JAVA_HOME
keytool -import -file SSLcertificate.pem -keystore keystorename -storepass keystorepassword -alias aliasforprivatekeyFor example, run the command and replace relevant parameters:
keytool -import -file ~/Downloads/SSLcertificate.pem -keystore $JAVA_HOME/jre/lib/security/cacerts -storepass changeit -alias myidcscert -
Enter yes in the Trust this certificate? question. The confirmation message that the certificate is added to the keystore is displayed.
-
In the same session, run the keytool command to import certificate to WebLogic Server
keytool -import -file SSLcertificate.pem -keystore $WL_HOME/server/lib/DemoTrust.jks -storepass keystorepassword -alias aliasforprivatekeyFor example, run the command and replace relevant parameters:
keytool -import -file ~/Downloads/SSLcertificate.pem -keystore $WL_HOME/server/lib/DemoTrust.jks -storepass DemoTrustKeyStorePassPhrase -alias WLidcscert -
Enter yes in the Trust this certificate? question. The confirmation message that the certificate is added to the keystore is displayed.
Task 5: Create an OCI Group and assign it Access Governance Application Roles
-
Open your Oracle Cloud account and from the navigation menu, select Identity & Security -> Domains.
-
Select your domain.
-
From the Identity Cloud Service console, select Groups.
-
Select Create group.
-
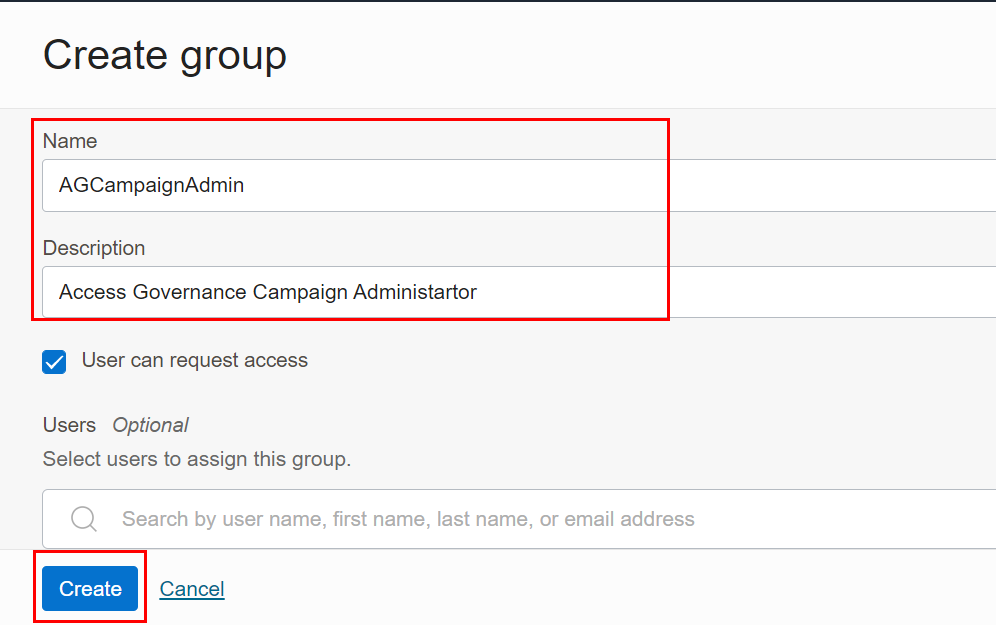
Enter Name and Description of your choice. In this tutorial, let’s name our group AGCampaignAdmin.
-
Select the user can request access check box, and then click Create. The group is successfully created.
-
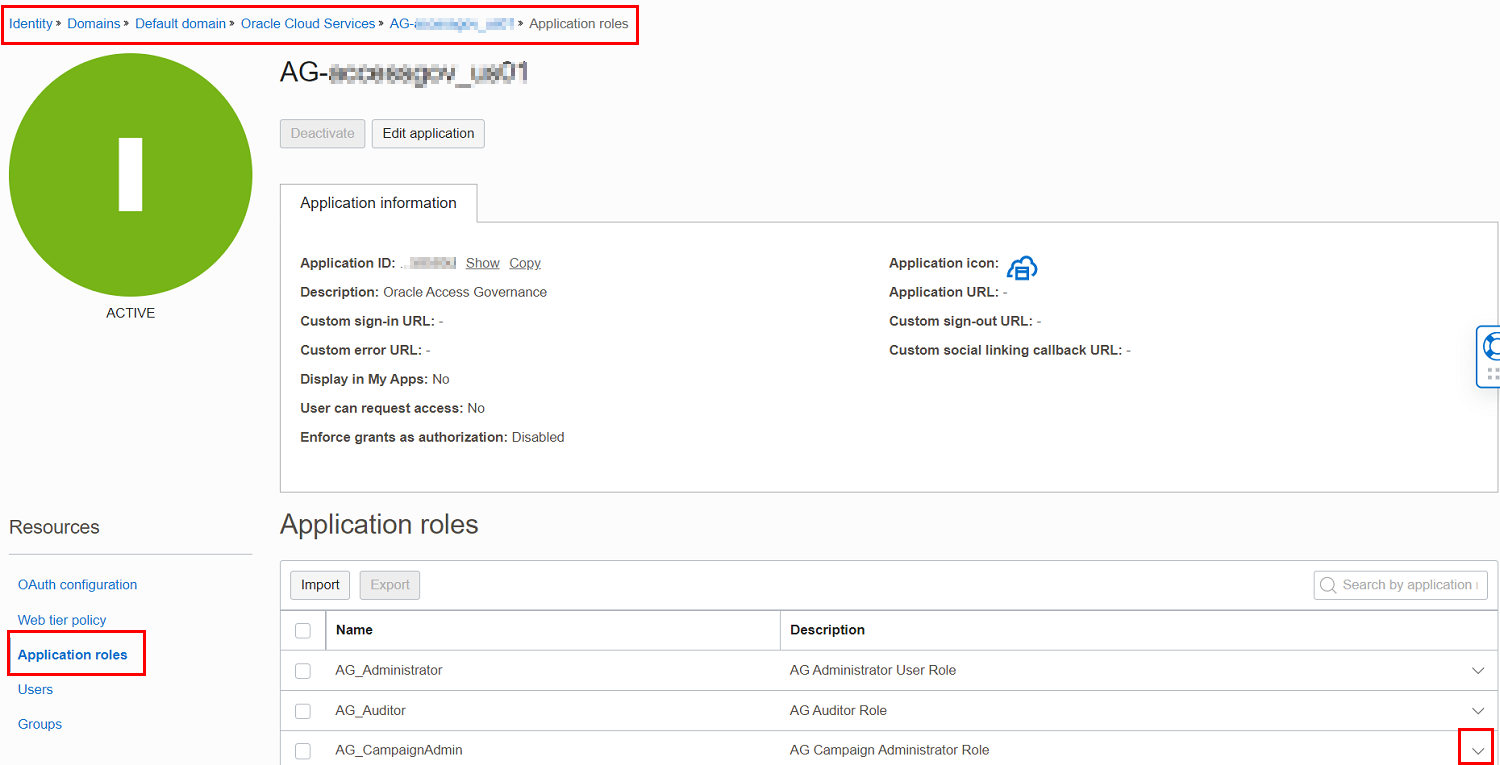
Go back at the Integrated applications level following the breadcrumbs, and then on the left pane, click Oracle Cloud Services.
-
Select the Oracle Access Governance cloud service instance.
-
On the left pane, in the Resources section, select Application roles.
-
In the Application roles section, select the
 expand icon corresponding to the application role that you want to assign.
 -
Select the Manage link corresponding to the Assigned groups category. The Manage group assignments window is displayed.
-
Select the Show available groups link.
-
In the available group list, select the checkbox corresponding to the group name, and then click Assign.
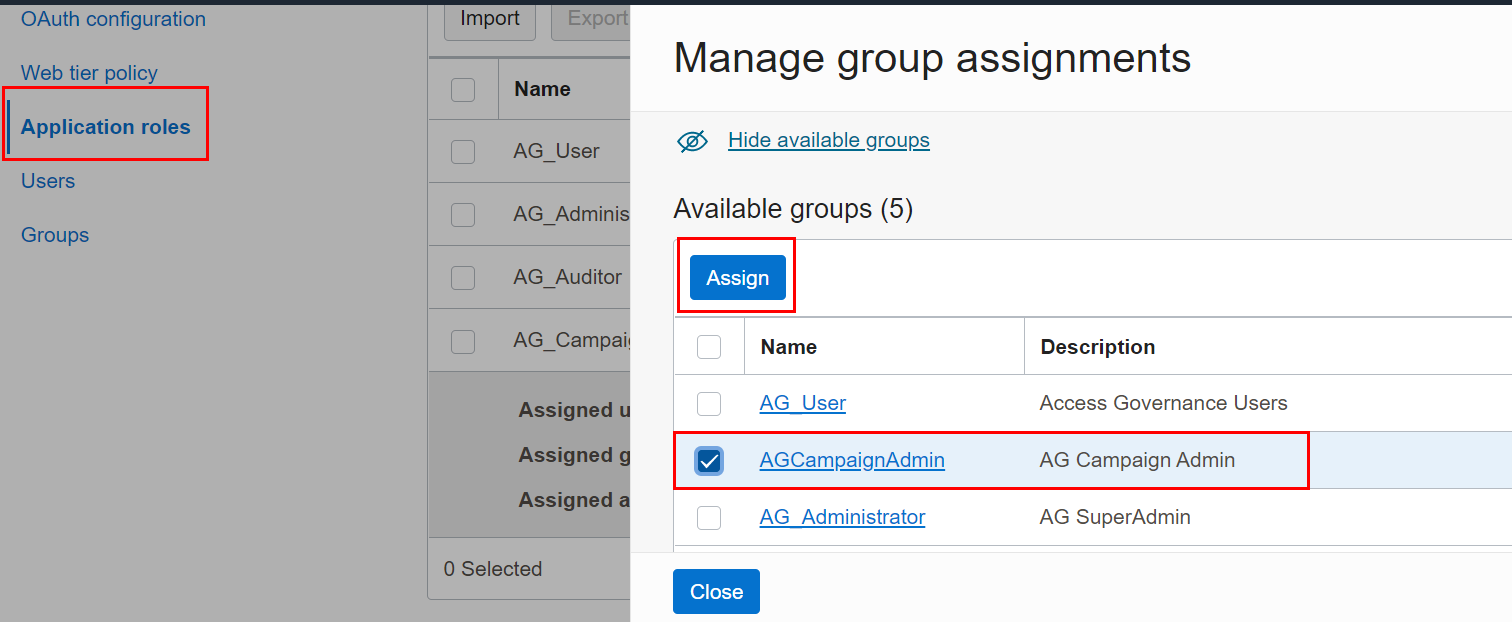
The application role is assigned to the selected group. You can verify the same by viewing the names in the Assigned groups list.
Task 6: Configure an IDCS Connector Application in OIG
-
Sign in to Identity Self Service as a System Administrator.
-
Go to Manage -> Application.
-
In the Basic Information section, fill the following information:
- Select Connector Package.
- In the Select Bundle drop-down list, select Oracle Identity Cloud Service 12.2.1.3.0.
- In the Application Name field, enter the application name.
-
In the Basic Configuration, select
- acceptType: application/json
- authenticationServerUrl: Enter the Access Governance IDCS URL.
- baseURI: Enter the base URL. For example, enter
/admin/v1. - contentType: application/json
- customAuthHeaders: Enter Base64 Encode value calculated in Task 3 in the following format “Authorization=Basic Base64_encodevalue”
- grantType: Enter client_credentials.
- host: Enter IP address of the target system. For example,
idcs-123456789abcedef123s2.identity.oraclecloud.com. - port: Enter the port number at which the target system is hosted. Foe example, enter
80. - scope: Enter the scope to authenticate request based on OAuth2.0 Resource Owners Password or Client Credentials authentication. For example, use
urn:opc:idm:__myscopes__. - sslEnabled: true
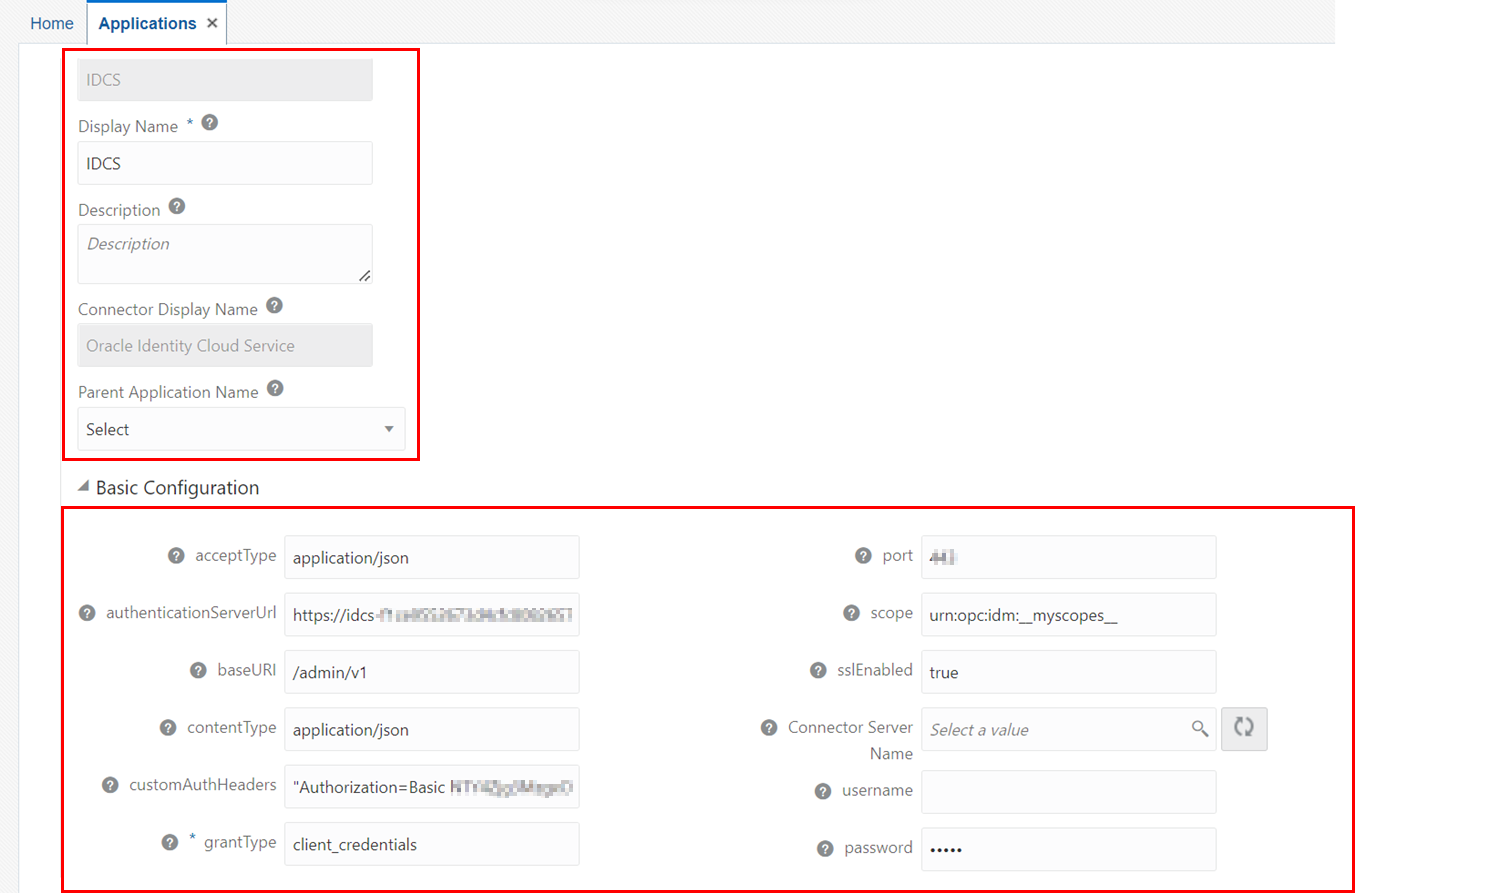
Description of the illustration IDCSConnector_BasicConfig.png
-
Select Test Connection to verify the connection with the target system. The confirmation message that the test connection is successful is displayed.
-
If required, make required configurations in Schema and Settings. In this example, we will leave the default value as is.
-
Review the application summary and select Finish. The message confirming that the IDCS Application has been successfully created is displayed.
Task 7: Run Group Lookup Recon Job
Run the IDCS Group Lookup Reconciliation job to reconcile all group data in the target system into lookup fields in Oracle Identity Governance (OIG). This step would bring the groups that you created and assigned to the AG role within OIG.
Task A: Run Group Lookup Recon Job
-
Open the Identity System Administrative console. You can use Identity Self Service host name or IP address followed by “/sysadmin”.
-
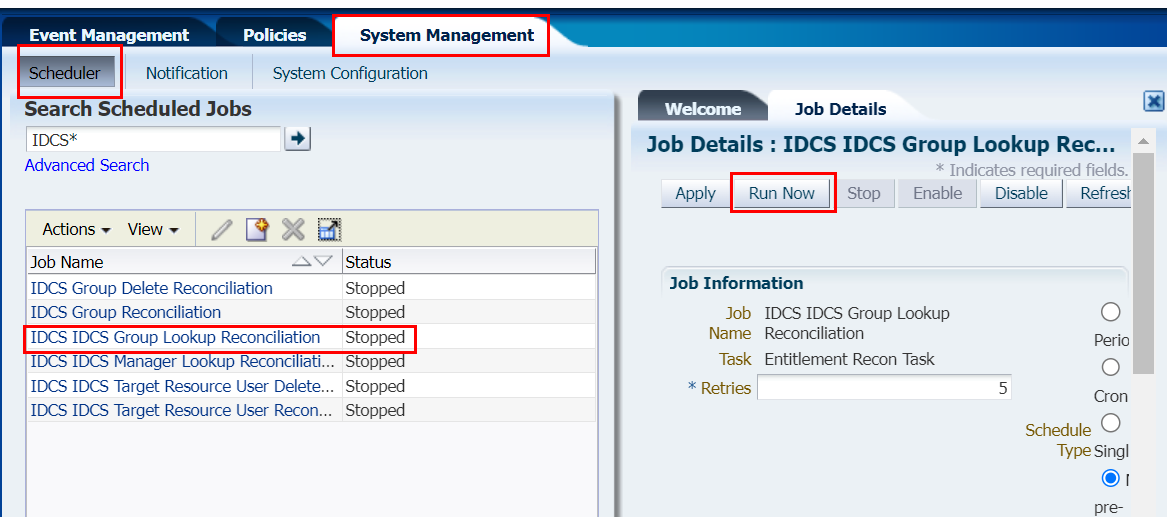
On the left pane, in the System Configuration menu select Scheduler.
-
Select Search Scheduled Jobs within System Management.
-
Search “IDCS*“ without the quotes.
-
Select Application_Name IDCS Group Lookup Reconciliation job and then select Run Now. For this example, select IDCS IDCS Group Lookup Reconciliation and then select Run Now.
-
Select Refresh. The status in the Job History section should be Stopped :: Success.
Task B: Run Group Lookup Recon Job
Note: This content applies only to OIG Bundle Patch 12.2.1.4.221004 and later releases.
- Sign in to Oracle Identity Self Service.
- Select the Manage tab.
- Click System Configuration box, and select Scheduler. The Manage Scheduler Jobs section is displayed.
- In the Job Search results table, click Run Job.
- Click Yes to confirm, or click No. A confirmation message confirming the success is displayed.
Task 8: Provision the Application and Campaign Administrator Role to Users
You can provision the application and campaign administrator role in bulk by defining role and access policy, or to a single user by managing that user account.
Task A: Bulk Provision the Application and Campaign Administrator Role to Users
Create Access Policy to Provision User
-
Sign in to Identity Self Service as a User Administrator.
-
Go to Manage -> Roles and Access Policies. Select Access Policies. The Access Policy page is displayed.
-
Click Create to open the Create Access Policy page.
-
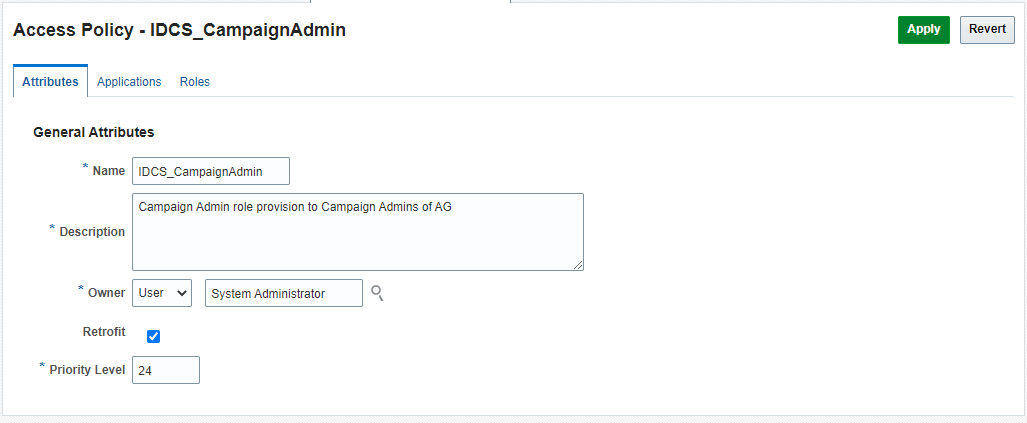
Enter information in the required fields indicated with an asterisk (*), such as access policy name and description. For this tutorial, set the Access policy name as IDCS_CampaignAdmin and Description as Campaign Admin role provision to Campaign Admins of AG.
-
In the Applications tab, under the Provisioned Applications section, click the Add button.
-
Select the application name. In this tutorial, select IDCS and then click Add Selected.
-
Click Finish.

Description of the illustration AccessPolicy_Application.png
Create Role for a Campaign Administrator
-
Sign in to Identity Self Service as a User Administrator.
-
Go to Manage -> Roles and Access Policies. Select Roles. The Roles page is displayed.
-
Click Create on the toolbar. The Attributes page of the Create Role wizard is displayed.
-
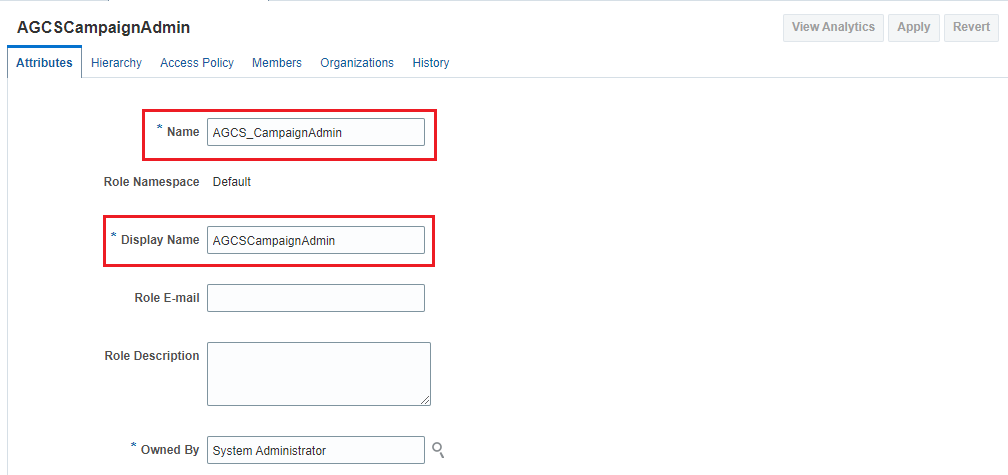
Enter information in the required fields indicated with an asterisk (*). In this tutorial, enter the information as shown in the following image.
-
In the Catalog Attributes section, select Certifiable, Auditable and Requestable check boxes.
-
Click the Access Policy tab and add the access policy that you created in the above sub task to this role. In this tutorial, add IDCS_CampaignAdmin.
-
Click the Members tab and assign users to the role who needs to be provisioned with this role. You can directly add members or create rules to include members. In this tutorial, we will directly add the users.

-
Click Apply. The request generates an approval workflow, which when approved, adds the selected members to the role.
After approval you can also see that the role is assigned to the access policy.

Description of the illustration AccessPolicy_Role.png
For Account provisioning at user level, you may need to run Evaluate User Policies scheduled job from the System Configuration wizard. For more information, see Starting and Stopping Scheduled Jobs.
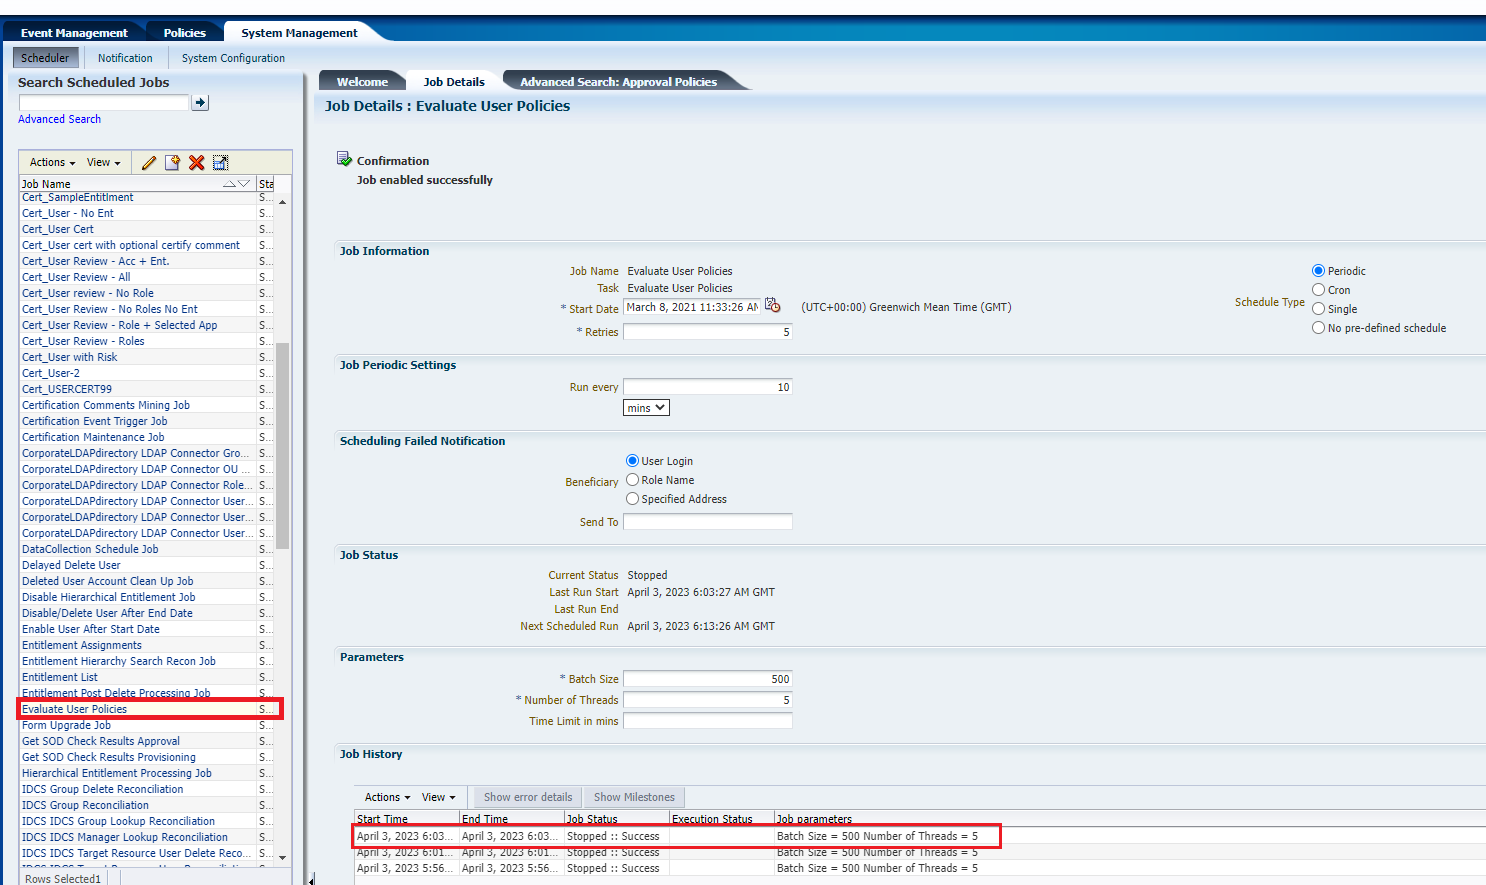
Description of the illustration UserPolicyJob.png
The application and role will be auto provisioned within a brief period.
Task B: Provision the Application and Campaign Administrator Role to a User
-
Sign in to Identity Self Service as a User Administrator.
-
Go to Manage -> Users. Select Manage users.
-
Search and select the user name for which the application needs to be provisioned.
-
In the Accounts tab, select Request.
-
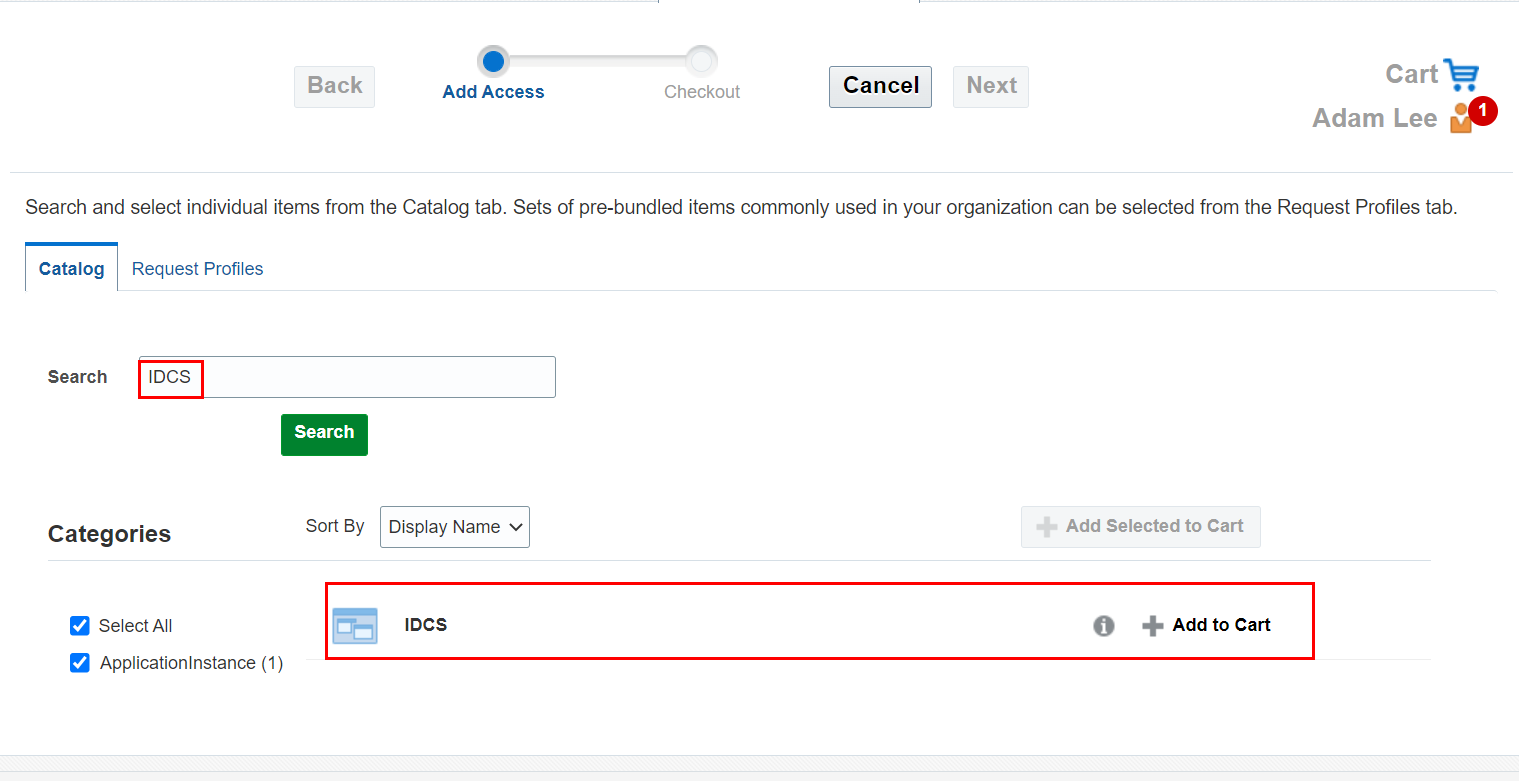
In the Search field, select IDCS and then click Search.
-
Select Add to Cart and then click Next.
-
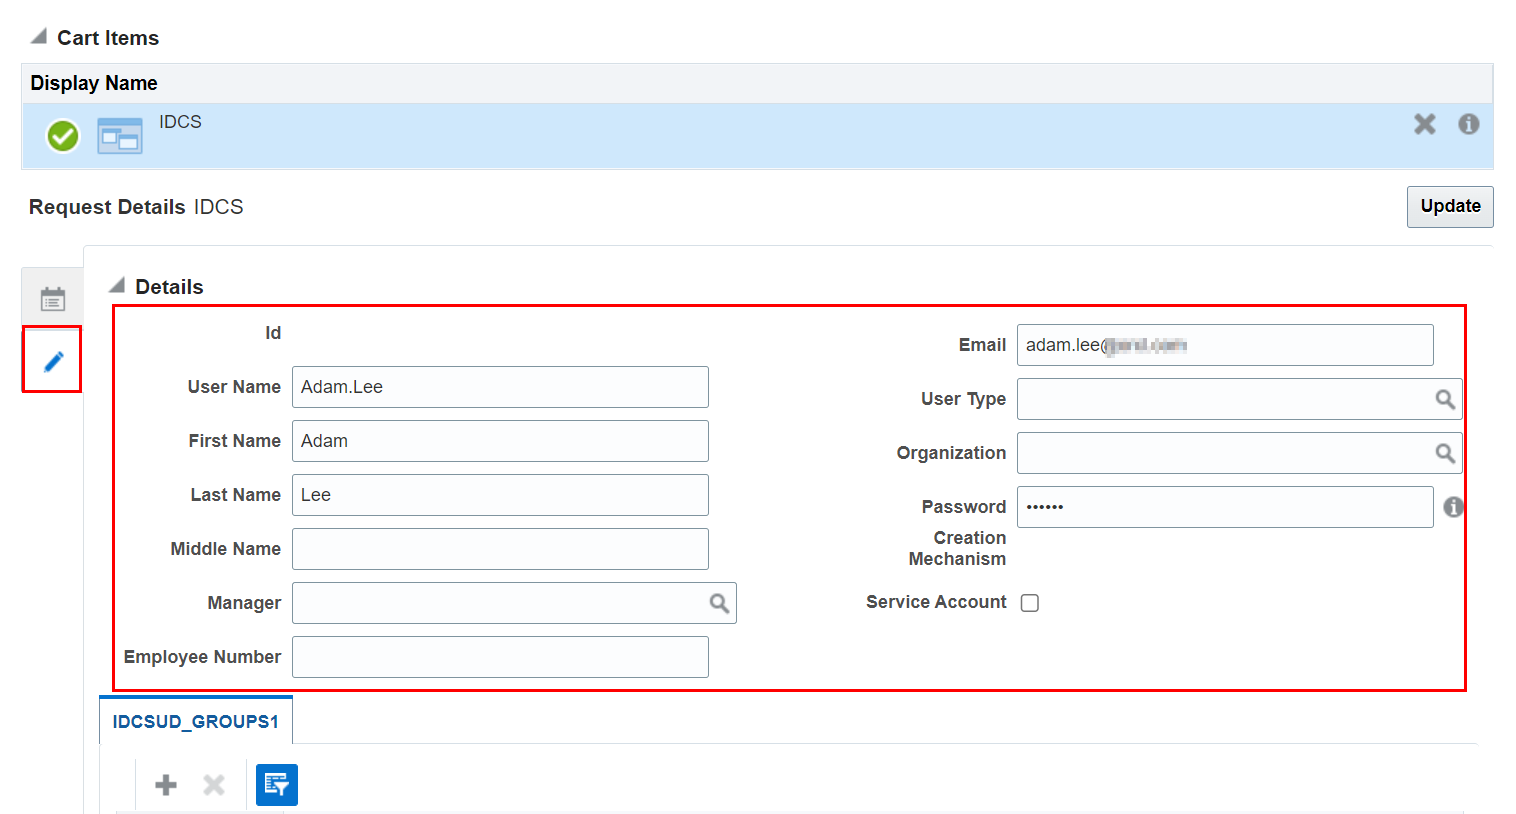
In the Request Details section, select the pencil icon to enter the user details and password for the Access Governance application.
-
Enter the following information:
- Enter user name in the User Name field.
- Enter first name in the First Name field.
- Enter last name in the Last Name field.
- Enter email address in the Email field.
- Enter password as per the defined password policy in the Password field.
-
To provide Campaign Administrator rights, click the plus icon in the IDCSUD_GROUPS1 section.
-
Search the roles and select **IDCS-
**. In this tutorial, we created **AG_CampaignAdmin**, so select **IDCS-AGCampaignAdmin**. 
-
Select Update and then Submit. The application and role will be auto provisioned within a brief period.
Task 9: Verify User Login on Access Governance instance
-
Open the Access Governance URL.
-
Fill user name and password you entered while requesting to provision the application.
-
The user would be asked to reset the default password. After resetting the password, the Access Governance Console is displayed.
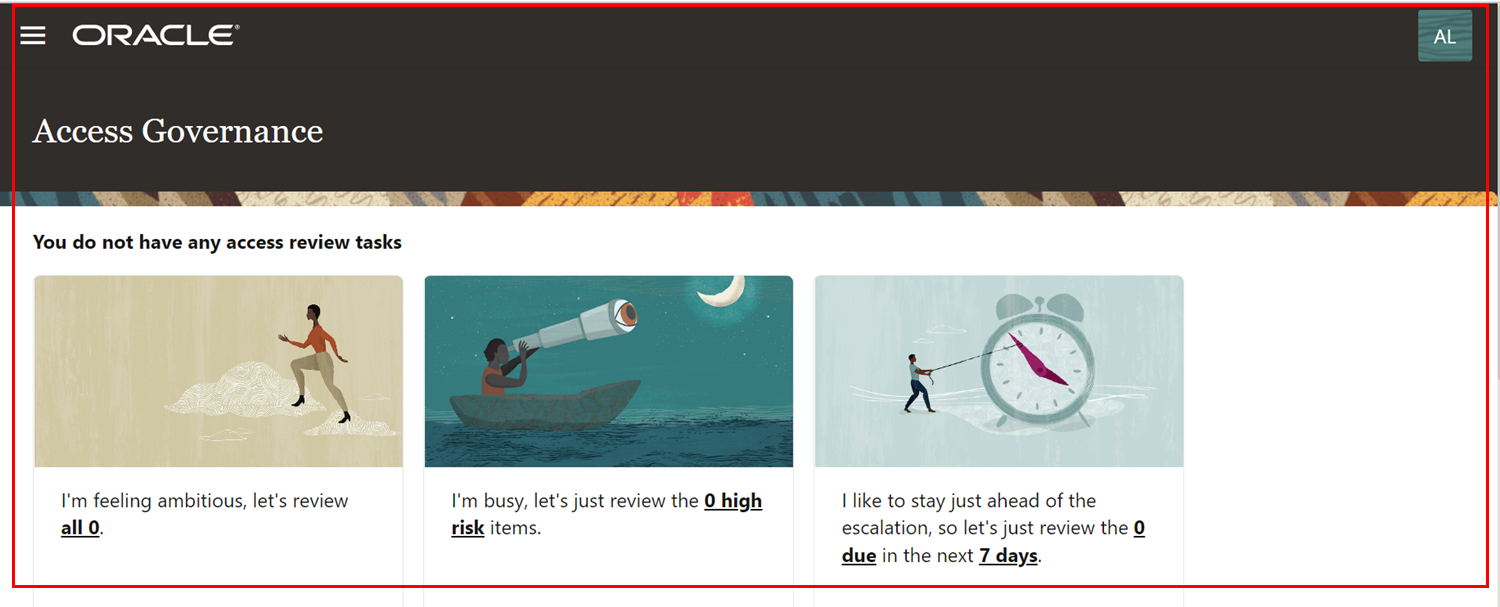
This concludes the tutorial on setting up of users for Access Governance by performing provisioning operations in Oracle Identity Governance (OIG) using the Cloud Identity Service (IDCS) Connector.
Acknowledgments
- Author - Komalreet Kaur
- Contributors - Abhishek Juneja, Arun Kumar, Varun Jain, IDM Quality Assurance Team
More Learning Resources
Explore other labs on docs.oracle.com/learn or access more free learning content on the Oracle Learning YouTube channel. Additionally, visit education.oracle.com/learning-explorer to become an Oracle Learning Explorer.
For product documentation, visit Oracle Help Center.
Set Up Users for Access Governance by Performing Provisioning Operations in OIG using the IDCS Connector
F75099-02
September 2023
Copyright © 2023, Oracle and/or its affiliates.