Configure Report Properties
In the report editor, click Properties and launch the Report Properties dialog to configure report properties.
The Report Properties dialog has the following option sets:
-
General - Set general properties for the report.
-
Caching - Specify caching options for this report.
-
Formatting - Set the runtime configuration properties for the report.
-
Font Mapping - Create font mappings for this report.
-
Currency Format - Define currency formats for this report.
Set the General Properties
Set the properties on the General tab as follows:
Run Report Online
Disable this property if you don't want users to view this report in the online Report Viewer.
When disabled, users can Schedule the report only. For most reports you keep this enabled. Disable it for long-running, batch, or other reports for which online viewing isn't appropriate. When this property is enabled, you can also set the properties described in the following table.
| Property | Description | Default |
|---|---|---|
|
Show controls |
This property controls the display of the control region of the report. The Control region consists of the Template list, Output list, and Parameter lists. Disable this property if you don't want users to view and update these options. |
Enabled |
|
Allow Sharing Report Links |
The Actions menu of the Report Viewer includes the option Share Report Link, which enables users to display the URL for the current report. Disable this property if you don't want users to see and copy the report link. |
Enabled |
|
Open Links in New Window |
This property controls how links contained within a report are opened. By default links open in a new browser window. Disable this property to open links in the same browser window. |
Enabled |
|
Auto Run |
When this property is enabled, the report automatically runs when the user selects the Open link for the report. When Auto Run is disabled, selecting the Open link for the report displays the online viewer but doesn't run the report. The user must select an output type from the View Report menu to run the report. |
Enabled |
Advanced Options
You can set the advanced properties for a report.
The following table describes the advanced property options.
| Property | Description |
|---|---|
|
Job Priority |
Specifies the priority for the report. You can assign Critical, Normal, or Low priority for a report. By default, the priority of a report is Normal. Publisher sets the JMS Priority to sort the scheduled report jobs based on priority, and enables the high priority report jobs to run before the non-critical jobs. If all the reports have the same priority, Publisher processes the reports in First In First Out (FIFO) order. You can view the priority settings of jobs in the Report Job History page. |
| Send Output as URL |
Specifies whether to send the report output as a URL. This report-level property overrides the setting of the Email Output as URL instance-level property. Administrators and report authors and can configure this report-level property.
|
| Save XML for Republishing |
Specifies whether to save the XML data for republishing the report. Deselect this option to disable generation of the XML data file for the report. |
| Disable "Make Output Public" option |
Select this option to prohibit anyone from scheduling this report to make the output public. This disables the Make Output Public option for the report in the Output tab of the Schedule Report Job page. |
|
Enable Bursting |
Select this option to enable bursting of the report output, and then select the appropriate bursting definition from the list. When a user schedules the report, the selected bursting definition will be enabled in the Scheduler. The bursting definition is a component of the data model. |
| Enable Chunking | Chunk Size |
Select this option to enable XML data chunking for a report job and specify the data size for each chunk. The layout processor outputs individual XML data chunks and merges them to generate a consolidated final report output. This option is available only if you have enabled XML data chunking at the server level. XML data chunking isn't available for online reports. XML data chunking in a report job supports RTF, XPT, and eText output formats, but you can't schedule a job to output in multiple formats. |
| Ignore Email Domain Restrictions |
Select this option to ignore the values set in the Allowed Email Recipient Domains property in the delivery configuration page. |
|
Report is Controlled by External Application. Users cannot run or schedule report from catalog, can view history |
Select this option when Publisher is integrated with another application that controls the generation of this report, and you do not want users to run and view this report directly from the catalog. Reports run by Publisher are stored in the Publisher history tables and users can view completed reports from the Report Job History page. |
Set the Caching Properties
Set these options for caching.
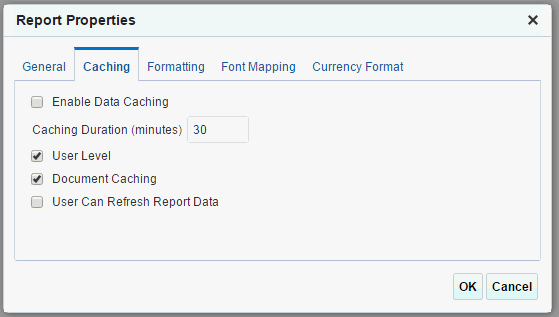
The following illustration shows the Caching tab.
The following table describes the properties on the Caching tab.
| Variable | Description | Default |
|---|---|---|
|
Enable Data Caching |
When this property is enabled, the data generated by the online submission of this report is stored in the cache. Subsequent requests to run this report with the same parameter selections display the report using the data from the cache. This setting enhances performance by using stored data to generate a report rather than regenerating the data from the source. The data remains in the cache according to the time limit that's specified in the Cache Duration property. You can control whether the cache for the report is shared by users by setting the User Level property. |
Not Enabled |
|
Caching Duration (Minutes) |
Enter the time limit for a report dataset or document to remain in cache. Once the time limit has expired, the next request for the same report generates a fresh dataset. |
30 minutes |
|
User Level |
This property stores a separate cache for each user. The report data shown to each user comes only from the private cache. When enabled, this property ensures that each user can only see data that they're authorized to view. However, user-level cache has less efficient performance. If the report data isn't user sensitive, you can disable this property to enhance performance. |
Enabled |
|
Document Caching |
Enable this property to cache the report document. With document cache enabled, when a user views the report online, the document (data plus layout) is placed in the cache. When any other user (unless User Level is enabled) uses the online viewer to view the exact same report (same layout, same output type, same parameter selections) the document is retrieved from the cache. The document remains in the cache according to the caching duration specified. Scheduled reports don't use document cache. |
Enabled |
|
User Can Refresh Report Data |
When this property is enabled, the user can choose to refresh the data on demand. When the user clicks Refresh in the report viewer, Publisher generates a fresh dataset for the report. |
Not Enabled |
Set the Formatting Properties
The Formatting properties tab enables you to set runtime properties at the report level.
These same properties can also be set at the system level, from the Administration page. The Formatting properties tab displays both the system-level setting and the report-level setting for each property. If different values are set at each level, the report level takes precedence.
For a full description of each property, see Set Report Processing and Output Document Properties.
Configure Font Mapping
You can map base fonts in RTF or PDF templates to target fonts to be used in the published document. Font mappings can be set at the report level or the system level. The administrator configures the system level font mappings in the Runtime Configuration page. When you view the report properties Font Mapping tab, any system level settings are displayed. To change the settings for this report, edit the font mappings here.
Configure Currency Formats
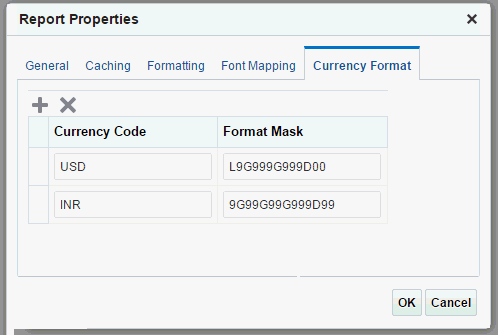
In the Currency Format tab, map a number format mask to a specific currency so that reports can display multiple currencies with their own corresponding formatting. Currency formatting is only supported for RTF and XSL-FO templates.
Currency formats can be set at the report level or the system level. The report properties display the system level settings in the Currency Format tab. You can edit the currency format and change the settings for the report.
To apply these currency formats in an RTF template, you must use the format-currency function.
The following figure shows sample currency formats:

