 Build Dimensions Using Rules
 Before You Begin
This 15-minute tutorial shows you how to build dimensions using a rule.
Background
You can add, edit, and map dimensions to an Essbase outline using a rule, rather than manually building empty dimensions in the Essbase Outline editor. When you build using a rule, you define the hierarchical structure of dimensions and member metadata.
In this tutorial, you build dimensions from a flat file using a rule. You also set up options for the rule and preview the results.
After defining a rule, you run a job to build the dimension using the rule.
What Do You Need?
- Access to Oracle Analytics Cloud as a Power User or Administrator.
- Download the following data files to your computer:
 Import the Database without Data
Import the worksheet and create Sample5 application, and Basic database, which is emtpy of data.
- Sign into the Oracle Analytics Cloud – Essbase web interface.
- On the Applications home page, click Import.
- Click File Browser, select the downloaded file
sample_basic.xlsx,and click OK. - In the Import dialog box, modify Application Name to Sample5.
- Accept the default database name, Basic.
- Expand Advanced Options, and deselect the check boxes, Load Data and Execute Scripts, and click OK.
- On the home page, expand the Sample5 application, and select the Basic database.
- On the row for the Basic database, click Actions
 , and click Inspect.
 - Select Statistics tab. On the General page, under Storage, notice that the value for Number of Existing Blocks is 0, indicating that the Basic database contains no data.
- Click Close.
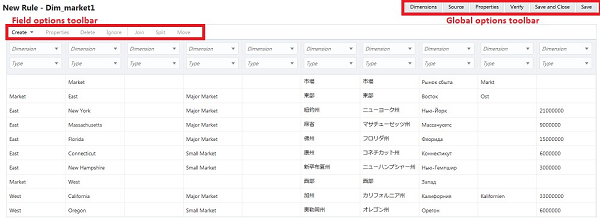
 Create the Rule File
Create a build dimension rule that is index-based, which removes the dependency of fields to each other and allows the fields to appear in any order.
- Open the downloaded
dim_market_data1.txtfile in a formatted text editor. Notice that the file doesn't have a header row and that the file delimiter is a comma. - On the home page, expand the Sample5 application, and select the Basic database.
- On the row for the Basic database, click Actions , and click Inspect.
- Click Files, and Upload Files. Select the two files that you previously downloaded, click Open, to upload the files to the Catalog, and then click Close.
- Select Scripts tab, and then Rules, to see the defined rules in the Rules editor.

Description of the illustration create-rule-file.png - Click Create, and select Dimension Build (Indexed Based) to create the build dimension rule.
- In the New Rule dialog box, enter
Dim_market1,as the name of the rule file. - For Preview Data, select File, for the flat file input option.
- Click the browse icon to the right of File Select File (optional).
- In the Preview Data dialog box, click Catalog, select the file you uploaded,
dim_market_data1.txt,and click Select. - Deselect the Header Row check box, if selected, because the first row of the flat file doesn't contain header values.
- In the Delimiter drop-down list, ensure that Comma is selected.
- Click Proceed, to view the dimension rule in the Rules editor, with the columns populated based on the input flat file.
 Select Rule Options and View in Preview
On the Rules editor page, you can now set up and edit the rule.
Using the Global options toolbar, you can view and change the properties and data source for the rule. Using the Field options toolbar, you specify field mapping for the rule.
- In the first field (column), click Dimension, and select Market, as the dimension name for all of the rule fields.
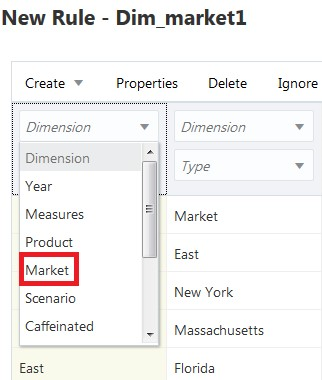
Description of the illustration dim-field-market.png - Under Market, in the first field, in the Type list, select Parent, to reflect a rule for parent-child source file format.
- Set the other fields (columns) as follows:
- Field 2, set Type to Child
- Field 3, set Type to Property, and third row Parent/Child box to Child
- Fields 4 and 5, set Type to UDA, and third row Parent/Child boxes to Child
- Field 6, set Type to Alias, third row Alias box to ChineseNames, and fourth row box to Child
- Field 7, set Type to Alias, third row Alias box to JapaneseNames, and fourth row box to Child
- Field 8, set Type to Alias, third row Alias box to RussianNames, and fourth row box to Child
- Field 9, set Type to Alias, third row Alias box to GermanNames, and fourth row box to Child
- Field 10, set Type to Attribute Member, third row Attribute Dimension box to Population, and fourth row box to Child
- Click the gray area in column Field 4, under the mapping of Market, UDA, and Child, to highlight the column. Notice that the data values in that column contain a space, for example: Major Market.
- On the Field options toolbar, open the Properties tab, select the Convert Spaces to Underscore check box, and click OK. Notice that the data values in Field 4 now contain an underscore.
- In the Global options toolbar, open the Source tab to view the options and properties for the file associated with the rule. Open the File Properties tab, verify that the Delimiter is set to Comma, and click OK.
- Click Verify in the Global options toolbar to validate the rule syntax, and click Close.
- On the Rules editor page, click Save and Close.
- On the Scripts tab, click Refresh, and verify that your created rule
Dim_market1appears in the Rules list. - Click the rule,
Dim_market1,to edit it. Accept the defaults, click Proceed. - In the Global options toolbar, open the Dimensions tab, click the Market dimension, and the Advanced tab.
- Select the check boxes for Allow Property Changes and for Allow UDA Changes. Ensure that all four Allow xxx Changes check boxes are selected. Click OK.
- Click Save and Close, and then Close, to return to the Applications home page.

 Run the Build Dimension Job
Next, create a job to build the dimension using the rule.
- On the home page, select Jobs
 .
. - In the New Job drop-down menu, select Build Dimension.
- In the Build Dimension dialog box, from the Application list, select the Sample5 application.
- In the Database list, select the Basic database. It might take a few moments to load.
- In the Script list, select the build dimension rule file,
Dim_market1. - For Load Type, select File.
- In the Data File list, select
dim_market_data1as the build dimension data file. - In the Restructure Options list, select the Preserve Input Data option for the data to preserve, and click OK.
- On the Jobs page, click Refresh
 to monitor the job status.
 - When the job ends, click Actions menu for the executed job.
- Select Job Details to verify the status of your build data job completion. Notice the number of records processed. Click Close.
 View the Build Dimension Results
- On the Applications home page, expand the Sample5 application.
- On the row for the Basic database, click Actions .
- Select Outline. View the build dimension in the Outline editor, based on the executed rule.
- On the Outline editor, expand Market, East, and click New York.
- In the right pane, scroll down and expand User-defined Attributes. Notice that Major_Market appears with an underscore, as you specified in the field properties of the rule. Close the browser tab.