 Configuring Your Map Data
 Before You Begin
This 15-minute tutorial shows you how to configure your map data by associating business intelligence columns with map layers.
Background
Maps in Oracle Analytics Cloud consist of two components: a background map and map layers.
A background map serves as a noninteractive base for a map view.
Map layers are displayed on top of a background map or another map layer. For example, in the background map, if you place the World_Cities layer above the World_Countries layer, and the Schools layer above the World_Cities layer, then, in the map view, the Schools layer is displayed on top of the World_Cities layer and the World_Cities layer is displayed on top of the World_Countries layer.
A layer is any collection of features and formats that have a common set of attributes and a location. For example, the World_Countries and World_Cities layers can include color coding of countries by revenue and a pie graph that shows revenue per brand for a city. You can display data on maps in different formats such as color fill, graphs, variable shapes, or images.
What Do You Need?
- Access to Oracle Analytics Cloud as a service administrator
- Download revenue_by_brand.xlsx to your computer
 Create a Data Set
- Sign in to Oracle Analytics Cloud with your administrator credentials.
- On the Home page, click Create, and then click Data Set.
- In Create Data Set, click File, select
revenue_by_brand.xlsxfrom your computer, and click Open. - On the Data Set page, click Add, and then close the page.
 Import Layers for Your Maps
- On the Home page, click Page Menu
 , and then select Open Classic Home.
 - On the Classic Home page, click Administration.
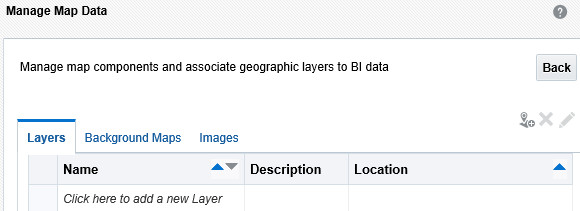
- On the Administration page, under Map Data Management, click Manage Map Data.
- On the Manage Map Data page, click Import Layers
 on the Layers tab.
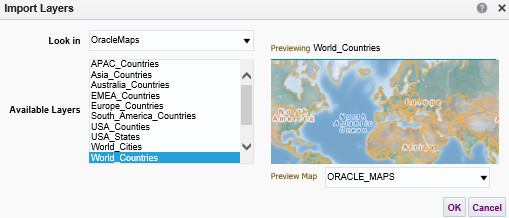
Description of the illustration oac_import_layers_tab.jpg - In the Import Layers dialog box, select OracleMaps from the Look in drop-down list. In Available Layers, select World_Countries. From the Preview Map drop-down list, select ORACLE_MAPS, and then click OK.
Description of the illustration oac_import_layers.jpg - Click Import Layers . In the Import Layers dialog box, select OracleMaps from the Look in drop-down list. In Available Layers, select World_Cities. From the Preview Map drop-down list, select ORACLE_MAPS. Click OK.
 Edit the Map Layers
- On the Manage Map Data page, select World_Countries on the Layers tab, and click Edit
 .
. - In the Edit Layer – World_Countries dialog box, select Name from the Layer Key drop-down list. In Geometry Type, keep the default value, Polygon. To the right of BI Key Columns, click Add
 .
.
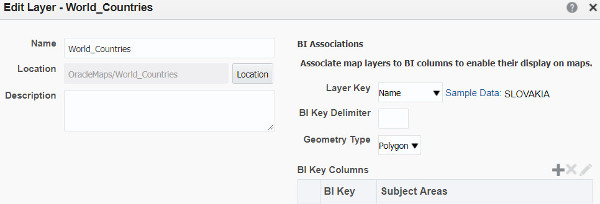
Description of the illustration oac_edit_layers.jpg - In the Select Subject Area dialog box, select revenue_by_brand.
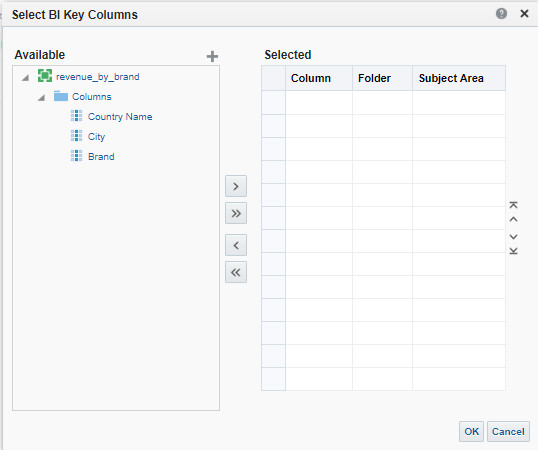
- In the Select BI Key Columns dialog box, expand Columns, select Country Name, select Move
 , and then click OK.
Description of the illustration oac_bikeycolumns.jpg - On the Layers tab, select World_Cities, and click Edit .
- In the Edit Layer – World_Cities dialog box, select City Name from the Layer Key drop-down list. In Geometry Type, keep the default value, Polygon. To the right of BI Key Columns, click Add .
- In the Select Subject Area dialog box, select revenue_by_brand.
- In the Select BI Key Columns dialog box, expand Columns, select City, select Move , and then click OK.
 Set Up Background Maps
- On the Manage Map Data page, click the Background Maps tab, and then click Import Background Maps
 .
. - In the Import Background Maps dialog box, select ORACLE_MAPS from the Look in drop-down list. In Available Maps, select ORACLE_MAPS, and click OK.
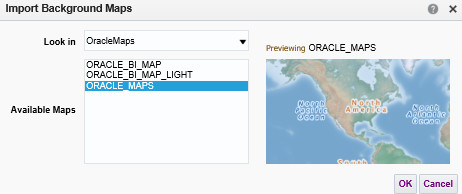
Description of the illustration oac_import_bgmap.jpg - On the Background Maps tab, select ORACLE_MAPS, and click Edit Background Map
 .
. - In the Edit Background Map - ORACLE_MAPS dialog box, review the Layers column. To move World_Cities above World_Countries, hover your cursor over World_Cities, and click Action
 . From the drop-down list, select Move Up.
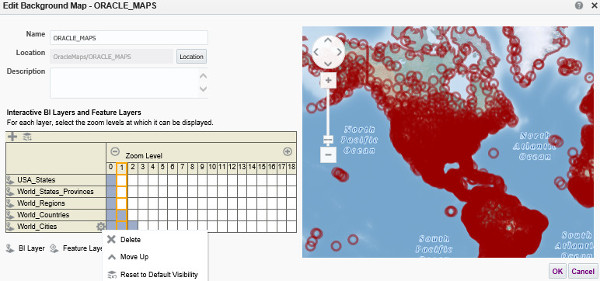
Description of the illustration oac_moveup_layer.jpg - To change the zoom levels of the layers, in the World_Cities row, click the cell in column 11. In the World_Countries row, click the cell in column 5. Click OK.
The World_Cities layer is displayed at a higher zoom level than the World_Countries layer. The default zoom level of the layers is highlighted. The background map doesn't display the layers that have 0 zoom level.
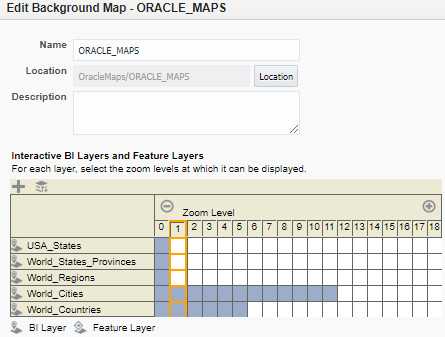
Description of the illustration oac_edit_bgmap.jpg