 Create a Report Layout Using the Layout Editor in Oracle Business Intelligence Publisher
 Before You Begin
This 15-minute tutorial shows you how to use the Layout Editor in Oracle Business Intelligence Publisher to create a report layout.
Background
You learn to use the report designing and formatting features of the Layout Editor.
In this tutorial, you first create a basic report layout, and then you edit the report layout to design an order summary report. You learn to insert and arrange the layout components in the report layout.
What Do You Need?
- Access to Oracle Business Intelligence Publisher in Oracle Analytics Cloud as a BI Content Author
- The
CustomerOrdersdata model created under My Folders in Catalog - The sample_logo.png file downloaded to your computer
 Create a Report Layout
In this section, you use the CustomerOrders data model and the Layout Editor to create a basic report layout.
- Sign in to Oracle Analytics Cloud.
- On the Home page, click Page Menu
 , select Open Classic Home, click the Open menu, and then select the CustomerOrders data model under Recent.
 - In the
CustomerOrdersdata model, click Create Report. - In the Create Report dialog box, select the
/My folders/CustomerOrders.xdmdata model. In the How do you want to create your report?: field, select Guide Me, and then click Next. - From Page Options, select Portrait, Page Header, and Page Footer. From Layout, select Table.
- On the Create Table page, under Data Source, select and drag the ORDER_ID, ORDER_MODE, and ORDER_TOTAL fields to Drop Fields here, and then click Next.
- Click View Report, and then click Finish.
- In the Save as dialog box, enter
Order Summaryin the Name field, and then click Save. - In the Order Summary report, enter
102in the Customer ID field, click Apply, and then view the report.
 Edit the Report Layout
In this section, you edit the report layout to add an image, data elements, layout grids, and the text.
- On the Report Viewer page, click Actions
 , and then select Edit Layout.
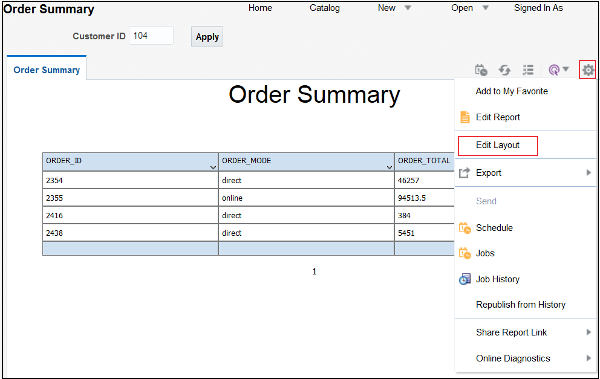
Description of the illustration report_viewer.png - On the Layout Editor page, below the report title, select the page header. On the Insert tab, click Layout Grid
 . In Rows, enter
 1.In Columns, enter2,and then click OK. - Click the first column of the grid. On the Insert tab, click Image
 .
. - Select Select the image from your local folder, click Choose File, select the
sample_logo.pngfile from your local folder, click Open, and then click Insert. - Click below the data table. On the Insert tab, click Layout Grid . In Rows, enter
2.In Columns, enter2,and then click OK. - Format the layout grid cells:
- In the first row and first column of the layout grid, click the cell. On the Insert tab, click Text Item
 , double-click, and then enter
 Customer ID:in the cell. - In the first row and second column of the layout grid, click the cell. Drag and drop the CUSTOMER_ID field from the Data Source pane to the cell.
- In the second row and first column of the layout grid, click the cell. On the Insert tab, click Text Item , double-click, and then enter
Customer Name:in the cell. - In the second row and second column of the layout grid, click the cell. Drag and drop the CUSTOMER_NAME field from the Data Source pane to the cell.

Description of the illustration layout_grid.png - In the first row and first column of the layout grid, click the cell. On the Insert tab, click Text Item
- Select the column separator of the layout grid and size the first column to 132px, and then drag and drop the layout grid below the report header.
- Click below the data table component, on the Insert tab, click Text Item , double-click, and then enter the following text:
Dear Sir/Madam, Please review and confirm your orders. - Drag and drop the text component in between the layout grid component and the data table component.
- Click below the data table component, on the Insert tab, click Text Item , double-click, and then enter the following text:
Thanking you in advance. Regards, Sales Manager - Verify the report layout:
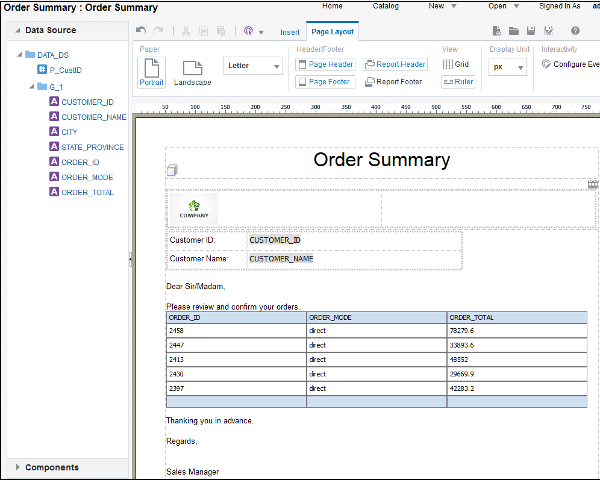
Description of the illustration report_layout.png - Click Save
 .
. - Click Done.