 Load Data Using Rules
 Before You Begin
This 10-minute tutorial shows you how to load data using a rule.
Background
You can use rules to extract, transform, and load data values to an Essbase database. The data source values can contain data values, member names and formulas, generation and level names, data storage properties, and attributes.
After you define a rule with the relevant options and preview the results, you run a job to load data using the rule.
What Do You Need?
- Access to Oracle Analytics Cloud as a Power User or Administrator.
- Access to the same Sample5 application and Basic database that you previously used.
- The following data file that you previously downloaded to your computer:
 Create the Rule File
Create the rule file to load the data into the Essbase database.
- Open the downloaded
data_basic_data1.txtfile in a formatted text editor. Notice that there is no header row and that the file delimiter is a comma. - Sign into the Oracle Analytics Cloud – Essbase web interface.
- On the Applications home page, expand the Sample5 application, and select the Basic database.
- In the row for the Basic database, click Actions
 , and click Inspect.
 - Select Scripts tab, and then Rules, to see the defined rules in the Rules editor.
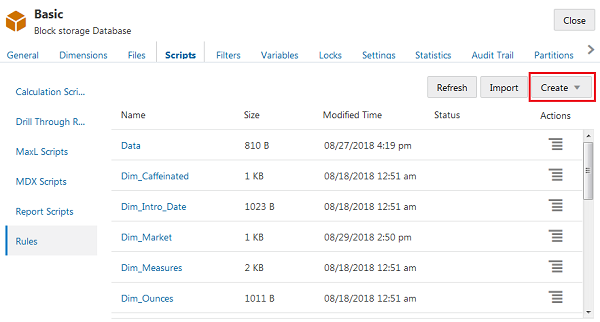
Description of the illustration create-rule-file.png - Click Create, and select Data Load to begin defining the load data rule.
- In the New Rule dialog box, enter
Data_basic1as the name of the rule file. - Enter
Measuresas the data dimension. - For Preview Data, select File as the flat file input option.
- Click the browse icon to the right of File Select File (optional).
- In the Preview Data dialog box, rather than using File Browser, select Catalog, select the file you previously uploaded,
data_basic_data1.txt, and click Select. - Deselect the Header Row check box, because the first row of the flat file doesn't contain header values.
- In the Delimiter drop-down list, select Comma, or verify that it's already selected.
- Click Proceed to view the data in the Rules editor, based on the input flat file.
 Select Rule Options and View in Preview
On the Rules editor page, you can now set up and edit the rule.
Because the input file has no headers, you must map each column to the appropriate dimensions and members. The order of the entered fields during your mapping must match the order of the data in the rows of the load data file.
All dimensions must be represented in the load data rule before any data can be loaded. If Essbase encounters a data value before all dimensions are specified, an error message is displayed.
- On the Rules editor page, to map each rule field, click the Select drop-down boxes, and select the field (column) names as follows:
- Field 1, Product
- Field 2, Market
- Field 3, Year
- Field 4, Scenario
- Field 5, Sales, and set Storage Type to Sum
- Field 6, COGS, and set Storage Type to Sum
- Field 7, Marketing, and set Storage Type to Sum
- Field 8 Payroll, and set Storage Type to Sum
- Field 9, Opening Inventory, and set Storage Type to Sum
- Field 10, Misc, and set Storage Type to Sum
- Field 11, Additions, and set Storage Type to Sum
- Click Verify in the Global options toolbar to validate the rule syntax, and click Close.
- Click Save and Close.
- On the Scripts tab, click Refresh, and verify that your created rule
Data_basic1appears in the Rules list. - Click Close, and return to the Applications home page.
 Run the Load Data Job
Next, create a job to load the data using the rule file.
- On the home page, select Jobs
 .
. - In the New Job drop-down menu, select Load Data.
- In the Load Data dialog box, from the Application menu, select Sample5.
- In the Database list, select the Basic database. It may take a few moments to load.
- In the Script list, select the load data rule file,
Data_basic1. - For Load Type, select File.
- Select
data_basic_data1file from the Data File list. - Select the Abort on error check box to cause the load to stop if an error occurs.
- Click OK.
- On the Jobs page, click Refresh
 to monitor the job status.
 - When the job ends, click the Actions menu for the executed job.
- Select Job Details to view the load data job details. Under Output, notice the values for Result, Records Processed, and Records Rejected.
- Click Close.
 View the Load Data Results
View the loaded data.
- On the Applications home page, expand the Sample5 application, and select the Basic database.
- On the row for the Basic database, click Actions , and click Inspect.
- Select Statistics tab. On the General page, under Storage, notice that the value for Number of Existing Blocks is now over 300, indicating that the Basic database now contains data. Click Close.
- On the Applications home page, expand the Sample5 application, and select the Basic database.
- On the row for the Basic database, click Actions .
- Select Export to Excel, select the Export Data check box and click OK.
- Click OK to view the exported file in Excel.
- On the opened Basic Excel worksheet, view the dimension structure in the various worksheet tabs. Scroll to the right to the Data.Basic tab and view the loaded data.
- Close Excel and Essbase.