 Update an Oracle Analytics Cloud - Essbase Cube Using an Application Workbook
 Before You Begin
This 15-minute tutorial shows you how to do an incremental update of a single dimension in an Oracle Analytics Cloud - Essbase cube using a modified application workbook.
Background
You can modify an application workbook to use for incremental updates. To do this, remove worksheets you don't plan to change.
To update one dimension, first reduce the size of the workbook by removing worksheets that are not needed for the update, as shown in this tutorial.
What Do You Need?
- Access to Essbase as a power user
- Access to an Essbase cube built from the
sample_dynamic_basic.xlsxapplication workbook - The sample_dynamic_basic.xlsx file, downloaded to your computer.
- Microsoft Excel
- Smart View
- Cube Designer (a Smart View extension)
You need the following to connect to Essbase to support Cube Designer:
- Service URL for the Essbase service
- Connection from Smart View to the Essbase service
- User name and password of a power user
 Remove Unnecessary Sheets from the Application Workbook
When you update a cube using an application workbook, you don't need to include unchanged dimension, data, calc, and query sheets. You can delete these unnecessary sheets to reduce the size of the application workbook, to improve processing time.
- Open
sample_dynamic_basic.xlsx. - On the cube designer ribbon, click Designer Panel and then at the bottom of the Designer Panel, click From Sheet.
- In the Designer Panel, on the Cube tab, delete every dimension except Product.
- On the Data tab, select Basic and press the Delete key.
- Click Yes to confirm.
- On the Calc tab, select calcall and press the Delete key.
- Click Yes to confirm.
- Navigate to the Query.Sample tab in the application workbook, right-click, and select Delete.
- Click Delete to confirm.
- Click To Sheet to update the application workbook.
- Click Save.
 Modify the Product Dimension Sheet
Remove the Diet product hierarchy and replace it with the Water Beverages product hierarchy.
- On the Dim.Product tab, in the Incremental Mode field, delete Merge and type Remove Unspecified in its place.
- Select all of the rows in the Diet product hierarchy and press the Delete key.

Description of the illustration diet_hierarchy.png - Select all of the rows in the 400 product hierarchy and press Ctrl + C to copy.
- Move your cursor to the row directly below the 400 product hierarchy you copied, and press Ctrl + V to paste.

Description of the illustration 400_hierarchy.png - In the copy of the 400 product hierarchy, change all of the 400s to 500s and change Fruit Soda to Water Beverages.
- Change Grape to Sparkling, Orange to Sparkling Lemon, and Strawberry to Sparkling Lime.
- Select the foreign language content under the ALIAS.languageNames column headings and press the Delete key to delete the content.
Language represents a portion of the column names, for example, ALIAS.ChineseNames.

Description of the illustration 500_hierarchy.png - Press Ctrl + S to save the application workbook.
 Update the Cube
- In Excel, on the cube designer ribbon, click Build Cube.
- Log in with your Essbase power user credentials.
- In the Build Cube dialog box, accept the default to incrementally update the cube.
- Wait until you are notified that the job is complete, and click Yes to open the Job Viewer.
- Confirm that the build was successful by checking the Status column in the Job Viewer dialog box.
- Close the Job Viewer.
 View the Updated Cube in the Web Interface
Open the updated outline in the Essbase web interface and check your updates in the Sample_Dynamic.Basic outline.
- Log in to the Essbase web interface.
- On the home page, expand the Sample_Dynamic application and select the cube, Basic.

Description of the illustration expand_sample_dynamic.png - From the Actions
 menu to the right of the cube name, select Outline.
 - Expand the Product dimension, and expand 500.
- Verify that the outline reflects your updates.
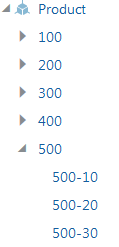
Description of the illustration expand_sample_dynamic.png