Triggers for Business Objects
Triggers are scripts that you can write to complement the default processing logic for business objects. A trigger defines behavior that happens in response to a specific business object event, for example, inserting or updating a record, or in response to a field value change.
In the Business Rules tab of a business object, an object trigger refers to the sequence of actions that starts when a specific event occurs.
A field trigger refers to the sequence of actions that starts when a field value changes.
The trigger designer provides a visual representation of your sequence where you can define the conditions that determine the actions that will be executed. For each criterion you can assemble a list of actions composed of functions and Groovy scripts.
Object Triggers
You can create an object trigger to specify a sequence of actions that starts when a specific event occurs.
A typical event triggering a sequence is adding or updating a record in the business object. When you create a trigger, you specify the trigger event and the actions that are then executed. You can refine the sequence so that actions are executed only when some criteria is met. A sequence can define multiple criteria and multiple actions.
To create an object trigger for a business object:
- Select the business object to which you want to add an object trigger.
- Select the object's Business Rules tab.
- Click the Object Triggers tab to see a list of all object triggers that are defined for the business object.
- Click + New Object Trigger, and in the Create Object Trigger dialog box, enter a name to identify the trigger, and select a Start Event for the sequence. You can modify these later if you want.
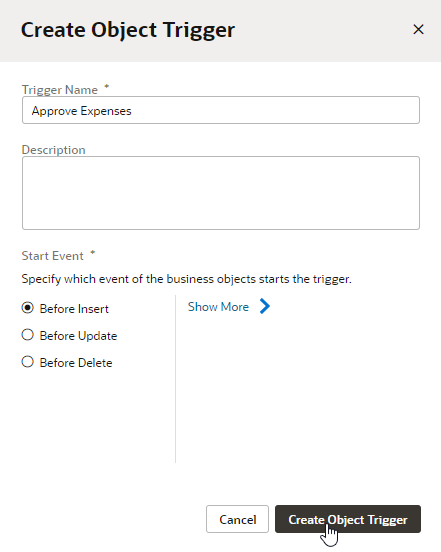
Description of the illustration bo-trigger-create.png -
Click Create Object Trigger to open the trigger designer.
You use the designer to build a sequence of criteria and actions that are triggered by the Start Event. No criteria or actions are defined when you first open the designer.
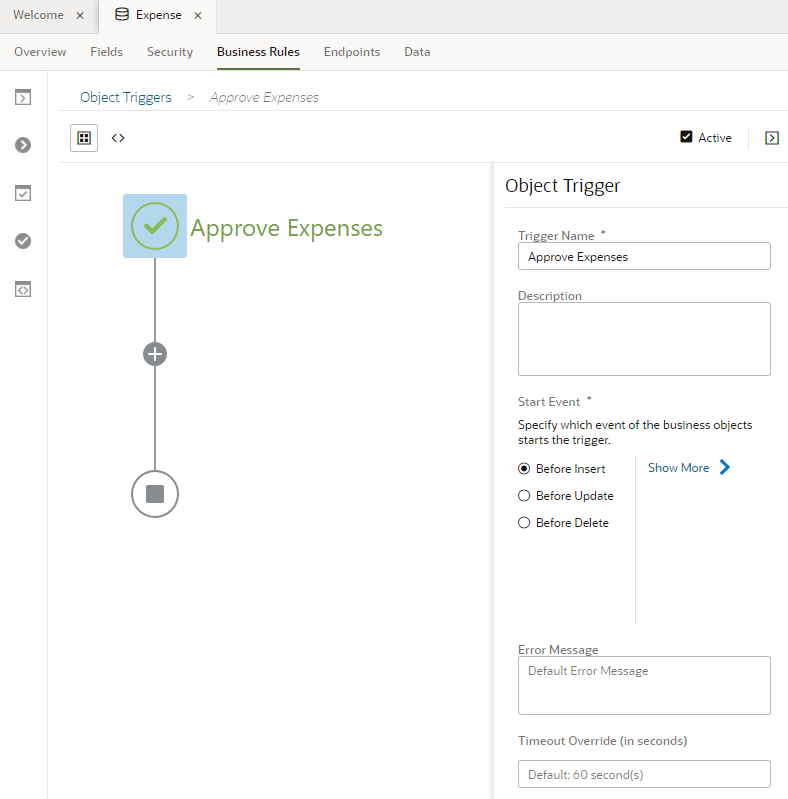
Description of the illustration bo-trigger-designer.png -
Click Create New Criteria (the + sign) and choose a criteria type.
Three types of criteria are available in the dialog box. If you select Execute Conditionally, you can define the conditions that must be met to execute actions that you define. If the conditions are not met, the actions are skipped and the sequence advances to the next step.
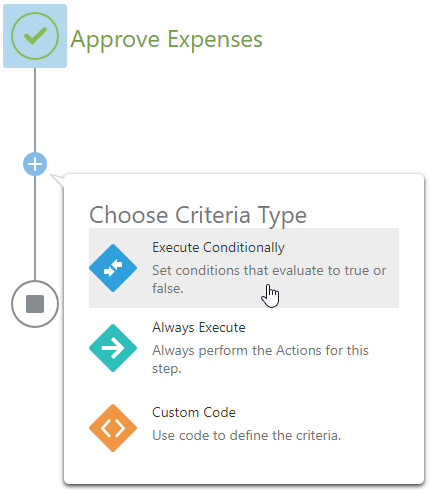
Description of the illustration bo-trigger-criteria.png - If you specify Execute Conditionally, follow the instructions to build conditions for the trigger.
- Click the Add Actions box, then specify a Name for the Action Group and click Add Actions.
The Configure Actions page opens when you click Add Actions. You can add one or more actions to the list by dragging predefined functions (such as create a record or perform a process task action) and custom Groovy scripts into the list.
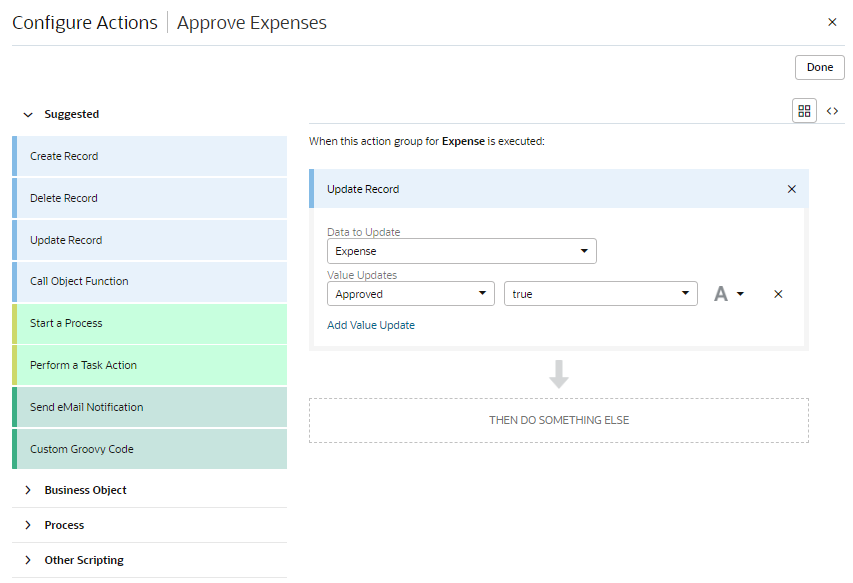
Description of the illustration bo-trigger-add-actions.pngIf you drag Custom Groovy Code into the list of actions, you’ll need to click Edit Custom Code and type your script in the editor. If you drag Send eMail Notification into the list, you’ll need to specify email details such as the recipients, the sender, and the contents of the message.
-
Click Done when you complete your list of actions.
You can continue to add more criteria nodes and actions to build up the sequence for the trigger. When you select a criteria node in your sequence you can use the Properties pane to edit the criteria name, type, and conditions. Depending on the criteria type that you select, you might need to specify conditions that need to be satisfied before the corresponding actions are executed. You can use the Conditions Builder to set conditions, or you can use the code editor to write custom code.
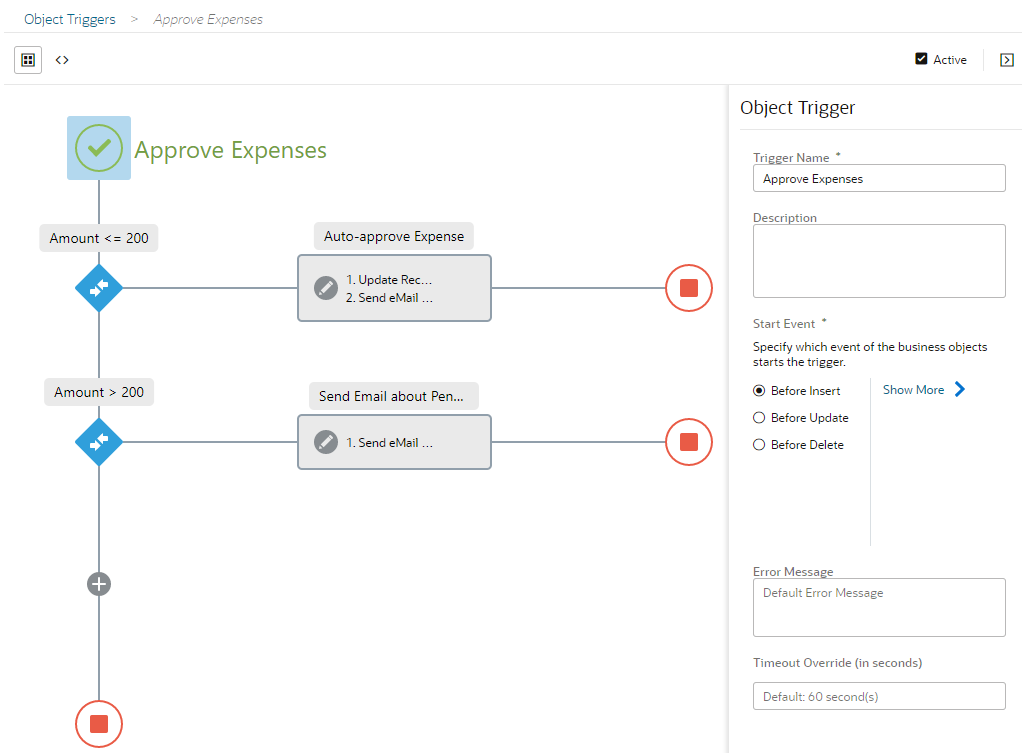
Description of the illustration bo-trigger-criteria-done.pngClick Code Editor to view the read-only code that is generated by the designer.
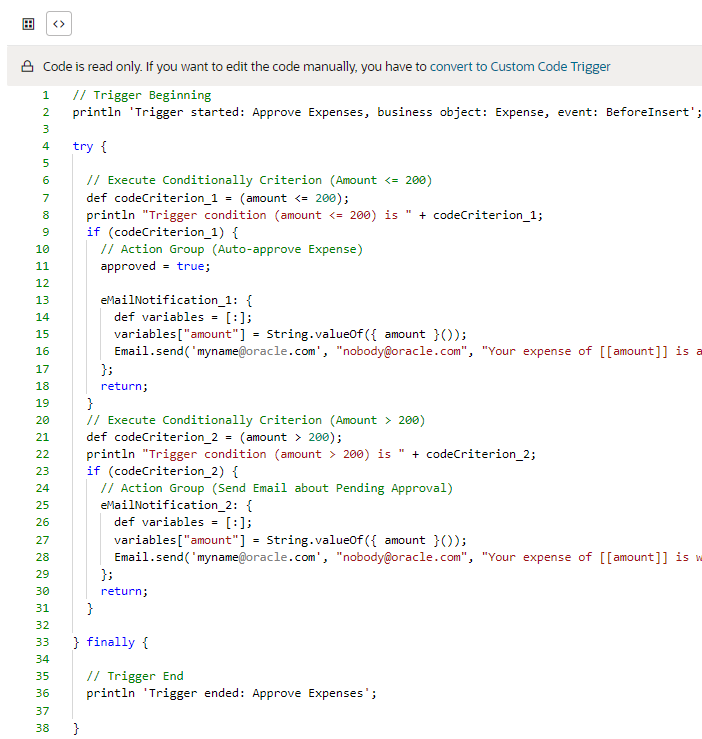
Description of the illustration bo-trigger-code.pngWhen you define Groovy code for object triggers, you have the option of overriding the default Groovy timeout specified in the Timeout Override field.
- When you are finished designing the trigger, click the Object Triggers tab to return to the Object Triggers page.
Field Triggers
You can create a field-level trigger to define conditions that apply whenever a specific business object field changes in value.
In contrast to an object trigger, which defines conditions that apply when a specific event happens, a field trigger applies conditions when a field value changes.
To create a field-level trigger for a business object:
- Select the business object to which you want to add a trigger.
- Select the Business Rules tab of the business object.
- Click the Field Triggers tab to see a list of all field triggers that are defined for the business object.
- Click + New Field Trigger, and in the Create Field Trigger dialog box, enter a name to identify the trigger, and select the field name from the Field drop-down list.
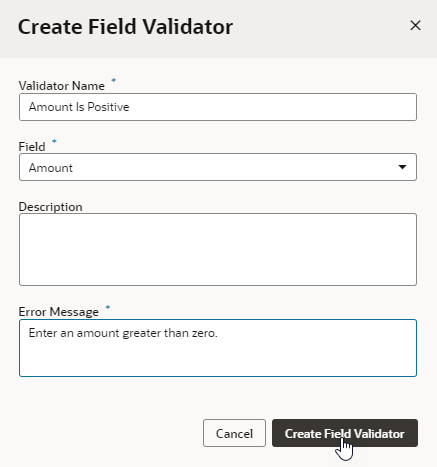
Description of the illustration bo-field-trigger-create.png -
Click Create Field Trigger to open the trigger designer.
You use the designer to build a sequence of criteria and actions that are triggered by a change in the field value. No criteria or actions are defined when you first open the designer.
- Click Create New Criteria (the + sign) and choose a criteria type.
- If you specify Execute Conditionally, follow the instructions to build conditions for the trigger.
-
Click the Add Actions box, then specify a Name for the Action Group and click Add Actions.
The Configure Actions page opens when you click Add Actions. You can add one or more actions to the list by dragging predefined functions and custom Groovy scripts into the list.
If you drag Custom Groovy Code into the list of actions, you’ll need to click Edit Custom Code and type your script in the editor. If you drag Send eMail Notification into the list, you’ll need to specify email details such as the recipients, the sender and the contents of the message.
-
Click Done when you complete your list of actions.
You can continue to add more criteria nodes and actions to build up the sequence for the trigger. When you select a criteria node in your sequence you can use the Properties pane to edit the criteria name, type and conditions. Depending on the criteria type that you select, you might need to specify conditions that need to be satisfied before the corresponding actions are executed. You can use the Conditions Builder to set conditions, or you can use the code editor to write custom code.
Click Code Editor to view the read-only code that is generated by the designer.
When you define Groovy code for field triggers, you have the option of overriding the default Groovy timeout specified in the Timeout Override field.
- When you are finished designing the trigger, click the Field Triggers tab to return to the Field Triggers page.
Add an Action to Send Email Notifications
Drag Send eMail Notification into your list of actions when you want to send an email notification that is triggered by a business object event.
If you add Send eMail Notification to your list of actions, you’ll need to specify the email template for the message and the message recipients in the Configure Actions dialog box. You can create your own email template or use an existing one.
To add a Send eMail Notification action to your list of actions:
- For new and existing triggers, click Add Actions in the trigger designer to open the Configure Actions dialog box.
The Send eMail Notification action is available in the list of Suggested actions and under Other Scripting actions.
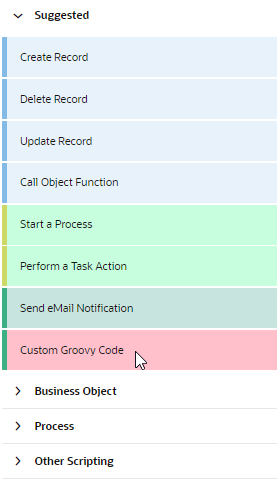
Description of the illustration bo-trigger-email1.png - Drag the Send eMail Notification action into the list.
After adding the action to the list, select the email template that you want to use, and then specify the email Recipients. Note that the sender's email address is always
nobody@oracle.comand cannot be changed.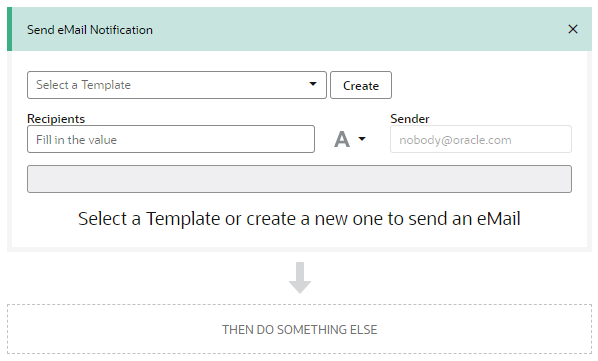
Description of the illustration bo-trigger-email2.png - Select the email template.
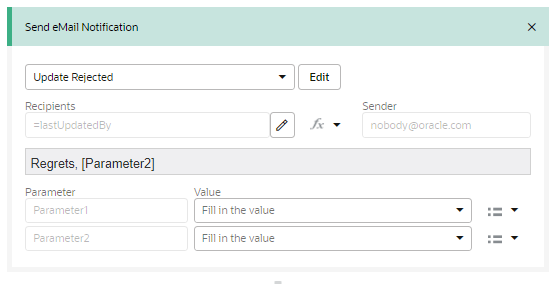
You can select an existing email template from the drop-down list or create a new email template. If you select an existing template, you can click Edit to modify the template.
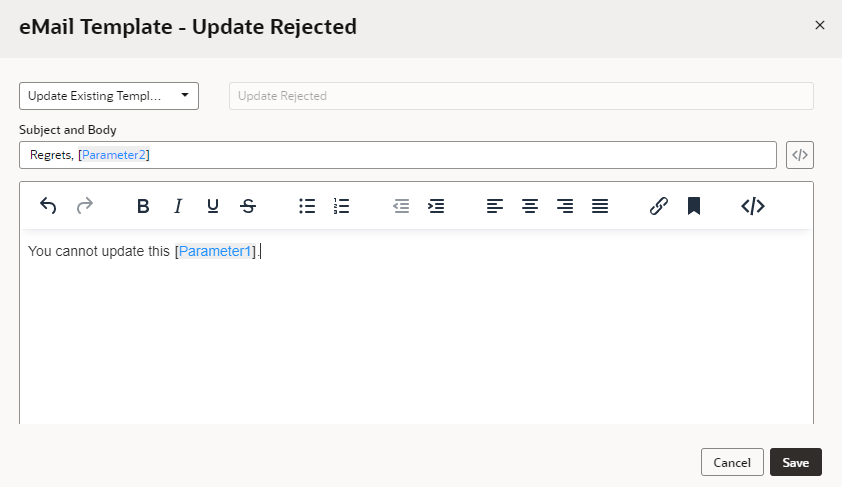
Description of the illustration bo-trigger-email3.pngDepending on the template that you select, you might need to supply additional parameters that are used when generating the email. For example, you might want to specify a reference as a parameter used to generate the email subject or in the body of the message. If a template uses parameters, you’ll need to define the values of the parameters, or you can edit the template to remove the parameters that you do not want to use. Parameter values can be a static value, a Groovy expression or a reference to a field in the business object. In the following example, you could replace Parameter1 and Parameter2 with field names from your business object.
Description of the illustration bo-trigger-email4.png - Define values for the Recipients.
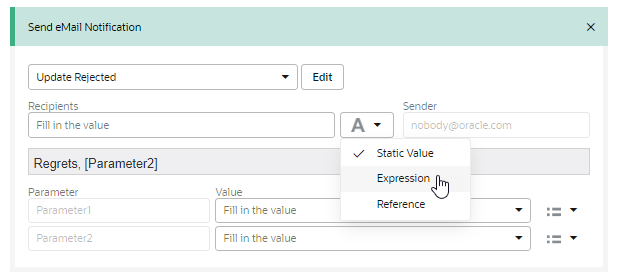
You can use static values for the Recipients, or the values can be generated with a Groovy expression or reference to a field in the business object. You can use the drop-down list next to the Recipients field to select the type of value in the field.
Description of the illustration bo-trigger-email5.png
Convert a Trigger to Editable Code
To edit the entire trigger script in a code editor instead of using the visual trigger designer, you need to convert the script generated by the trigger designer.
When you create a trigger script in the visual trigger designer, you build up the sequence by creating groups of actions that are performed when criteria are met. The trigger designer provides tools to help you build the sequence, and you can use custom code to define criteria and actions individually, but you cannot edit the entire trigger script. If you want to freely edit the entire script in a code editor, you need to convert to code the script generated by the trigger designer.
Note:
You will not be able to edit the trigger script in the visual trigger designer after it is converted to code. After a script is converted, it cannot be converted back to script that can be edited in the visual designer.You can view the entire script generated by the trigger designer by clicking ![]() in the designer. The script displayed in the code editor is read-only. To edit the script in a code editor, click Convert to Custom Code Trigger.
in the designer. The script displayed in the code editor is read-only. To edit the script in a code editor, click Convert to Custom Code Trigger. 
Description of the illustration bo-trigger-code-convert.png
Build Conditions for Triggers
If you select Execute Conditionally as the criteria type for a trigger, the Conditions Builder can help you specify the conditions that need to be satisfied before the actions are executed.
When you set a criterion to execute conditionally, you use the Conditions Builder to define the set of conditions that determine when actions will be executed. You open the Conditions Builder by selecting the criterion in the designer and clicking Add Conditions in the Properties pane. 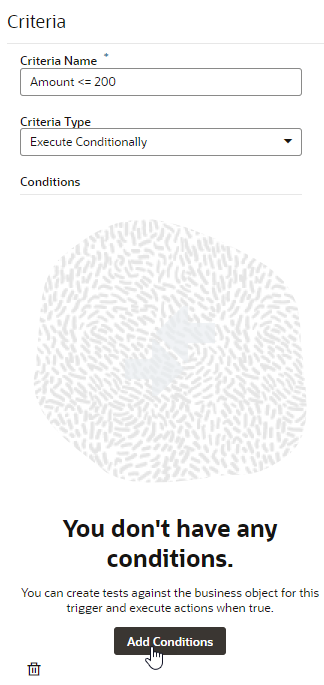
Description of the illustration bo-trigger-condition-build.png
To set up conditions in the Conditions Builder, you must select a field, select an operator, and set a value. The Condition Builder provides menus for selecting the fields in the business object, selecting operators, and helping you specify values. When specifying values, you can choose to use a static value, a field reference or an expression. You can create complex conditions by adding multiple conditions and grouping conditions together.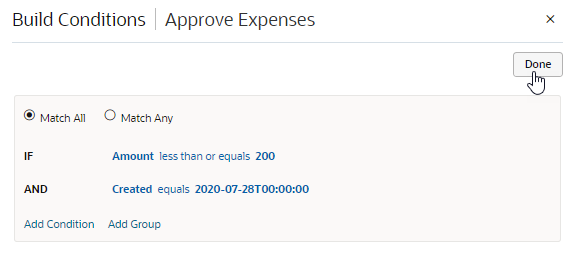
Description of the illustration bo-trigger-condition-add.png