 Deploy a .NET Core Application to Oracle Cloud
 Before You Begin
This 15-minute tutorial shows you how to create a basic .NET Core application and how to deploy it to Oracle Application Container Cloud Service.
Background
Oracle Application Container Cloud Service lets you deploy .NET Core, Go, Java Platform, Standard Edition (Java SE), Node.js, PHP, Python, Ruby, and Enterprise Edition (Java EE) applications to the Oracle Cloud.
What Do You Need?
- .NET Core 2.0.0 SDK
- Access to an instance of Oracle Application Container Cloud Service
 Create a .NET Core Application
- Create the
sample-appproject directory in your local system. - Open a command-line interface and go to the
sample-appdirectory. - Create a web .NET project.
dotnet new web - Open the
Program.csfile in a text editor and add the following code in the line 23:.UseUrls("http://0.0.0.0:"+ Environment.GetEnvironmentVariable("PORT")) - Go back to the command-line interface, and update the project's dependencies and tools.
dotnet restore - Create a Debug build of your app.
dotnet build - Create a self-contained deployment for the Linux platform.
dotnet publish -c Release -r linux-x64
 Prepare Your Application to Cloud Deployment
- In the
sample-app\bin\Release\netcoreapp2.0\linux-x64directory, create themanifest.jsonfile, and add the following content:{ "runtime":{ "majorVersion":"2.0.0-runtime" }, "command": "dotnet publish/sample-app.dll" } - Create the
sample-app.zipfile with themanifest.jsonfile and thepublishdirectory.
 Deploy Your Application to Oracle Application Container Cloud Service
- Open the Oracle Application Container Cloud Service console.
- In the Applications list view, click Create Application and select Dotnet.
- In the Application section, enter a name for your application and click Browse.
- On the File Upload dialog box, select the
sample-app.zipfile that you created in the previous section and click Open. - Keep the default values in the Instances and Memory fields and click Create.
- Wait until the application is created. The URL is enabled when the creation is completed.
- Click the URL of your application.
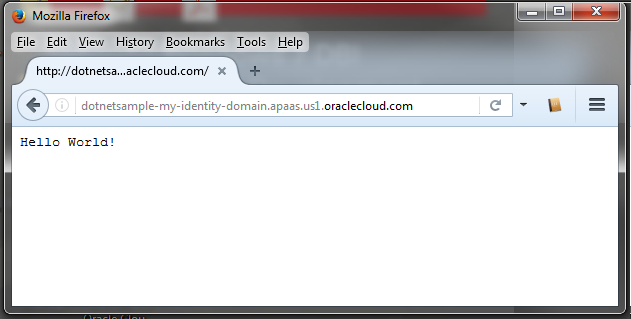
Description of the illustration dotnet-app-response.png
 Want to Learn More?
- Oracle Application Container Cloud Service: Get Started in the Oracle Help Center
- Get started with .NET Core