Delay Integration Processing for a Specified Time Period with a Wait Action
The wait action enables you to delay the processing of an integration for a specified period of time. Use this action in schedule integrations, asynchronous integrations, synchronous integrations, and fire-and-forget integrations. A typical use for this action is to invoke a specific operation at a certain time. You can specify literal values or build XPath expressions that you can configure with property values during runtime.
Create a Wait Action
-
Add a wait action to an integration in either of the following ways:
- On the side of the canvas, click
Actions
 and drag the Wait
action to the appropriate location.
- Click
 at the location where you want to add the
wait action, then select
Wait.
The Configure wait panel opens.
- On the side of the canvas, click
Actions
-
Click Edit
 under Configure wait
to enter a name and optional description for the
wait action.
Configure the time to wait before processing the integration in either of two ways:
- If you want to use literal (hard coded) values:
-
Enter the number of seconds to wait before processing the integration. Literal values can only be in seconds, with no upper limit. The wait time cannot exceed the total running time of the integration.

-
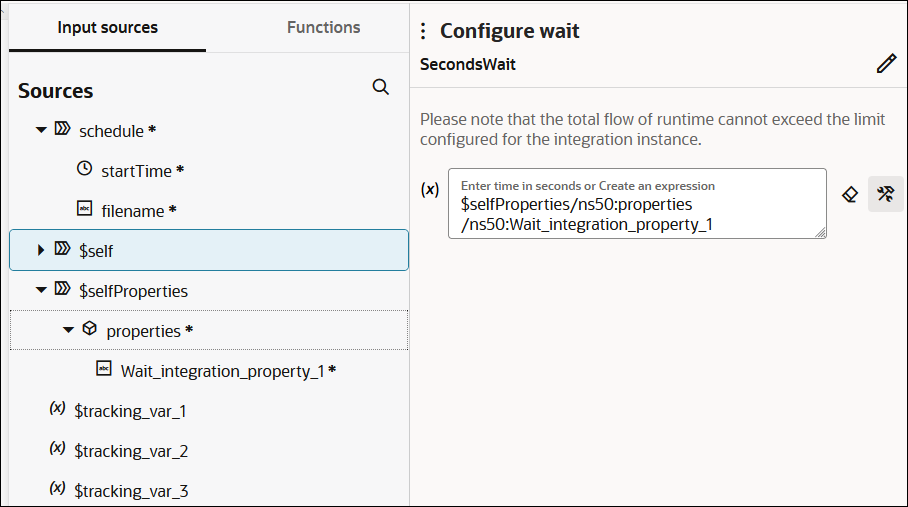
- If you want to enter an XPath expression:
This option enables you to update a wait action parameter with an integration property value after the integration is activated. This update does not require a re-activation of the integration.
- Drag an element from the Input sources
section.

- Complete design of your integration and exit the integration canvas.
- Activate the integration.
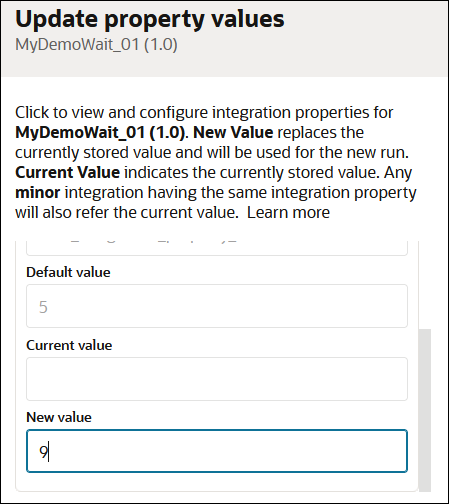
- Hover your cursor over the integration, and select
Actions
 , then select Update property values.
- Enter a value to use at runtime in the New value
field (for this example,
9is entered). This value overrides the value provided in the Default value field.
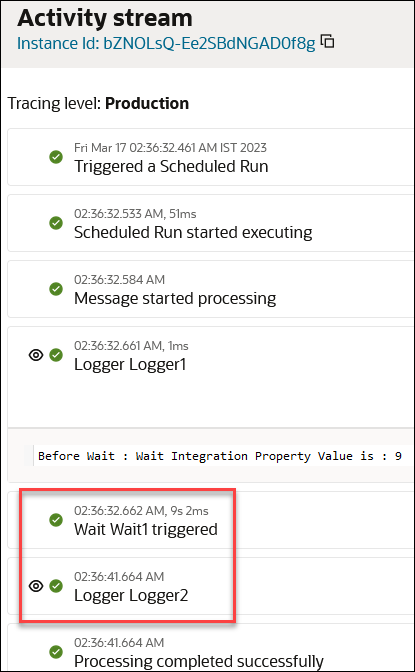
- Run the integration and view the activity stream.
- Click View
 for the action in front of the wait action (for this example, a logger
action) and note that the integration property value is 9 and
the wait action was initiated at 02:36:32 and the next action
(for this example, a second logger action) was initiated at
02:36:41 (nine seconds later).

- Drag an element from the Input sources
section.
Track the Status of a Wait Action During Runtime
During runtime, you can track the status of the wait action on the Tracking page through the tracking diagram and activity stream for an activated integration.
- In the navigation pane, click Observability, then Instances.
-
Click the business identifier value of the integration to track.
The integration flow (including any wait actions) is displayed.
- Use the Extract API in a Schedule Integration in Using the SAP Concur Adapter with Oracle Integration 3
- Process RaaS Reports that Support the Delivery of Data in CSV Format in Using the Workday Adapter with Oracle Integration 3
- Export Candidate Data from Oracle Talent Acquisition Cloud (Taleo EE) in Using the Oracle Taleo Enterprise Edition Adapter with Oracle Integration 3