Export Bulk Campaign Data from Snowflake to Salesforce Marketing Cloud Through GCP Storage

You can export bulk campaign data from Snowflake to Salesforce Marketing Cloud using Google Cloud Platform (GCP) storage.

The integration process begins with the Snowflake Adapter extracting files from the Snowflake database and placing the bulk data into a designated storage bucket within the Google Cloud Platform. Subsequently, the GCP Storage Adapter retrieves these files from the Google Cloud Platform storage. Finally, the Salesforce Marketing Cloud Adapter operates on the extracted file content from stage, reads, and processes the messages before transmitting them to the Salesforce Marketing Cloud.

To perform these operations, you must create the Snowflake Adapter, GCP Storage Adapter, and Salesforce Marketing Cloud Adapter connections in Oracle Integration. This implementation pattern provides an overview of the steps.
  1. Create a scheduled integration.
  2. Drag a Snowflake Adapter into the integration canvas.
  3. Configure the Snowflake Adapter as follows:
    1. On the Basic Info page, provide a name.
    2. On the Action page, select the Perform Bulk Export action.
    3. On the Operations page, select the stage type, stage name, target Snowflake database table name, and file format.
    4. On the Summary Page, review your selections.
  4. Assign the following two variables and values to the integration.
    • flag = 'false'
    • filename= ''
  5. Click Validate, and then click Close.
  6. Drag a while action below the assign action. Provide a unique name for this action, and click Create. Set the condition for the specified variables to flag = 'false’.
  7. Click Validate, and then click Close.
  8. Drag a Snowflake Adapter inside the while action.
  9. Configure the Snowflake Adapter as follows:
    1. On the Basic Info page, provide a name.
    2. On the Action page, select the Check/Cancel Statement Execution action.
    3. On the Operations page, select the stage type, stage name, target Snowflake database table name, and file format.
    4. On the Summary Page, review your selections.
  10. In the mapper, perform the required mapping.
  11. Drag a switch action inside the while action and specify the condition as follows:
    Statement executed successfully
  12. Drag an assign action into the Otherwise section of the switch action to update the specified variables as follows:
    flag = 'false'
  13. Drag the GCP Storage Adapter into the integration canvas.
  14. Configure the GCP Storage Adapter as follows:
    1. On the Basic Info page, provide an endpoint name.
    2. Select Objects as a resource and Download Object as an action.
    3. On the Summary page, review your selections.
  15. Perform the required mapping to download the files.
  16. Drag a stage file action into the integration canvas after the GCP Storage Adapter and configure it to unzip the file.
    1. On the Basic Info page, provide a name.
    2. On the Configure Operation page, select Unzip File from the Choose Stage File Operation field.
    3. Specify the XPath expression for the file reference in the Specify the File Reference field.
    4. Specify the directory name in the Specify the Directory to Unzip field.
    5. Review your selections on the Summary page.
  17. Drag a second stage file action into the integration canvas and configure it to read an unzipped file.
    1. On the Basic Info page, provide a name.
    2. On the Configure Operation page, select Read Entire File from the Choose Stage File Operation field.
    3. Specify the XPath expression for the file reference in the Specify the File Reference field.
    4. On the Scheme Options page, select Yes in the Do you want to specify the structure for the contents of the file field.
    5. Select Sample delimited document (e.g. CSV) in the Which one of the following choices would be used to describe the structure of the file contents field.
    6. On the Format Definition page, click Choose File and upload the sample CSV file in the Select a New Delimited Data File field.
    7. Review your selections on the Summary page.
  18. Drag a for-each action. The for-each action enables you to loop over individual files within the ZIP file and stage each file in Oracle Integration for transformation.
  19. Specify Record as a repeating element (for this example, Campaign_Record).
  20. Drag the Salesforce Marketing Cloud Adapter inside the for-each action.
  21. Configure the Salesforce Marketing Cloud Adapter as follows:
    1. On the Basic Info Page, provide a name.
    2. Select Campaign as a business object and Create Campaign as an action to extract the entire file content from the stage to the Campaign table.
    3. On the Summary Page, review your selections.
  22. Perform the required mapping.
  23. Click Validate.
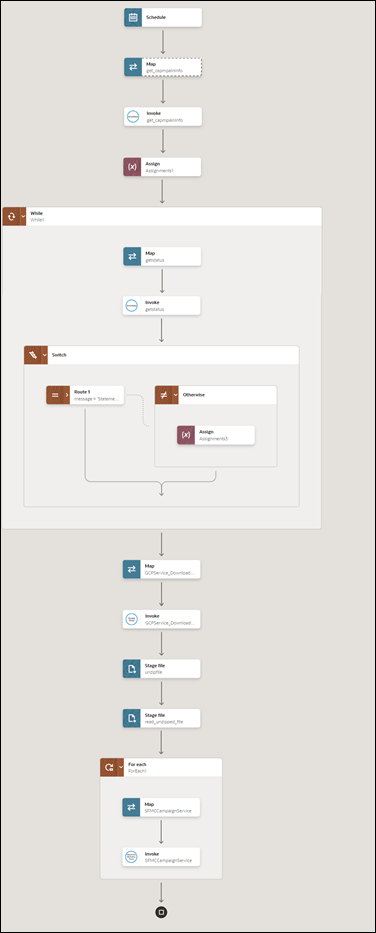
    The complete integration looks as follows.


    The integration shows a schedule, map action, Snowflake Adapter invoke connection, and assign action. Below this is a while action, which includes a map action, Snowflake Adapter invoke connection, and a switch action with two branches. Below and outside the while action is a map, GCP Storage Adapter, two stage file actions, a for-each action that includes a map action and q Salesforce Marketing Cloud Adapter.

  24. When complete, save and activate the integration. As a result, the Salesforce Marketing Cloud Adapter imports bulk data from the Snowflake application into Salesforce Marketing Cloud.