Upload a List of Products Available in Shopify to Microsoft SharePoint

You can use the Microsoft SharePoint Adapter to upload a file containing a list of products available in Shopify to Microsoft SharePoint with the stage file action.

The Shopify Adapter fetches the list of products from the Shopify application. This data is then written to the stage file action. The Microsoft SharePoint Adapter then uploads this file to the Microsoft SharePoint application.

The following adapters and their operations are used in this use case:
  • The Shopify Adapter configured as an invoke connection retrieves the list of products available in the Shopify application.
  • The Microsoft SharePoint Adapter configured as an invoke connection uploads the product list to the Microsoft SharePoint application.

This implementation pattern provides an overview of the steps:
  1. Create the Microsoft SharePoint Adapter and Shopify Adapter connections in Oracle Integration.
  2. Create a schedule integration.
  3. Drag a Shopify Adapter into the integration canvas as an invoke connection.
  4. Configure the Shopify Adapter as follows:
    1. On the Basic Info page, provide an endpoint name.
    2. On the Operations page, select the Query operation.
    3. Select Products as a module.
    4. Select Product as an object.
    5. Select Retrieve list of products as an operation.
    6. On the Summary page, review your selections.
  5. Drag the stage file action into the integration canvas.
  6. Configure the stage file action as follows:
    1. On the Basic Info page, select Write File as the operation.
    2. Drag the file reference that you want to write.
    3. On the Configuration page, select CSV as the structure of the file content.
    4. Select the sample CSV file and enter the file record and file record set name.
    5. On the Summary page, review your selections.
  7. In the mapper, map the fields from the Shopify response to the stage file action.
  8. Drag a Microsoft SharePoint Adapter into the integration canvas.
  9. Configure the Microsoft SharePoint Adapter as follows.
    1. On the Basic Info page, provide an endpoint name.
    2. From the Select Resource list, select Files.
    3. From the Select Action list, select to upload files.
    4. On the Configuration page, select the specific site from the Select Site Name list.
    5. From the Select List Name list, select the list name that you want to upload.
    6. On the Summary page, review your selections.
      The stage file action response provides an input to the Microsoft SharePoint Adapter.
  10. Click Validate.
  11. Add the tracking element in the Business Identifier field and save the integration.
  12. When complete, activate the integration.

    As a result, the SharePoint application receives the file containing the product list retrieved from Shopify.

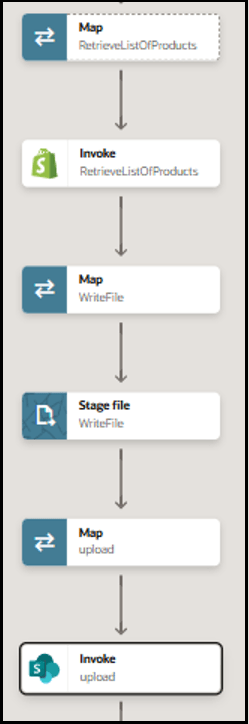
    A portion of the completed integration looks as follows.


    The map action, invoke, map action, stage file action, map action, and invoke are shown.