Registering the Oracle Database Instance with a Microsoft Azure AD Tenancy

A user with Azure AD administrator privileges uses Microsoft Azure AD to register the Oracle Database instance with the Microsoft Azure AD tenancy.

  1. Log in to the Azure portal as an administrator who has Microsoft Azure AD privileges to register applications.
  2. In the Azure Active directory admin center page, from the left navigation bar, select Azure Active Directory.
  3. In the MS - App registrations page, select App registrations from the left navigation bar.
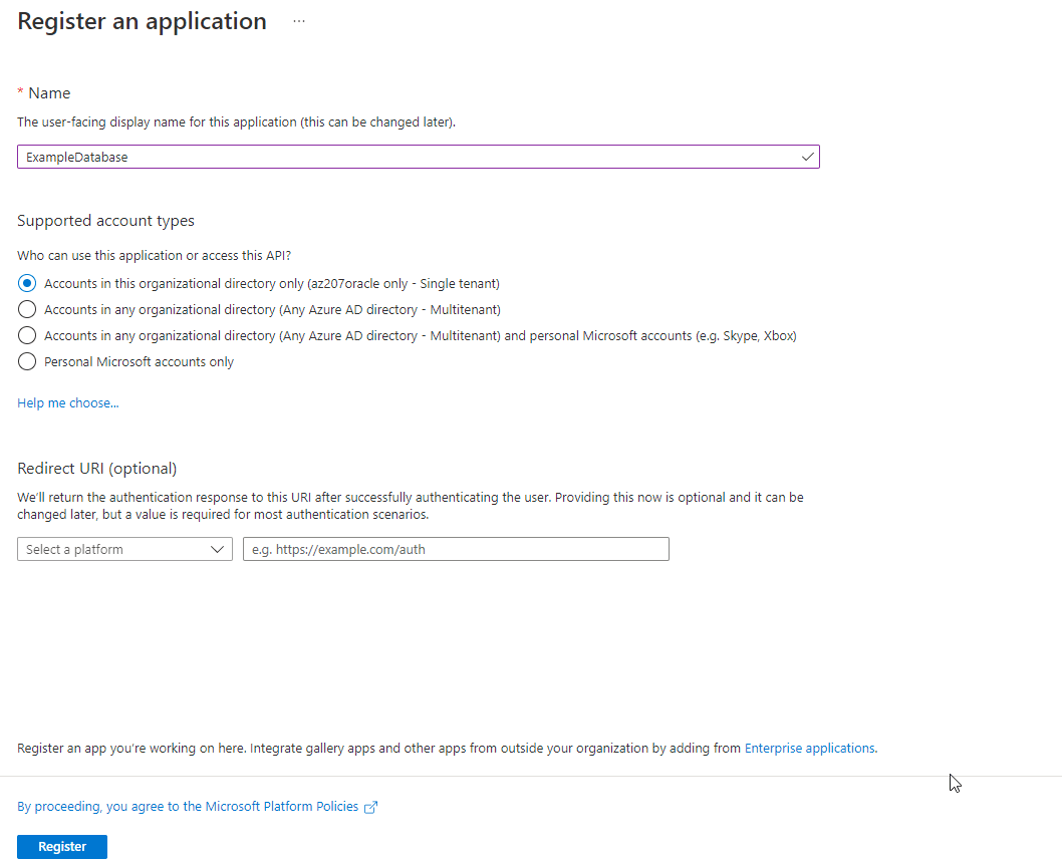
  4. Select New registration.
    The Register an application window appears. Description of azure-reg.png follows
    Description of the illustration azure-reg.png
  5. In the Register an application page, enter the following Oracle Database instance registration information:
    • In the Name field, enter a name for the Oracle Database instance connection (for example, Example Database).
    • Under Supported account types, select the account type that matches your use case.
      • Accounts in this organizational directory only (tenant_name only - Single tenant)
      • Accounts in any organizational directory (Any Azure AD directory - Multitenant)
      • Accounts in any organizational directory (Any Azure AD directory - Multitenant) and personal Microsoft accounts (e.g. Skype, Xbox)
      • Personal Microsoft accounts only
  6. Bypass the Redirect URI (Optional) settings. You do not need to create a redirect URI because Azure AD does not need one for the database server.
  7. Click Register.
    After you click Register, Azure AD displays the app registration's Overview pane, which will show the Application (client) ID under Essentials. This value is a unique identifier for the application in the Microsoft identity platform. Note the term Application refers to the Oracle Database instance.
  8. Register a scope for the database app registration.
    A scope is a permission to access the database. Each database will need a scope so that clients can establish a trust with the database by requesting permission to use the database scope. This allows the database client to get access tokens for the database.
    1. In the left navigation bar, select Expose an API.
    2. Under Set the App ID URI, in the Application ID URI field, enter the app ID URI for the database connection using the following format, and then click Save:
      your_tenancy_url/application_(client)_id

      In this specification:

      • your_tenancy_url must include https as the prefix and the fully qualified domain name of your Azure AD tenancy.
      • application_(client)_id is the ID that was generated when you registered the Oracle Database instance with Azure AD. It is displayed in the Overview pane of the app registration.

      For example:

      https://sales_west.example.com/1aa11111-1a1z-1a11-1a1a-11aa11a1aa1a
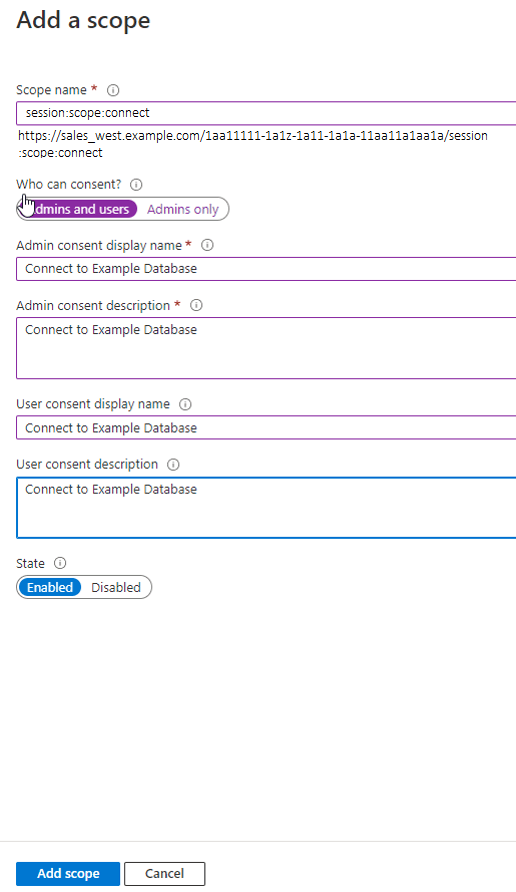
    3. Select Add a scope and then enter the following settings:
      Description of azure-scope.png follows
      Description of the illustration azure-scope.png
      • Scope name specifies a name for the scope. Enter the following name:
        session:scope:connect

        This name can be any text. However, a scope name must be provided. You will need to use this scope name later when you give consent to the database client application to access the database.

      • Who can consent specifies the necessary permissions. Select Admins and users, or for higher restrictions, Admins only.
      • Admin consent display name describes the scope's purpose (for example, Connect to Oracle), which only administrators can see.
      • Admin consent display name describes the scope's purpose (for example, Connect to Example Database), which only administrators can see.
      • User consent display name is a short description of the purpose of the scope (for example, Connect to Example Database), which users can see if you specify Admins and users in Who can consent.
      • User consent description is a more detailed description of the purpose of the scope (for example, Connect to Example Database), which users can see if you specify Admins and users in Who can consent.
      • State enables or disables the connection. Select Enabled.
After you complete these steps, you are ready to add one or more Azure app roles, and then perform the mappings of Oracle schemas and roles.