Loading Data from Other Databases
To load data from tables in another database into your Oracle Autonomous Database, on the Data Load page, select LOAD DATA and DATABASE. Select a database link from the drop-down list. Drag one or more tables from the list of database tables and drop them in the Data Load Cart.
Each table appears as an item in the Data Load Cart. The item shows the name of the table and the number of rows in it, and the name of the table that is the target for the data load.
To remove a table from the Data Load Cart, click the Remove (trash can) icon for the item. To remove all tables from the cart, click the Remove All (trash can) icon in the Data Load Cart menu bar.
To add a remote database to the list of database links, create a database link to the remote database. For information on creating a database link, see Database Links in Oracle Database Administrator’s Guide.
The databases available to you appear in the drop-down list of the database navigation pane of the Load Tables page.
You can filter the tables displayed in the navigation pane by entering a case-sensitive value in the search field at the top of the navigation tree and pressing Enter. To display all of the tables again, clear the search field and press Enter.
You can add any number of tables from the navigation pane to the Data Load Cart and load data from all of them in a single data loading job. You can set filters on the data for a table to load only the specified data.
Specify Processing Options
To specify settings for the data load job, preview the data in the source or the target, and see statistics about the data, click the Settings (pencil) icon for the item in the Data Load Cart.
In the settings pane, on the Settings tab, you can view the name and size of the file in the title of the Load Data dialog box.
The Table field specifies the name of the target table. The value in the field varies depending on the selection in the Options field. If the option is Create Table, then the default target value is the name of source table. To specify a different name for the target, enter it in the Name field. For the other options, the default value is <None>. Expand the drop-down list and select a table as the target.
In the Options field for the source, select Create Table, Insert into Table, Replace Data, Drop Table and Create New Table, or Merge into Table. Point to the question mark icon to see a brief description of the selected option.
Note:
The Schema drop-down is available only if you have PDB_DBA role grant to you.
To grant yourself a PDB_DBA role, you must log into your Database Actions instance and enter the following command in the SQL worksheet area displayed in the SQL tab under Development tools present in the Launchpad.
Grant PDB_DBA to Username;This drop-down is available for Create Table and Drop Table and Create New Table options.
If you select Create Table, then in the Name field accept the default name, which is the name of the source table, or enter a different name.
If you select one of the other options, then expand the drop-down list of the Name field and select a table as the target.
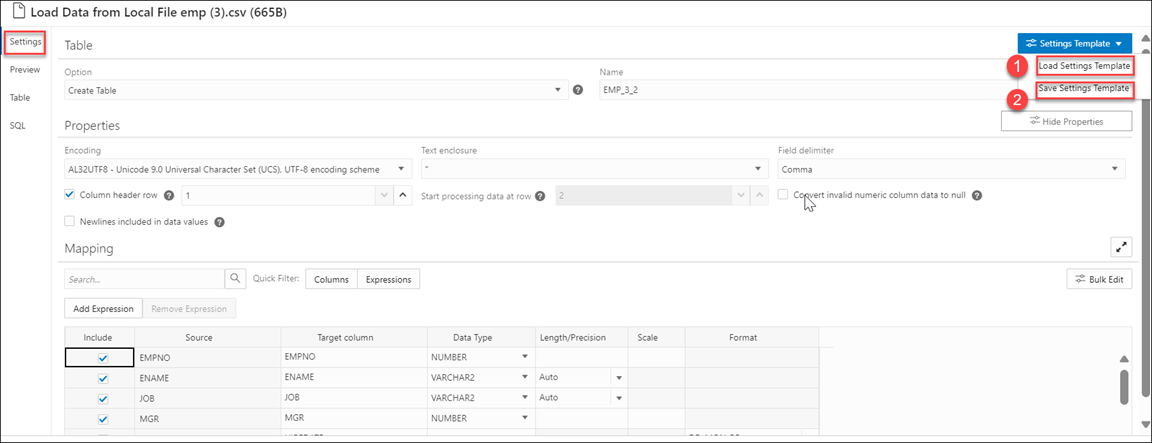
Settings Template
- Load Settings Template: Loads a settings template from your local system.
- Save Settings Template: Saves the current existing settings template.

Description of the illustration settings-template.png
- From the Settings Template in the Settings tab of the Load Data page, select Load Settings Template.
- You will see a Load Settings Template wizard, click the Settings Template JSON to load a JSON file from your system.
- Clicking the Settings template JSON will open your local system. Click OK to load the JSON file.
- After you load the JSON file, you can view the updates applied automatically to the settings tab which matches the JSON settings template you load from your local.
- From the Settings Template in the Settings tab of the Load Data page, select Save Settings Template.
- The Template file editor appears. Click the Template File name and name the new template.
- Click OK to finish saving the new name of the existing template.
- You can test the configuration of the new template.
Bulk Edit Settings
- Update values of all the fields in a group.
- Find and replace, Add Prefix and Add suffix to target column name.
- Include the column(s) for loading data to the target table.
- Exclude the column(s) for loading data to the target table.
Searching the Column
The Bulk Edit setting updates the columns returned by the search field. The search box besides the Bulk Edit setting icon filters the list of columns you wish to update in a bulk. As soon as you start typing in the search field, the tool returns the field values which contains the letters you type. You can remove the filter by deleting all the content from the search box and clicking the magnifier icon that appears next to the search box.
- Data Type
- Target Column name
- Include Columns for loading
- Exclude columns for loading

Description of the illustration bulk-edit1.png
-
Type
VARCHARin the search field and click on the magnifier icon besides the search field.
Description of the illustration bulk-edit2.png -
The search will return the rows having
VARCHARas the Data Type. Select the Bulk Edit icon besides the magnifier icon.
Description of the illustration bulk-edit3.png -
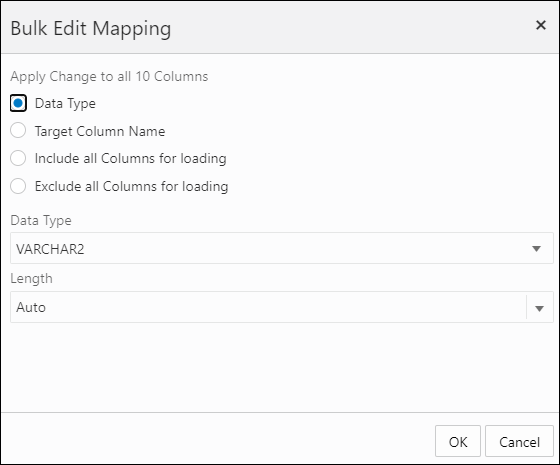
Selecting the Bulk Edit icon opens the Bulk Edit Mapping dialog box.

Description of the illustration bulk-edit4.png -
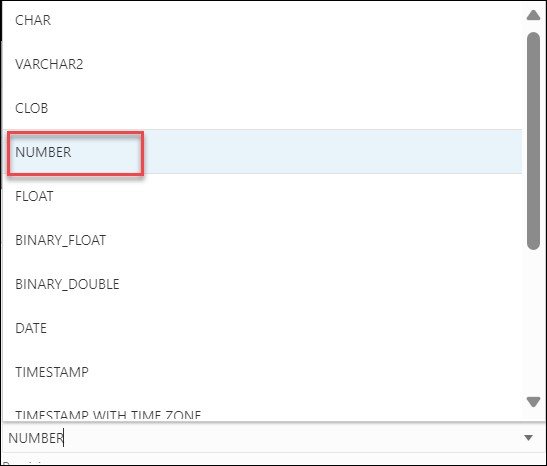
Click Data Type and select
NUMBERfrom the Data Type drop-down. Click OK.
Description of the illustration bulk-edit5.png -
The Data Type of the selected rows changes from
VARCHARtoNUMBER.
Description of the illustration bulk-edit6.png -
Clear the content from the search field and click the magnifier icon to view the bulk edit updates in the Mapping table.

Description of the illustration bulk-edit7.png
Specify Mappings
Note:
You will receive a tooltip error message with the exact reason for the error message when you complete editing a cell. The mapping grid cell will be highlighted with red to indicate an invalid value that must be fixed. The highlight is removed after you fix the invalid value. For example, you can view the following tooltip error message when the target column name is not filled in.
Description of the illustration tooltip-error.png
For the Insert into Table or Replace Data options, select a target column from the drop-down list of existing columns.
For the Merge into Table option, for each source column, select a target column form the drop-down list. You must specify at least one column as a key column. To specify a column as a key column, select the Merge Key check box for the column. Merge keys are one or more columns that uniquely identify each row in the table. Merge keys must not contain any null values. For loading tables with primary keys, this option automatically enables the selection of primary key columns as the merge keys.
Preview
To view the data in the source table, in the settings pane select the Source Table tab. The source preview displays the data in the table.
Table
For all options except Create Table, to view the existing data in the target table, in the settings pane select the Target Table tab. The target preview displays the data in the table before you run the data load job.
SQL
Note:
You can see the SQL code even before the table is created.Run the Data Load Job
When you have added all of the source tables for the job and specified the settings for each table, to run the job click the Start icon in the Data Load Cart menu bar. To stop the data load job, click the Stop icon.
Once the data load job starts, you can view the progress of the job in the Data Load dashboard.
When the data load job completes, the Data Load dashboard page displays the results of the job. At the top of the header of the table load, you can view the name of the table along with the total columns present in the table.
Click Report to view a report of the total rows loaded and failed for a specific table.You can view the name of the table, the time the table was loaded and the time taken to process the load.
At the header of the Table Load, you can view the name of the table with total number of columns loaded. When you expand the Table Load you can view the options you used to load the source data with the count of rows loaded.
To view information about an item in the job, click the Settings icon in the item. The settings pane has the same Settings, Source, Table, SQL, Job Report and Data Definition tabs as the settings pane before running the job, except that the target preview now contains the data loaded by the data load job. To close the settings pane, click Close.
To view a log of the load operation, click the Log icon. You can save the log, clear it, or refresh it. Click OK to dismiss the log.
The list of tables on the Data Load / Explore page contains any new tables created. The target tables for the Insert into Table, Replace Data, Drop Table and Create New Table, and Merge into Table options contain the loaded data.
Fixing a data load job
After your data load job, you might see errors that you want to correct, or upon inspection, realize that you wanted to name a column differently. In such cases, you will view a warning sign on the Table load. Click the Reload icon to reload source with suggested fixes. Click Actions icon on the Table load and select Edit to make any changes to the data load job (i.e., change a column name).
Click Apply to apply any changes. Click Close to return to the Database Actions page.
Parent topic: Loading Data