 Analyze Data from Multiple Sources with Oracle Big Data Manager
 Before You
Begin
Before You
Begin
In this 15-minute tutorial, you learn how to import a Zeppelin note from a GitHub repository into
Oracle Big Data Manager Notebook. You also learn how to load a comma-separated-value
(.csv) file from the Hadoop Distributed File System (HDFS) and an Oracle database table
as new paragraphs into the imported note. Finally, you run the note.
Background
This is the third tutorial in the Integrate GitHub and Oracle Database with Oracle Big Data Manager series. Read the tutorials in the order listed.
- Register a GitHub Repository as a Storage Provider with Oracle Big Data Manager
- Register an Oracle Database as a Storage Provider with Oracle Big Data Manager
- Analyze Data from Multiple Sources with Oracle Big Data Manager
What Do You Need?
- Access to either an instance of Oracle Big Data Cloud Service or to an Oracle Big Data Appliance, and the required login credentials.
- Access to Oracle Big Data Manager, on either an instance of Oracle Big Data Cloud Service or on an Oracle Big Data Appliance, and the required sign in credentials. A port must be opened to permit access to Oracle Big Data Manager, as described in Enabling Oracle Big Data Manager.
- Read/Write privileges to the
/user/demoHDFS directory. - Complete the first two tutorials in this series: The Register a GitHub Repository as a Storage Provider with Oracle Big Data Manager and the Register an Oracle Database as a Storage Provider with Oracle Big Data Manager tutorials.
- Access to an Oracle database and the required login credentials.
- Basic familiarity with HDFS, Spark, and optionally, Apache Zeppelin.
 Import a Zeppelin Note from GitHub into Oracle Big Data
Manager Notebook
Import a Zeppelin Note from GitHub into Oracle Big Data
Manager Notebook
In this section, you import a Zeppelin note from a GitHub repository into Oracle Big Data Manager Notebook.
- Sign in to Oracle Big Data Manager. See Access Oracle Big Data Manager.
- On the Oracle Big Data Manager page, click the Data tab.
- In the Data explorer section, select Github (github)
from the Storage drop-down list. The
bdm-notebook-demoGitHub repository that you registered in the first tutorial is displayed in the Name column. Double-click the repository name and navigate to themasterbranch. This branch contains theNotebook.jsonZeppelin note that you will import into Oracle Big Data Manager Notebook.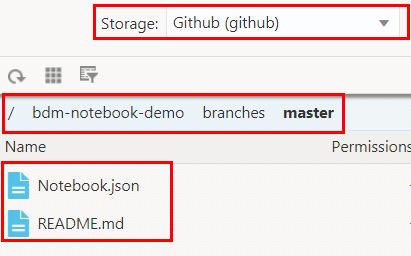
Description of the illustration master-branch.png - Right-click the
Notebook.jsonfile. From the context menu, select Notebook, and then Import as Notebook Note. The Import as Notebook Note dialog box is displayed. - Enter
HDFS and Oracle Database Data Analysisin the Note name field, and then click Create. TheHDFS and Oracle Database Data Analysisnote is imported and displayed in Notebook. The initial status of each paragraph in the note isREADYwhich indicates that the paragraph has not been executed yet. - The top paragraph in the note uses the
%mdMarkdown interpreter to generate static html from Markdown plain text to display detailed information about this note. Click Hide editor(Ctrl+Alt+E) on the paragraph's toolbar to hide the detailed information.

 Load an HDFS File as a Paragraph into the
Imported Note
Load an HDFS File as a Paragraph into the
Imported Note
In this section, you upload the edges.csv file to HDFS and load the file as a new
paragraph into the imported note. The edges.csv file contains two columns. Each column represents a student id. The
two student ids in each row represent two students who are collaborating on a specific class project.
- Right-click the edges.csv file, select Save link as... from the context menu, and then save it to your local machine.
- Upload the
edges.csvfile to HDFS. On the Oracle Big Data Manager page, click the Data tab. In the Data explorer section, select HDFS storage (hdfs) from the Storage drop-down list. Navigate to the/user/demodirectory, and then click File upload on the toolbar.

Description of the illustration file-upload.png - In the Files upload dialog box, choose Files upload from the Select files drop-down list. In the Open dialog box, navigate to your local directory
that contains the
edges.csvfile, and then select the file. Theedges.csvfile is displayed in the Name column. Click Upload. - Drill-down on the Details section in the Files upload
dialog box to display the progress of the file upload operation. When the file is uploaded
successfully to HDFS, the Upload has finished message is displayed. Click
Close to close the dialog box. The
edges.csvfile is now displayed in the/user/demoHDFS directory. - Right-click the
edges.csvfile. From the context menu, select Notebook, and then Load as general file. The Load file in Notebook wizard is displayed. It has three pages: Paragraph settings, Note settings, and Overview. - In the Paragraph settings wizard page, enter
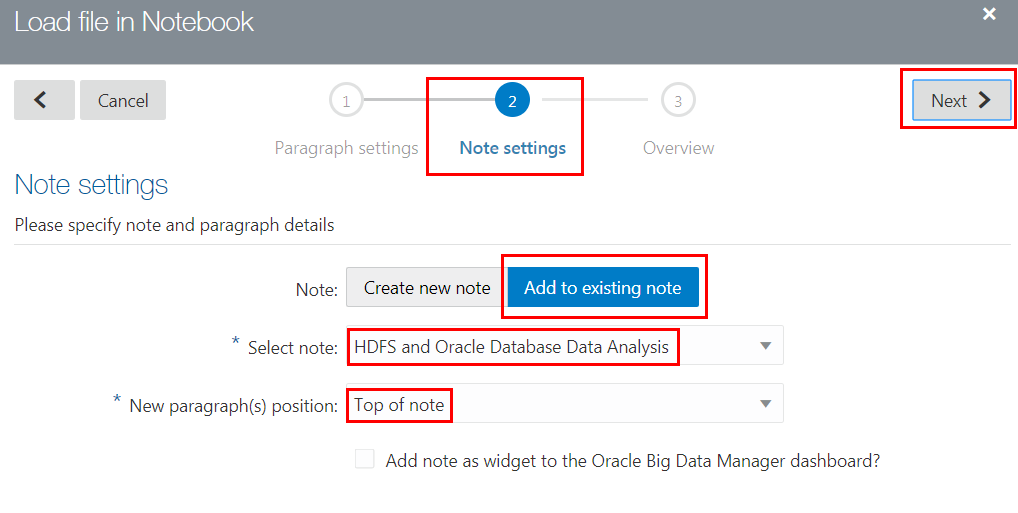
Load Data from HDFSin the Paragraph name field. Selectsparkfrom the Interpreter drop-down list, and then click Next. - In the Note settings wizard page, select Add to existing note
in the Note field. Select the
HDFS and Oracle Database Data Analysisnote from the Select note drop-down list. Select Top of note from the New paragraph(s) position drop-down list, and then click Next. - In the Overview wizard page, review the settings. If you need to make a
correction, click the back arrow
 . If you are satisfied with the settings, click Finish to display the updated note. The new Load Data from HDFS paragraph is displayed at the top of the updated
note.
. If you are satisfied with the settings, click Finish to display the updated note. The new Load Data from HDFS paragraph is displayed at the top of the updated
note.
- The new Load Data from HDFS paragraph uses the
%sparkSpark interpreter to create a DataFrame that references theedges.csvfile that you uploaded earlier to the/user/demoHDFS directory. This DataFrame is stored in thefileDataFramevariable. Rename this variable tographText.The Process the Data paragraph in this note references thegraphTextvariable.val graphText = sc.textFile("hdfs:/user/demo/edges.csv")

 Load an Oracle Database Table into the Imported Note
In this section, you load the USERS Oracle database table that you created in the
second tutorial as a new paragraph into the imported note. The USERS table contains
information about each student's name, id, and class category.
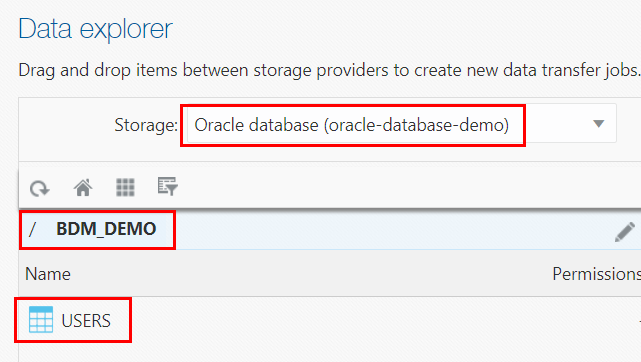
- On the Oracle Big Data Manager page, click the Data tab. In the Data
explorer section, select
Oracle database (oracle-database-demo)from the Storage drop-down list. Navigate to your schema that contains theUSERStable that you created earlier. In this example, we created theUSERStable in the BDM_DEMO schema. The table is displayed in the Name column. - Right-click the
USERStable. From the context menu, select Notebook, and then Load table. The Load table in Notebook wizard is displayed. It has three pages: Paragraph settings, Note settings, and Overview. - In the Paragraph settings wizard page, enter
Load Data from Oracle
                             Database Table
in the Paragraph name field. Selectsparkfrom the Interpreter drop-down list, and then click Next. - In the Note settings wizard page, select Add to existing note
in the Note field. Select the
HDFS and Oracle Database Data
                             Analysis
note from the Select note drop-down list. Select Top of note from the New paragraph(s) position drop-down list, and then click Next. - In the Overview wizard page, review the settings. If you need to make a
correction, click the back arrow
. If you are
satisfied with the settings, click Finish to display updated note.
Two new paragraphs are added at the top of the note.
- Click the title of the
Load Data from Oracle Database Table (paragraph 1)paragraph. The title becomes active in read/write mode. Rename the title toLoad Data from Oracle Database Table.Rename the title of theLoad Data from Oracle Database Table (paragraph 2)paragraph toCount Number of Students.
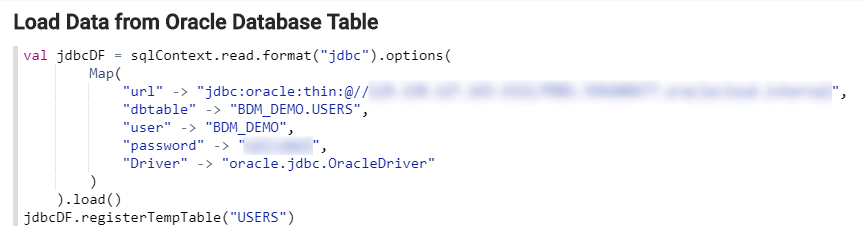
Description of the illustration oracle-database-paragraphs.png When you load a relational database table into a note, Oracle Big Data Manager creates two paragraphs. The first paragraph creates the
jdbcDFDataFrame which references theUSERStable in your Oracle database. It also registers thejdbcDFDataFrame as a temporary table namedUSERS.You can run SQL queries on this temporary table. The second paragraph uses the%sqlinterpreter which enables you to execute a Spark SQL query. This simple query counts the number of rows in theUSERStable. - Make sure that the url field in the
Load Data from Oracle Database Tableparagraph references your host name and port # where your Oracle database is running. Enter your Oracle database username in the empty user field. Enter your Oracle database password in the empty password field.
 Run the Note
In this section, you run the updated note and review the output.
- Click Run all paragraphs
 on the Note's toolbar to run all paragraphs in this note. A Run all paragraphs?
confirmation message is displayed. Click OK. When a paragraph executes
successfully, its status changes to
on the Note's toolbar to run all paragraphs in this note. A Run all paragraphs?
confirmation message is displayed. Click OK. When a paragraph executes
successfully, its status changes to FINSIHED. - The output of the Count Number of Students paragraph is displayed in the default table format in the result section at the bottom of the paragraph.
- The Process the Data paragraph performs most of the analysis on the dataset.
It joins the HDFS data with the Oracle database table data. The code accesses the two
idcolumns from theedges.csvfile, and then uses theUSERStable as a look-up table to find the associated names and class categories for those student ids. The code then registers the joined data as a new temporary table namedFRIENDS. This new table contains six columns which represent the two students collaborating on a project from theedges.csvfile. Finally, the code counts the number total projects, same-class projects, and cross-class projects. These values are used and displayed in the Project Collaboration Statistics paragraph.
Description of the illustration process-data-paragraph.png - The output of the Projects Collaboration Details paragraph is displayed in the default table format in the result section at the bottom of the paragraph. The following image shows the partial output.
- The output of the Projects Collaboration Statistics paragraph is displayed in the result section at the bottom of the paragraph.
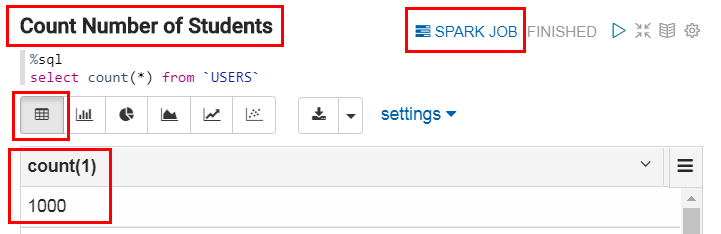
You can click the SPARK JOB icon in a paragraph to display the Spark job details in your cluster's Spark web UI, only if you configured the firewall to allow access to the Spark web UI.

The results of the SQL query are returned in an arbitrary
order unless you use the order by clause followed by the column(s) name; therefore, your results might not match the result shown in the image.

 Clean up (Optional)
If you want to re-run the tutorials in this series again, you will need to perform the following clean up steps.
- Remove the Github and the Oracle database registered storage providers.
- On the Oracle Big Data Manager page, click the Administration tab to display the Storage providers page.
- In the row for the GitHub registered storage provider, click Manage this provider
 , and then select Remove from the context menu. In the Remove storage dialog box, click Remove.
 - In the row for the Oracle database registered storage provider, click Manage this provider , and then select Remove from the context menu. In the Remove storage dialog box, click Remove.
- Drop the
USERStable that you created in your Oracle Database. In a terminal window, connect to your Oracle Database using SQL*Plus, and enter the following command at theSQL>command-line prompt:SQL>drop table users;You can reuse the
create-and-populate-users-table.sqlscript file that you already saved to your machine when you re-run the series. - Delete the
HDFS and Oracle Database Data Analysisnote. On the Oracle Big Data Manager page, click the Notebook tab to display the Notebook page. In the list of notes, locate theHDFS and Oracle Database Data Analysisnote. Click Move note to Trash next to the note. In the Move this note to trash dialog box, click OK.
 - Delete the
edges.csvfile from the/user/demoHDFS directory. On the Oracle Big Data Manager page, click the Data tab. In the Data explorer section, select HDFS storage (hdfs) from the Storage drop-down list. Navigate to the/user/demodirectory. Right-click theedges.csvfile, and then select Delete from the context menu. In the Delete file edges.csv dialog box, click Delete.You can reuse the
edges.csvfile that you already saved to your machine when you re-run the series.