 Copy Data from an HTTP(S) Server with Oracle Big Data Manager
 Before You
Begin
Before You
Begin
In this 15-minute tutorial, you learn how to use Oracle Big Data Manager to copy data files hosted on a Hyper Text Transfer Protocol Secure (HTTPS) server to the Hadoop Distributed File System (HDFS) on your cluster.
Background
This is the first tutorial in the Work with Oracle Big Data Manager series. Read them sequentially.
- Copy Data from an HTTP(S) Server with Oracle Big Data Manager
- Analyze Data with Oracle Big Data Manager Notebook
- Create a Personal Dashboard in Oracle Big Data Manager
What Do You Need?
- Access to an HTTP server such as Apache HTTP server, Oracle HTTP Server (OHS), or Oracle Weblogic Server.
- Access to either an instance of Oracle Big Data Cloud Service or to an Oracle Big Data Appliance, and the required login credentials.
- Access to Oracle Big Data Manager, on either an instance of Oracle Big Data Cloud Service or on an Oracle Big Data Appliance, and the required sign in credentials. A port must be opened to permit access to Oracle Big Data Manager, as described in Enabling Oracle Big Data Manager.
- Read/Write privileges to the
/user/demoHDFS directory. - Basic familiarity with HDFS, Spark, and optionally, Apache Zeppelin.
 Configure and Run Your HTTP(S) Server
In this section, you copy two files to a new HTTP(S) web server directory on your cluster. Next, you configure and run your HTTP(S) server which will host the data files.
- Sign in to Oracle Big Data Manager. See Access Oracle Big Data Manager.
- Copy the taxidropoff_files.zip file to a new directory named
taxi_telemetryon your machine where you will run the HTTP(S) server. This file contains (12).csvdata files that were created from several datasets on the NYC Taxi & Limousine Commission website. Thetaxi_telemetrydirectory will be accessible via web browsers, HTTP(S), and Oracle Big Data Manager. - Extract the
taxidropoff_files.zipfile into thetaxi_telemetrydirectory. - Make sure that you have the following files in your
taxidropoff_filesHTTP(S) web server directory.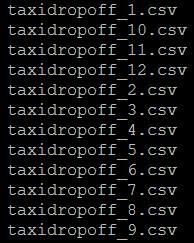
Description of the illustration files-on-cluster.png - Right-click the list_of_files.txt file, select Save link as from
the context menu, and then save it in your
taxi_telemetrydirectory on your machine where you will run the HTTP(S) server. Edit thelist_of_files.txtfile. Replace the occurrences of your_host_name with your host name. Replace the occurrences of your_port_number with your port number. Save the file.
Description of the illustration list-of-files.png Your
taxi_telemetryHTTP(S) web server directory should contain thelist_of_files.txtfile and the (12).csvdata files. - In this tutorial, we are using the
SimpleHTTPServermodule that is available when you install Python. You can use this built-in HTTP(S) server (or your own HTTP(S) server) to turn any directory in your cluster into a web server directory. In your terminal window,cdinto thetaxi_telemetrydirectory.$
cd taxi_telemetry -
You can use any port that is available to you with your HTTP(S) server. Your HTTP(S) server will listen to HTTP(S) requests
for the data hosted on your web server directory using this port. In this tutorial, we will use port 17777. For example, to
make sure that your port is available, enter the following
command:
$ netstat -tlnp 2>/dev/null | grep [port#]In the preceding command, substitute
[port#]with your port number. - Start-up the HTTP(S) server. For example, to start the HTTP(S) server on port 17777, enter the
following command at the
$prompt:$ python -m SimpleHTTPServer 17777
Description of the illustration start-http-server.png In the preceding command, substitute port
17777with your port number.
 Copy a Data File from an HTTP(S) Server to HDFS
In this section, you copy the taxidropoff_1.csv data file from the
taxi_telemtry directory to HDFS using the Copy here from
HTTP(S) feature in Data explorer.
- On the Oracle Big Data Manager page, click the Data tab.
- In the Data explorer section, select HDFS storage (hdfs)
from the Storage drop-down list. Navigate to the
/user/demodirectory, and then click Copy here from HTTP(S) on the toolbar. The New copy data job dialog box is displayed. It has the Sources and Destination sections and the General and Advanced tabs.
- In the Sources section, click Select file or directory to display the Select file or directory dialog box. Select HTTP(S) from the Location drop-down list, if not already selected. In the URI field, enter a valid HTTP(S) URI using the following format, and then click Select. Substitute your_host_name with your actual host name. Substitute your_port_number with your port number that you are using with your HTTP server.
http://your_host_name:your_port_number/taxidropoff_1.csv
Description of the illustration sources-section.png You can click Add source to add more source locations to this copy data job. In addition to HTTP(S), you can specify other storage source locations such as HDFS storage (hdfs) and Oracle Object Storage Classic (bdcs). In this example, we will only include the HTTP(S) source.
- In the Destination section, make sure that the
/user/demoHDFS destination directory is displayed. To make any changes to the destination directory, click Edit destination .
.

Description of the illustration destination-section.png - In the General tab, accept the defaults for all the fields, and then click
Create.

Description of the illustration general-tab.png - A Data copy job created window is displayed for the requested data transfer (copy). The window displays the job details such as the job number, start time, progress, start date and time, and duration. To display additional details about the data copy job, click View more details. When the file is copied successfully to HDFS, a Succeeded window is displayed.
- In the Data explorer section, select HDFS storage (hdfs)
from the Storage drop-down list. Navigate to the
/user/demodirectory, and then click Refresh on the toolbar. The
taxidropoff_1.csvfile is now displayed in the/user/demoHDFS directory.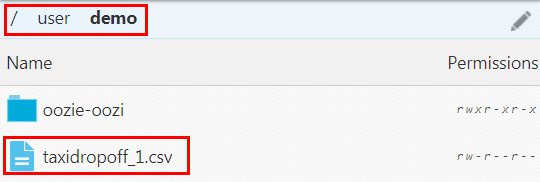
Description of the illustration file-in-hdfs.png
 Copy Multiple Data Files from an HTTP(S) Server to HDFS
In this section, you copy six .csv data files from the taxi_telemetry
directory to HDFS using the Use file as link to list of files checkbox in the New copy data job dialog box. You will use the list_of_files.txt
file which contains the urls for the six .csv data files.
- On the Oracle Big Data Manager page, click the Data tab.
- In the Data explorer section, select HDFS storage (hdfs)
from the Storage drop-down list. Navigate to the
/user/demodirectory, and then click Copy here from HTTP(S) on the toolbar. The New copy data job
dialog box is displayed.
- In the Sources section, click Select file or directory to display the Select file or directory dialog box. Select HTTP(S) from the Location drop-down list, if not already selected. Select the Use file as link to list of files checkbox. In the URI field, enter a valid HTTP(S) URI that references the
list_of_files.txtfile using the following format, and then click Select. The New copy data job dialog box is displayed.http://your_host_name:your_port_number/list_of_files.txtIn the preceding URI, substitute your_host_name with your actual host name. Substitute your_port_number with your port number that you are using with your HTTP server.
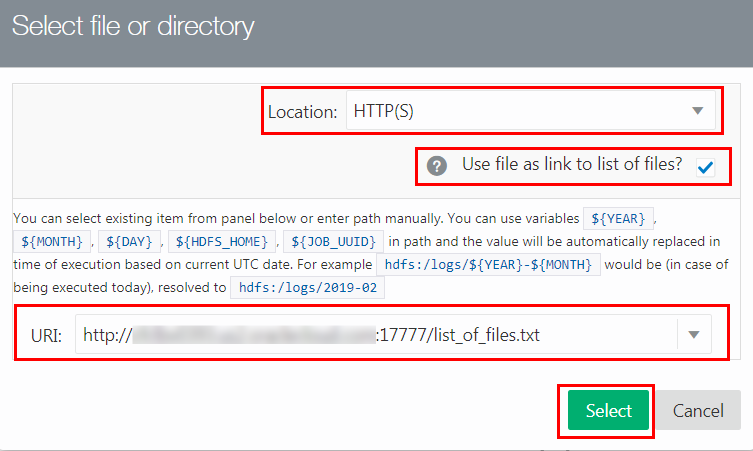
Description of the illustration copy-using-list-of-files.png To display the contents of the
list_of_files.txtfile in thetaxi_telemetrydirectory, enter the following command:$ cat list_of_files.txt - In the Destination section, make sure that the
/user/demoHDFS destination directory is displayed. - In the General tab, accept the defaults for all the fields, and then click Create.
- A Data Copy Job Created window is displayed for the requested data transfer. When the files are copied successfully to HDFS, a Succeeded window is displayed. Click Close to close the window.
- The copied
.csvfiles are now displayed in the/user/demoHDFS directory. If the files are not displayed, click Refresh
on the toolbar.
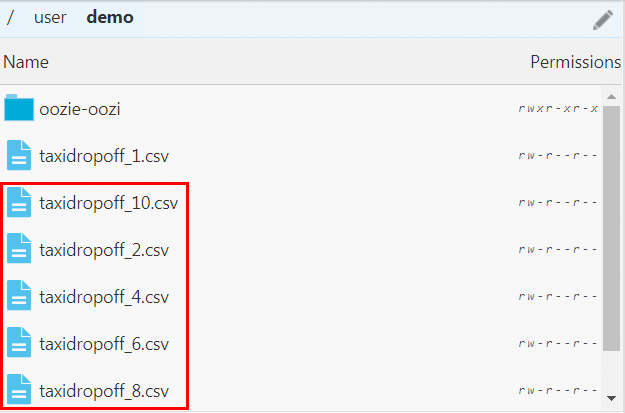
Description of the illustration files-in-hdfs.png
 Next Tutorial
Analyze Data with Oracle Big Data Manager Notebook