 Before You
Begin
In this 20-minute tutorial, you learn how to create and run a new Oracle Big Data Manager pipeline that contains Data Copy and Data Extract jobs. You also import a note into Oracle Big Data Manager that displays the copied and extracted data.
Background
You can use pipelines in Oracle Big Data Manager to easily chain Data Copy and Data Extract jobs. One job can automatically trigger another job without the need for manual intervention. The Analytic Pipelines feature is built on top of the Oozie workflow scheduler.
What Do You Need?
- Access to either an instance of Oracle Big Data Cloud Service or to an Oracle Big Data Appliance, and the required login credentials.
- Access to Oracle Big Data Manager, on either an instance of Oracle Big Data Cloud Service or on an Oracle Big Data Appliance, and the required sign in credentials. A port must be opened to permit access to Oracle Big Data Manager, as described in Enabling Oracle Big Data Manager.
- Read/Write privileges to your HDFS home directory that is associated with your Oracle Big Data Manager Username. For
example, if you logged in to Oracle Big Data Manager with username
john, and your HDFS directory is/user/john, then you must have Read/Write privileges to your/user/johnHDFS directory. In this tutorial, we use the demo user which has Read/Write privileges to the/user/demoHDFS home directory associated with this user. - Read/Write privileges to the
/tmpHDFS directory. - Basic familiarity with HDFS, Spark, database concepts and SQL, and optionally, Apache Zeppelin.
 Upload Local Files to HDFS
- Sign in to Oracle Big Data Manager. See Access Oracle Big Data Manager.
- Right-click the taxidropoff_11.csv file, select Save link as from the context menu, and then save it to your local machine.
- Right-click the taxidropoff_files_1_10.zip file, select Save link as from the context menu, and then save it to your local machine.
- On the Big Data Manager page, click the Data tab.
- In the Data explorer section, select HDFS storage (hdfs)
from the Storage drop-down list. Navigate to the
/tmpHDFS directory, and then click File upload on the toolbar.
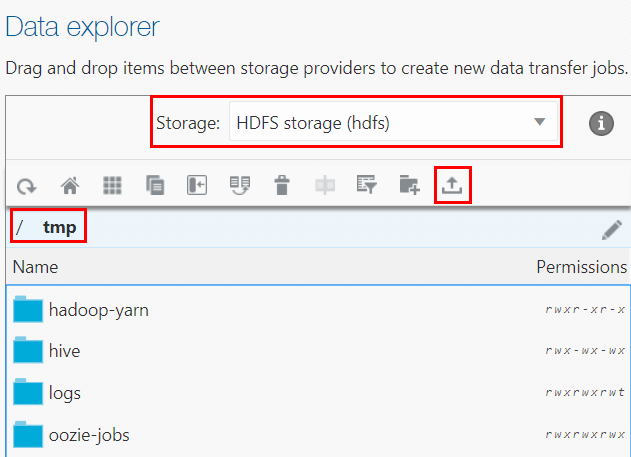
Description of the illustration file-upload.png - In the Files upload dialog box, click the Select files
drop-down list, and then select Files upload. In the Open dialog box, navigate to your local directory
that contains the
taxidropoff_11.csvand thetaxidropoff_files_1_10.zipfiles. Hold down the Ctrl key, and then select the two files. The two files are displayed in the Name column. Click Upload. - When the two files are uploaded successfully to the
/tmpHDFS directory, the Upload has finished message is displayed in the Details section of the dialog box. Click Close to close the dialog box. The two files are displayed in the/tmpdirectory.

 Create and Run a Data Copy Job
- On the Oracle Big Data Manager page, click the Jobs tab to display the Jobs page. Click Create a new job, and then select Data Copy from the context menu. The Create a new job dialog box is displayed.
- Accept the default and unique Data Copy job name in the Job name field.
- Accept the default setting for the Run immediately field. When you click Create in a later step, the job is created and executed immediately.
- In the Source(s) section of the Source and destination
tab, click Select file or directory.
The Select file or directory dialog box is displayed. Select HDFS
storage (hdfs) from the Location drop-down list. Navigate to the
/tmpdirectory, click thetaxidropoff_11.csvfile, and then click Select. - In the Destination section of the Source and destination
tab, click Select file or directory.
The Select file or directory dialog box is displayed. Select HDFS
storage (hdfs) from the Location drop-down list. Click Open home directory
 on the toolbar to navigate to your HDFS home directory automatically. For example, if you logged in to Oracle Big Data Manager with username
 john, and your HDFS directory is/user/john, then your destination directory should be/user/john. Again, in this tutorial, we used the demo user with the/user/demoHDFS home directory associated with this user. Click Select.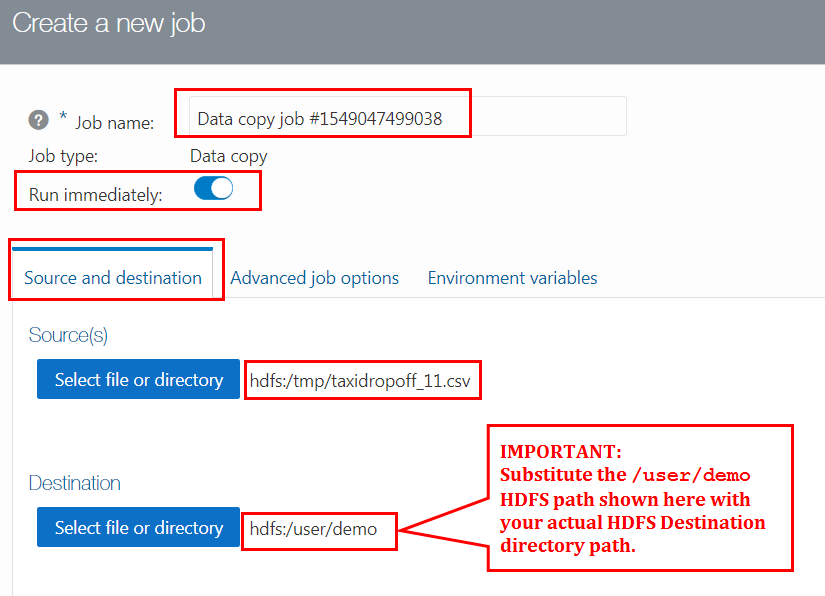
Description of the illustration create-new-job.png Important: Your job name and destination HDFS directory will be different than what it is shown in the preceding screen capture. Substitute the
/user/demopath shown in the preceding screen capture with your actual HDFS home directory path associated with your username. - Click Create to create and run the Data Copy job. The Jobs page is refreshed and the new Data Copy job is displayed in the list of available jobs. If the Data Copy job
executes successfully, the Last execution field shows Succeeded.
This indicates that the source file is copied successfully to the
/user/demoHDFS destination directory.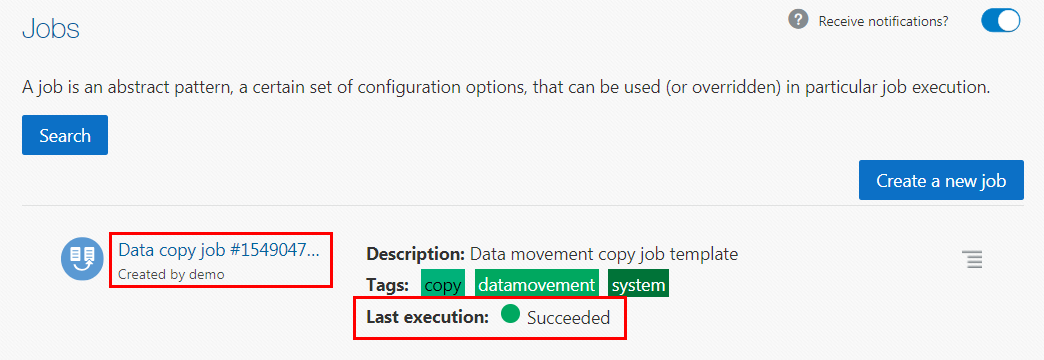
Description of the illustration job-details.png Note: You can click the job name link to display the job details while it is executing or after the execution is completed.
 Create and Run a New Pipeline
- On the Oracle Big Data Manager page, click the Pipelines tab to display the Pipelines page.
- Click the Create new empty pipeline box. The New pipeline: Pipeline #
unique_job_numberpage is displayed. Accept the default and unique pipeline name. Click anywhere on the page to hide the tooltips. - Click the Existing job tab. Click and drag your Data Copy job that you created in the previous section from the list of available jobs onto the Add new job node
 at the end of the pipeline in the Pipeline Editor. The Data Copy
job is added to the pipeline.
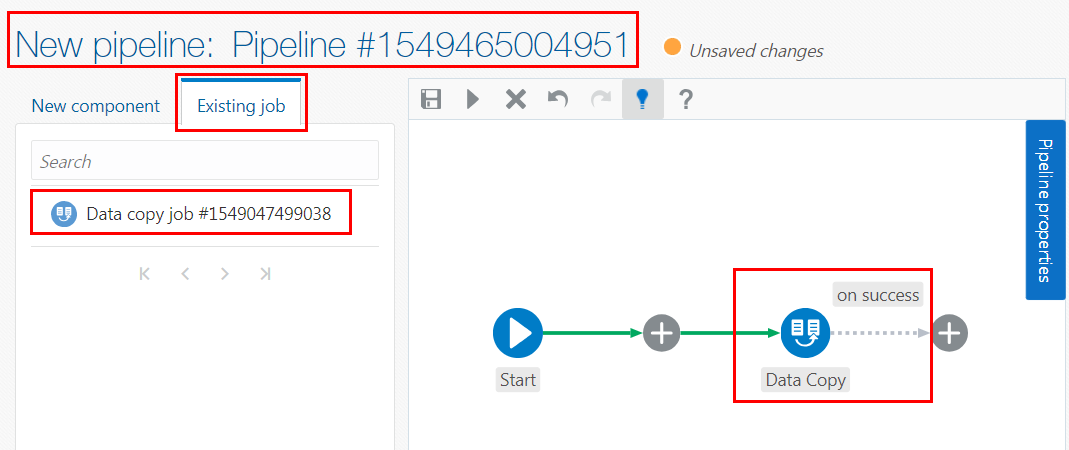
Description of the illustration add-copy-job.png Important: Your pipeline and Data Copy job names will be different than what it is shown in the preceding screen capture.
- Create a new Data Extract job to copy and extract the contents of the the
taxidropoff_files_1_10.zipfile that you uploaded to the/tmpHDFS directory into a different HDFS directory. Click the Add new job node at the end of the
pipeline to add a new Data Extract job. Click Data Extract from the Select item context
menu. The Edit Data Extract properties dialog box is displayed. Accept the default and unique Data Extract
job name in the Job name field.
- In the Source(s) section of the Source and destination
tab, click Select file or directory.
The Select file or directory dialog box is displayed. Select HDFS
storage (hdfs) from the Location drop-down list, if not already selected. Navigate to the
/tmpdirectory, click thetaxidropoff_1_10.zipfile, and then click Select. - In the Destination section of the Source and destination
tab, click Select file or directory.
The Select file or directory dialog box is displayed. Select HDFS
storage (hdfs) from the Location drop-down list. Click Open
home directory
 on the toolbar to navigate to your HDFS home directory automatically, and then click Select. For example, if you logged in to Oracle Big Data Manager with username
 john, and your HDFS directory is/user/john, then your destination directory should be/user/john. Again, in this tutorial, we used the demo user with the/user/demoHDFS home directory associated with this user.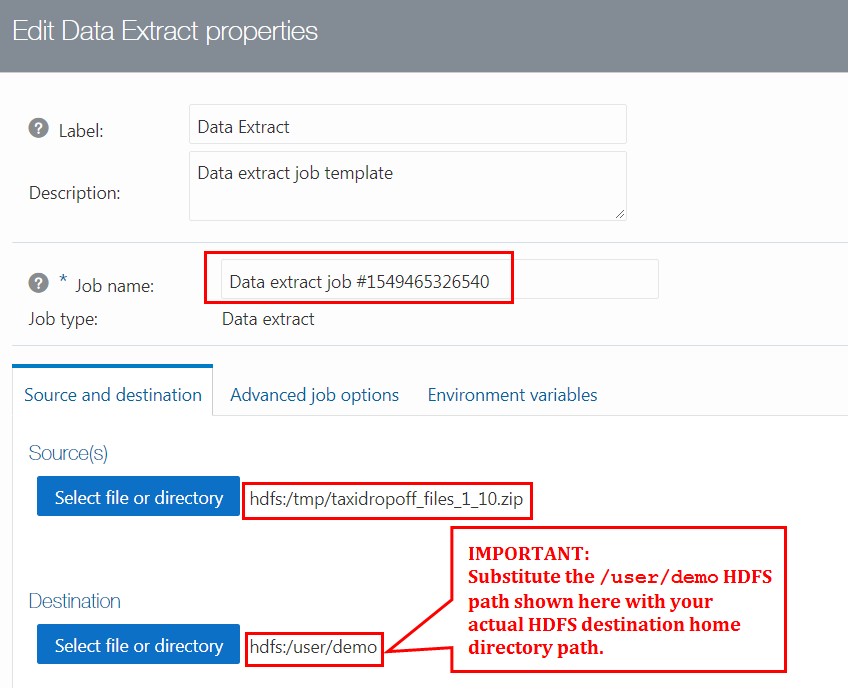
Description of the illustration new-extract-job.png Important: Your Data Extract job name and destination HDFS directory will be different than what it is shown in the preceding screen capture. Substitute the
/user/demopath shown in the preceding screen capture with your actual HDFS home directory path associated with your username. - Click Update. The Data Extract job is displayed in the pipeline.

Description of the illustration completed-pipeline.png - Click Save and run pipeline
 on the toolbar. The Enable pipeline?
dialog box is displayed. Click Enable, save, and run pipeline. If the pipeline
executes successfully, Succeeded is displayed to the left of the Execution # 1 link. This
indicates that the Data Extract job in the pipeline copied the taxidropoff_files_1_10.zip file and extracted its content into your designated destination HDFS directory. This file contains ten files,
taxidropoff_1.csv through taxidropoff_10.csv.
The taxidropoff_files_1_10.zip file is not saved in this HDFS directory.
 - You can view the pipeline execution page either while the job is executing or after the execution is completed. On the Oracle Big Data Manager page, click the Pipelines tab to display the Pipelines page. In the list of available pipelines, click your new pipeline. The Pipeline details page is displayed. It contains the Pipeline overview
and Execution history sections. You can drill-down on the Pipeline overview section to display the pipeline flow.
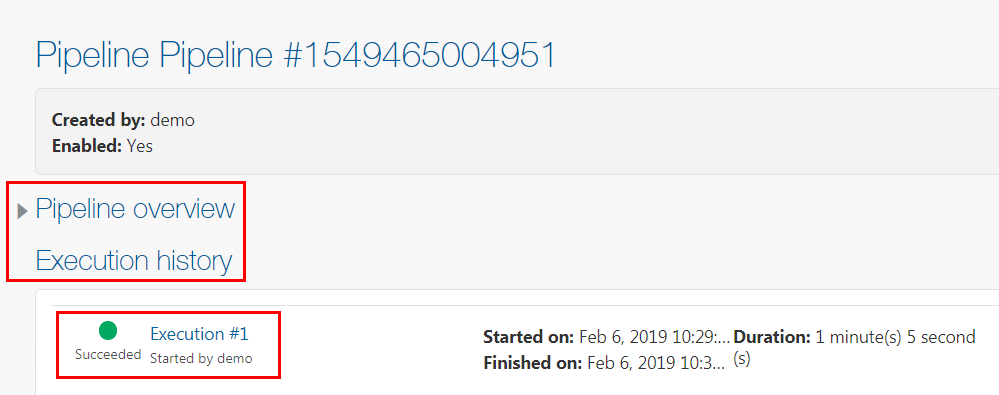
Description of the illustration pipeline-details-page.png - In the Execution history section, click Execution #1. The
Pipeline execution page is displayed. This page contains the Summary,
Status, and Executed jobs sections.
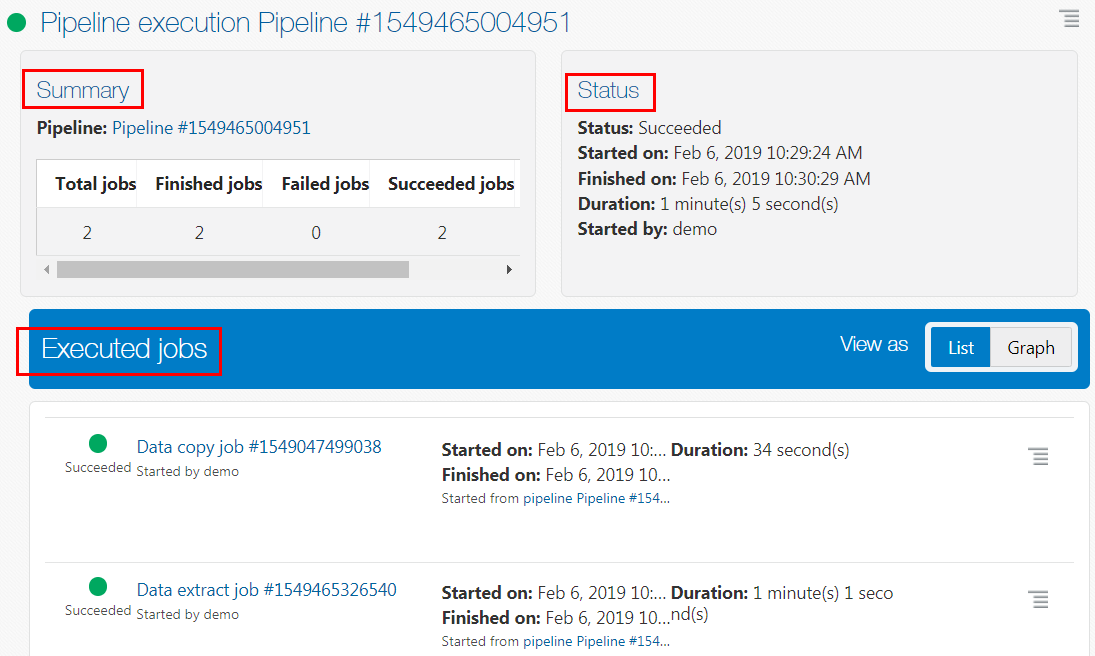
Description of the illustration pipeline-execution.png Note: You can click on any executed job name to view the job's detail and output.
- In the Executed jobs
section, click Graph in the View as field to
display the pipeline in a graph format instead of a
list. If the pipeline is executed successfully, a green check mark badge
 is displayed at the bottom right of the Data Copy and Data Extract jobs.

Description of the illustration pipeline-executed.png
 View the Copied and Extracted Data in a Zeppelin Note
In this section, you restart the Spark interpreter and import a note into Oracle Big Data Manager Notebook. This note verifies that the data was copied and extracted to your HDFS home directory successfully.
- On the Oracle Big Data Manager page, click the Notebook tab.
- Right-click the copy_extract_data_from_pipeline_to_hdfs.json file, select Save link as from the context menu, and then save it to your local machine.
- On the Notebook tab banner, click Home
 . In the Notebook
section, click Import note. The Import New Note dialog box is displayed.
 - In the Import AS field enter Data Copy and Extract Jobs to HDFS Pipeline Template.
Click the Select JSON File icon.
In the Open dialog box, navigate to your local directory that contains the
copy_extract_data_from_pipeline_to_hdfs.jsonfile, and then select the file. The note is imported and displayed in the list of available notes in the Notebook. - Click the
Data Copy and Extract Jobs to HDFS Pipeline Templatenote to view it. The initial status of each paragraph in the note isREADYwhich indicates that the paragraph has not been executed yet. - In the Load data from HDFS and count number of lines paragraph, replace the
/user/demo/path in theloadcommand with your actual HDFS home directory path. For example, if you logged in to Oracle Big Data Manager with username john, edit the path in theloadcommand to reflect the actual path of your HDFS home directory as follows:.load("hdfs:/user/john/*.csv") - Click Run all paragraphs
 on the Note's toolbar to run all paragraphs in this note. A Run all paragraphs
confirmation message is displayed. Click OK. When a paragraph
executes successfully, its status changes to
 FINSIHED. The note loads the data from your HDFS home directory, counts the numbers of lines, analyzes the data, and then displays the data in tabular and Bar Chart formats.
 Create and Run Oracle Big Data Manager Analytic Pipelines