C Run Solidity Smart Contracts with EVM on Oracle Blockchain Platform
You can run Solidity smart contracts with an Ethereum Virtual Machine (EVM) deployed as a chaincode on Oracle Blockchain Platform.
The EVM runs Solidity smart contracts in Ethereum networks. The EVM was created through the Hyperledger Burrow project and integrated into Hyperledger Fabric. This project enables you to use a Hyperledger Fabric permissioned blockchain platform to interact with Ethereum smart contracts written in an EVM-compatible language such as Solidity. See: Hyperledger Fabric EVM chaincode.
- Upload the EVM chaincode package into Oracle Blockchain Platform.
- Deploy the EVM chaincode on a channel.
- Generate bytecode for a Solidity smart contract by using the Remix IDE.
- Deploy the smart contract bytecode into the deployed EVM chaincode. Use the address returned from the deployment to send transactions.
fabric-chaincode-evm:release-0.4 and may not work with other releases.
Set Up the EVM Chaincode Package
Before you can deploy the smart contract, you must set up the EVM chaincode package. Complete the following steps to create the chaincode package folder.
- Download the EVM chaincode package (
.zipfile) from the following GitHub repository: Hyperledger Fabric EVM chaincode. - Extract the downloaded file
fabric-chaincode-evm-release-0.4.zip. - In the extracted files, navigate to the
fabric-chaincode-evm-release-0.4/evmccdirectory. - Delete the
go.sumfile and thevendordirectory. - Vendor all of the dependent Go modules by using the
go modcommand:go mod tidy go mod vendor - Navigate to the
fabric-chaincode-evm-release-0.4/emvcc/vendor/github.com/hyperledgerdirectory. - Create the directory
fabric-chaincode-evm/evmccin the/hyperledgerdirectory. - Move the following folders from the
fabric-chaincode-evm-release-0.4/evmccdirectory to thefabric-chaincode-evm-release-0.4/evmcc/vendor/github.com/hyperledger/fabric-chaincode-evm/evmccdirectory:/address/event/eventmanager/mocks/statemanager
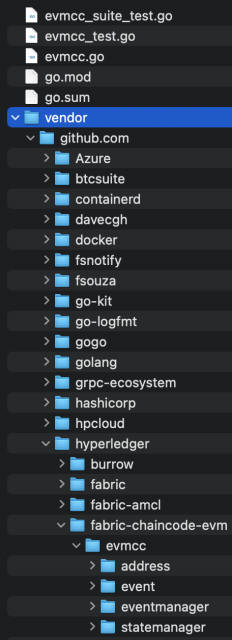
- Compress the top-level
fabric-chaincode-evm-release-0.4/evmccfolder in.zipformat and rename it. The following steps useevmcc.zipas the example name.
Deploy EVM Chaincode on Oracle Blockchain Platform
After you create the EVM chaincode package, you deploy it on Oracle Blockchain Platform.
- Log into the Oracle Blockchain Platform console.
- On the Chaincodes tab, select Deploy a New Chaincode.
- Select Quick Deployment, and enter the
following information:
- Package Label: enter a description of the chaincode package.
- Chaincode Language: GoLang.
- Chaincode Name: enter the name of
the chaincode. For example, enter
soliditycc. - Version:
v1. - Init-required: leave this unselected.
- Channel: select the channels where you want to install the chaincode.
- Chaincode source: upload the
evmcc.zippackage that you created in the previous steps.
After you submit your information, the EVM chaincode is visible on the Chaincodes page and is listed as a deployed chaincode on each channel that you selected to install it on.
Create and Compile Your Solidity Smart Contract
- Open the browser-based Remix IDE: https://remix.ethereum.org/.
- If you already have a Solidity smart contract written, import it into Remix.
- If you don't have a Solidity smart contract written, create a Solidity file (
.solfile) in Remix and take one of the following steps:- If you're familiar with Solidity, create your own smart contract file.
- Use the
SimpleStoragesample code provided in the Solidity documentation: Solidity: Introduction to Smart Contracts - Use the sample code that is being used for this example, which takes the
string namevalue as an input and prints the same value as an output string using theset(name)andget()functions.pragma solidity ^0.4.0; contract Myname { string public yourName; function set(string name) public { yourName = name; } function get() public view returns (string) { return yourName; } }
- Compile your smart contract. Open the Solidity Compiler panel in Remix, ensure that your smart contract tab is open to select it as the file being compiled, set the compiler version to the most recent 4.X version, and then select Compile.
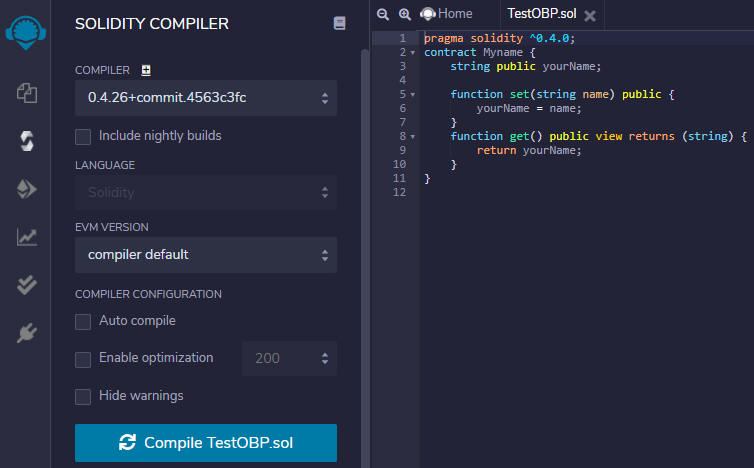
- After the file is compiled, select the Bytecode icon to copy the bytecode as a JSON document to your clipboard.
- Paste the copied bytecode into a text editor and save it.
Deploy the Smart Contract
"object" field. This is the EVM bytecode of a sample smart
contract."object": "608060405234801561001057600080fd5b50610410806100206000396000f30060
8060405260043610610057576000357c0100000000000000000000000000000000000000000000000000000000900463
ffffffff1680634ed3885e1461005c5780636d4ce63c146100c5578063d97d663014610155575b600080fd5b34801561
006857600080fd5b506100c3600480360381019080803590602001908201803590602001908080601f01602080910402
602001604051908101604052809392919081815260200183838082843782019150505050505091929192905050506101
e5565b005b3480156100d157600080fd5b506100da6101ff565b60405180806020018281038252838181518152602001
91508051906020019080838360005b8381101561011a5780820151818401526020810190506100ff565b505050509050
90810190601f1680156101475780820380516001836020036101000a031916815260200191505b509250505060405180
910390f35b34801561016157600080fd5b5061016a6102a1565b60405180806020018281038252838181518152602001
91508051906020019080838360005b838110156101aa57808201518184015260208101905061018f565b505050509050
90810190601f1680156101d75780820380516001836020036101000a031916815260200191505b509250505060405180
910390f35b80600090805190602001906101fb92919061033f565b5050565b6060600080546001816001161561010002
03166002900480601f016020809104026020016040519081016040528092919081815260200182805460018160011615
6101000203166002900480156102975780601f1061026c57610100808354040283529160200191610297565b82019190
6000526020600020905b81548152906001019060200180831161027a57829003601f168201915b505050505090509056
5b60008054600181600116156101000203166002900480601f0160208091040260200160405190810160405280929190
818152602001828054600181600116156101000203166002900480156103375780601f1061030c576101008083540402
83529160200191610337565b820191906000526020600020905b81548152906001019060200180831161031a57829003
601f168201915b505050505081565b828054600181600116156101000203166002900490600052602060002090601f01
6020900481019282601f1061038057805160ff19168380011785556103ae565b828001600101855582156103ae579182
015b828111156103ad578251825591602001919060010190610392565b5b5090506103bb91906103bf565b5090565b61
03e191905b808211156103dd5760008160009055506001016103c5565b5090565b905600a165627a7a72305820a990d4
0b57c66329a32a18e847b3c18d6c911487ffadfed2098e71e8cafa0c980029",- The
toaddress. - The
inputbytecode that's necessary in Ethereum transactions.
To deploy smart contracts, the to field is the zero address, and
the input is the compiled EVM bytecode of the contract. Thus, there
are two arguments provided to the invoke command. The first one,
which was traditionally supposed to be a function name inside the chaincode, is now
0000000000000000000000000000000000000000, and the second
argument is the Solidity smart contract bytecode.
- To deploy the Solidity smart contract on Oracle Blockchain
Platform, you can make the following REST proxy call to send the two arguments to the EVM.
{
    "chaincode": "<evmcc-ccid>",
    "args": [
        "0000000000000000000000000000000000000000",
        "<bytecode-of-the-smart-contract>"
    ],
    "timeout": 0,
    "sync": true
}
The following example uses cURL to deploy the Solidity smart contract to Oracle Blockchain Platform with the namesoliditycc.curl -L -X POST 'https://<hostname>:443/restproxy/api/v2/channels/<channelname>/transactions' \ -H 'Authorization: Basic dXNlcm5hbWU6cGFzc3dvcmQ=' \ -H 'Content-Type: application/json' \ --data-raw '{"chaincode":"<evmcc-ccid>","args":["0000000000000000000000000000000000000000","<bytecode-of-the-smart-contract>"],"timeout":0,"sync":true}' - The response
payloadof the transaction is the contract address for your deployed contract. Copy this address and save it. The contract address is used when you run smart contract functions.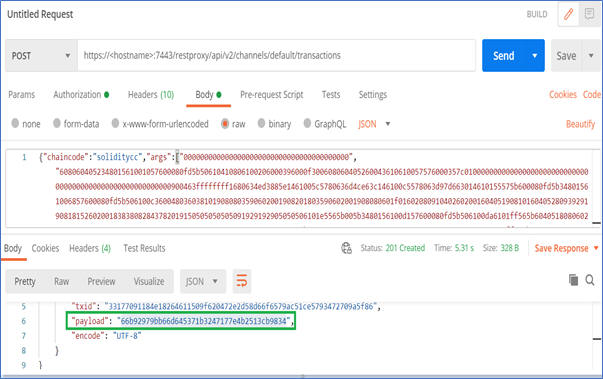
In this example, the smart contract address is66b92979bb66d645371b3247177e4b2513cb9834.
- Interact by using a hash value of the method and input parameters.
- Interact by using the method name and input parameters directly.
Interacting With the Smart Contract by Using Hash Values
After you have the smart contract address, you can use the following calls to interact with the deployed smart contract via the REST proxy.
To run functions, you use invoke and query transactions but with different parameters. The sample contract contains two functions: get and set.
In these transactions, the to field is the contract
address and the input field is the function execution hash
concatenated with any of the required arguments.
You must acquire the hash of the function execution to run a transaction. A simple way to do this is to run the functions in the Remix IDE and to then copy the hash from the transaction logs:
- In the Remix IDE, open the Deploy and Run Transactions panel. Ensure that your contract is selected in the Contract field, and select Deploy.
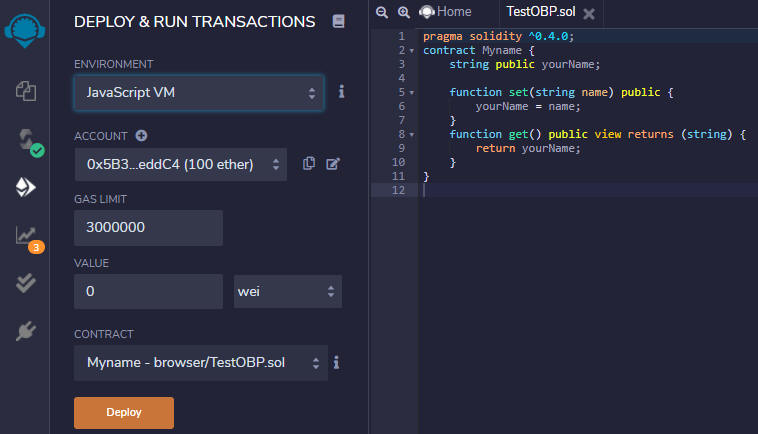
After the deployment completes, the contract will be listed in the Deployed Contracts list. - Expand the contract in the Deployed Contracts list. The smart contract functions are listed.
- Run a transaction. For the provided example, enter oracle and then select set.
- The Terminal window shows the transaction logs. If the transaction logs are minimized, expand them by selecting the log. Copy the value of the
inputfield (which is the function execution hash) by selecting the icon next to it. Save this value to the same location as your contract address, removing the leading0x.
- After you have the function execution hash and the contract address, you can run the set transaction on Oracle Blockchain
Platform using the hash and address as the raw data arguments.
The following example shows how to run the transaction by using cURL:--data-raw '{"chaincode":"<chaincodename>","args":["<contractaddress>","<setfunctionexecutionhash>"]}'curl -L -X POST 'https://<hostname>:443/restproxy/api/v2/channels/<channelname>/transactions' \ -H 'Authorization: Basic dXNlcm5hbWU6cGFzc3dvcmQ=' \ -H 'Content-Type: application/json' \ --data-raw '{"chaincode":"soliditycc","args":["66b92979bb66d645371b3247177e4b2513cb9834","4ed3885e000000000000000000000000000000000000000000000000000000000000002000000000000000000000000000000000000000000000000000000000000000066f7261636c650000000000000000000000000000000000000000000000000000"]}' - Open the Oracle Blockchain Platform console and check that the transaction is listed in the ledger.
To run another transaction such as a query by using the smart contract's
get function, you can generate the function execution hash in
Remix and then combine it with the contract address:
- In Remix on the Deploy and Run Transactions panel, ensure that your contract is still listed under Deployed Contracts. If not, redeploy it.
- Select get. Retrieve and save the input from the transaction as you did with the set transaction, removing the leading
0x.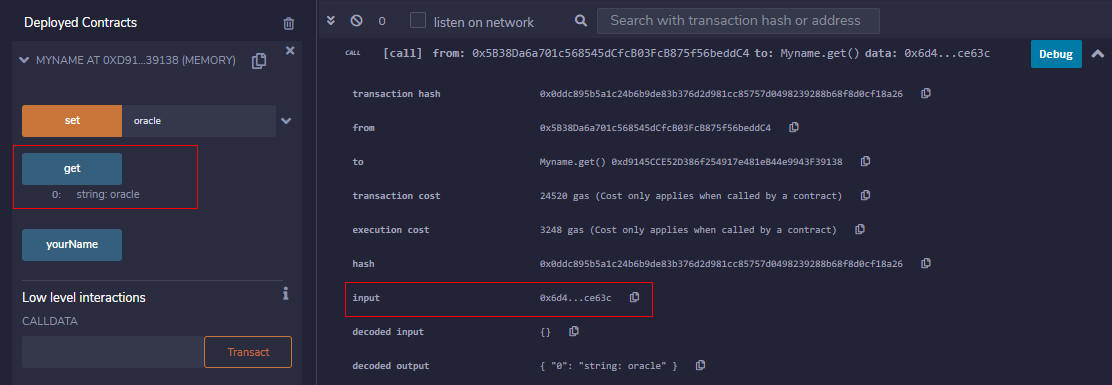
- Use this transaction hash and the contract address to run a query transaction against the chaincode deployed on Oracle Blockchain
Platform.
The following example shows how to run the transaction by using cURL:--data-raw '{"chaincode":"<chaincodename>","args":["<contractaddress>","<getfunctionexecutionhash>"]}'
The returned payload will contain the asset being queried, which in the example case is the stringcurl -L -X POST 'https://<hostname>:443/restproxy/api/v2/channels/<channelname>/chaincode-queries' \ -H 'Authorization: Basic dXNlcm5hbWU6cGFzc3dvcmQ=' \ -H 'Content-Type: application/json' \ --data-raw '{"chaincode":"soliditycc","args":["66b92979bb66d645371b3247177e4b2513cb9834","6d4ce63c"]}'oracle.