Oracle Content Capture Engineering Case Study
Introduction
This article describes an end-to-end case study for Oracle Content Management (OCM), where its content capture and asset modeling features are used to organize project documents for an engineering firm.
To learn more about Oracle Content Management, visit the Oracle website or have a look at the documentation.
Use Case Scenario
Supremo Engineering specializes in the construction of new office buildings. They have a need for a new content management solution to help them organize the documents related to the construction and ongoing maintenance of their office building projects. This new content management implementation must enable them to find building details and architectural drawings, and to trace the history of change requests that were issued during construction of a building.
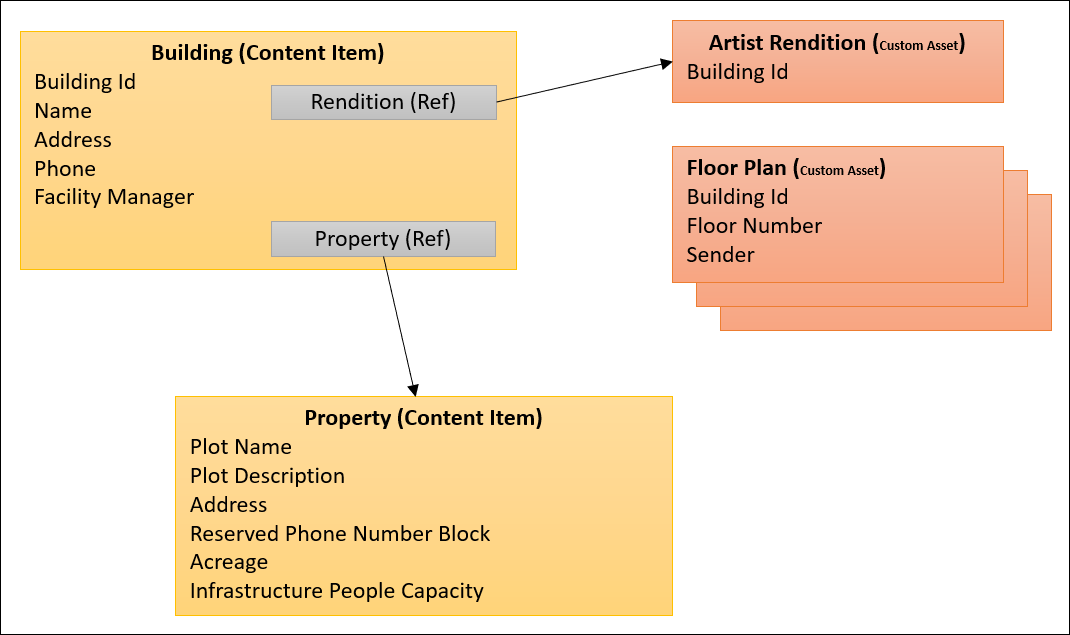
Oracle Content Management offers asset modeling features that can be used to create building project objects with the necessary references to an architect’s original artistic rendition of the proposed building, a collection of floor plan diagrams (one for each floor), and a collection of change requests that were submitted during building construction.
Oracle Content Management also provides content capture features that can be used to manage the ingestion of these different asset types, ensuring that they’re properly indexed and attached to the appropriate building projects.
Personas
The following roles are involved in this project:
| Name | Role |
|---|---|
 Conrad |
As an OCM capture manager, I administer the capture procedures at Supremo Engineering to collect the content from various sources and route it to Oracle Content Management. |
 Andrea |
As the OCM content administrator, I develop and maintain the various content and asset types at Supremo Engineering to represent the data in Oracle Content Management. |
Project Definition
Andrea and Conrad have had several meetings with the Supremo Engineering building projects team to gather their document collection and storage requirements. They’ve identified different groups which will be producing documents that will need to be stored within their Oracle Content Management (OCM) repository, including real estate, engineering, architects, and builders.
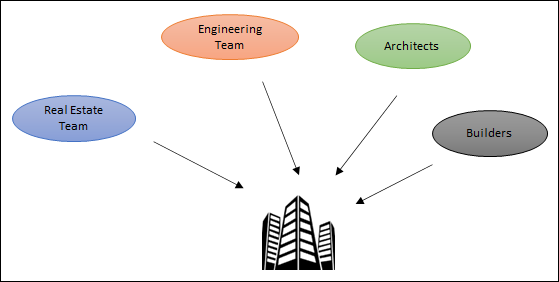
Their next task is to translate these requirements into an Oracle Content Management implementation.
This project covers these areas:
- Property selection (with asset synchronization)
- Building project initialization (with file import and asset lookup)
- Architectural drawings (with email import and barcode extraction)
- Change requests (with scanned documents and client lookup)
Process Diagram
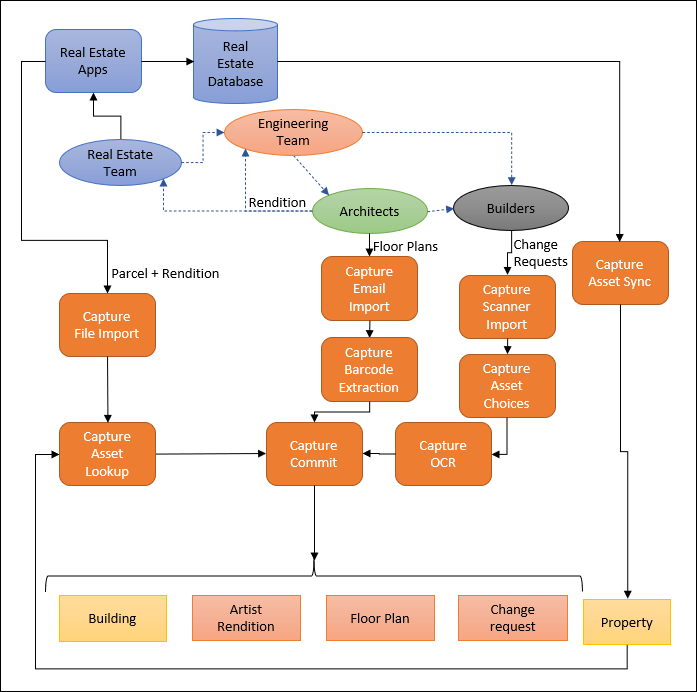
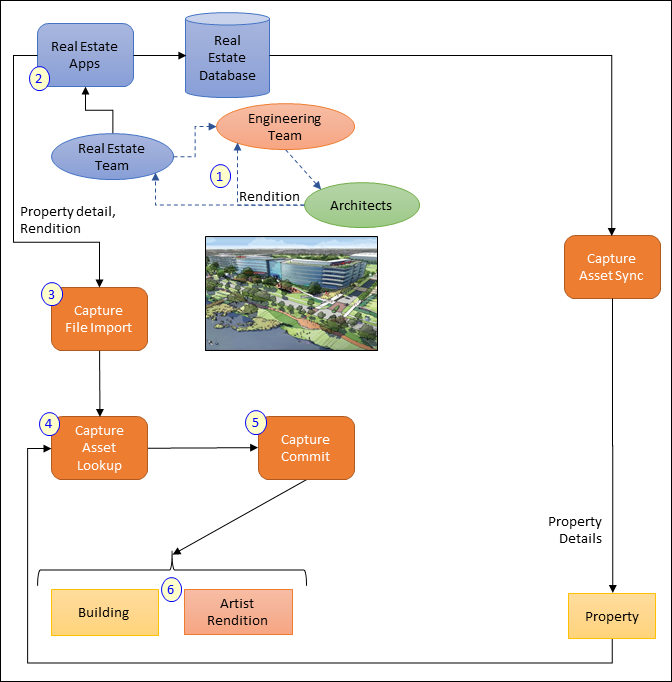
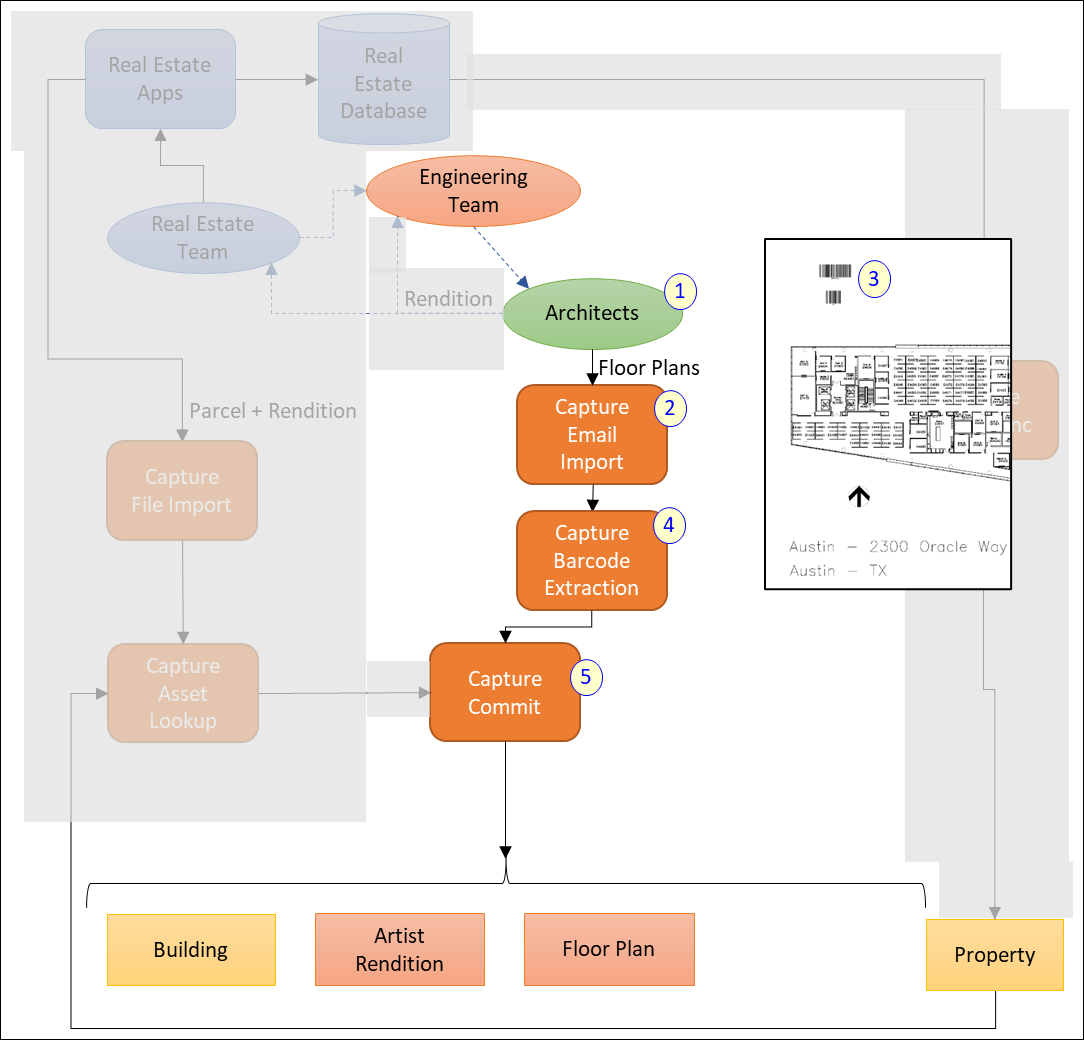
This is a visualization of the overall project workflow:
Property Selection: Asset Synchronization
The first step in the building process is selecting the best real estate lots for new building projects.
Supremo Engineering’s real estate team finds desirable properties upon which to construct new buildings. They have specialized applications that they use to manage this process. Much of the data collected about the property will also be useful during construction and long-term maintenance of the building. The engineering team would like to have this data available in Oracle Content Management for reference.
Andrea creates an asset repository and then a new content item type in Oracle Content Management to hold this data about the property parcels.
Conrad uses the capture asset synchronization feature to synchronize data from the real estate database to the new property content type that Andrea created.

Create an Asset Repository
Andrea must first create an asset repository in Oracle Content Management that will contain all the building project assets to be collected.
In the Oracle Content Management web application, Andrea clicks Content in the left navigation menu and then chooses Repositories in the dropdown menu.

When she clicks the Create button, she’s presented with two repository options:
- Asset Repository—The traditional OCM asset repository, which is designed to support web site management.
- Business Repository—An asset repository that’s intended for backoffice solutions as opposed to high-profile, outward-facing websites.
Andrea selects the business repository type, since it more closely matches the needs of the engineering team.
There are multiple configuration options for a repository, but Andrea only provides the initial name and description at this point. She’ll update the repository later as new components are defined.

Create a Property Content Item Type
Andrea’s next task is to define a content item type to hold the property parcel information:
Andrea navigates to the Asset Types page and clicks Create.

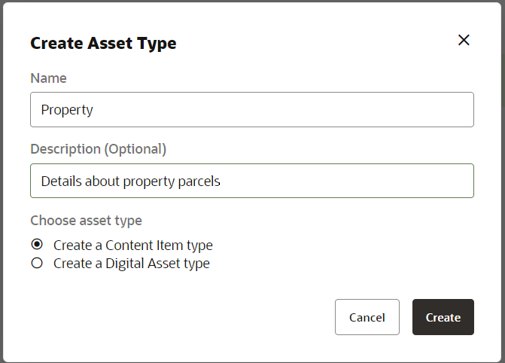
She provides the name and description of the type, and then chooses to create a content item type:
- Content Item Type—A content item type isn’t associated with a specific asset (or file), but it does include metadata fields and references to other content items or assets.
- Digital Asset Type—A digital asset type is always associated with a file. Metadata about the file can also be defined. Asset types don’t support links to other items or assets.
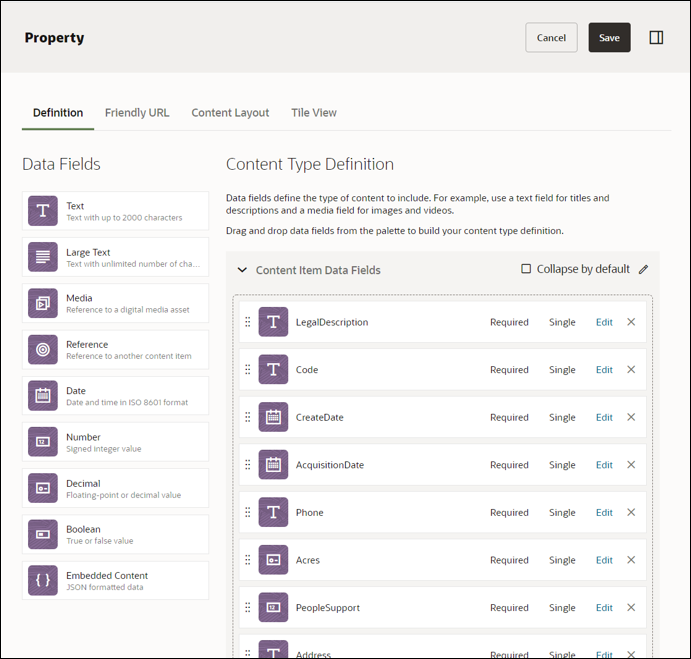
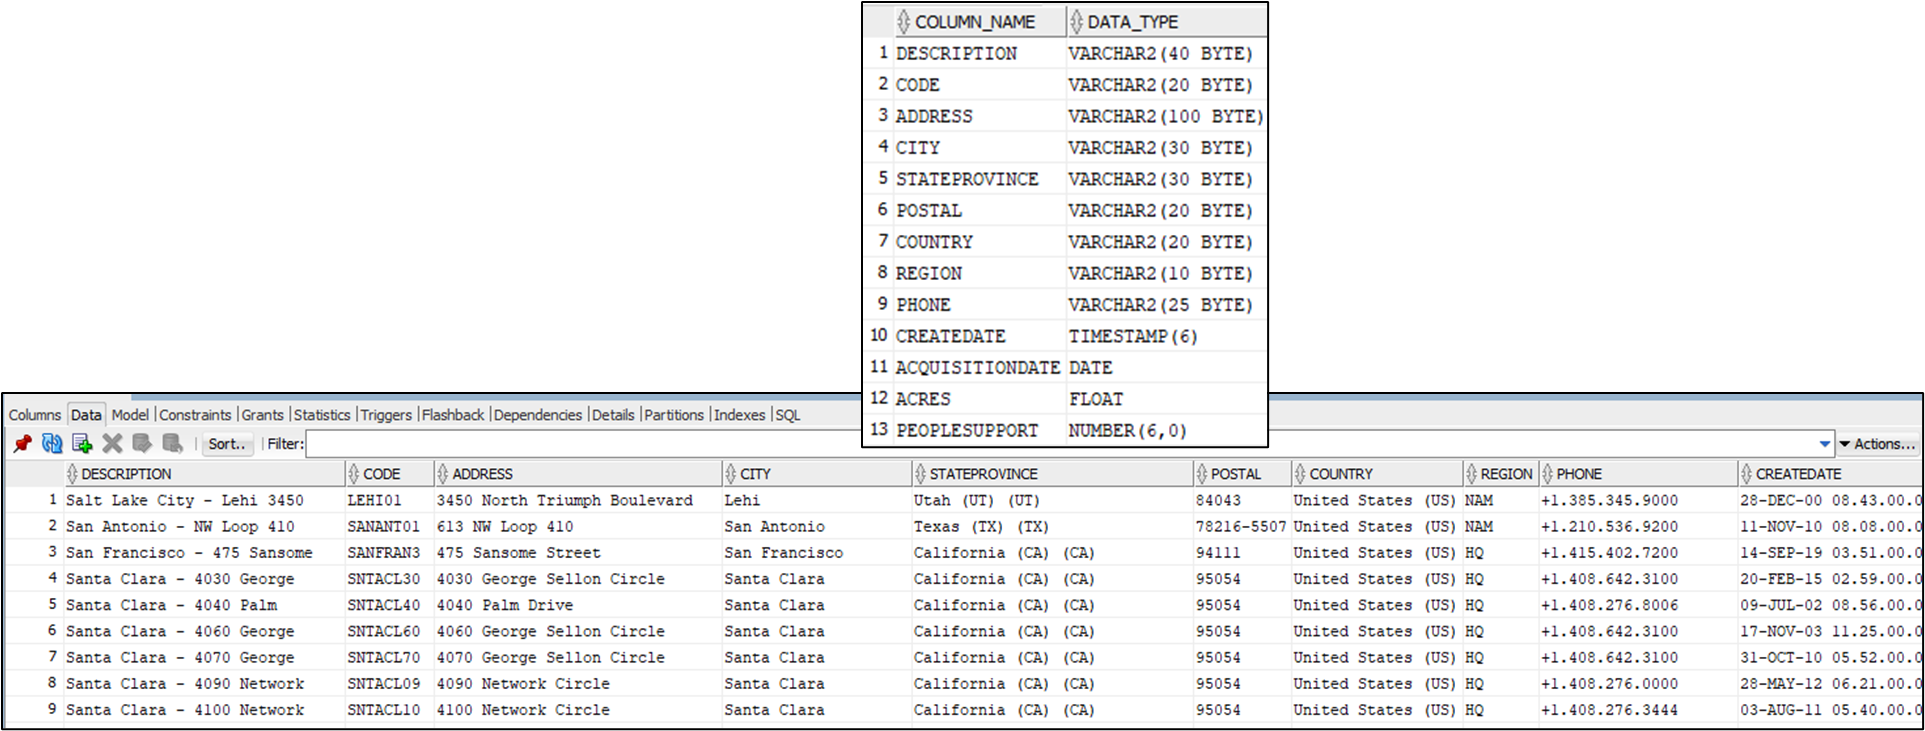
The engineering team has asked for the following fields of the real estate team’s property data to be synchronized to Oracle Content Management for reference:
- LegalDescription—The legal description of the property.
- Code—A unique identifier assigned to a parcel based on the initially developed building ideas.
- Phone—The lowest phone number of a set of phone numbers reserved for a future building.
- CreateDate—The date the parcel was acquired.
- Acres—The size of the parcel in fractional acres.
- PeopleSupport—The number of people (office workers) the local infrastructure (water, electricity, sewage, etc.) can support.
- Address, City, StateProvince, Postal, Country, Region—The address of the parcel.
Andrea adds the various metadata values to the content type using the correct data type for each field. They are all required fields.
After creating the new content type, Andrea goes back to the Building Projects repository and updates it to include the new Property content type.
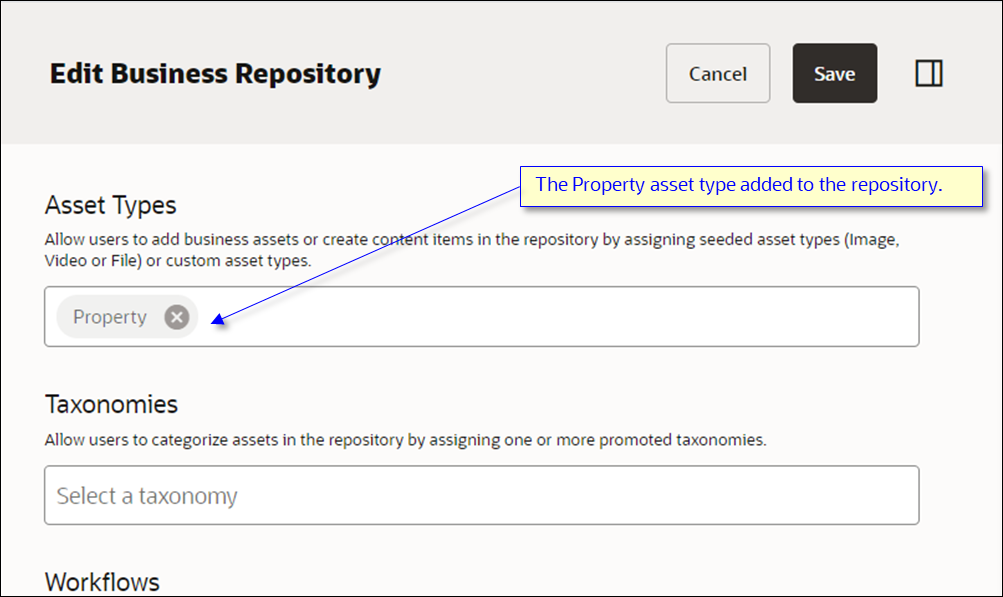
Andrea lets Conrad know that the Property content type is ready for use.
Set Up Asset Synchronization
Conrad is now ready to set up asset synchronization between Supremo Engineering’s real estate database and Oracle Content Management.
Create a New Content Capture Procedure
Conrad starts by creating a new content capture procedure that defines the various document collection flows for the engineering team.

Obtain Database Details
Next, Conrad obtains the database connection details to the real estate team’s database from which to synchronize the data over to the content type:
- Database Machine:
realEstateDB.engco.com - Port:
1521 - Service:
property.engco.com - Credentials:
readOnlyUser/ASafePassword
Looking at the database design, there’s a clear mapping of the fields from the real estate database over to the new content type that Andrea created.
Start the Import File Agent
Conrad intends to use the asset synchronization feature of the capture file import utility to synchronize the data from the real estate database to the Property content type in Oracle Content Management.
The first step is to download the File Import Agent onto a server machine that’s running in their on-premise data center, so that it will have access to the real estate database.
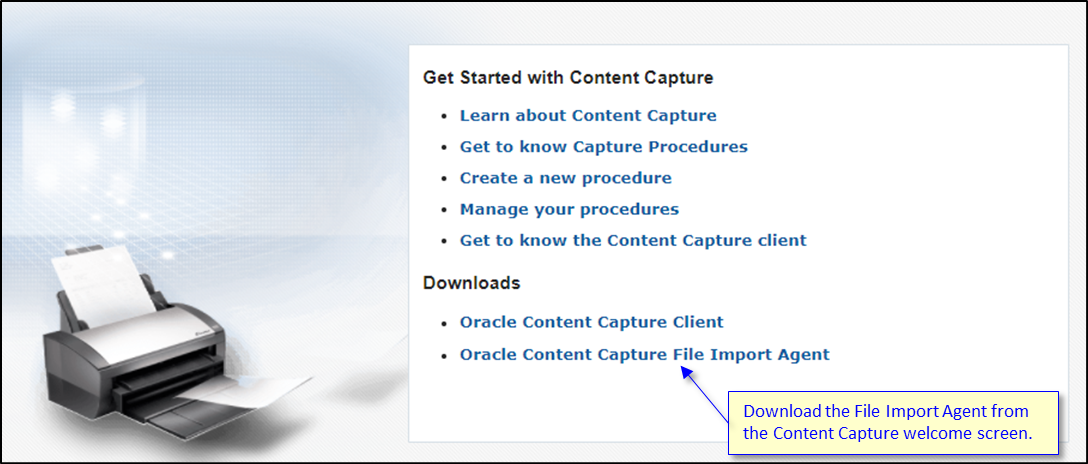
Conrad unzips the downloaded file and navigates into
capture-agent/bindirectory.He executes the
capture -hcommand to show the command help so he can see all options that are available.He then verifies that the Import File Agent isn’t currently running, and he starts it:
capture status
capture start
Create Confidential Client Application
Next, Conrad creates a confidential application within his Oracle Cloud domain instance and grants that application access to OCM Content Capture, so the File Import Agent can communicate with OCM Content Capture.
Conrad navigates to the domain administration page and then opens the domain.
Oracle is in the process of updating Oracle Cloud Infrastructure (OCI) regions to switch from Identity Cloud Service (IDCS) to Identity and Access Management (IAM) identity domains. All new Oracle Cloud accounts automatically use IAM identity domains. For existing accounts, you may create the confidential client application in IDCS or IAM, depending on your cloud account status.
He then chooses to add a new confidential application.
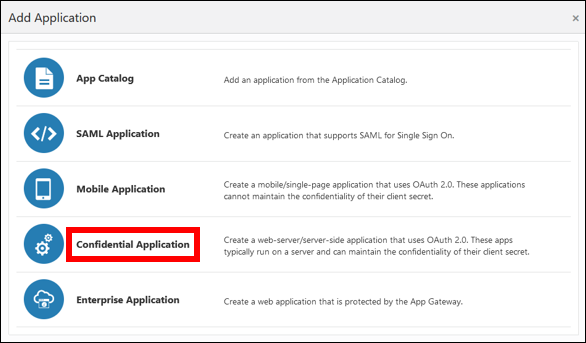
He provides the relevant details about the new client configuration. This creates a secure entry point for API-based applications such as the File Import Agent to use the Content Capture APIs.
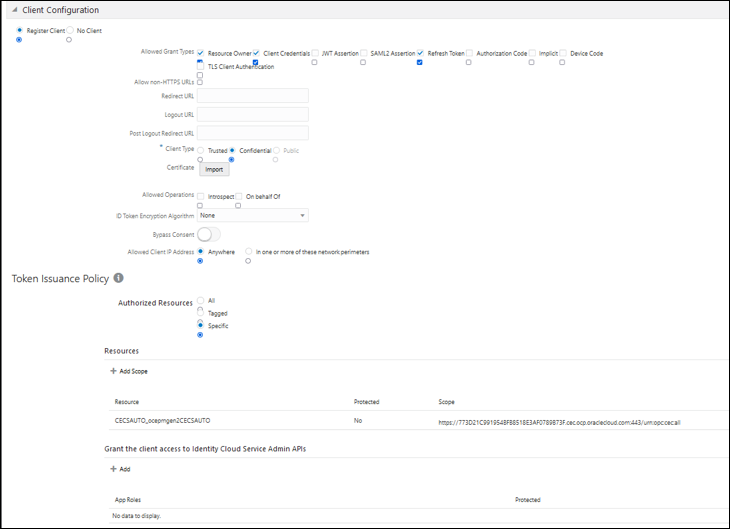
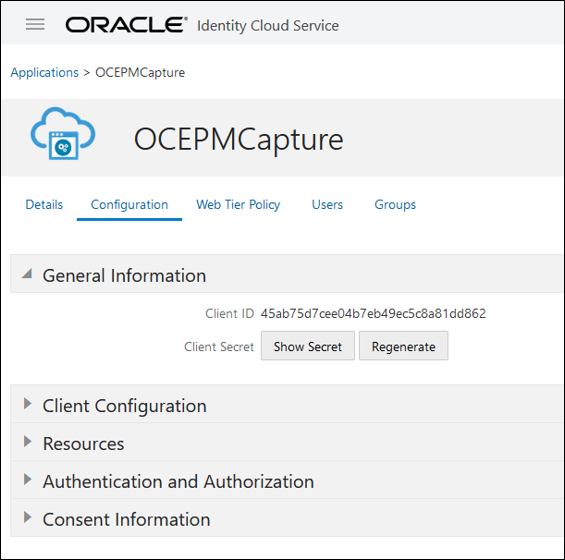
Conrad collects the following pieces of information from this new application:
- URL:
https://idcs-61f5af048a00496383f26169094f0d2f.identity.oraclecloud.com/oauth2/v1/token - Client Id:
4ab705d7cee04b7eb49ec5c8a81dd862 - Client Secret:
698abaa3-0deb-4b13-8850-26c6ad4df1f0 - Scope:
https://73D21C991954BFB8518E73AF0789B73F.cec.ocp.oraclecloud.com:443/urn:opc:cec:all
- URL:
Connect the File Agent to OCM Content Capture
Conrad now connects the Import File Agent to his instance of OCM Content Capture.
He connects the Import File Agent by running the
register-servercommand (line breaks added for legibility):C:\CaptureImportAgent\capture-agent\bin>capture register-server oceServer -e https://engnrco-oce0001.cec.ocp.oraclecloud.com -u captureService@engco.com -p ALongSafePasswordValue -i https://idcs-61f5af048a00496383f26169094f0d2f.identity.oraclecloud.com/oauth2/v1/token -c 4ab705d7cee04b7eb49ec5c8a81dd862 -s 698abaa3-0deb-4b13-8850-26c6ad4df1f0 -o https://73D21C991954BFB8518E73AF0789B73F.cec.ocp.oraclecloud.com:443/urn:opc:cec:all Server created with name : oceServerHe then uses the
list-serverscommand to confirm the registration by showing the servers that the agent is connected to:C:\CaptureImportAgent\capture-agent\bin>capture list-servers server name user endpoint ----------- ---- -------- oceServer captureService@engco.com https:// engnrco-oce0001.cec.ocp.oraclecloud.comConrad’s next goal is to link the Import File Agent to the real estate database. Details about the structure of the database will be uploaded to OCM Content Capture for later mapping of database columns to the content type fields.
He uses the
list-procedurescommand to find the identifier of the procedure he created in OCM Content Capture:C:\CaptureImportAgent\capture-agent\bin>capture list-procedures –s oceServer name id description created by ---- -- ----------- ---------- Engineering Projects 7 Document flows for the Buildin conrad@engco.com Invoice flow 4 conrad@engco.comConrad then uses the
register-databasecommand to establish a three-way linkage between the File Import Agent, the real estate database, and his new content capture procedure (line breaks added for legibility):C:\CaptureImportAgent\capture-agent\bin>capture register-database propertyDB -s oceServer -w 7 -c jdbc:oracle:thin:@//realEstateDB.engco.com:1521/property.engco.com -u readOnlyUser -p ASafePassword Successfully registered database connectionHe confirms the linkage using the
list-databasescommand:C:\CaptureImportAgent\capture-agent\bin>capture list-databases –s oceServer database name procedure linked user url ------------- --------- ------ ---- --- propertyDB 7 tru RealEstateSchema jdbc:oracle:thin:@//dajones.sub…
Create the Data Synchronization
Now that the database has been registered, Conrad can choose which tables he wishes to expose to OCM Content Capture for synchronization to content items.
Knowing that the desired database table name is PROPERTY, Conrad registers the table as one available for synchronization:
C:\CaptureImportAgent\capture-agent\bin>capture register-table
-s oceServer
-w 7
-d propertyDB
-t PROPERTY
Successfully registered table
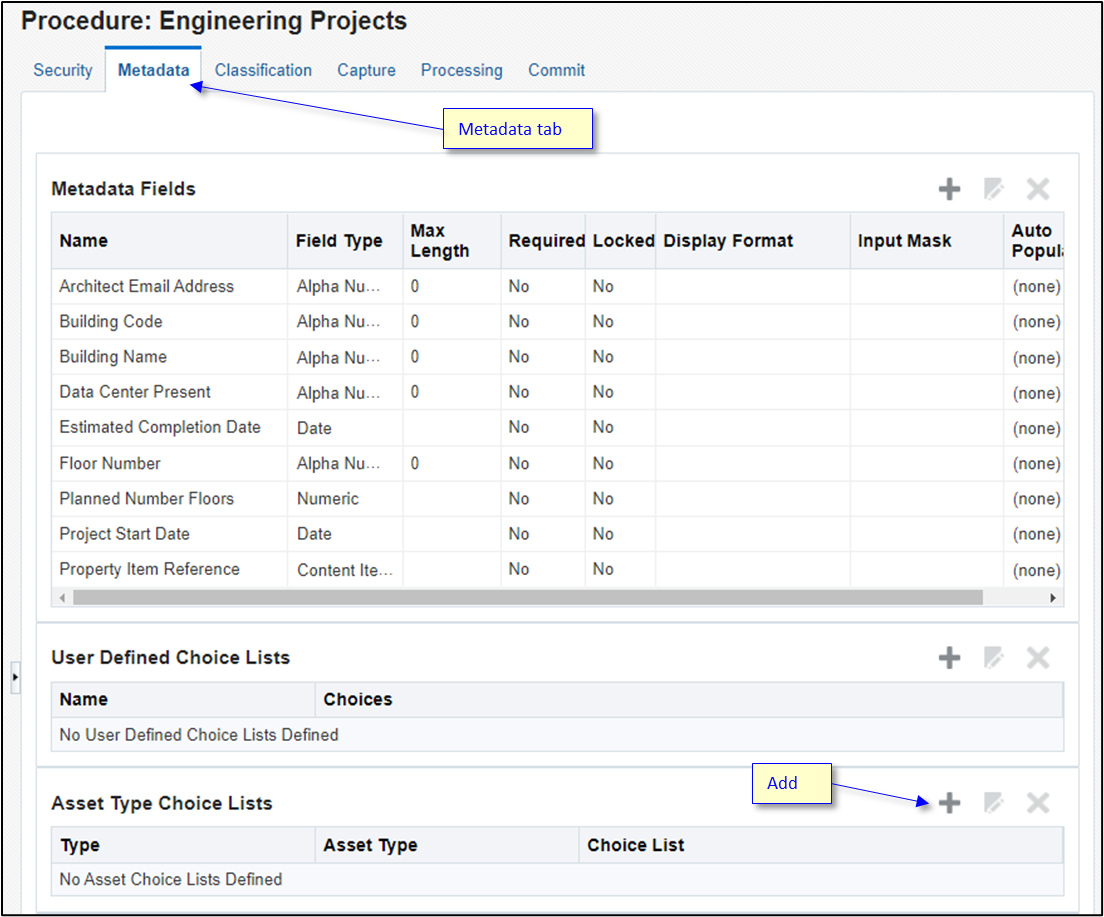
He now returns to the Content Capture administration UI, selects the Engineering Projects procedure, and opens the Metadata tab.
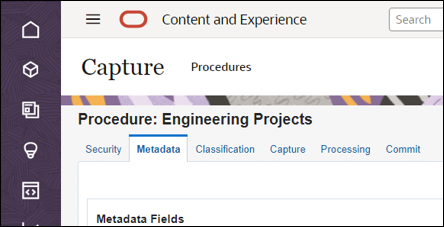
He scrolls down the page until he finds the Asset Synchronizations section, and then clicks + to add a new one.

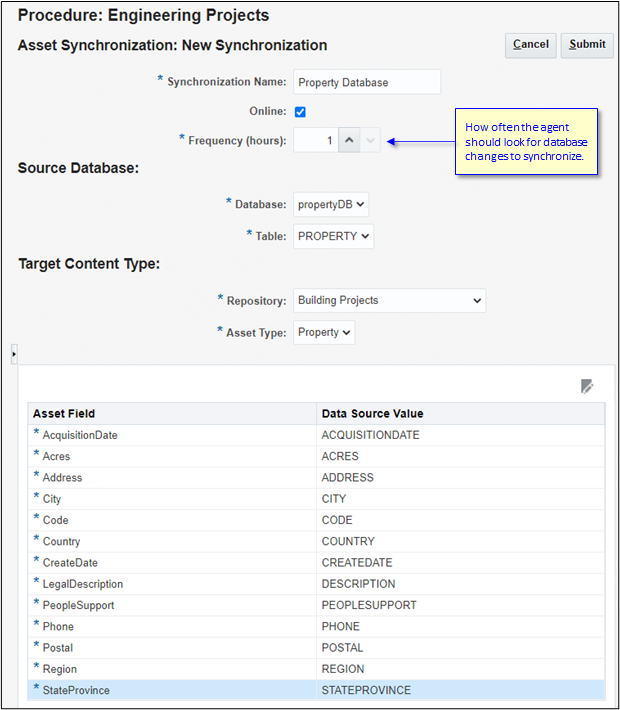
Conrad configures the new synchronization.
The Source Database section shows the databases and tables that he registered via the agent.
In the Target Content Type section, Conrad selects the new repository and asset type created by Andrea.
The file agent has also uploaded the details of the columns available in the database table. This allows Conrad to map the database columns to their corresponding asset fields by selecting columns from a dropdown list (which shows only those fields that have compatible data types).
Confirm Data Synchronization
Conrad knows that the agent will start the next synchronization cycle on the given schedule. However, he’d like to confirm things are working immediately, so he chooses to force the update.
Conrad runs the
refresh-configcommand to cause the agent to download the newest configurations from OCM Content Capture, which will include his new asset synchronization definition:C:\CaptureImportAgent\capture-agent\bin>capture refresh-config Configuration updated.He then uses
list-table-sync-jobsto get the unique identifier of his new configuration.C:\CaptureImportAgent\capture-agent\bin>capture list-table-sync-jobs server sync name id online linked database table asset type --------- --------------- ------------------------------ ------ ------ ------------ ---------- ----------- oceServer Property Databa fafcb76e-8bb6-4eb7-827e-ba8348 true true propertyDB PROPERTY PropertyFinally, he triggers the data synchronization to start immediately using the
trigger-table-synccommand:C:\CaptureImportAgent\capture-agent\bin>capture trigger-table-sync -s ocepmgen2 -a fafcb76e-8bb6-4eb7-827e-ba8348f3407b Asset sync job triggered successfully
Check Incoming Property Content Items
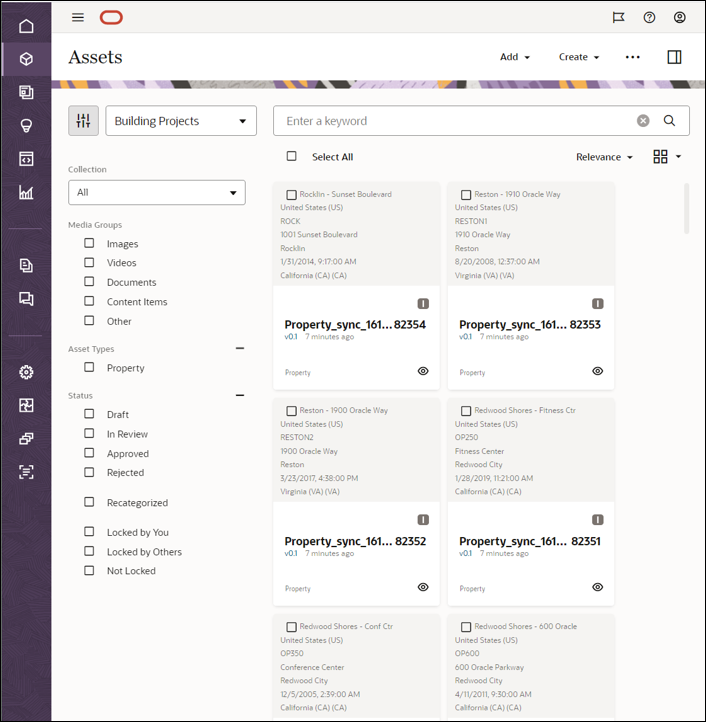
Conrad opens the Building Projects asset repository in the Oracle Content Management web application, where he can see the new content items coming in.
Building Project Initialization: File Import and Asset Lookup
In this stage, the building project is initialized, and the files associated with the project are captured and stored in Oracle Content Management.
When the real estate team identifies a property, they engage the engineering team, who evaluates the property. If they see potential, they work with an architect firm to prepare initial building designs. The architect team provides an artistic rendition of the future building. If the real estate and engineering teams approve, the land purchase proceeds.
Once the land purchase has been finalized, the real estate team’s application will generate a file of relevant metadata along with the artist rendition in a directory.
Conrad uses the Content Capture list file import feature to monitor the directory. Each new file initiates a building project capture flow.
The building project flow uses the building identifier from the inbound metadata to perform an asset lookup against the Property content items that are now being created by the asset synchronization process. The lookup produces a reference to the Property content items.
Conrad will add a commit step to the flow to save the artist’s rendition as a new asset and to create a new Building content item.
Andrea will need to define the new Building Project content item and the Artist Rendition asset.
Create the Artist Rendition Asset Type
Andrea worked with the engineering team to define the metadata to be collected.
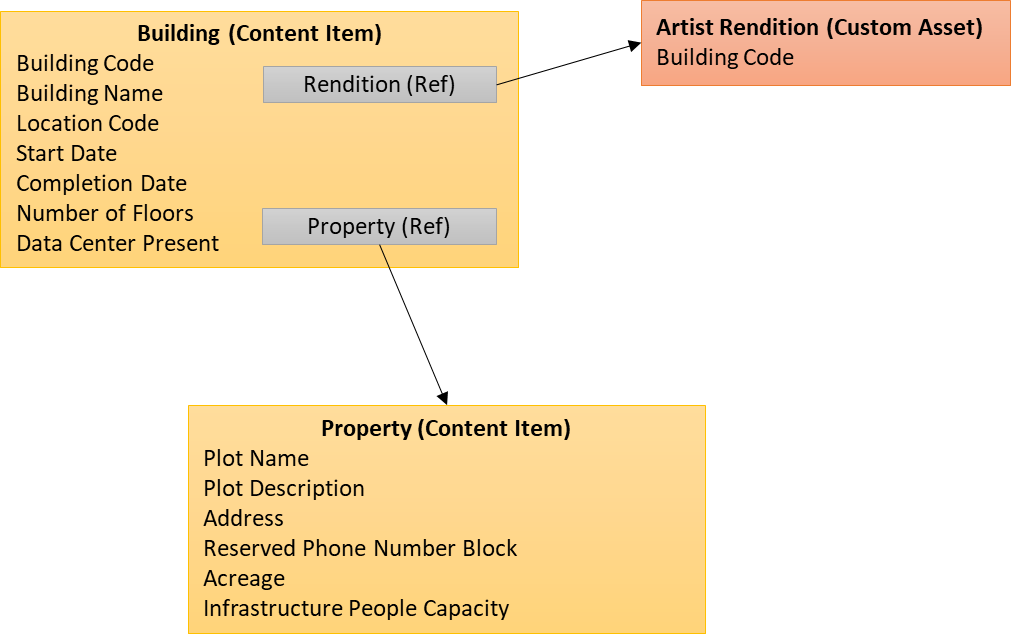
There will be a new asset type to hold the artist’s rendition of the proposed building. This custom asset type, copied from the default system ‘Image’ type, will include the building code as a metadata field.
In addition, there will be a primary Building Project content item, which will represent the project. It will have links to various other artifacts collected during the project:
- A media reference to the artist’s rendition asset type
- An item reference to the Property content item that was synchronized from the real estate database.
The Building Project content item will have the following metadata fields:
- Building Code (a coded string used to reference the building)
- Building Name
- Proposed start date
- Proposed completion date
- Number of floors
- Data center present (true/false)
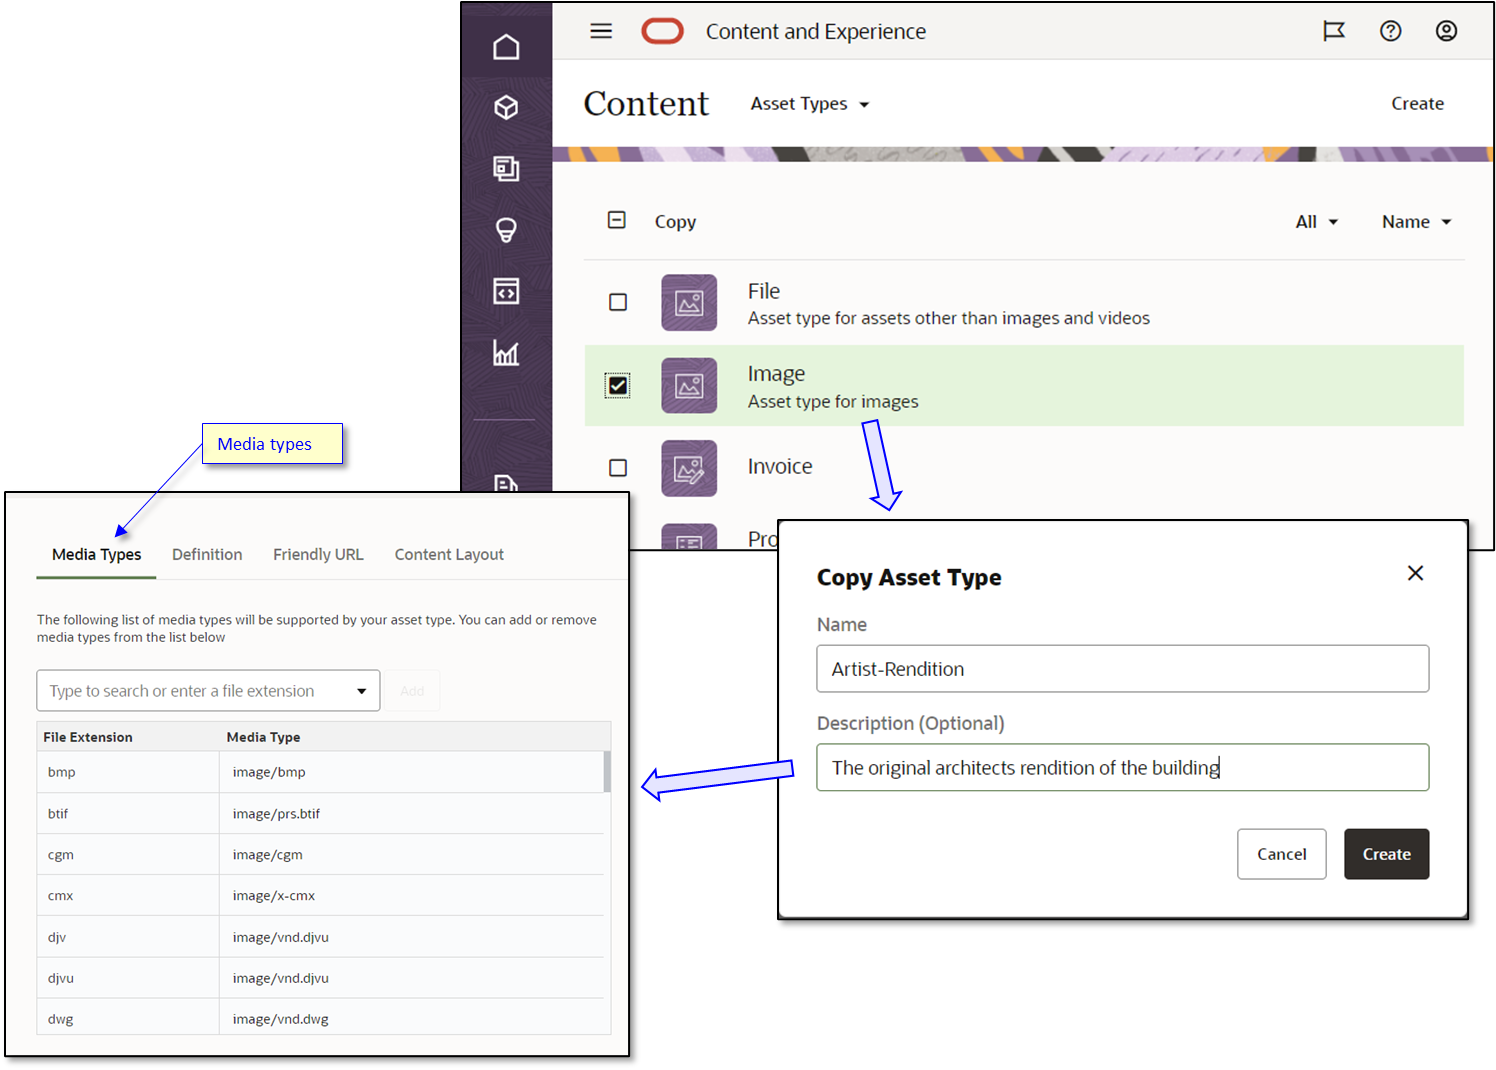
Andrea starts by creating the new artist’s rendition asset type. This asset will always be in an image format (jpg, png, etc.).
Andrea navigates to the Asset Types area in the Oracle Content Management web application.
She selects the Image type, and then proceeds to copy this asset type.
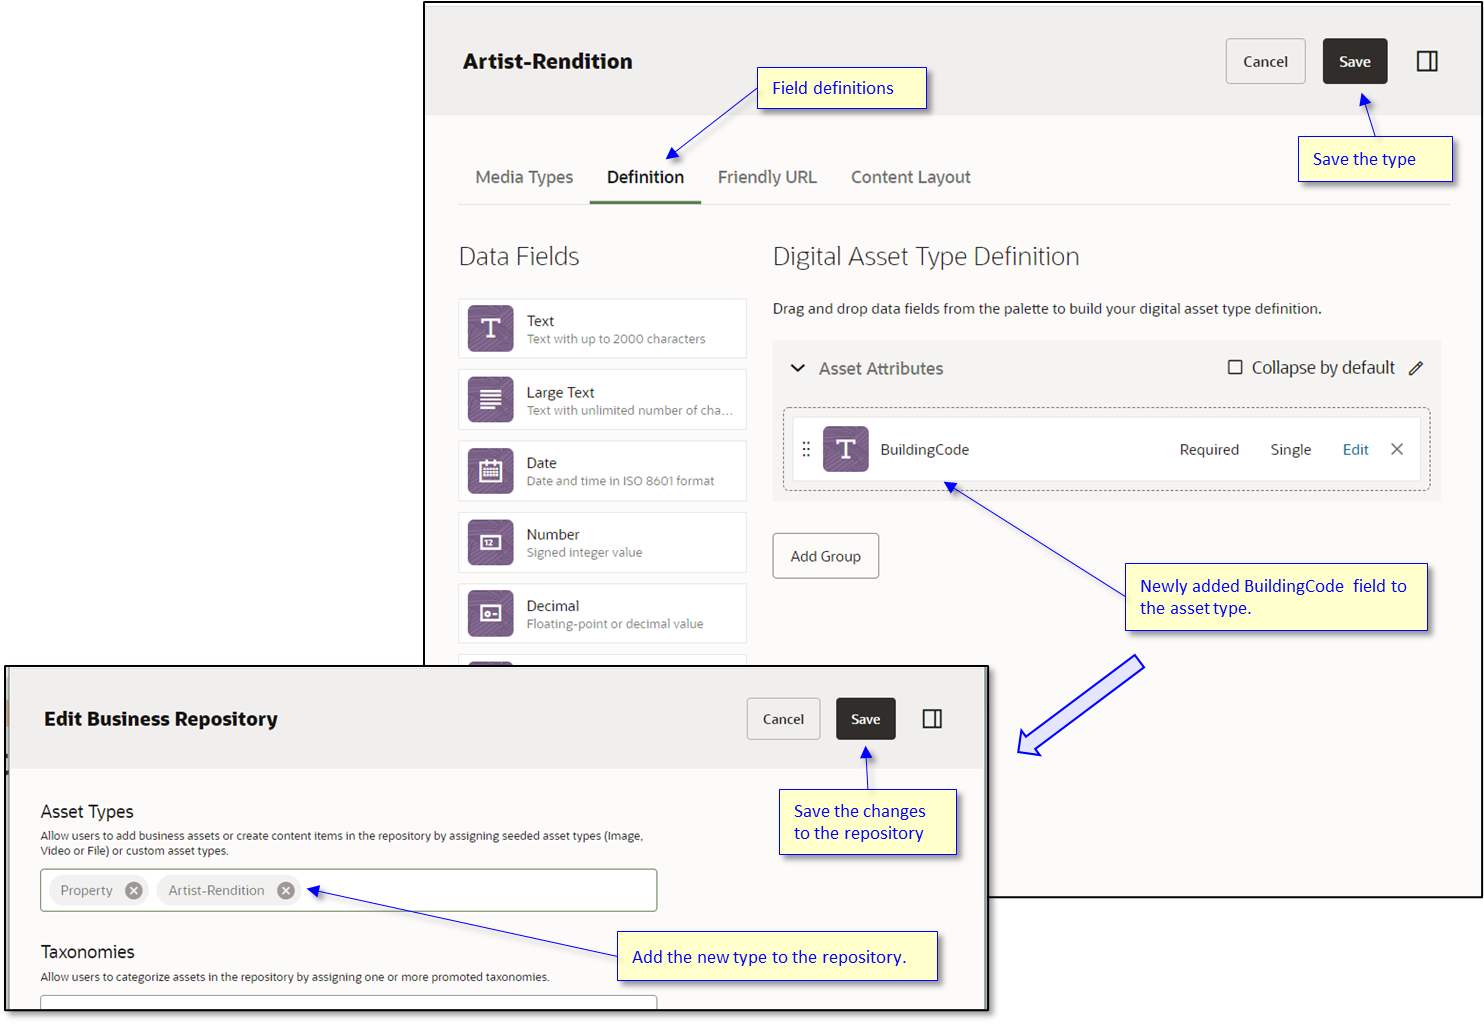
She then provides the new name of the asset type: Artist-Rendition.
By copying the default Image type, she gets all the common image file types associated with the new asset type.
Andrea then switches to the Definition tab for the Artist-Rendition asset type to add the BuildingCode field.
She saves the new asset definition.
She then navigates back to the repositories and modifies the Building Projects repository to include assets of type Artist-Rendition. She saves these changes as well.
Create the Building Project Content Item
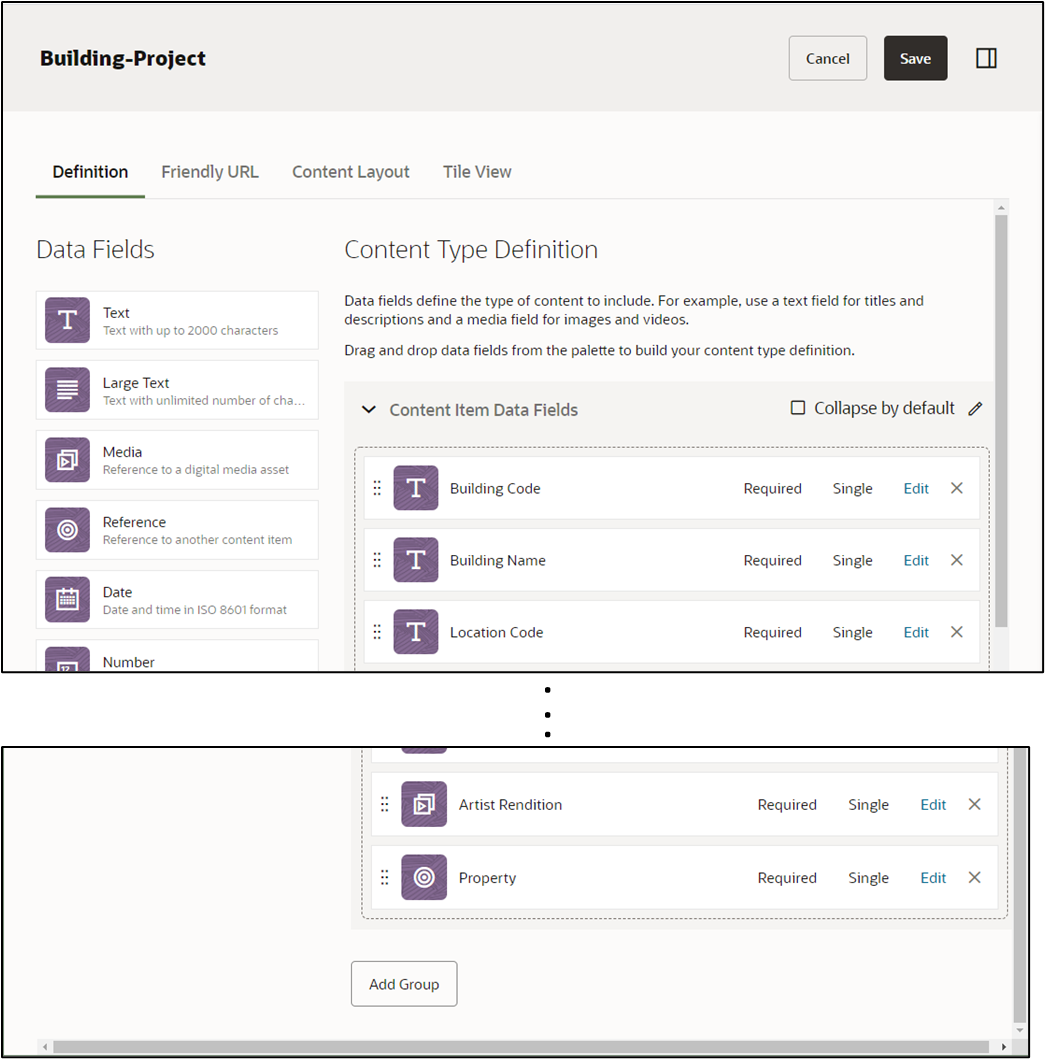
Andrea then creates the Building Project content item. This process includes adding multiple fields of the appropriate data types, including Building Code, Building Name, Location Code, etc.
The last two fields are the references to other objects:
- The Artist Rendition field contains a reference to the new asset type that Andrea just created.
- The Property field contains a reference to the Property content item that gets created by the asset synchronization process. Once the new content item type is created, Andrea adds this type to the repository as well.
Set Up Content Capture File Import
Andrea conveys the details of the new content types to Conrad.
Conrad’s next goal is to set up a Content Capture file import definition to accept the files being generated by the projects team. The projects team has placed some sample files in the shared directory they will be using to transfer the content to capture.
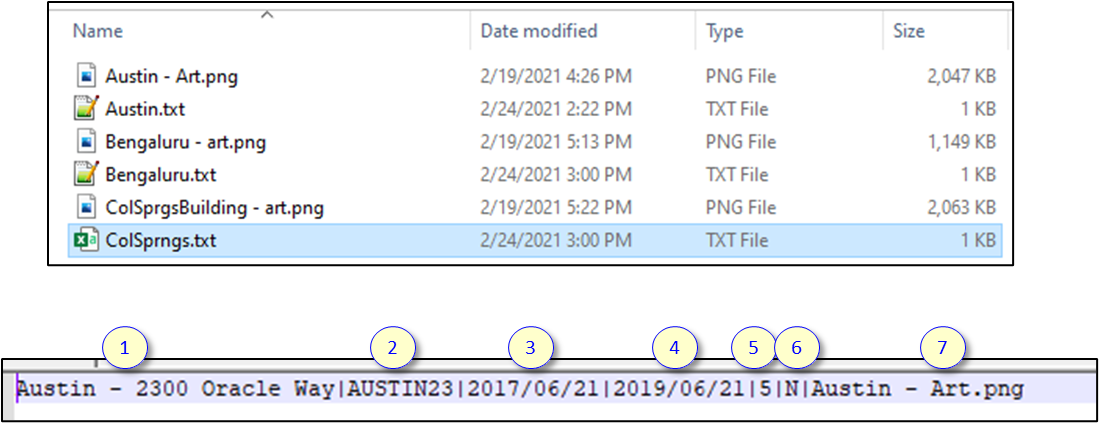
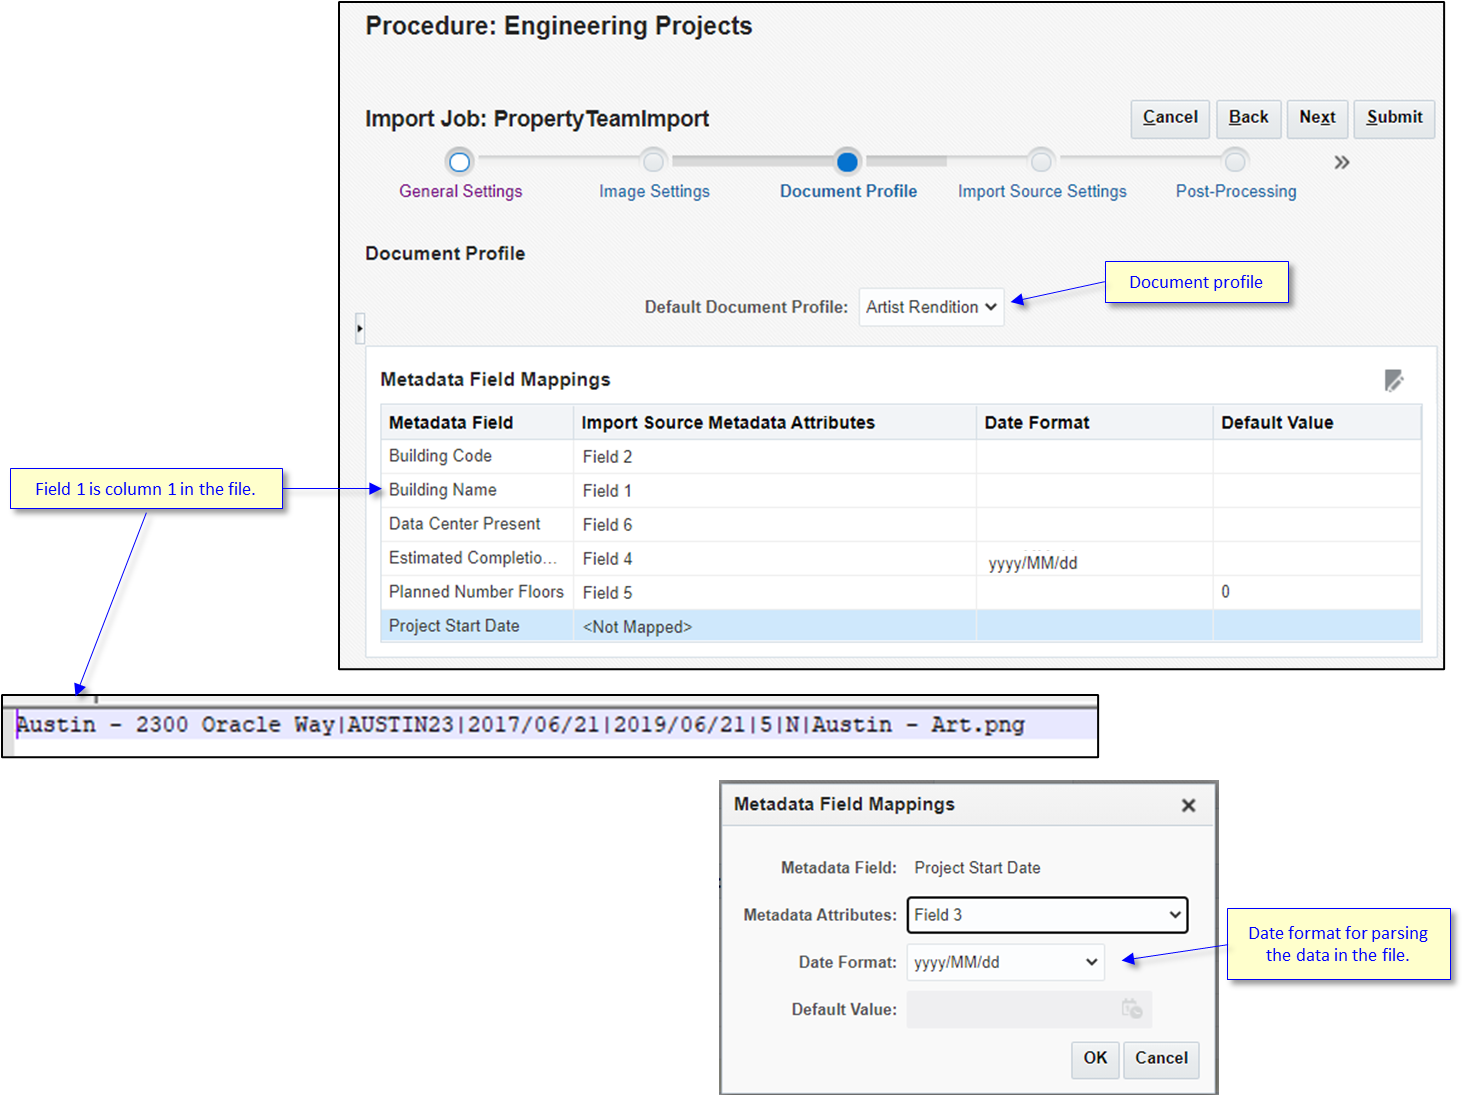
Conrad opens the Austin.txt file and sees that it contains multiple metadata values separated by a vertical bar character.
- Column 1 = Building name
- Column 2 = Building code
- Column 3 = Project start date
- Column 4 = Estimated completion date
- Column 5 = Planned number of floors
- Column 6 = Data center to be present
- Column 7 = A file path to the artist’s rendition.
Conrad then proceeds to set up the Content Capture file import:
Conrad opens the Content Capture administration interface, selects his Engineering Projects procedure, and then opens the Metadata tab.
He scrolls down to the metadata fields area and clicks + to add each of the field values to be collected from the source file.
He creates each field of the appropriate type, including a field of type ‘Content Item Reference’, which will hold the link to the Property content item to be associated with the building project.

After defining each field, they appear in the Metadata Fields table.
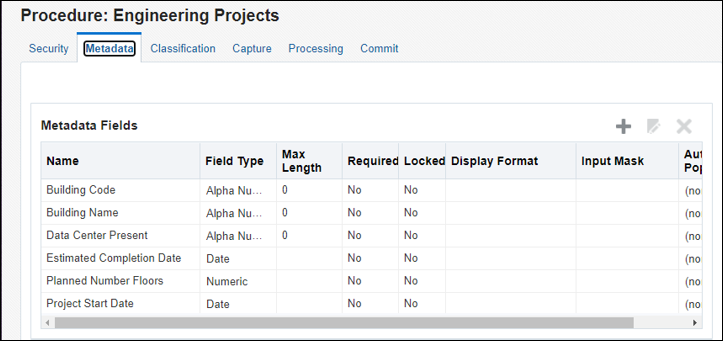
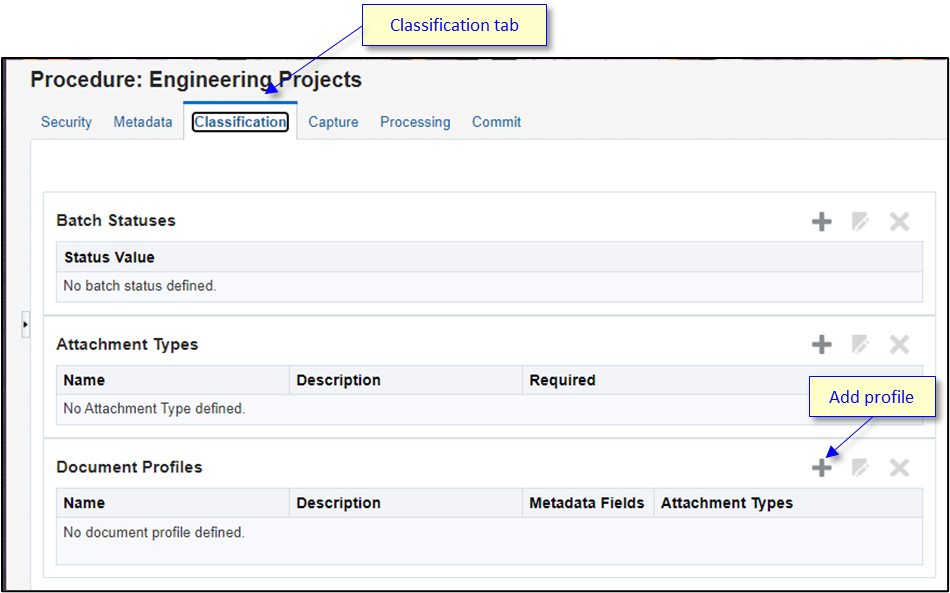
After entering the fields, Conrad opens the Classification tab to define a document profile to be associated with the artist renditions.
He clicks + in the Document Profiles area to create a new document profile.
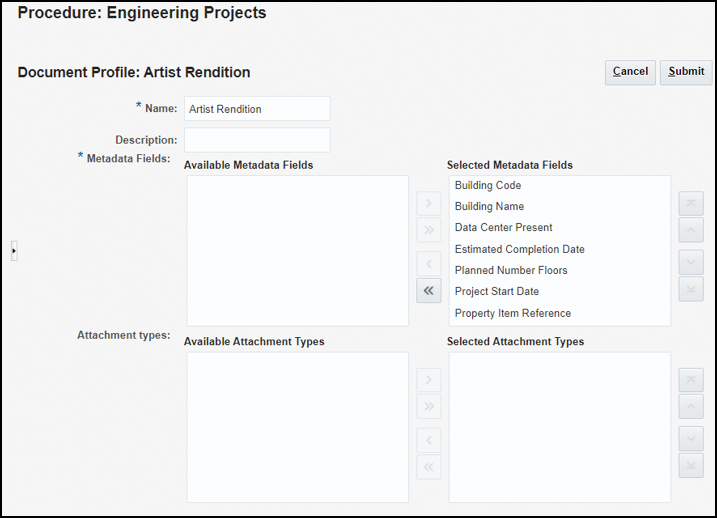
Conrad gives the document profile a name and then includes all the fields defined so far.
The fields selected here are those that will appear on the Content Capture desktop client when indexing documents. Conrad doesn’t expect to use the Oracle desktop client for this purpose. However, the client can be used to view the status of a document flowing through Content Capture. He therefore includes the fields so he can check on them later.
He then clicks Submit to save the profile.
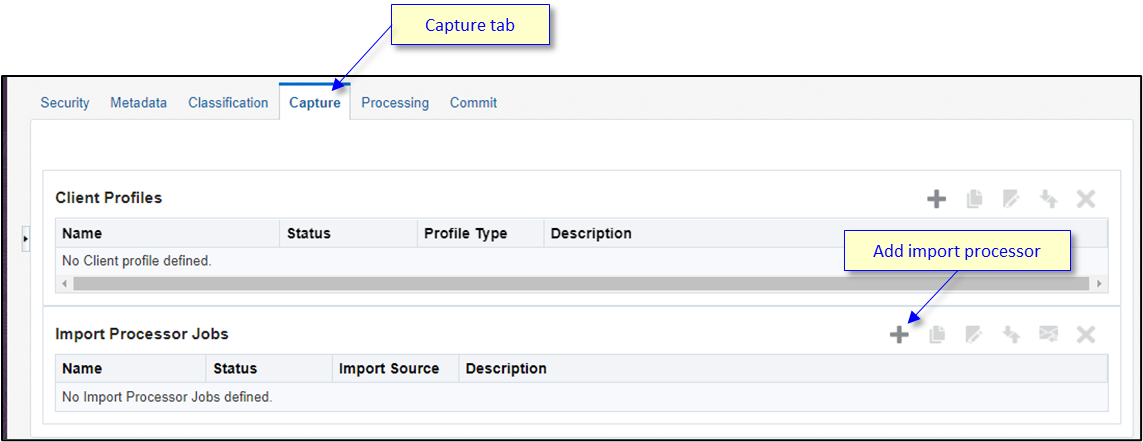
Conrad now navigates to the Capture tab to define the new file import.
He clicks + in the Import Processor Jobs area to create a new file import.
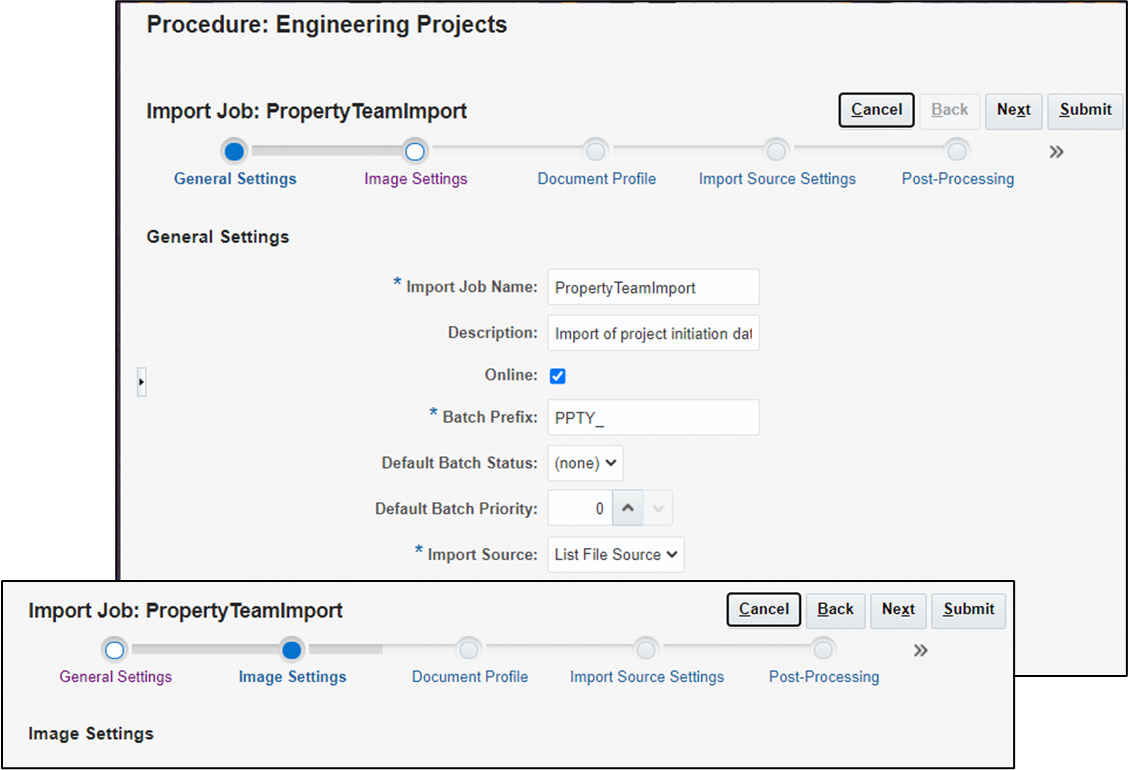
Conrad gives the import job a name.
He defines a batch prefix so he can differentiate the batches flowing in from the Property group from those arriving from the other sources.
He selects the input source to be ‘List File Source’, which indicates a file of metadata including a path to an asset.
Conrad clicks Next to move to the subsequent configuration tab. Although this tab provides options to manipulate the image, Conrad accepts the images as originally provided, and clicks Next again.
Conrad indicates that documents flowing in through this import definition should be assigned the Artist Rendition document profile.
Conrad maps the column data based on position from the input file to the target fields. While mapping the Project Start Value, he selects the value of column 3 to fill this field. He also selects the format of the dates to be found in the input file, so they are parsed correctly. When he’s done, he clicks Next.
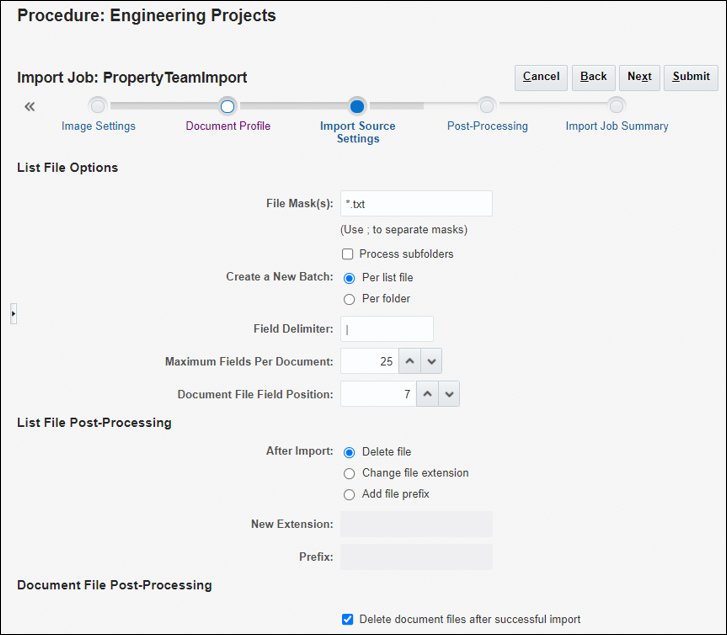
Conrad changes the file mask so that Content Capture looks for files ending in .txt.
He indicates that the separator between the data values is a vertical bar (|).
He indicates that column 7 is the location where the path to the corresponding image file will be. Since this data is also available from the Property system, he feels comfortable allowing Content Capture to delete the list file and the image file after they are successfully imported, since it could be recovered.
Configure the File Import Agent
Conrad’s next step is to configure the File Import Agent to monitor the file folder that the property team will be exporting their content to.
- Conrad must first get the unique identifier of the import job to
configure the folder, so he uses the
list-import-jobscommand to display the available import jobs.
C:\CaptureImportAgent\capture-agent\bin>capture list-import-jobs
server      name        type       online  id                                     enabled   local folder path
----------  -----       ------     -----   -------------------------------------  --------  -----------------
oceServer PropertyTe List File true c146cb18-3f78-4d7d-8d77-0943430d83ea false <not set>- He can then use the
configure-import-jobcommand to link the import job to a specific directory.
C:\CaptureImportAgent\capture-agent\bin>capture configure-import-job -s oceServer -i c146cb18-3f78-4d7d-8d77-0943430d83ea -p “S:\InterDep\EngProj\Property"
import folder path set to S:\InterDep\EngProj\Property- Next, he lists the configuration again and notices that the enabled setting is still false.
C:\CaptureImportAgent\capture-agent\bin>capture list-import-jobs
server      name        type       online  id                                     enabled   local folder path
----------  -----       ------     -----   -------------------------------------  --------  -----------------
oceServer PropertyTe List File true c146cb18-3f78-4d7d-8d77-0943430d83ea false S:\InterDep\Eng...- He executes the
configure-import-jobcommand again to enable it, which tells the File Import Agent to begin monitoring the folder.
C:\CaptureImportAgent\capture-agent\bin>capture configure-import-job -s oceServer -i c146cb18-3f78-4d7d-8d77-0943430d83ea -e
enabled import- When listing the configuration again, Conrad now sees the import job is enabled.
C:\CaptureImportAgent\capture-agent\bin>capture list-import-jobs
server      name        type       online  id                                     enabled   local folder path
----------  -----       ------     -----   -------------------------------------  --------  -----------------
oceServer PropertyTe List File true c146cb18-3f78-4d7d-8d77-0943430d83ea true S:\InterDep\Eng...- He then uses the
trigger-import-jobcommand to cause the File Import Agent to immediately look for new work and process it.
C:\CaptureImportAgent\capture-agent\bin>capture trigger-import-job -s oceServer -i c146cb18-3f78-4d7d-8d77-0943430d83ea
import job triggered successfully- Conrad executes the
statuscommand to confirm that the agent has begun monitoring the directory, and he confirms that it has picked up the single test list file he provided with one document.
uptime - 1 hours, 23 minutes, 3 seconds

----------------
 IMPORT SCHEDULE
----------------
server      job         next scheduled run
----------  ---------   ----------------------
oceServer   PropertyTe  in 2 minutes, 36 seconds

--------------------
 TABLE SYNC SCHEDULE
--------------------
server      job         next scheduled run
----------  ---------   ----------------------
oceServer   Property D  in 37 minutes, 21 seconds

----------------
 IMPORT ACTIVITY
----------------
date / time        server      job         user                       status     batches  documents
-----------------  ----------  ---------   -------------------------  ---------  -------  ---------
5/17/21 1:28 PM    oceServer   PropertyTe  captureService@engco.com   COMPLETED  1        1
Create a Client Profile
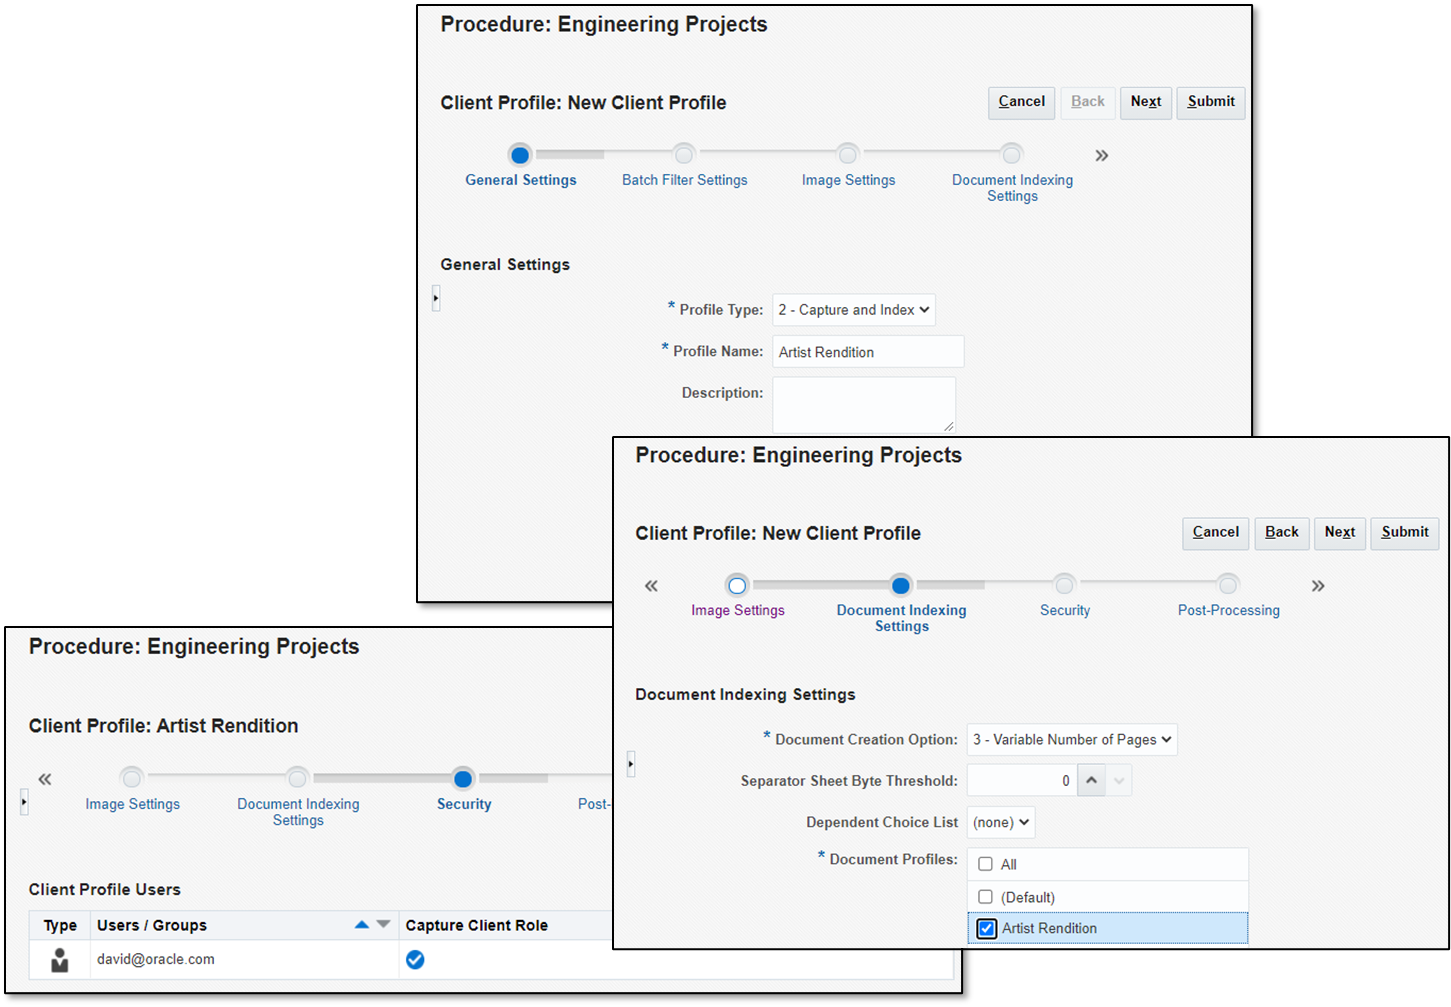
At this point, Conrad realizes that he didn’t create a commit step in the new procedure to send the data to Oracle Content Management. He decides to configure a simple client profile, so he can use the Content Capture desktop client to see the document that was just imported. He enters minimal information in the general settings, document indexing settings, and security settings.
Conrad then submits the client profile.
Set Up the Content Capture Desktop Client
Conrad proceeds to set up the Content Capture desktop client:
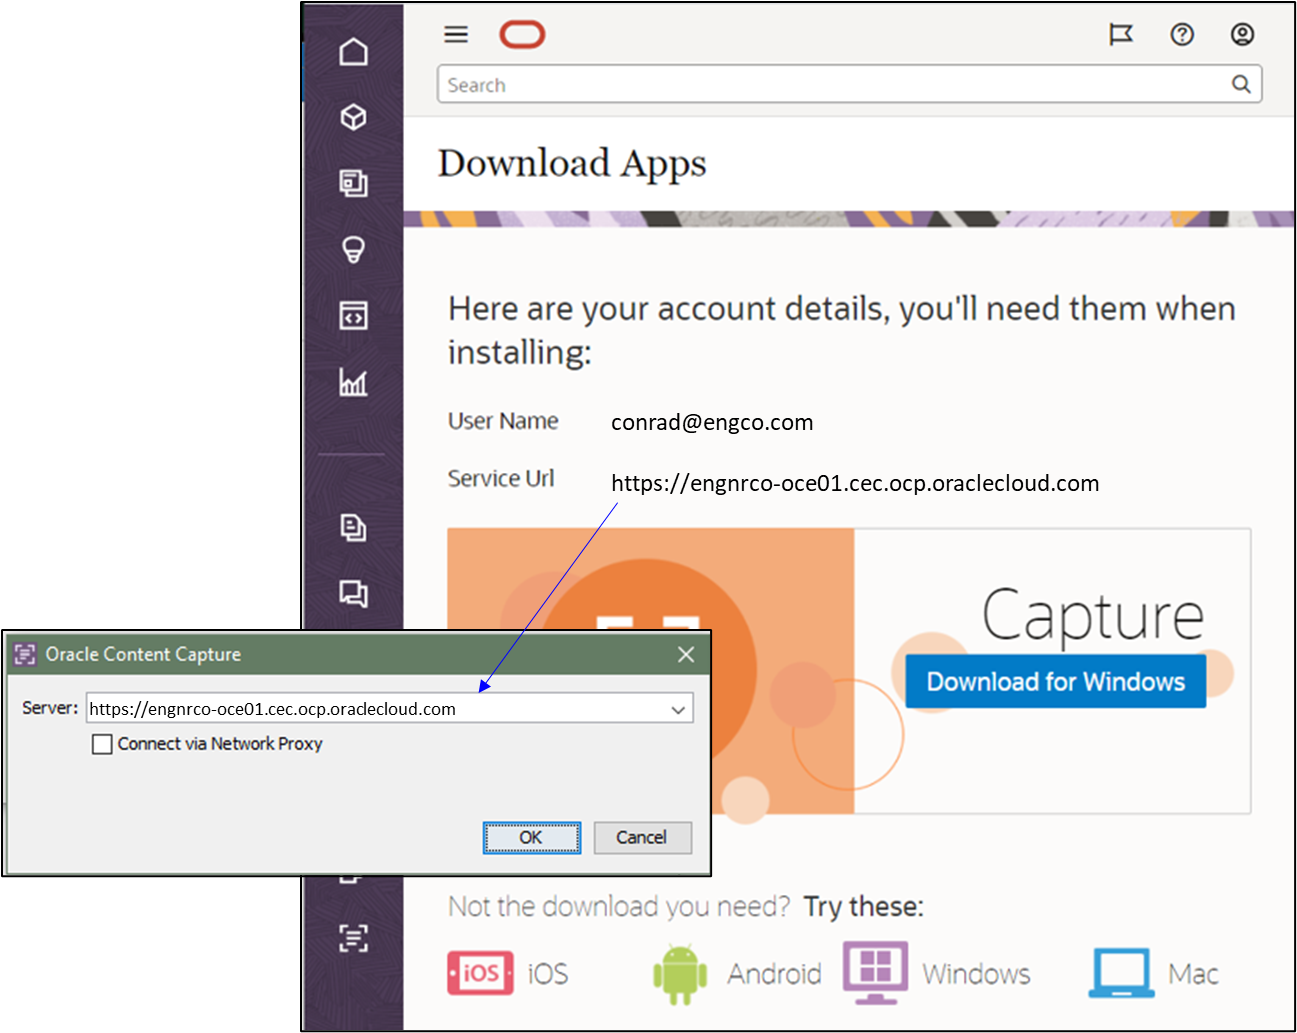
Conrad navigates to the application download page in the Oracle Content Management web interface and downloads the Content Capture desktop client.
After the install completes, he enters the service URL shown on the download page into the connection dialog.
He then enters his user credentials into the login dialog.
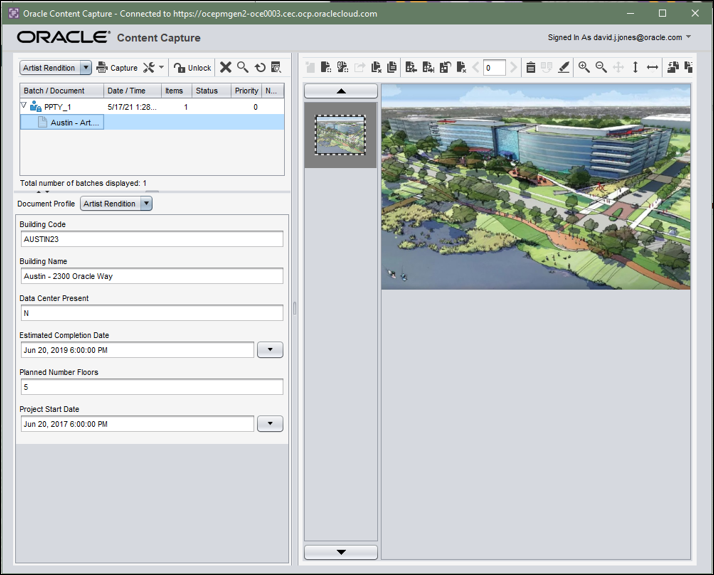
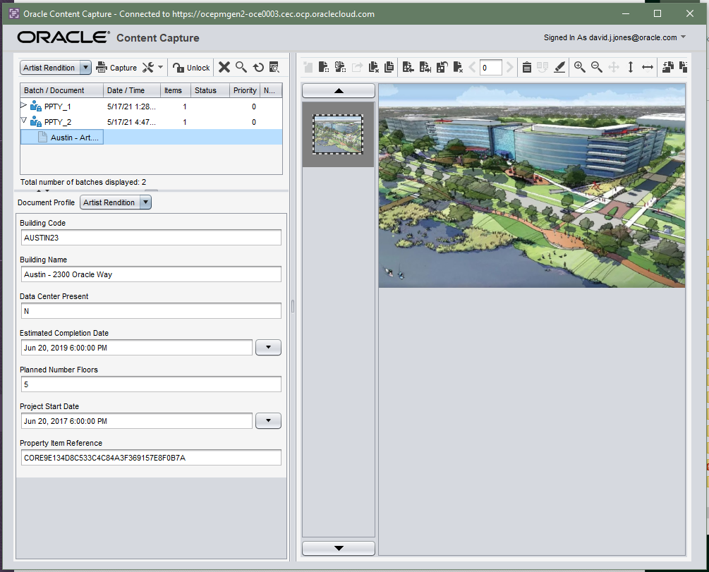
The Content Capture client opens showing the batches and documents that were imported by the File Import Agent.
Conrad verifies that the metadata matches what was provided by the property team, and that the artist’s rendition is correct.
Create an Asset Lookup
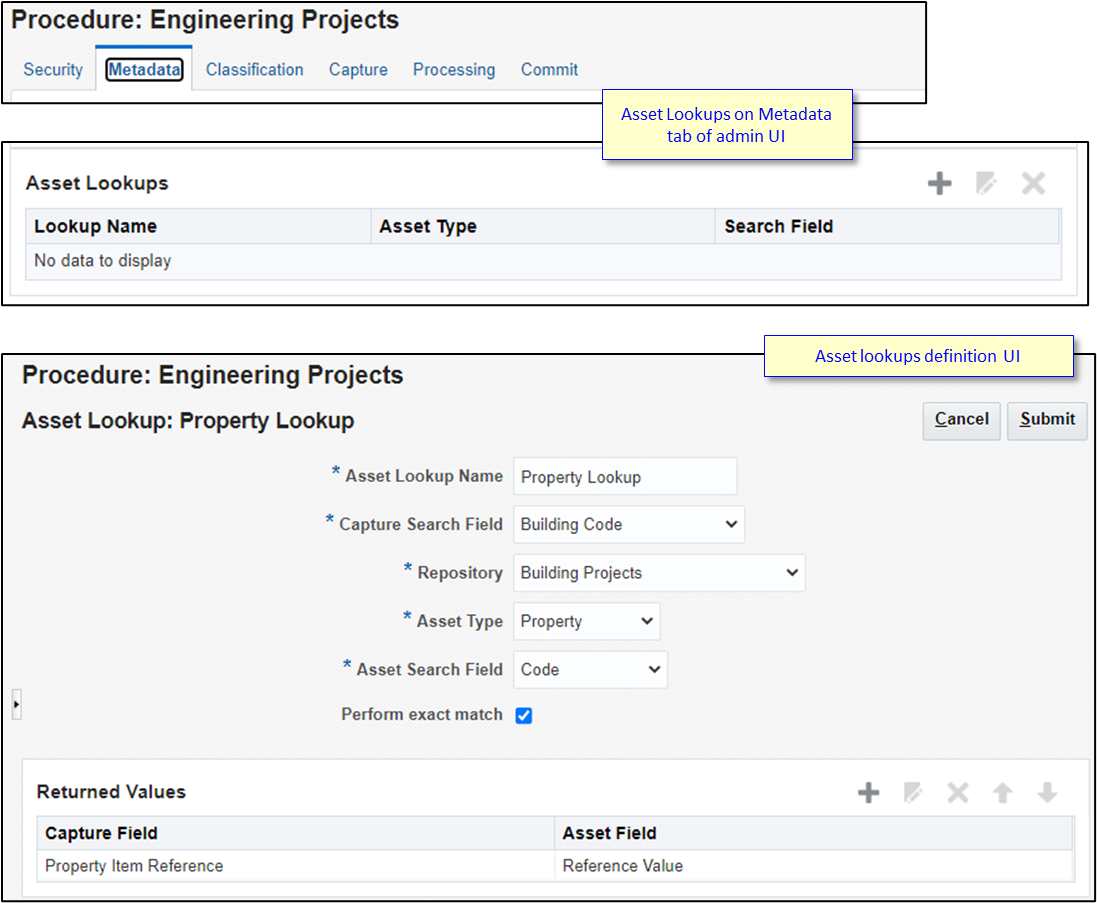
The next step is to find the matching property content item that was synchronized into Oracle Content Management, so that the new building project object has a link to the corresponding property item.
Conrad opens the Metadata tab and navigates to the Asset Lookup section. He clicks + to add a new lookup.
He configures to search using the Building Code field mapped into Content Capture from the list file to search the Property assets using the Code field defined there.
He expects that the building code values provided in the list files will always be correct, so he selects to perform an exact match.
The data to be returned from the lookup is the link to the property content item. This will be saved in the Property Item Reference field created in Content Capture.
A lookup can be presented to a user via the Content Capture desktop client, or it can be performed in the background via a lookup processor. Since no user involvement is expected in this flow, Conrad chooses to perform the lookup in the background.
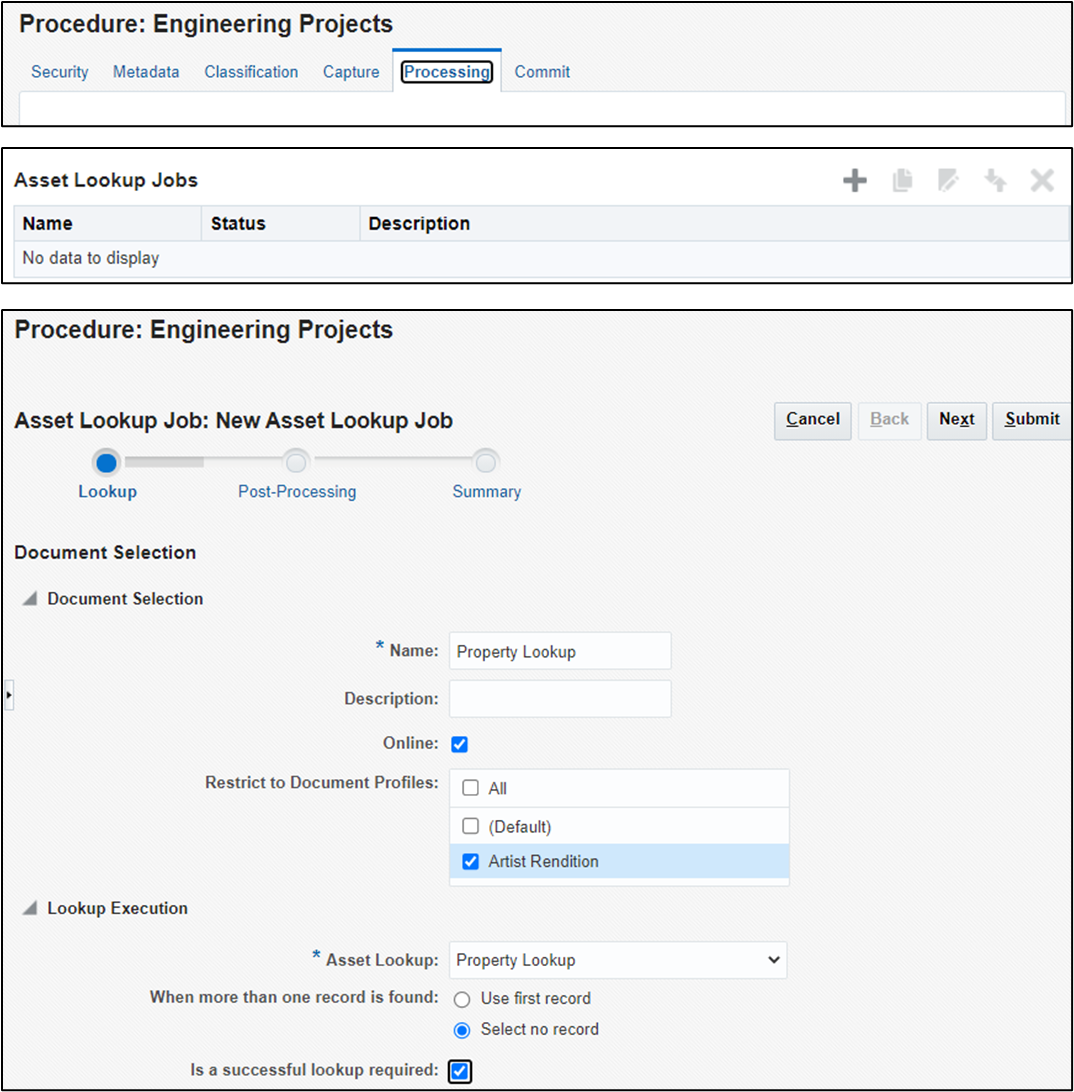
Conrad opens the Processing tab, navigates to the Asset Lookup Jobs section, and clicks + to add a new asset lookup job.
He gives the processing step a name, selects the corresponding document profile, and selects the property lookup he just defined.
There should always be only a single property content item that matches, so he chooses the selection option to ensure that only one is found, and that one is always found.
He leaves the post-processing step unconfigured temporarily, which means that the document will flow back to the client so he can verify that the lookup worked.
Conrad navigates back to the file import profile, so that he can connect it to the lookup processor.
He opens the Property Team Import job and navigates to the Post-Processing step. He selects ‘Asset Lookup Processor’ as the next type of step in the flow, and then he selects ‘Property Lookup’ as the specific batch processor job.
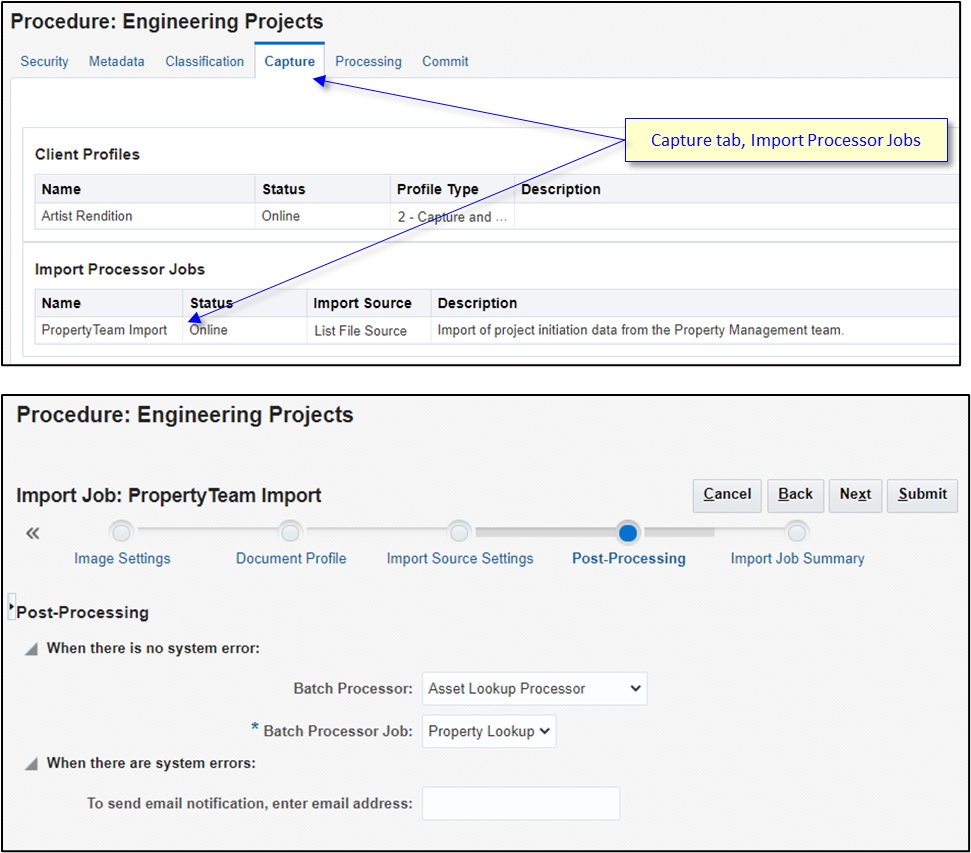
He submits the changes to the import job.
Conrad then copies the sample data from the property team back into the input folder to test the lookup processor.
The same property list file is processed a second time.
After the lookup is performed, the content capture batch is routed to the client.
This time Conrad sees the Property Item Reference field having a value. This confirms that the lookup step was successful.
Create a Capture Commit Step
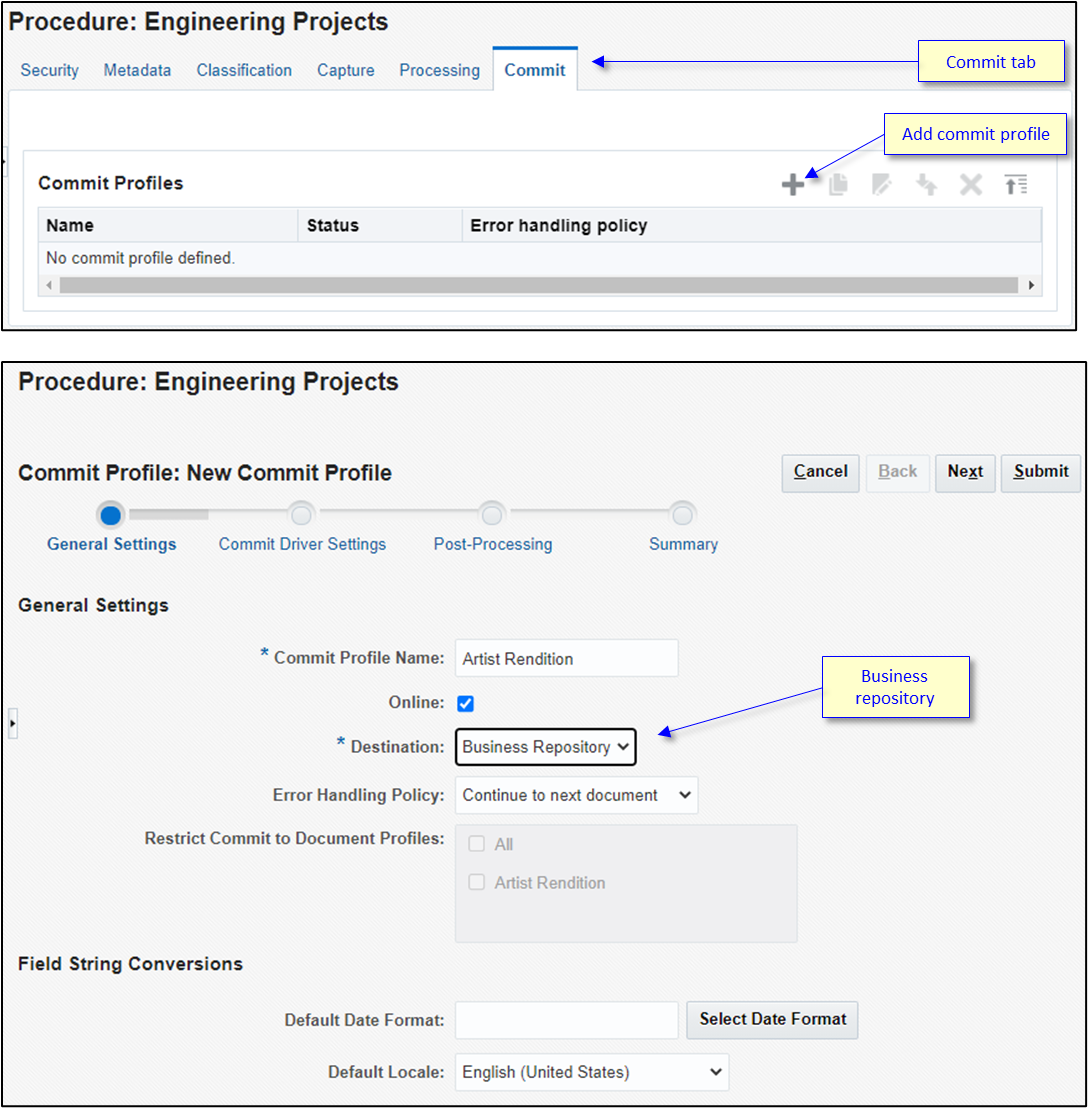
Conrad now creates a commit step in the Content Capture procedure to send the property team data into Oracle Content Management.
Conrad returns to the Content Capture administration interface, and clicks + to create a new commit profile.
He provides a name for the new commit profile.
He selects the destination to be a business repository, since that’s the repository type that Andrea created. Then he clicks Next.
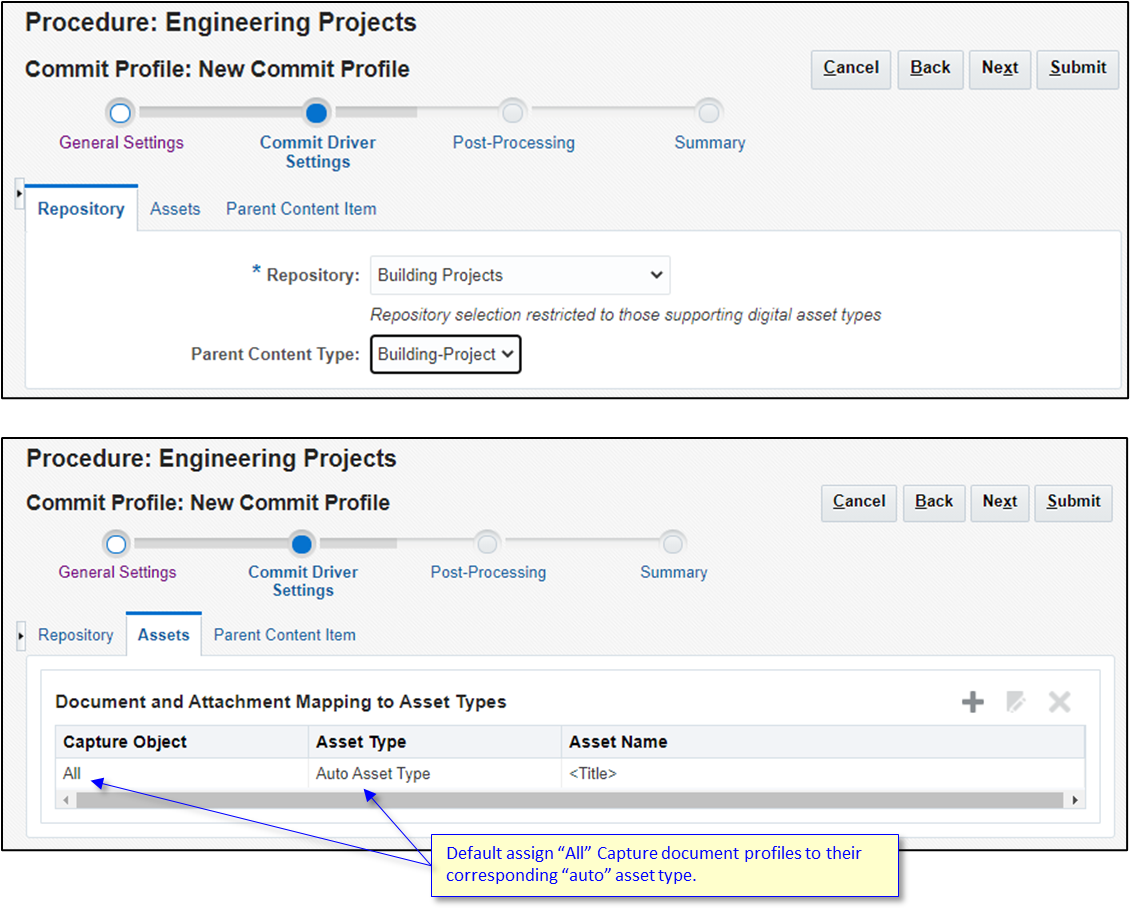
Conrad selects the Building Projects repository.
He also selects to create a parent content item of type ‘Building Project’. That parent item will have links to the other supporting assets, such as the artist rendering. He opens the inner Assets tab.
A default asset configuration is provided, which will cause all objects flowing through this commit to be sent to Oracle Content Management to the appropriate default asset type based on the file format.
Conrad uses the X button to remove the default asset mapping. Then he click + to create a new asset mapping.
For this commit step, he’s only interested in mapping the Artist Rendition documents, so he selects that from the dropdown menu.
Then he picks the Oracle Content Management asset type that Andrea created earlier specifically for the artist renditions.
He combines the building code, name, and projected start date together to form the name of the asset, and then maps the building code into the asset.
When he’s done, he clicks OK to save the new mapping.

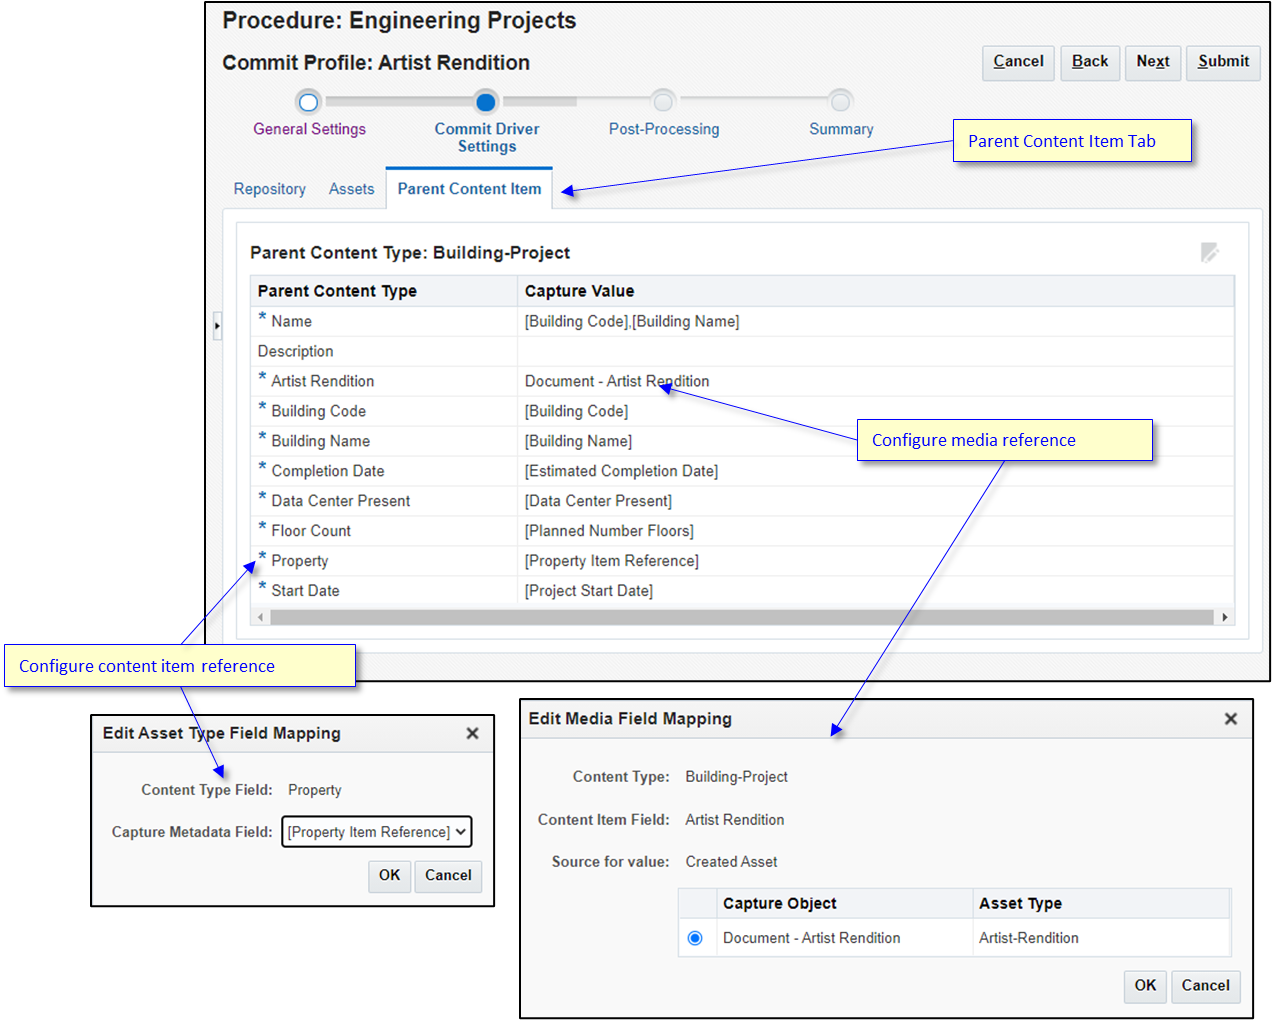
Conrad continues to the Parent Content Item tab and configures the metadata mappings from the Content Capture fields to the Building Project content item type.
The Artist Rendition content item field is a media reference type which points to other assets. When Conrad defines this mapping, he’s presented with a list of the assets that are defined on the Assets tab (currently only ‘Document – Artist Rendition’).
The Property content item field is an item reference type. When Conrad defines this mapping, he’s presented with a list of Content Capture fields that are also the item reference type.
Conrad then submits his new commit processor.
Add the Commit Step to the Asset Lookup
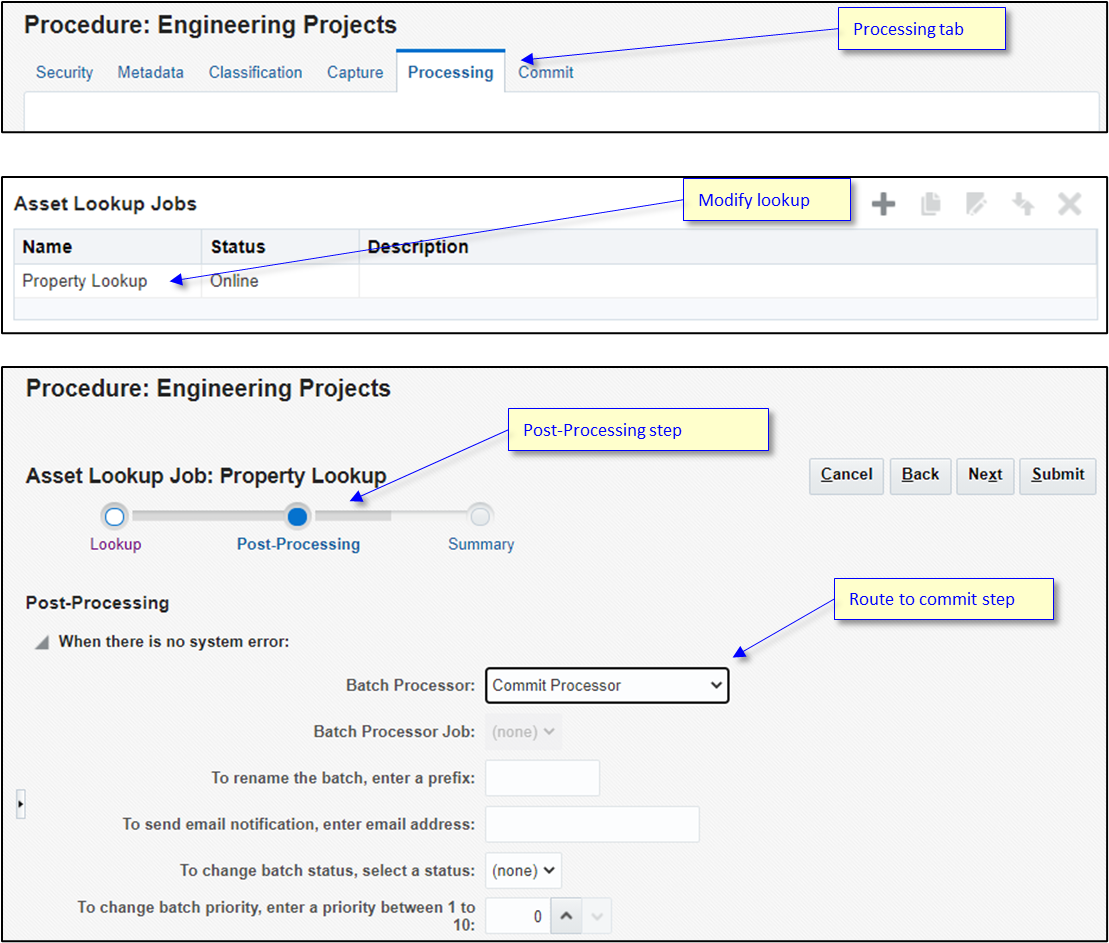
Conrad returns to the Processing tab so he can modify the asset lookup step to route to the commit step rather than the client.
He modifies the asset lookup.
He opens the Post-Processing tab and redirects the flow toward the commit processor.
When he’s done, he submits the changes.
Test the Process
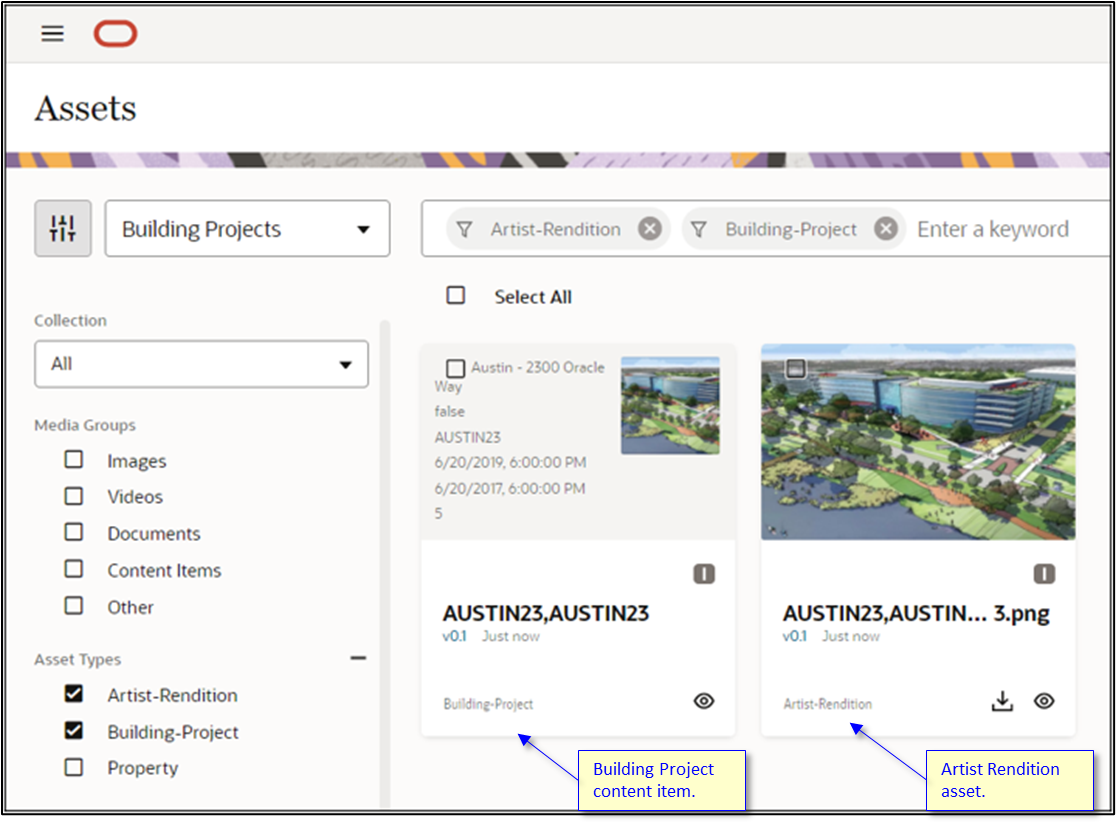
Conrad now copies the sample data files from the property team back into the Capture File Agent input directory. He then monitors the Assets view in the Oracle Content Management web interface to confirm that the new asset and content item are created.
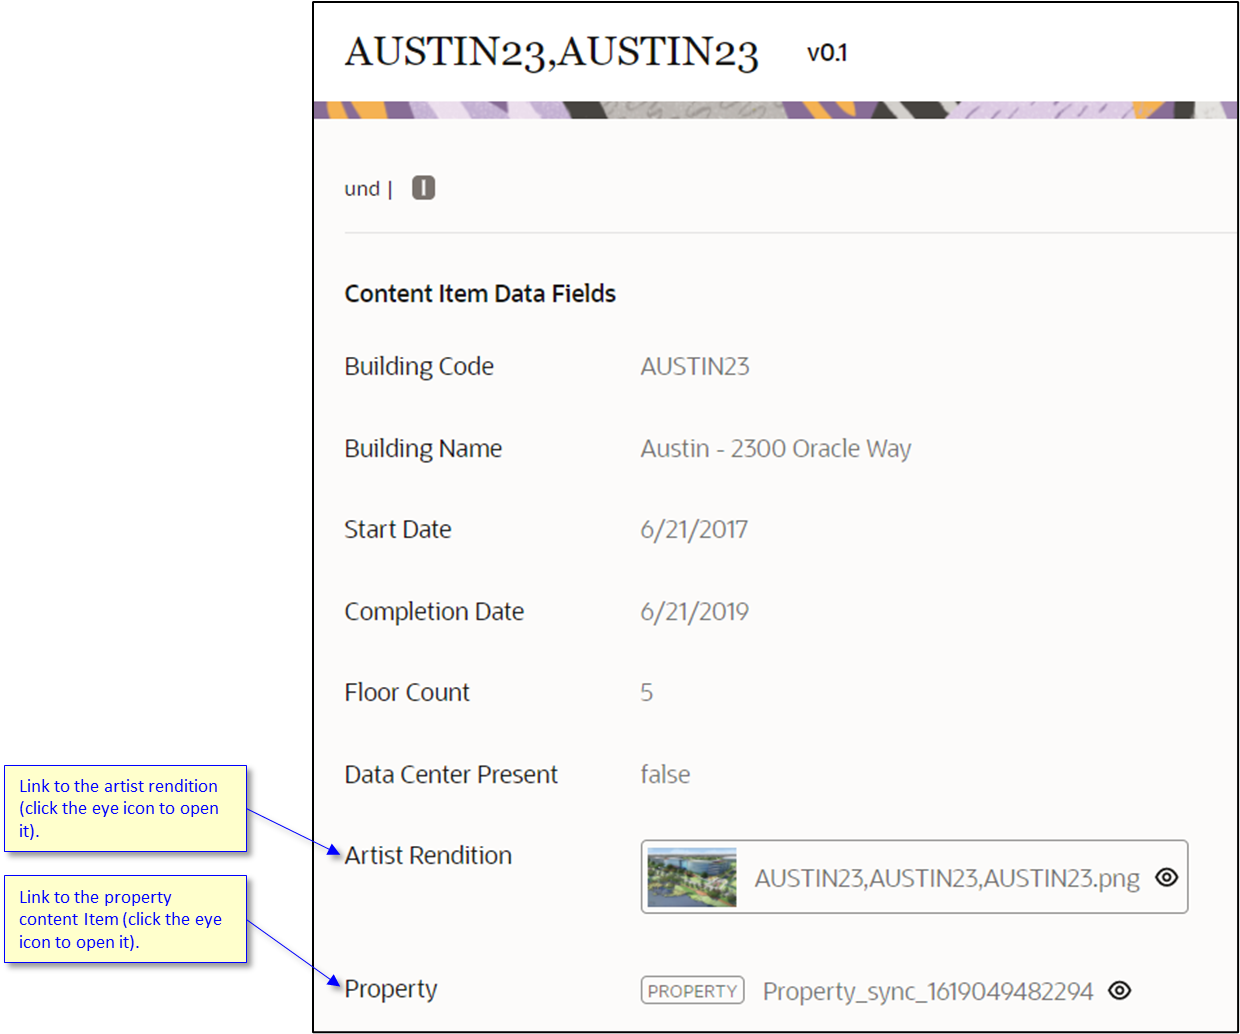
Conrad opens the content item to confirm that there are links to the asset and the property content item.
Architectural Drawings: Email Import and Barcode Extraction
Conrad now maps out the flow of documents that Content Capture will need to collect.
The architects receive the approval and begin producing detailed designs. As each floor plan is completed, they email a new copy of the design to the engineering team. It can take multiple attempts to get the designs right.
Conrad configures a Capture Email Import profile to monitor an email account that the engineering team has set up to receive new floor plans from the architects.
Each floor plan has two barcodes on it: one barcode has the building identifier, and the other is the floor number.
Conrad configures a Capture Recognition Processor step which will identify and extract the barcode values.
The building identifier and floor number are used in the commit step to link the floor plan asset back to the building content item.
Create the Floor Plan Asset Type
Andrea defines an additional custom asset type that will store the image of the proposed floor plan, along with metadata fields for the building identifier, the floor number, and the email address of the sender.
Andrea starts by creating the new Floor Plan asset type. This artifact is always going to be a digital image from the architects.
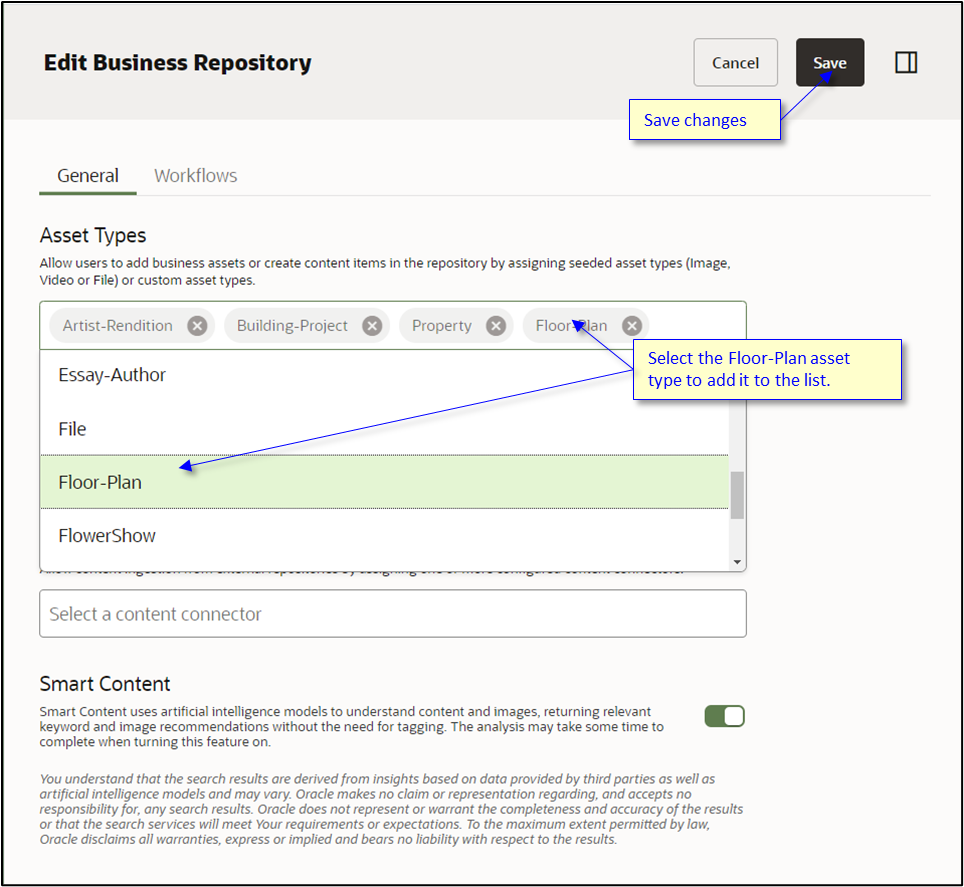
Similar to the artist rendition, Andrea copies the base Image type to create a new custom asset type called ‘Floor-Plan’.
The engineering team has an agreement with the architects that the building identifier and the corresponding floor number will be printed on each page.
Andrea adds the Building Id field, the Floor Number field, and the Architect Email Address field to the asset type.
The Floor Number field is a text field, because Content Capture’s barcode extraction logic produces text values (since barcodes can be alphanumeric).
Andrea saves the new custom asset type.

She now navigates back to the repositories and modifies the Building Projects repository to include assets of type Floor-Plan. She saves these changes as well.
Set Up Mail Import
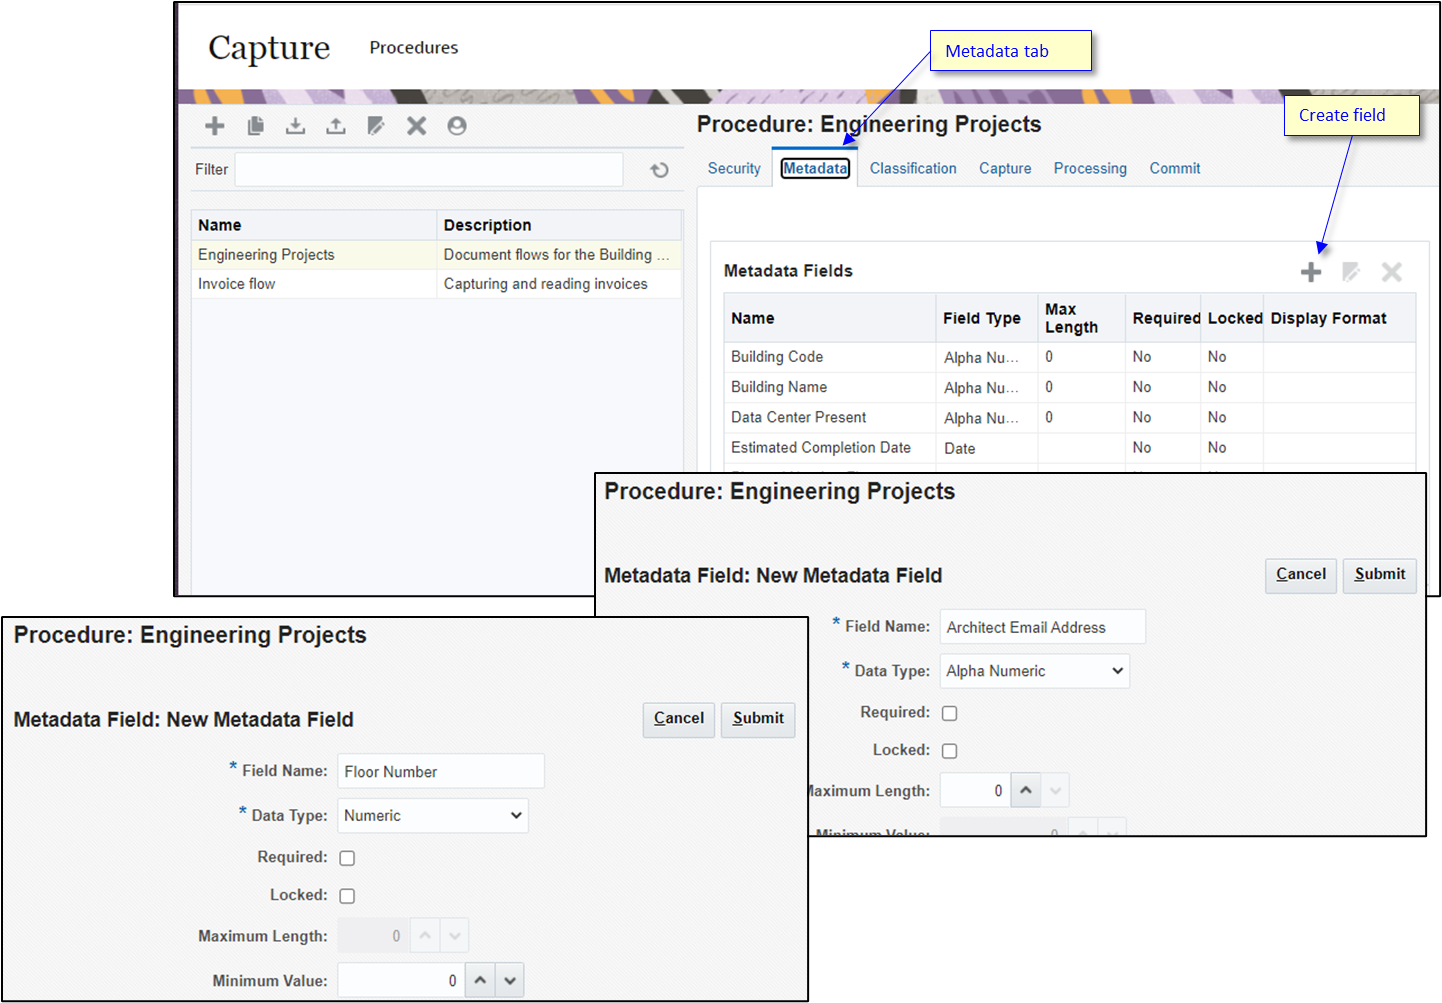
Conrad goes to the Content Capture administration interface, opens the Engineering Project procedure, and then navigates to the Metadata tab.
He defined the Building Code field type before, but he needs to add two new fields:
- the floor number
- the sender’s email address
He clicks + for each of the new fields, defines the attributes, and then submits them.
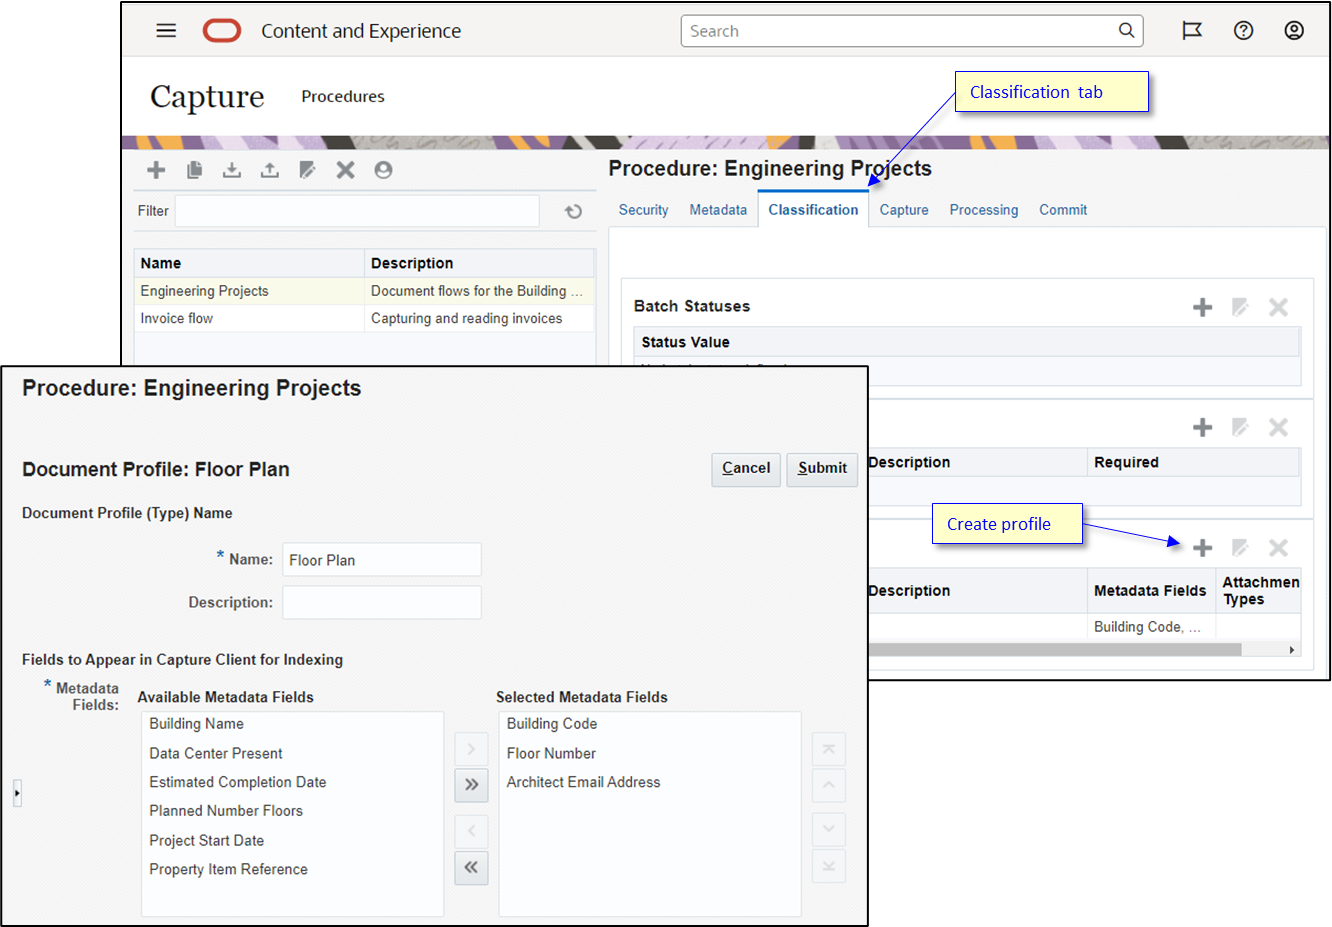
Conrad now opens the Classification tab.
He clicks + in the Document Profiles area to create a new document profile for the floor plan documents.
He provides a name for the new document profile: Floor Plan.
He adds the building ID, floor number, and architect email address fields to the document profile.
When he’s done, he submits the new profile.
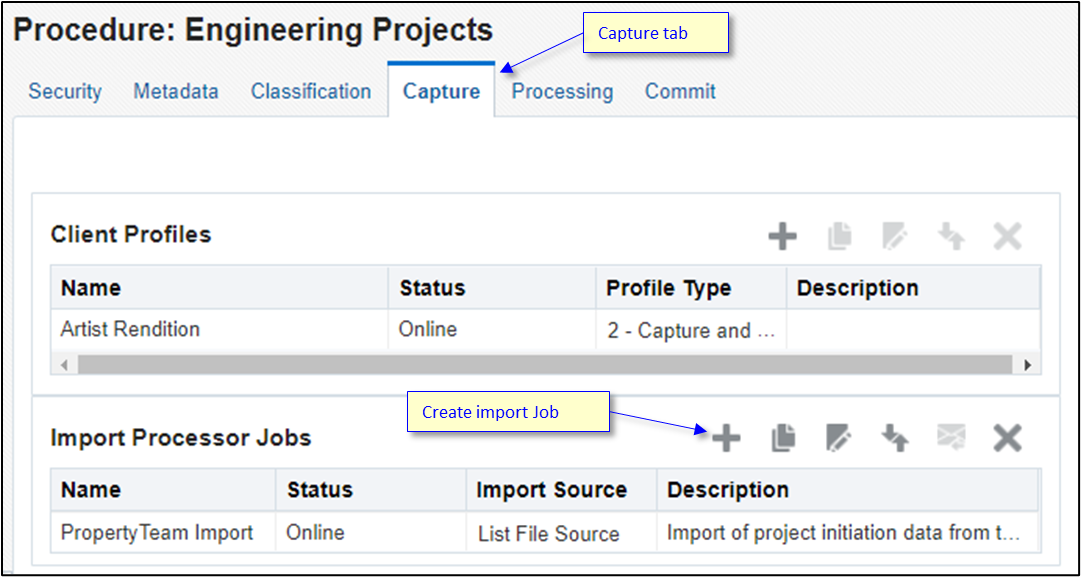
Conrad navigates to the Capture tab.
He clicks + in the Import Processor Jobs area to configure an email monitoring job for the floor plan documents.
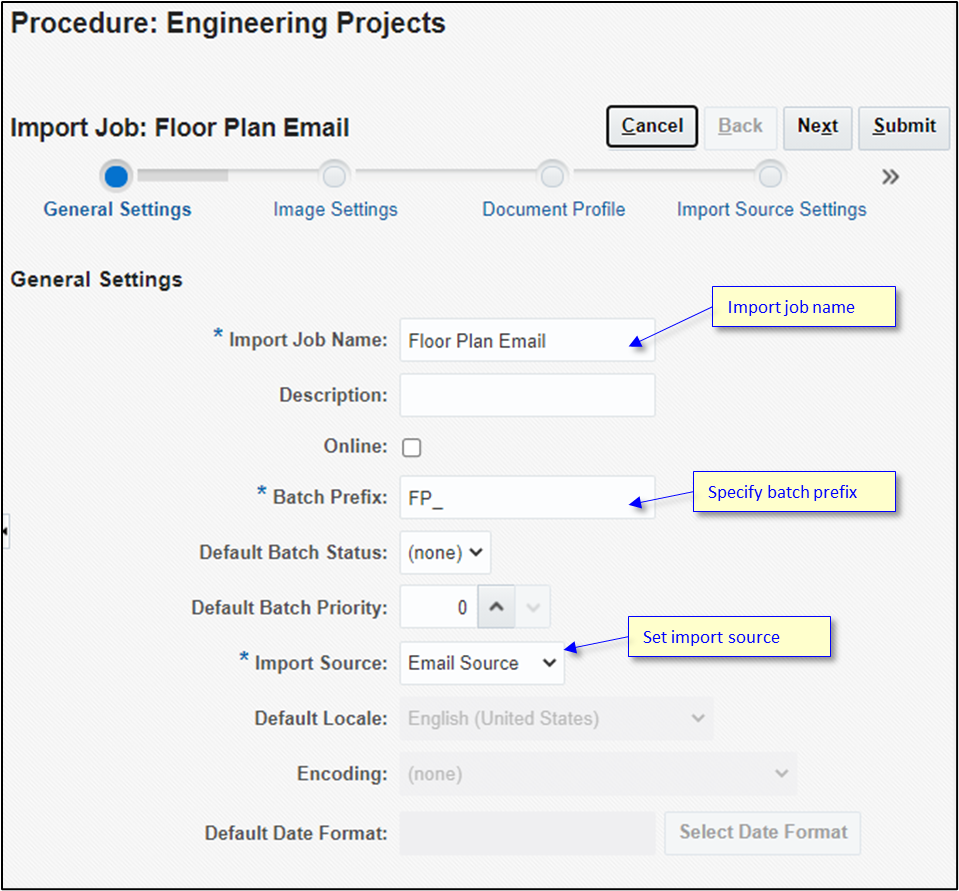
Conrad provides a name for the new job: Floor Plan Email.
He provides a batch prefix.
He selects Email Source as the import source, and then clicks Next.
Conrad won’t need to manipulate the scanned images as they were imported, so he skips the Image Settings page.
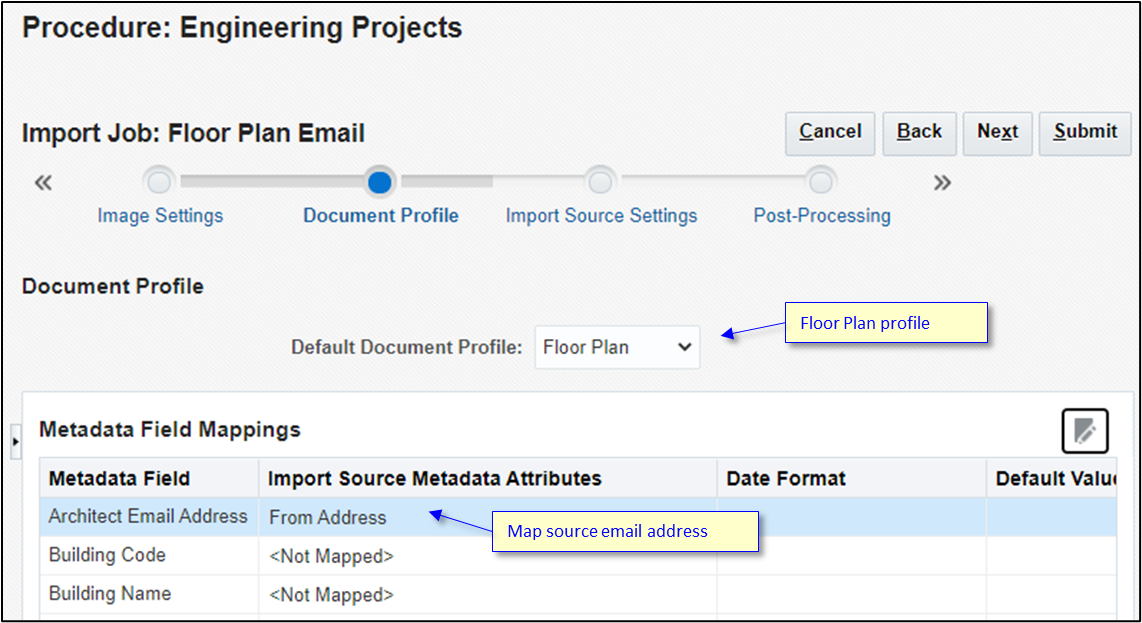
On the Document Profile page, he indicates that the documents flowing into Content Capture through this source should be of type Floor Plan.
He also maps the From Address attribute of the email to the Architect Email Address metadata field, and then clicks Next.
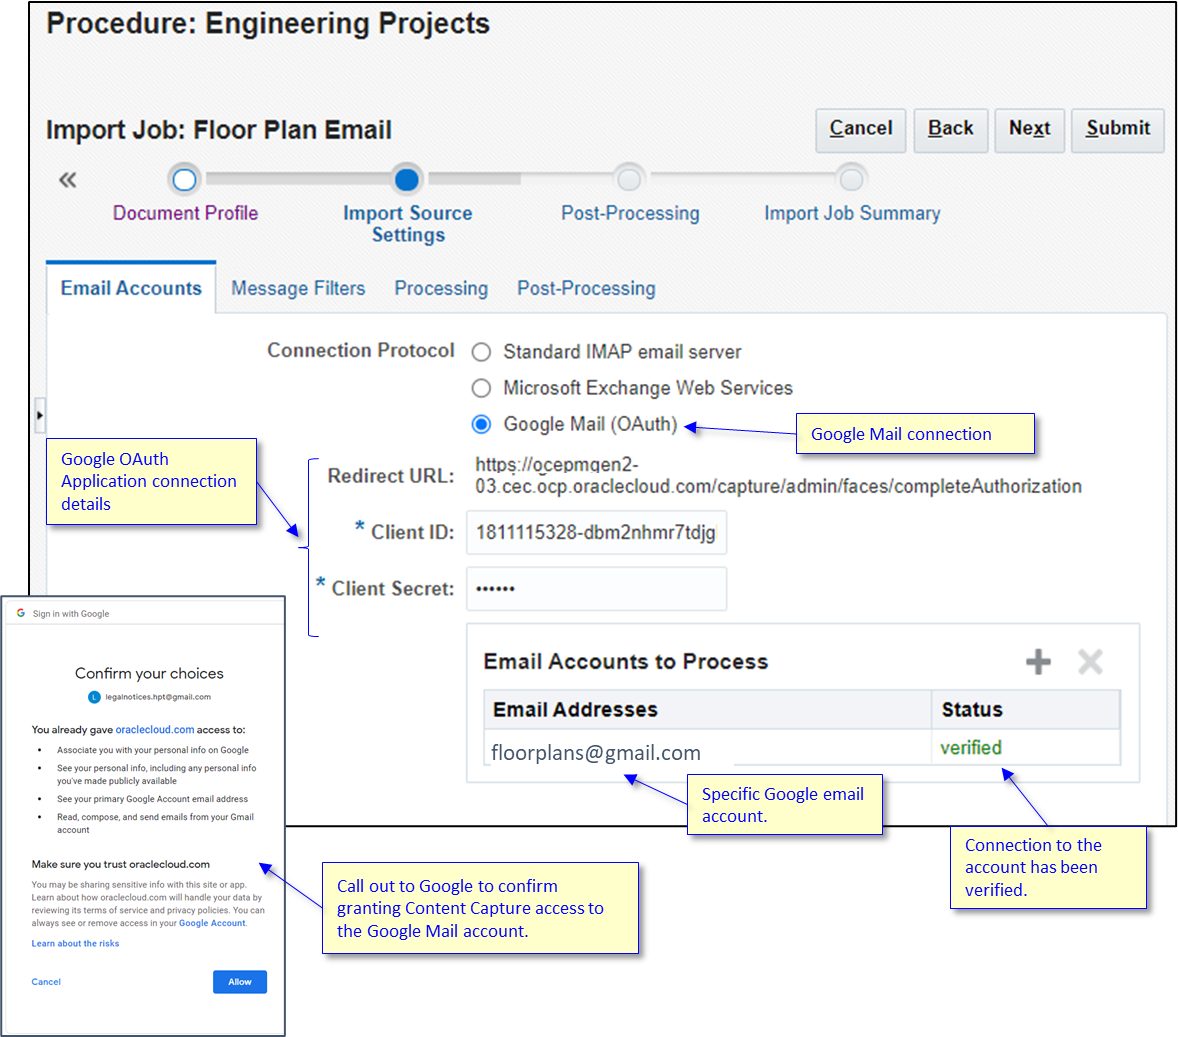
Conrad’s company has set up a specific email account to receive the floor plans. They use the Google Mail cloud service to manage their email accounts. Conrad must define an OAuth Application entity within Google to represent Content Capture.
Conrad creates the new entity, which provides him with the necessary connection details.
He clicks + in the Email Accounts to Process table to add a specific email account that he’d like to monitor.
He must confirm with Google that this is a valid connection.
Once the access is confirmed, the email account is added to the list and the status indicates that the account has been verified.
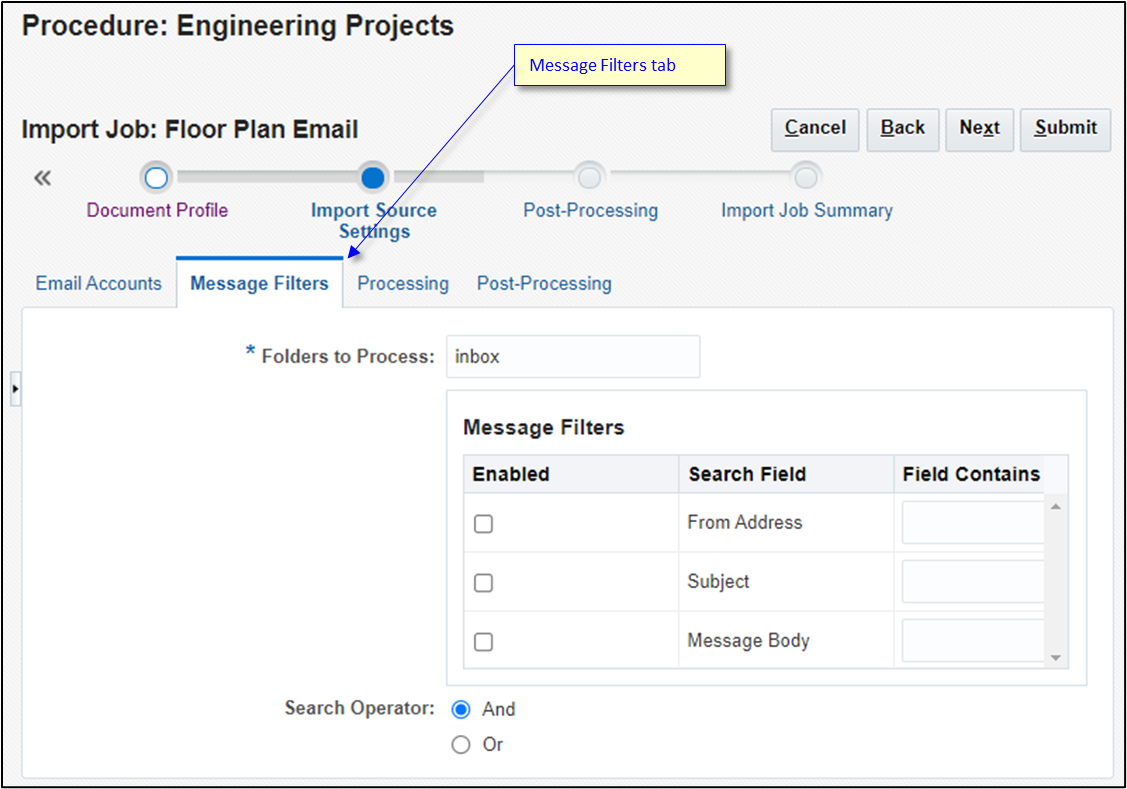
- Conrad navigates to the Message Filters tab of the Import Source Settings page. On this tab, he can define filters to select relevant emails, but filters are not required in this use case.
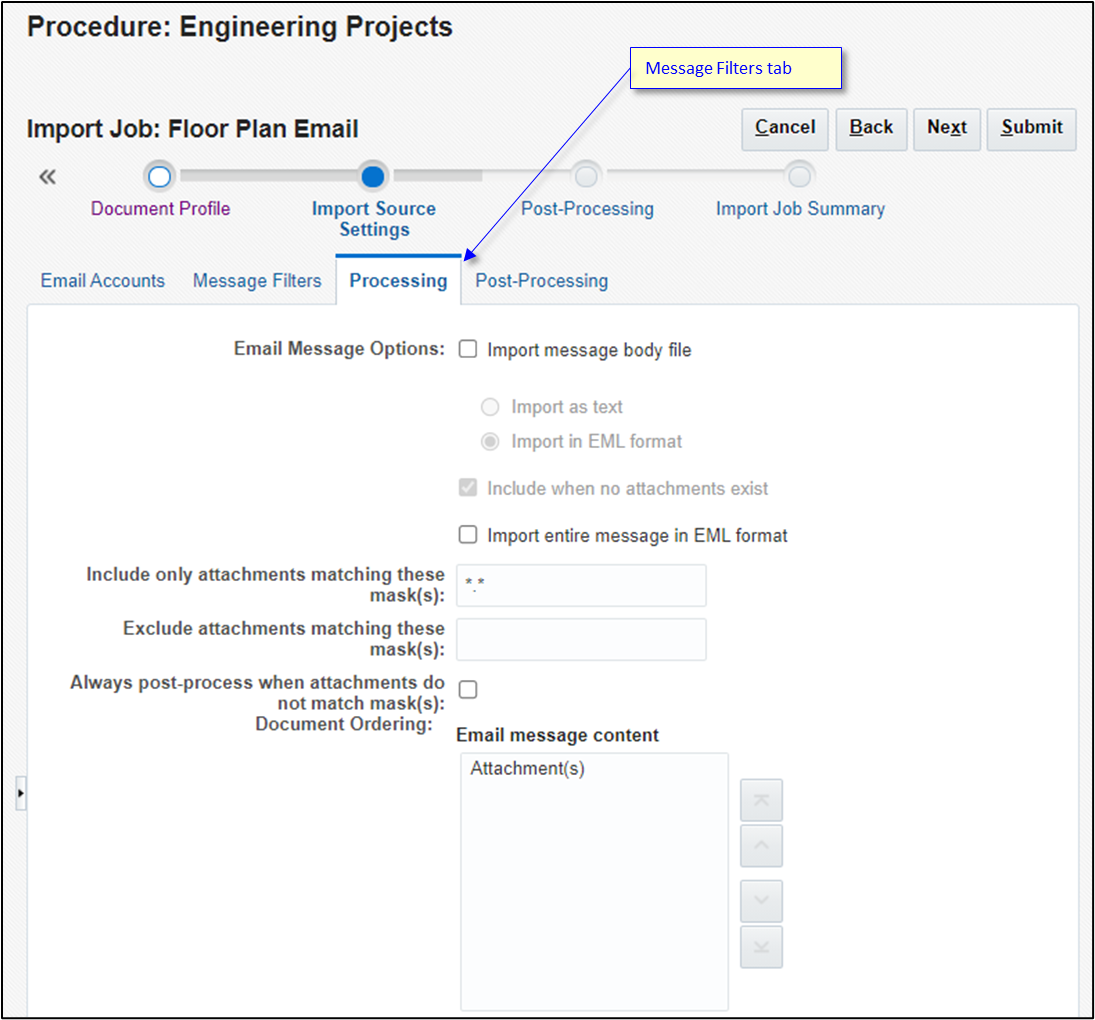
- Next, he opens the Processing tab of the Import Source Settings page. On this tab, he can define various options to control whether the email body should be preserved and which attachments are relevant. In this use case, no additional criteria are required.
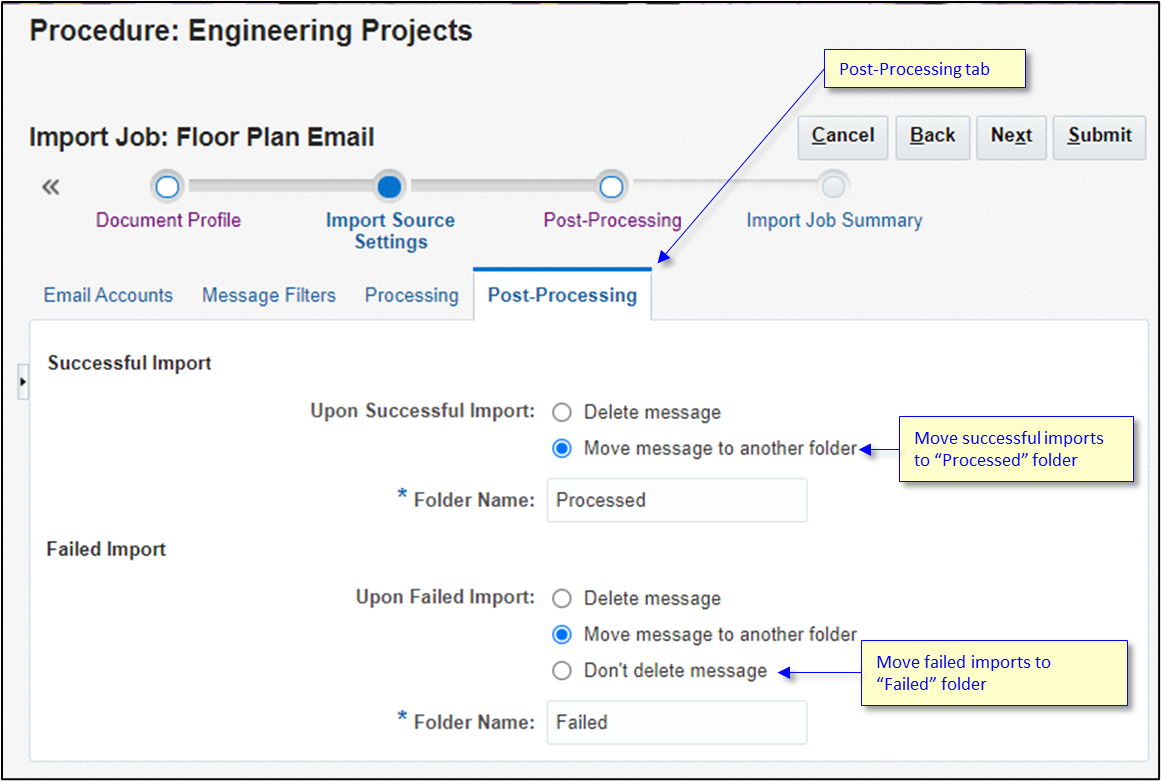
He navigates to the Post-Processing tab of the Import Source Settings page. On this tab, he defines what happens after the email has been imported by Content Capture.
Eventually, Conrad will delete the email messages after they’ve been imported, but he chooses to move them to a folder named Processed until he’s finished testing the flow.
He specifies to move emails to a folder named Failed if there are errors while importing emails at any point of time.
He clicks Next to continue to the next page.
- Conrad decides not to configure settings on the Post-Processing page so that the post-processing flow will default to the Content Capture desktop client, which will allow him to confirm the email import.

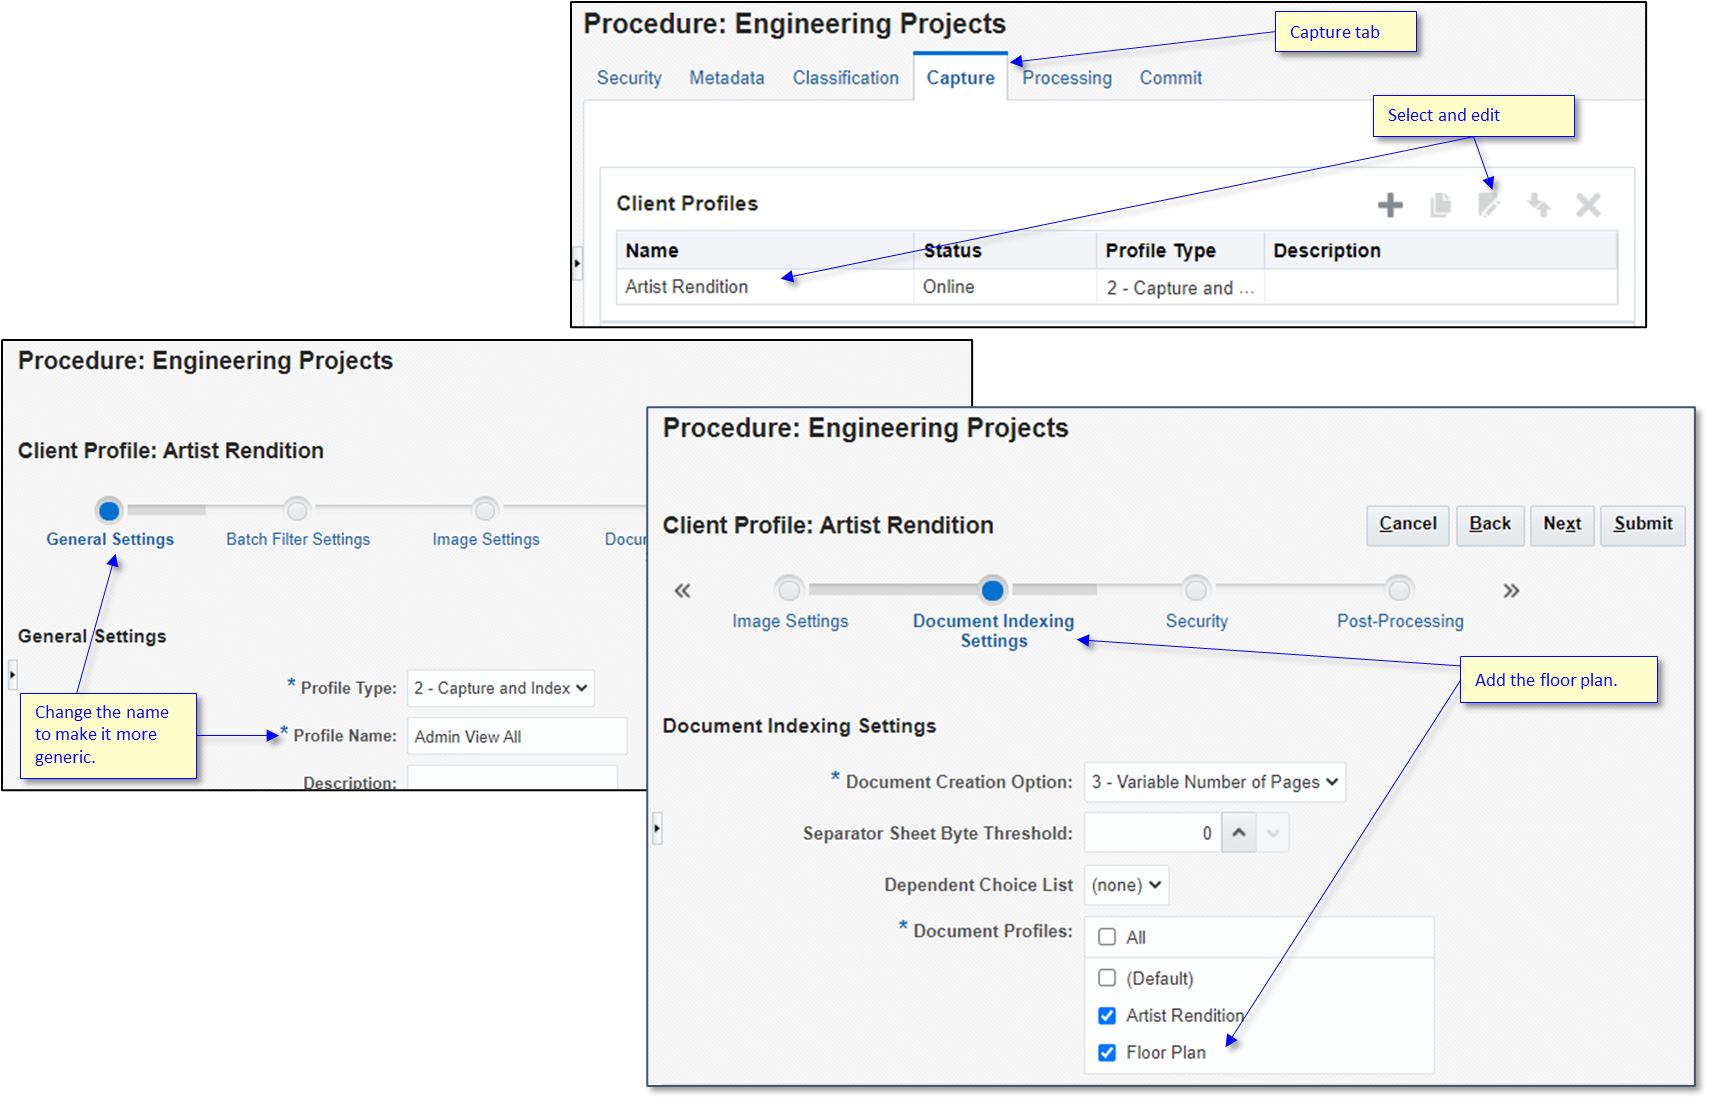
- He updates the client profile so he’ll be able to see the floor plan documents as well as the artist renditions.
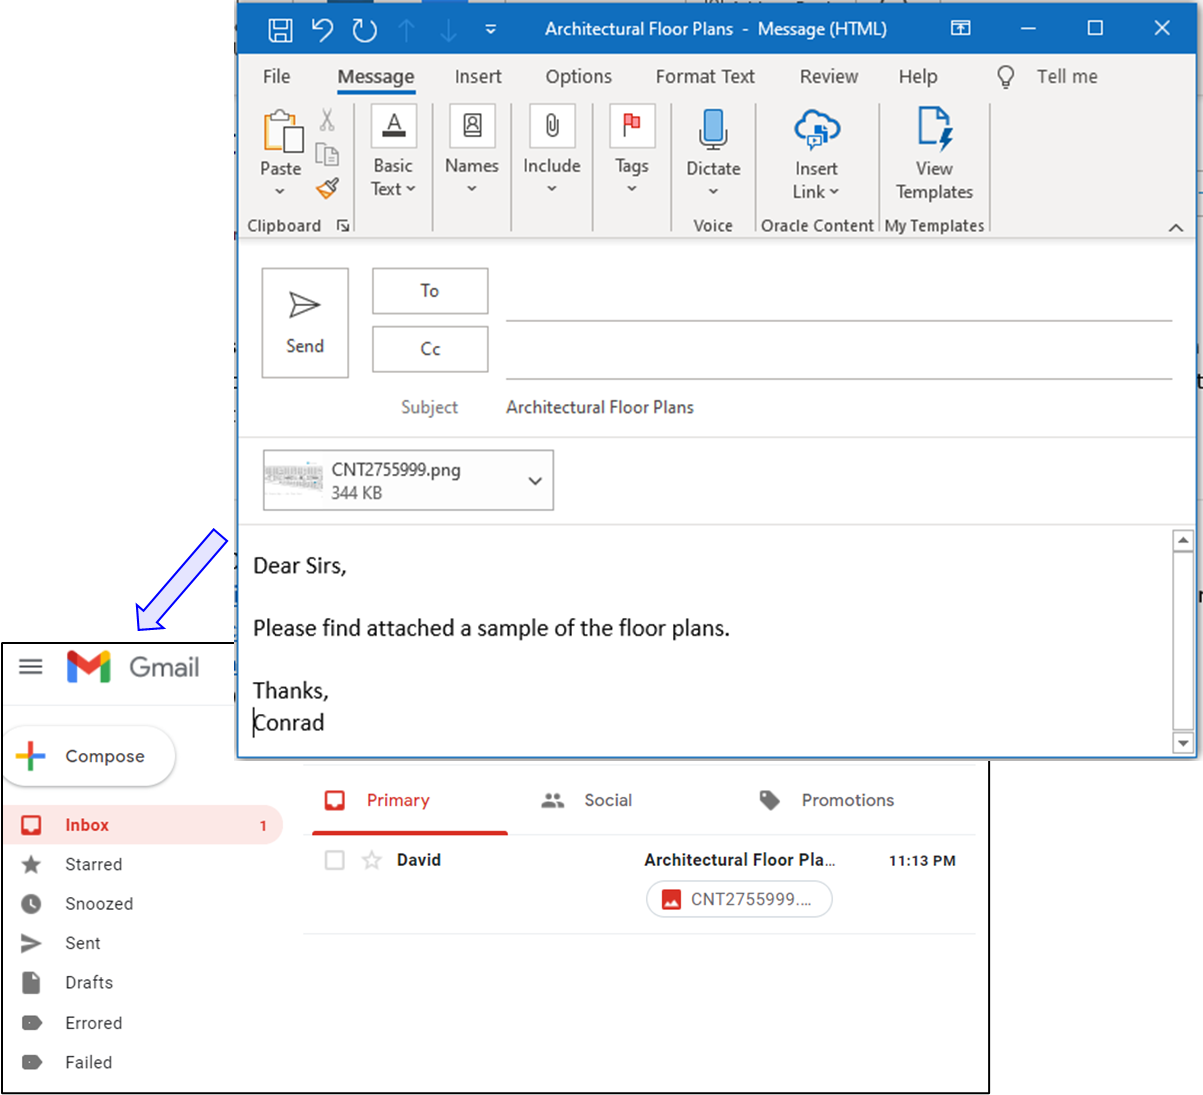
Conrad drafts a sample email in his work email client addressing it to the target email box. He attaches a sample floor plan diagram and then sends the email.
He signs in to the Gmail account and verifies that his email made it to the target email box.
Conrad returns to the Content Capture administration interface. He notices that the Floor Plan Email job is currently offline.
He clicks the Online/Offline icon to enable it.
He then clicks the Check email icon to check for new email.

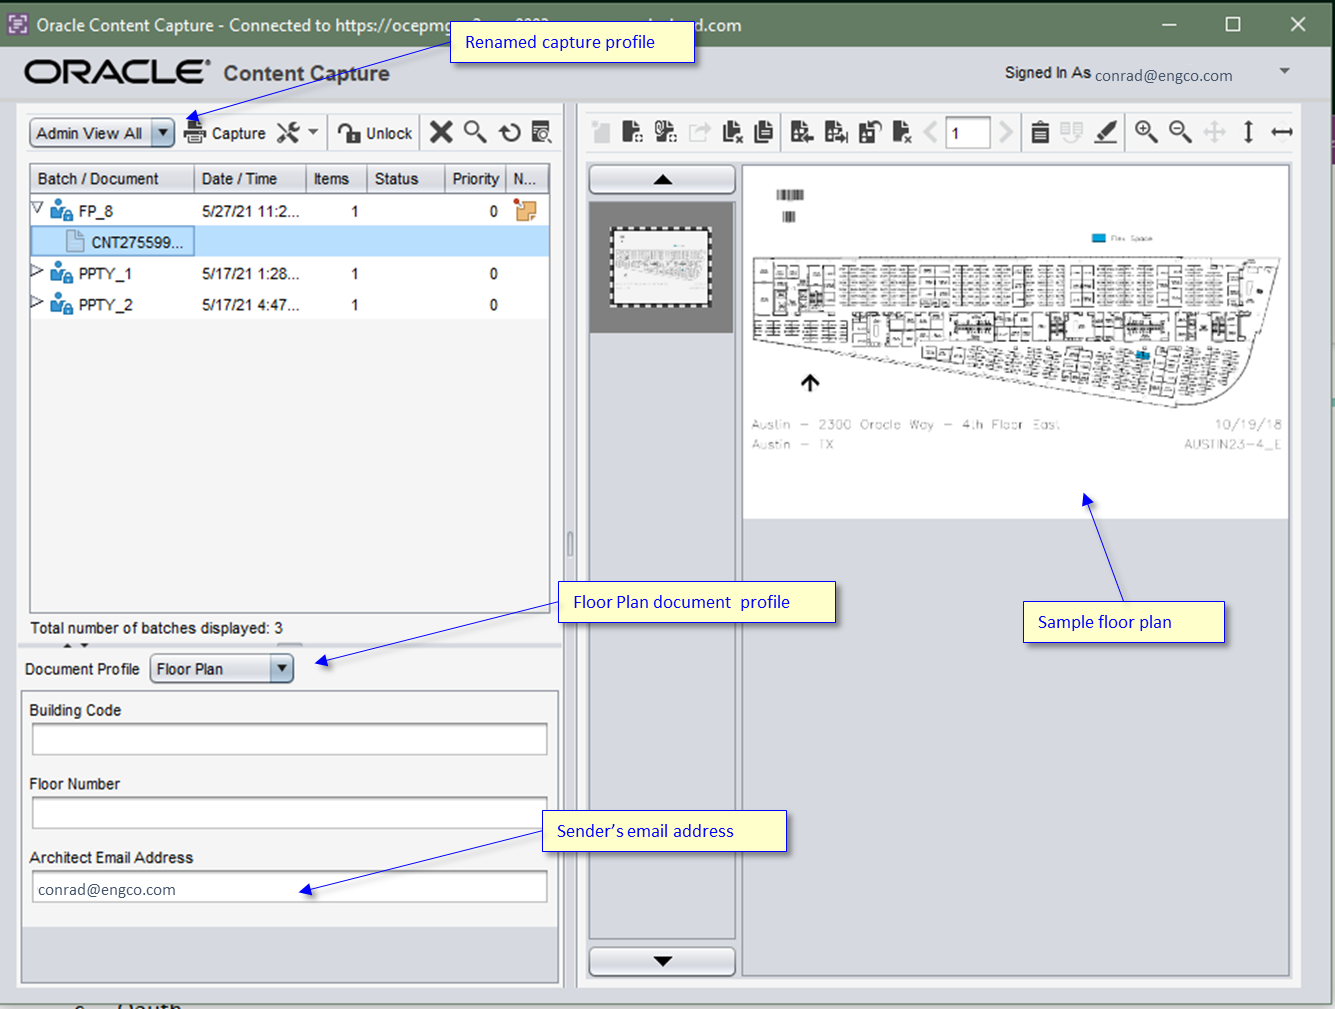
Conrad opens the Content Capture desktop client to see if a new floor plan has arrived.
The email did arrive and the floor plan attachment was extracted, which created a new batch containing a single document.
The sender’s email address was saved in the desired field.
Set Up Bar Code Extraction
Now that Conrad is receiving the emails, he needs to use the bar code recognition processor to extract the building identifier and the floor number from the drawings.
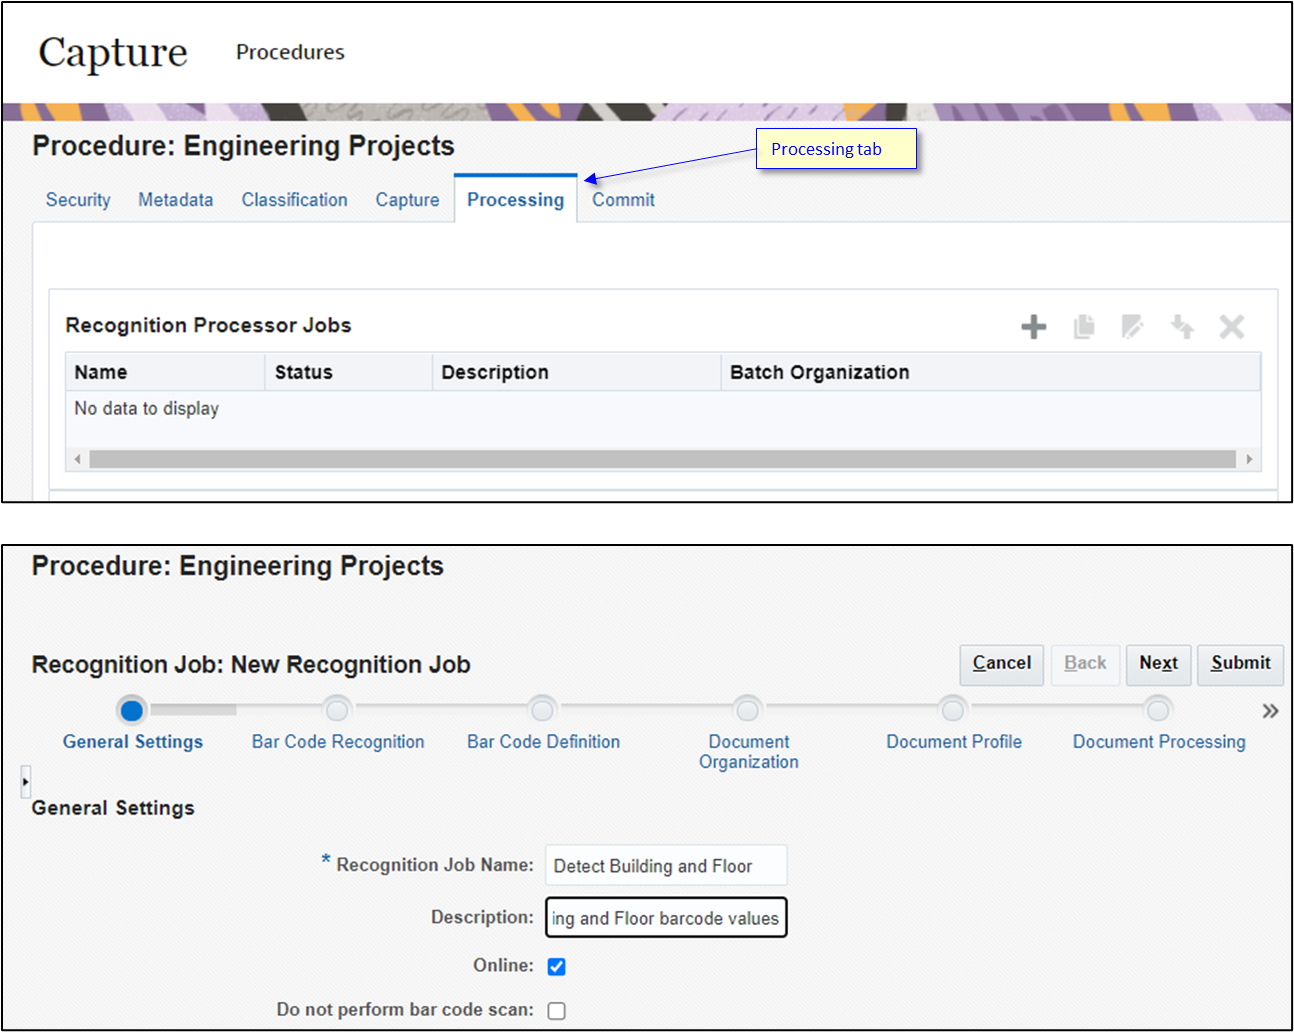
Conrad navigates to the Processing tab and clicks + in the Recognition Processor Jobs area to create a new recognition processor job.
He provides a name (Detect Building and Floor) and a description for the new job, and then clicks Next.
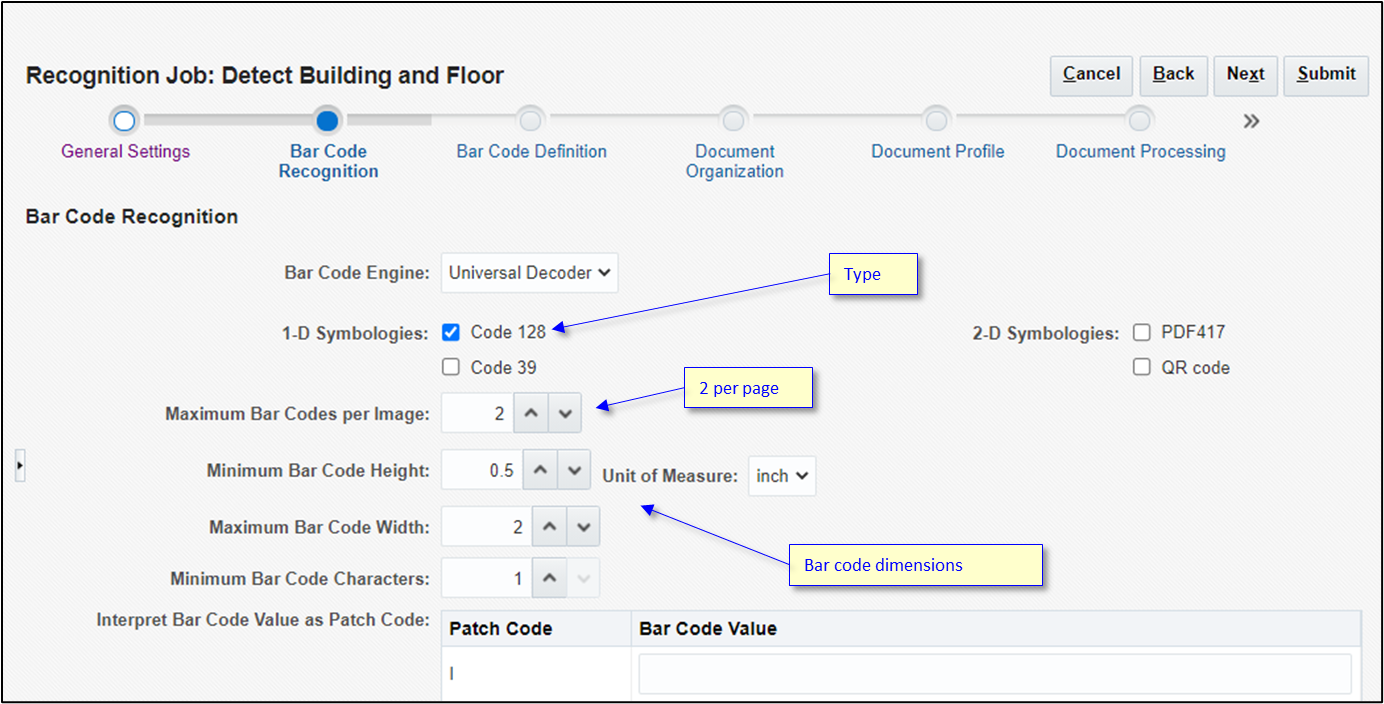
Conrad defines the kinds of bar codes he’s expecting, which in this case is type Code 128.
He also provides details about how many he’s expecting to find on the page: the building identifier and the floor number.
He measures the sizes of some of the samples he has and provides the dimension details.
He clicks Next to continue.
On the bar code definition page, he defines two new bar code formats.
The Building Identifier bar code is always an 8-character code. It can be a mix of alphanumeric characters (letters and numbers). For this bar code, Conrad specifies only a length criterion.
The Floor Number bar code is always going to be a 2-digit numeric value, so he uses a mask indicating two digits for this field.
He clicks Next to continue.

- Each image will be a single floor plan. He won’t need any of the advanced multi-page document organization features, so he clicks Next to continue.

- The document profile won’t be determined dynamically based on the value of any bar code values, so Conrad configures this step to have no effect and clicks Next on the Document Profile page.

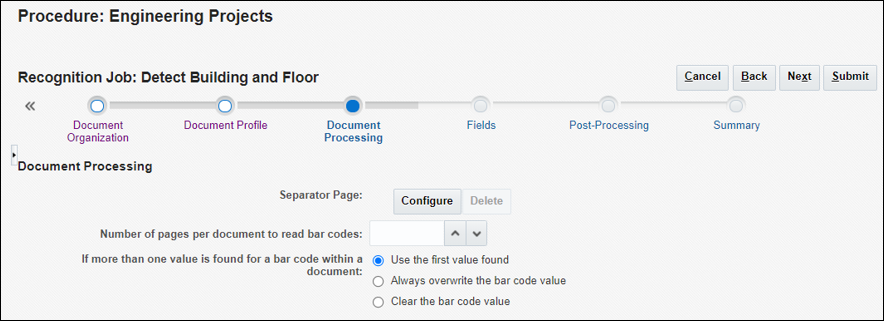
- Conrad doesn’t need to separate multiple pages of a single TIFF file based on bar code values, so he doesn’t change the settings on the Document Processing page and clicks Next.
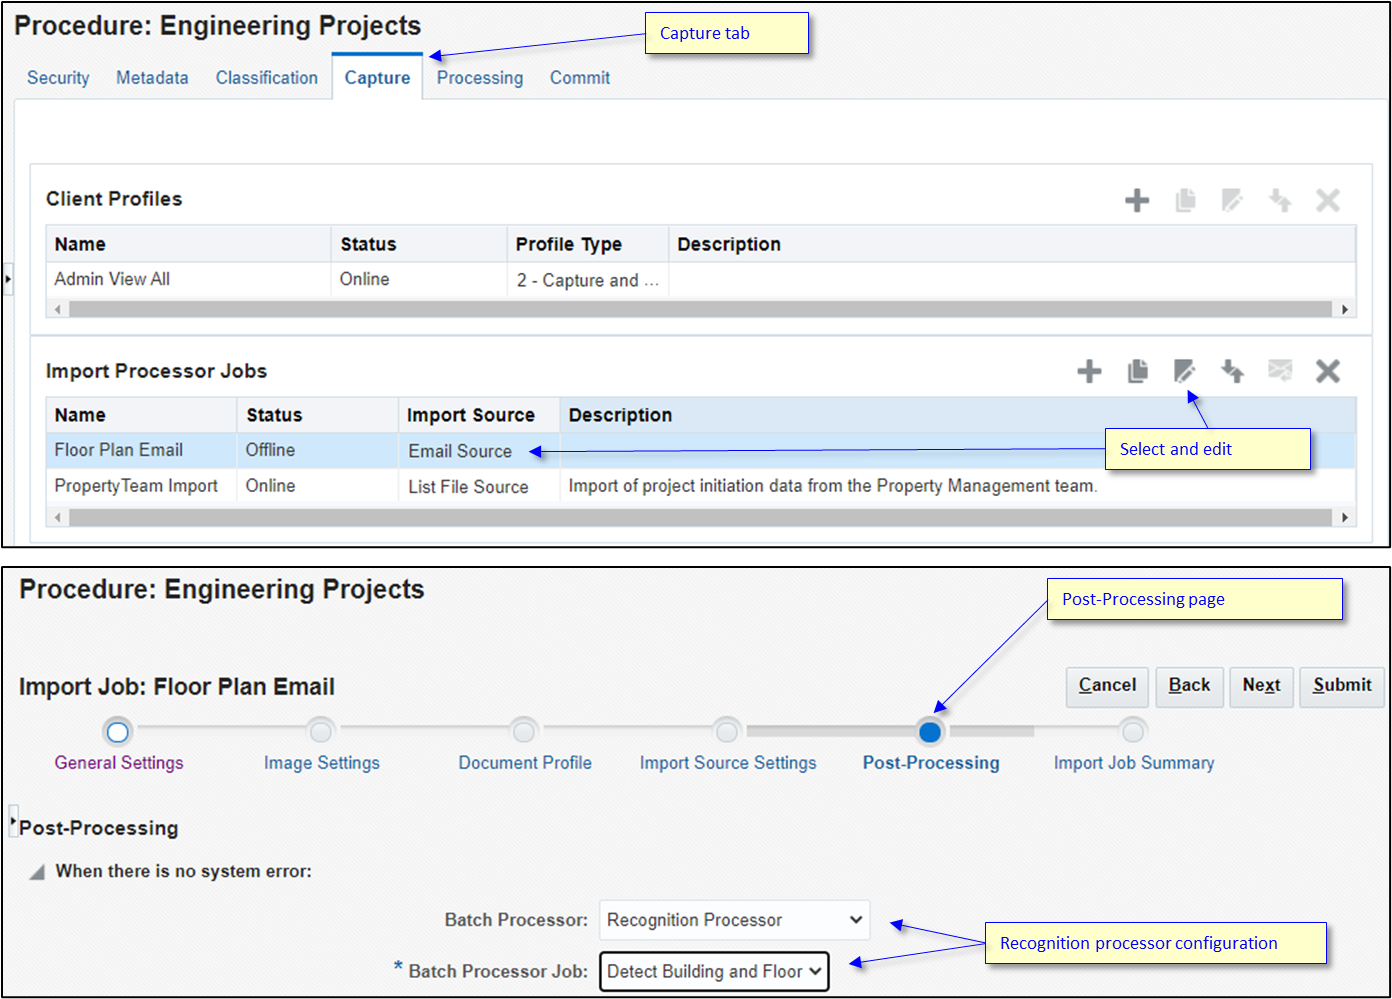
Conrad returns to his email import definition by navigating to the Capture tab.
He selects the Floor Plan Email import job and then clicks the edit icon.
He navigates directly to the Post-Processing page to connect the email import job to the recognition processor job.
He clicks Submit.
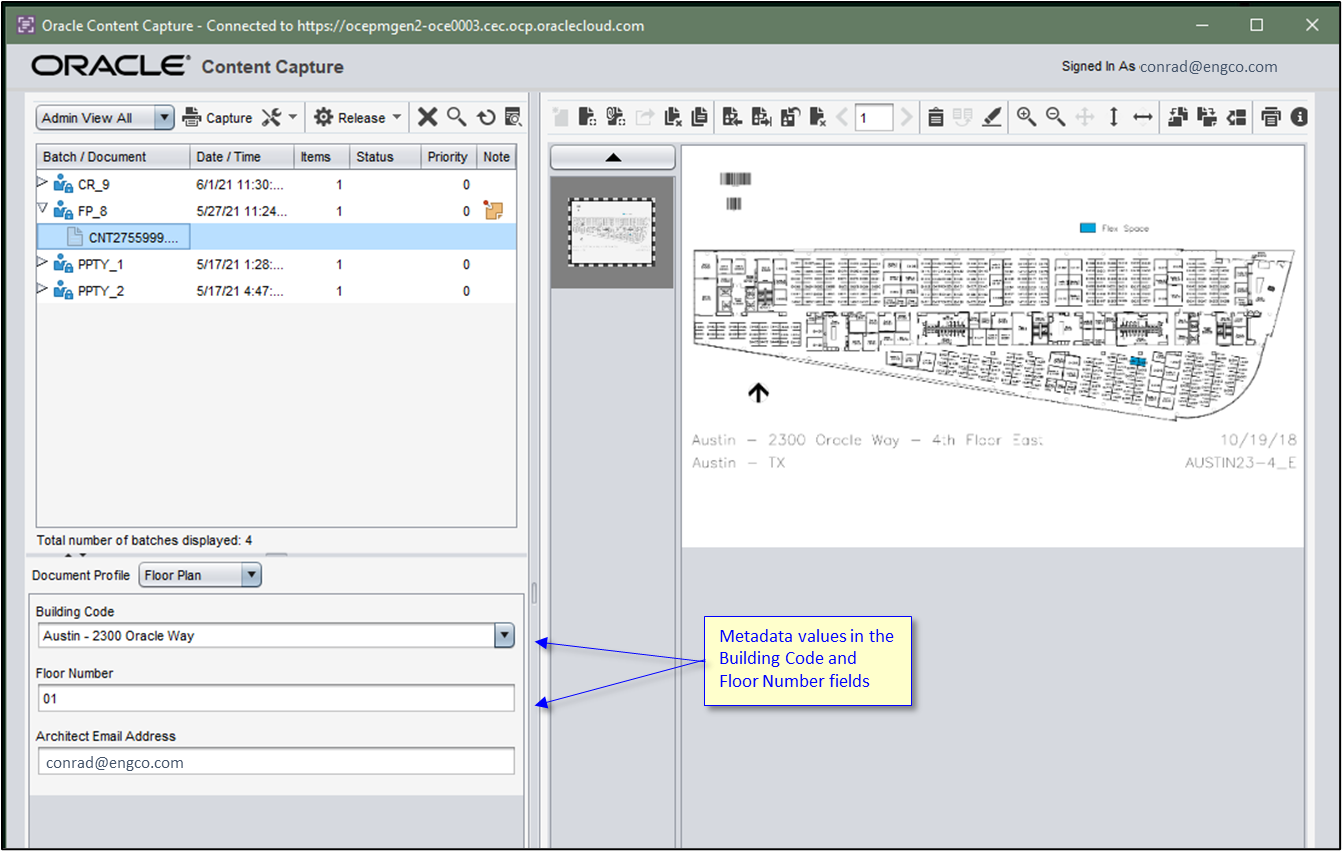
- Conrad sends another sample email to the inbox.
The floor plan design appears in the Content Capture desktop client after going through the recognition step. It now has values assigned to the metadata fields for Building Code and Floor Number.
Commit Floor Plan Documents to Oracle Content Management
The final step in this flow is to commit the floor plan documents to Oracle Content Management.
Conrad navigates to the Commit tab.
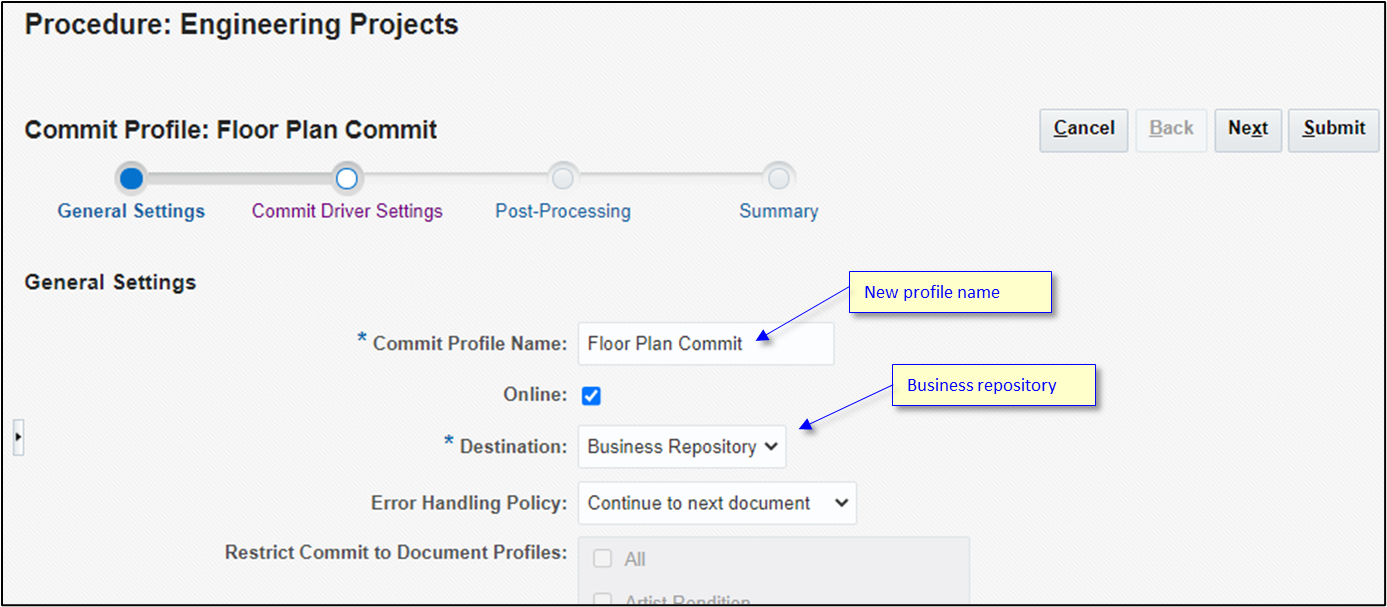
He clicks + to create a new commit profile.

He provides a name for the commit profile: Floor Plan Commit.
He selects Business Repository as the destination and then clicks Next.
The floor plan documents are in the same Building Projects repository.
The floor plans won’t be linked to a content item, so Conrad leaves the Parent Content Type setting as (none).

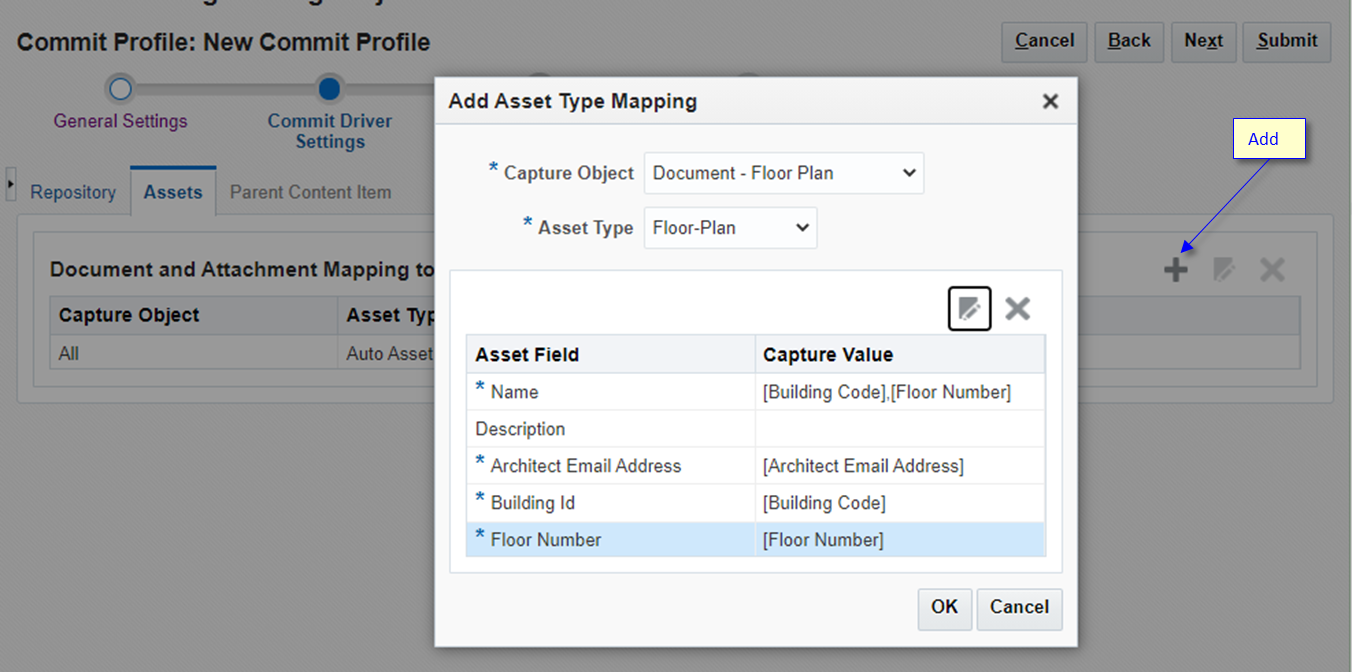
He opens the Assets tab and clicks + to add a new asset mapping.
He connects the Content Capture floor plan to the corresponding asset type and links the fields together.
He clicks OK.
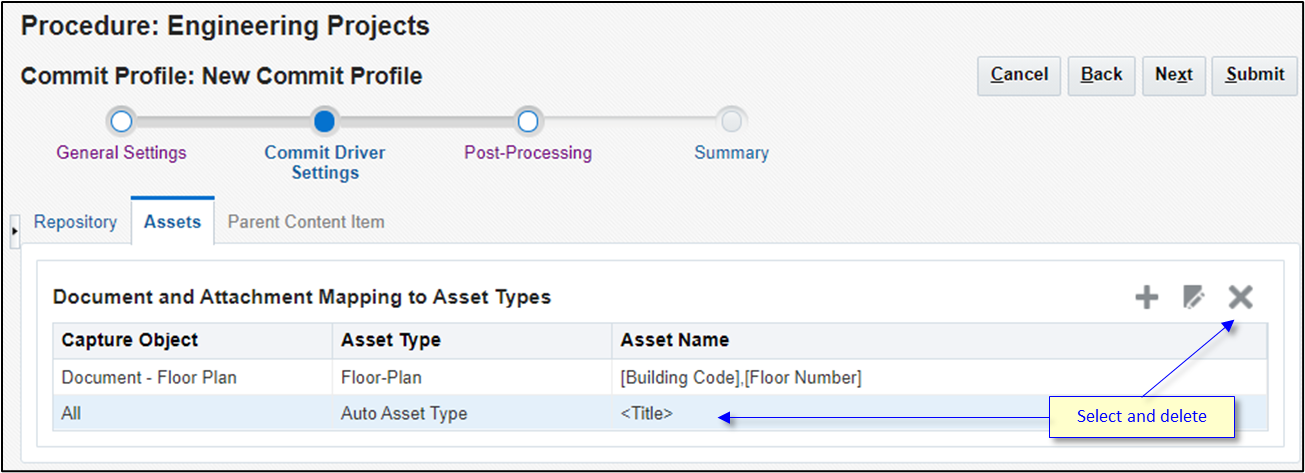
Conrad has configured this commit profile very specifically for the floor plan flow. So, he deletes the default row All and clicks Submit.
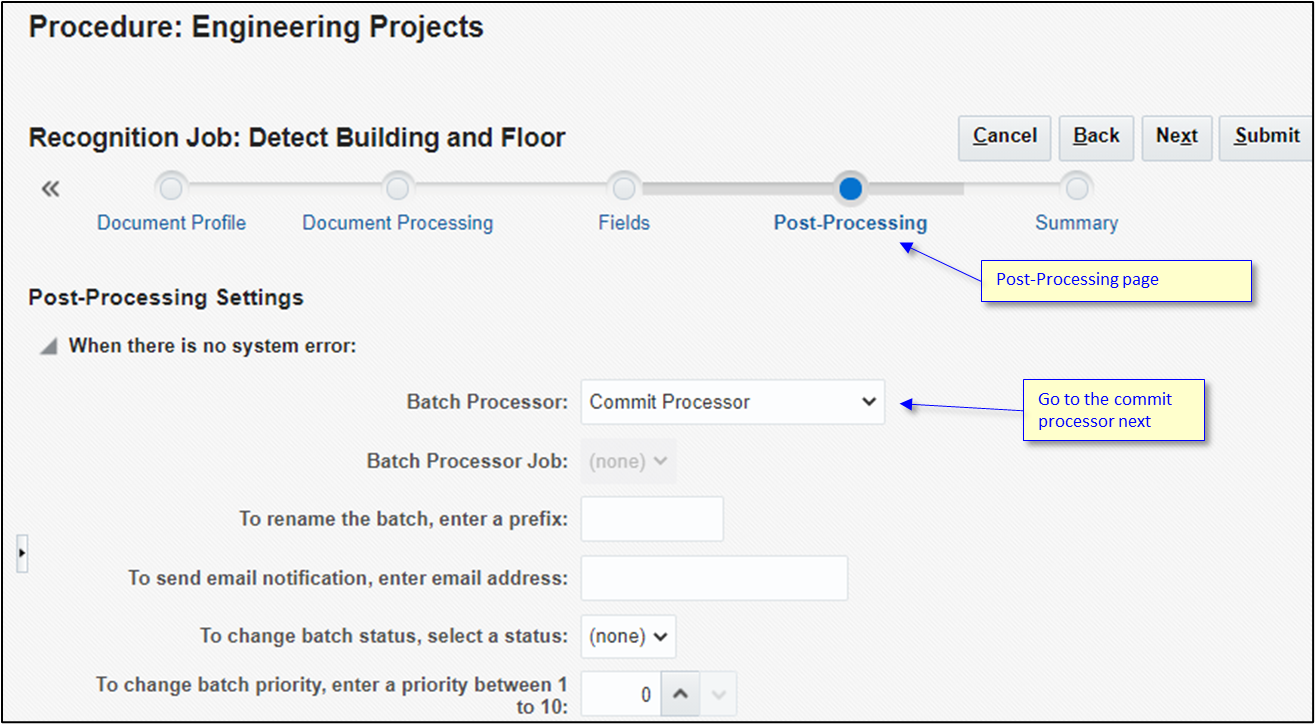
Conrad needs to redirect the flow in the barcode-processing step to point to the commit step.
He navigates to the Processing tab. Then, he selects the recognition processor job and modifies it.

He then navigates to the Post-Processing page and sets the batch processor to the commit step.
Conrad clicks Submit.
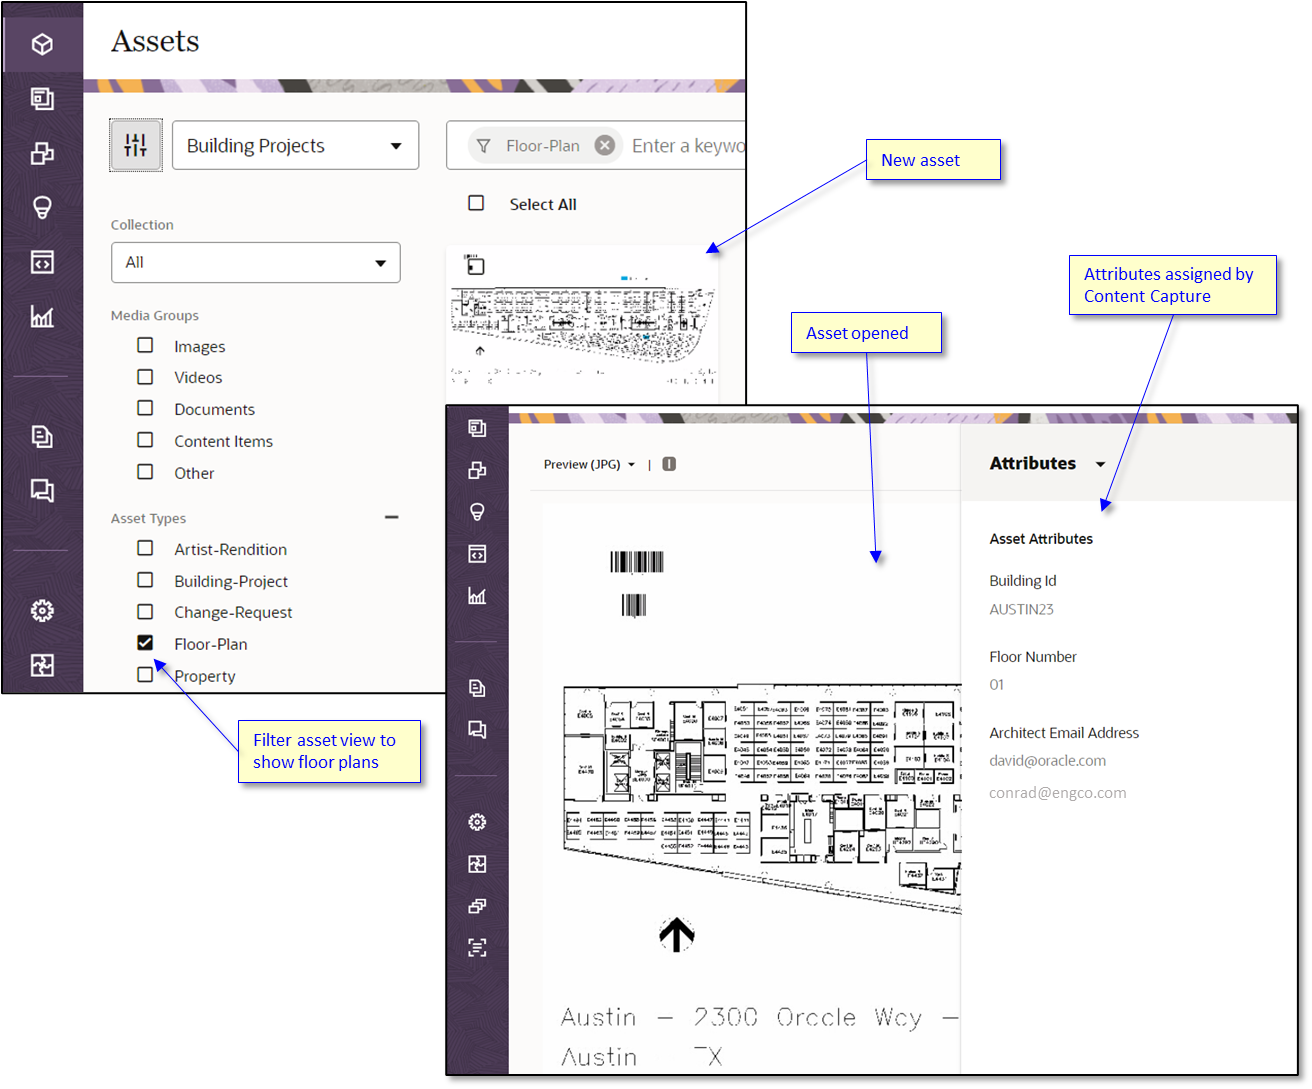
Conrad sends another floor plan to the email address.
He then navigates to the Assets page in the Oracle Content Management web interface and filters his search by selecting only the Floor-Plan asset type.
He verifies that the new image is present with the desired metadata.
Change Requests: Scanned Documents and Client Lookup
Conrad now maps out the flow of the change request documents that Content Capture will need to collect.
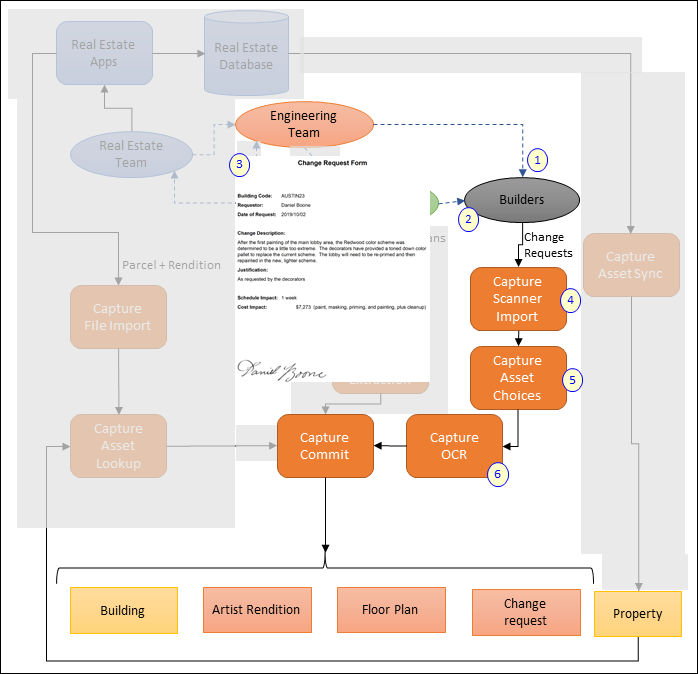
The engineering team engages a commercial building company to begin construction of the building.
The architects share the design plans, and construction begins.
As construction progresses, the builders will inevitably encounter unexpected challenges that will cause deviation from the original design. These are managed by issuing change requests. After each change request has been approved, the site manager sends the final signed copy to the engineering team’s scanning department through a courier service.
Conrad configures a Content Capture client profile to capture the incoming signed copies of any change request documents.
He’ll include an additional capture asset choice list to appear in the desktop client to help scanning users find the corresponding building content item that the change request should be linked to.
He’ll perform optical character recognition (OCR) on the scanned document to convert it into a text PDF format, so its text content can be indexed and searched.
Create the Change Request Asset Type
Andrea defines an additional custom asset type that will store the scanned copy of the change request. The new change request will have the building identifier so it can be linked to the building object.
Andrea starts by creating the new change request asset type. These files are always going to be a PDF document by the time it reaches Oracle Content Management. It will be a combination of the original scanned document, including the signatures of the various project stakeholders, plus the text (which went through OCR processing) for searching.
Andrea copies the base file type to create a new Change-Requests custom asset type.
The scanner operator will be expected to select the appropriate building identifier in the Content Capture desktop client. Andrea adds the Building Id field and saves the new asset type.

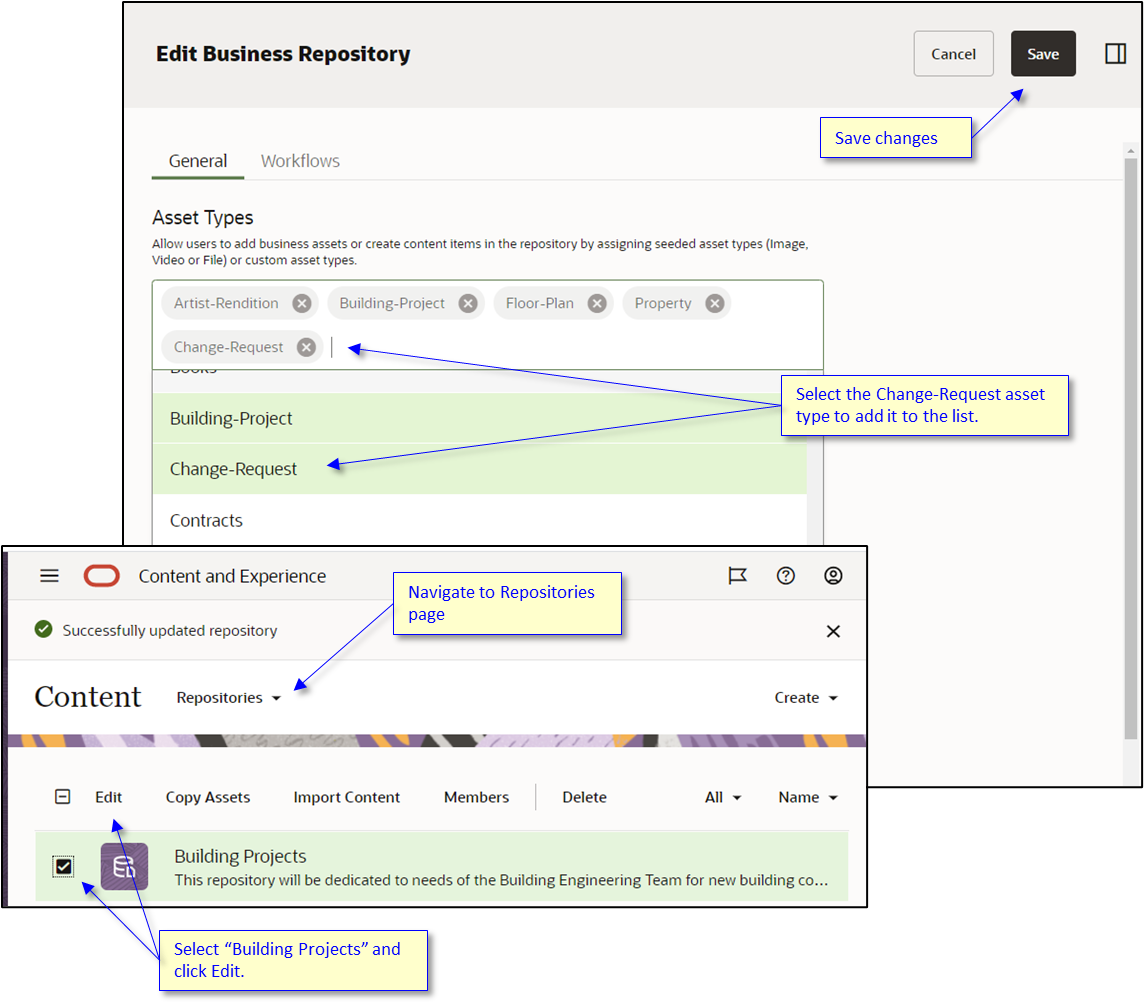
As she did before, she edits the Building Projects repository to add the new content type.
She saves the updated repository definition.
Create a Document Profile for Change Requests
Conrad now creates a document profile for change requests.
Conrad logs in to the Content Capture administration web interface and opens the Engineering Projects procedure.
He opens the Classification tab.
He clicks + in the Document Profiles section to create a document profile for the change request documents.
Conrad enters a name for the new document profile: Change Requests.
He adds the Building Code field to the document profile and then submits the new profile.

Create a Building Identifier Choice List
Next, Conrad creates a building identifier choice list.
Conrad logs in to the Content Capture administration web interface and opens the Engineering Projects procedure.
He opens the Metadata tab.
He clicks + in the Asset Type Choice Lists area to create a new single-value choice list.
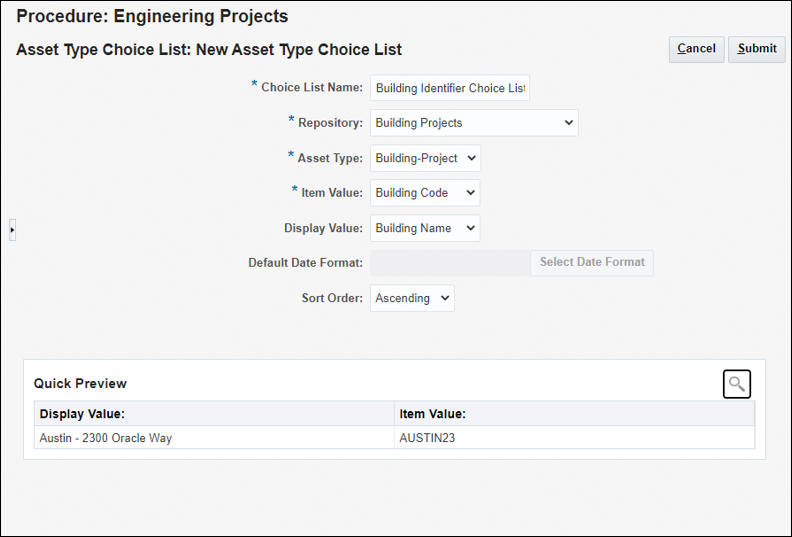
Change requests will only start arriving after the building project is under way, so Conrad can use the Building Project content type as the source of a choice list of known buildings.
His goal is to get the building code, but the building’s name will be easier for the user to identify.
He selects Building Code as the value to be stored, but Building Name to be displayed in the choice list.
He clicks the quick preview icon, which shows sample data. He has only created a single building project so far, so only one appears in the list.
He clicks Submit to save the choice list.
Conrad returns to the Metadata tab and selects the Building Code field to modify it.
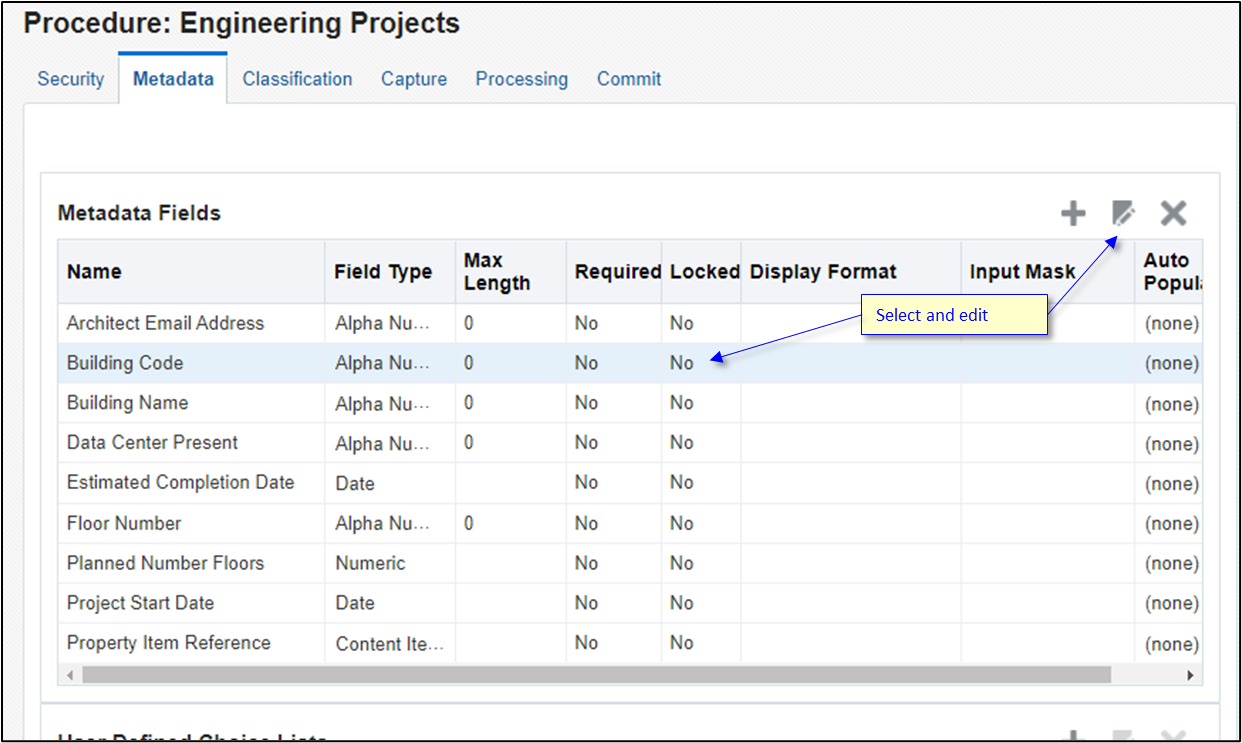
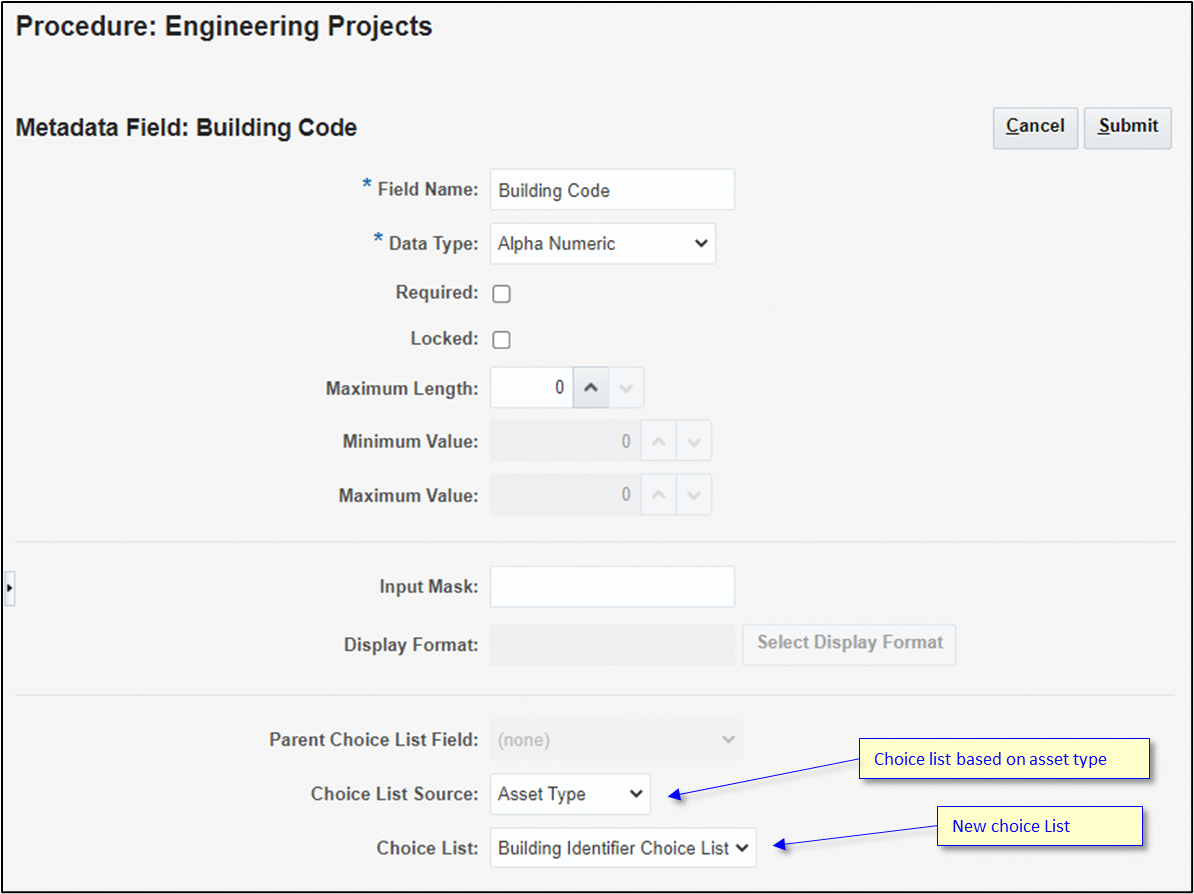
Conrad scrolls down to the choice list area of the field definition.
He selects the new choice list (Building Identifier Choice List) that he just created for the Building Code field.
Whenever the field appears in the client, it will now have a choice list (dropdown list) associated with it, so a value can be selected.
He clicks Submit.
Create a Client Profile for Change Requests
The next step is for Conrad to create a client profile for change requests.
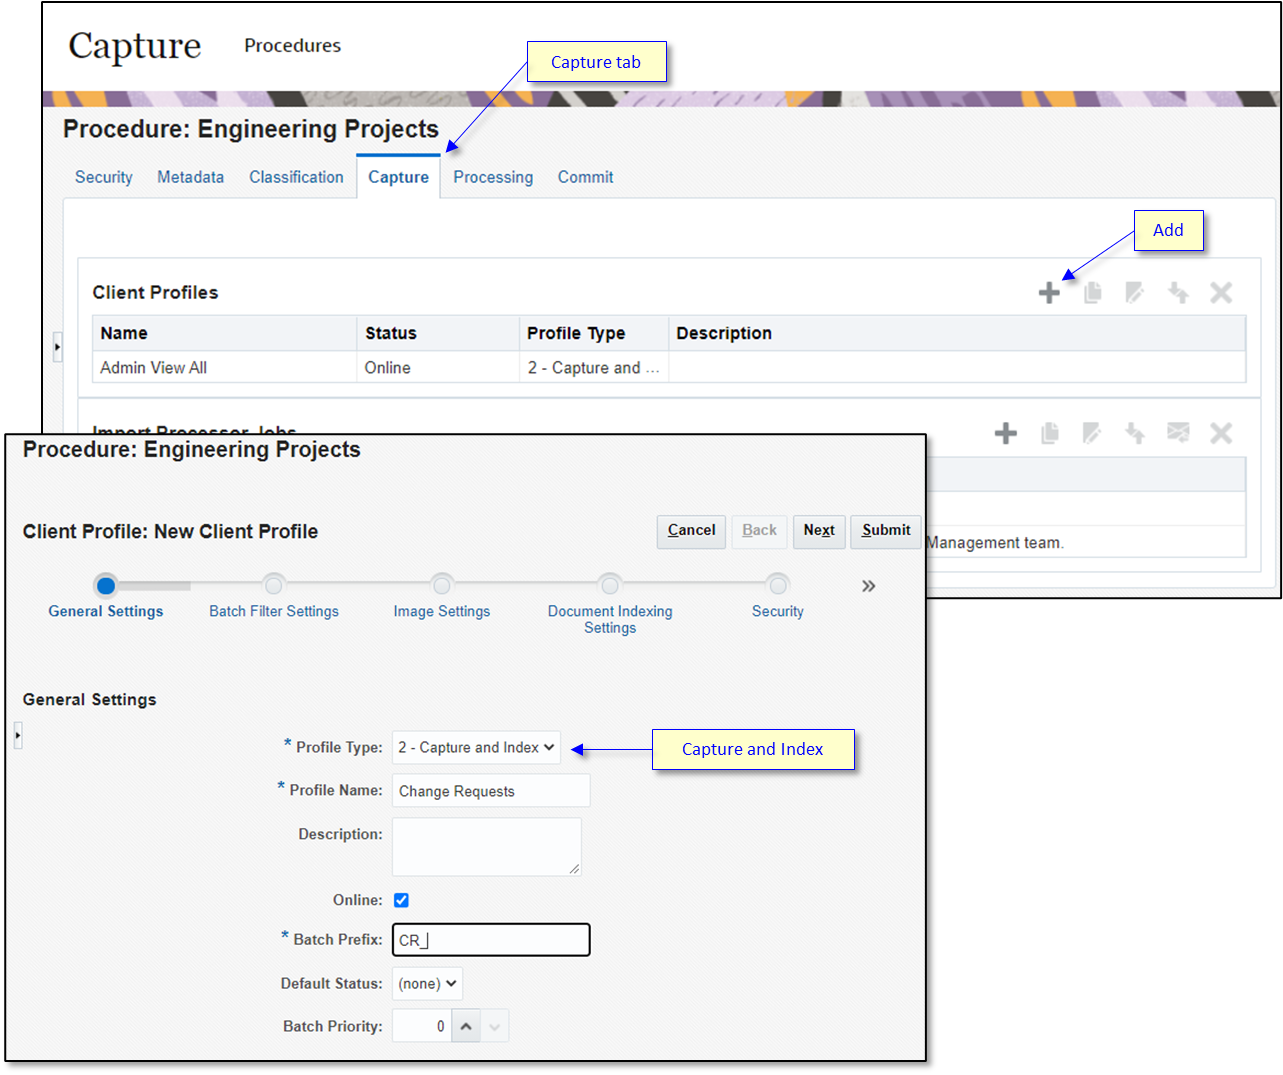
Conrad opens the Content Capture administration interface, selects the Engineering Project procedure, and then navigates to the Capture tab.
He clicks + to add a new client profile.
He selects Capture and Index because the scan client users will perform both actions.
He provides a name for the client profile: Change Requests.
He provides a batch prefix and clicks Next.
He continues through the Batch Filter Settings and Image Settings pages, since these aren’t relevant in his use case.
On the Document Indexing Settings page, he chooses the Change Requests document profile and clicks Next.

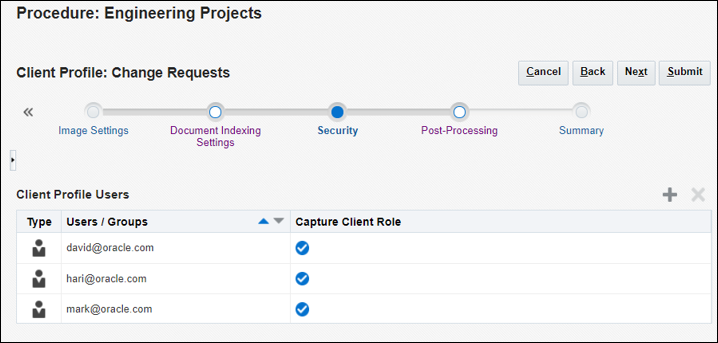
On the Security page, Conrad’s user identity is automatically added as a valid user of the profile. He then adds the additional users that will operate the scanners and use the Content Capture desktop client to index the change requests.
He clicks Next.
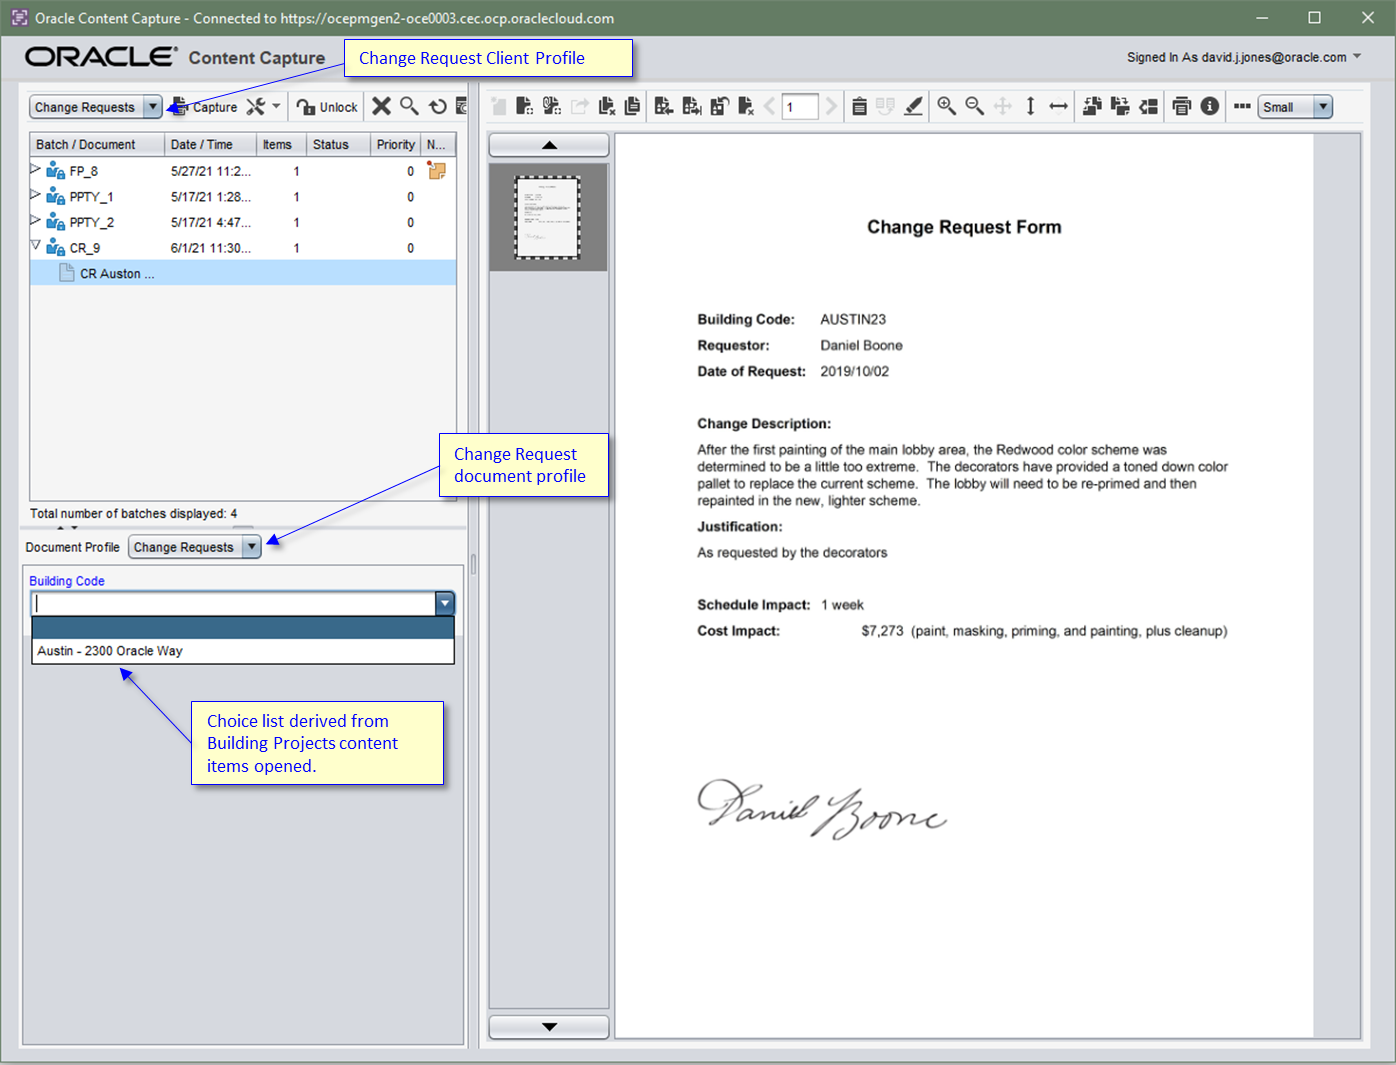
Conrad opens the Content Capture desktop client.
He selects the Change Requests client profile.
He scans a sample change request document.
In the metadata section, the Building Code field has a selection list that shows all known building projects.
Create an OCR Processor Job to Convert Scanned Images to PDF
Conrad now proceeds to create an OCR processor job to convert image-based scanned images to text-based, searchable PDF documents.
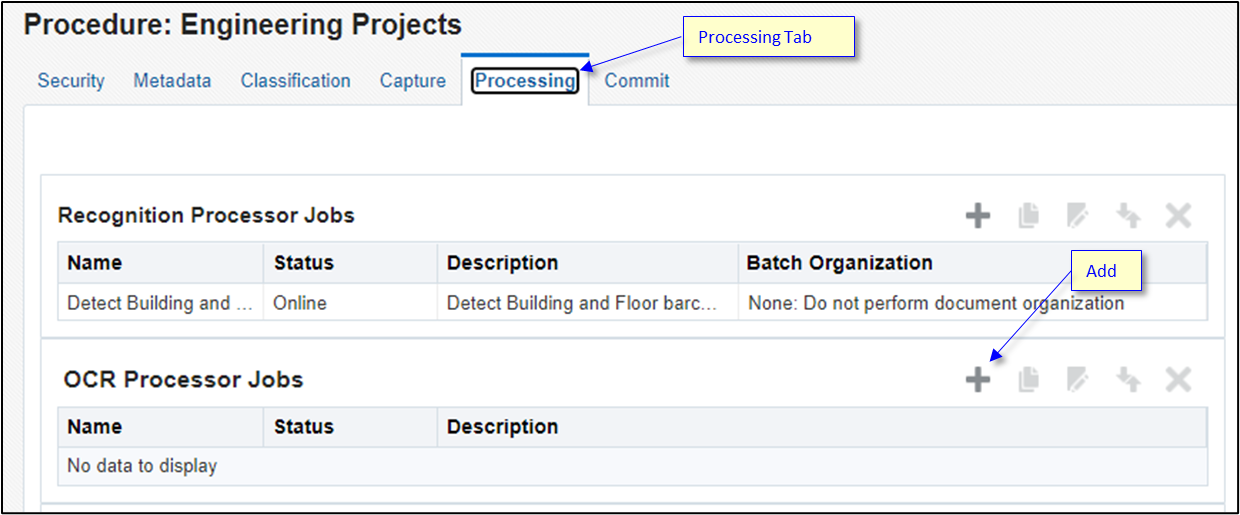
Conrad navigates to the Processing tab in the Content Capture administration interface.
He clicks + to create a new OCR processor job.
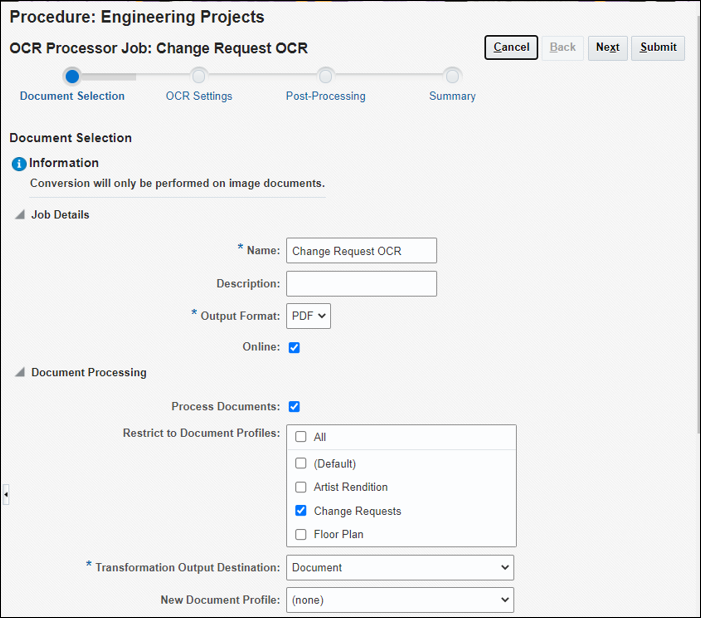
He provides a name for the conversion: Change Request OCR.
He selects PDF as the output format. This format is a combination of the original scanned document image pages plus a corresponding text layer.
He indicates that this conversion step only applies to documents in the Change Requests document type and clicks Next.
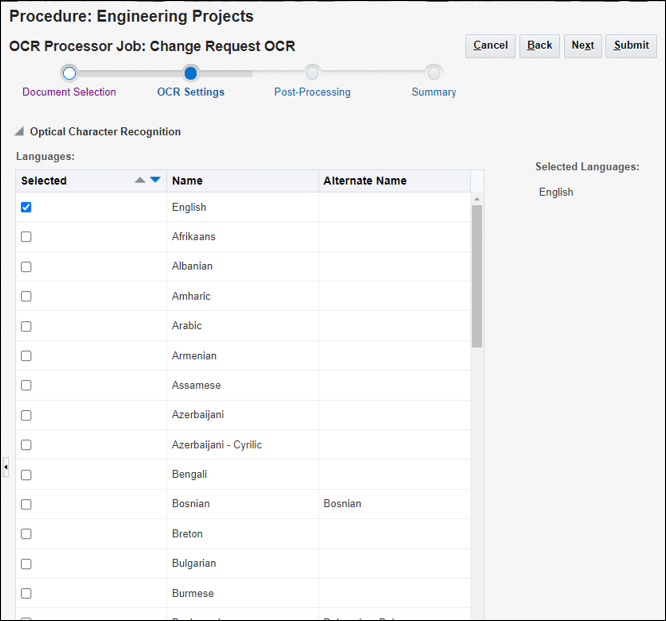
All the documents will be in English, so Conrad only selects English as the source language for the OCR conversion.
He’ll verify this step in the desktop client so he leaves the Post-Processing page in its default state.
He clicks Submit.
Add PDF Conversion to the Client Profile
Next, Conrad adds the PDF conversion step to the client profile configuration.
Conrad returns to the incomplete client profile to link it to the PDF conversion.
He selects the Change Requests client profile and edits it.

He navigates to the Post-Processing page and clicks + to add a new release process.
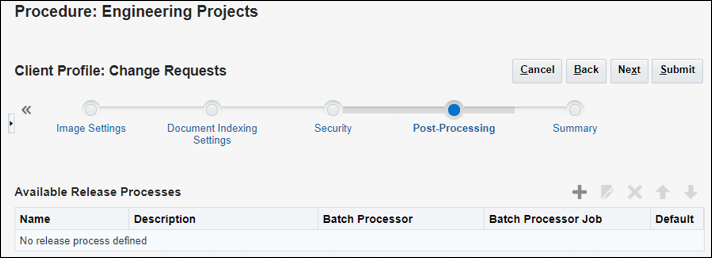
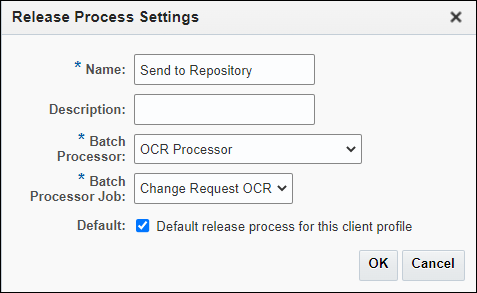
Conrad provides a name that will be relevant to the desktop client user.
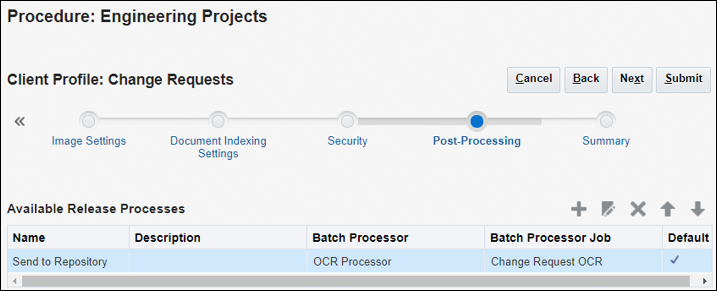
He selects the OCR Processor batch processor type and the Change Request OCR batch processor job. He selects this as the default release option and clicks OK.
He then clicks Submit to save the updates to the client profile.
Create a Commit Profile
Conrad now creates a new commit profile to add the mapping to the change request assets.
Conrad navigates to the Commit tab of the Engineering Projects procedure.
He clicks + to create a new mapping.

He provides a name for the commit profile: Change Request Commit.
He selects Business Repository as the target repository type and clicks Next.

Conrad selects the Building Projects repository.
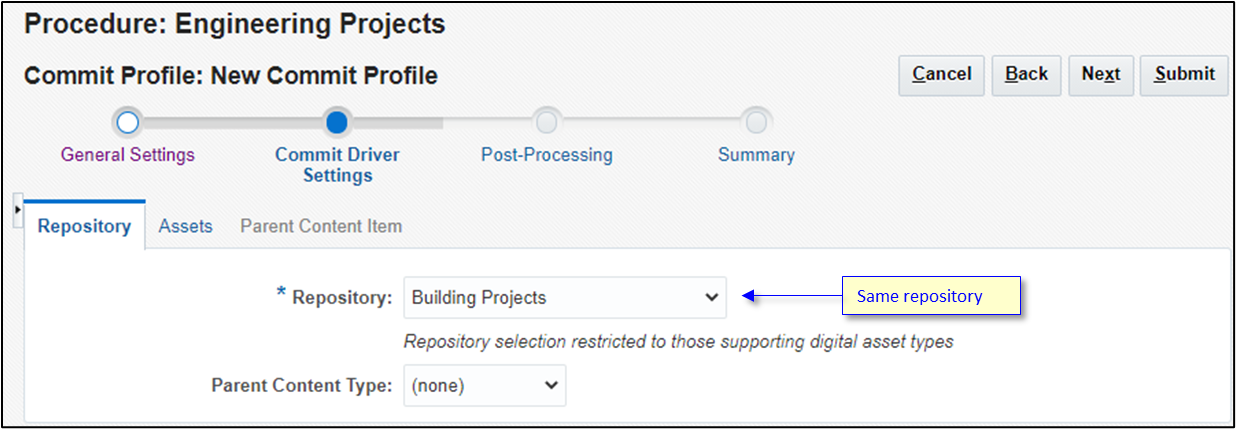
He opens the Assets tab.
He selects and deletes the “All” mapping.
He then clicks + to add a new mapping.
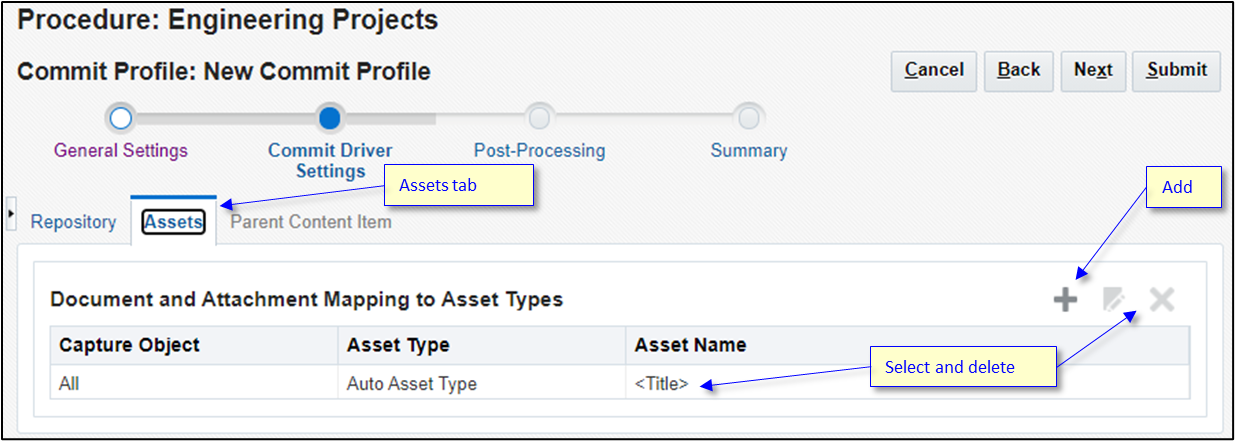
Conrad defines a mapping from the Content Capture Change Requests document profile to the Oracle Content Management Change-Request asset type.
He maps the building code to the name of the asset.
He maps the building code to the corresponding asset field and clicks OK.

He clicks Submit to save the commit profile.
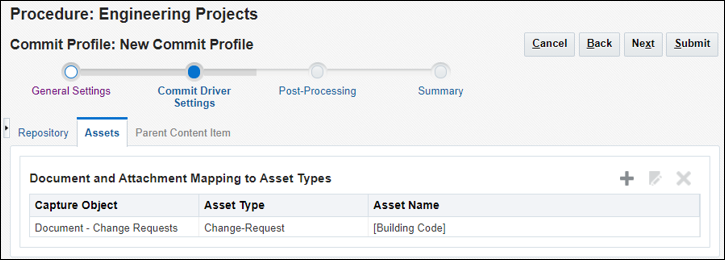
Conrad confirms that he now has commit profiles for each document type.
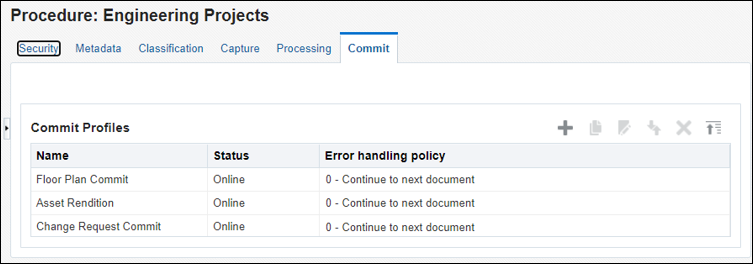
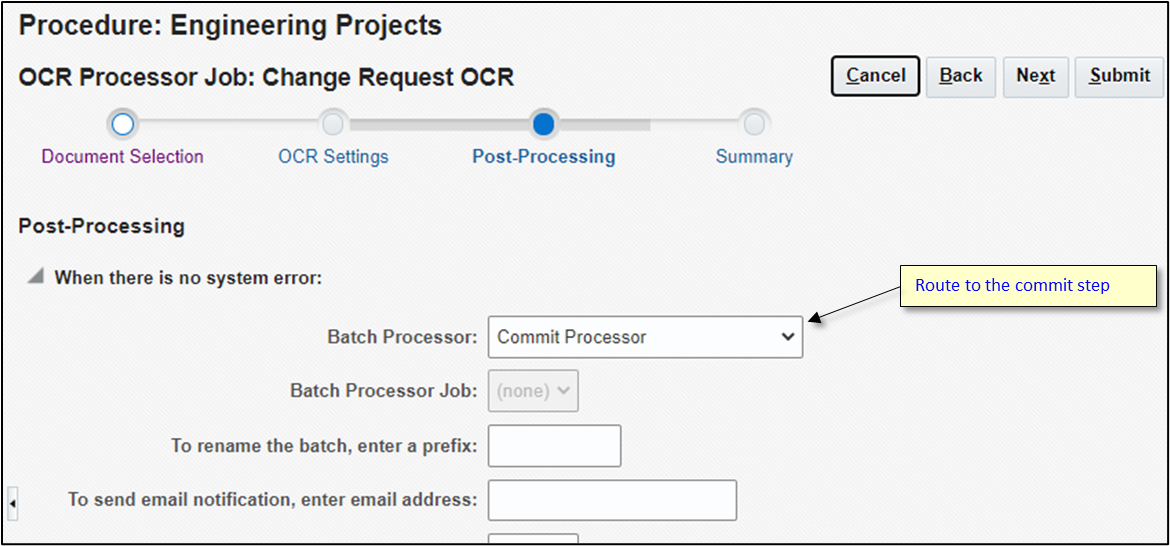
Configure the OCR Processor Job to Flow to the Commit Processor
Conrad now configures the OCR processor job, so it flows to the commit processor.
Conrad navigates to the Processing tab of the Engineering Projects procedure.
He selects and modifies his OCR processor job.
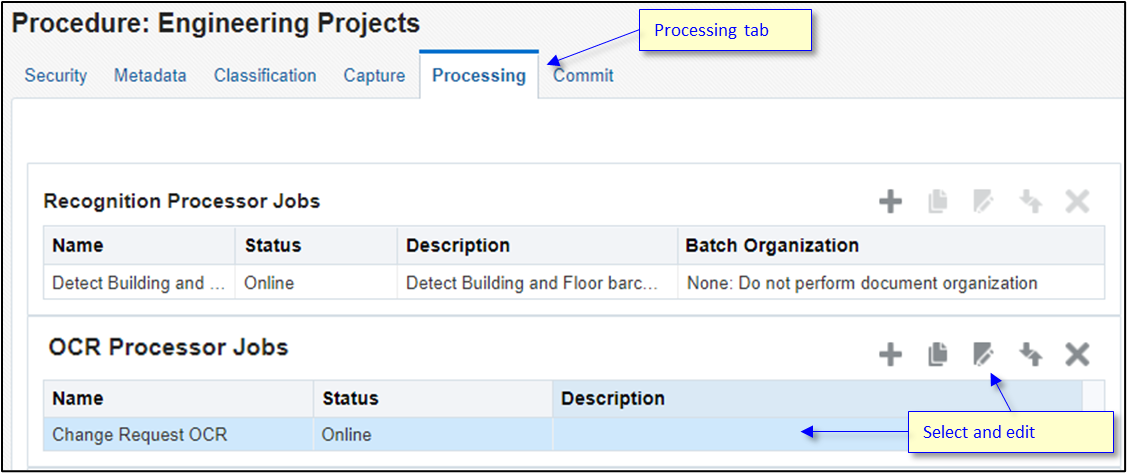
He navigates to the Post-Processing page and changes the Batch Processor field to Commit Processor.
He clicks Submit.
Test the Change Request Process
As the final step, Conrad rescans the change request to make sure it goes through the flow as expected.
Conrad rescans the change request again and sends it through the flow.
He navigates to the Assets page in the Oracle Content Management web interface.
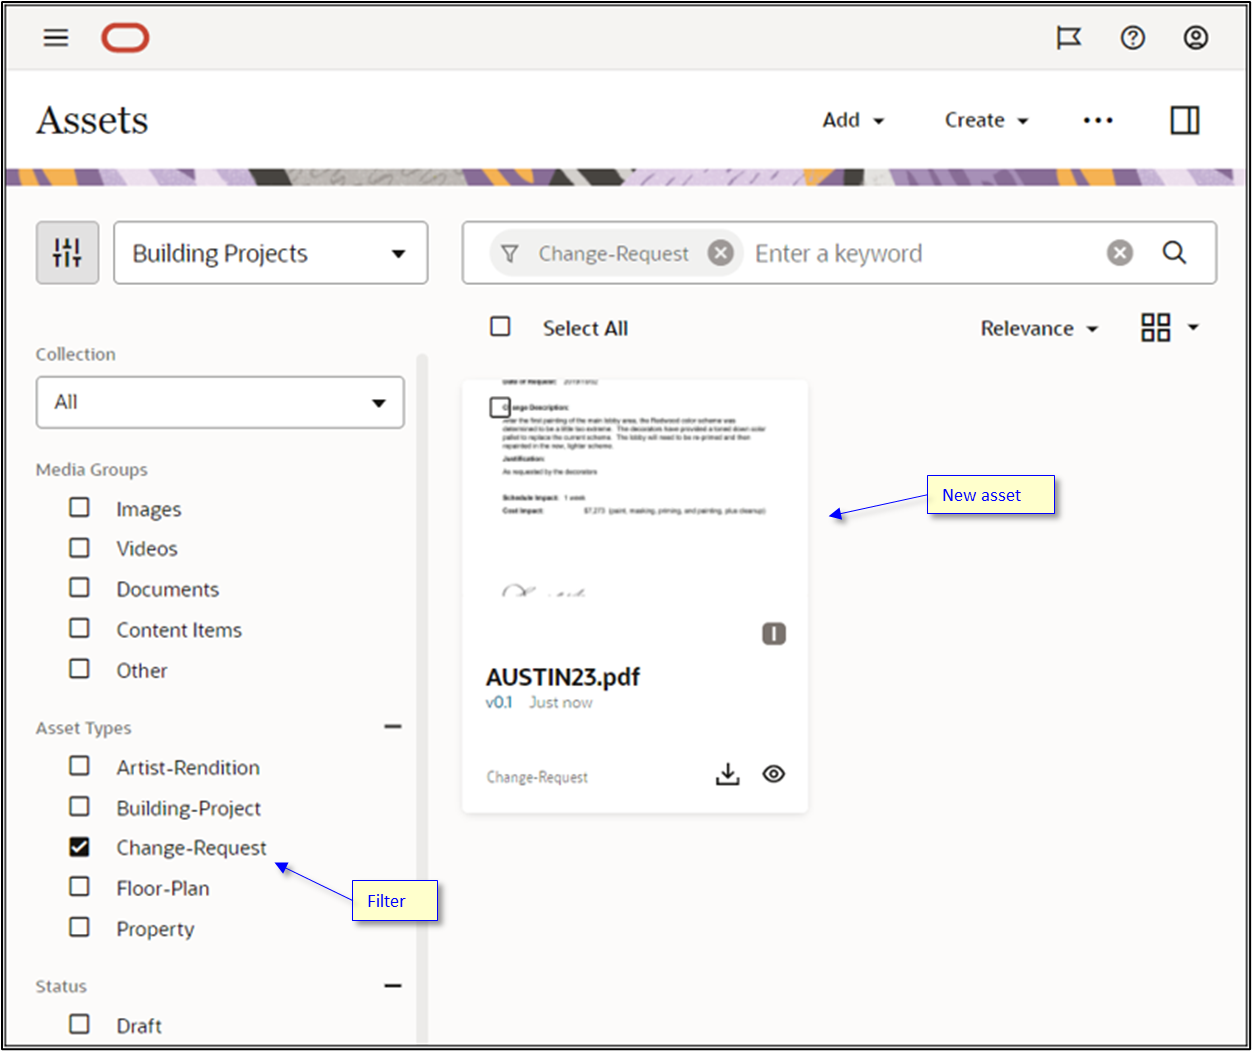
In the Building Projects repository, he selects the Change-Request asset type to filter the list.
The new change request displays in the list.
Process Challenges
Conrad would like to create linkages between the building content item and the supporting assets. However, this introduces a few special cases that need to be handled:
A. Unpredictable order: The purchasing of the real estate is often delayed, while the architects have made progress on the designs. Conrad can’t dictate which document will arrive first:
- Parcel detail and rendition (A.1 in the diagram below)
- Floor plans (A.2 in the diagram below)
The arrival of either one will need to create the ‘Building’ object in Oracle Content Management.
B. Additional linkages: As change requests are received, a reference to each must be added to the existing building object.
C. Asset versions: The floor plans will be updated a few times as the design is finalized. The goal is to store each of these iterations of the floor design as versions of the same asset.

Unpredictable Order
The first problem is the unpredictable arrival order of the floor plans versus the asset rendition documents.
Conrad currently has separate commit steps for these two document types, but he wants the arrival of either document to create the building project content item.
To accomplish this, he’s going to merge the Floor Plan Commit and Asset Rendition commit steps together. Since the Asset Rendition commit step already has the parent content item definition for the building project, he’s going to modify it first.
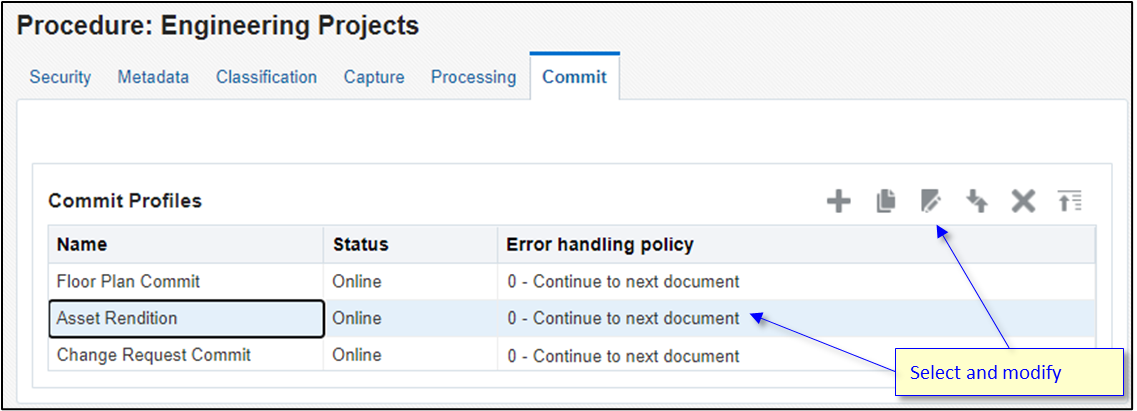
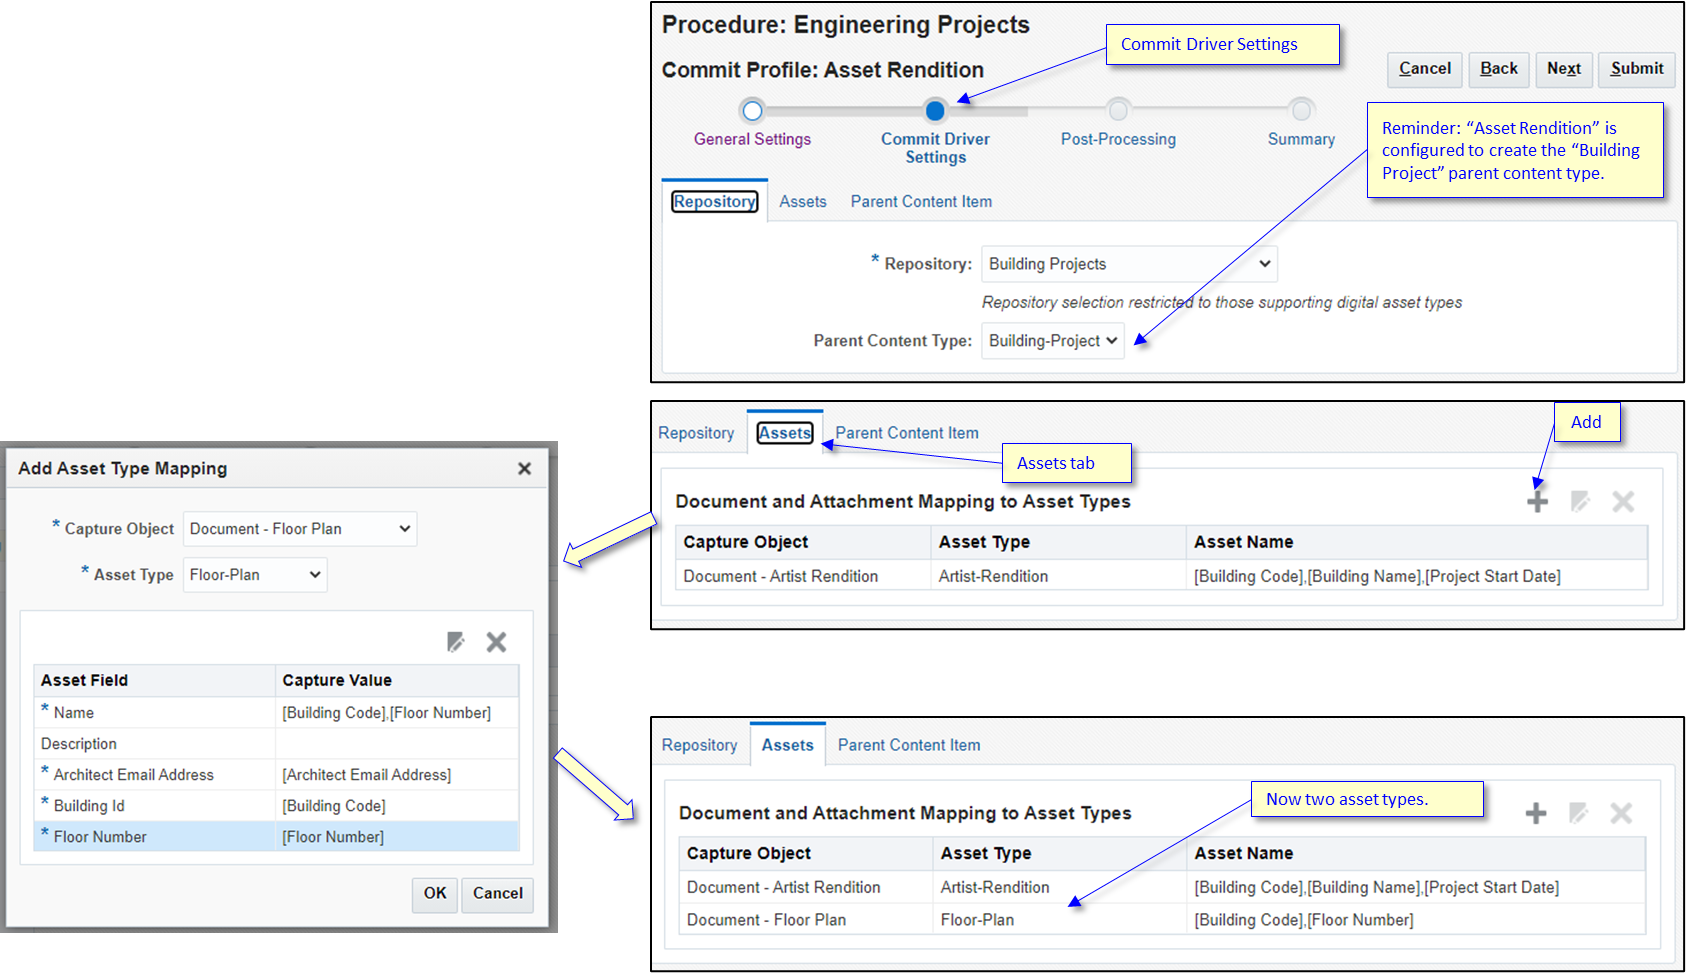
Conrad navigates to the Commit Driver Settings page and then to the Assets tab from the Repository tab.
He clicks + to add a new asset mapping.
He recreates the floor plan asset mapping here.
Now, either artist renditions or floor plans flowing through this commit step will create the corresponding asset types.
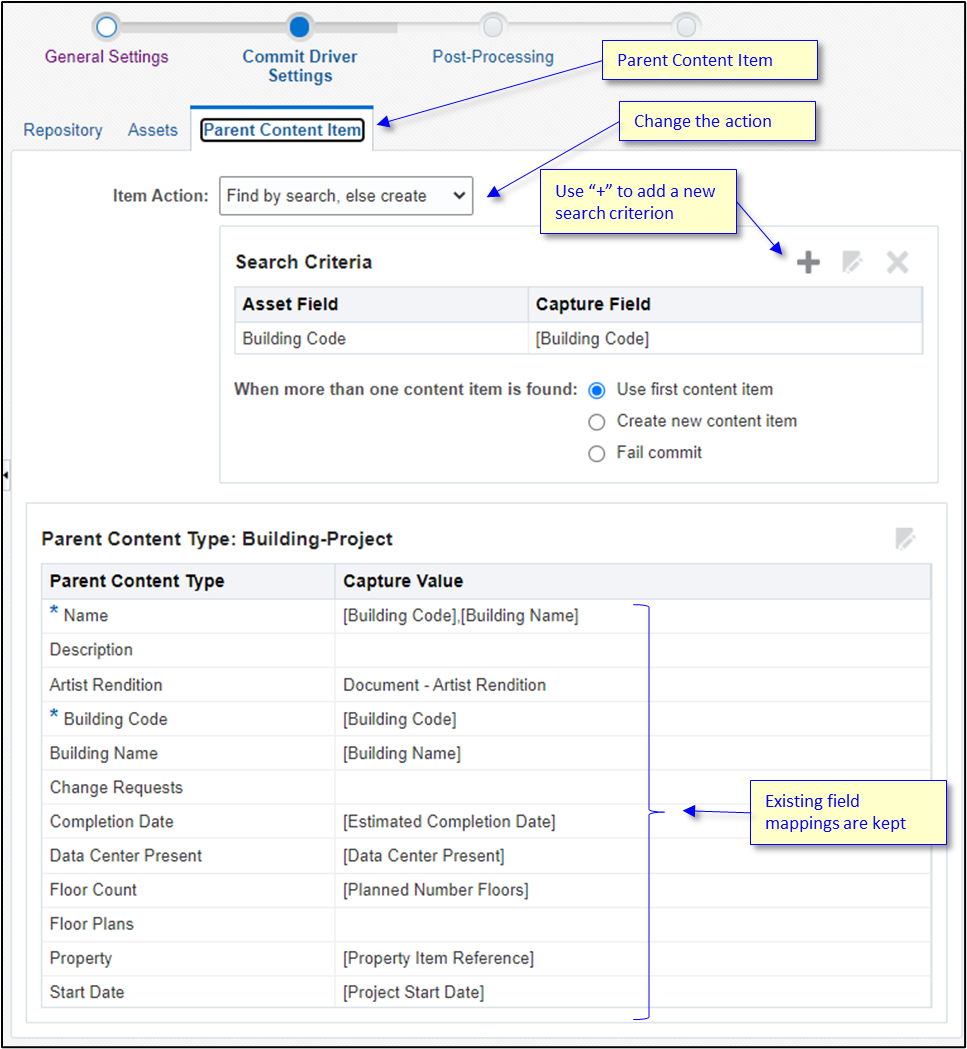
Conrad then navigates to the Parent Content Item tab.
Conrad needs to change the operation from an Always Create action to the Find by search, else create action. This action will cause Content Capture to search for an existing building project content item first. If one is found, it will be updated.
Conrad clicks + to define a new search criterion indicating that Content Capture’s Building Code field should be used to search for an existing building content item comparing against the asset’s Building Code field.
All of the existing field mappings from the original Artist Rendition mapping can be used.
The floor plan documents flowing through Content Capture will only populate three of the Content Capture fields: the building code, the architect’s email address and the floor number. Thus, the majority of the Content Capture fields will have no value and they won’t update the fields in the target building project content item.
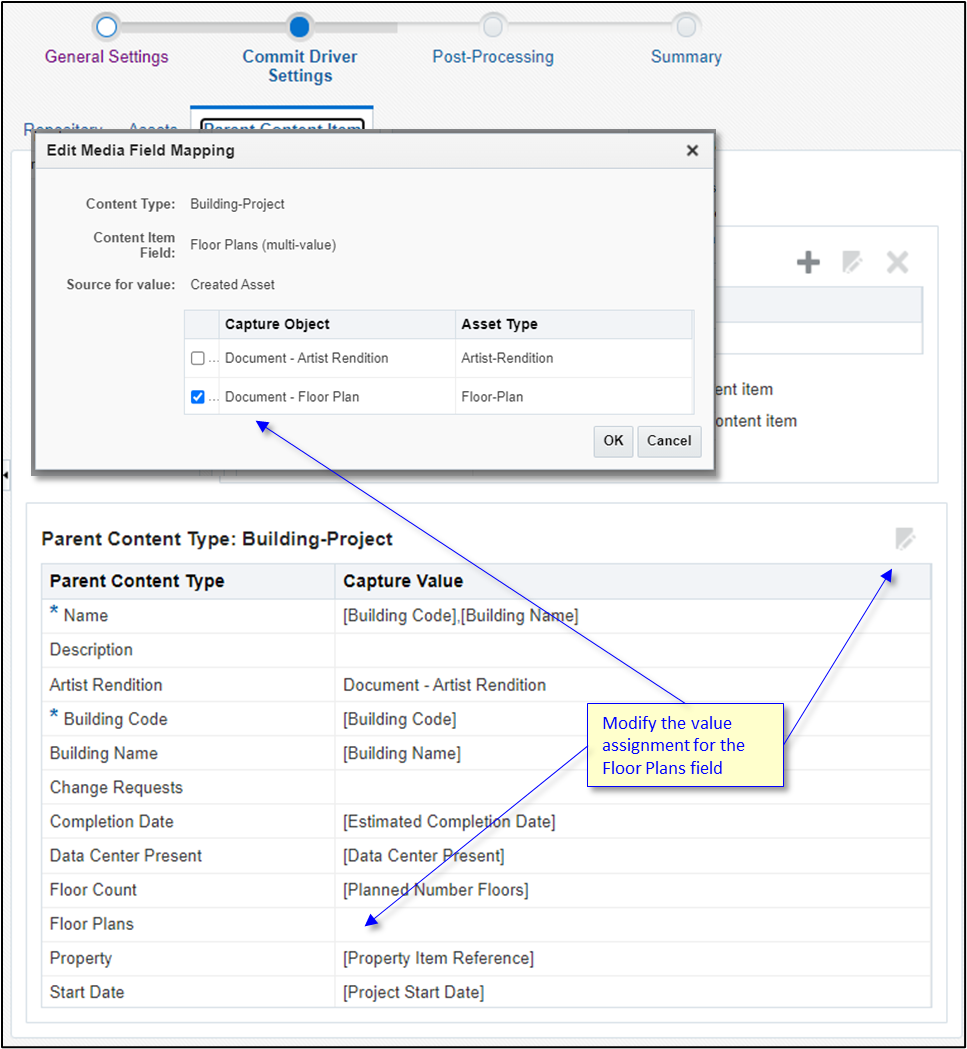
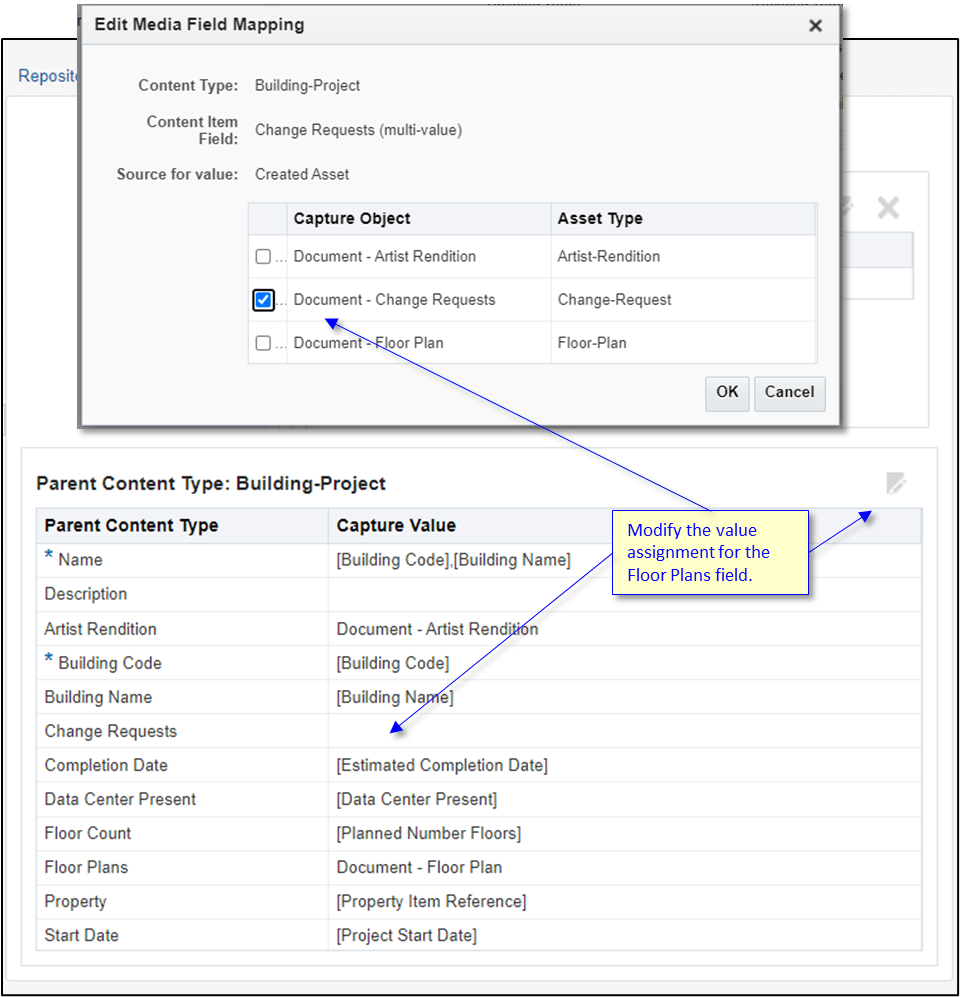
Conrad wants the floor plan asset to be referenced by the Building-Project content item. He selects the Floor Plans field that Andrea created from the list of content type fields and clicks the edit icon.
In the newly opened dialog, Conrad selects the type of created asset he prefers to link to the Floor Plans media reference.
After that link is created, he submits the changes.
With this configuration, the Building-Project content item will be created when the first asset arrives. The arrival of the second asset will only update the existing item.
Content Capture fields assigned to single-value content item fields will update the target field if the Content Capture field has a value.
Content Capture fields or link references assigned to multi-value content item fields will add their values to the multi-value list if their value isn’t already present.
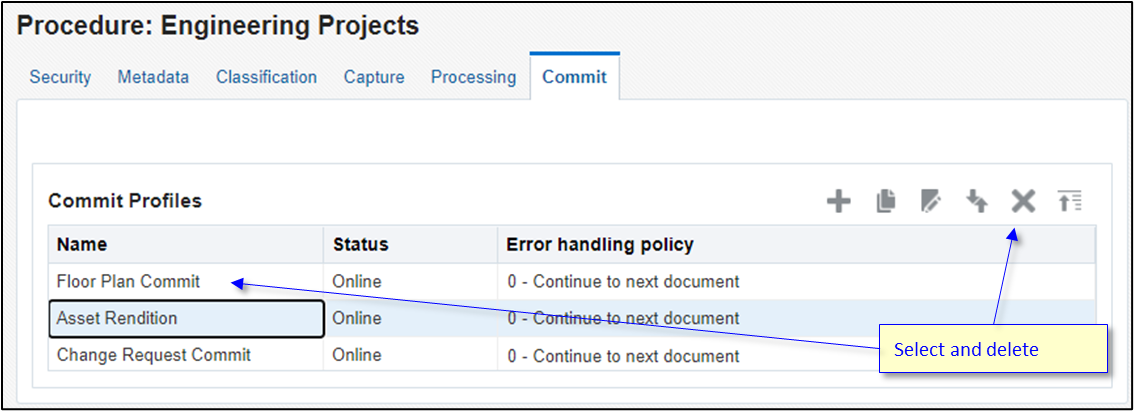
After combining the Floor Plan Commit and Asset Rendition commit profiles, Conrad deletes the redundant Floor Plan Commit profile.
Additional Linkages
Andrea will add new fields to track linkages to other supporting assets.
Andrea will add two multi-value media references. The multi-value feature allows a single field to hold multiple values. In this case, this field will support multiple links to supporting document assets.
- A multi-value media reference to a collection of floor plan diagrams (one for each floor).
- A multi-value media reference to a collection of change requests that were submitted during the construction of the building.
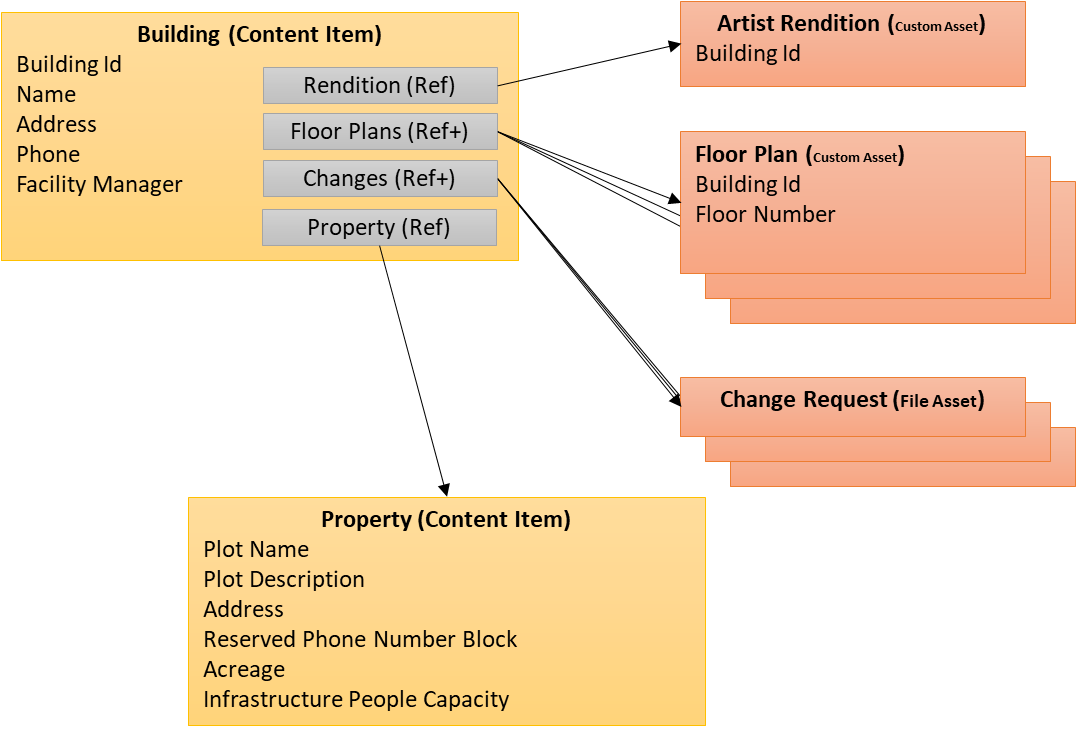
Andrea adds the two new media fields (of multiple-value type). Neither is required to have a value since these links will get populated over time as the documents are added to the system.

Asset Versions
Conrad now turns his attention to the problem of there being multiple floor plans for a single floor over time as the plans evolve.
Conrad navigates back to the Assets tab of the Asset Rendition commit profile.
He selects the asset configuration for floor plans and modifies it.
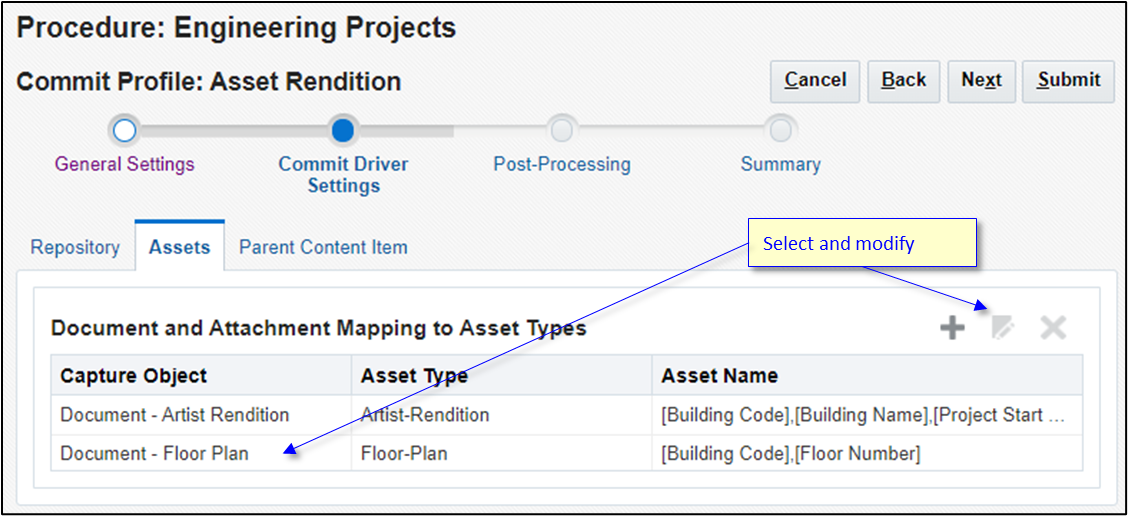
Conrad sets the Asset Action field to Find by search, else create.
He then clicks + to add search criteria indicating that the Building Code field should be used to search for any Floor-Plan assets by their Building Id field.
If an existing asset is found, then that asset will be versioned with the new floor plan.
If no asset is found, then Content Capture will create a new asset.
Conrad clicks OK and then submits the changes made to the commit profile.

Update Additional Linkages
Finally, Conrad wants to update the Change Requests media linkage field in the Building-Project content item every time a new change request is received.
The process here is very similar to what was done for floor plans. Conrad navigates to the Asset Rendition commit profile. He then configures an additional asset creation entry for the change requests.
The mappings are the same as before.
The Asset Action field is set to Always create, because change requests aren’t versioned.
Conrad clicks OK.

Conrad navigates to the Parent Content Item tab again.
Here he configures the Change Requests content item field by setting it to the media references from the created change requests.
Conrad clicks OK.
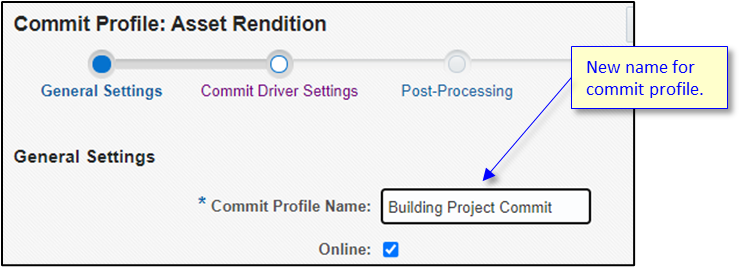
Since all the asset types are now flowing through this single commit profile, Conrad changes the name of the commit profile to make it more generic.
Conrad submits the changes made to the commit profile.
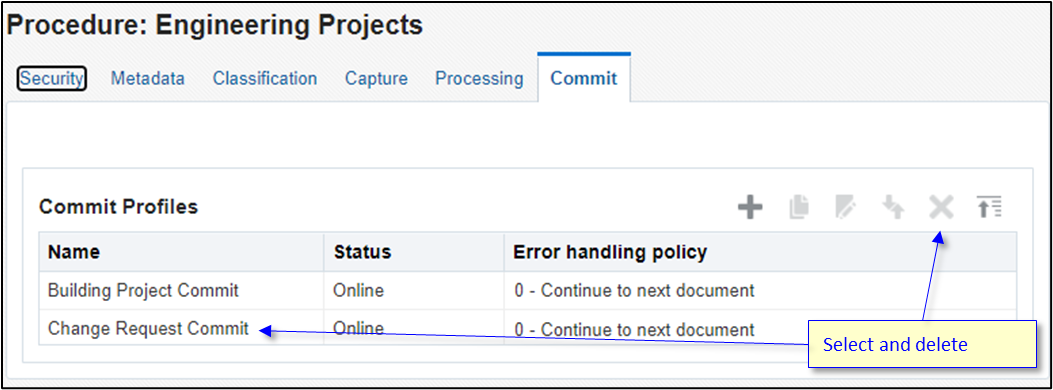
Conrad no longer needs the Change Request Commit profile, so he deletes it.
Conclusion
At this point, Conrad and Andrea have created a content capture flow which accepts various document types and creates an interconnected representation within Oracle Content Management.

Congratulations on making it all the way to the end! If you implemented all of this along with us, you may now call yourself a genuine content capture administrator.
So where to go from here? To find out more about Oracle Content Management and its content capture features, check out the Oracle Help Center or look at the Content Capture documentation.
Content Capture Engineering Case Study for Oracle Content Management
F41910-01
May 2022
Copyright © 2021, 2022, Oracle and/or its affiliates.
Primary Author: Oracle Corporation