Create and Share Content Types
A content type is a framework used to specify what information is included in a content item. Content administrators can create content types and share them with others.
When a repository is created, a content type can be included with that repository so it’s available for use there. In order for other people to use a content type to create a new content item, it must be shared with people.
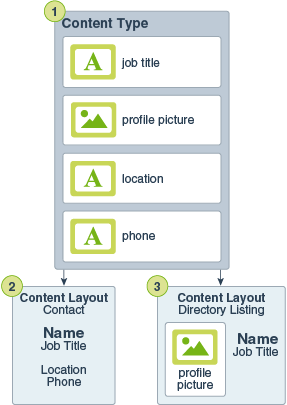
Content types (1) can have layouts (2) associated with them, which determine how they appear and what information is used in that particular layout. For example, you may only want a subset of information to appear on an employee contact list, but you might want an employee picture, location, and job title appear in another location on your website. When you create a content item using a content type, you can preview how it will look with different layouts.

Creating Content Types
In order to create a content type, you must have content administrator privileges. After it’s created, you need to share the content type with others so they can use it to create content items. Those content items can then be used on a website, or in a brochure, or wherever they might be needed.
-
Sign in as a content administrator in your browser and click Assets under Administration in the left navigation menu.
-
Select Content Types from the drop-down menu.
-
To create a new content type, click Create.
-
Enter a name and optional description for your content type.
-
Drag as many data fields as you need into the content type definition.
-
On the settings page for each data field:
-
Enter a name and description for your data field.
-
Optionally, edit the unique ID for the field.
-
If you selected text, media, or reference, select whether the field allows only a single value or multiple values and the number of values allowed.
-
Select if the field is required when users submit the content.
Click Next after adding each data field to define the appearance for the field.
-
-
On the appearance page for each data field, set what your data field will look like and if you want to apply any kind of validation. Each data field has different appearance values, such as validation, minimum or maximum length, the type of text editor to use, or if the data needs to follow a particular pattern, such as a valid email address or zip code.
When you add a large text field and set the appearance to rich-text editor, you can select the type of toolbar: standard, basic, or custom. See Customize the Rich-Text Editor Toolbar.
-
On the Friendly URL page for the content type, you can specify a readable URL for content items created using this content type.
-
On the Content Layout page for the content type, select the layouts that are associated with this content type for the mobile version and the desktop version. If the content item created using this type will be used on a website, the content layouts should be created and uploaded prior to creating a content type. You can associate additional layouts by clicking Add Layout Style then entering a name and choosing a layout. See Manage Custom Components and Layouts.
When a content item is created using this content type, the person creating the item can preview how the content item will appear using any of these layouts.
Share Content Types
You must share a content type with others in order for them to use it to create content items. Sharing a content type is like sharing any file or folder. Just select the type, click Members, and choose members to add to the type and choose the role they can have when using the type. You can share with individuals or with groups.
Users will be able to see all associated content types in the filter pane on the asset page, and they can view and edit items of those types without explicit sharing. However, in order to create a new content item, you must share the content type with users.