- Building Sites with Oracle Content Management
- Developing for Sites
- Develop Layouts
- Develop Content Layouts
- Create Content Layouts with Oracle Content Management
Create Content Layouts with Oracle Content Management
Create a content layout for laying out fields in a content item when displayed on a site page. When a content item is added to a page, it will use the chosen content layout.
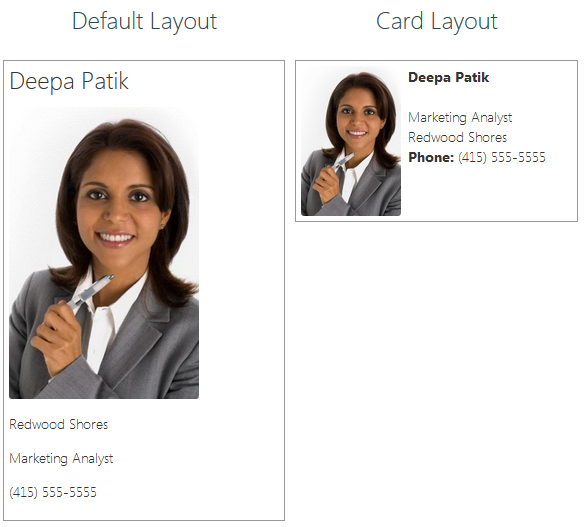
An enterprise user can create and use content items based on content types and layouts that you provide as a developer. You can create new content layouts from the default layout. Multiple content layouts associated with the content type make it possible for the site designer to display content items in different contexts without changing the content.
If you use a content layout in a content list component, then the content layout is repeated once per content item. The content layouts are then arranged by the section layout.
You can export a content layout to modify it offline and then import it to replace the existing content layout.
To create a content layout:
- On the Oracle Oracle Content Management home page, click Developer in the side navigation.The Developer page is displayed.
- Click View all Components.
- From the Create drop-down menu on the right, choose Create Content Layout.
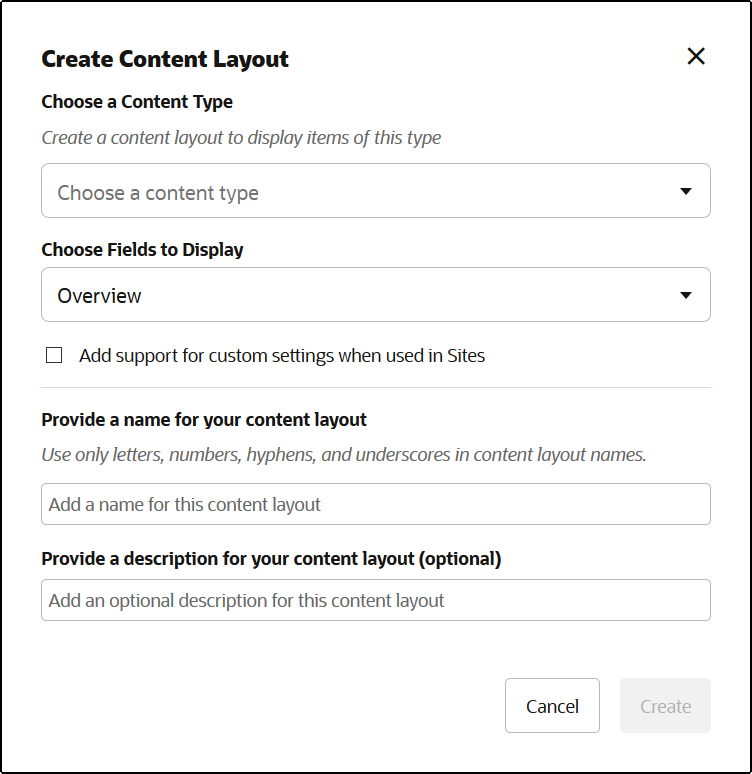
- In the Create Content Layout dialog box, select the content types that
will use the layout, choose the fields to display, and enable Add
support for custom settings when used in Sites if you want site
creators to be able to add custom settings and styles when adding content item
and content list components to a page.

- Provide a name and description for your content layout component and click
Create.
The content layout is added to your components.
Note:
Only alphanumeric characters, hyphens, and underscores are valid in content layout titles. - To export the content layout for editing, select it, and then click
Export in the right-click menu or click
 in the actions bar.
- Navigate to an existing folder, or select Create then Folder to create a new folder and provide a name and, optionally, a description.
- Select the checkbox next to the folder, and click OK.
- Click the folder’s icon or name to open it.
A layout package file is created in the selected folder with the content layout name and a
.zipextension. Download the file to your development environment to edit the files.
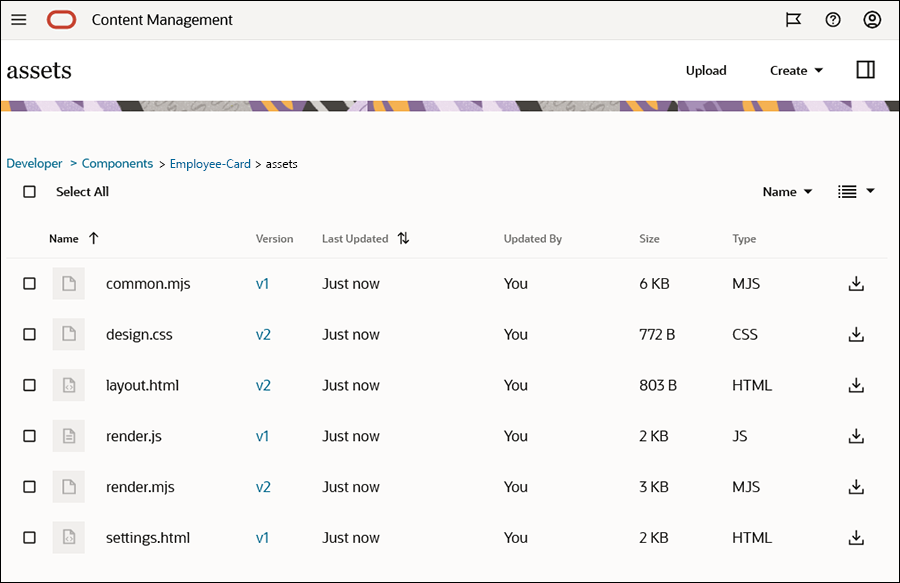
These files control the layout of the fields in content items that use the Employee-Card content layout. If you enabled the Add support for custom settings when used in Sites, then an additional file named settings.html is also created which provides a default rendering of a single content item so it can be displayed.

Description of the illustration layout_compare.png
- Edit the
design.css,layout.html, andrender.jsfiles to get the content layout you want.For example, the following files specify the Employee-Card content layout:
- Edit the
design.cssfile:.scs-tile-layout { font-family: 'Helvetica Neue', 'Segoe UI', sans-serif-regular, Helvetica, Arial; font-size: 16px; margin: 0px; padding: 0px; font-style: normal; color: #333; } .scs-tile-layout li { list-style: none; font-size: 14px; font-style: normal; font-variant-caps: normal; font-weight: 200; margin: 0px; } .scs-tile-layout-img-container { height: 150px; width: 100px; float: left; margin: 0em 0.5em 0em 0em; padding: 0px; border-radius: 3px; overflow: hidden; position: relative; } .scs-tile-layout-img { position: absolute; left: -100%; right: -100%; top: -100%; bottom: -100%; margin: auto; height: 100%; min-width: 100%; } .scs-tile-layout p { margin: 0px; } - Edit the
layout.htmlfile:{{#data.employee_profile_pictureURL}} <div class="scs-tile-layout-img-container"> <img class="scs-tile-layout-img" src="{{data.employee_profile_pictureURL}}" /> </div> {{/data.employee_profile_pictureURL}} <ul class="scs-tile-layout"> <li> <p><b>{{name}}</b></p> </li> <li> </li> <li> <p>{{data.employee_job_title}}</p> <p>{{data.employee_location}}</p> <p><b>Phone: </b>{{data.employee_phone}}</p> </li> {{#scsData.detailPageLink}} <li> <a href="{{scsData.detailPageLink}}" title="Go to detail page"><span class="detail-page">Profile</span></a> </li> {{/scsData.detailPageLink}} </ul> - Edit the
render.mjsfile:/* globals Mustache */ import CommonUtils from './common.mjs'; export default class { // class variables contentVersion = ">=1.0.0 <2.0.0" // Content Layout constructor constructor(params) { // store passed in values this.contentItemData = params.contentItemData || {}; this.scsData = params.scsData; this.contentClient = params.contentClient; this.libs = this.contentClient.getLibs() || {}; // store path to the "assets" folder this.assetsFolder = import.meta.url.replace('/render.mjs', ''); // access resources this.Mustache = params.Mustache || this.libs.Mustache || window.Mustache; } // Main rendering function: // - Updates the data to handle any required additional requests and support granular permissions // - Expand the Mustache template with the updated data // - Appends the expanded template HTML to the parentObj DOM element render(parentObj) { const contentClient = this.contentClient; const commonUtils = new CommonUtils(contentClient); const noPermissionToViewMsg = "You do not have permission to view this asset"; let contentType; let customSettings; let secureContent = false; // extract the content that will be used as the model this.content = Object.assign({}, this.contentItemData); // If used with CECS Sites, Sites will pass in context information via the scsData property. if (this.scsData) { this.content = Object.assign(this.content, { "scsData": this.scsData }); contentType = this.content.scsData.showPublishedContent === true ? "published" : "draft"; customSettings = this.content.scsData.customSettingsData || {}; } // // Handle fields specific to this content type. // // If displaying detail items, get the IDs of any referenced assets // we will do an additional query to retrieve these so we can render them as well. const referedFields = []; const referedIds = commonUtils.findReferenceFieldIds(referedFields, this.content.fields, noPermissionToViewMsg); // Handle expansion of URLs and check permissions for access to referenced digital asset const digitalAssetFields = ["starter-blog-author_avatar"]; commonUtils.updateDigitalAssetURLs(digitalAssetFields, this.content.fields, noPermissionToViewMsg); // Handle markdown expansion const markDownFields = ["starter-blog-author_bio"]; commonUtils.updateMarkdownFields(markDownFields, this.content.fields); // Handle richText expansion const richTextFields = []; commonUtils.updateRichTextFields(richTextFields, this.content.fields); // Handle date field formatting const dateTimeFields = []; commonUtils.updateDateTimeFields(dateTimeFields, this.content.fields); // // Fetch any referenced items and resources used to render the content layout // Promise.all([ commonUtils.getRefItems(referedIds), contentClient.importText(this.assetsFolder + '/layout.html'), contentClient.importCSS(this.assetsFolder + '/design.css') ]).then((resources) => { const results = resources[0]; const templateHtml = resources[1]; // Store the retrieved referenced items in the model used by the template. commonUtils.addReferencedItems(referedFields, results, this.content.fields); // apply the model to the template try { // Use Mustache to expand the HTML template with the data. const template = this.Mustache.render(templateHtml, this.content); // Insert the expanded template into the passed in container. if (template) { parentObj.insertAdjacentHTML('beforeend', template); } } catch (e) { console.error(e.stack); } }); } }For information about editing the render.js and other files, see Develop Components.
- Edit the
- Import your modified files to replace the existing content layout.
- On the home page, click Documents.
- Upload the modified content layout to a folder, in a file with a
.zip extension, which includes the same folder and file names
that you exported.If you want to import it as a new content layout, you need to change the GUID of the content layout in
_folder.json. - On the home page, click Developer.The Developer page is displayed.
- Click View all Components.
- From the Create menu, choose Import Component.
- Select the checkbox next to the uploaded zip file that contains the modified component, and click OK.
Your modified content layout is imported to Components.
You can also export a content layout to copy or move it to another Oracle Content Management instance and import it there.