Deploy Applications on Heroku with Experience Orchestration in Oracle Content Management
Introduction
Heroku is a cloud platform that allows you to build, deliver, monitor, and scale applications.
Deploying an application on Heroku is a simple operation that requires only a few easy steps for basic applications, but can also support many advanced settings for more complex scenarios.
In this tutorial, we’ll deploy an application on Heroku from a GitHub source using the experience orchestration features in Oracle Content Management. Oracle Content Management provides a way to connect content repositories and publishing channels to headless experiences developed and managed outside of Oracle Content Management and to automatically trigger deployments based on content changes or published status.
The tutorial consists of these steps:
- Create a Heroku application
- Create an Oracle Content Management experience
- Configure outgoing webhooks
- Configure incoming webhooks
- Optionally, add additional outgoing/incoming webhooks for content preview
- Analyze the events
Prerequisites
Before proceeding with this tutorial, we recommend that you read the following information first:
To follow this tutorial, you’ll need:
- an Oracle Content Management subscription
- an Oracle Content Management account with the Content Administrator role
- a Heroku account with Member or Admin role
- a GitHub account with source code
Task 1: Create a Heroku Application
If you don’t already have an Oracle Content Management instance, see Quick Start to learn how to register for Oracle Cloud, provision an Oracle Content Management instance, and configure Oracle Content Management as a headless CMS.
If you don’t already have a Heroku account, you’ll need to create a Heroku account. The free tier has sufficient privileges to deploy most simple Heroku apps.
If you don’t already have a GitHub account, you’ll need to create a GitHub account. A basic free account is all you need to put your source code in. Your source code can be either a public or private repository.
Once all of these are set up, let’s connect Heroku to GitHub and deploy an application:
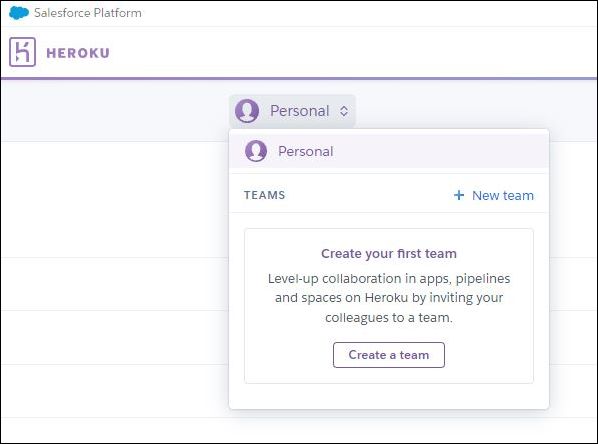
Log in to Heroku and choose Personal or Team in the top left depending on your use case.
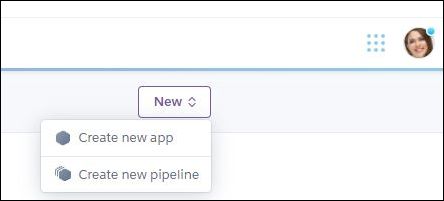
Click New in the dropdown menu in the top right, and choose Create new app.
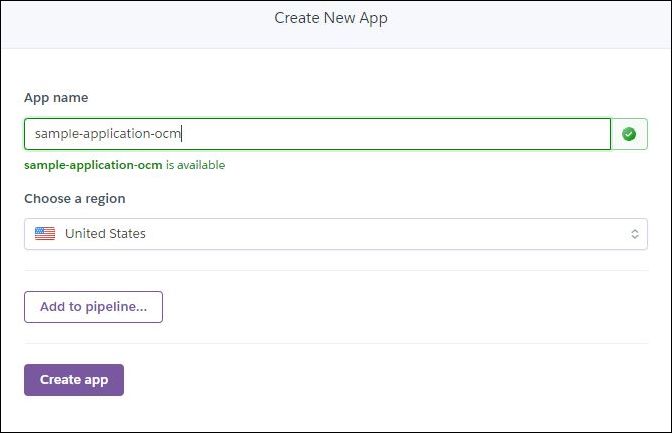
Give your app a name and click Create app.
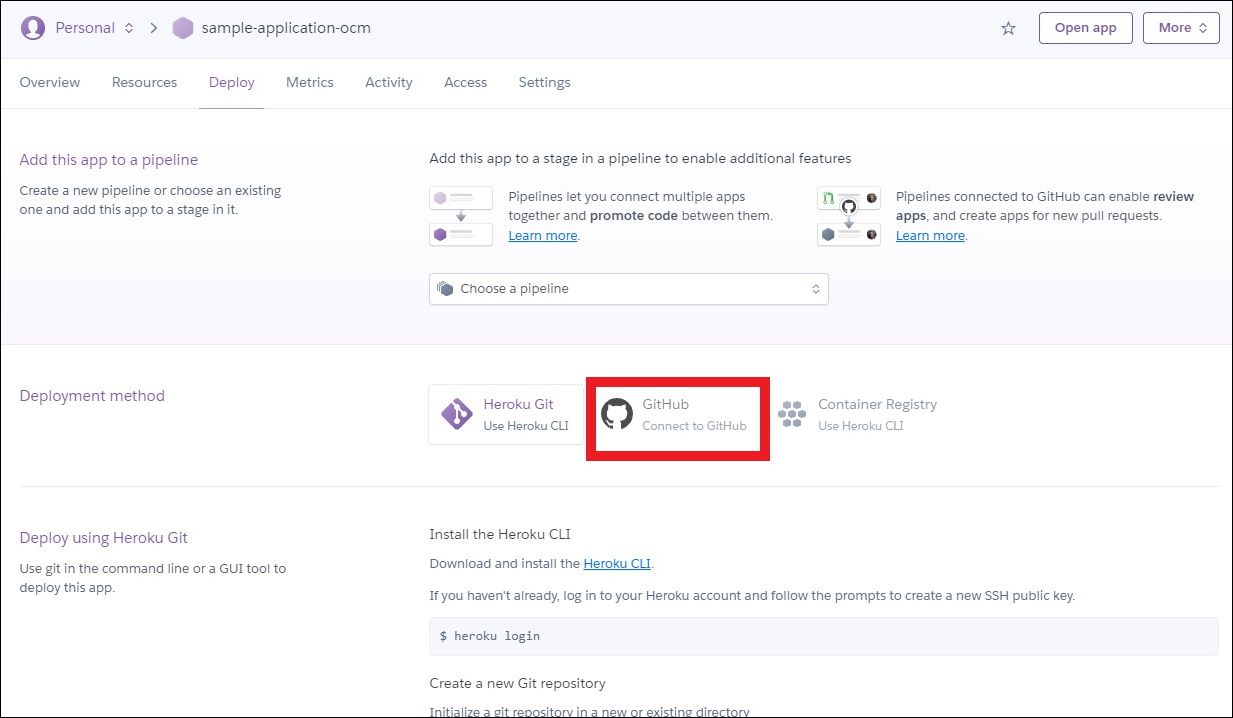
Open the Deploy tab and connect to GitHub by searching for your repository and select the one you wish to deploy. If you intend to deploy the latest version of the application, then this setting can be left as ‘main’ (which is the default). If this is the first time you’re building a site from this provider, you’ll be prompted to give Heroku permission to access your repositories. Follow the prompts to allow this.
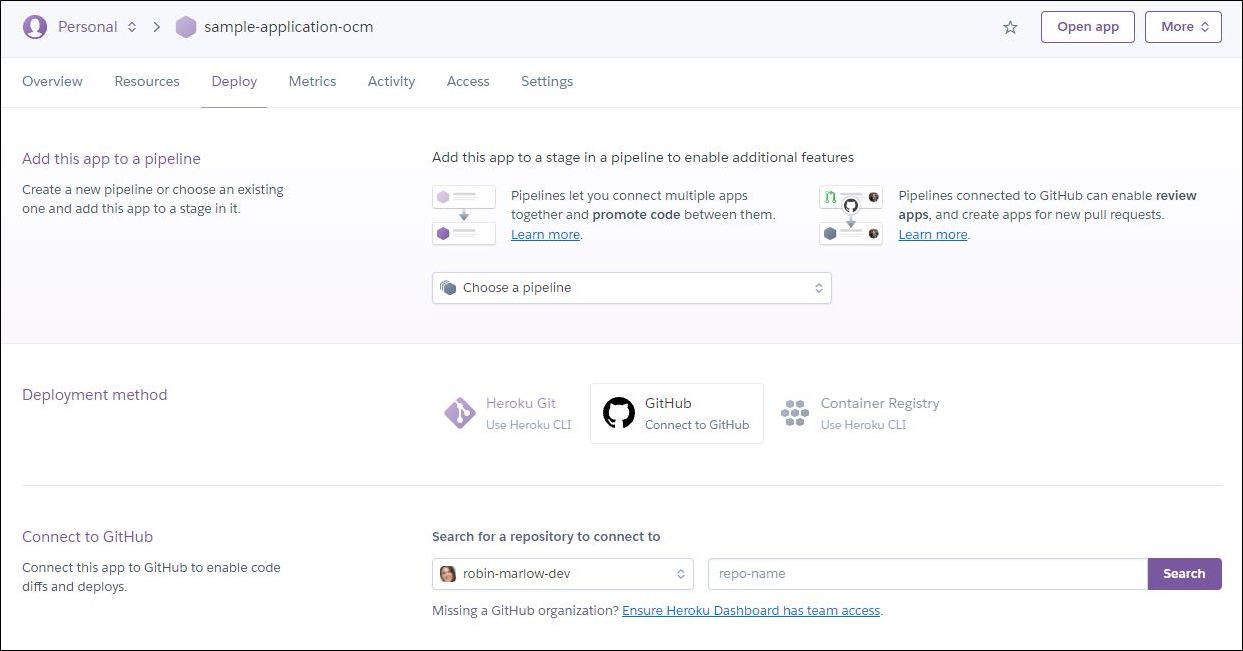
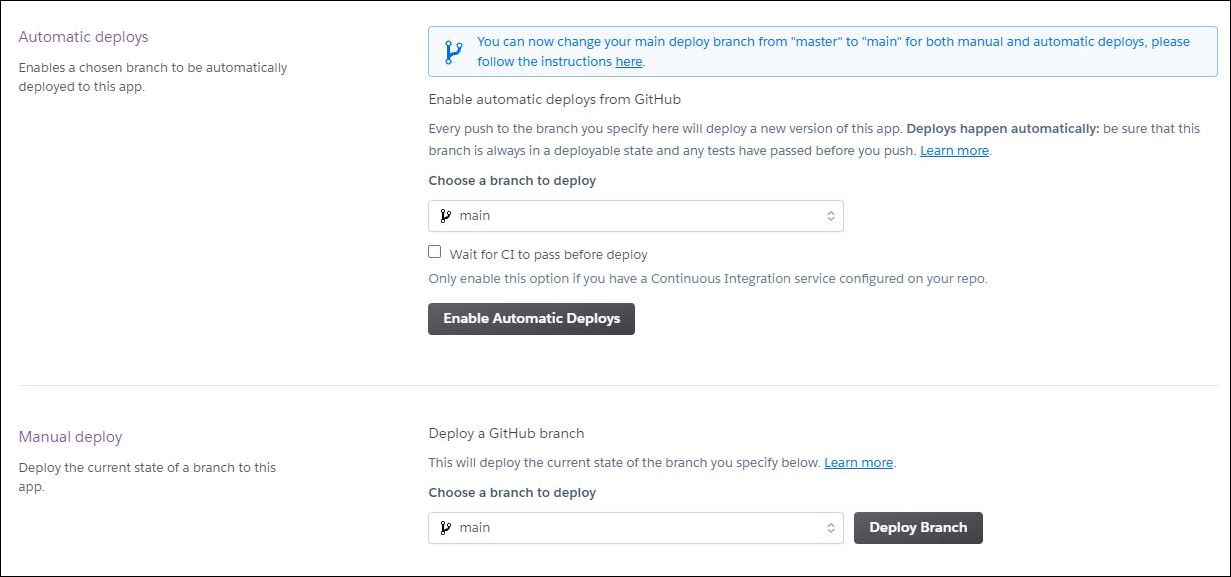
For the first time, you’ll need to click Deploy Branch in the Manual deploy section. If you want to enable automatic deployments, enable them in the Automatic deploys section.
Please note the following:
If you need to set any environment variables before running the build, make sure to do this in the .env file.
Make sure that all required files are within the GitHub repository, paying particular attention to the .env and .gitignore files.
The package.json file should contain
install,build, andserveentries in the scripts for Node.js applications.Other ways to connect with Heroku not using GitHub are possible with the Heroku Connect API. More details can be found in the Heroku Dev Center.
If your deployment fails, read the build and application logs carefully for any errors.
See the Heroku Dev Center for more information on deploying Node.js and troubleshooting Node.js deployments.
Other runtime environments have language support in Heroku, too. See the Heroku Dev Center for additional information.
Sample Vue Repository for Heroku deployment
This section is optional, but provides a sample Vue blog sample repository that can easily be deployed to Heroku. The repository can be found on GitHub.
A tutorial on how to set up the Vue blog sample is available in the Oracle Help Center including a video walk-through. Some setup for this sample may be needed on your system such as changing the .env file and uploading data to your server, which is shown in the tutorial.
You can fork this repository in your account by going to the GitHub repository and clicking “fork.”

Forking a repository creates a copy of the repository. Here, forking a repository allows you to freely experiment with changes without affecting the original project, but no changes are needed to be able to deploy this application to Heroku.
Once you fork this project, you can go ahead and create your first sample deployment, as outlined above.
Fix Potential CORS Errors for Your Heroku App
This section will help you fix any CORS (Cross-Origin Resource Sharing) errors that may exist in your application. CORS is a standard that allows a server to relax the same-origin policy, so if the location of where the app is being served and the origin of the resource being requested are different, then the web browser’s same-origin policy takes effect and CORS is required for the request to be made.
We can enable this in the Oracle Content Management web interface by going to System and then Security. Add the Heroku app URL to Front Channel CORS Origins and then click Save.
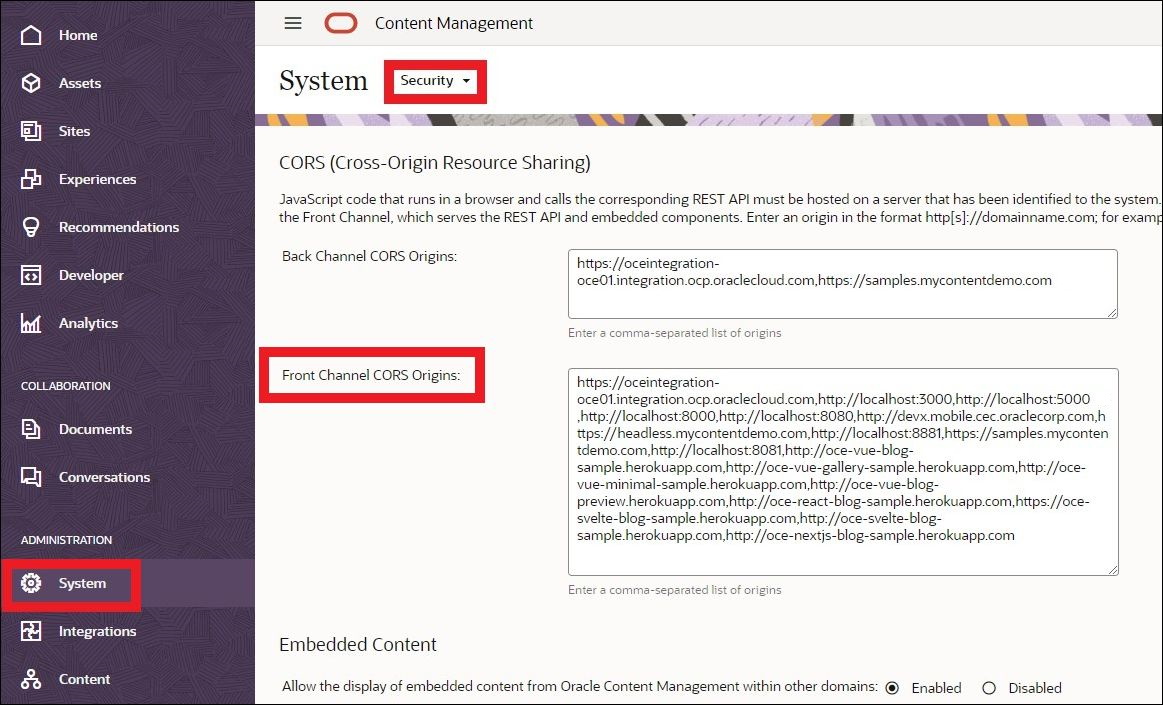
Note: Based on the same-origin policy, two URLs have the same origin if and only if they share the exact same protocol, domain, and port. This means you may need to add both http and https URLs in this section.
Task 2: Create an Oracle Content Management Experience
In the previous task, we connected Heroku to GitHub. Now we’re going to create an Oracle Content Management experience object, which will be connected to Heroku later.
To create an experience object in Oracle Content Management:
Log in to the Oracle Content Management web interface as an administrator.
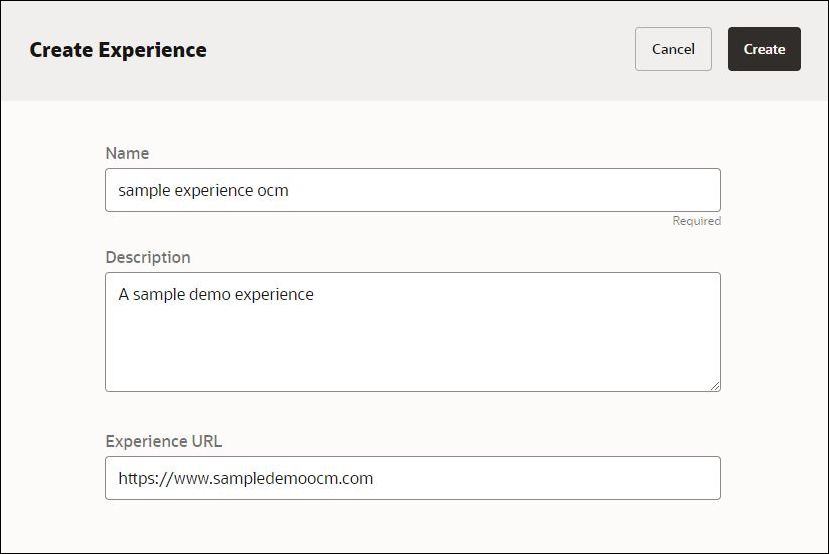
Click Experiences in the left navigation panel and then click Create in the top right.

Enter the required information and click Create when done. More information can be found in the Oracle Content Management documentation.
Task 3: Configure Outgoing Webhooks
Next, we’re going to configure the outgoing webhook for the newly created Oracle Content Management experience object. The outgoing webhook is intended to automatically trigger deployments from Oracle Content Management to Heroku based on content changes or published status.
To configure the outgoing webhooks:
Log in to the Oracle Content Management web interface as an administrator.
Click Experiences in the left navigation panel.
Select the experience that you want to configure and then open the Properties panel.
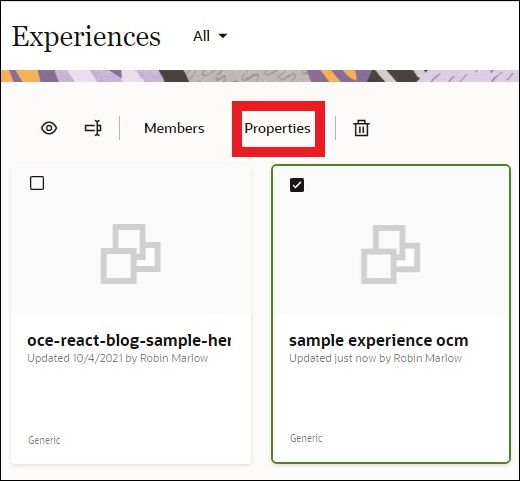
In the Properties panel, open the Outgoing tab.
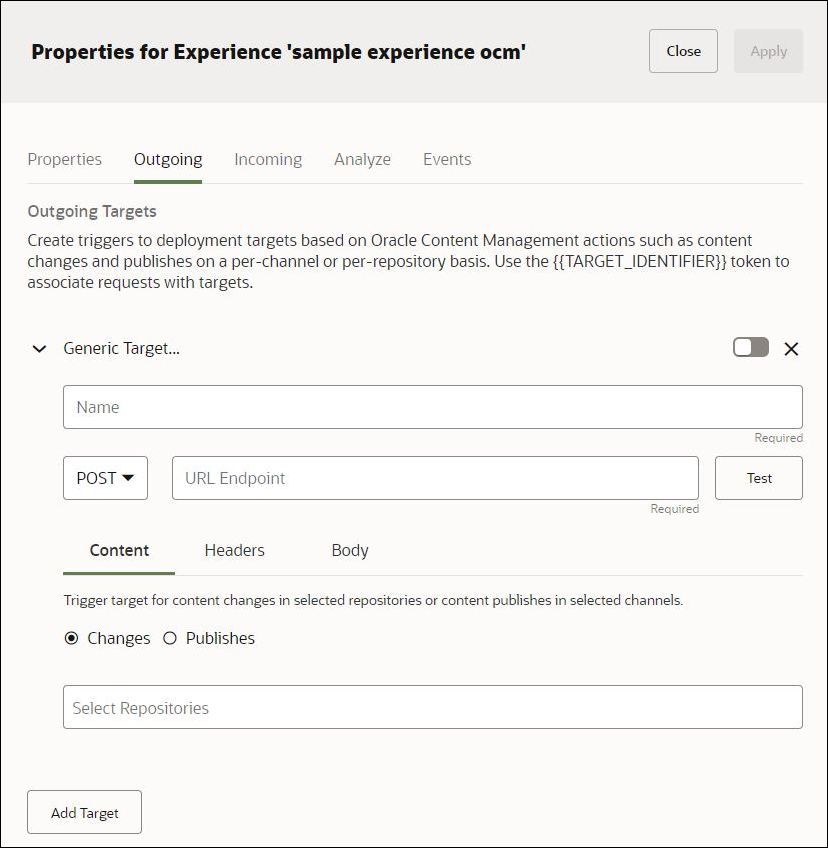
Configure the name for the target, method (GET or POST), URL endpoint, and trigger for the request.
Target name: You can give the target any name you want. Oracle Content Management will provide a unique TARGET_IDENTIFIER for this target.
Method: Specify either GET or POST in the request via the dropdown menu. For Heroku, we want to do a POST request to trigger a build.
URL endpoint: This is the API endpoint. For Heroku, we’ll use the endpoint
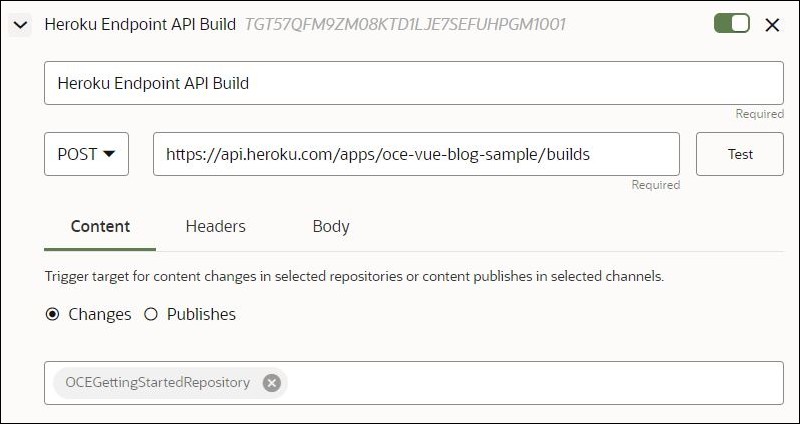
https://api.heroku.com/apps/NAME-OF-YOUR-HEROKU-APP/builds, where NAME-OF-YOUR-HEROKU-APP should be replaced accordingly.Request trigger: This is under the Content tab, where you can specify a trigger based on a specific event. In the example below, a build will be triggered based on a change in the asset repository called OCEGettingStartedRepository, which represents the Blog channel in Oracle Content Management.
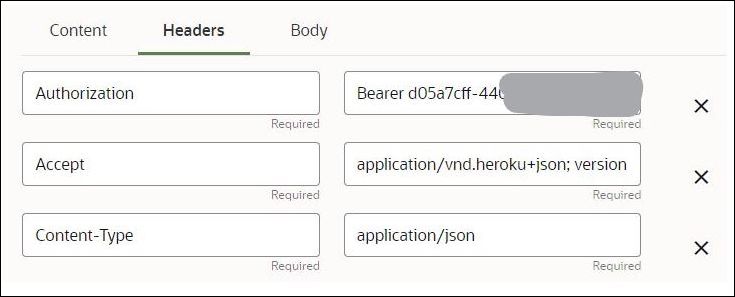
Configure the headers. You’ll need three headers: Authorization, Accept, and Content-Type. These are documented in the Heroku documentation.
Authorization: This is an authorization token that you need to obtain from Heroku. Only authorized users can create builds from Heroku, and this token is required for authentication to use the Heroku API. You can view your Heroku API key by going to Account Settings > API Key > Reveal.
Accept: This is what your Accept header will be:
application/vnd.heroku+json; version=3. Note that you must use version 3 of the Heroku Build API for this to work.Content-Type: This is what your Content-Type header will be:
application/json.
Configure the body. You’ll need one source blob with a URL and optional version formatted as a JSON object as shown below. The source blob is where your source code is located for the deployment. The JSON object for the body must be:
{"source_blob":{"url":"GITHUB_API_ENDPOINT_FOR_TARBALL", "version":"OPTIONAL_TARGET_IDENTIFIER"}}url
The URL to use is the location where a gzipped tar archive of the source code for the build was downloaded. We’ll get this through GitHub’s API.
Note that there’s a difference in the URL for public vs. private repositories on GitHub. See the Heroku documentation for further details.
For public repositories, your URL should be:
https://api.github.com/repos/<username>/<repo name>/tarball/<branch>For private repositories, your URL should be:
https://user:token@api.github.com/repos/<username>/<repo name>/tarball/<branch>The
<username>is your GitHub username, the<repo name>is the slug of your GitHub repository, and<branch>is the name of your branch (usually ‘main’ or ‘master’). An example for a sample public repository is shown below.For private repositories, you need to change the
user:tokensection for the private repository source blob URL. Theuserpart can be replaced with the same username as before, andtokenneeds to be replaced with a GitHub Personal Access Token with appropriate scope. To generate this token, follow the steps outlined in the GitHub documentation. Pay particular attention to the expiration date of this token (you typically don’t want to set it to expire), and you need to give this token “repo” access only, which gives full control over private repositories.version
The version parameter is not required and is not used when downloading and building the source code. It’s merely a piece of metadata that you can optionally use to track what source code version went into building what slug.
For our case, we’ll add
"{{TARGET_IDENTIFIER}}"as the version parameter. Oracle Content Management will put the TARGET_IDENTIFIER as the ID seen next to the target name into the body of the request. When this is sent to Heroku, it will be sent back via the incoming webhook once it’s configured. In this response back from Heroku about the build, Oracle Content Management will receive the payload and evaluate if that target ID exists. If it does, then the payload is associated with the outgoing target from Oracle Content Management; otherwise, it’s considered ‘Unknown’. More information about target IDs can be found in the Oracle Content Management documentation.
Click Apply at the top right to save your configuration.
Optionally, click Test next to the API endpoint to test a trigger of this build as if content or the published status changes in the selected channel.
Note: Additional details about outgoing webhook configuration in Oracle Content Management can be found in the Oracle Content Management documentation.
Task 4: Configure Incoming Webhooks
Next, we’re going to configure the incoming webhook from Heroku to Oracle Content Management for the newly created experience object. The incoming webhook is intended to give information about the build and its status back to Oracle Content Management without leaving Oracle Content Management. The results can be viewed in the Events tab, where more information can be found when analyzing the events.
To configure the incoming webhooks:
Log in to the Oracle Content Management web interface as an administrator.
Click Experiences in the left navigation panel.
Select the experience that you want to configure and then open the Properties panel.

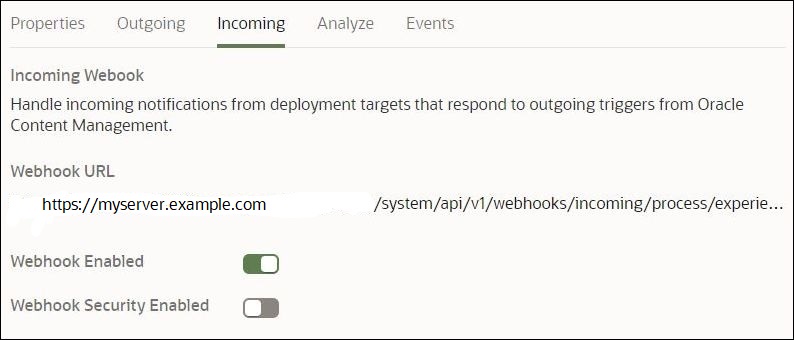
In the Properties panel, open the Incoming tab. Copy the webhook URL, which we’ll place into Heroku.
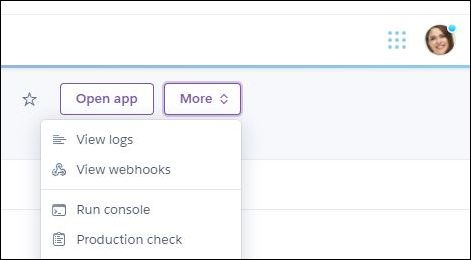
Log back in to Heroku and find your application. In the top right, click More and then View webhooks.
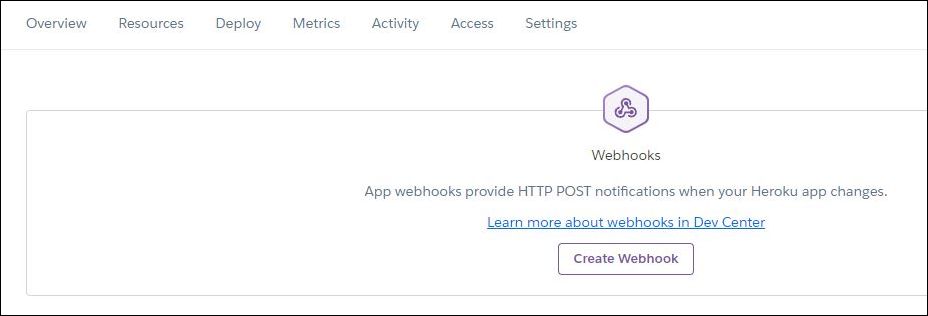
Click Create Webhook in the center of the screen.
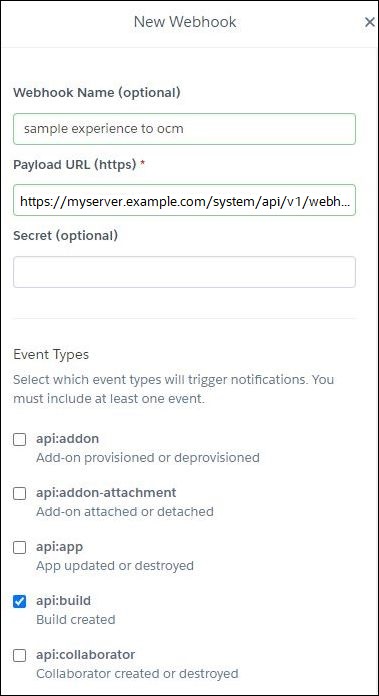
In the New Webhook dialog, provide the information for the new webhook. Any name is fine, the payload URL should be the one copied from Oracle Content Management, and no secret is needed. For event types, ensure that only ‘api:build’ is selected.
Click Add Webhook when you’re done.
Task 5 (Optional): Add Additional Outgoing and Incoming Webhooks for Content Preview
REST APIs are available in Oracle Content Management for content delivery and management, as well as for conversations, documents, and users and groups. For the integration with Heroku, it may be useful to have two separate deployments on different Heroku apps using the same experience for content preview and content delivery so that unpublished changes to an asset can be previewed in an application without affecting the production delivery build. In this optional section, we’ll go through how to use a second target on the experience to trigger preview deployments separately from production deployments.
The first step is to create a total of two separate Heroku apps, where one Heroku app will be using the preview content and the other the delivery content. You can create a Heroku application by following the instructions in task 1.
Once this is set up, you’ll need to configure both outgoing targets. You can add a second target by clicking Add Target at the bottom. Follow the steps in task 3 to create an outgoing webhook. Note that there should be two main differences between both outgoing webhooks:
The content delivery API should be triggered based on a publish in the content channel, and the content preview API should be triggered based on a change in the content repository.
The body of the outgoing webhook should be tied to the appropriate code that uses the content delivery API or the content preview API. This will require your preview code and delivery code hosted on two separate GitHub repositories.
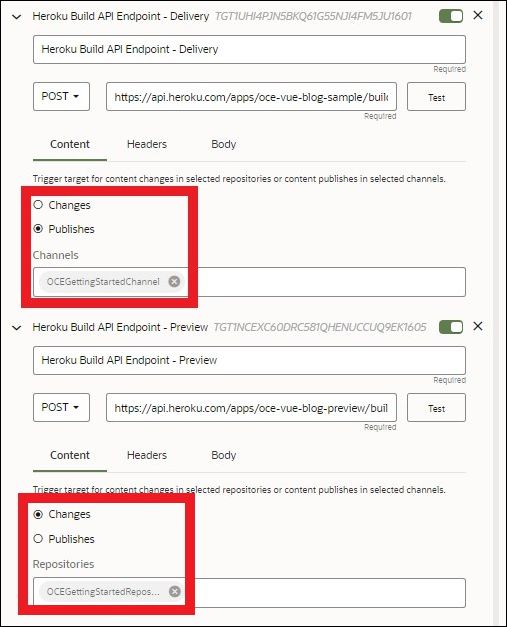
Note: For additional details about preview API configuration in Oracle Content Management, see Use Preview APIs in Headless Oracle Content Management Sites.
The last step is to configure the incoming webhooks from each Heroku application, which can be done by following the steps in task 4 for each of the applications. Both Heroku applications will share the same incoming webhook URL provided by Oracle Content Management.
One important issue to note is that Heroku limits the number of concurrent builds per account. Heroku only allows verified accounts to run builds of multiple apps across an account concurrently, which requires additional payment to Heroku. If you’re using the free Heroku version integrated with Oracle Content Management’s experience orchestration feature on two Heroku apps under the same account, you may need to wait for the builds to finish before performing another change in an asset repository or publish in a content channel.
Task 6: Analyze the Events
Finally, we can test the full experience orchestration in Oracle Content Management without having to leave the Oracle Content Management web interface. Based on changes in content or publish status, or by simply clicking the Test button on the Outgoing tab, the following steps will be performed:
Oracle Content Management triggers a build by calling the Heroku Build API using the specified header and body with the POST request on the URL endpoint.
Heroku receives the request to perform a build, which uses the source code (that pulls content from Oracle Content Management).
Heroku pushes a response back to Oracle Content Management when the build starts, providing a pending status and some other metadata.
When the build finishes, Heroku issues another response back to Oracle Content Management about the build failure or success with additional metadata.
All of these events are displayed in the Events tab of the Properties panel. The following is a sample sequence of events numbered 1, 2, and 3, in order of occurrence:
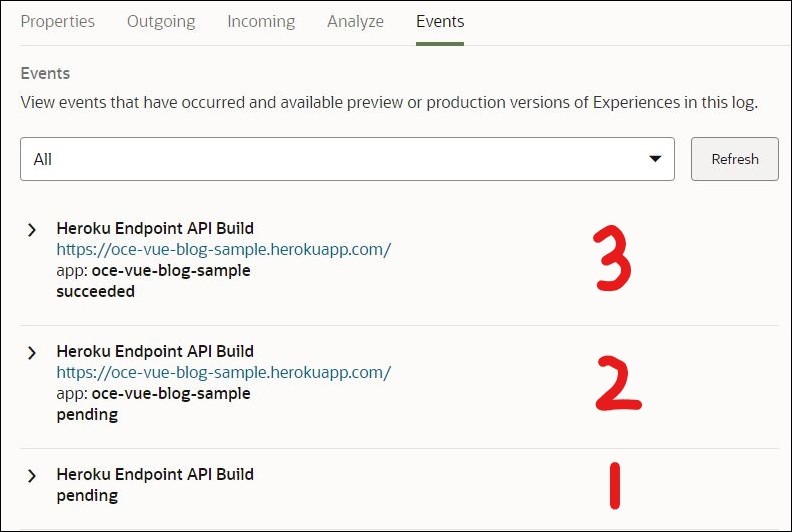
As shown, the first event (labeled 1) is the trigger from Oracle
Content Management to Heroku to start a build. The second event
(labeled 2) is the incoming webhook back from Heroku telling Oracle
Content Management that the build has been started. The final event
(labeled 3) is the successful build event, also from the incoming
webhook from Heroku to Oracle Content Management. Each of these
events can be analyzed in detail by clicking on them on the Events
tab. Notice how all the events have the same tag called ‘Heroku
Endpoint API Build’. The first event (labeled 1) is called that,
since that was the name we gave it on the Outgoing tab. The second
and third events (labeled 2 and 3, respectively) are tagged the same
since we added a {{TARGET_IDENTIFIER}} token to
associated requests with targets.
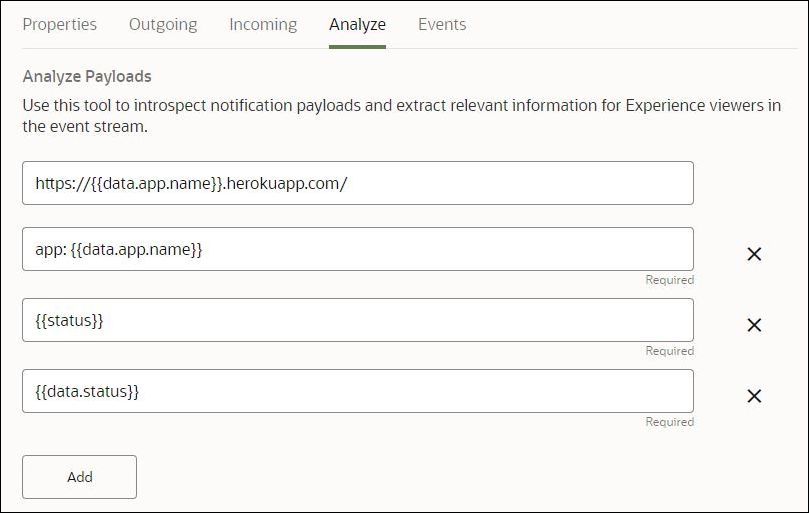
The content displayed below each event on the Events tab comes from the settings in the Analyze tab. The Analyze tab allows you to extract information from an incoming response payload and display it on the Events tab to provide information important to content editors and contributors, such as when their content is saved, published, or goes live. Additional information about the Analyze tab can be found in the Oracle Content Management documentation.
For the events displayed above, the following was specified on the Analyze tab:
The Complete Experience Orchestration
This section is optional, but demonstrates the full process and benefit of using Oracle Content Management’s experience orchestration features. In this section, we’ll see an experience URL in production, make a change in content, then publish it, and finally see the published content on a Heroku deployment without affecting the experience URL or leaving Oracle Content Management.
We first need to make sure that we want to see preview changes based on the publishing status of assets in the OCEGettingStartedRepository, which can be set in the Outgoing tab of the experience.
First, here is the experience URL site, which can be set in the Properties section of the site for experience URL. This is the current live state of your site that you want to see previews of without affecting this production.
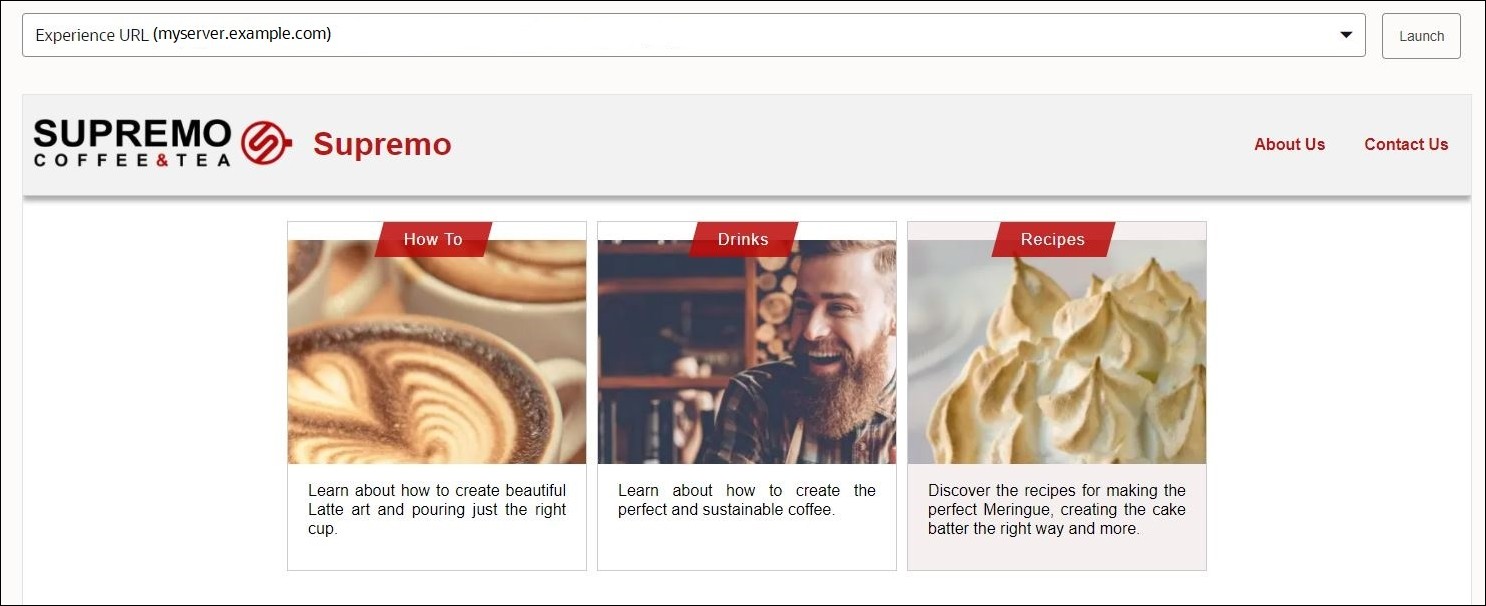
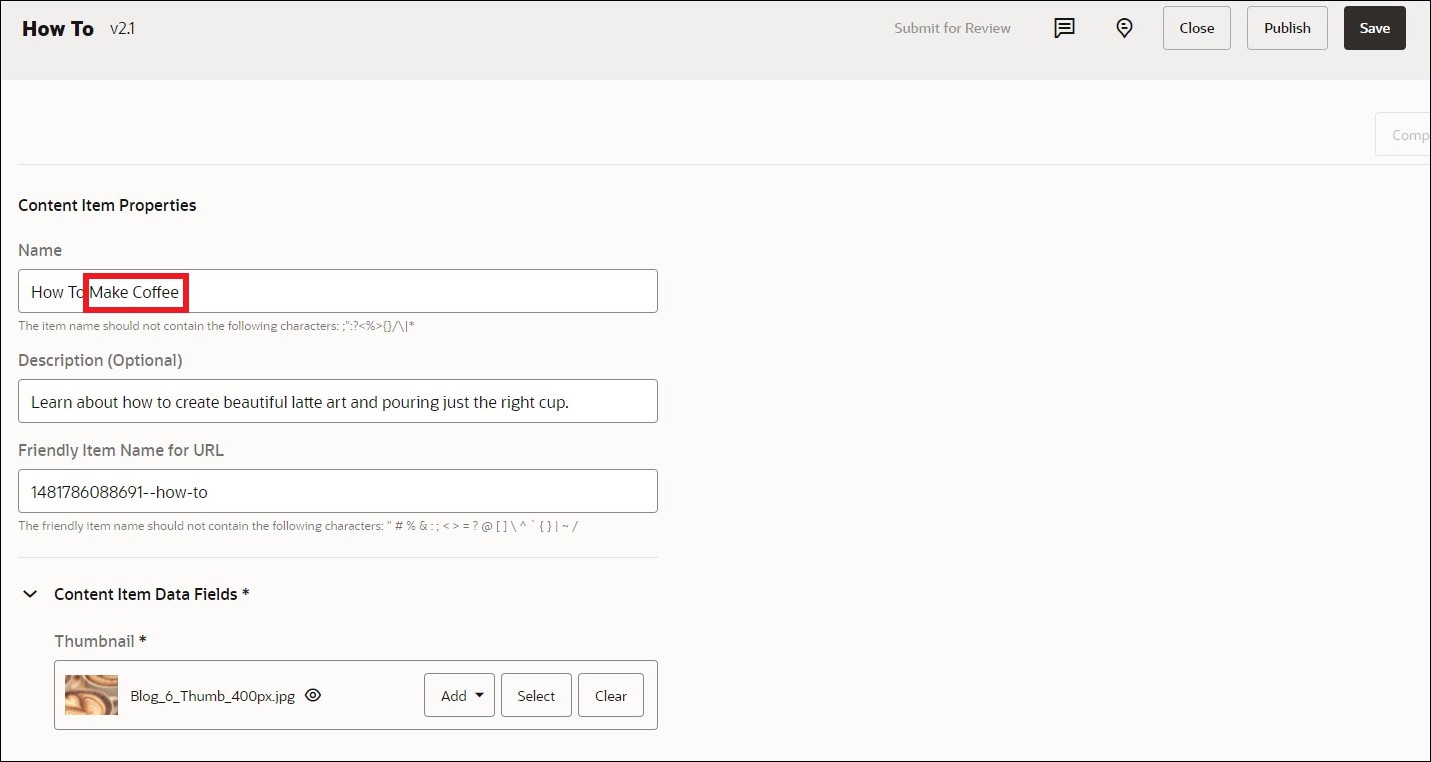
Now, we’ll create a change in content and publish that content to the correct corresponding channel. For this section, let’s update the asset for the home page of the blog called ‘How To’ and add the words ‘Make Coffee’ to it.
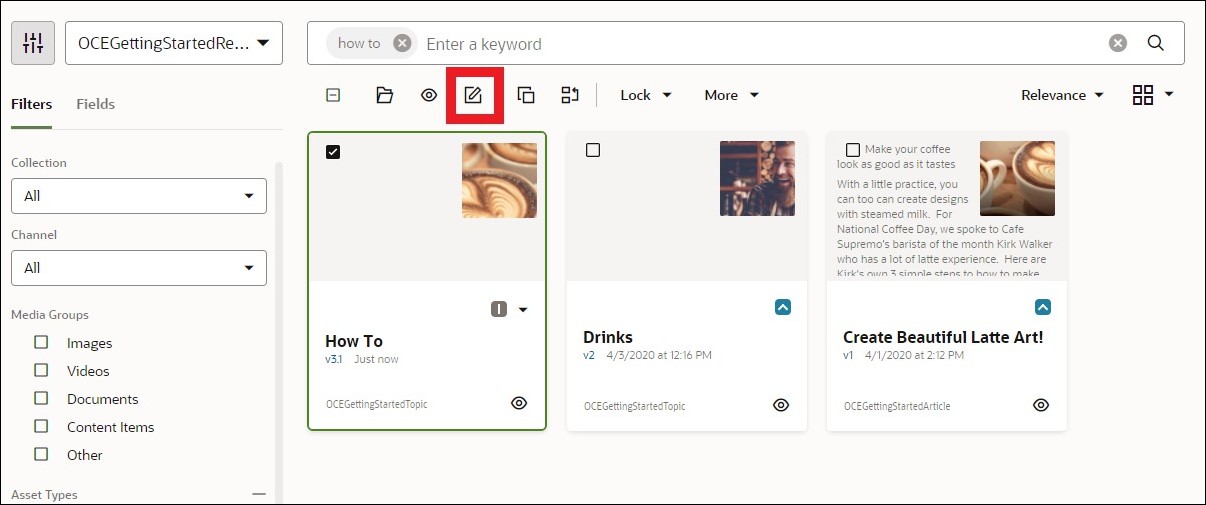
Search for the ‘How To’ asset in the search bar and click the edit icon.
Now, let’s change the content by adding the words ‘Make Coffee’ and save it in the top right.
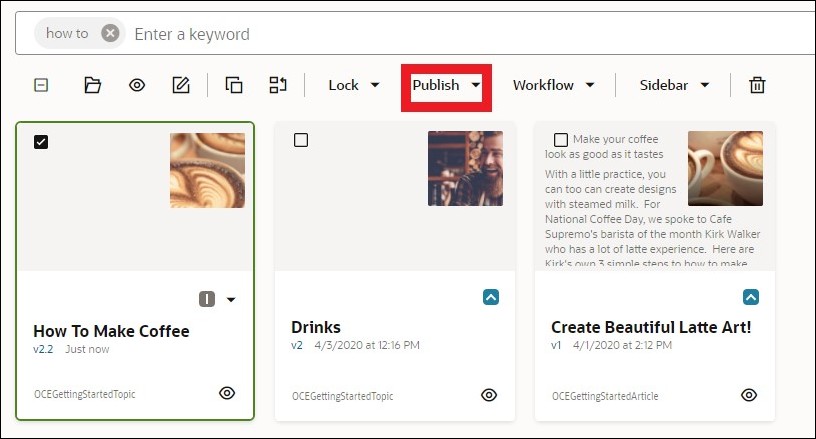
Let’s publish that content to the correct channel, which should trigger the proper build for the preview.
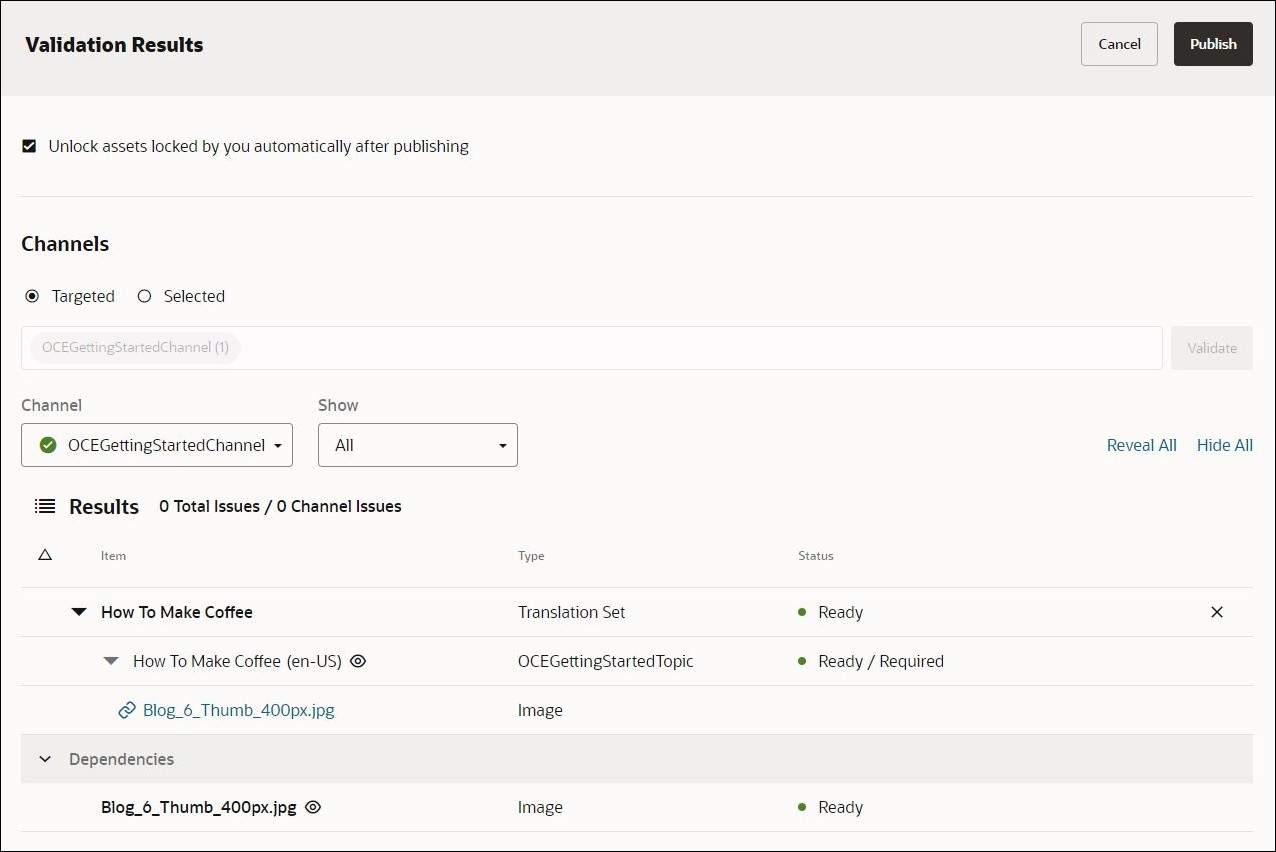
We can verify the build triggered by going into the experience orchestration object and viewing the Events tab when analyzing the events.
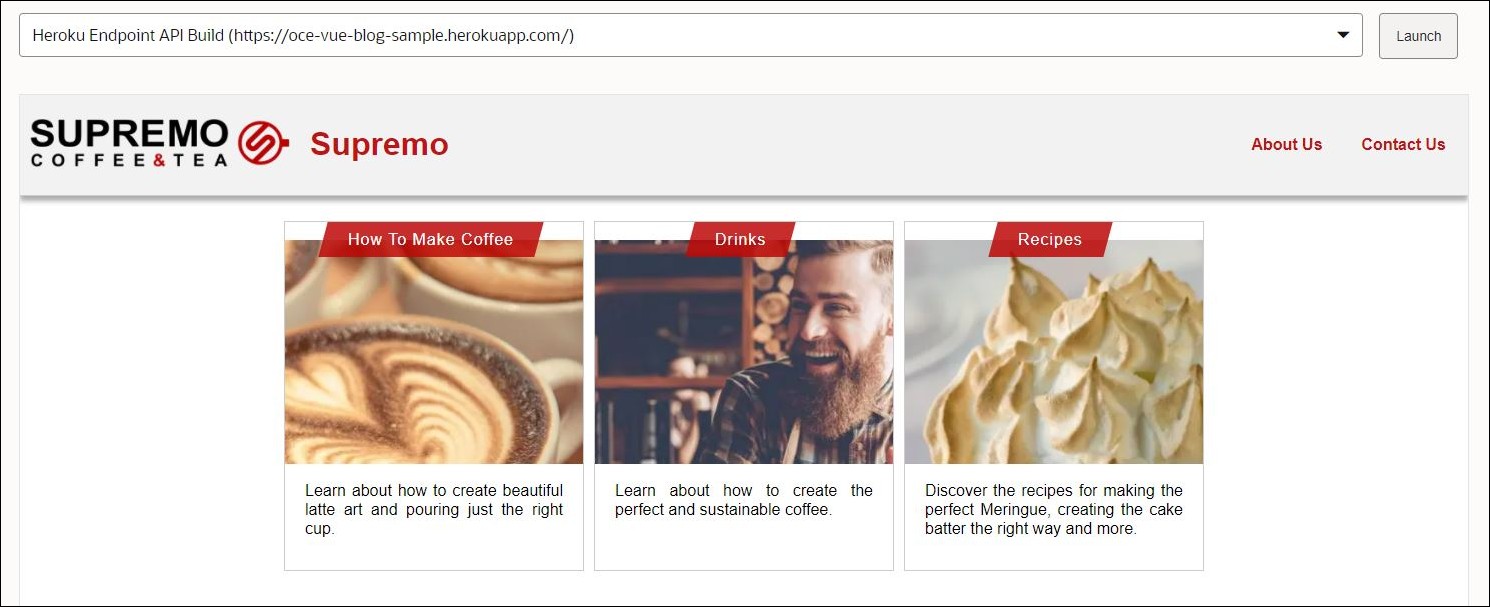
Once the build is finished and successful, we can verify that the preview URL, which we called ‘Heroku Endpoint API Build’, has those updates with the words ‘Make Coffee’ after ‘How To’. And, we can see that the previous experience URL is still the same site.
Conclusion and Next Steps
In this tutorial, we deployed an application on Heroku from a GitHub source using the experience orchestration features in Oracle Content Management. We first created a Heroku application and deployed a GitHub source, such as the sample Vue blog repository, which runs using Node.js. Then, we created an Oracle Content Management experience and configured the outgoing webhooks and incoming webhooks. Finally, the experience orchestration process is now set up such that on changes in content or publish status, or by simply clicking the Test button on the Outgoing tab, Oracle Content Management will trigger a build by calling the Heroku Build API using the specified header and body with the POST request on the URL endpoint. The events can be analyzed directly in Oracle Content Management in the Events tab, and we also demonstrated the full experience orchestration process.
The next steps for managing the experience orchestration process are:
With this, we can now connect content repositories and publishing channels to headless experiences deployed on Heroku that automatically trigger deployments based on content changes or published status. Content providers can leverage the advantages of repository asset management such as powerful tools to organize, retrieve, translate, collaborate on, approve, and publish content. Then, without leaving Oracle Content Management, they can preview their headless applications in context and with content. Experience developers can work with tools they have and configure headless experiences to automatically build based on changes to content in associated repositories or publishing status of content in associated publishing channels to drive continuous integration/continuous deployment (CI/CD).
Deploy Applications on Heroku with Experience Orchestration in Oracle Content Management
F49441-02
June 2022
Copyright © 2021, 2022, Oracle and/or its affiliates.
Primary Author: Oracle Corporation