Build a Minimal Site in Flutter with Headless Oracle Content Management
Introduction
Flutter is an open source framework by Google for building beautiful, natively compiled, multi-platform applications from a single codebase. Flutter code compiles to ARM or Intel machine code as well as JavaScript, for fast performance on any device. Flutter can be a powerful tool for building applications that consume content from Oracle Content Management. Armed with the right content model, you can quickly build Flutter UI that make up a typical blog.
In this tutorial, we’ll build a simple minimal site in Flutter by leveraging Oracle Content Management as a headless CMS. This Flutter sample is available on GitHub.
The tutorial consists of three steps:
- Prepare Oracle Content Management
- Build the minimal site in Flutter
- Prepare your application for deployment
Prerequisites
Before proceeding with this tutorial, we recommend that you read the following information first:
To follow this tutorial, you’ll need:
- an Oracle Content Management subscription
- an Oracle Content Management account with the Content Administrator role
- a Windows or Mac computer with Node version 10 or higher
What We’re Building
With Flutter minimal, you can easily retrieve images and other content from your Oracle Content Management repository.
To take a look at what we’re building, here’s the end state of our tutorial, a basic Flutter minimal site that consumes content from Oracle Content Management.
This is what the home screen will look like at the end of this tutorial:
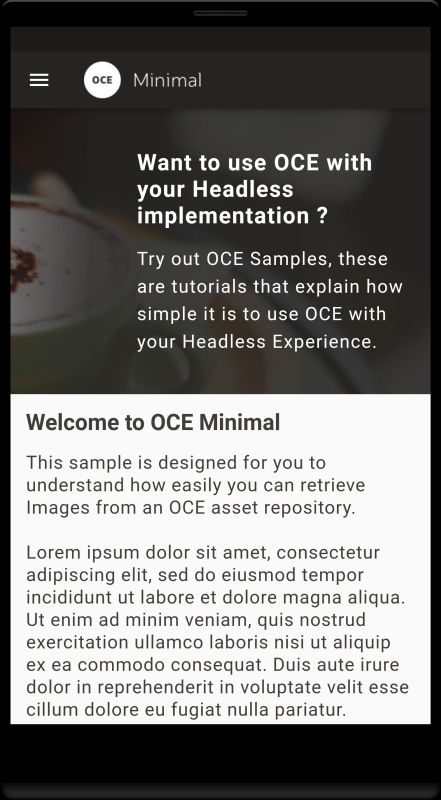
This is what the contact us screen will look like at the end of this tutorial:
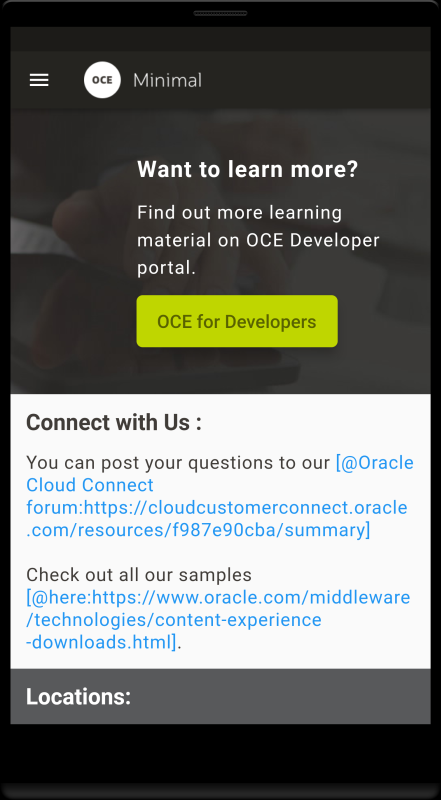
To proceed, you’ll need to have an active subscription to Oracle Content Management and be logged in with the Content Administrator role.
Task 1: Prepare Oracle Content Management
If you don’t already have an Oracle Content Management instance, see Quick Start to learn how to register for Oracle Cloud, provision an Oracle Content Management instance, and configure Oracle Content Management as a headless CMS.
For this tutorial, you’ll need to create a content model. There’s a downloadable asset pack available that will fill your empty repository with content types and associated content.
To prepare Oracle Content Management:
Create a Channel and Asset Repository
You first need to create a channel and an asset repository in Oracle Content Management so you can publish content.
To create a channel and an asset repository in Oracle Content Management:
Log in to the Oracle Content Management web interface as an administrator.
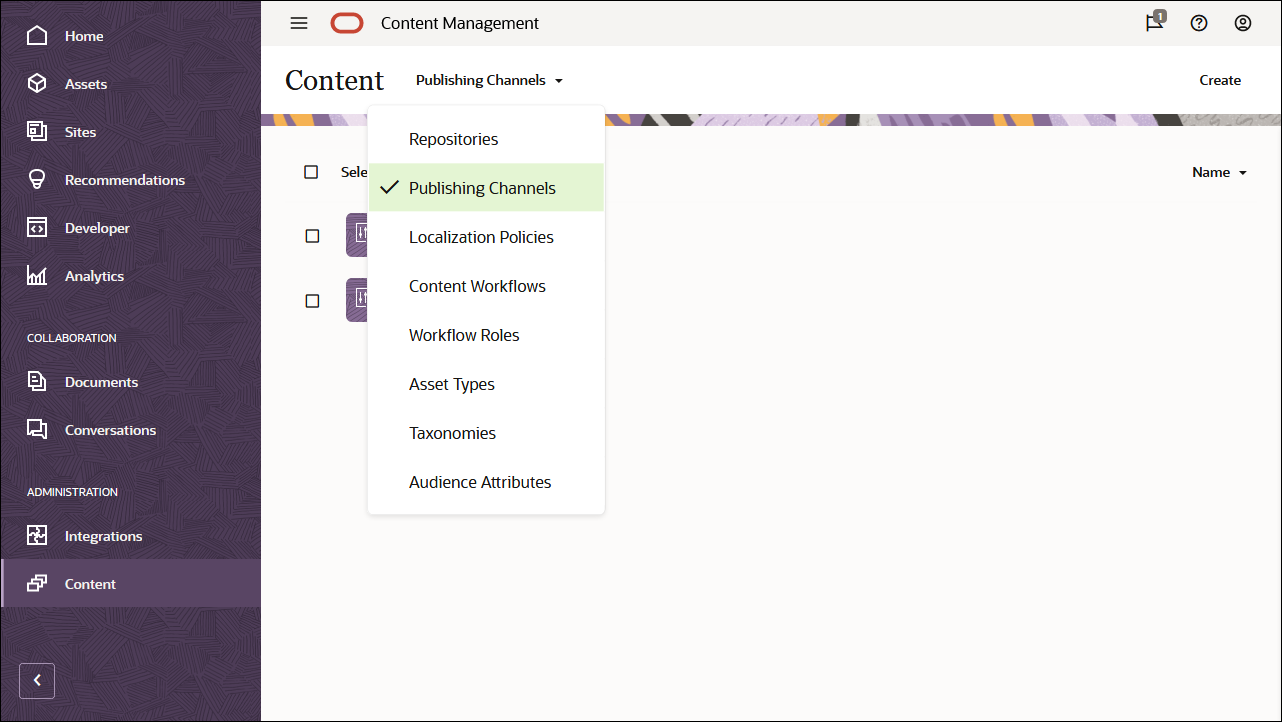
Choose Content in the left navigation menu and then choose Publishing Channels from the selection list in the page header.
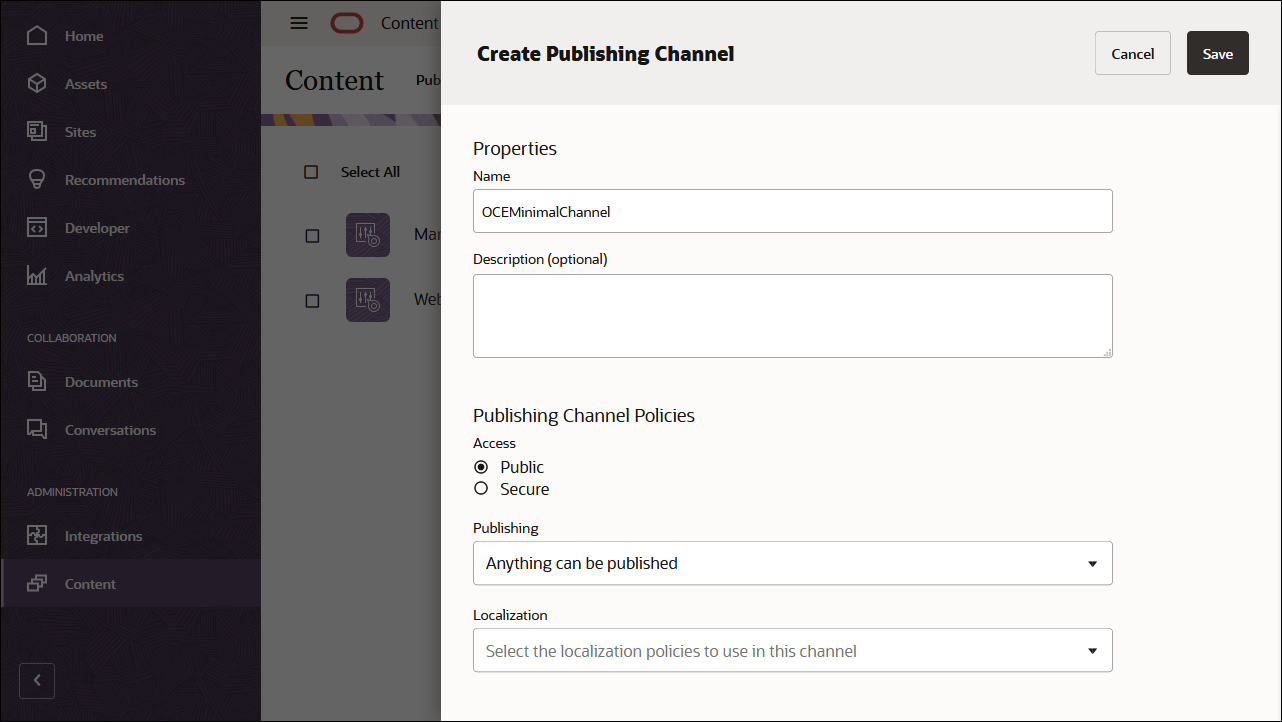
In the upper right corner, click Create to create a new channel. Name the channel ‘OCEMinimalChannel’ for the purpose of this tutorial, and keep the access public. Click Save to create the channel.
Choose Content in the left navigation menu and then choose Repositories from the selection list in the page header.
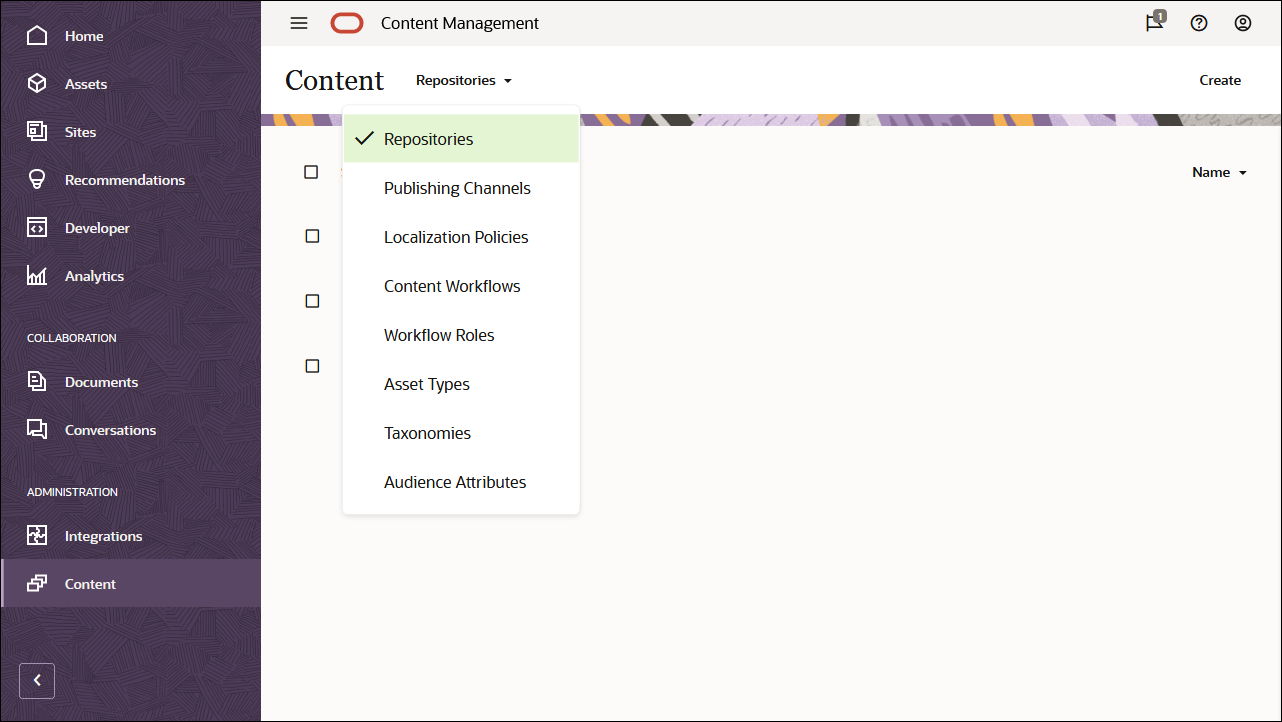
In the upper right corner, click Create to create a new asset repository. Name the asset repository ‘OCEMinimalRepository’ for the purpose of this tutorial.
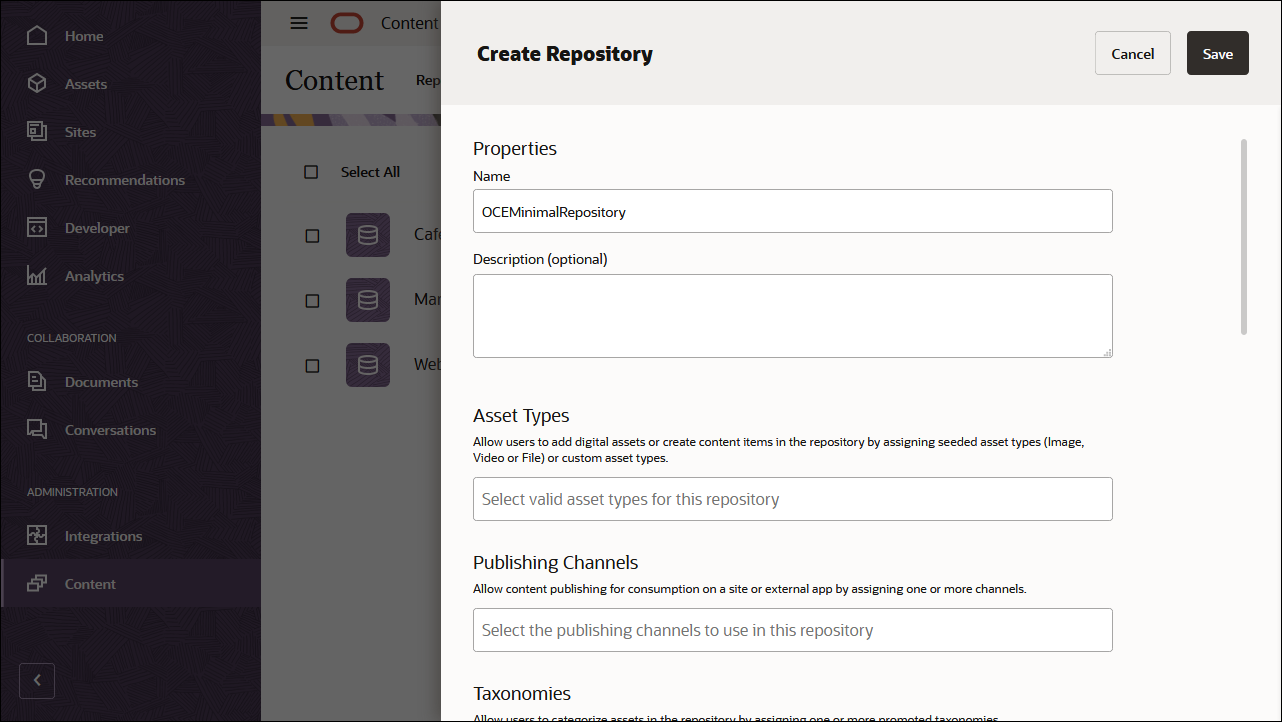
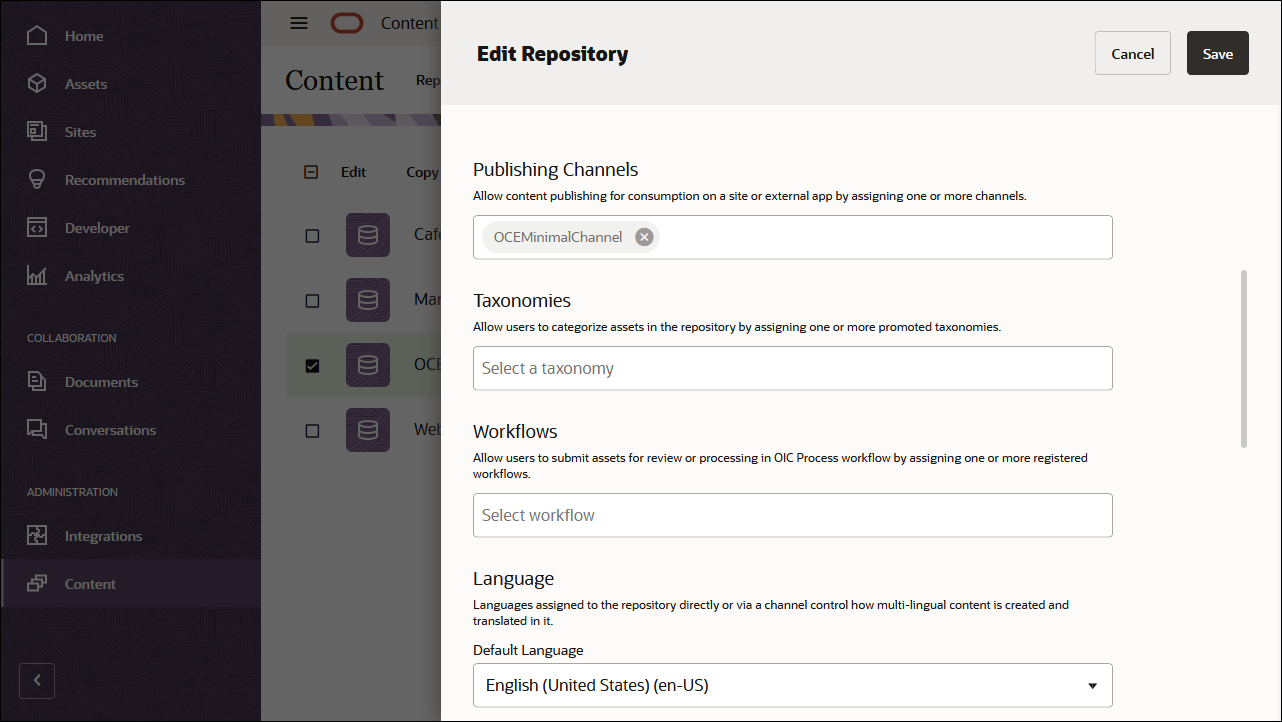
In the Publishing Channels field, select the OCEMinimalChannel channel to indicate to Oracle Content Management that content in the OCEMinimalRepository repository can be published to the OCEMinimalChannel channel. Click Save when you’re done.
Import the Oracle Content Management Samples Asset Pack
You can download a preconfigured Oracle Content Management sample assets pack that contains all required content types and assets for this tutorial.
You can upload a copy of the content we’re using in this tutorial from the Oracle Content Management Samples Asset Pack. This will let you experiment with the content types and modify the content. If you want to import the Oracle Content Management Samples Asset Pack, you can download the asset pack archive, OCESamplesAssetPack.zip, and extract it to a directory of your choice:
Download the Oracle Content Management Samples Asset Pack (OCESamplesAssetPack.zip) from the Oracle Content Management downloads page. Extract the downloaded zip file to a location on your computer. After extraction, this location will include a file called OCEMinimal_data.zip.
Log in to the Oracle Content Management web interface as an administrator.
Choose Content in the left navigation menu and then choose Repositories from the selection list in the page header. Now select OCEMinimalRepository and click the Import Content button in the top action bar.
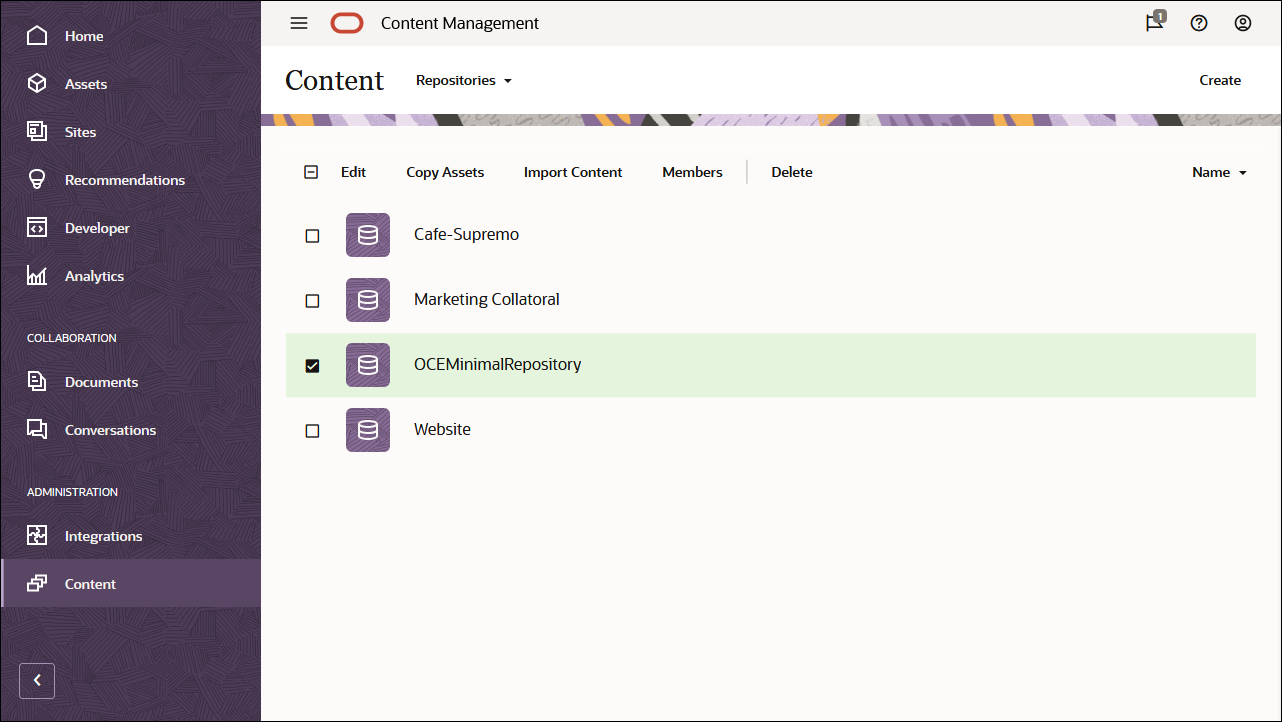
Upload OCEMinimal_data.zip from your local computer to the Documents folder.
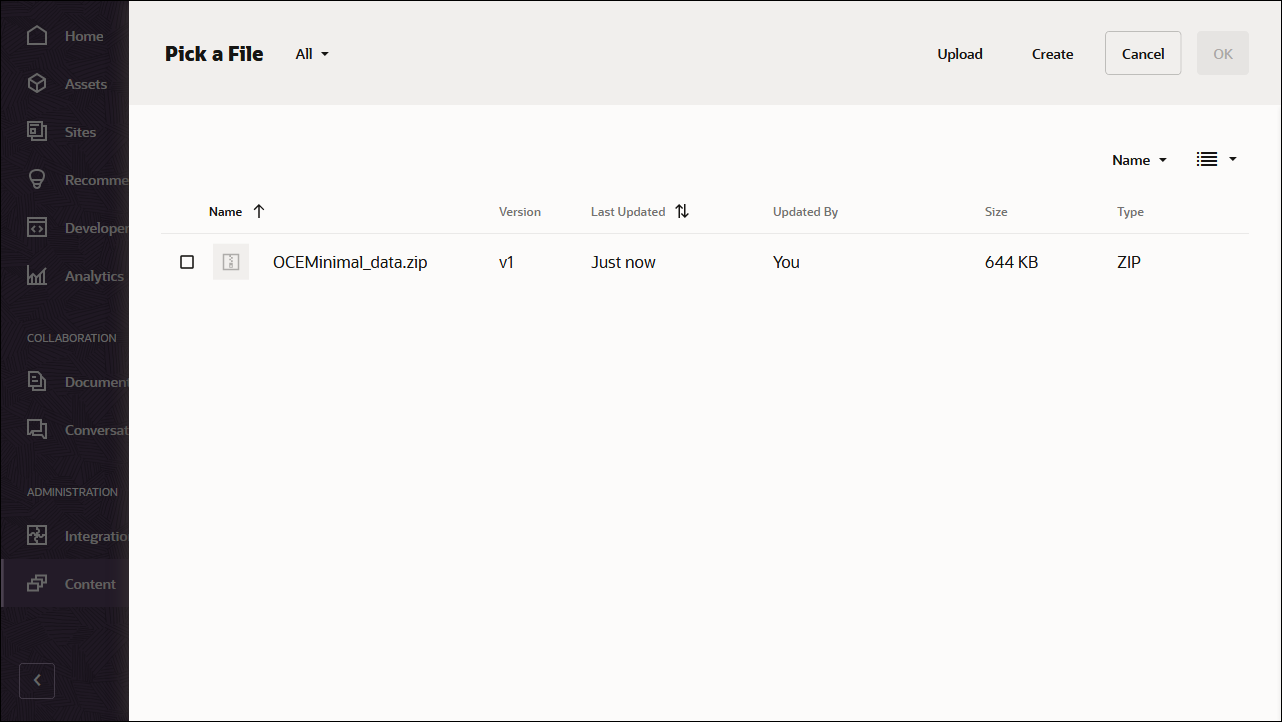
Once it’s uploaded, select OCEMinimal_data.zip and click OK to import the contents into your asset repository.
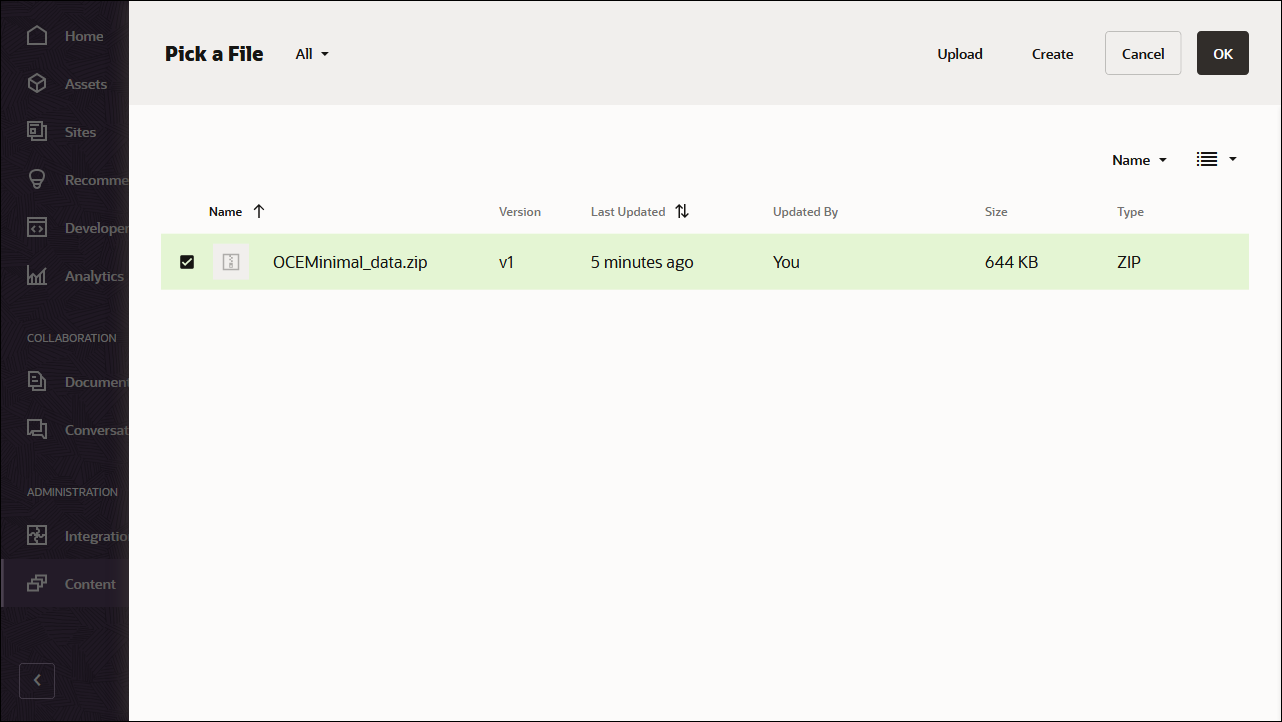
After the content has been imported successfully, navigate to the Assets page and open the OCEMinimalRepository repository. You’ll see that all the related images and content items have now been added to the asset repository.
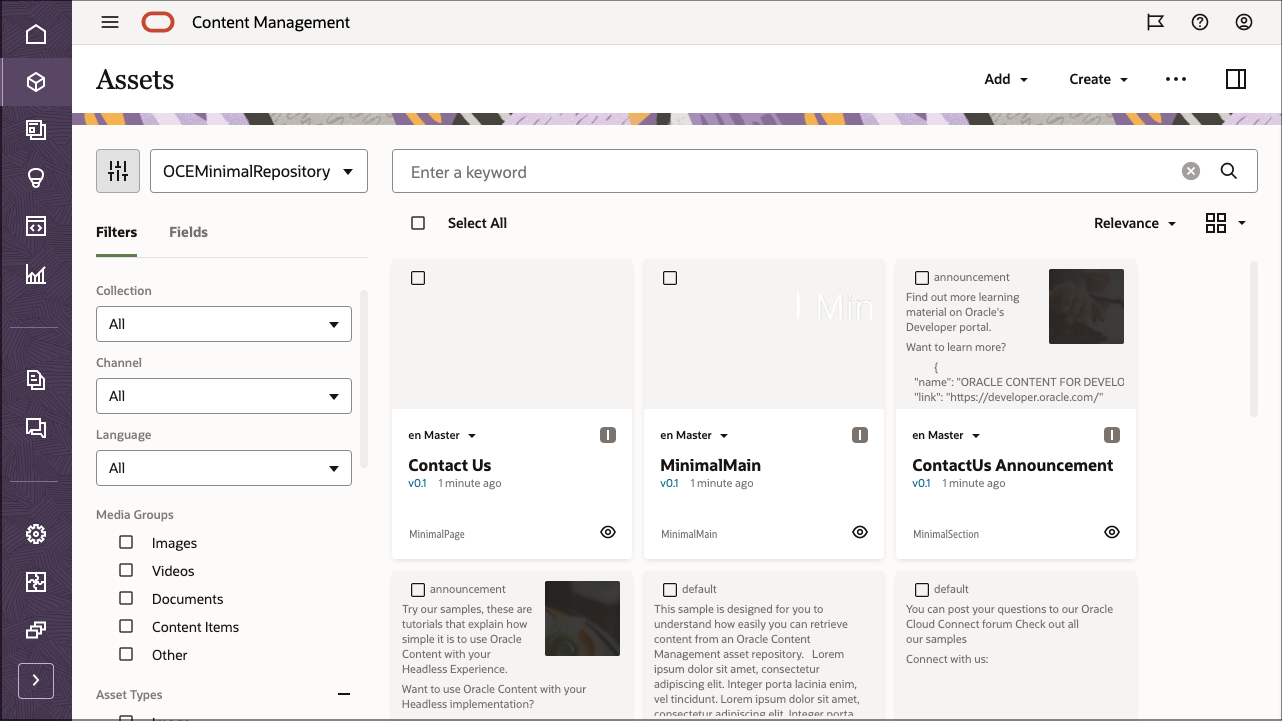
Click Select All on the top left and then Publish to add all the imported assets to the publishing channel that you created earlier, OCEMinimalChannel.
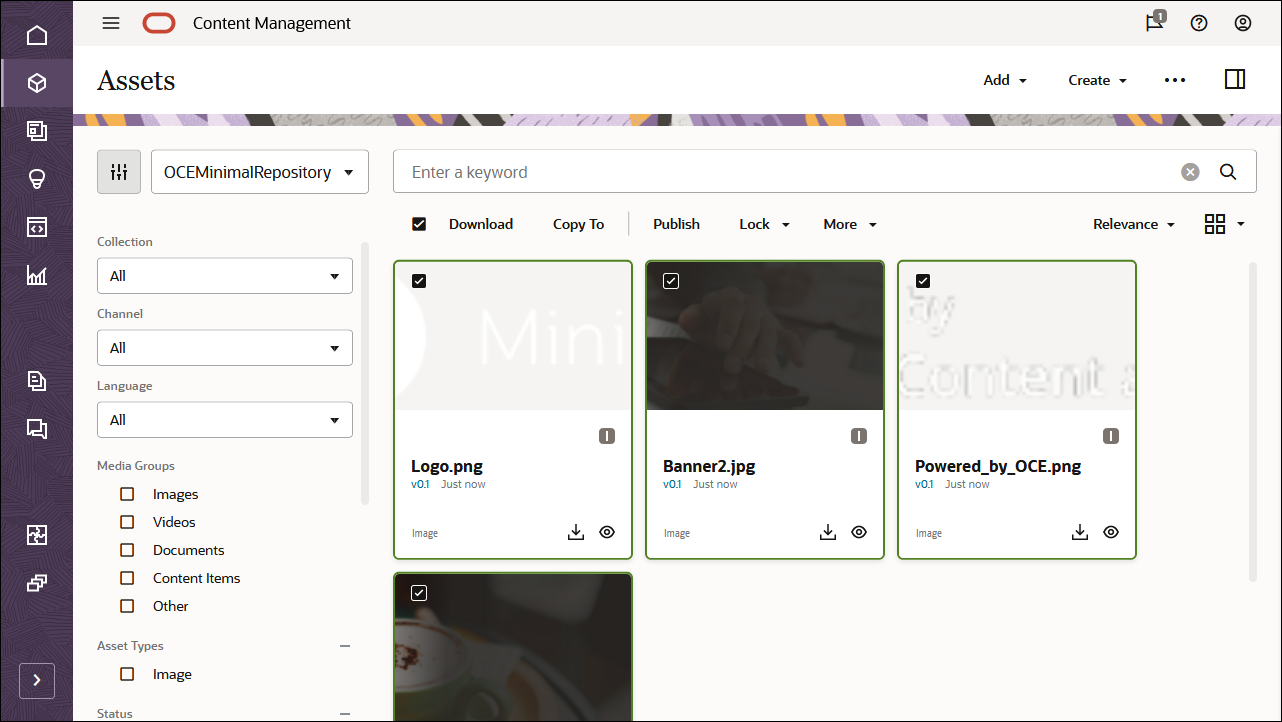
Before publishing, you need to validate all the assets. First add OCEMinimalChannel as a selected channel, and then click the Validate button.
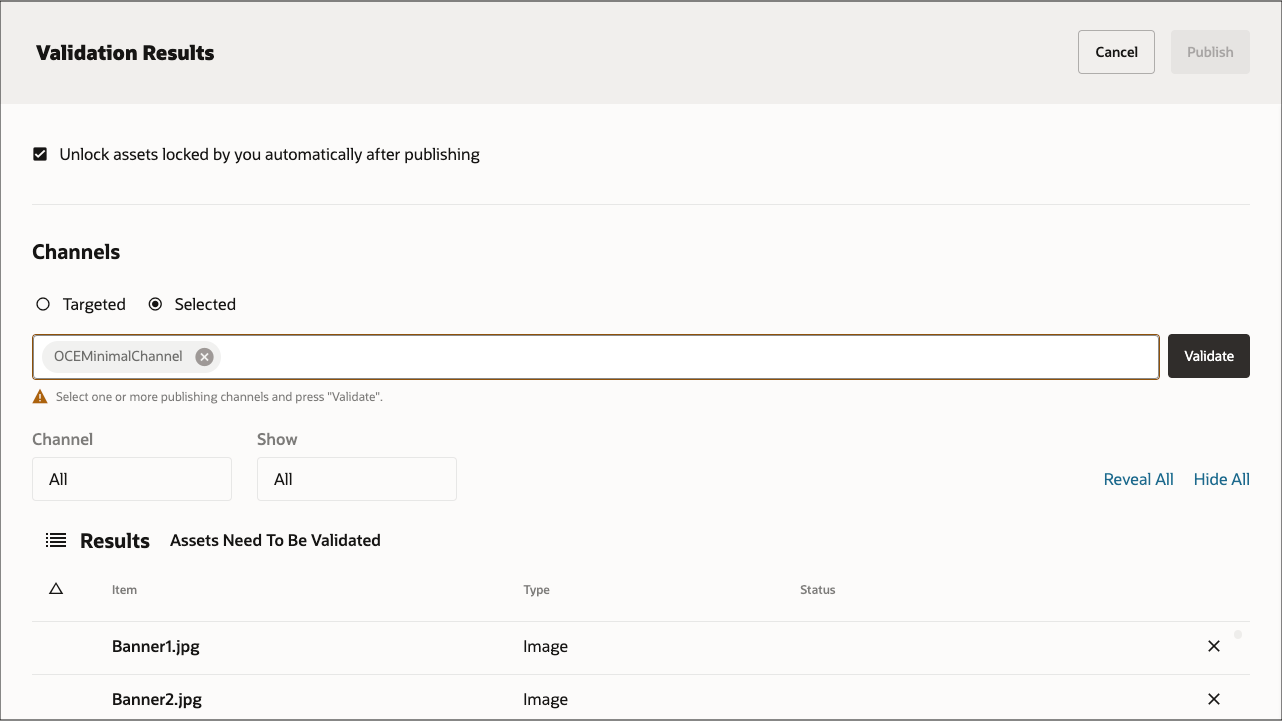
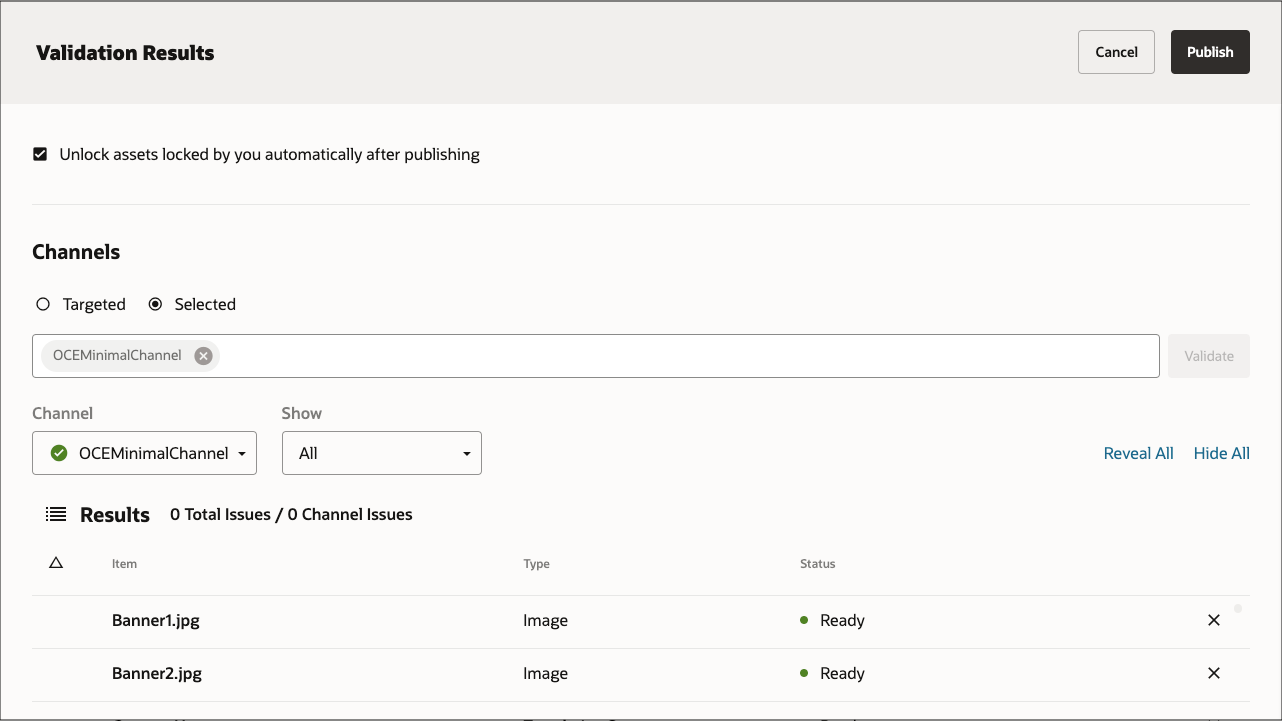
After the assets have been validated, you can publish all the assets to the selected channel by clicking the Publish button in the top right corner.
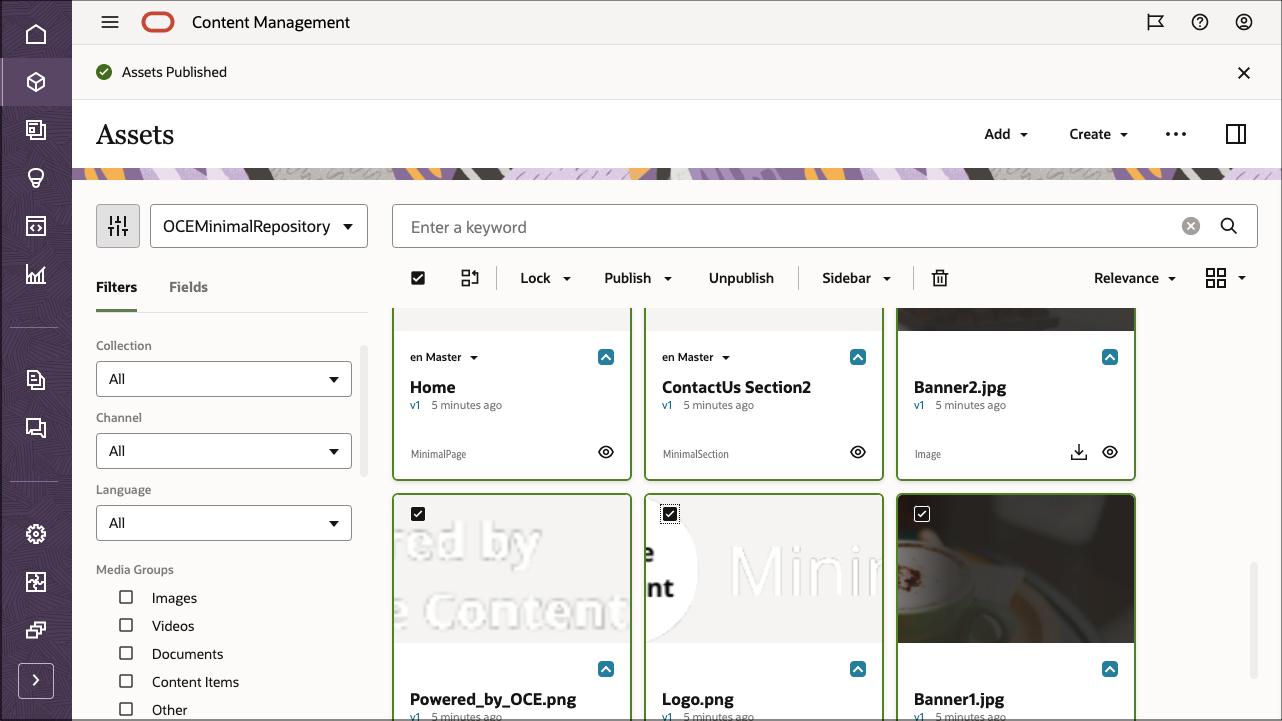
Once that’s done, you can see on the Assets page that all assets have been published. (You can tell by the icon above the asset name.)
Task 2: Build the Minimal Site in Flutter
To consume our Oracle Content Management content in a Flutter application, we can use the Flutter minimal site sample, which is available as an open-source repository on GitHub.
Note: Remember that using the Flutter sample is optional, and we use it in this tutorial to get you started quickly. You can also build your own Flutter application.
Building the minimal site in Flutter consists of these steps:
- Install Flutter
- Clone the sample repository and install dependencies
- Configure the Flutter application
- Use the Oracle Content Management REST API to fetch content
Install Flutter
The first thing you need to do to get started with Flutter is to set up your environment. You can find the instructions for setting it up on the Flutter website. Use the option corresponding to your operating system. Here’s a summary of the installation steps:
- Get the Flutter SDK.
- Update your path environment variable.
- Run
flutter doctor. - Follow the steps outlined on the Flutter website to install an editor of your choice.
- Add an editor plugin for Android Studio, IntelliJ, VS Code, or Emacs. The instructions specify how to install the Flutter and Dart plugins in your editor.
- Modify the values in the android.properties file to refer to the appropriate locations, sdk and kotlin versions. You may also need to modify values in the android.gradle file for the appropriate versions.
Clone the Sample Repository and Install Dependencies
The Flutter minimal site sample is available as an open-source repository on GitHub.
You’ll first need to clone the sample from GitHub to your local computer and change your directory into the repository root:
git clone https://github.com/oracle-samples/oce-flutter-minimal-sample.git
cd oce-flutter-minimal-sample
Open the project from Android Studio or any other editor of your choice. To get all the packages that are being used in the project, click the Get packages button.
Configure the Flutter Application
In this Flutter minimal sample, you need to configure a few pieces of information so that your REST API requests can target the correct instance URL and API version with the correct channel token. These values defined in lib/config/oce.dart are used by the functions defined in lib/networking/content.dart to establish the endpoint for the REST API.
You’ll see the following information in lib/config/oce.dart:
const Map<String, String> config = <String, String>{
  'serverUrl': 'https://samples.mycontentdemo.com',
  'apiVersion': 'v1.1',
  'channelToken': 'ba0efff9c021422cb134c2fd5daf6015'
};
Change each key-value pair to reflect your instance URL, the API version you want to target, and the channel token associated with your publishing channel. The channel for this tutorial is OCEMinimalChannel.
We also need to configure which images are to be used throughout the application. In the same file you’ll see the following:
const Map<String, String> appConfig = <String, String>{
  'homePage': 'Banner1.jpg',
  'contactUs' : 'Banner2.jpg',
  'logo' : 'Logo.png',
  'footerLogo' : 'Powered_by_OCE.png',
};
Change the name of each image to reflect the values in your instance.
Use the Oracle Content Management REST API to Fetch Content
The REST API for Content Delivery provides access to published assets in Oracle Content Management. Published assets include content items and digital assets, as well as their renditions. We can now leverage the Oracle Content Management REST API to fetch content so that we can render it in our minimal Flutter application.
The lib/networking/content.dart file has methods for connecting to the server specified in the oce.dart file using the REST API and returning the response from it.
  //Utility method to build up the URL for published content.
  String _getPublishedContentServerURL() {
    final String? serverUrl = data['serverUrl'] as String?;
    final String? apiVersion = data['apiVersion'] as String?;
    return '$serverUrl/content/published/api/$apiVersion/';
  }

  // Adds the channel token to the URL
  String _addChannelToURL(String currUrl) {
    final String? channelToken = data['channelToken'] as String?;
    return '$currUrl?channelToken=$channelToken';
  }

  //Make an http get call and return the response if successful
  Future<dynamic> _get(String url) async {
    dynamic responseJson;
    try {
      final Response response = await get(Uri.parse(url));
      responseJson = _returnResponse(response);
    } on SocketException {
      throw FetchDataException(kConnectionError);
    }
    return responseJson;
  }

  //Return the json decoded response body if response status is successful
  dynamic _returnResponse(Response response) {
    switch (response.statusCode) {
      case 200:
        final Map<String, dynamic>? responseJson =
            json.decode(response.body.toString()) as Map<String, dynamic>?;
        return responseJson;
      case 400:
        throw BadRequestException(response.body.toString());
      case 401:
      case 403:
        throw UnauthorizedException(response.body.toString());
      case 500:
      default:
        throw FetchDataException('StatusCode : ${response.statusCode}');
    }
  }
For rendering the images, the content.dart also provides helper methods to retrieve the various renditions for an asset.
  String getMediumRenditionUrl(Map<String, String> args) {
    final String itemId = args['id'];
    if (itemId == null) return null;
    String url = _getPublishedContentServerURL();
    url = '${url}assets/$itemId/Medium';
    // add the channel token to the URL
    url = _addChannelToURL(url);
    url = '$url&format=jpg&&type=responsiveimage';
    return url;
  }

  String getRenditionURL(Map<String, String> args) {
    final String itemId = args['id'];
    if (itemId == null) return null;
    String url = _getPublishedContentServerURL();
    url = '${url}assets/$itemId/native';
    // add the channel token to the URL
    url = _addChannelToURL(url);
    return url;
  }
The lib/networking/services.dart file contains all the code to get data for the application.
Fetching Image Data
Open lib/networking/services.dart and find the function below, which helps to get all of the images for this app.
  // Get all the images needed for the app
  Future<AppImages> getAppImages() async {
    final Content content = Content();
    final String homepageImage = appConfig['homePage'];
    final String contactUsImage = appConfig['contactUs'];
    final String logoImage = appConfig['logo'];
    final String footerImage = appConfig['footerLogo'];
    AppImages images;
    try {
      final dynamic data = await content.queryItems(<String, String>{
        'q':
            '(name eq "$homepageImage" OR name eq "$contactUsImage" OR name eq "$logoImage" OR name eq "$footerImage")',
        'fields': 'all',
        'expand': 'all',
      });
      final List<dynamic> items = data['items'] as List<dynamic>;
      String homePageImageGUID,
          contactUsImageGUID,
          headerLogoGUID,
          footerLogoGUID;
      for (int i = 0; i < items.length; i++) {
        final String name = items[i]['name'] as String;
        final String id = items[i]['id'] as String;
        if (name == homepageImage) {
          homePageImageGUID = id;
        } else if (name == contactUsImage) {
          contactUsImageGUID = id;
        } else if (name == logoImage) {
          headerLogoGUID = id;
        } else if (name == footerImage) {
          footerLogoGUID = id;
        }
      }
      //If any of the image ids are null, let the user know but continue loading the app
      if (homePageImageGUID == null ||
          contactUsImageGUID == null ||
          headerLogoGUID == null ||
          footerLogoGUID == null) {
        print(kFileNameError);
      }
      images = AppImages(
        headerLogoUrl: content.getRenditionURL(<String, String>{'id': headerLogoGUID}),
        footerLogoUrl: content.getRenditionURL(<String, String>{'id': footerLogoGUID}),
        contactUsImageUrl:
            content.getMediumRenditionUrl(<String, String>{'id': contactUsImageGUID}),
        homePageImageUrl: content.getMediumRenditionUrl(<String, String>{'id': homePageImageGUID}),
      );
    } catch (exception) {
      rethrow;
    }
    return images;
  }
;
Now that we have our data queries, we can render the responses in our Flutter components.
Flutter Components
The minimal application breaks down each page into a number of smaller components.
The next few sections provide an overview of how Flutter renders our application in each of our components:
LoadingScreen Component
The LoadingScreen is a stateful widget that is rendered by the LoadingScreen component, located at lib/screens/loading_screen.dart.
The lib/screens/loading_screen.dart file contains all the code to get data for the screen and it makes calls to the functions defined in services.dart.
  Future<void> getData() async {
    final Services services = Services();
    try {
      final AppImages images = await services.getAppImages();
      if (images != null) {
        Navigator.push<dynamic>(context,
            MaterialPageRoute<dynamic>(builder: (BuildContext context) {
          return HomePage(appImages: images);
        }));
      }
    } catch (exception) {
      setState(() {
        this.exception = exception.toString();
      });
      print(exception.toString());
    }
  }
The component uses the getData method to get data using the method defined in the services.dart file.
HomePage Component
The home screen is rendered by the HomePage component, located at lib/screens/home_page.dart.
The HomePage component is launched by the LoadingScreen Component which passes the data to it. It does not get any additional data from the server.
It also uses the ScreenLayout component defined in the lib/components/screen_layout.dart file, as well as the ImageStack component defined in the lib/components/image_stack.dart file.
ContactUs Component
The Contact Us screen is rendered by the ContactUs component, located at lib/screens/contact_us.dart.
The ContactUs component is launched by the NavDrawer Component, defined in lib/components/navdrawer.dart file, which passes the data to it. It does not get any additional data from the server. It also uses the ImageStack component defined in lib/components/image_stack.dart file.
Task 3: Prepare Your Application for Deployment
Now that we’ve built our Flutter minimal site, we need to deploy it on an emulator or device so we can debug any issues and preview the application before it goes live.
Follow the instructions on the Flutter website for your editor to run the app.
- If you are using Android Studio as your editor, locate the main Android Studio toolbar.
- In the target selector, select an Android device for running the app. If none are listed as available, select Tools > Android > AVD Manager and create one there. For details, see Managing AVDs.
- Click the run icon in the toolbar, or invoke the menu item Run > Run.
Conclusion
In this tutorial, we created a minimal site in Flutter, which can be found on GitHub. This site uses Oracle Content Management as a headless CMS. After setting up and configuring Oracle Content Management with a channel of published content for the minimal site tutorial, we installed and ran the Flutter site to fetch the required content and build the site.
For more information on Flutter, go to the Flutter website.
Learn about important Oracle Content Management concepts in the documentation.
You can find more samples like this on the Oracle Content Management Samples page in the Oracle Help Center.
Build a Minimal Site in Flutter with Headless Oracle Content Management
F55028-01
March 2022
Copyright © 2021, 2022, Oracle and/or its affiliates.
Primary Author: Oracle Corporation