Build a Blog in Gatsby with Headless Oracle Content Management
Introduction
Gatsby is a React-based open-source framework for creating websites and apps. But what happens when you need a content management system (CMS) to serve all of your content? Fortunately, Oracle Content Management, with its rich headless CMS capabilities, has a graceful solution for your content administration and governance needs.
In this tutorial, we’ll build a simple blog in Gatsby by leveraging Oracle Content Management as a headless CMS. This Gatsby sample is available on GitHub.
The tutorial consists of three steps:
Prerequisites
Before proceeding with this tutorial, we recommend that you read the following information first:
To follow this tutorial, you’ll need:
- an Oracle Content Management subscription
- an Oracle Content Management account with the Content Administrator role
- a Windows or Mac computer with Node version 10 or higher
What We’re Building
Our blog will consist of a three-page site that lets visitors explore blog articles organized into topics. The first page, the home page, will consist of branding (company name and logo), some links, and a list of blog topics.
To take a look at what we’re building, here’s the end state of our tutorial, a basic Gatsby blog that consumes content from Oracle Content Management:
https://headless.mycontentdemo.com/samples/oce-gatsby-blog-sample
This is what the home page will look like at the end of this tutorial:

The second page, the topic page, shows previews of each blog article that belongs to the topic. Here’s how an individual topic page will look:
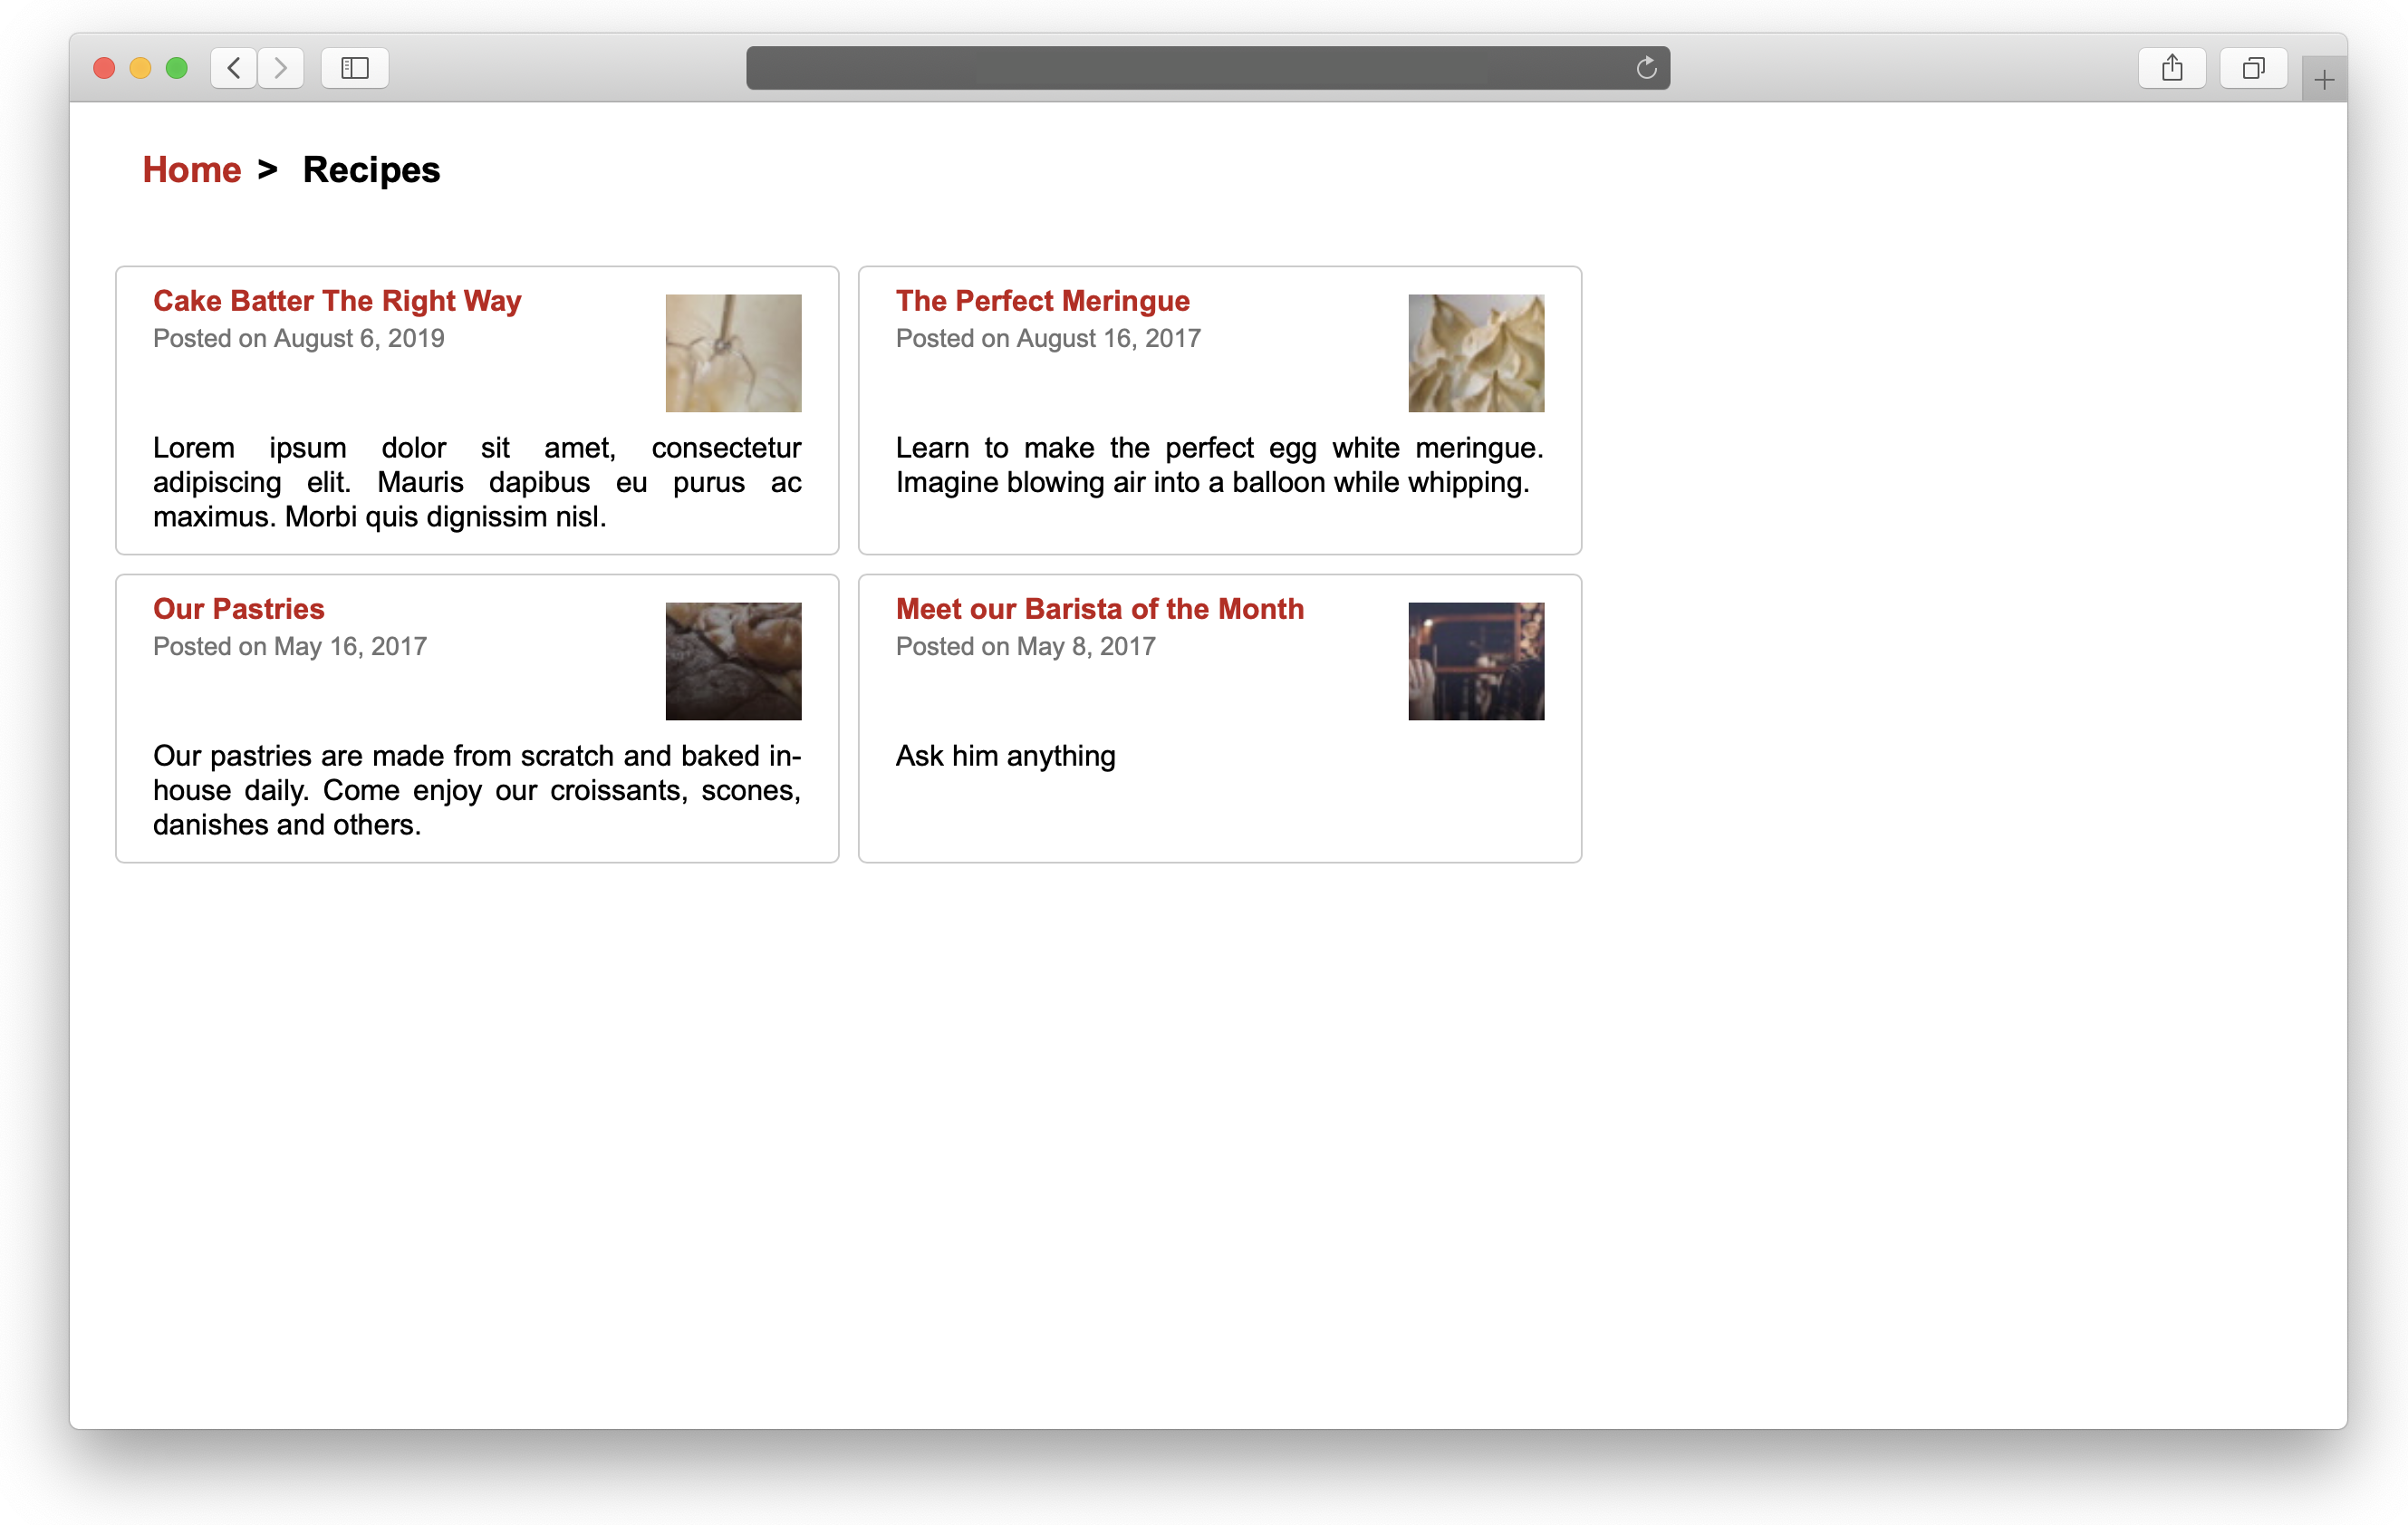
Lastly, the article page renders the final blog article, including information about the blog’s author. Here’s how an individual article page will look:
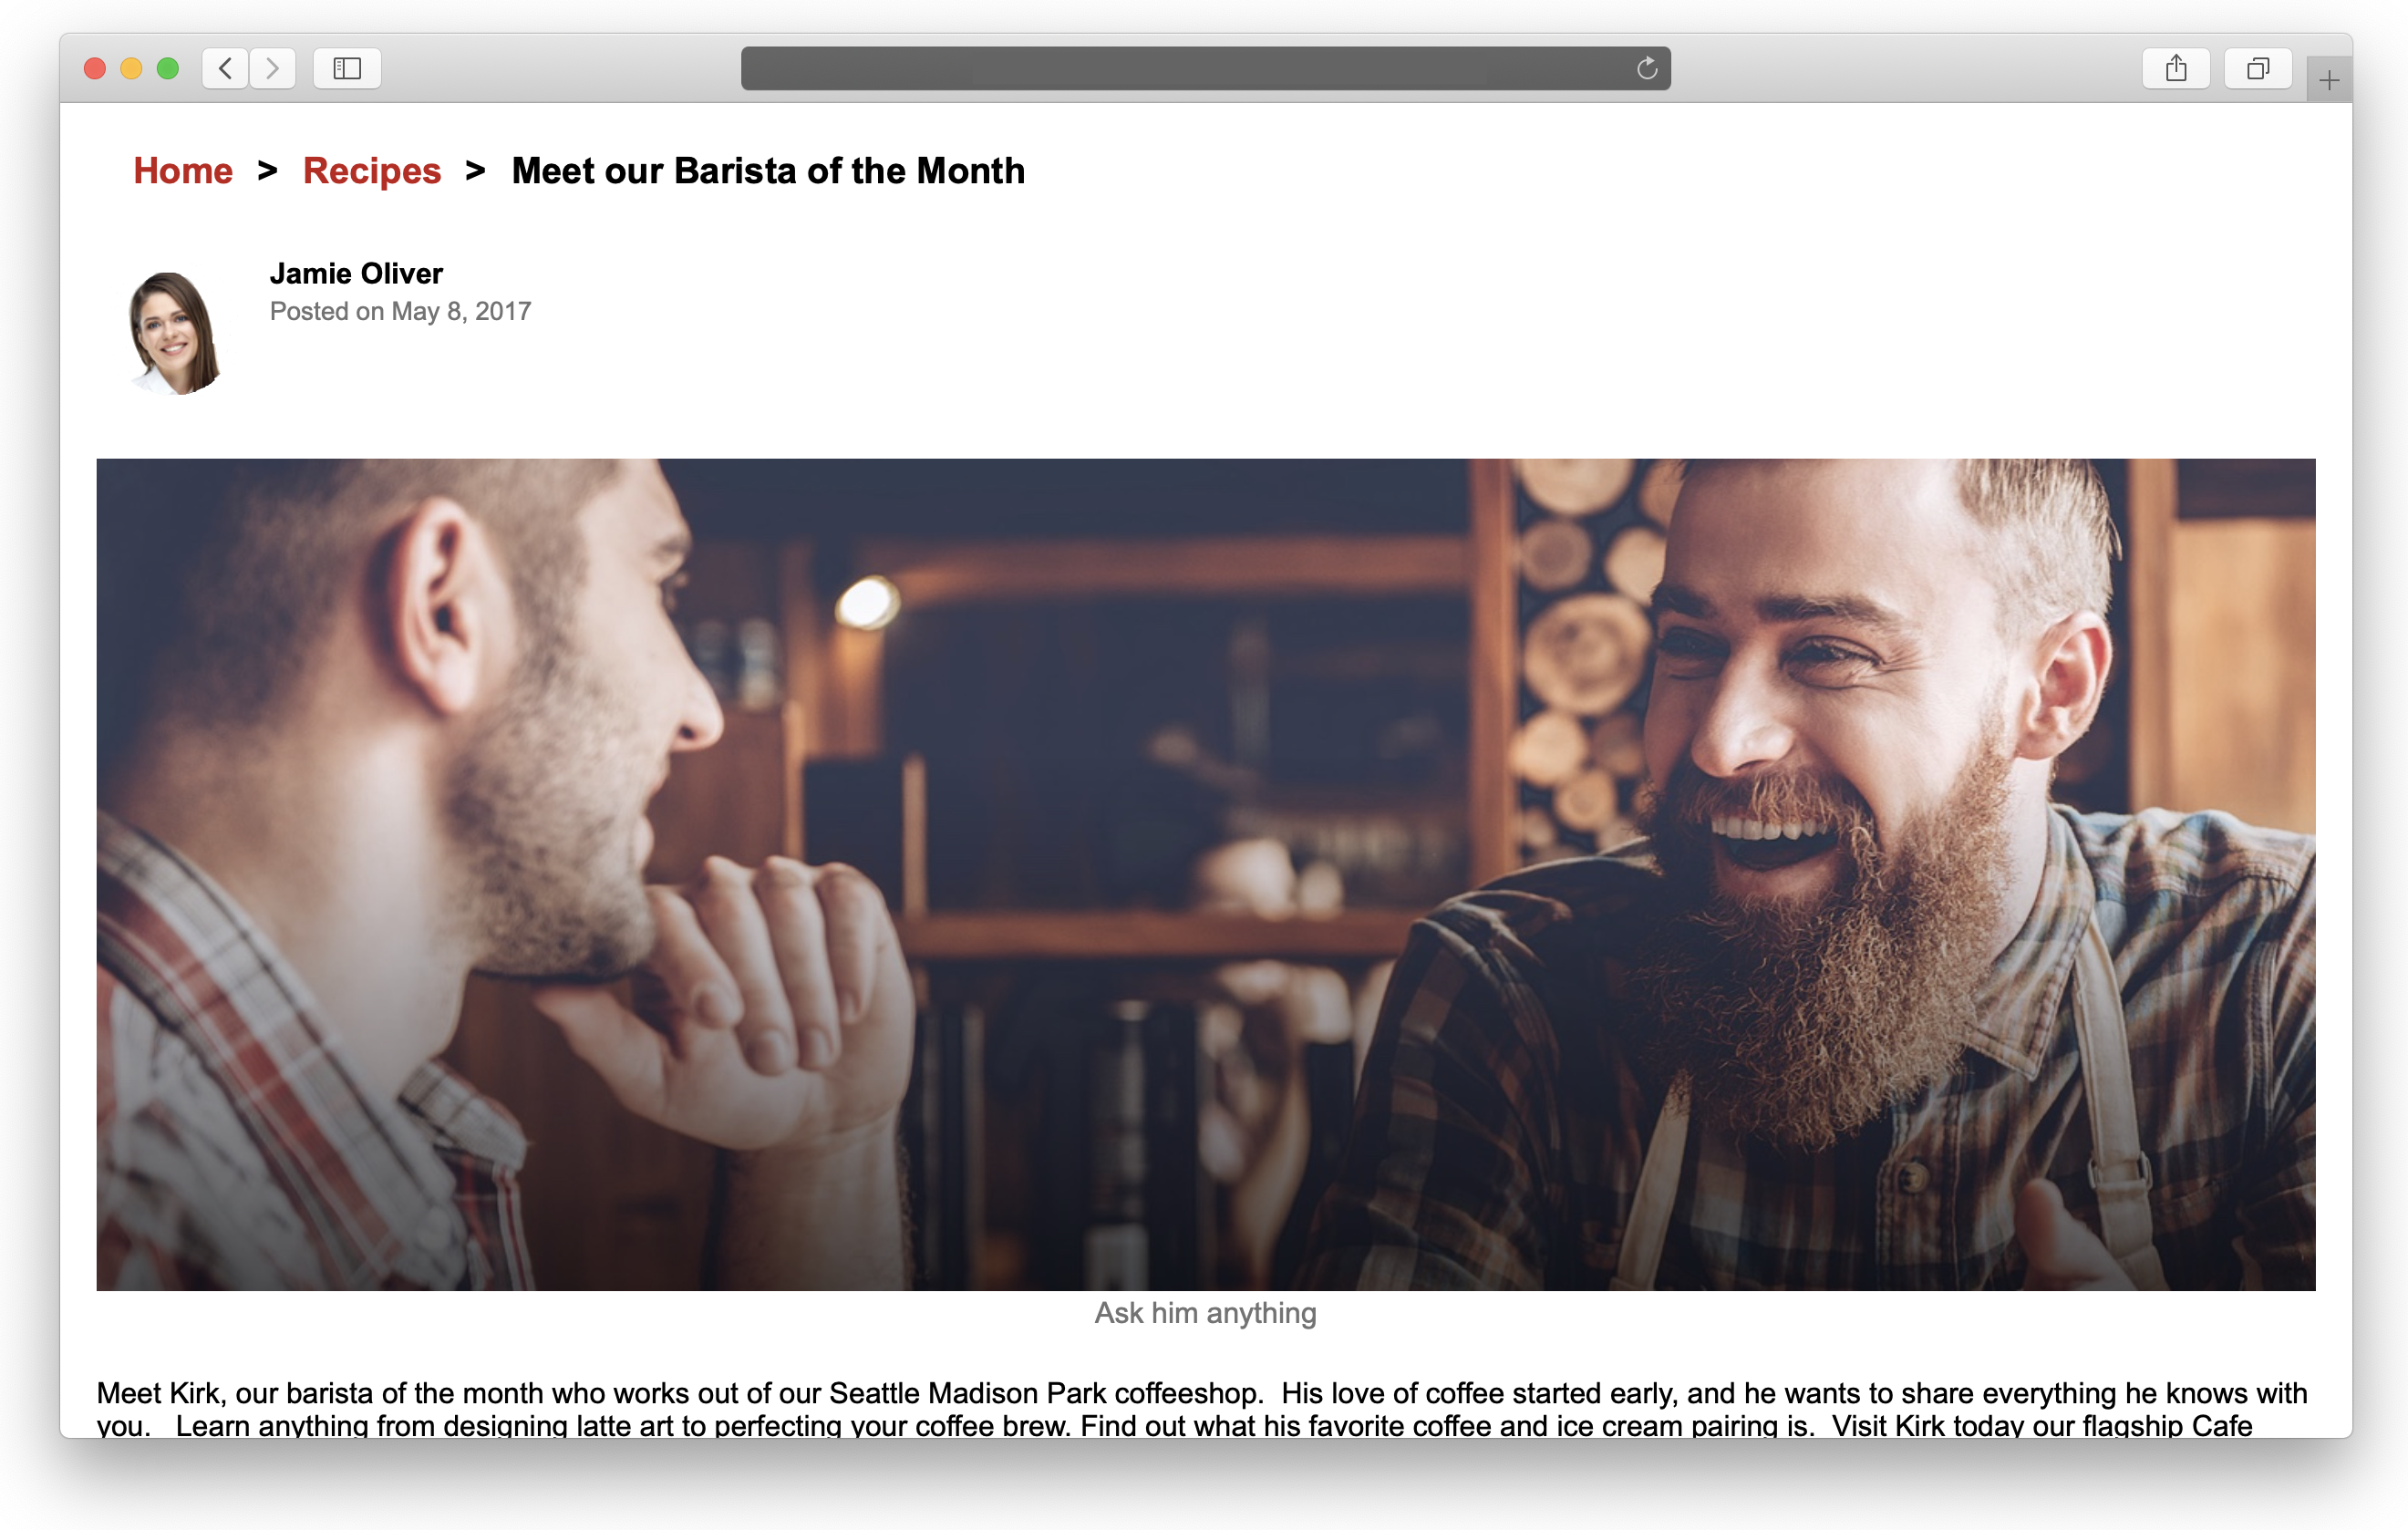
To proceed, you’ll need to have an active subscription to Oracle Content Management and be logged in with the Content Administrator role.
Task 1: Prepare Oracle Content Management
If you don’t already have an Oracle Content Management instance, see the Quick Start to learn how to register for Oracle Cloud, provision an Oracle Content Management instance, and configure Oracle Content Management as a headless CMS.
For this tutorial, you’ll need to create a content model in either of two ways. There’s a downloadable asset pack available that will fill your empty repository with content types and associated content, or you can create your own content model and content.
To prepare Oracle Content Management:
- Create a channel and asset repository.
- Create a content model using either of two methods:
- Method 1: Import the Oracle Content Management Samples Asset Pack
- Method 2: Create your own content model
Create a Channel and Asset Repository
You first need to create a channel and an asset repository in Oracle Content Management so you can publish content.
To create a channel and an asset repository in Oracle Content Management:
Log in to the Oracle Content Management web interface as an administrator.
Choose Content in the left navigation menu and then choose Publishing Channels from the selection list in the page header.
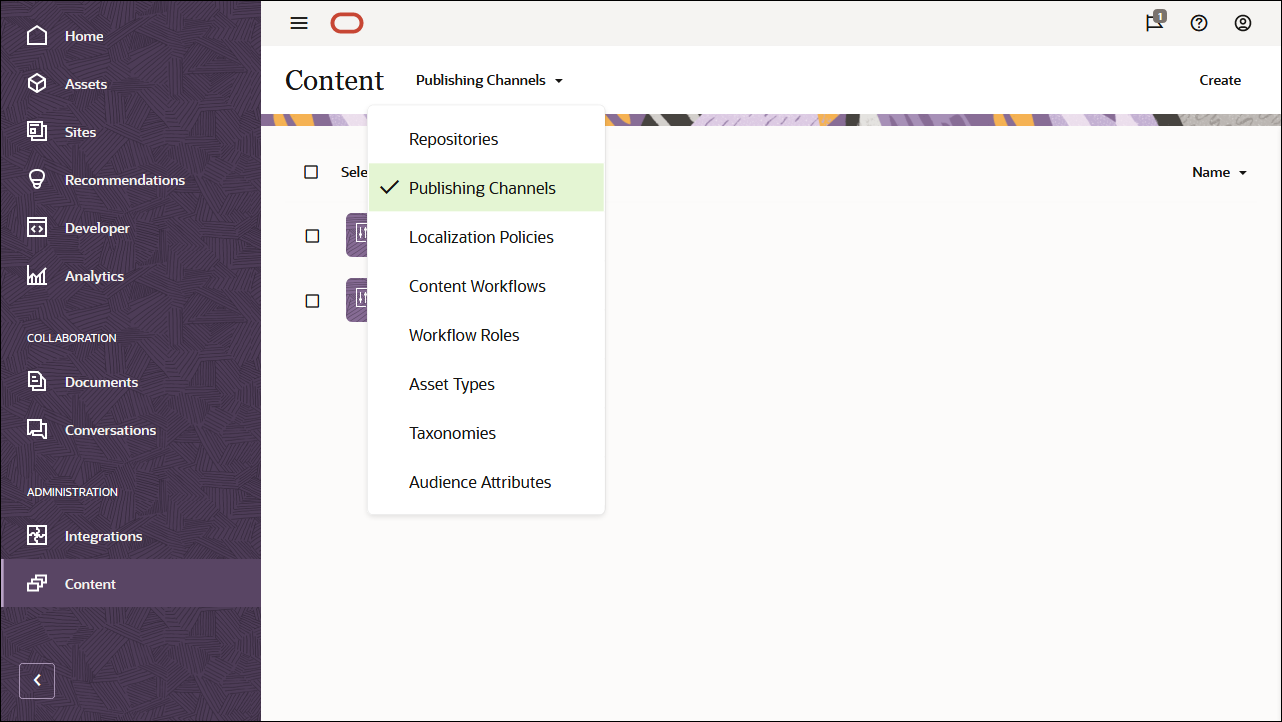
In the upper right corner, click Create to create a new channel. Name the channel ‘OCEGettingStartedChannel’ for the purpose of this tutorial, and keep the access public. Click Save to create the channel.
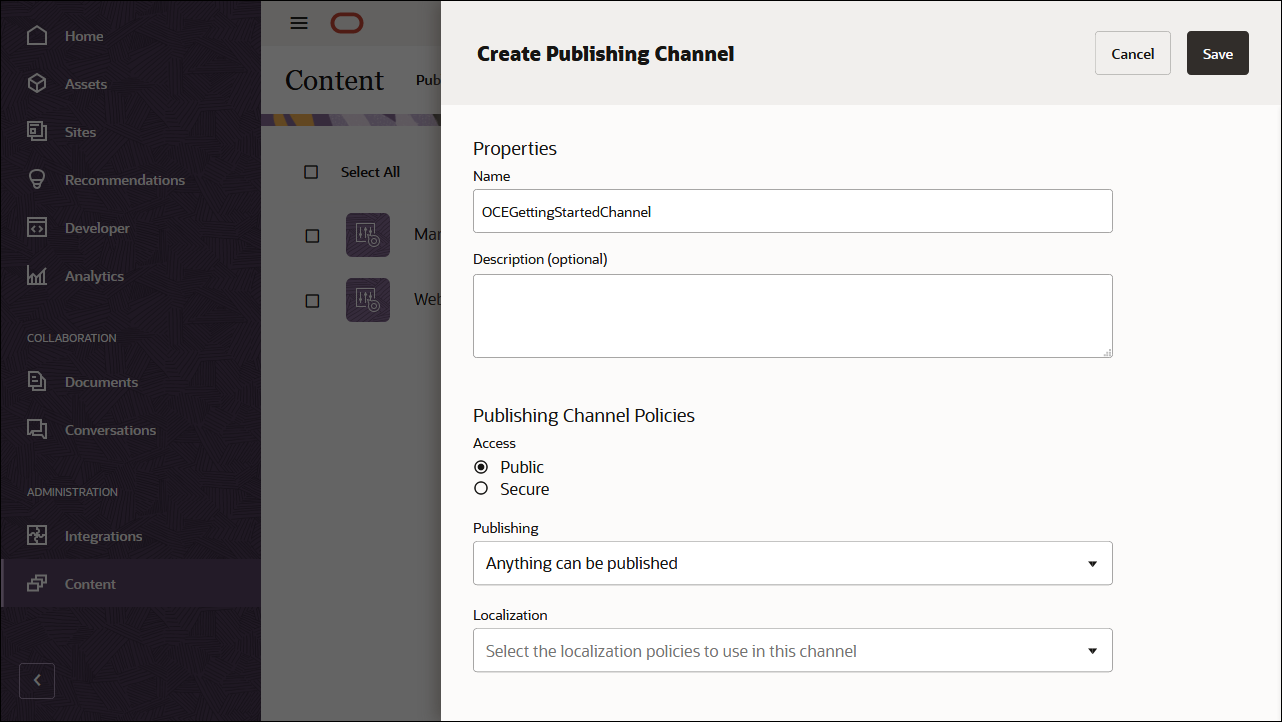
Choose Content in the left navigation menu and then choose Repositories from the selection list in the page header.
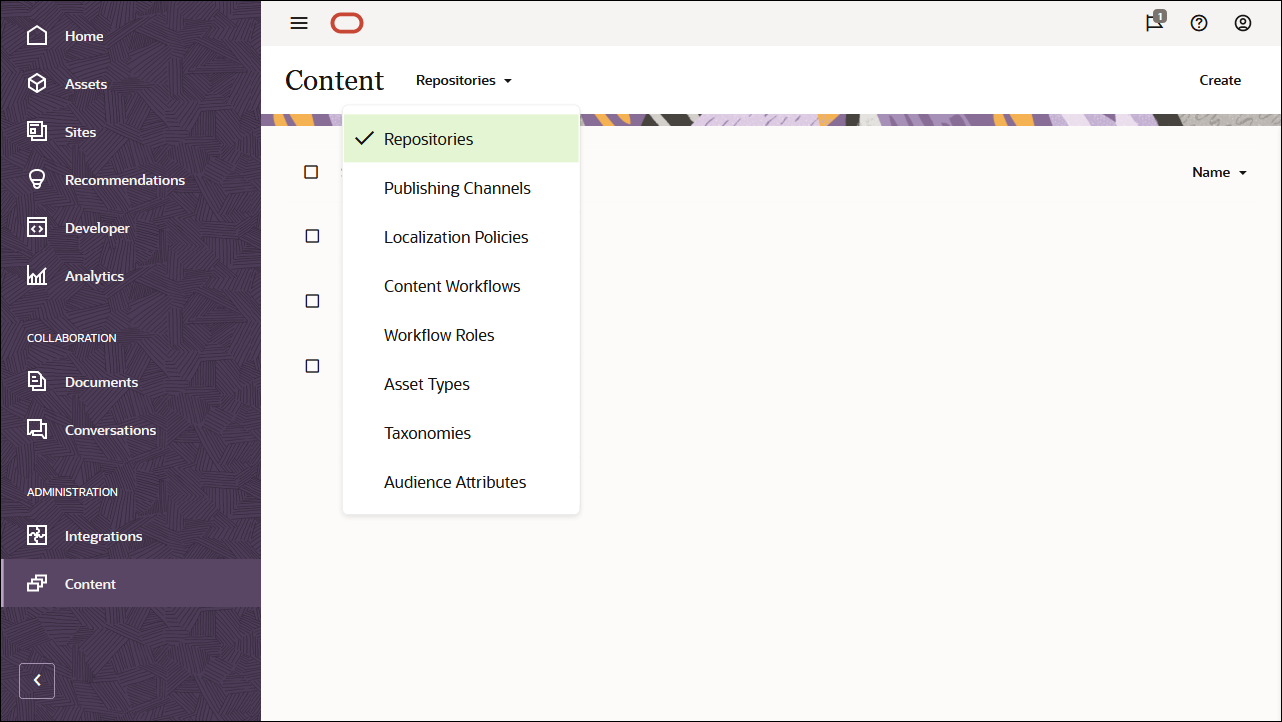
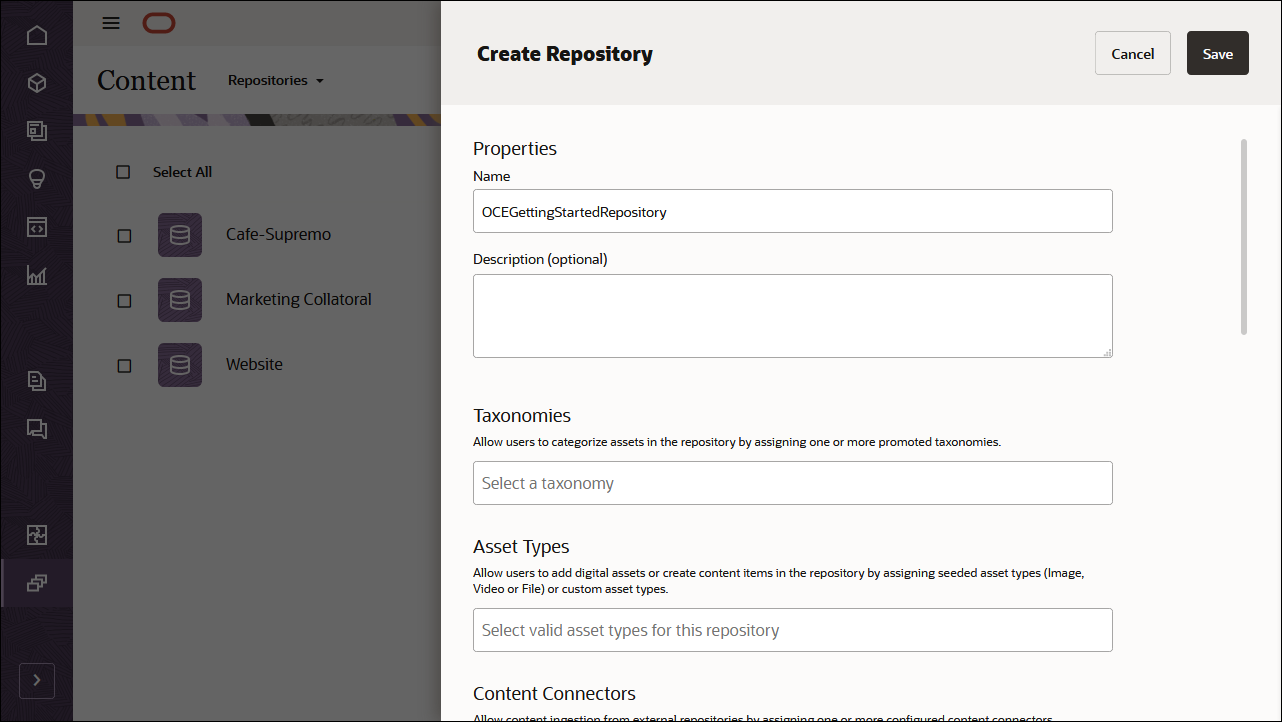
In the upper right corner, click Create to create a new asset repository. Name the asset repository ‘OCEGettingStartedRepository’ for the purpose of this tutorial.
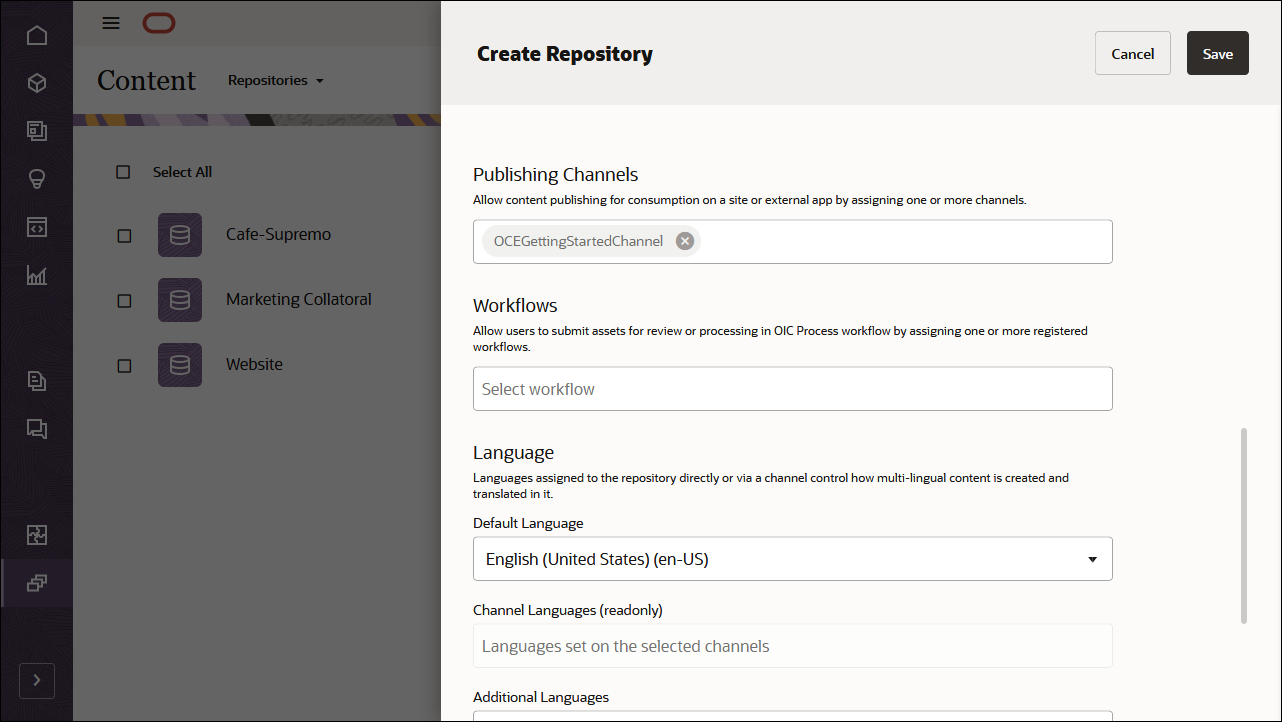
In the Publishing Channels field, select the OCEGettingStartedChannel channel to indicate to Oracle Content Management that content in the OCEGettingStartedRepository repository can be published to the OCEGettingStartedChannel channel. Click Save when you’re done.
Create a Content Model
The next step is to create a content model. You can use either of two methods:
- Method 1: Import the Oracle Content Management Samples Asset Pack
- Method 2: Create your own content model
Import the Oracle Content Management Samples Asset Pack
You can download a preconfigured Oracle Content Management sample assets pack that contains all required content types and assets for this tutorial. If you prefer, you can also create your own content model rather than download the sample assets pack.
You can upload a copy of the content we’re using in this tutorial from the Oracle Content Management Samples Asset Pack. This will let you experiment with the content types and modify the content. If you want to import the Oracle Content Management Samples Asset Pack, you can download the asset pack archive, OCESamplesAssetPack.zip, and extract it to a directory of your choice:
Download the Oracle Content Management Samples Asset Pack (OCESamplesAssetPack.zip) from the Oracle Content Management downloads page. Extract the downloaded zip file to a location on your computer. After extraction, this location will include a file called OCEGettingStarted_data.zip.
Log in to the Oracle Content Management web interface as an administrator.
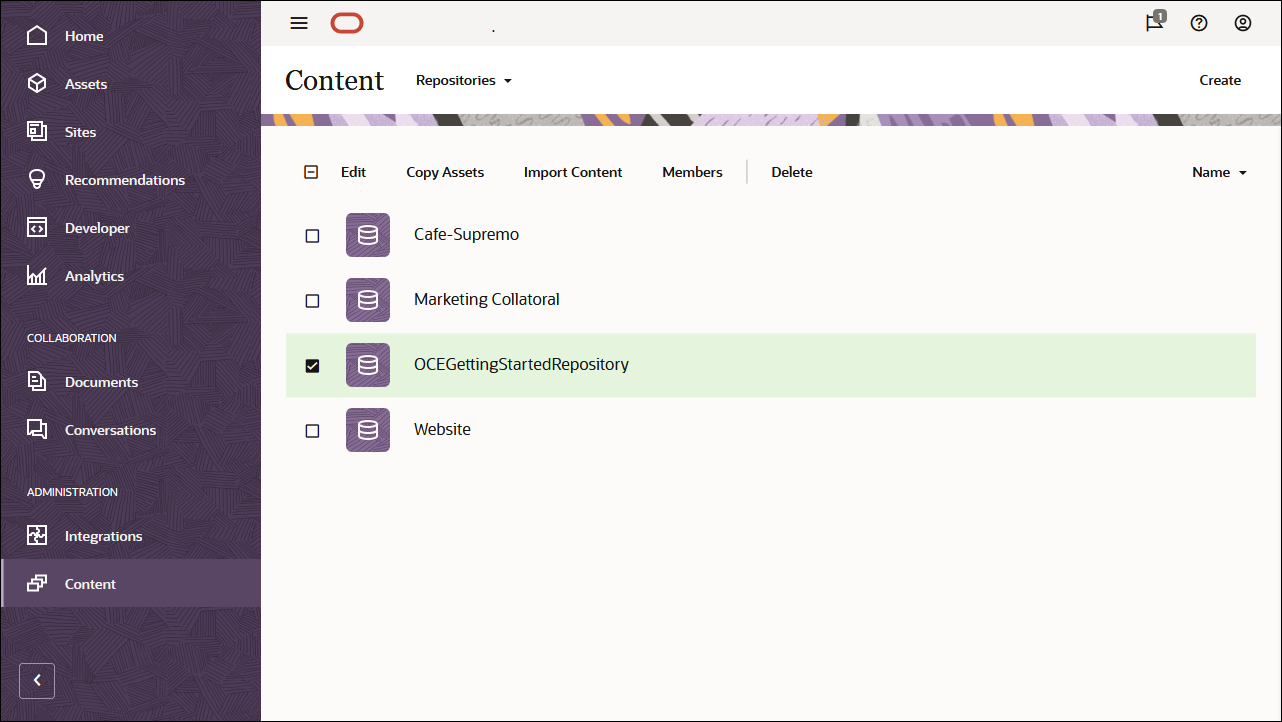
Choose Content in the left navigation menu and then choose Repositories from the selection list in the page header. Now select OCEGettingStartedRepository and click the Import Content button in the top action bar.
Upload OCEGettingStarted_data.zip from your local computer to the Documents folder.
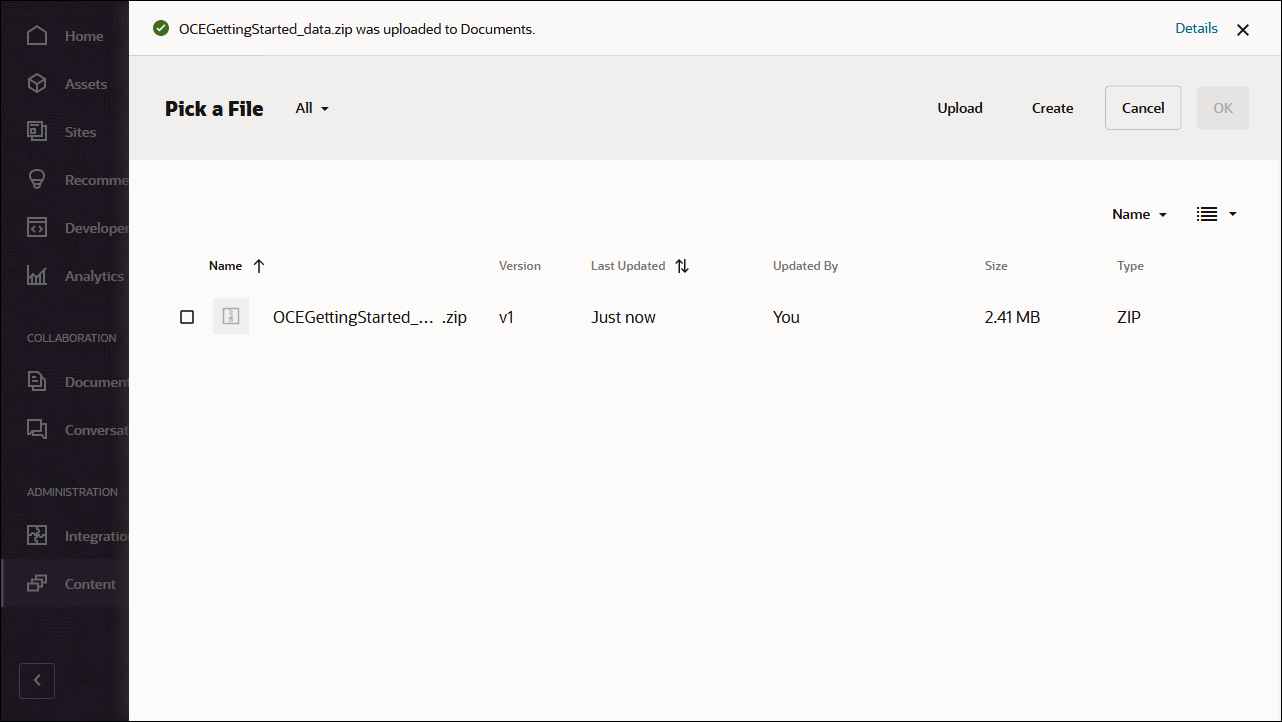
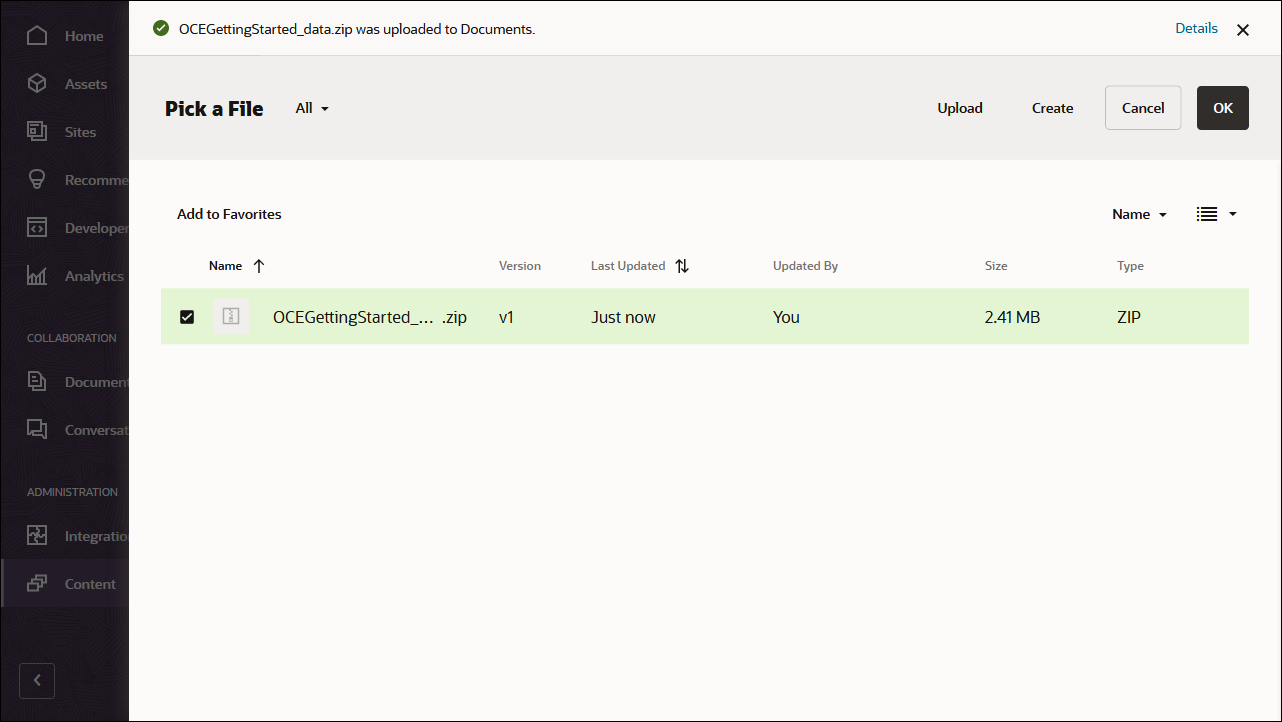
Once it’s uploaded, select OCEGettingStarted_data.zip and click OK to import the contents into your asset repository.
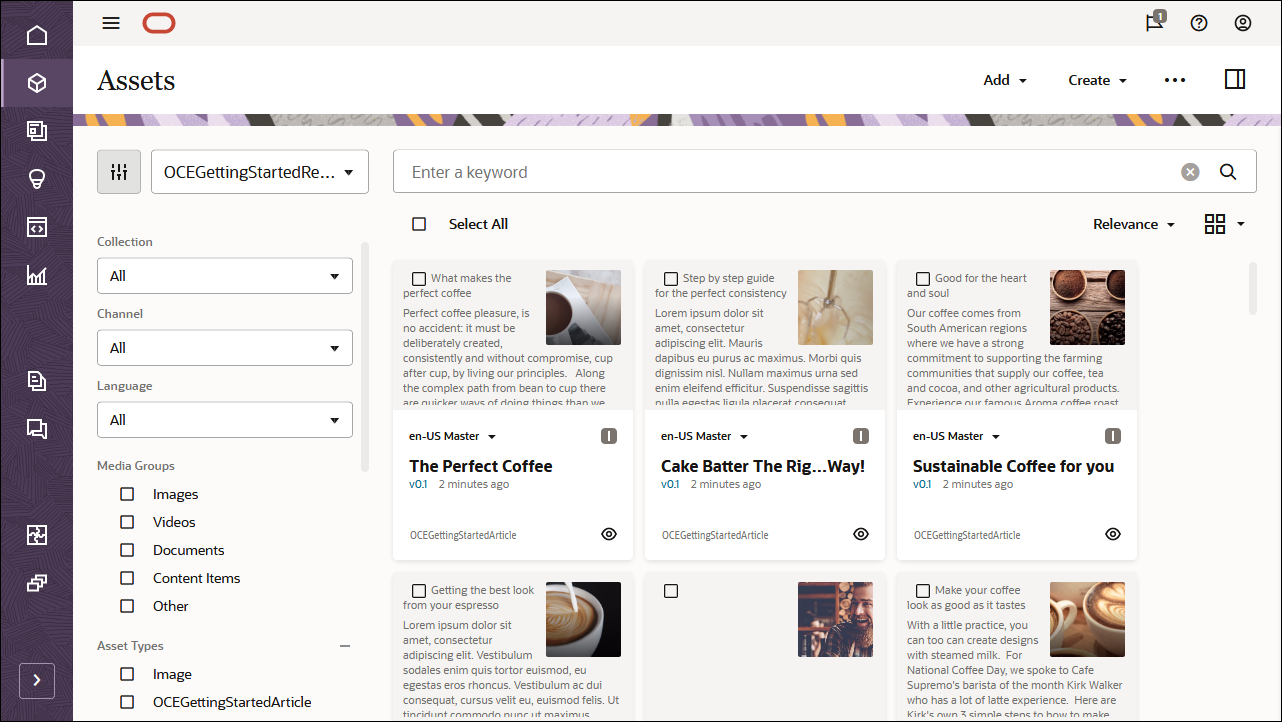
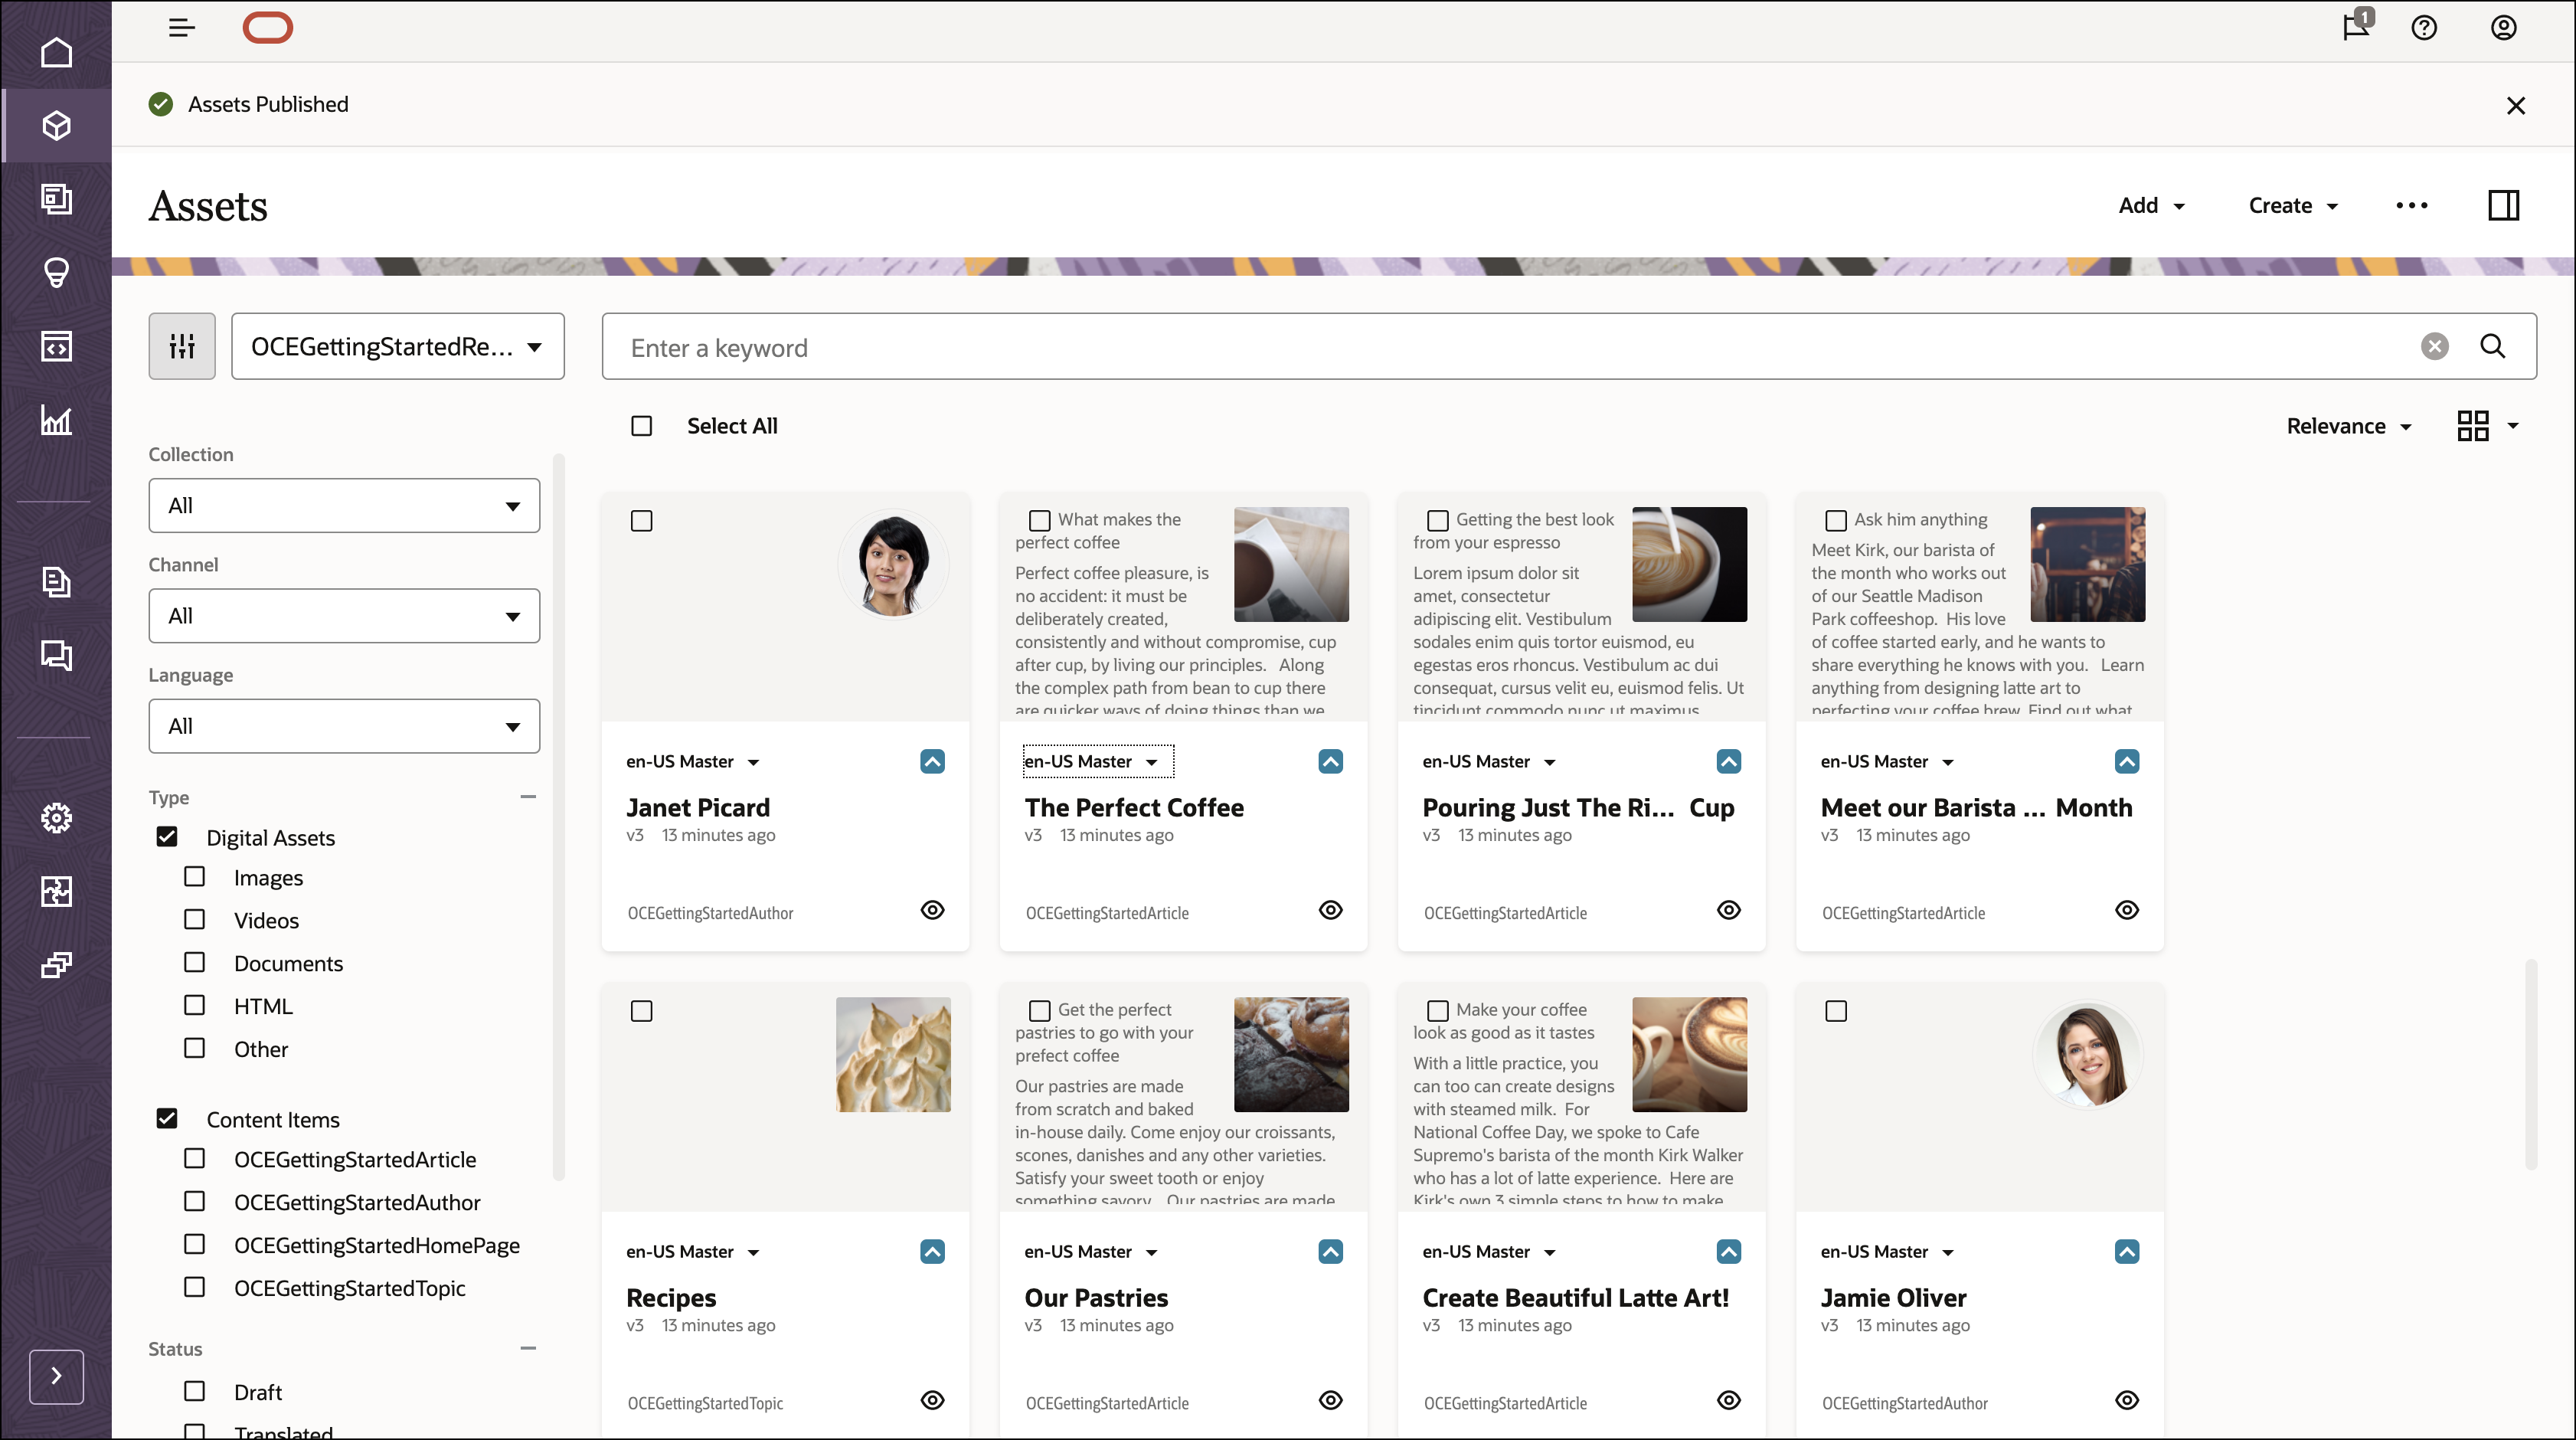
After the content has been imported successfully, navigate to the Assets page and open the OCEGettingStartedRepository repository. You’ll see that all the related images and content items have now been added to the asset repository.
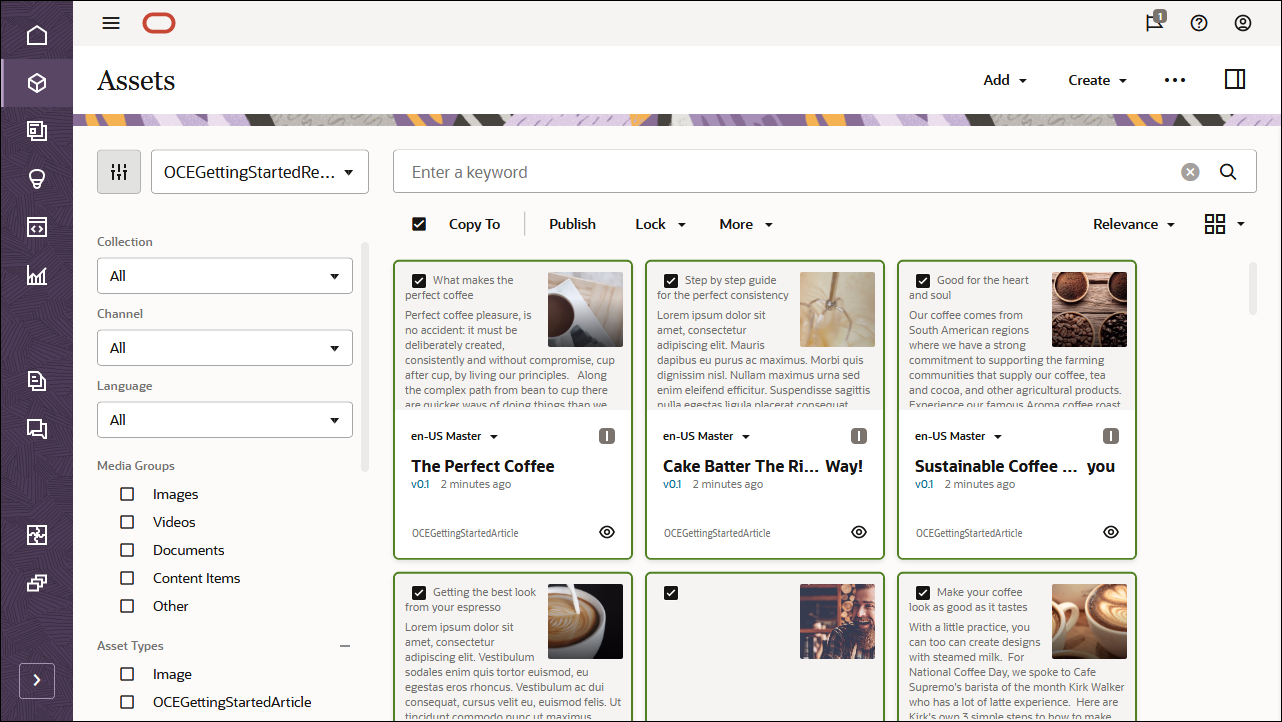
Click Select All on the top left and then Publish to add all the imported assets to the publishing channel that you created earlier, OCEGettingStartedChannel.
Before publishing, you need to validate all the assets. First add OCEGettingStartedChannel as a selected channel, and then click the Validate button.
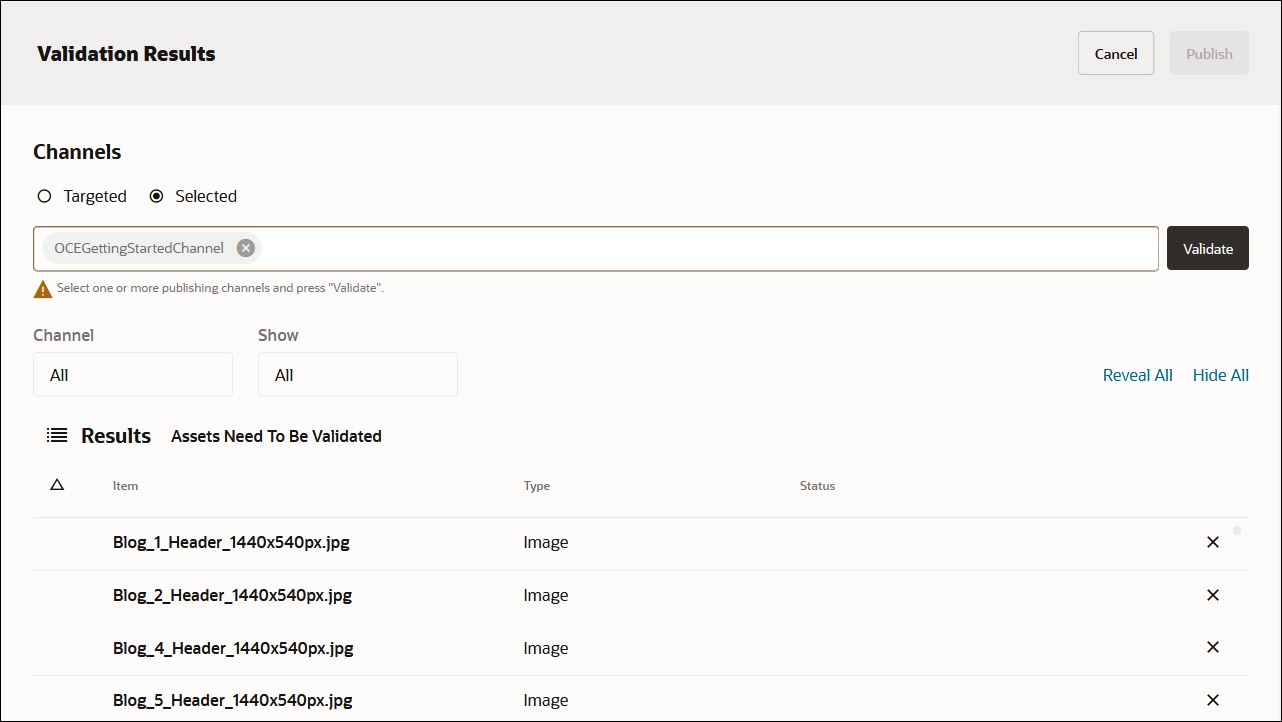
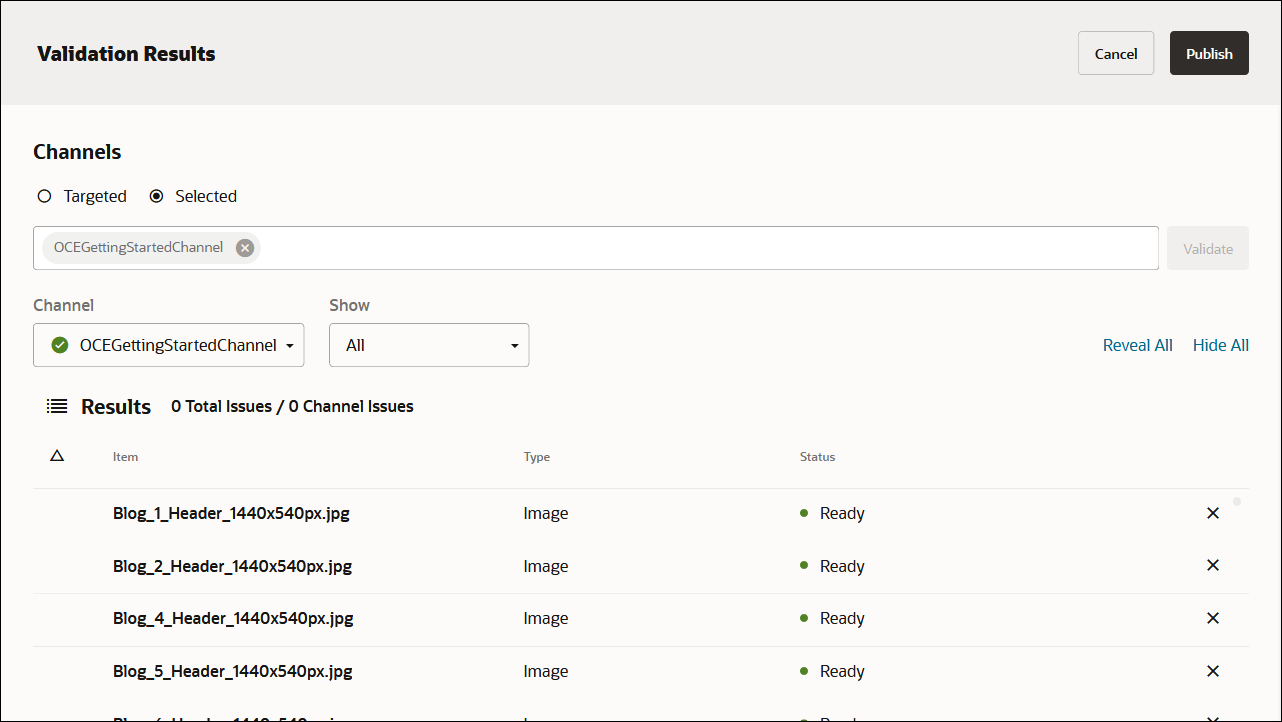
After the assets have been validated, you can publish all the assets to the selected channel by clicking the Publish button in the top right corner.
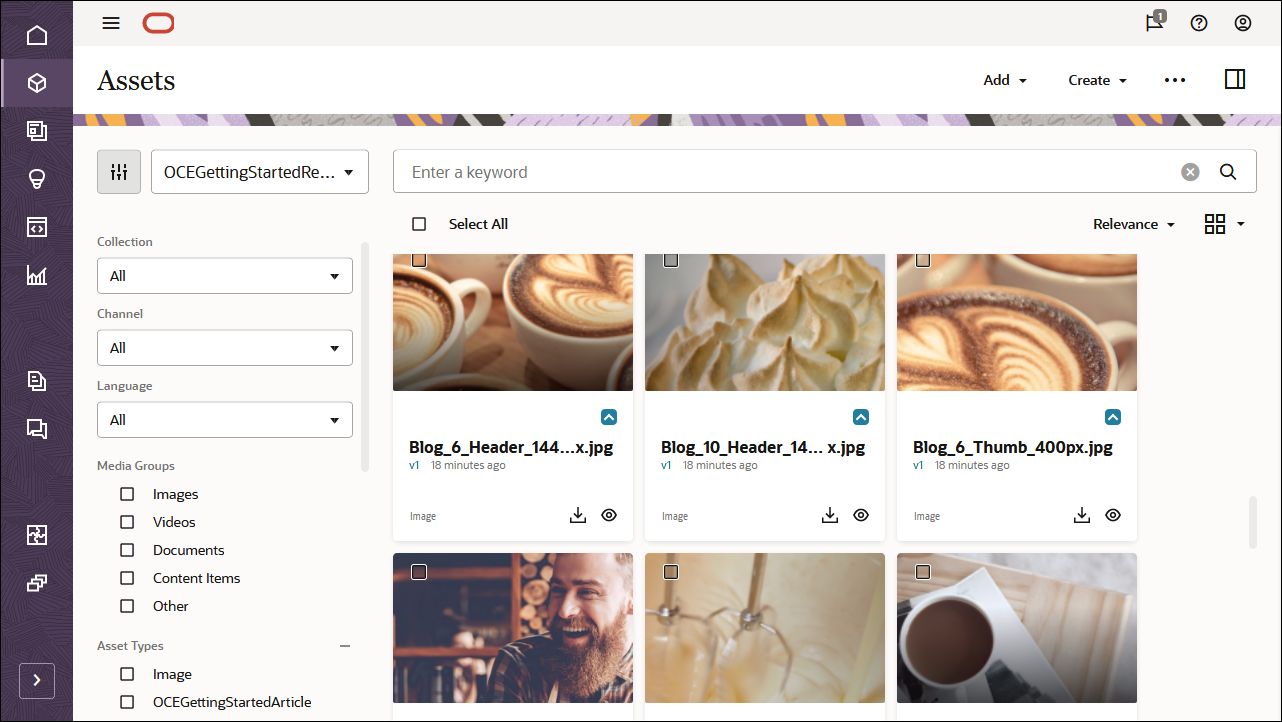
Once that’s done, you can see on the Assets page that all assets have been published. (You can tell by the icon above the asset name.)
After importing the Oracle Content Management Samples Asset Pack, you can start building the blog in Gatsby.
Create Your Own Content Model
Instead of importing the Oracle Content Management Samples Asset Pack, you can also create your own content model.
For this tutorial, we’re using a content type called ‘OCEGettingStartedHomePage’ to build the home page for our blog. This home page consists of branding (company name and logo), some URLs for links, and a list of blog topics that should be included on the page.

To create content types for the content model:
- Log in to the Oracle Content Management web interface as an administrator.
- Choose Content in the left navigation menu and then choose Asset Types from the selection list in the page header.
- Click Create in the top right corner.
- Choose to create a content type (not a digital asset type). Repeat this for all required content types.
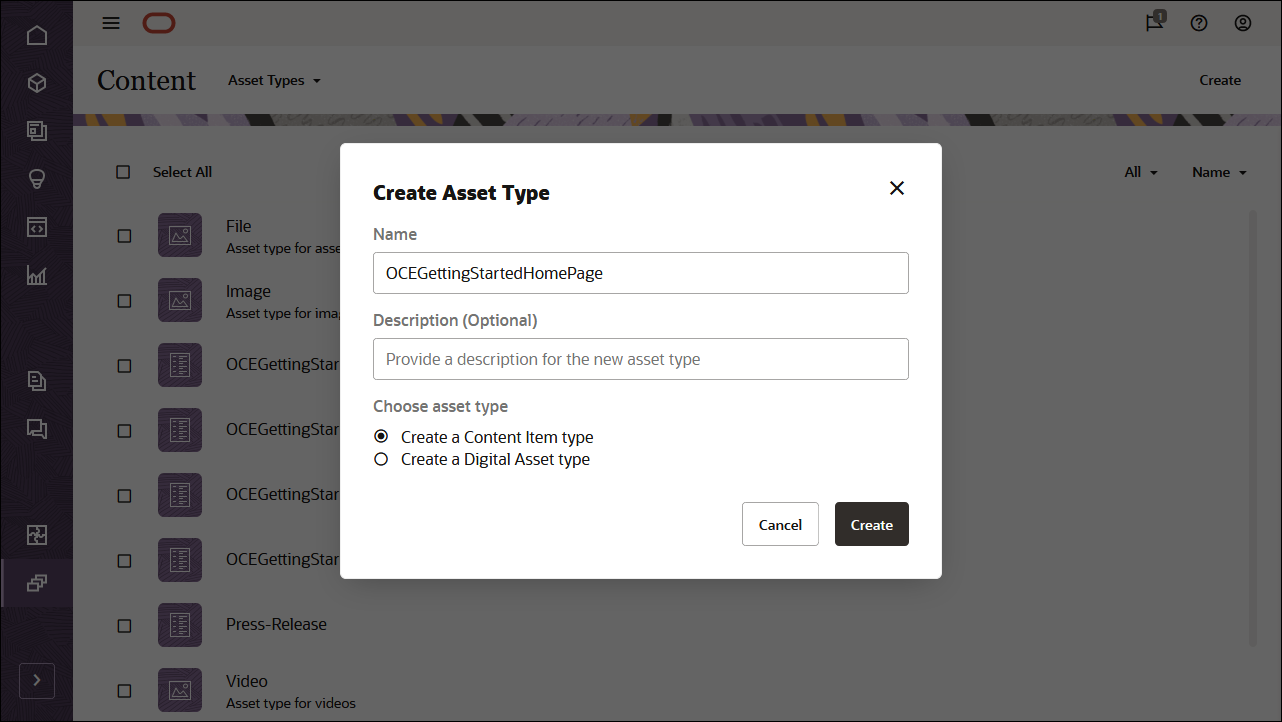
We’ll create four content types, each with its own set of fields:
- OCEGettingStartedHomePage
- OCEGettingStartedTopic
- OCEGettingStartedAuthor
- OCEGettingStartedArticle
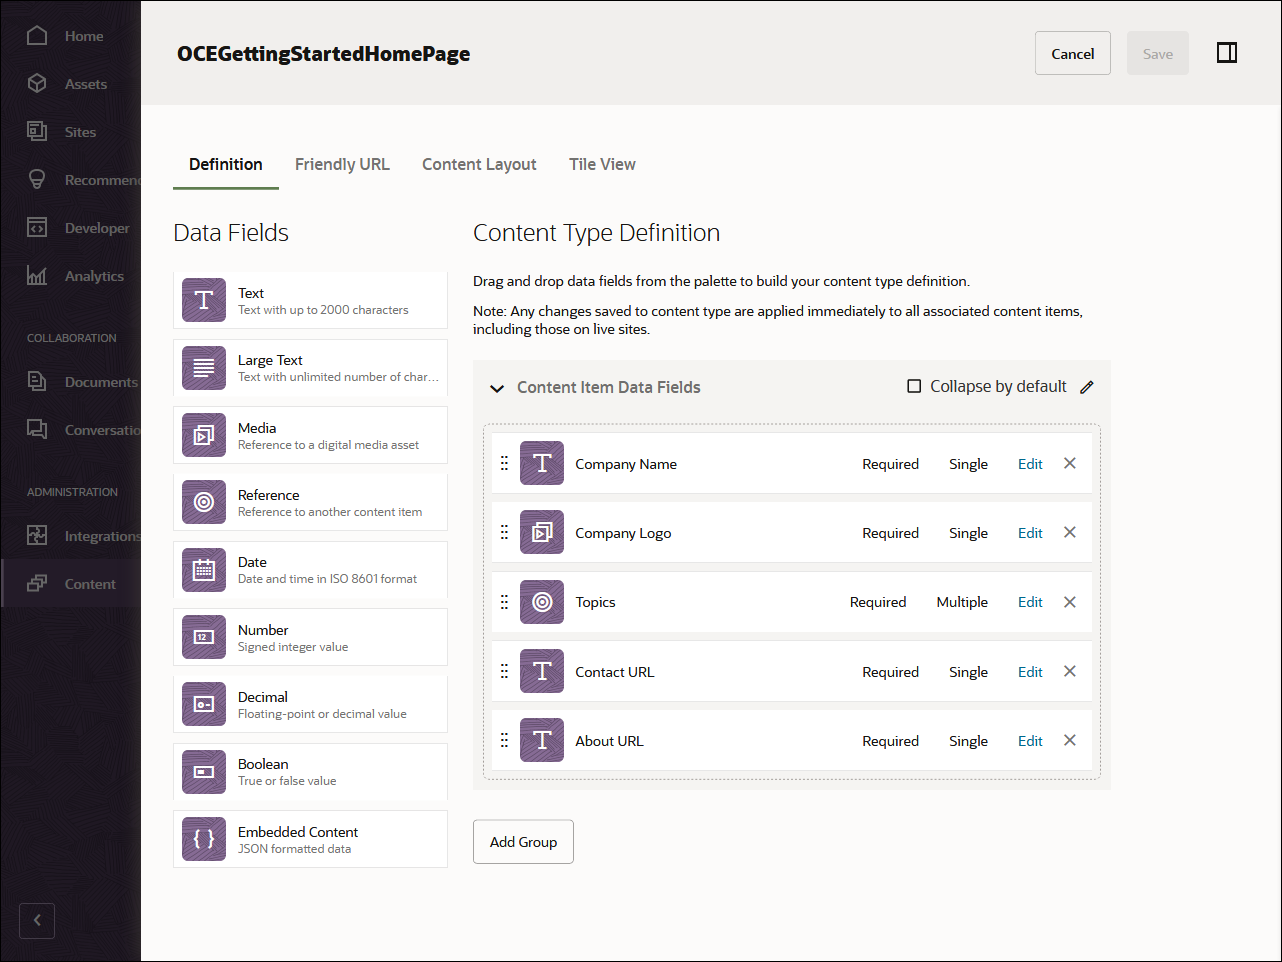
The first content type, OCEGettingStartedHomePage, should have the following fields:
| Display Name | Field Type | Required | Machine Name |
|---|---|---|---|
| Company Name | Single-value text field | X | company_name |
| Company Logo | Single-value text field | X | company_logo |
| Topics | Multiple-value reference field | X | topics |
| Contact URL | Single-value text field | X | contact_url |
| About URL | Single-value text field | X | about_url |
This is what your OCEGettingStartedHomePage content type definition should look like:
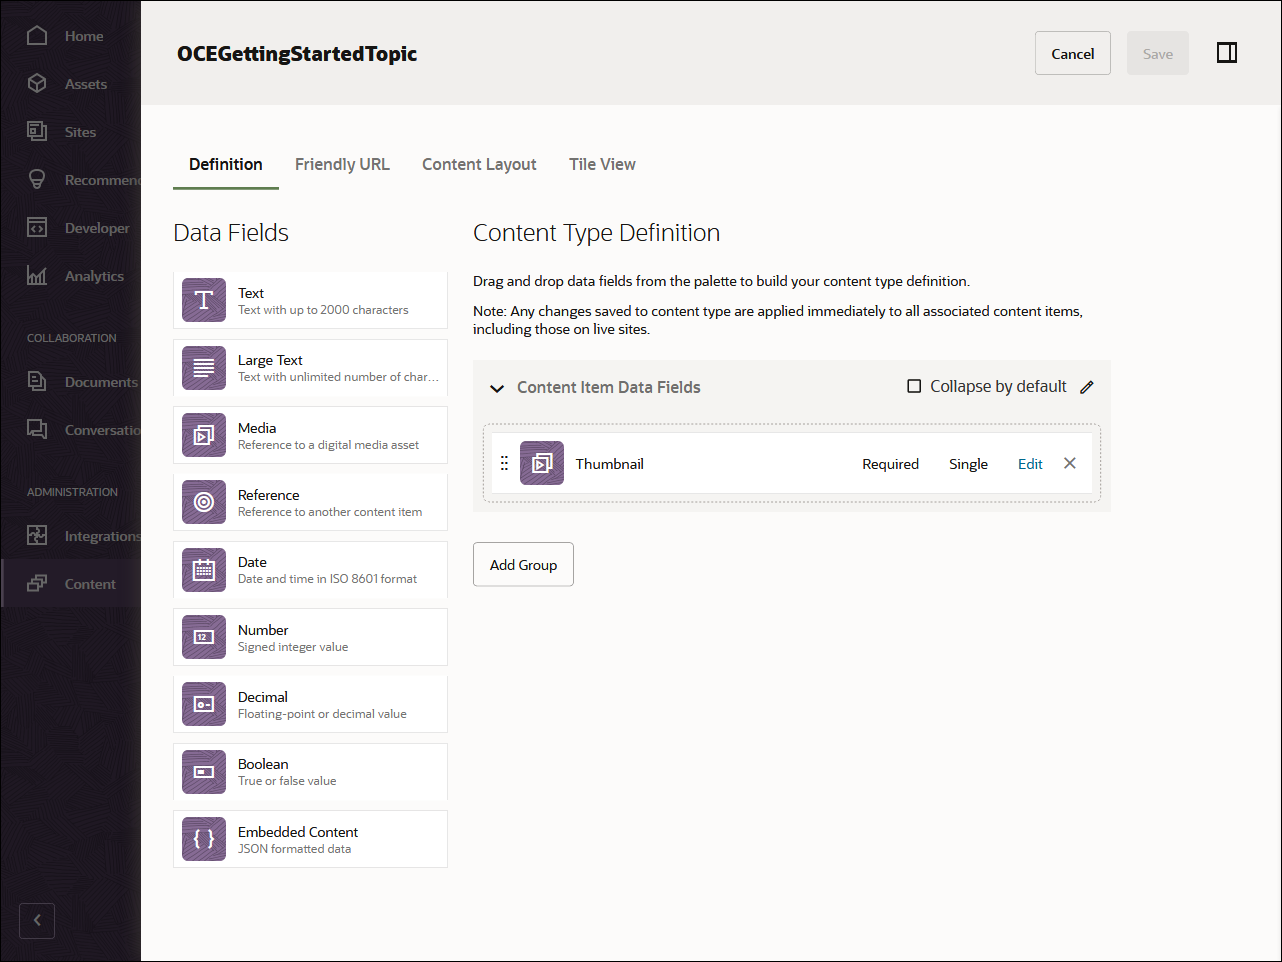
The second content type, OCEGettingStartedTopic, should have the following field:
| Display Name | Field Type | Required | Machine Name |
|---|---|---|---|
| Thumbnail | Single-value image field | X | thumbnail |
This is what your OCEGettingStartedTopic content type should look like:
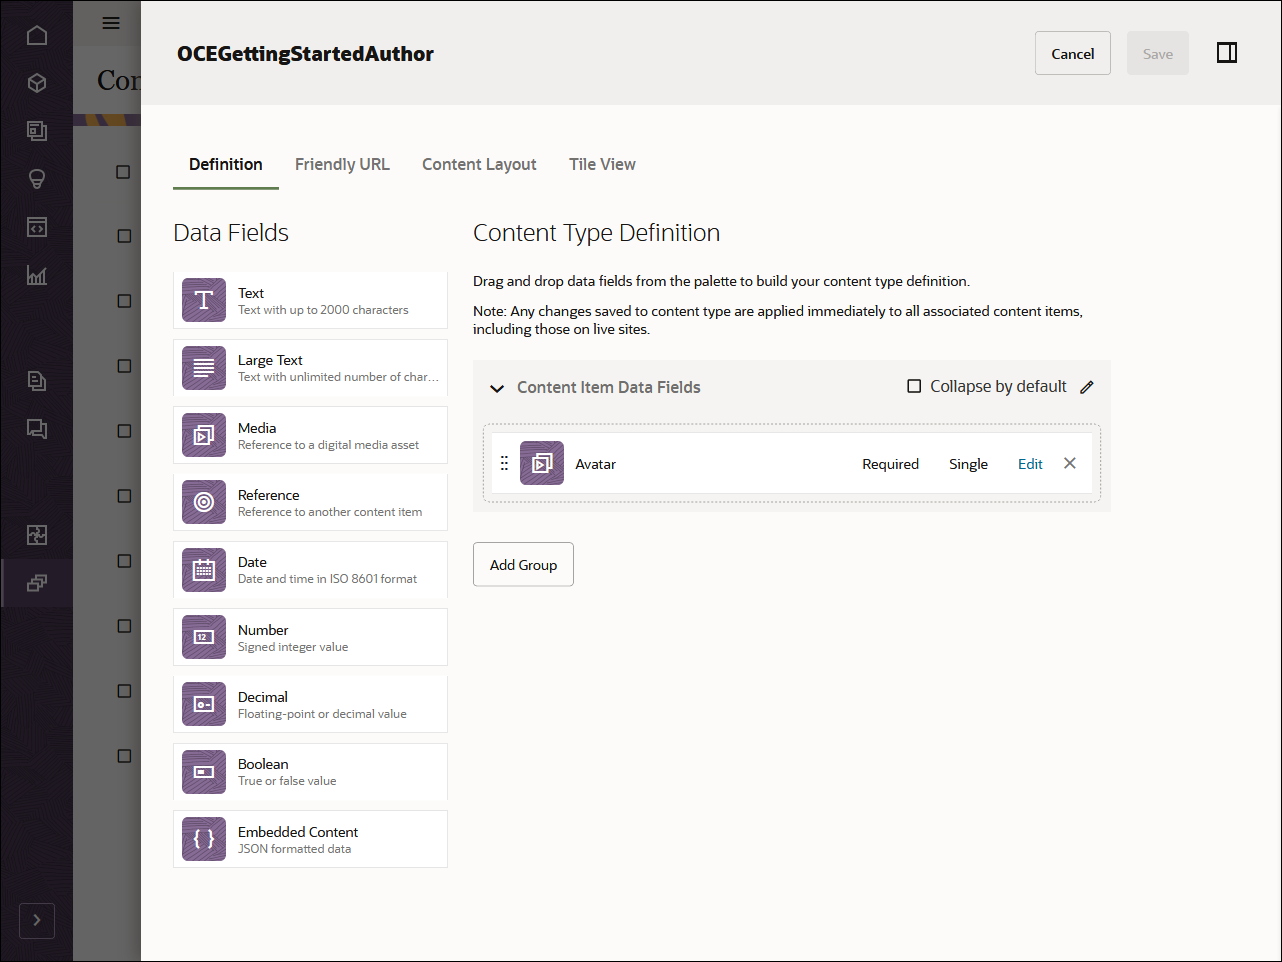
The third content type, OCEGettingStartedAuthor, should have the following fields:
| Display Name | Field Type | Required | Machine Name |
|---|---|---|---|
| Avatar | Single-value image field | X | avatar |
This is what your OCEGettingStartedAuthor content type should look like:
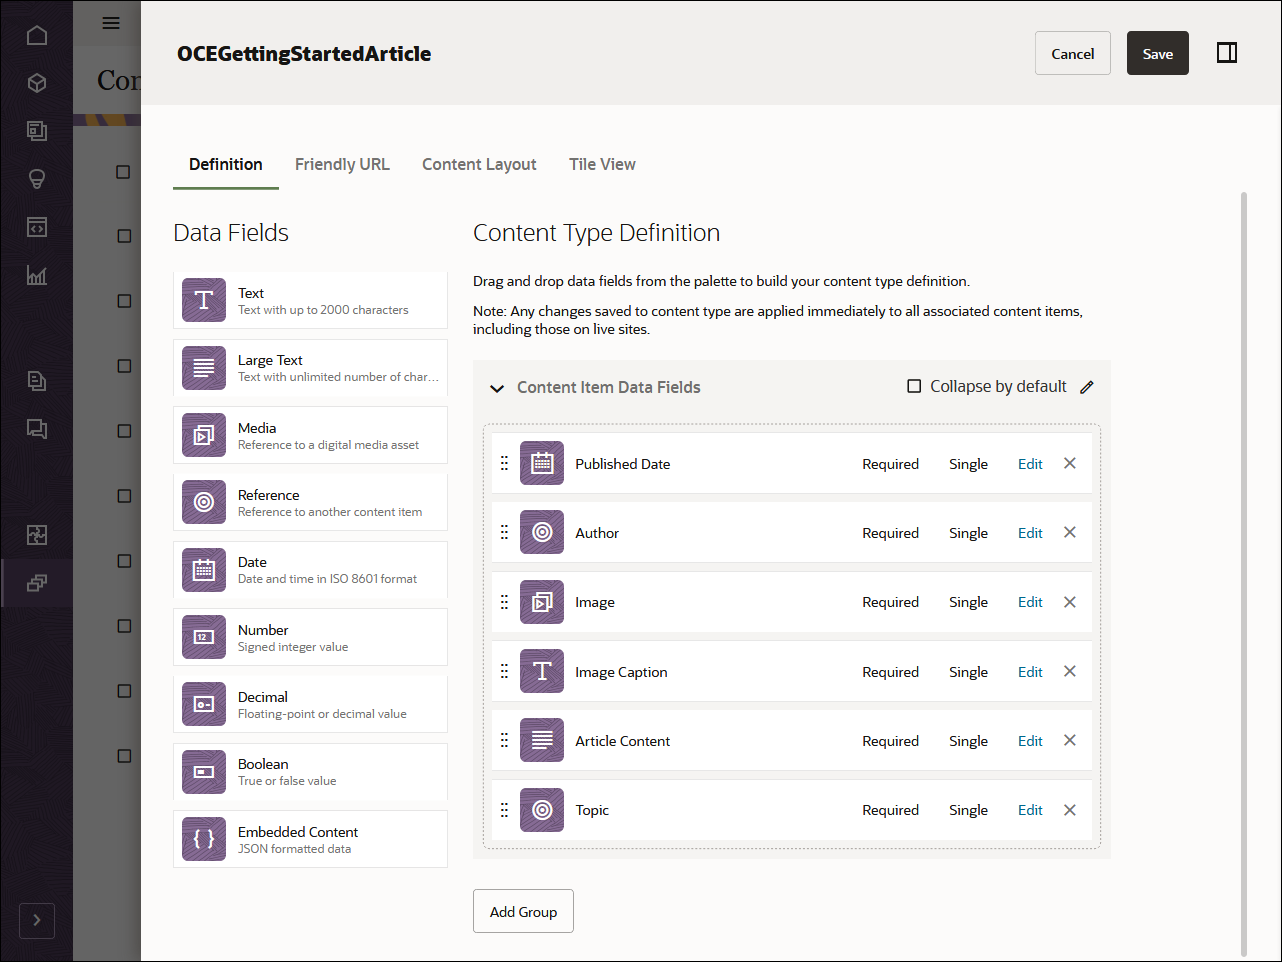
The fourth and final content type, OCEGettingStartedArticle, should have the following fields:
| Display Name | Field Type | Required | Machine Name |
|---|---|---|---|
| Published Date | Single-value date field | X | published_name |
| Author | Single-value reference field | X | author |
| Image | Single-value image field | X | image |
| Image Caption | Single-value text field | X | image_caption |
| Article Content | Single-value large-text field | X | article_content |
| Topic | Single-value reference field | X | topic |
This is what your OCEGettingStartedArticle content type should look like:
Once you’ve created your content types, you can add these content types to the repository that you created earlier, OCEGettingStartedRepository:
- Log in to the Oracle Content Management web interface as an administrator.
- Navigate to OCEGettingStartedRepository.
- Edit the repository and, under Asset Types, specify all four newly created content types. Click the Save button to save the changes.
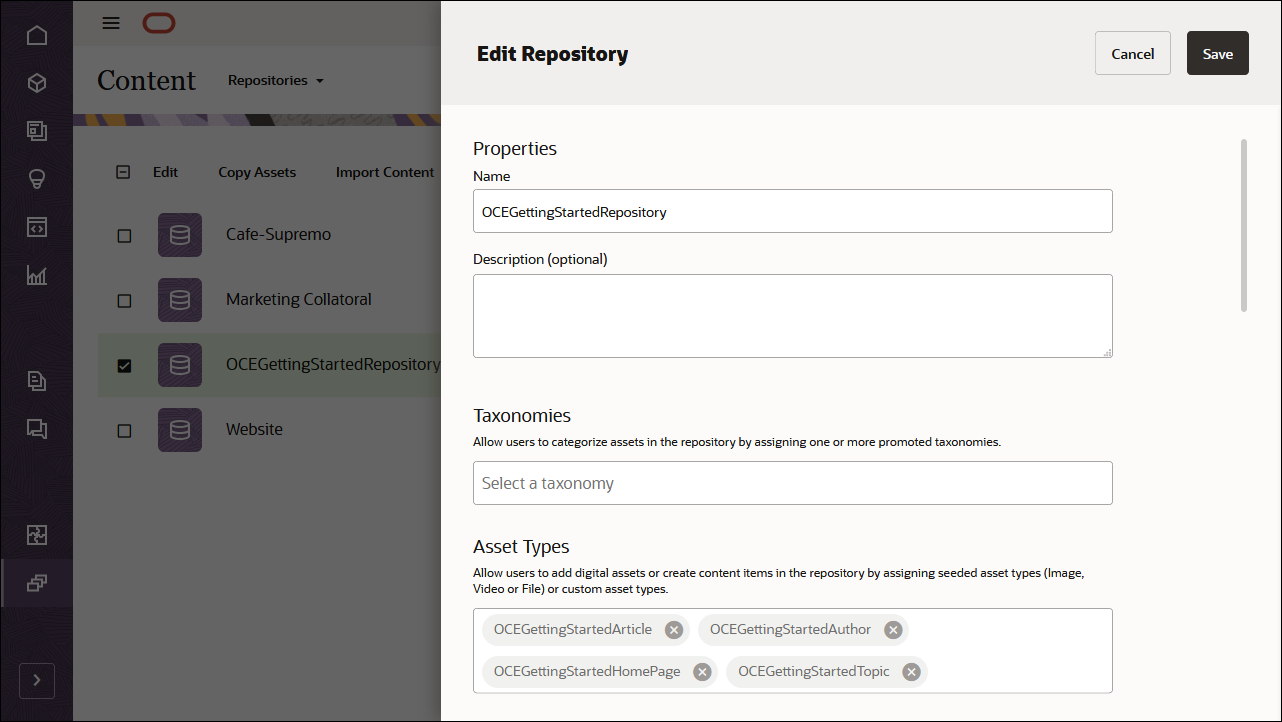
After adding the content types to the repository, you can open the OCEGettingStartedRepository repository on the Assets page and start creating your content items for all the content types.
Task 2: Build the Blog in Gatsby
To consume our Oracle Content Management content in a Gatsby application, we can use the Gatsby blog sample, which is available as an open-source repository on GitHub.
Note: Remember that using the Gatsby sample is optional, and we use it in this tutorial to get you started quickly. You can also build your own Gatsby application.
To build the blog in Gatsby:
- Cloning the sample repository and install dependencies
- Configuring the Gatsby application
- Running the Gatsby application
Cloning the Sample Repository and Install Dependencies
The Gatsby blog sample is available as an open-source repository on GitHub.
You’ll first need to clone the sample from GitHub to your local computer and change your directory into the repository root:
git clone https://github.com/oracle/oce-gatsby-blog-sample.git
    cd oce-gatsby-blog-sample
Now that you have your code base, you need to download dependencies for the application. Run the following command from the root directory:
npm installConfiguring the Gatsby Application
In this Gatsby blog sample, you need to configure a few pieces of information so that the Oracle Gatsby Plugin can target the correct instance URL and API version with the correct channel token. These values are used in the gatsby-config.js file that initializes the plugins your Gatsby application will use.
Rather than hard-coding these settings in the gatsby-config.js file we use the dotenv library to set all the required settings in one file. This file, called .env, can be used to configure any variables that the site needs to operate in one convenient location.
Opening the .env file in a text editor you’ll see the following information:
# The connection details for the Oracle Content Management server to be used for this application
    SERVER_URL=https://samples.mycontentdemo.com
    CHANNEL_TOKEN=47c9fb78774d4485bc7090bf7b955632

    # (Optional) If you need to set a proxy URL so that the application can connect outside of a firewall
    # PROXY_URL=http://myproxy.company.com:80
Change each key-value pair to reflect your instance URL, the API version you want to target, and the channel token associated with your publishing channel. The channel for this tutorial is OCEGettingStartedChannel.
Running the Gatsby Application
The Gatsby Blog application can run in either development or release (build) mode. Development mode is used when making and testing modifications to the project and release mode is used when producing a final result for deployment. In either mode the program will first update its cache from the Content Server as part of the build process.
To run in development mode you need to run:
npm run developThis will build the project and then run it giving you a URL that can be used to view it.
To produce a release build, you need to run:
npm run buildThis will produce a complete static build in the /public directory of your project. This can then be deployed on a server as described below. If you want to test it in place you can run:
npm run serveThis will start up a local web server to host the application. It will give a base URL that can be used to view the application.
Task 3: Prepare Your Application for Deployment
When the ‘npm run build’ command is run it creates a static build in a directory called public. All the CSS, HTML, and JavaScript needed to run the application are bundled in there so deployment can be as simple as copying that content into the webroot directory of a web server.
The GatsbyJS site features comprehensive instructions on how to deploy an application on richer and more complex hosting and cloud platforms. This documentation may be found here.
Structure of the Gatsby Blog Application
This section will discuss the layout of the application and the roles of different files in the project. (Only the files and directories that have a special role in the application will be discussed here.)
Connecting to Oracle Content Management and Downloading the Data
The Gatsby Blog sample uses a plugin called gatsby-source-oce to connect to Oracle Content Management and to retrieve the needed data. The default behavior is to download all assets defined on the provided channel and make them available to the application using GraphQL. This includes both text and binary data. An alternate mode - used in this application - will download all assets to the cache and then download all the binaries referenced by the assets to a directory in the build that will allow them to be loaded via static URLs.
You can find out more about the plugin by looking here.
Data Layout
Here is an overview of the asset relationships in the Blog site. The name in brackets at the end is the name of the asset definition used for each type.
Home Page asset - This contains a list of Topic Assets that need to be rendered as links on the root page of the site. (OCEGettingStartedHomePage)
Topic Page assets - These assets contain a list of individual blogs or articles related to a topic. (OCEGettingStartedTopic)
Article assets - These assets contain the information needed to render a blog. The text, image, and author are all specified here. (OCEGettingStartedArticle)
Author assets - These assets contain information about the authors of the Article assets
Source File Layout
/src
      /components
      /pages
      /scripts
      /styles
      /templates

    gatsby-config.js
    gatsby-node.js
Components - This directory contains React components that are used to build up the pages of the application. These components display data that is passed in from the pages or templates that use them.
Pages - Pages in Gatsby are used to display information that is predefined in the application. In the case of this sample we need to create extra pages for the topics and blog articles so we need to support parameterized pages. These are supported by the templates.
Styles (CSS) - The application uses a common stylesheet located in src/styles.
Templates - Templates are a special kind of page that can take parameters to be used in a query. This allows pages to be generated based on data only available at build time.
Special files
- gatsby-config.js - This file is used to configure the Gatsby plugins used in the project. All the settings and initializations occur here.
- gatsby-node.js - This file is used to create new templatized pages based on what data is available to the application at build time.
Code Details
The following is a set of code snippets from the sample along with explanations of what each piece is doing:
index.jsx
The GraphQL queries from src/pages/index.jsx. There are two queries happening here:
The first, topLevelQuery, is looking for an asset of type OCEGettingStartedHomePage that is named ‘HomePage’. This will be the asset that gives us a list of the topics that we will be supporting in our site as well as some of the metadata from the topics.
The second, oceToFileQuery, allows us to get details about all the binary files that were downloaded from Oracle Content Management. These include all the images that we need to display in our site. The reason we need this information is that when we load an asset that references a file we get the ID of the file asset, but not its internal content. For example in topLevelQuery we ask for the id of the company_logo. This will give us the ID of the file, but not a way to get the URL of the file or its internal representation. Using the data from oceFileQuery we can look up this ID and then see all of the data we need to display the image.
 export const query = graphql`{
      topLevelQuery: allOceAsset(
        filter: {oceType: {eq: "OCEGettingStartedHomePage"}, name: {eq: "HomePage"}}
      ) {
        nodes {
          about_url
          company_name
          company_logo {
            id
          }
          contact_url
          topics {
            description
            name
            id
            fields {
              thumbnail {
                id
              }
            }
          }
        }
      }
      oceToFileQuery: allOceAsset {
        nodes {
          oceId
          staticURL
        }
      }
    }
    `;
gatsby-node.jsx
The file gatsby-node.js has a special role in a Gatsby application since it is capable of creating new pages based on queried data. This allows the code in the sample to create pages for each of the topics and blog articles using templates. It is run after the application has finished running its plugins.
The two queries are used to get lists of all the topics and all the articles defined in the downloaded data.
graphql(`
        {
          topicsListQuery : allOceAsset(
            filter: {
              oceType: { eq: "OCEGettingStartedHomePage" }
              name: { eq: "HomePage" }
            }
          ) {
            nodes {
              topics {
                id
              }
            }
          }
          articlesListQuery: allOceAsset(
            filter: { oceType: { eq: "OCEGettingStartedArticle" } }
          ) {
            nodes {
              oceId
            }
          }
        }
      `)
Based on the query above it then iterates across each list and calls either the ArticlesListTemplate or ArticleDetailsTemplate to define a new page in the site.
   // Create topic pages.
        const toplevel = result.data.topicsListQuery.nodes[0];
        const { topics } = toplevel;
        topics.forEach((topic) => {
          const topicId = topic.id;
          createPage({
            // Path for this page
            path: `topic/${topicId}`,
            // Template for this page
            component: articlesListTemplate,
            // Data to pass in to the template.
            context: {
              topicId,
            },
          }); // end createpage for topic
        });

        // Create articles pages.
        const articles = result.data.articlesListQuery.nodes;
        articles.forEach((article) => {
          const articleId = article.oceId;
          createPage({
            // Path for this page
            path: `article/${articleId}`,
            // Template for this page
            component: articleDetailsTemplate,
            // Data to pass in to the template.
            context: {
              articleId,
            },
          });
        });
/src/templates/ArticlesListTemplate.jsx
This file is called by gatsby-node.js to build pages for each of the blog topics. It performs the following procedures:
- Query the detailed information about the topic as well as any files that may be referenced by it. Note that this uses a parameter (topicId), passed in from gatsby-node.js, as part of the query to narrow down the results. Using parameters in queries is a feature restricted to templates.
export const query = graphql`query ($topicId: String!) {
      topLevelQuery: allOceAsset(
        filter: {oceType: {eq: "OCEGettingStartedArticle"}, topic: {id: {eq: $topicId}}}
      ) {
        nodes {
          topic {
            name
            id
          }
          oceId
          name
          published_date
          description
          image {
            id
          }
        }
      }
      oceToFileQuery: allOceAsset {
        nodes {
          oceId
          staticURL
        }
      }

    }
`;- Using the results of the query, it then builds up the page:
/**
     * Template for the Articles List Page.
     */
    const ArticlesListTemplate = ({ data }) => {
      const articles = data.topLevelQuery.nodes;
      const oceToFile = data.oceToFileQuery.nodes;

      const breadcrumbsData = [
        {
          linkParams: { pathname: '/' },
          text: 'Home',
        },
        {
          linkParams: {},
          text: articles[0].topic.name,
        },
      ];

      return (
        <div data-testid="ArticlesListContainer">
          <Breadcrumbs breadcrumbsData={breadcrumbsData} />
          {data && (
            <div id="articles">
              {articles.map((article) => {
                const articleImageObj = getImageObject(
                  oceToFile,
                  article.image.id,
                );
                return (
                  <ArticlesListItem
                    article={article}
                    key={article.oceId}
                    image={articleImageObj}
                  />
                );
              })}
            </div>
          )}
        </div>
      );
    };

    export default ArticlesListTemplate;
/src/templates/ArticleDetailsTemplate.jsx
This file is called by gatsby-node.js to build a page for each of the blog articles. It performs the following tasks:
Get the detailed information about the article as well as any files that are referenced inside it. This is done using a GraphQL query that takes an article ID as a parameter.
Process the contents of the query to extract the data needed to build up a page.
(The details are similar to ArticlesListTemplate.jsx so code samples have been left out for this file.)
Overall Layout of the running application
Here is a list of the pages in the application and the templates used to generate each one:
Home page  (static page rendered with /src/pages/index.jsx)
    How To blogs (template page rendered with /src/templates/ArticlesListTemplate.jsx)
                 How To blog #1 (template page rendered with /src/templates/ArticleDetailsTemplate.jsx)
                 How To blog #2 (template page rendered with /src/templates/ArticleDetailsTemplate.jsx)
                 ...
              Drink blogs (template page rendered with /src/templates/ArticlesListTemplate.jsx)
                 Drink blog #1 (template page rendered with /src/templates/ArticleDetailsTemplate.jsx)
                 Drink blog #2 (template page rendered with /src/templates/ArticleDetailsTemplate.jsx)
                 ...

              Recipe blogs (template page rendered with /src/templates/ArticlesListTemplate.jsx)
                 Recipe blog #1 (template page rendered with /src/templates/ArticleDetailsTemplate.jsx)
                 Recipe blog #2 (template page rendered with /src/templates/ArticleDetailsTemplate.jsx)
                 ...

    404 page (This is a special page rendered by Gatsby that is shown when there is an error in the selected URL
It is rendered using src/pages/404.jsx)Build a Blog in Gatsby with Headless Oracle Content Management
F39966-01
August 2021
Copyright © 2021, Oracle and/or its affiliates.
Primary Author: Oracle Corporation