Build an Image Gallery in Gatsby with Headless Oracle Content Management
Introduction
Gatsby is a React-based open-source framework for creating websites and apps.
This tutorial will introduce you to the basic steps of building an image gallery using Gatsby, with Oracle Content Management as the content management system. You’ll see how taxonomies can be used to categorize content and how different renditions of digital assets can be used for various use cases. This Gatsby sample is available on GitHub.
The tutorial consists of three steps:
- Prepare Oracle Content Management
- Build the Image Gallery in Gatsby
- Prepare your application for deployment
Prerequisites
Before proceeding with this tutorial, we recommend that you read the following information first:
To follow this tutorial, you’ll need:
- an Oracle Content Management subscription
- an Oracle Content Management account with the Content Administrator role
- a Windows or Mac computer with Node version 10 or higher
What We’re Building
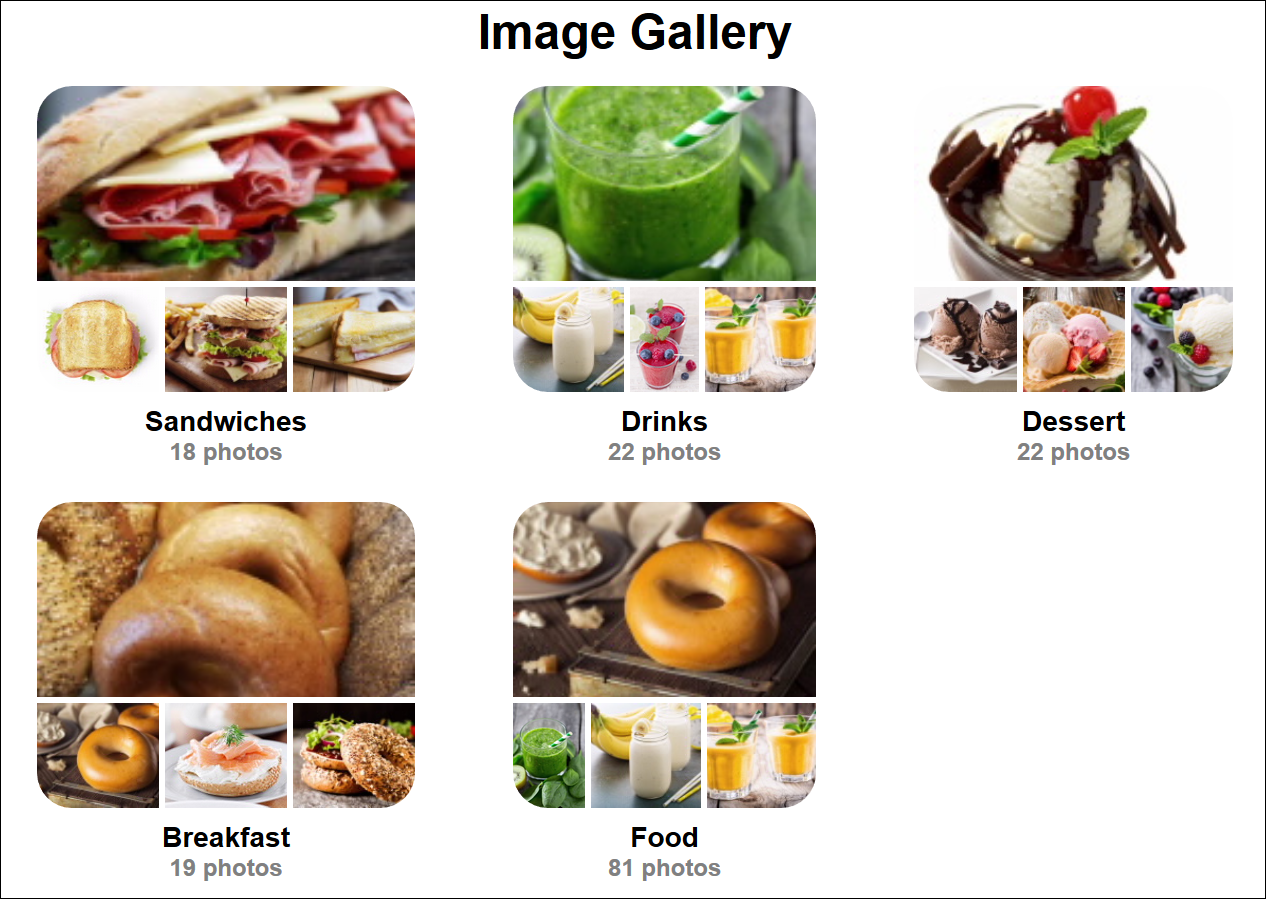
Our image gallery will consist of several pages of images of food and drinks available at a coffee shop.
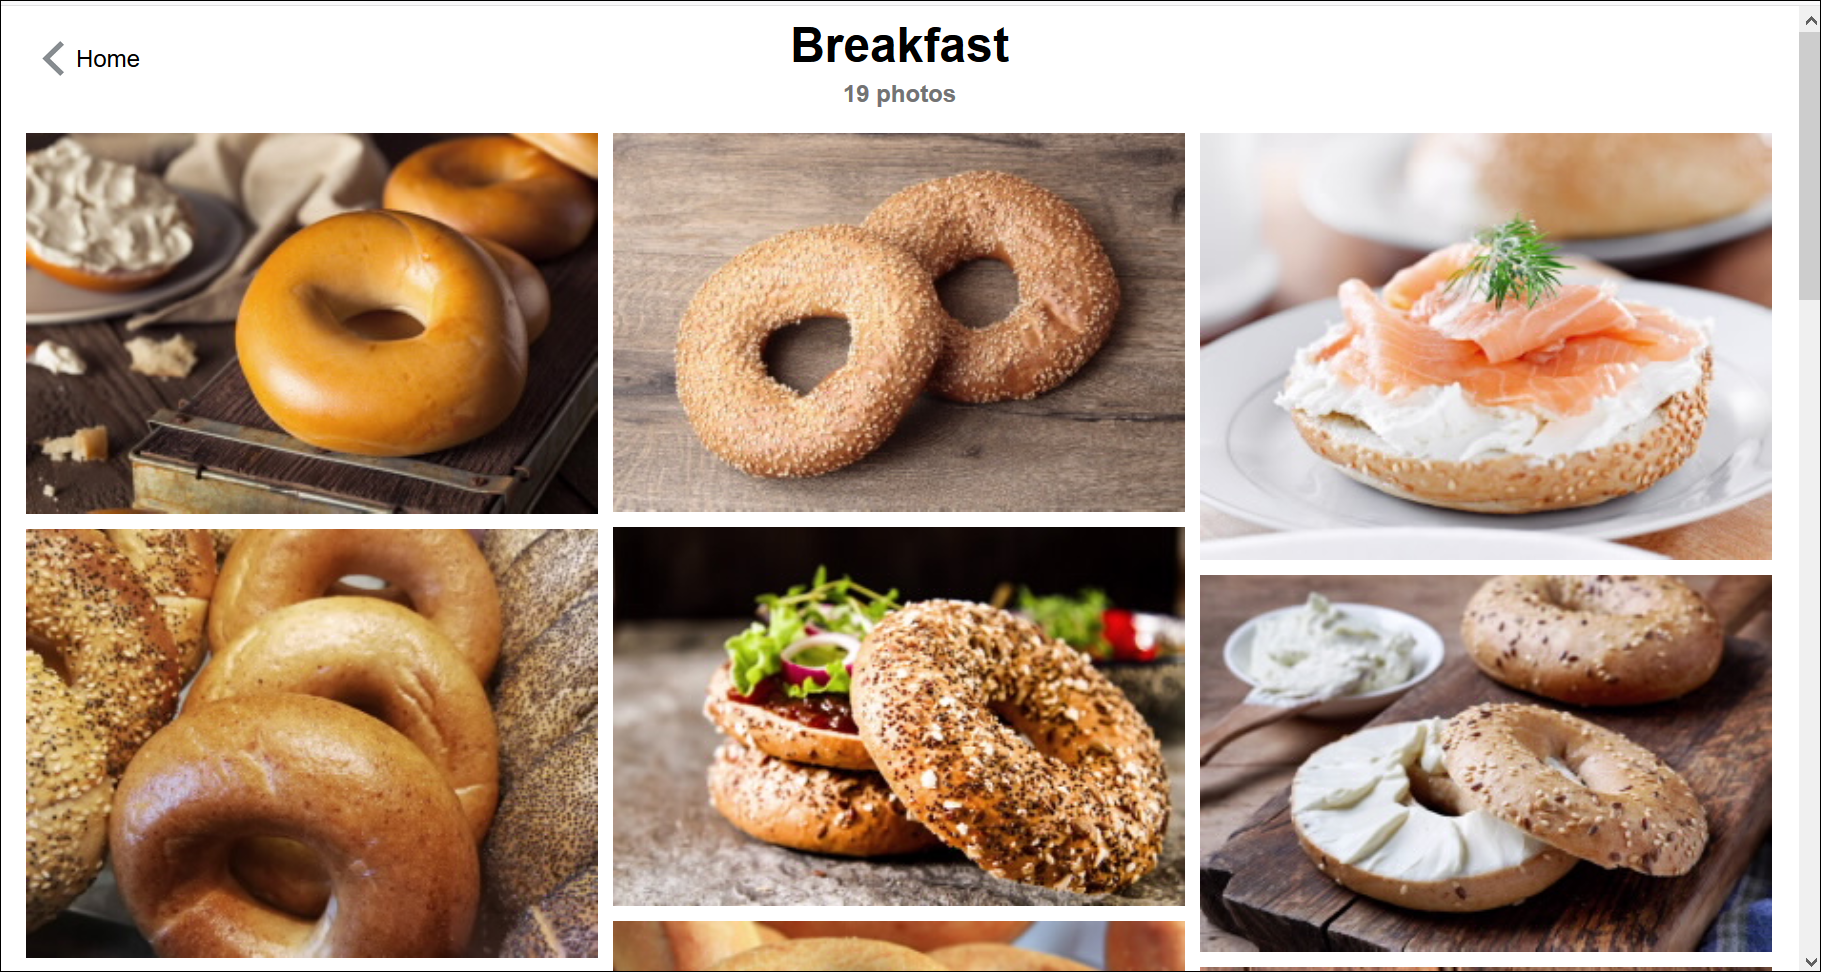
To take a look at what we’re building, here is the end state of our tutorial, a live version of this image gallery site:
https://headless.mycontentdemo.com/samples/oce-gatsby-gallery-sample
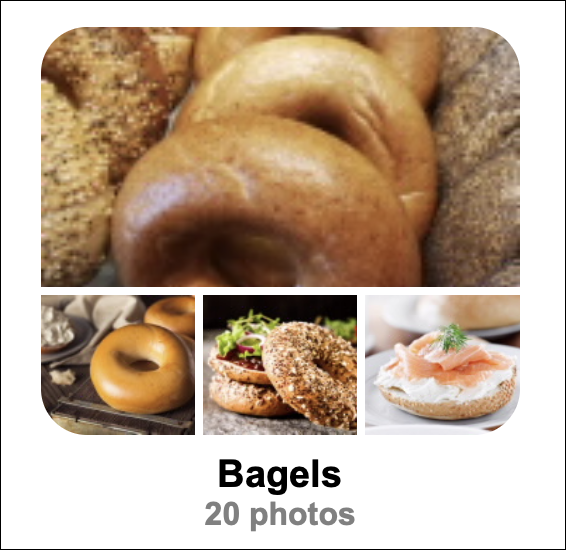
Categories are child nodes of a taxonomy and can be organized into hierarchies. For our image gallery, we want to show all available categories regardless of the organization. In the other image gallery samples this is done by querying the categories from the server and then querying the images for each category. Gatsby has to work differently though because it downloads all the image and category data to a local cache and then processes it locally before building the site. TThis is described in greater detail here.
To build the preview of a category, such as Bagels, we need to get a count of the number of images and the URLs of the first four images.
Note: In addition to publishing the digital assets that we want to view, you also need to publish the taxonomies to the channel.
To proceed, you’ll need to have an active subscription to Oracle Content Management and be logged in with the Content Administrator role.
Task 1: Prepare Oracle Content Management
This tutorial is based on the assumption that you’ve created your asset repository and currently have an empty content model (that is, no content types created).
If you don’t already have an Oracle Content Management instance, see the Quick Start to learn how to register for Oracle Cloud, provision an Oracle Content Management instance, and configure Oracle Content Management as a headless CMS.
For this tutorial, you’ll need to create a content model in either of two ways. There’s a downloadable asset pack available that will fill your empty repository with content types and associated content, or you can create your own content model and content.
To prepare Oracle Content Management:
- Create a channel and asset repository.
- Import the Oracle Content Management Samples Asset Pack
- Upload Your Own Image Assets
- Create Taxonomies and Link Them to Image Assets
Create a Channel and Asset Repository
You first need to create a channel and an asset repository in Oracle Content Management so you can publish content.
To create a channel and an asset repository in Oracle Content Management:
Log in to the Oracle Content Management web interface as an administrator.
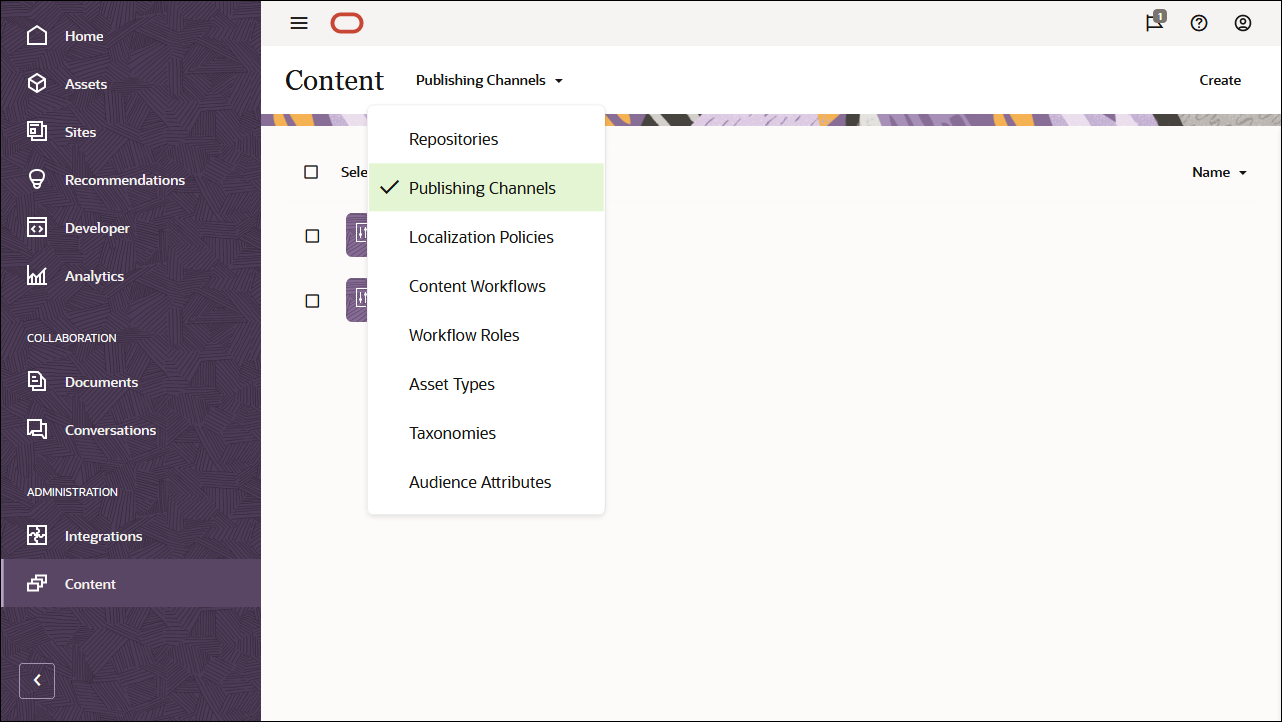
Choose Content in the left navigation menu and then choose Publishing Channels from the selection list in the page header.
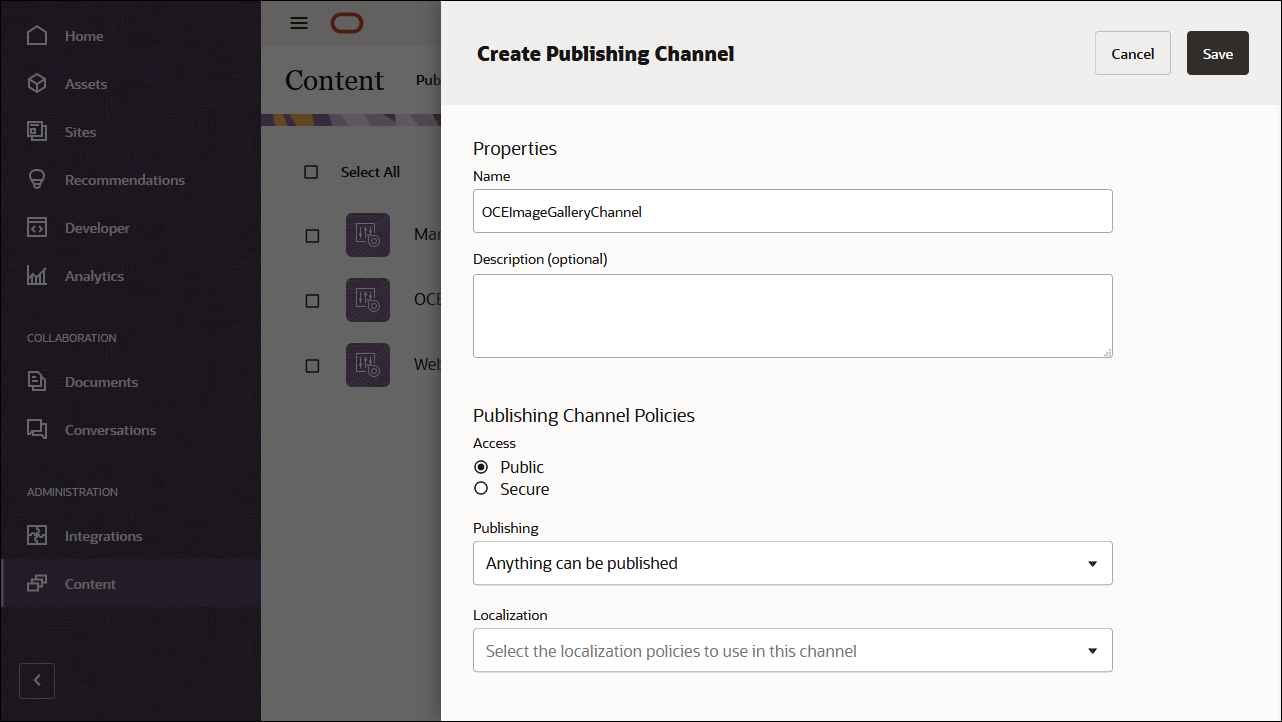
In the upper right corner, click Create to create a new channel. Name the channel ‘OCEImageGalleryChannel’ for the purpose of this tutorial, and keep the access public. Click Save to create the channel.
Choose Content in the left navigation menu and then choose Repositories from the selection list in the page header.
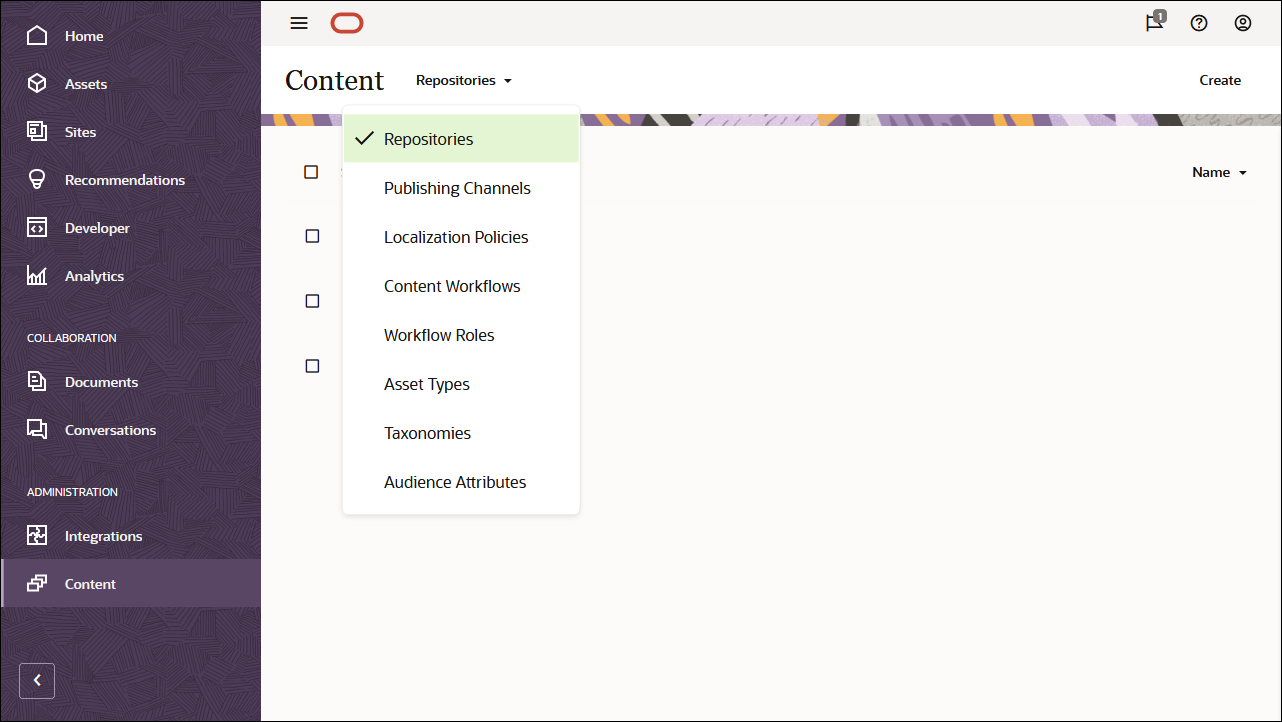
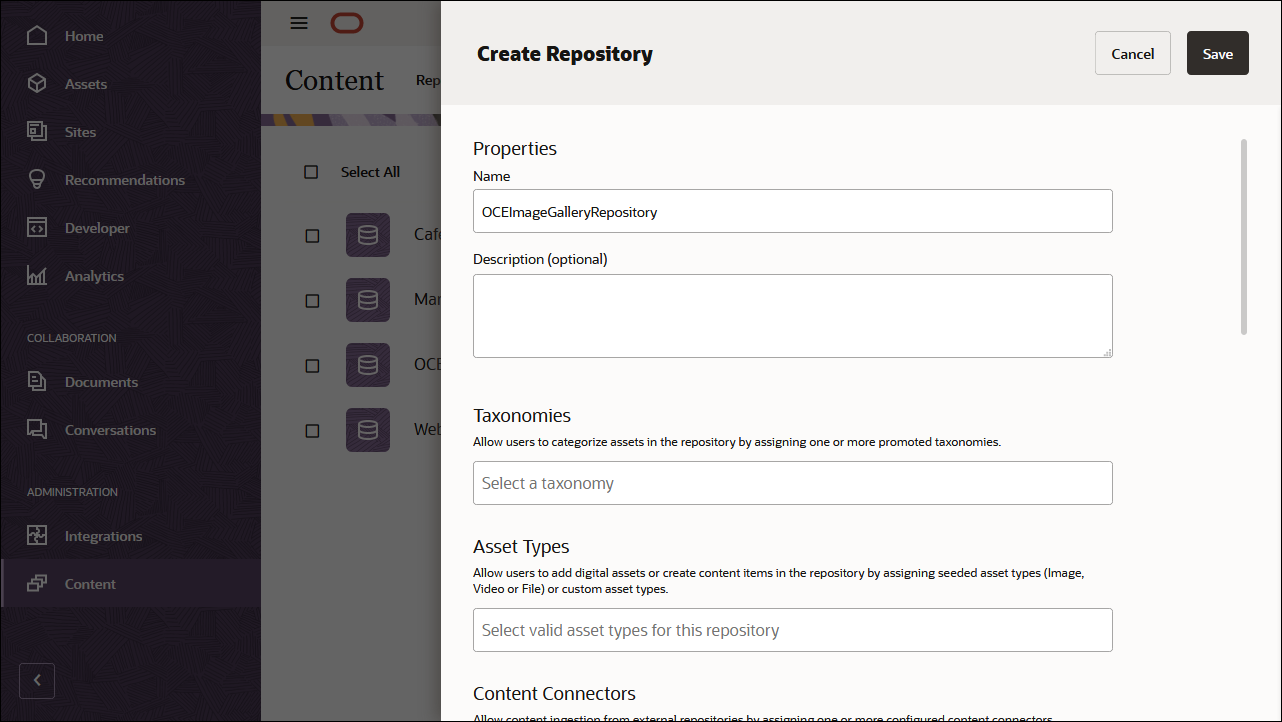
In the upper right corner, click Create to create a new asset repository. Name the asset repository ‘OCEImageGalleryRepository’ for the purpose of this tutorial.
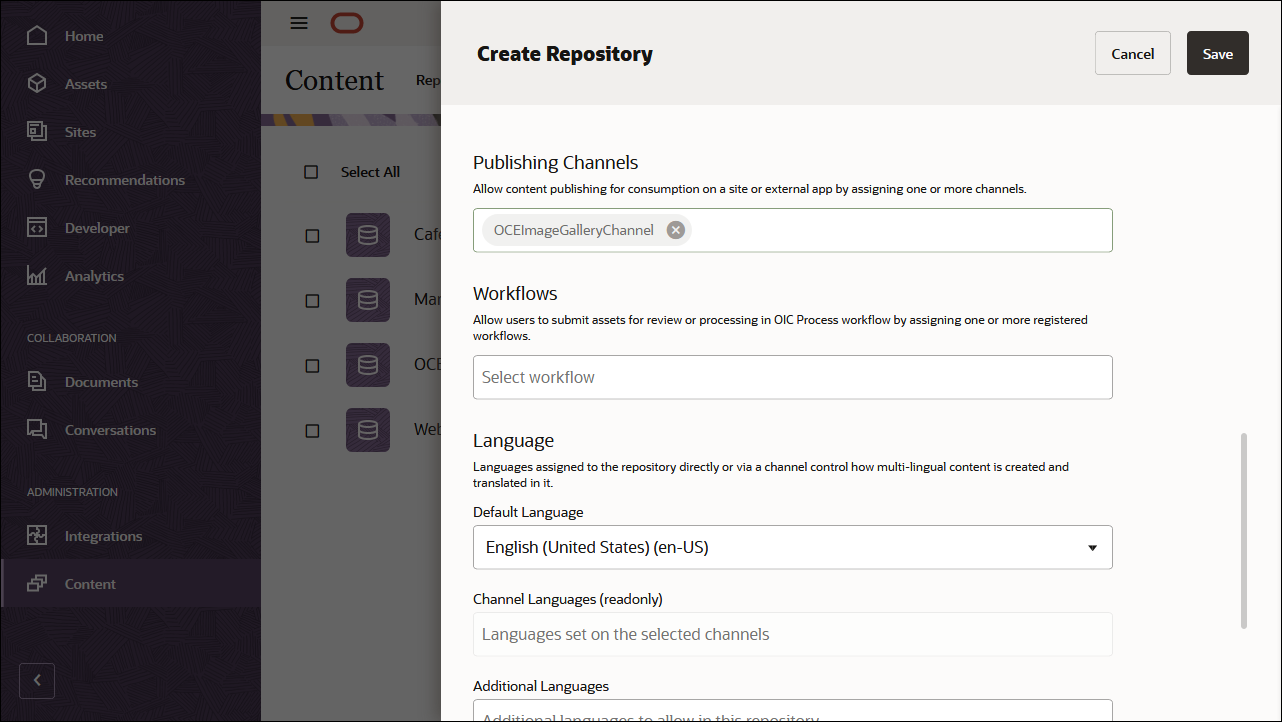
In the Publishing Channels field, select OCEImageGalleryChannel to indicate to Oracle Content Management that content in the OCEImageGalleryRepository repository can be published to the OCEImageGalleryChannel channel. Click Save when you’re done.
Import the Oracle Content Management Samples Asset Pack
You can download a preconfigured Oracle Content Management sample assets pack that contains all required content types and assets for this tutorial.
You can upload a copy of the content we’re using in this tutorial from the Oracle Content Management Samples Asset Pack. This will let you experiment with the content types and modify the content. You can download the asset pack archive, OCESamplesAssetPack.zip, and extract it to a directory of your choice:
Download the Oracle Content Management Samples Asset Pack (OCESamplesAssetPack.zip) from the Oracle Content Management downloads page. Extract the downloaded zip file to a location on your computer. After extraction, this location will include a file called OCEImageGallery_data.zip.
Log in to the Oracle Content Management web interface as an administrator.
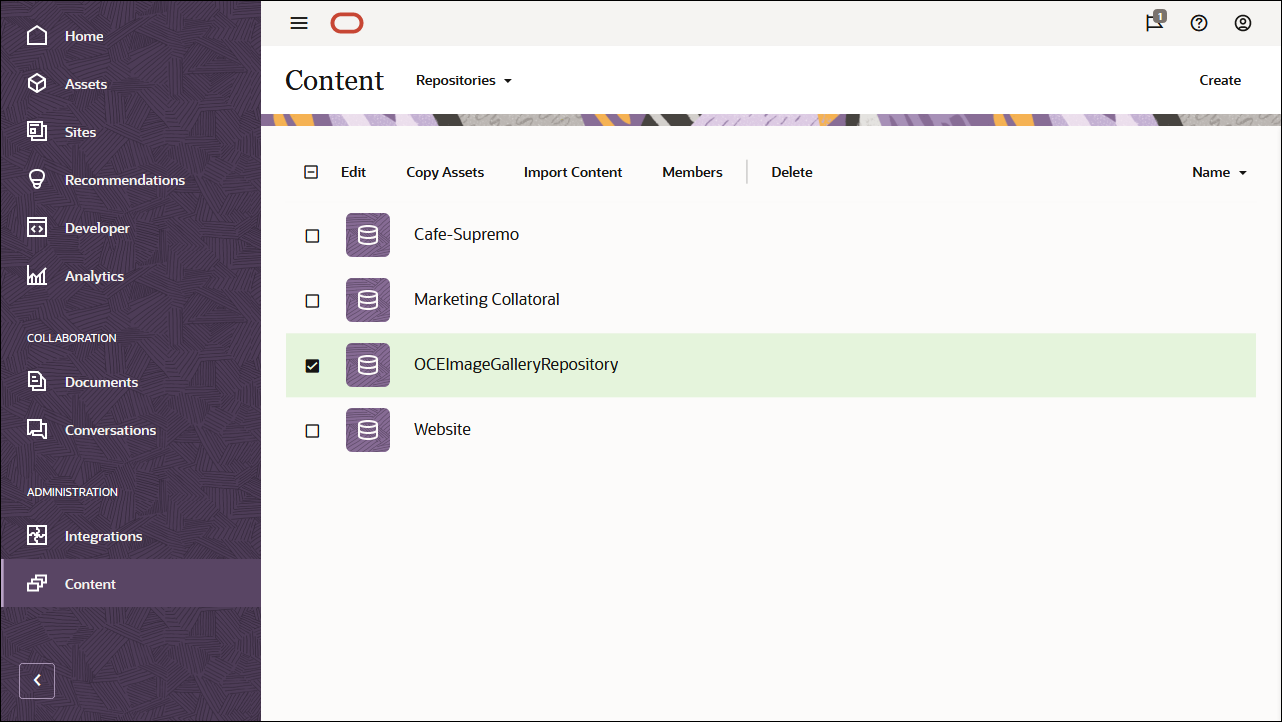
Choose Content in the left navigation menu and then choose Repositories from the selection list in the page header. Now select OCEImageGalleryRepository and click the Import Content button in the top action bar.
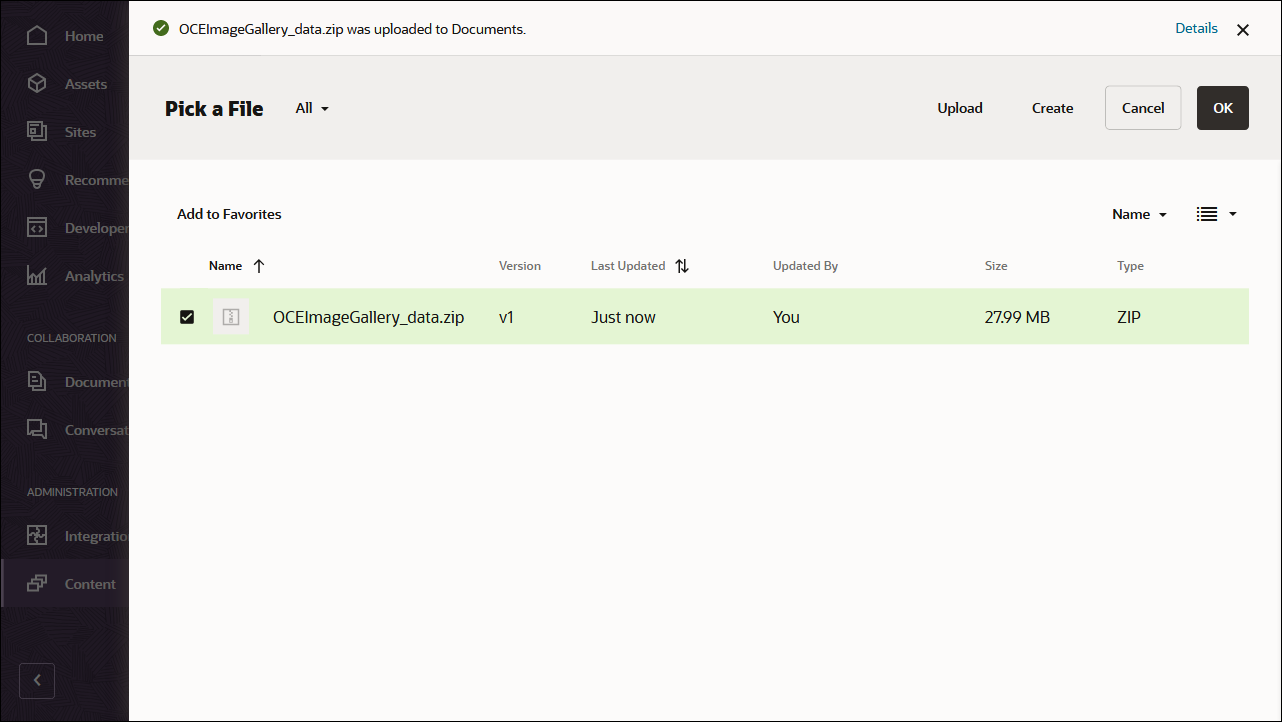
Upload OCEImageGallery_data.zip from your local computer to the Documents folder.
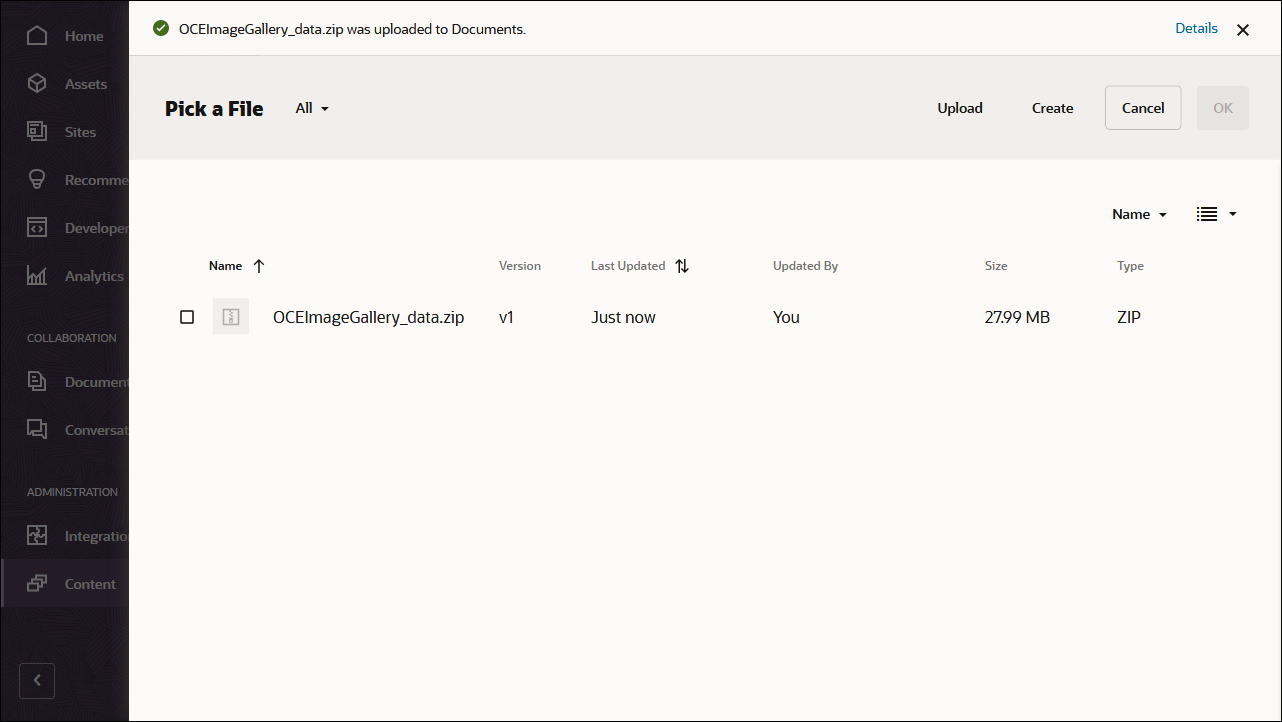
Once it’s uploaded, select OCEImageGallery_data.zip and click OK to import the contents into your asset repository.
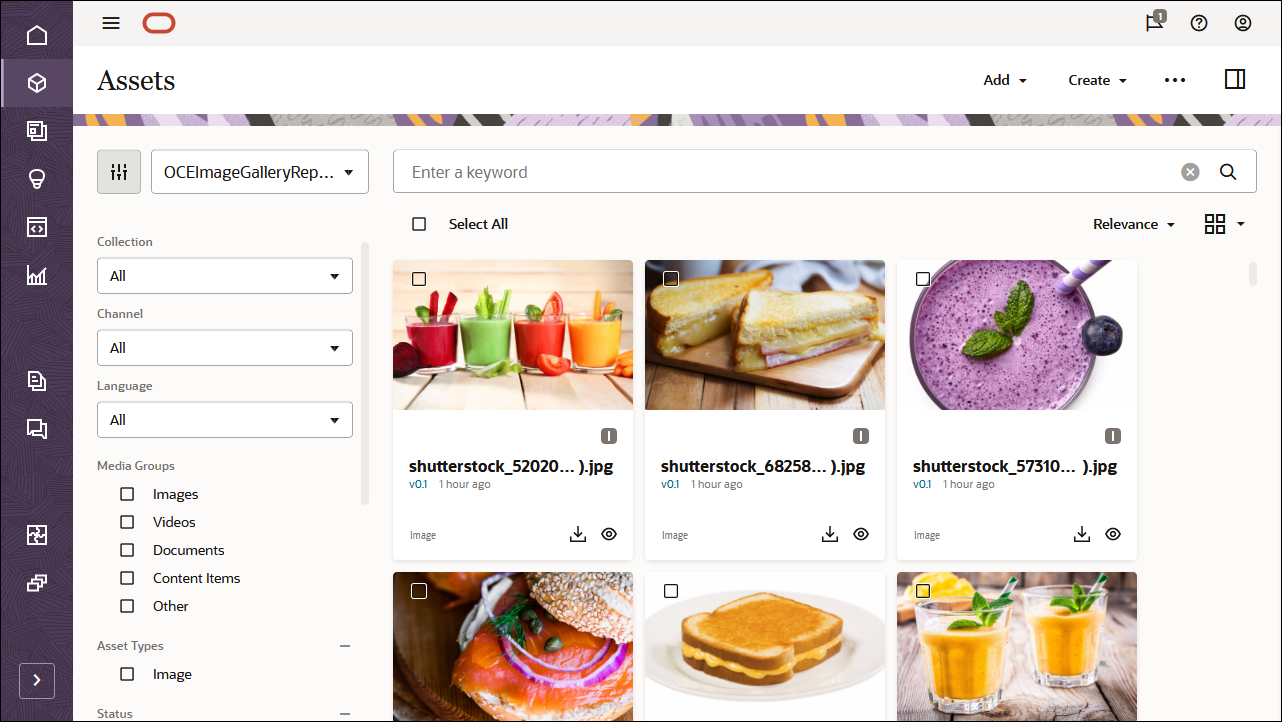
After the content has been imported successfully, navigate to the Assets page and open the OCEImageGalleryRepository repository. You’ll see that all the related images and content items have now been added to the asset repository.
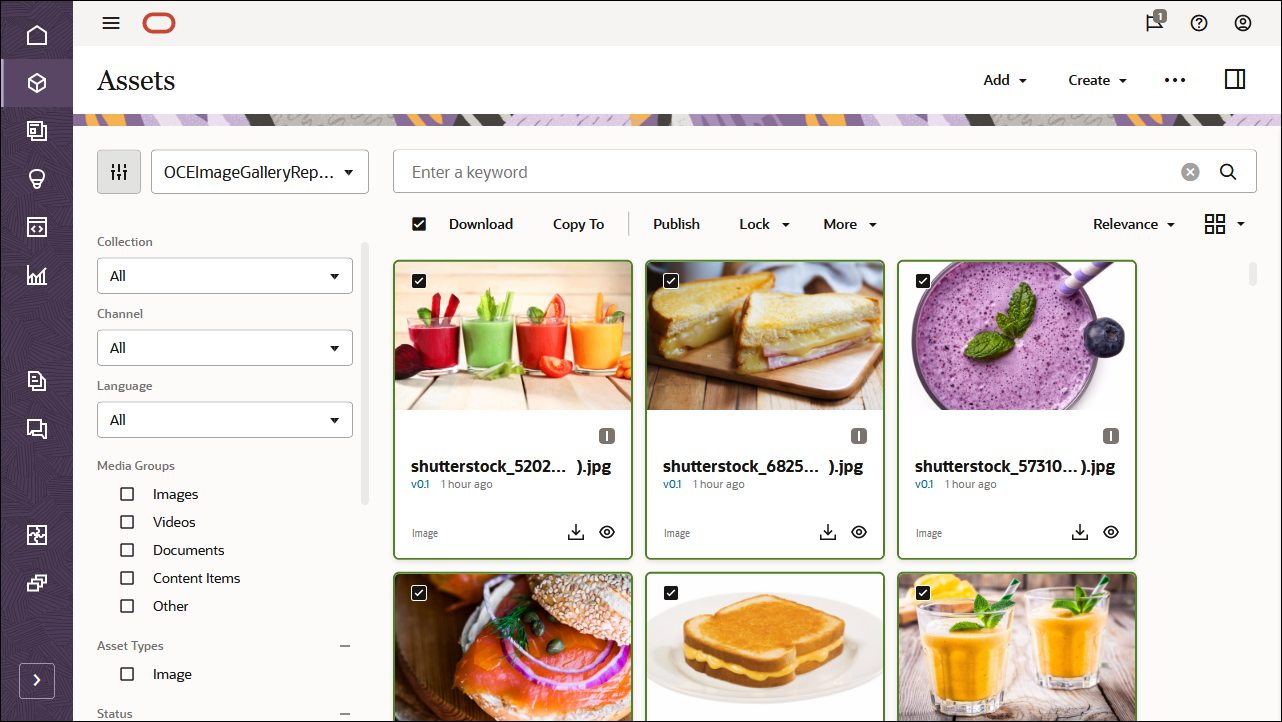
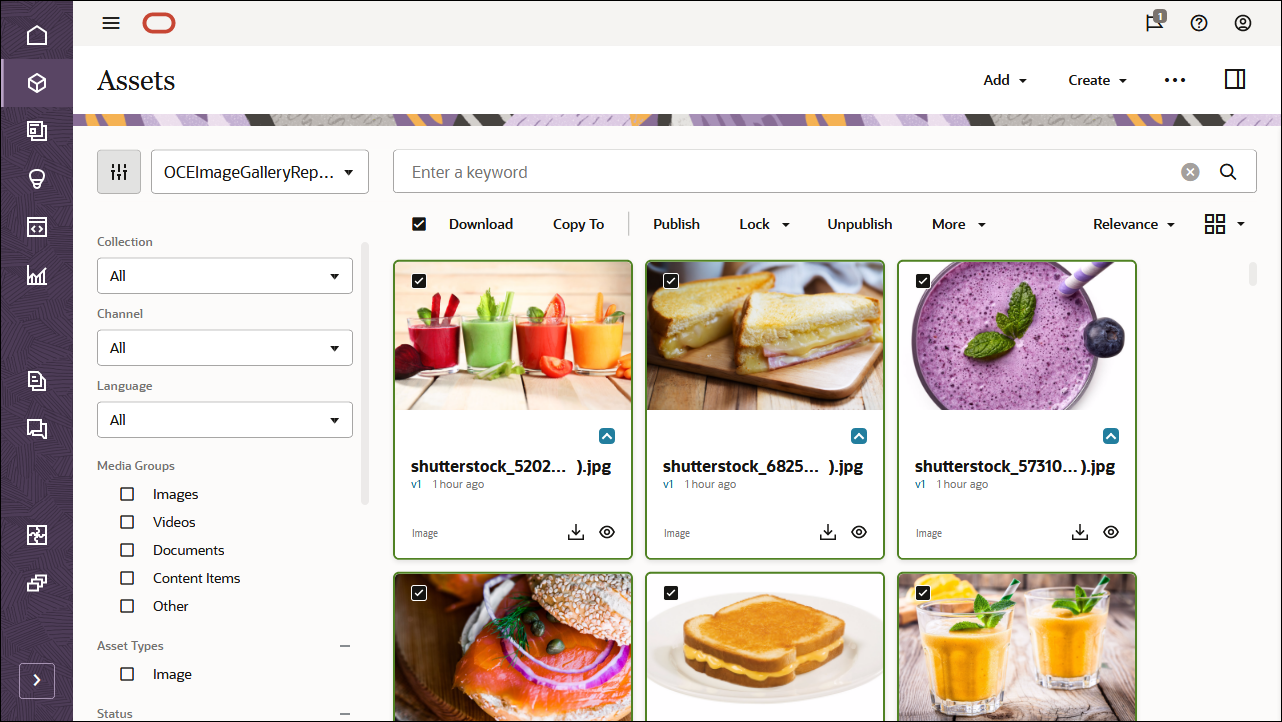
Click Select All on the top left and then Publish to add all the imported assets to the publishing channel that you created earlier, OCEImageGalleryChannel.
Before publishing, you need to validate all the assets. First add OCEImageGalleryChannel as a selected channel, and then click the Validate button.
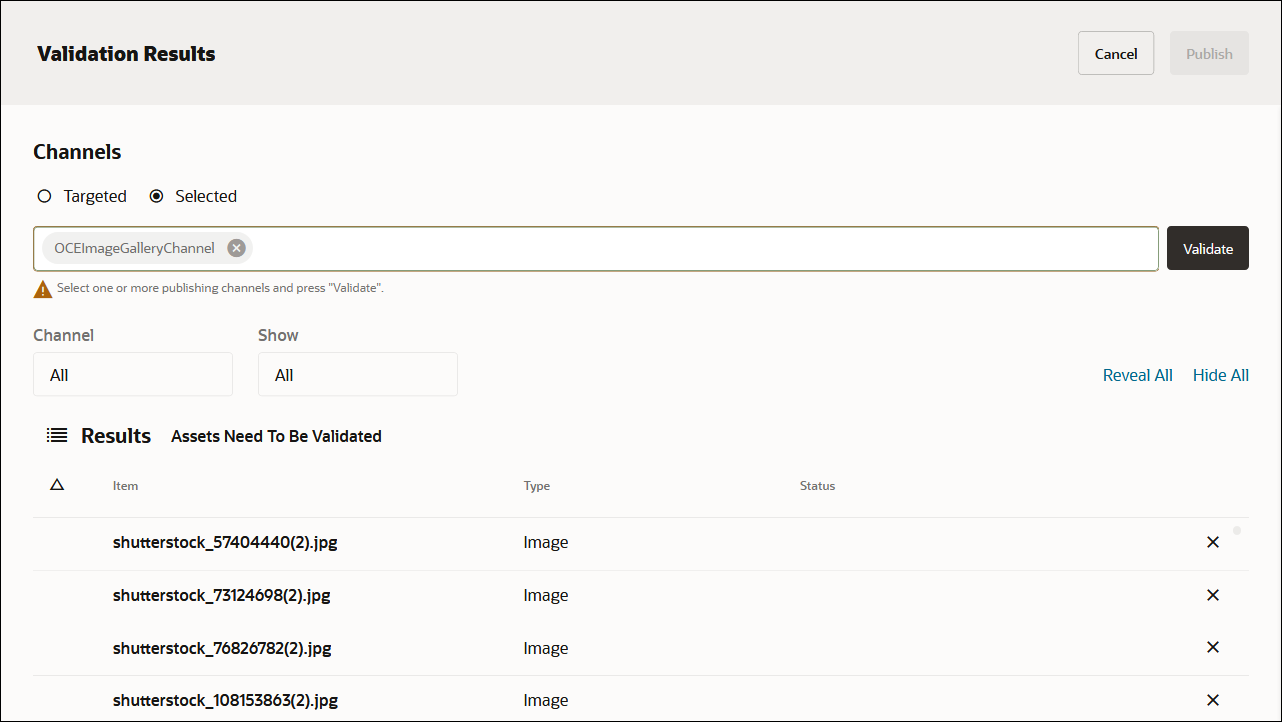
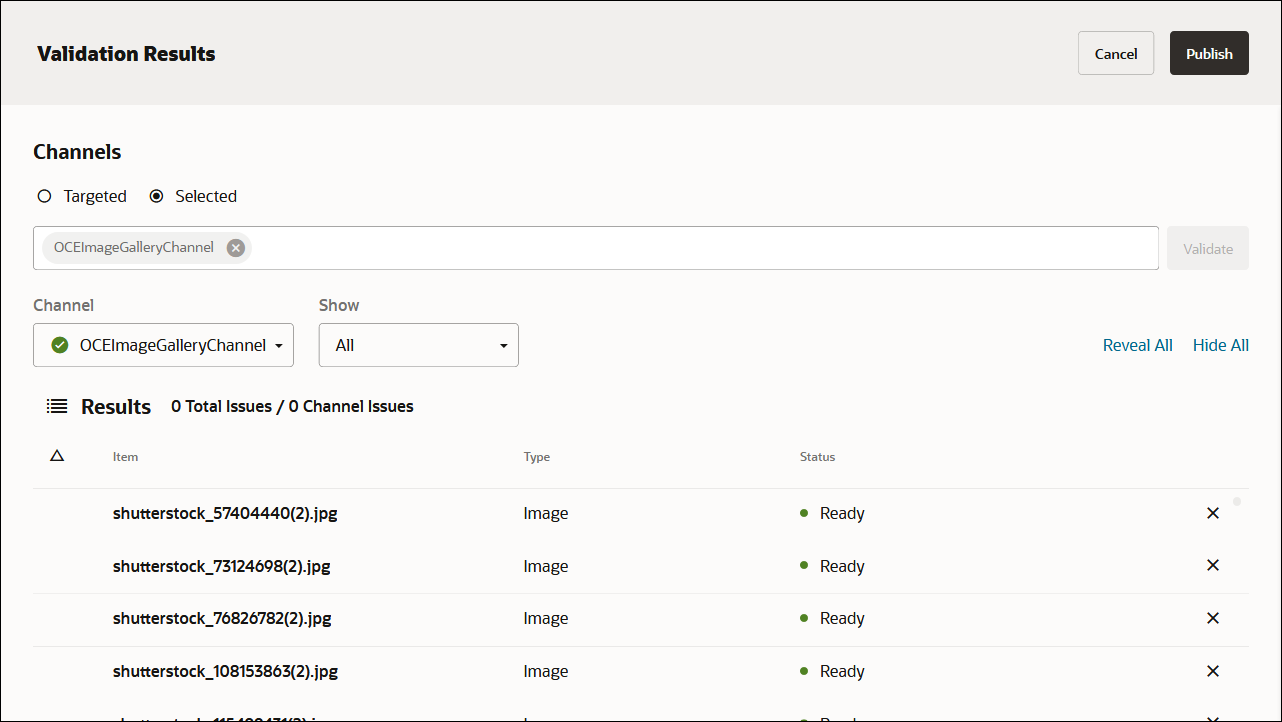
After the assets have been validated, you can publish all the assets to the selected channel by clicking the Publish button in the top right corner.
Once that’s done, you can see on the Assets page that all assets have been published. (You can tell by the icon above the asset name.)
After importing the Oracle Content Management Samples Asset Pack, you can start building the image gallery in Gatsby.
Upload Your Own Image Assets
For this tutorial, we’re using an asset repository called ‘OCEImageGalleryRepository’ to build the home page for our gallery site. This home page consists of the title ‘Image Gallery’ as well as image collection albums that have image assets inside.
To add image assets to the gallery asset repository:
Log in to the Oracle Content Management web interface.
Click Assets in the left navigation menu.
Open the OCEImageGalleryRepository repository.
Click Add in the upper right corner of the page to add image assets to the gallery asset repository.
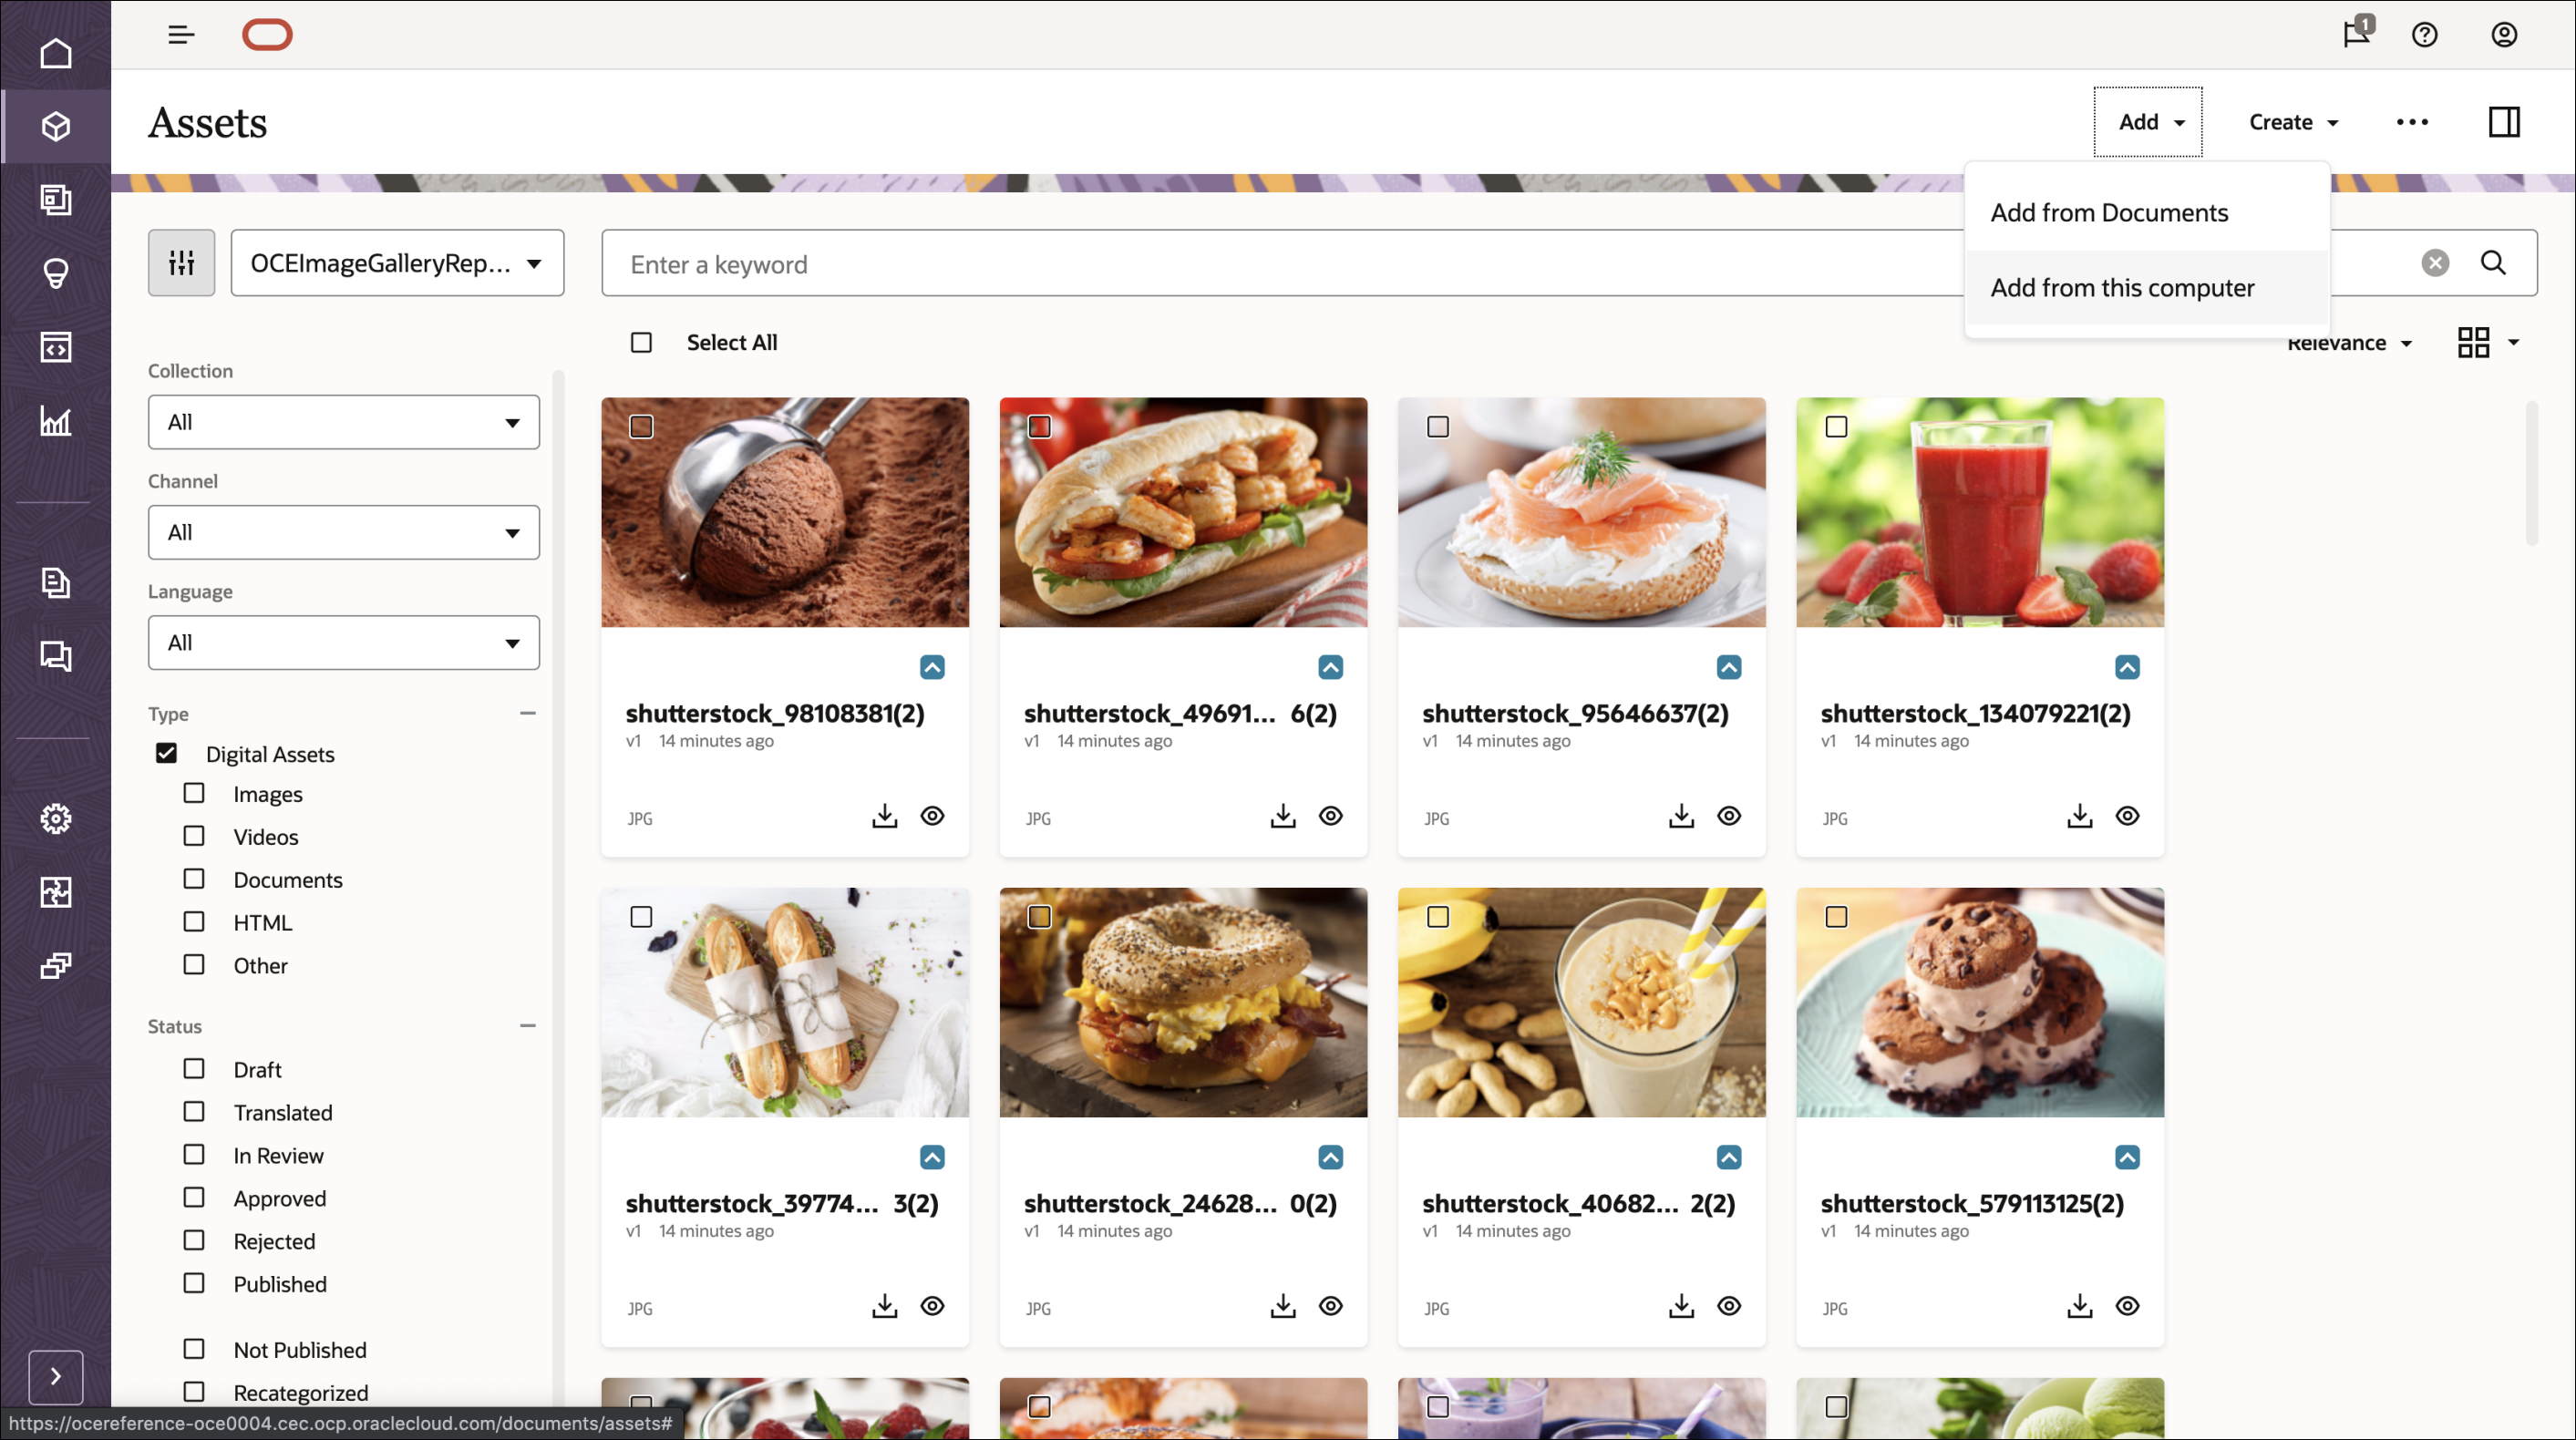
Upload your own new assets from your local computer or choose existing assets already in Oracle Content Management.
Create Taxonomies and Link Them to Image Assets
You need to create a taxonomy in Oracle Content Management and then assign categories to the assets in your repository.
To create a taxonomy in Oracle Content Management:
Log in to the Oracle Content Management web interface as an administrator.
Choose Content in the left navigation menu and then choose Taxonomies from the selection list in the page header.
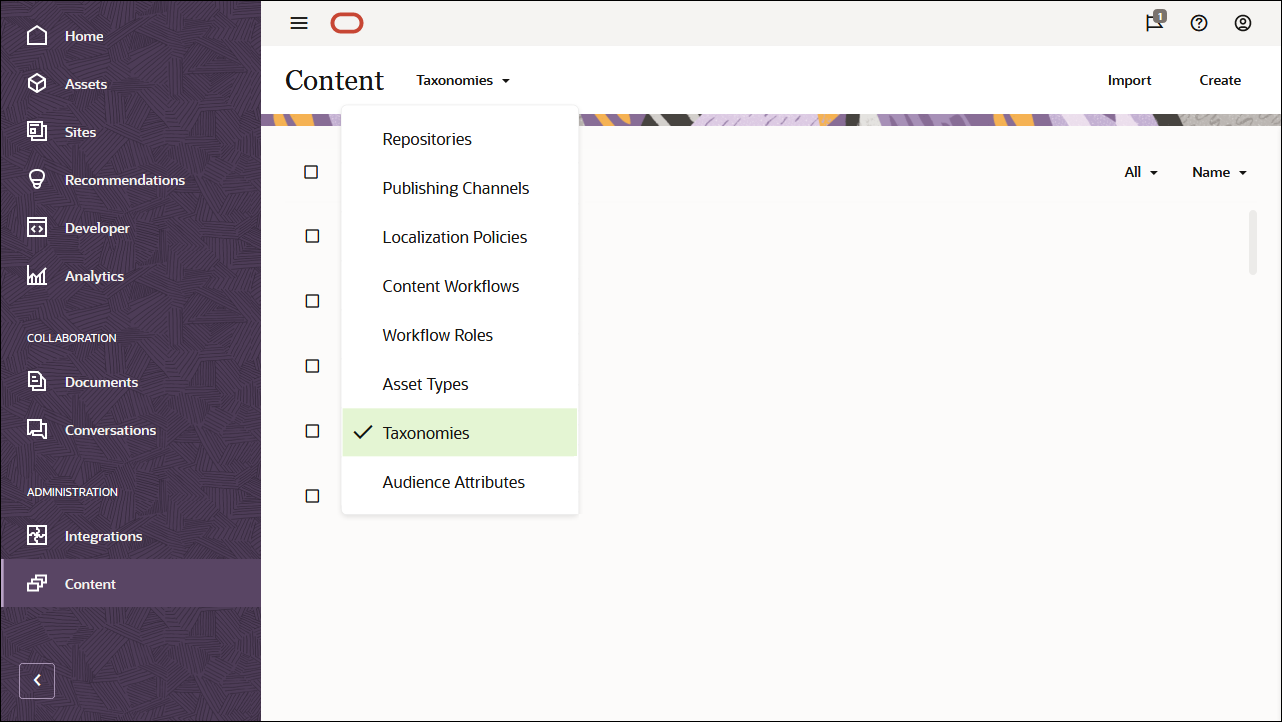
In the upper right corner, click Create to create a new taxonomy. Name the channel ‘OCEImageGalleryTaxonomy’ for the purpose of this tutorial.
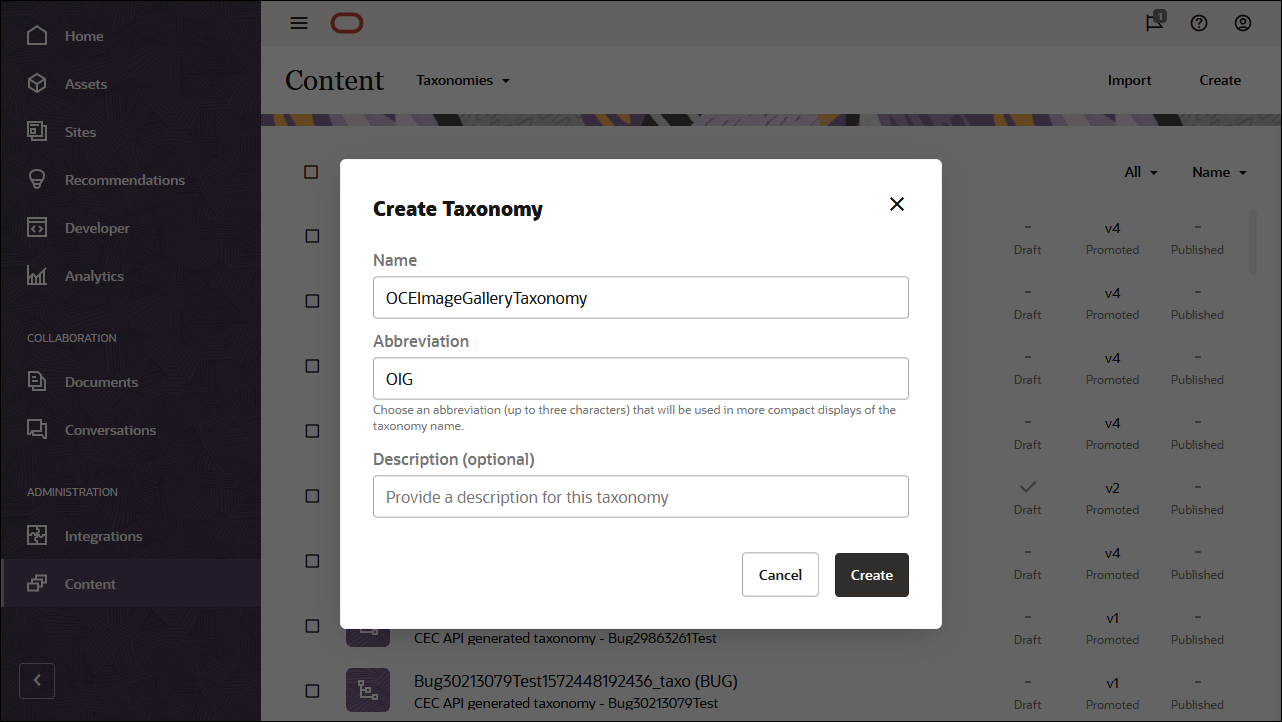
Click Create.
Now build your taxonomy by adding categories. Click Add a category.
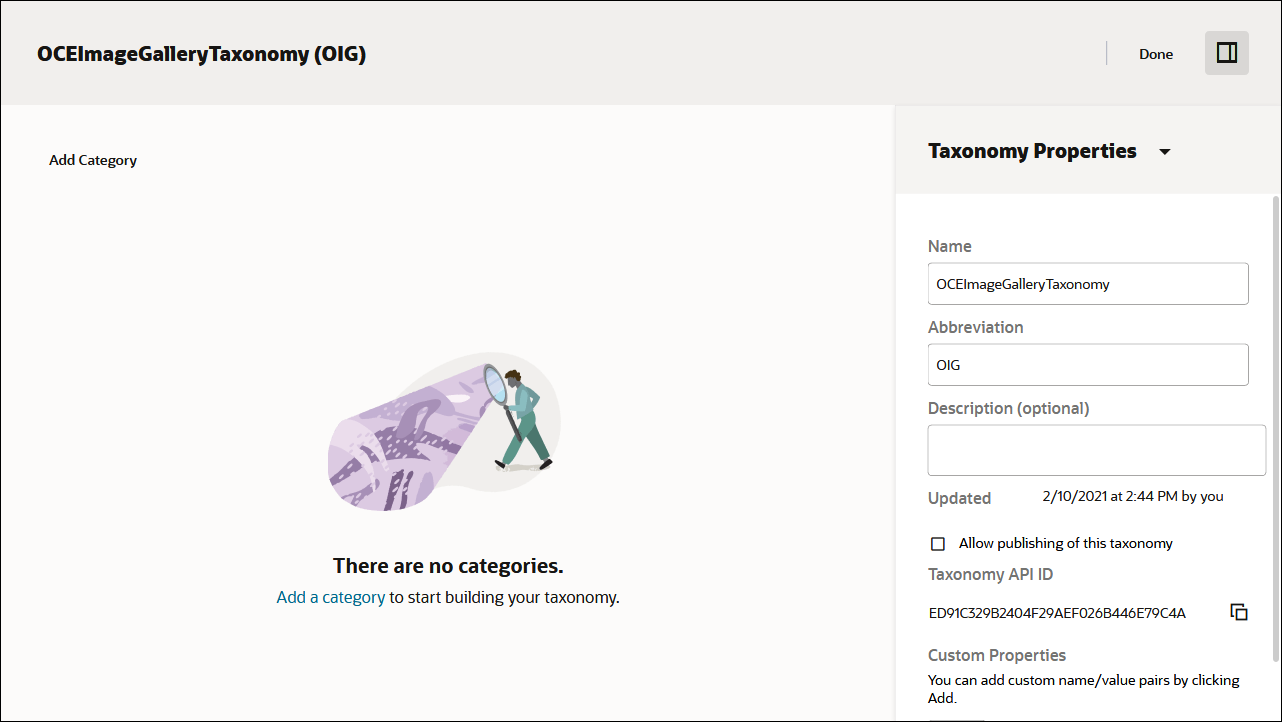
Name the parent category item ‘Food’, and add the following child categories:
- Breakfast
- Dessert
- Drinks
- Sandwiches
Click Done at the top right of the screen.
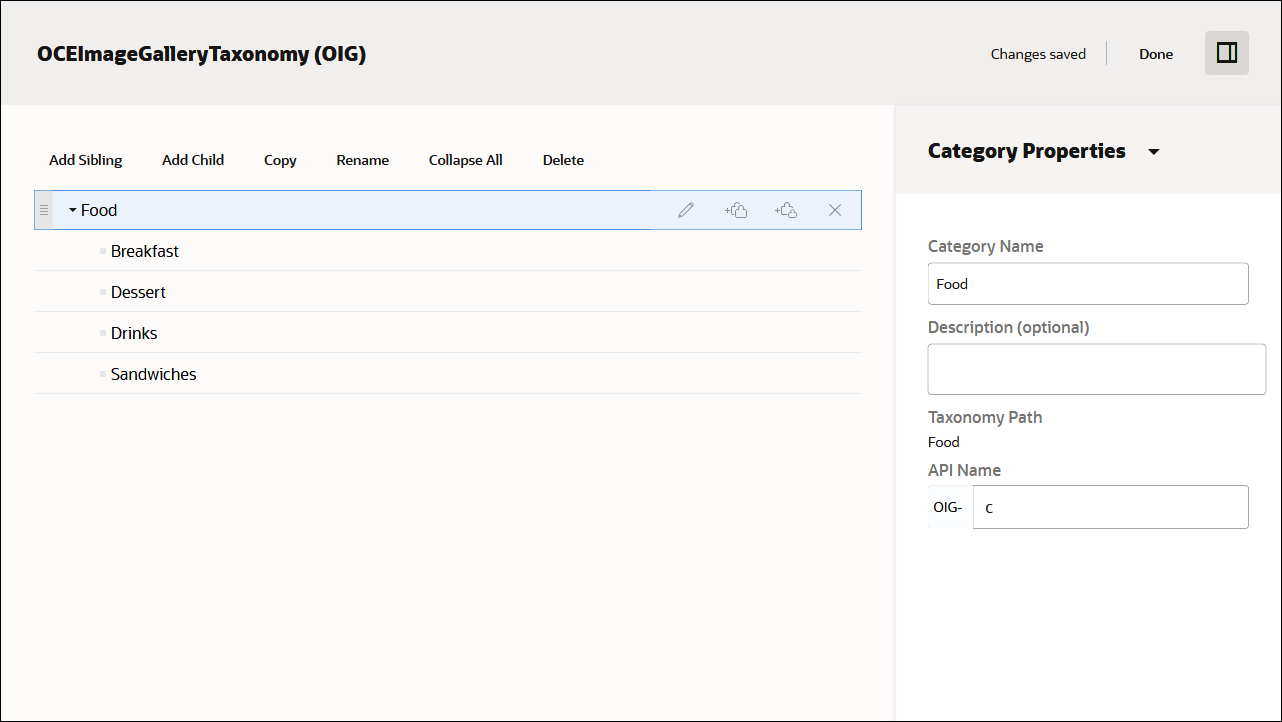
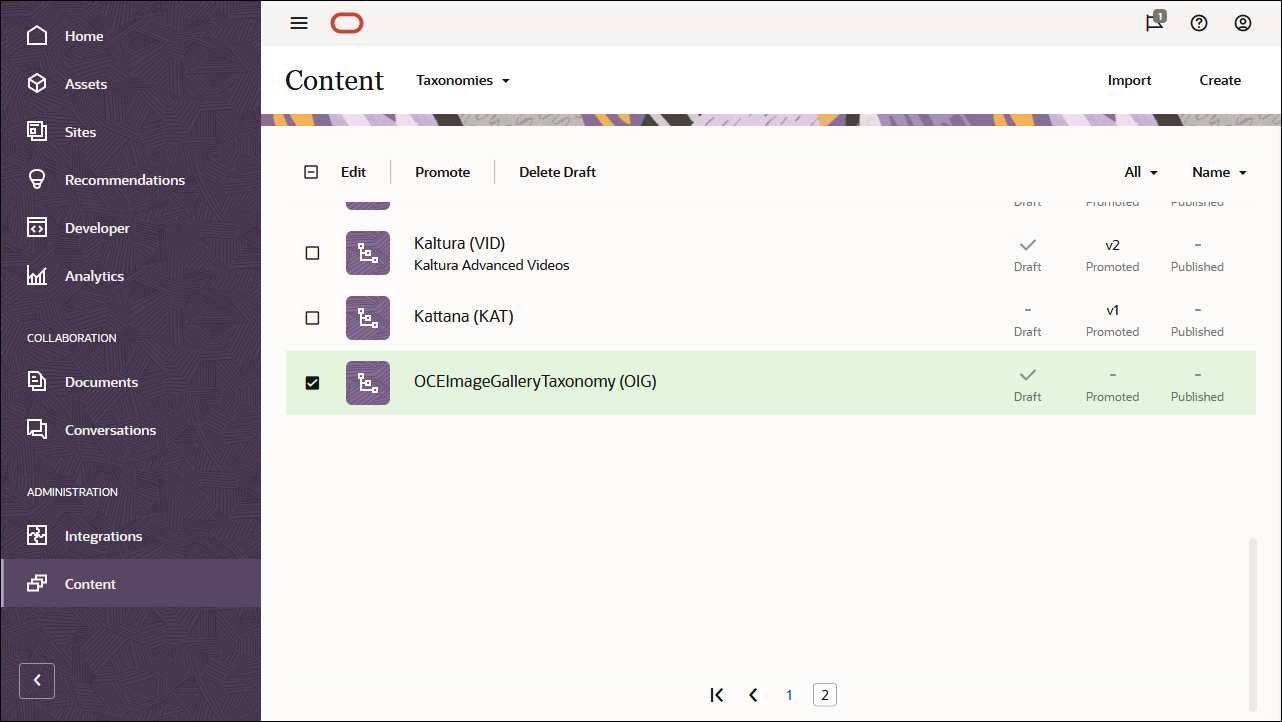
On the Taxonomies page, select the OCEImageGalleryTaxonomy taxonomy and click Promote in the actions bar to make it available for use in your asset repositories.
Next, edit the OCEImageGalleryRepository repository to enable the OCEImageGalleryTaxonomy taxonomy for that repository:
Log in to the Oracle Content Management web interface as an administrator.
Choose Content in the left navigation menu and then choose Repositories from the selection list in the page header.
Select and edit the OCEImageGalleryRepository repository.
In the Taxonomies field, select OCEImageGalleryTaxonomy, so you can assign categories from that taxonomy to the assets in the OCEImageGalleryRepository repository.
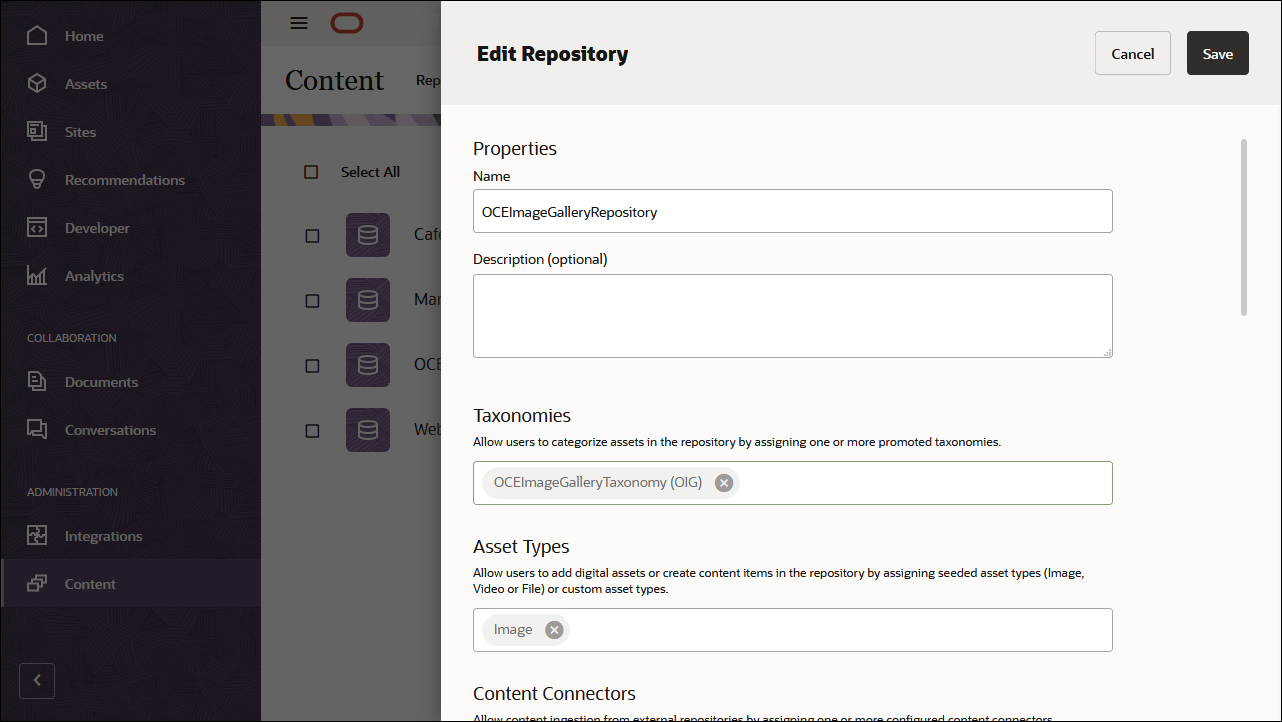
Click Save.
Then, assign taxonomy categories to each of the image assets in the OCEImageGalleryRepository repository:
Log in to the Oracle Content Management web interface.
Click Assets in the left navigation menu.
Open the OCEImageGalleryRepository repository.
Select one or more image assets, click More in the actions bar, and then choose Categories from the menu.
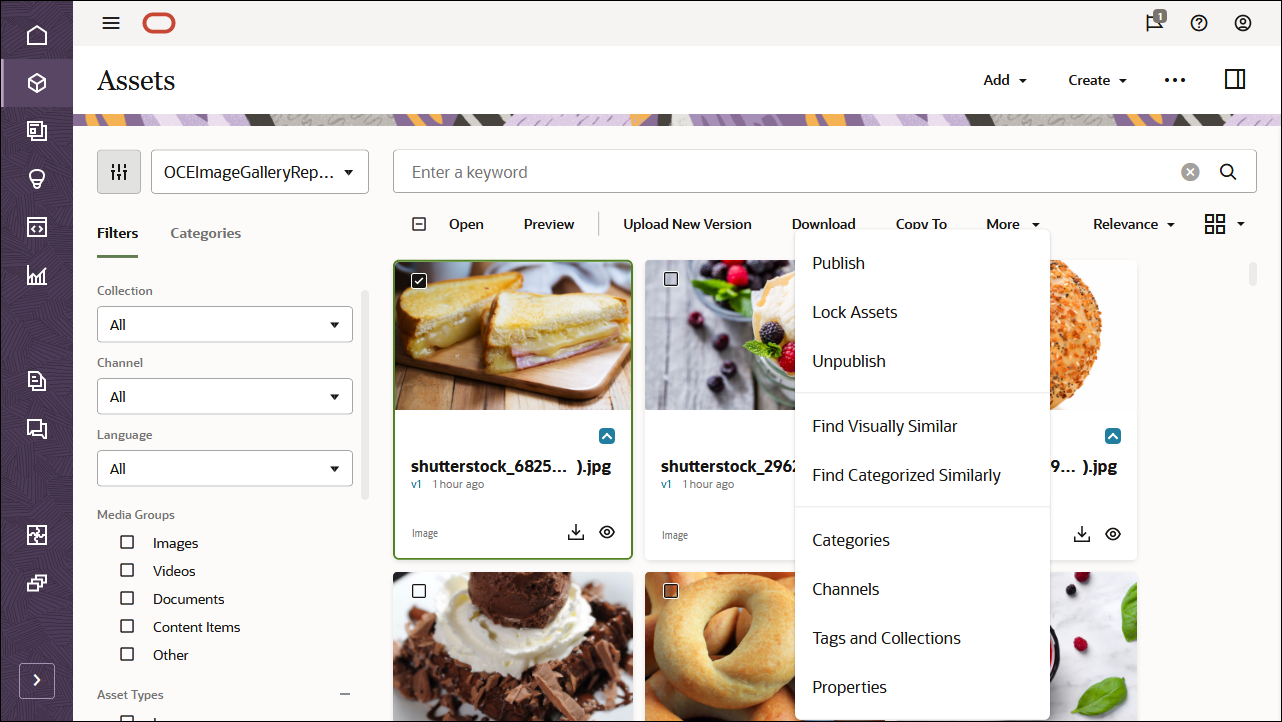
In the Categories panel, click Add Category. Search for the category name in the search bar or select a category from the taxonomy hierarchical structure, and click Add to assign the selected category. You can assign multiple categories to an asset.
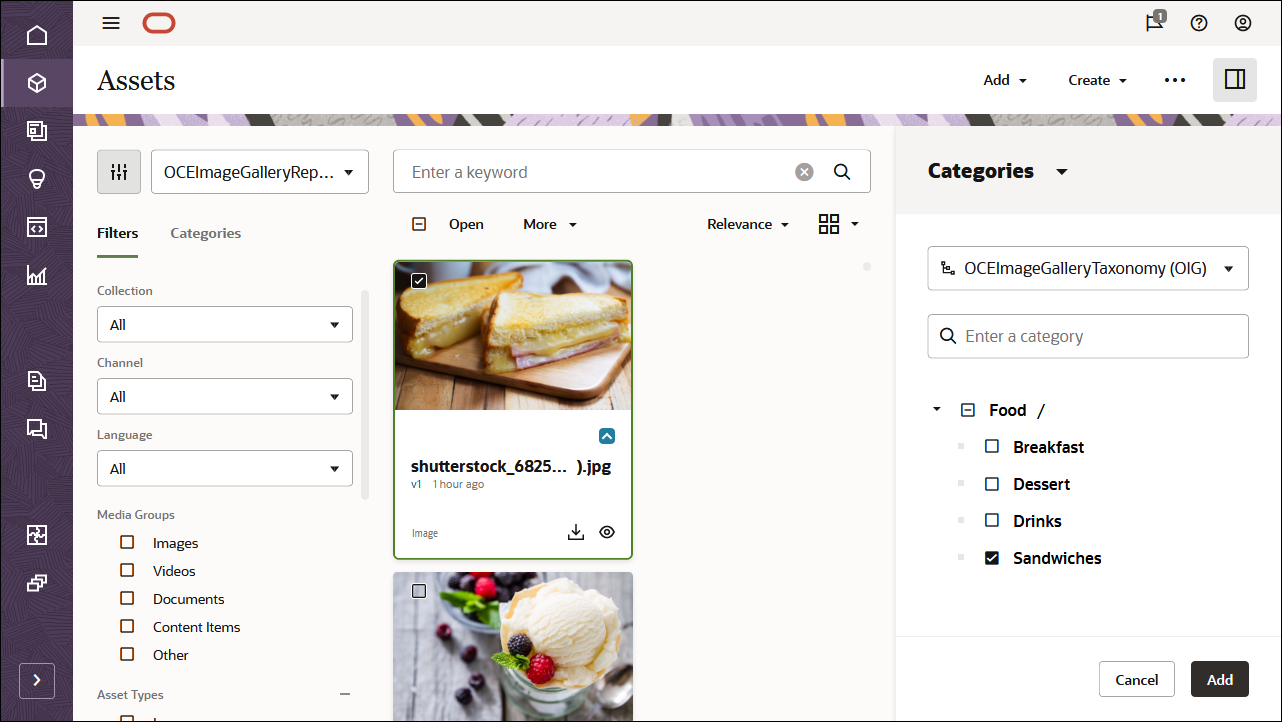
After you’re done assigning taxonomies to all the image assets, select all assets in your repository and publish them to the OCEImageGalleryChannel channel.
Task 2: Build the Image Gallery in Gatsby
To consume our Oracle Content Management content in a server-side rendered Gatsby application, we can use the Gatsby image gallery sample, which is available as an open-source repository on GitHub.
Note: Remember that using the Gatsby sample is optional, and we use it in this tutorial to get you started quickly. You can also build your own Gatsby application.
To build the Image Gallery in Gatsby:
- Cloning the sample repository and install dependencies
- Configuring the Gatsby application
- Running the Gatsby application
Cloning the Sample Repository and Install Dependencies
The Gatsby Image Gallery sample is available as an open-source repository on GitHub.
You’ll first need to clone the sample from GitHub to your local computer and change your directory into the repository root:
git clone https://github.com/oracle/oce-gatsby-gallery-sample.git
    cd oce-gatsby-gallery-sample
Now that you have your code base, you need to download dependencies for the application. Run the following command from the root directory:
npm installConfiguring the Gatsby Application
In this Gatsby Image Gallery sample, you need to configure a few pieces of information so that the Oracle Gatsby Plugin can target the correct instance URL with the correct channel token. These values are used in the gatsby-config.js file that initializes the plugins your Gatsby application will use.
Rather than hard-coding these settings in the gatsby-config.js file we use the dotenv library to set all the required settings in one file. This file, called .env, can be used to configure any variables that the site needs to operate in one convenient location.
Opening the .env file in a text editor you’ll see the following information:
# The connection details for the Oracle Content Management server to be used for this application
    SERVER_URL=https://samples.mycontentdemo.com
    CHANNEL_TOKEN=e0b6421e73454818948de7b1eaddb091

    # (Optional) If you need to set a proxy URL so that the application can connect outside of a firewall
    # PROXY_URL=http://myproxy.company.com:80
Change each key-value pair to reflect your instance URL, the API version you want to target, and the channel token associated with your publishing channel. The channel for this tutorial is OCEGettingStartedChannel.
Running the Gatsby Application
The Gatsby Image Gallery application can run in either development or release (build) mode. Development mode is used when making and testing modifications to the project and release mode is used when producing a final result for deployment. In both modes the
To run in development mode you need to run:
npm run developThis will build the project and then run it giving you a URL that can be used to view it.
To produce a release build you need to run:
npm run buildThis will produce a complete static build in the /public directory of your project. This can then be deployed on a server as described below. If you want to test it in place you can run:
npm run serveThis will start up a local web server to host the application. It will give a base URL that can be used to view the application.
Task 3: Prepare Your Application for Deployment
When the ‘npm run build’ command is run, it creates a static build in a directory called public. All the CSS, HTML, and JavaScript needed to run the application are bundled in there, so deployment can be as simple as copying that content into the webroot directory of a web server.
The GatsbyJS site features comprehensive instructions on how to deploy an application on richer and more complex hosting and cloud platforms. This documentation can be found here.
Structure of the Gatsby Image Gallery Application
This section will discuss the layout of the application and the roles of different files in the project. (Only the files and directories that have a special role in the application will be discussed here.)
Connecting to Oracle Content Management and Downloading the Data
The Gatsby Image Gallery sample uses a plugin called gatsby-source-oce to connect to Oracle Content Management and to retrieve the needed data. The default behavior is to download all assets defined on the provided channel and make them available to the application using GraphQL. This includes both text and binary data. An alternate mode - used in this application - will download all assets to the cache and then download all the binaries referenced by the assets to a directory in the build that will allow them to be loaded via static URLs.
You can find out more about the plugin by looking here.
Data Layout
The Image Gallery site contains only image assets, there are no assets storing text or markup. All of the images are organized into one or more of these categories:
Food
- Breakfast
- Drink
- Dessert
- Sandwiches
- Breakfast
The application uses these categories to determine which pages to create and what images should be displayed on each page.
Source File Layout
gatsby-config.js
    gatsby-node.js
    /src
      /components
      /pages
      /templates
      /utils
Components - This directory contains React components that are used to build up the pages of the application. These components display data that is passed in from the pages or templates that use them.
Pages - Pages in Gatsby are used to display information that is predefined in the application. In the case of this sample the only static page is the 404 error page.
Templates - Templates are a special kind of page that can take parameters to be used in a query. This allows pages to be generated based on data only available at build time.
Utils. This is a directory for storing utility js functions that are used to sort the data prior to rendering. These js functions don’t generate markup.
Special files
- gatsby-config.js - This file is used to configure the Gatsby plugins used in the project. All the settings and initializations occur here.
- gatsby-node.js - This file is used to create new templatized pages based on what data is available to the application at build time.
Code Details
The following is a set of code snippets from the sample along with explanations of what each piece is doing:
gatsby-node.js
This file performs the queries used to build up the application. The result of these queries, a series of images with associated categories, is then grouped by category. A template is then used to create a page for each category to show all the images associated with it. Finally a single page (the root page) is created to display a summary of all the category information.
Here is the GraphQL query that is used to download all the image data needed by the application. The rather complex filter used at the beginning is to exclude any images that don’t have valid category data and so would not be sortable by category. This step could have been done in the post processing of the query data, but using the filter instead simplified the code.
 const result = await graphql(`
      {
        allItems: allOceAsset(filter: {taxonomies: {items: {elemMatch: {categories: {items: {elemMatch: {name: {ne: ""}}}}}}}}) {
          nodes {
            name
            staticURL
            taxonomies {
              items {
                categories {
                  items {
                    name
                  }
                }
                name
              }
            }
          }
        }
      }`);
The data then goes through the following steps shown in the code snippet below:
It is passed through a series of filtering and sorting functions defined in src/utils/services.js that will create a map of the form: category => array of images.
The map is then transformed into an array and is passed into a template that will create the index page. This page shows a summary of all the categories and provides a convenient was to navigate to each of them.
Finally the code loops through the categoriesMap and creates a page for each defined category using a template.
const allImageAssets = result.data.allItems.nodes;
      console.log(`All Image ${allImageAssets.length}`);
      const simpleEntries = services.getSimplifiedEntries(allImageAssets);
      console.log(`Simple ${simpleEntries.length}`);
      const categoriesMap = services.getUniqueCategoryMap(simpleEntries);

      // Create the main page
      const categoriesArray = [...categoriesMap].map(([name, value]) => ({ name, value }));

      createPage({
        path: '/',
        component: path.resolve('src/templates/indexTemplate.jsx'),
        context: {
          categoriesArray,
        },
      });

      // For each category, we need to create its main page view. Pass the set of items to the
      // component as well as a category to match and display.

      categoriesMap.forEach((value, key) => {
        const category = key;
        const entries = value;
        createPage({
          path: `/${category}`,
          component: path.resolve('src/templates/categoryPageTemplate.jsx'),
          context: {
            category,
            entries,
          },
        });
      });

    };
src/templates/indexTemplate.jsx
This file is used to create the home page of the application. On this page it displays a summary of all the defined categories and provides links to each of the category pages.
    import React from 'react';
    import PropTypes from 'prop-types';
    import Gallery from '../components/Gallery';
    import * as styles from './indexTemplate.module.css';

    const Home = ({ pageContext: { categoriesArray } }) => (
      <>
        <h1 className={styles.heading}>Image Gallery</h1>
        <div className={styles.galleryContainer}>
          {categoriesArray.map((item) => (
            <Gallery key={item.name} allEntries={item.value} category={item.name} />
          ))}
        </div>
      </>
    );

    Home.propTypes = {
      pageContext: PropTypes.instanceOf(Object).isRequired,
    };
    export default Home;
src/templates/categoryPageTemplate.jsx
This page displays a grid of all images belonging to a category as well as allowing a user to open a larger modal view of each image. It doesn’t need to perform any queries and renders data that is passed in from the gatsby-node.js file. Rendering the grid view is done as follows:
    <div className={styles.grid}>
            {entries.map((entry, index) => (
              <div key={entry.id}>
                <img
                  src={entry.file}
                  alt="Food Pic"
                  className={styles.gridItem}
                  onClick={() => openLargeView(index)}
                  onKeyDown={(e) => handleGridKeyPress(e, index)}
                  role="link"
                  aria-label="photo"
                  tabIndex={0}
                />
              </div>
            ))}
          </div>
A Special Note about CSS
This application uses a useful feature of GatsbyJS to apply the CSS to the template classes. Each of the two template classes , categoryPageTemplate.js and indexTemplate.jsx have corresponding css files of the form classname.module.css. These files contain the styling that will be applied only to the JSX file that shares the same base name. This scoped styling makes it simpler to create CSS without worrying about rules creating unintended side effects elsewhere in the application.
Overall Layout of the Running Application
Here is a list of the pages in the application and the templates used to generate each one:
Home page - (template page rendered with indexTemplate.jsx)
       Uses the Gallery.jsx component to render each category summary based on data
       passed in from gatsby-node.js

    Category page 1..n - (template page rendered with categoryPageTemplate.jsx)
       Uses information about a single category and its images provided by gatsby-node.js

404 page - static page generated by Gatsby using the pages/404.jsx class. Build an Image Gallery in Gatsby with Headless Oracle Content Management
F39967-01
August 2021
Copyright © 2021, Oracle and/or its affiliates.
Primary Author: Oracle Corporation