Build a Blog in Swift with Headless Oracle Content Management
Introduction
An iOS development environment utilizing Swift and SwiftUI can be a powerful tool for building applications that consume content from Oracle Content Management. Armed with the right content model, you can quickly build the user interface that makes up a typical blog app.
In this tutorial, we’ll build a simple iOS blog application in Swift by leveraging Oracle Content Management as a headless CMS as well as its software development kit (SDK) for content delivery. This iOS sample is available on GitHub.
The tutorial consists of three steps:
Prerequisites
Before proceeding with this tutorial, we recommend that you read the following information first:
To follow this tutorial, you’ll need:
- an Oracle Content Management subscription
- an Oracle Content Management account with the Content Administrator role
- a Mac computer with Xcode version 14.2 or higher
What We’re Building
Our blog application consists of three separate pages that allow visitors to explore blog articles organized into topics.
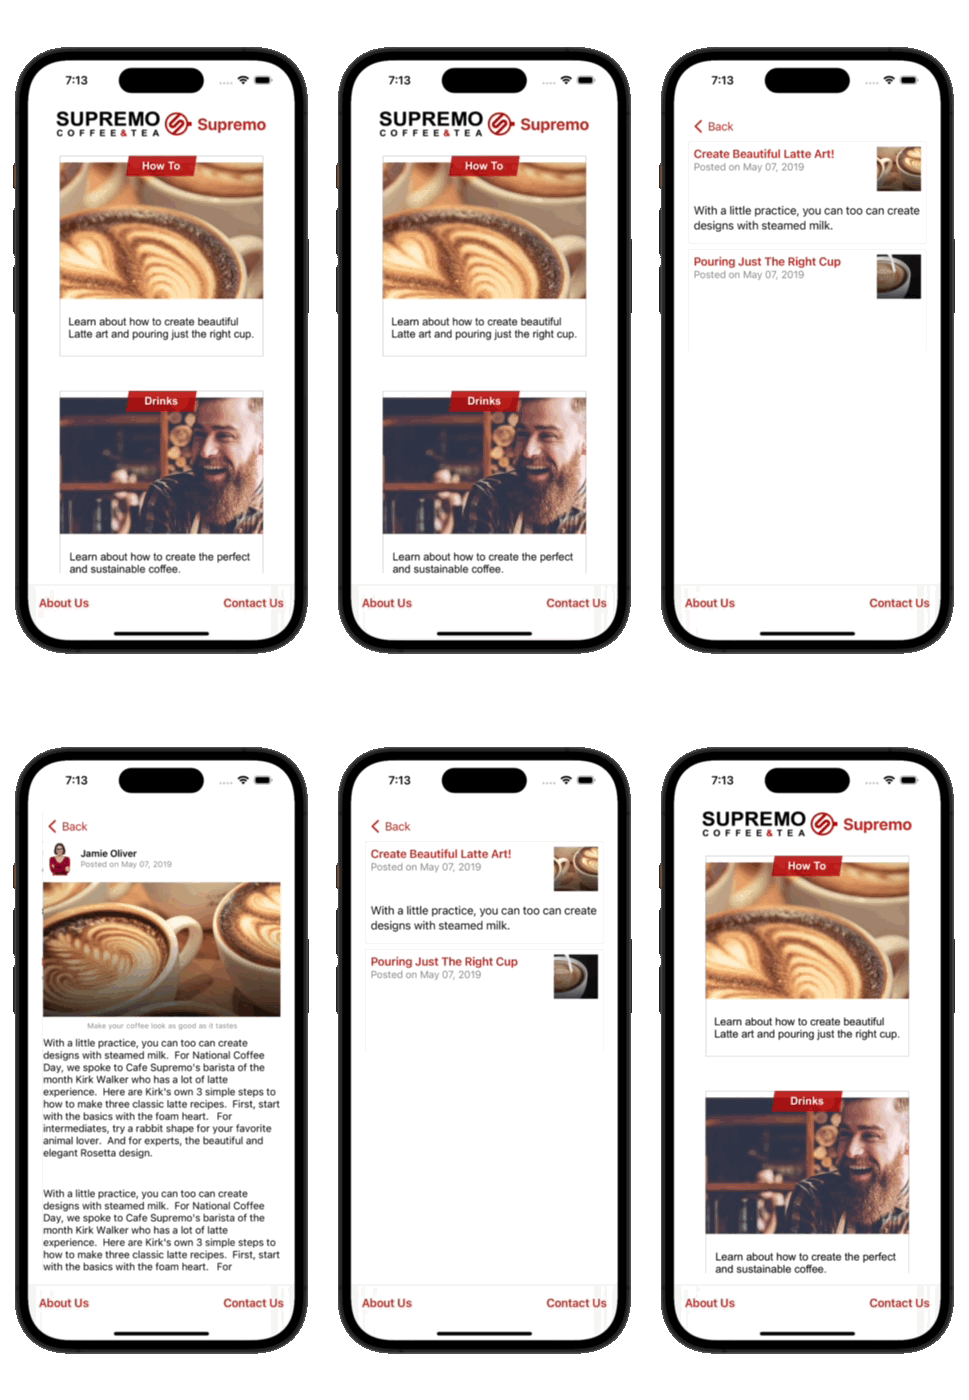
The first page, the home page, consists of branding (company name and logo), some links, and a list of blog topics.
The second page, the article listing page, shows previews of each blog article that belongs to the topic.
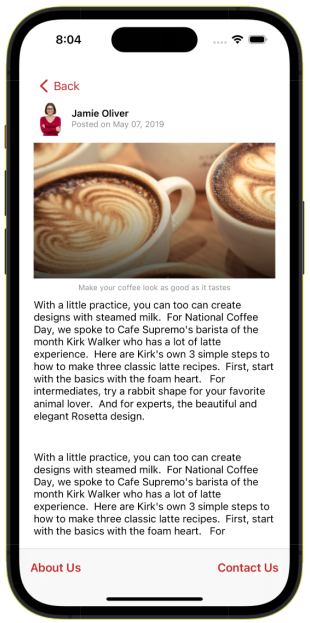
Lastly, the article page renders the final blog article, including information about the blog’s author.
To proceed, you’ll need to have an active subscription to Oracle Content Management and be logged in with the Content Administrator role.
Step 1: Prepare Oracle Content Management
If you don’t already have an Oracle Content Management instance, see the Quick Start to learn how to register for Oracle Cloud, provision an Oracle Content Management instance, and configure Oracle Content Management as a headless CMS.
For this tutorial, you’ll need to create a content model in either of two ways. There’s a downloadable asset pack available that will fill your empty repository with content types and associated content, or you can create your own content model and content.
To prepare Oracle Content Management:
- Create a channel and asset repository.
- Create a content model using either of two methods:
- Method 1: Import the Oracle Content Management Samples Asset Pack
- Method 2: Create your own content model
Create a Channel and Asset Repository
You first need to create a channel and an asset repository in Oracle Content Management so you can publish content.
To create a channel and an asset repository in Oracle Content Management:
Log in to the Oracle Content Management web interface as an administrator.
Choose Content in the left navigation menu and then choose Publishing Channels from the selection list in the page header.
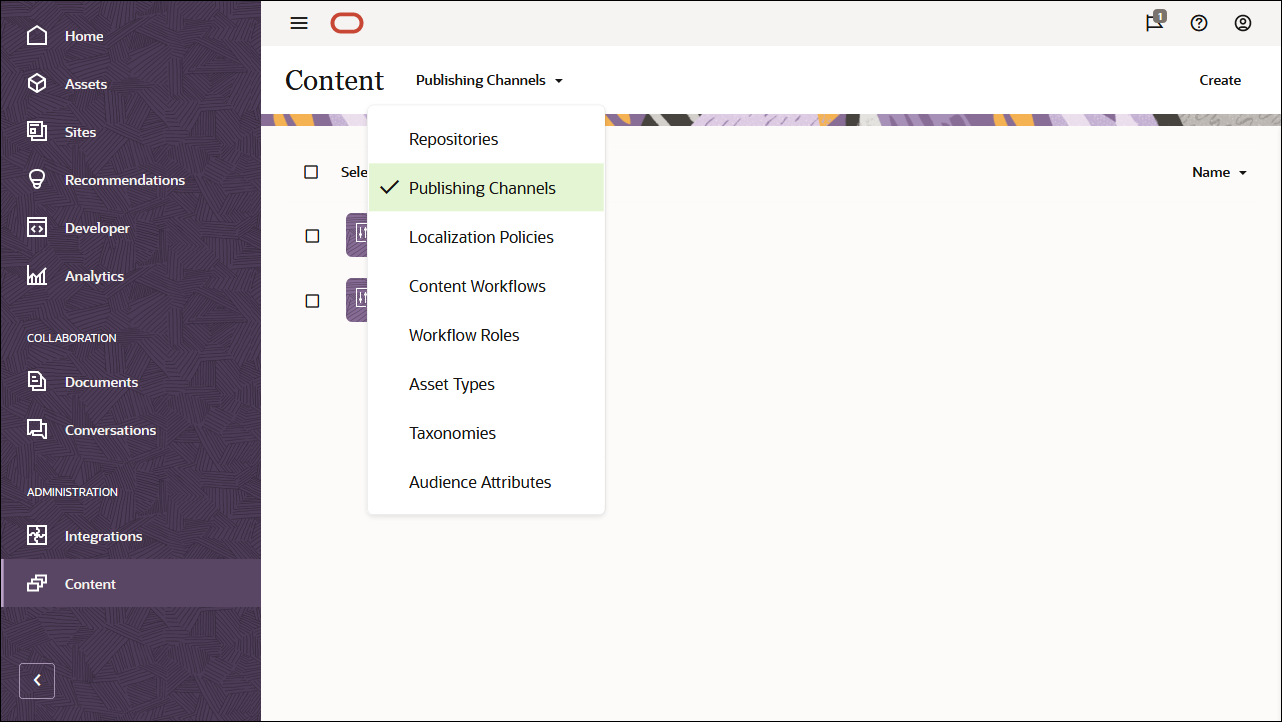
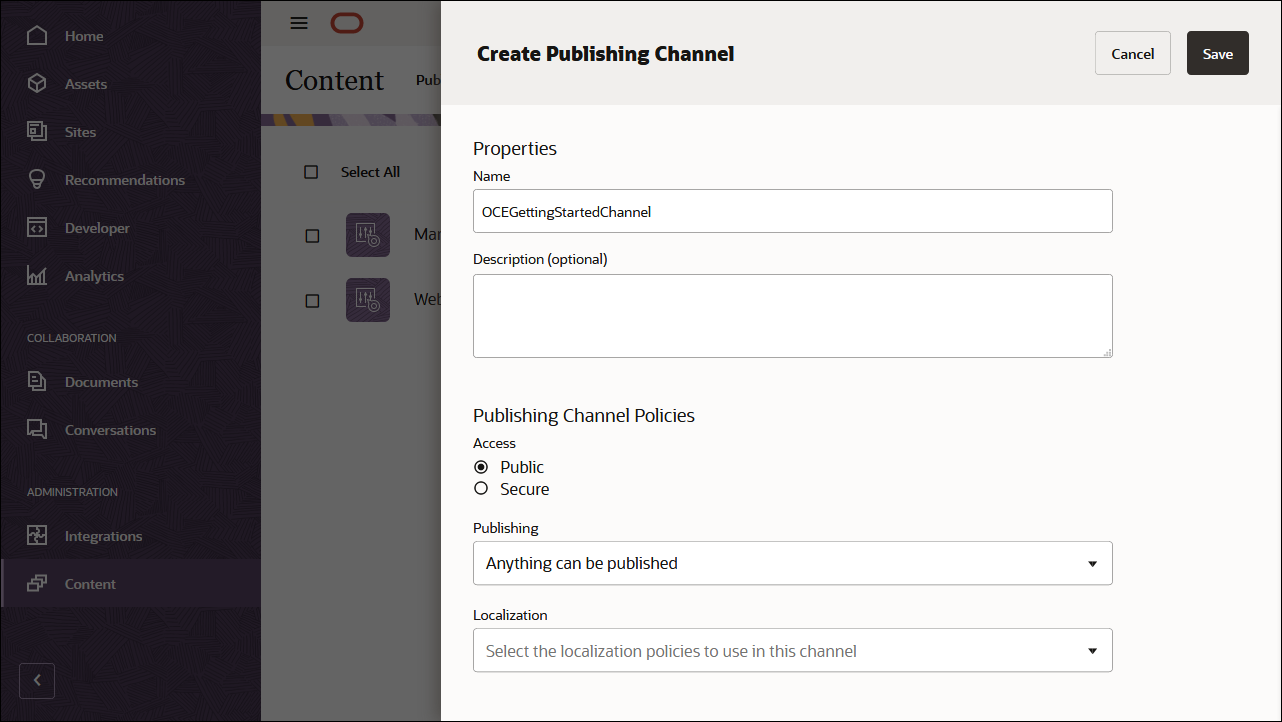
In the upper right corner, click Create to create a new channel. Name the channel ‘OCEGettingStartedChannel’ for the purpose of this tutorial, and keep the access public. Click Save to create the channel.
Choose Content in the left navigation menu and then choose Repositories from the selection list in the page header.
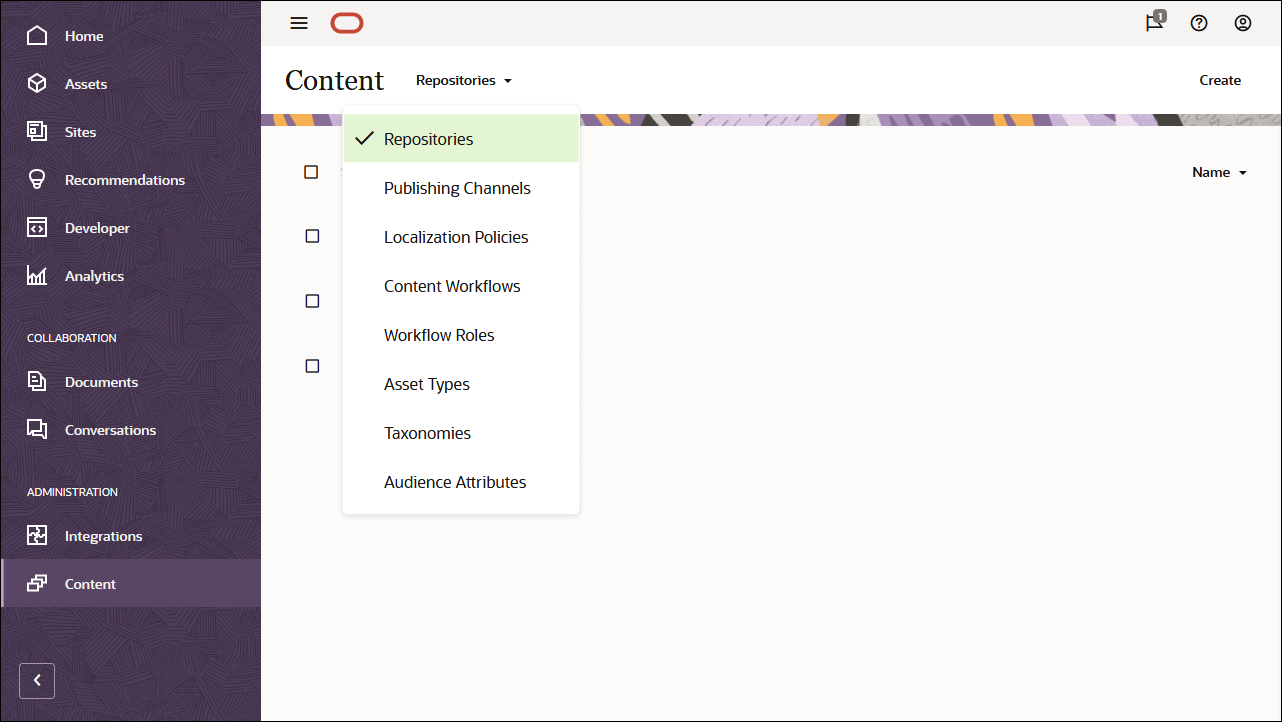
In the upper right corner, click Create to create a new asset repository. Name the asset repository ‘OCEGettingStartedRepository’ for the purpose of this tutorial.
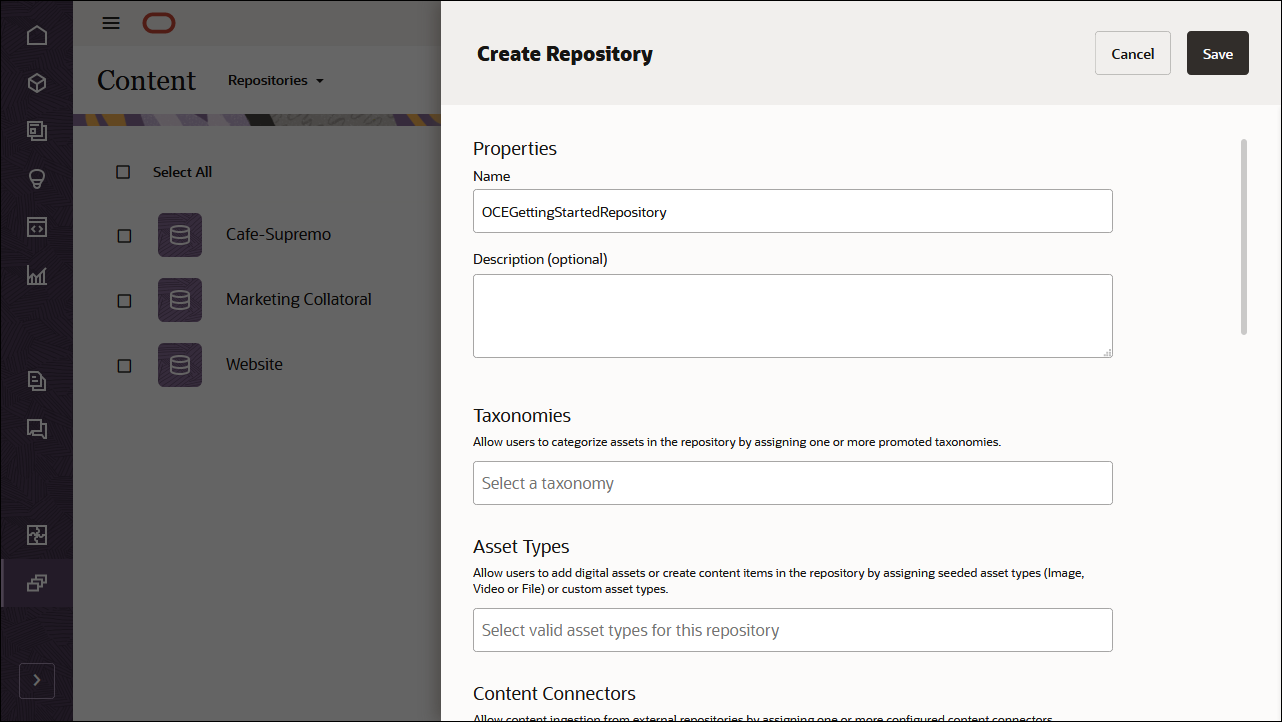
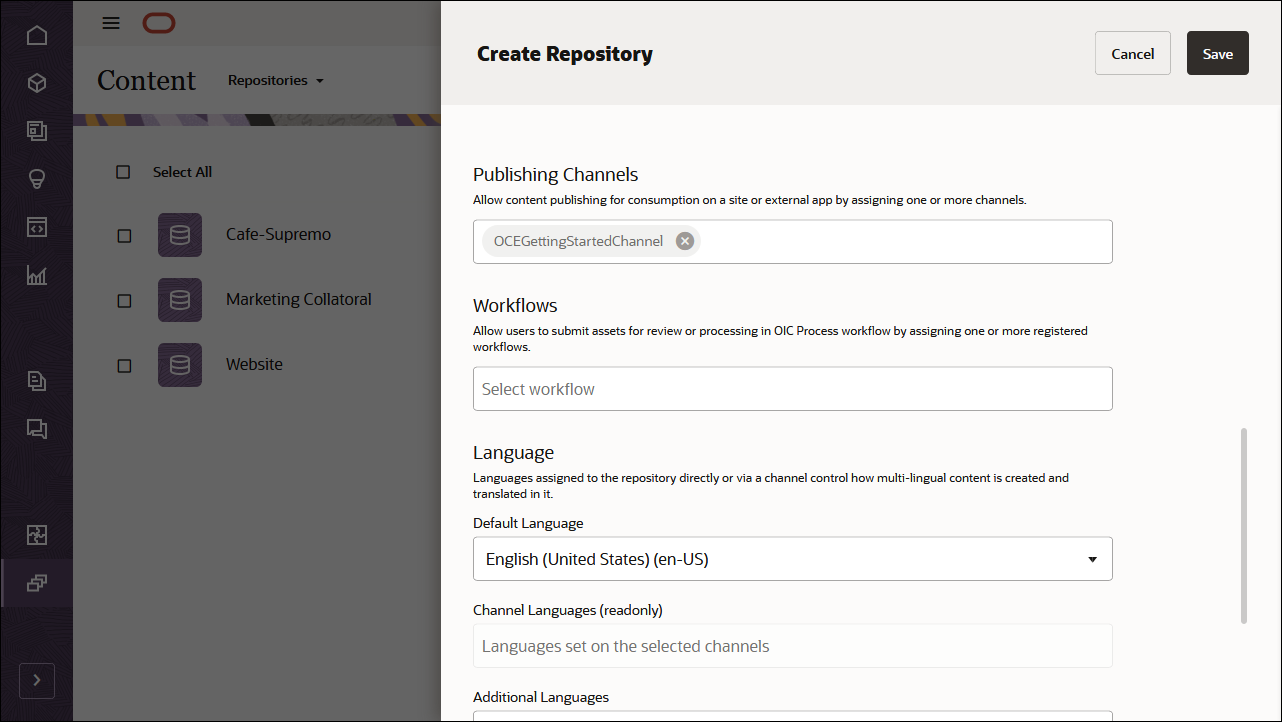
In the Publishing Channels field, select the OCEGettingStartedChannel channel to indicate to Oracle Content Management that content in the OCEGettingStartedRepository repository can be published to the OCEGettingStartedChannel channel. Click Save when you’re done.
Create a Content Model
The next step is to create a content model. You can use either of two methods:
- Method 1: Import the Oracle Content Management Samples Asset Pack
- Method 2: Create your own content model
Import the Oracle Content Management Samples Asset Pack
You can download a preconfigured Oracle Content Management sample assets pack that contains all required content types and assets for this tutorial. If you prefer, you can also create your own content model rather than download the sample assets pack.
You can upload a copy of the content we’re using in this tutorial from the Oracle Content Management Samples Asset Pack. This will let you experiment with the content types and modify the content. If you want to import the Oracle Content Management Samples Asset Pack, download the asset pack archive, OCESamplesAssetPack.zip, and extract it to a directory of your choice:
Download the Oracle Content Management Samples Asset Pack (OCESamplesAssetPack.zip) from the Oracle Content Management downloads page. Extract the downloaded zip file to a location on your computer. After extraction, this location will include a file called OCEGettingStarted_data.zip.
Log in to the Oracle Content Management web interface as an administrator.
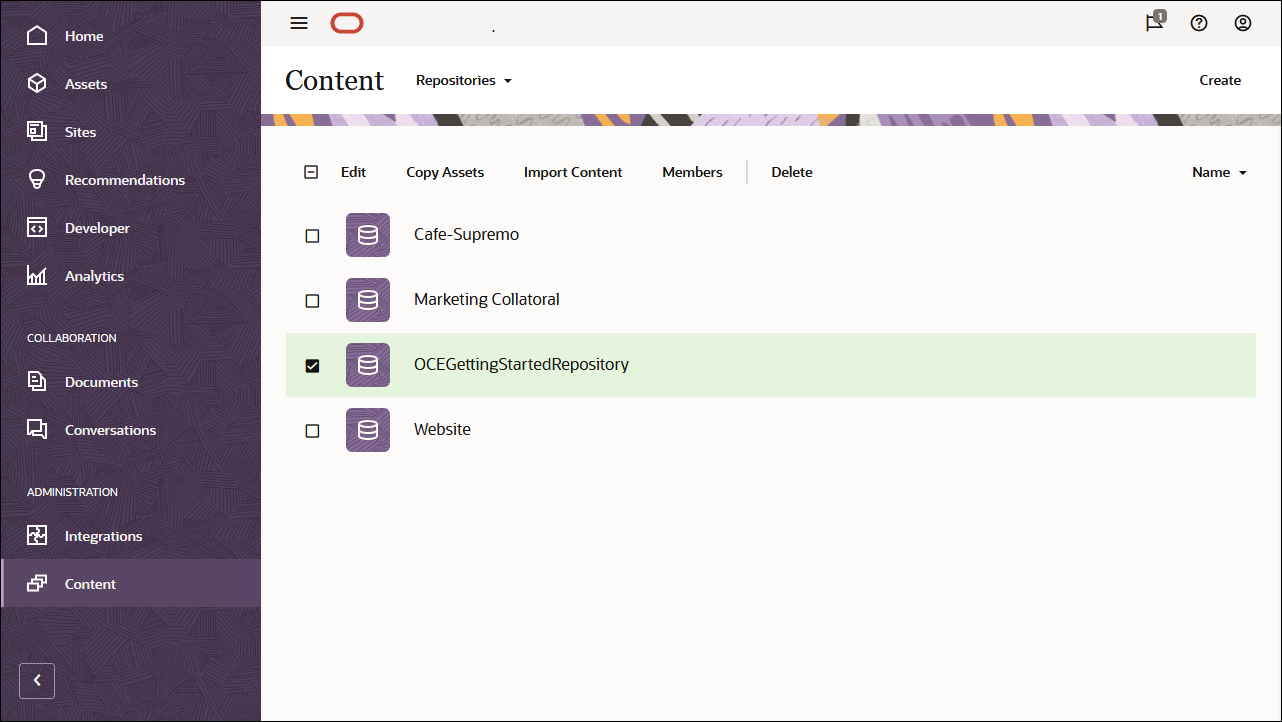
Choose Content in the left navigation menu and then choose Repositories from the selection list in the page header. Now select OCEGettingStartedRepository and click the Import Content button in the top action bar.
Upload OCEGettingStarted_data.zip from your local computer to the Documents folder.
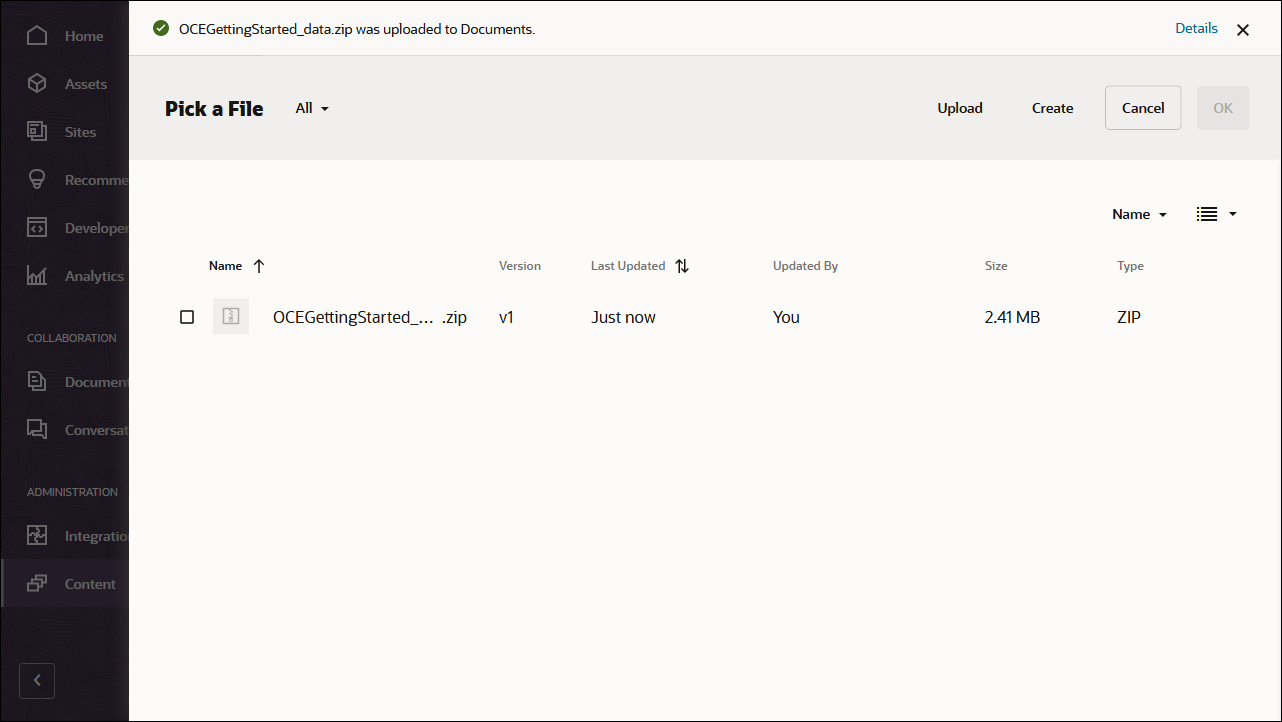
Once it’s uploaded, select OCEGettingStarted_data.zip and click OK to import the contents into your asset repository.
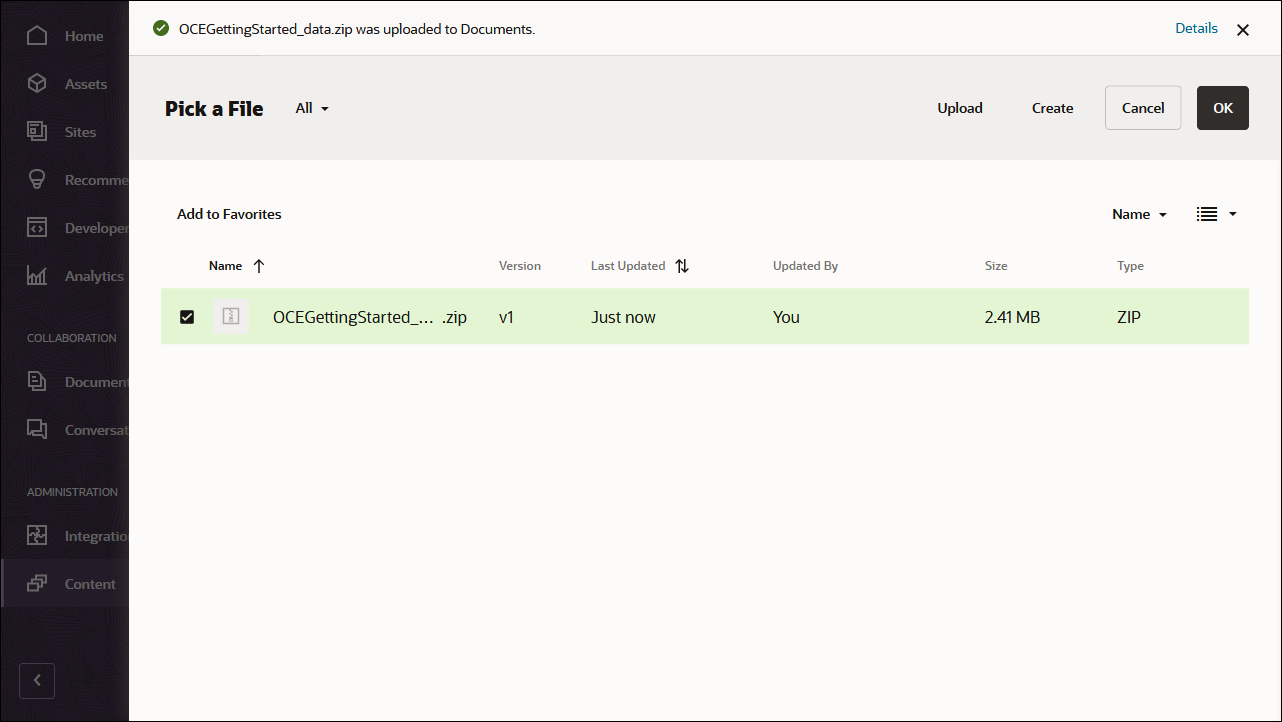
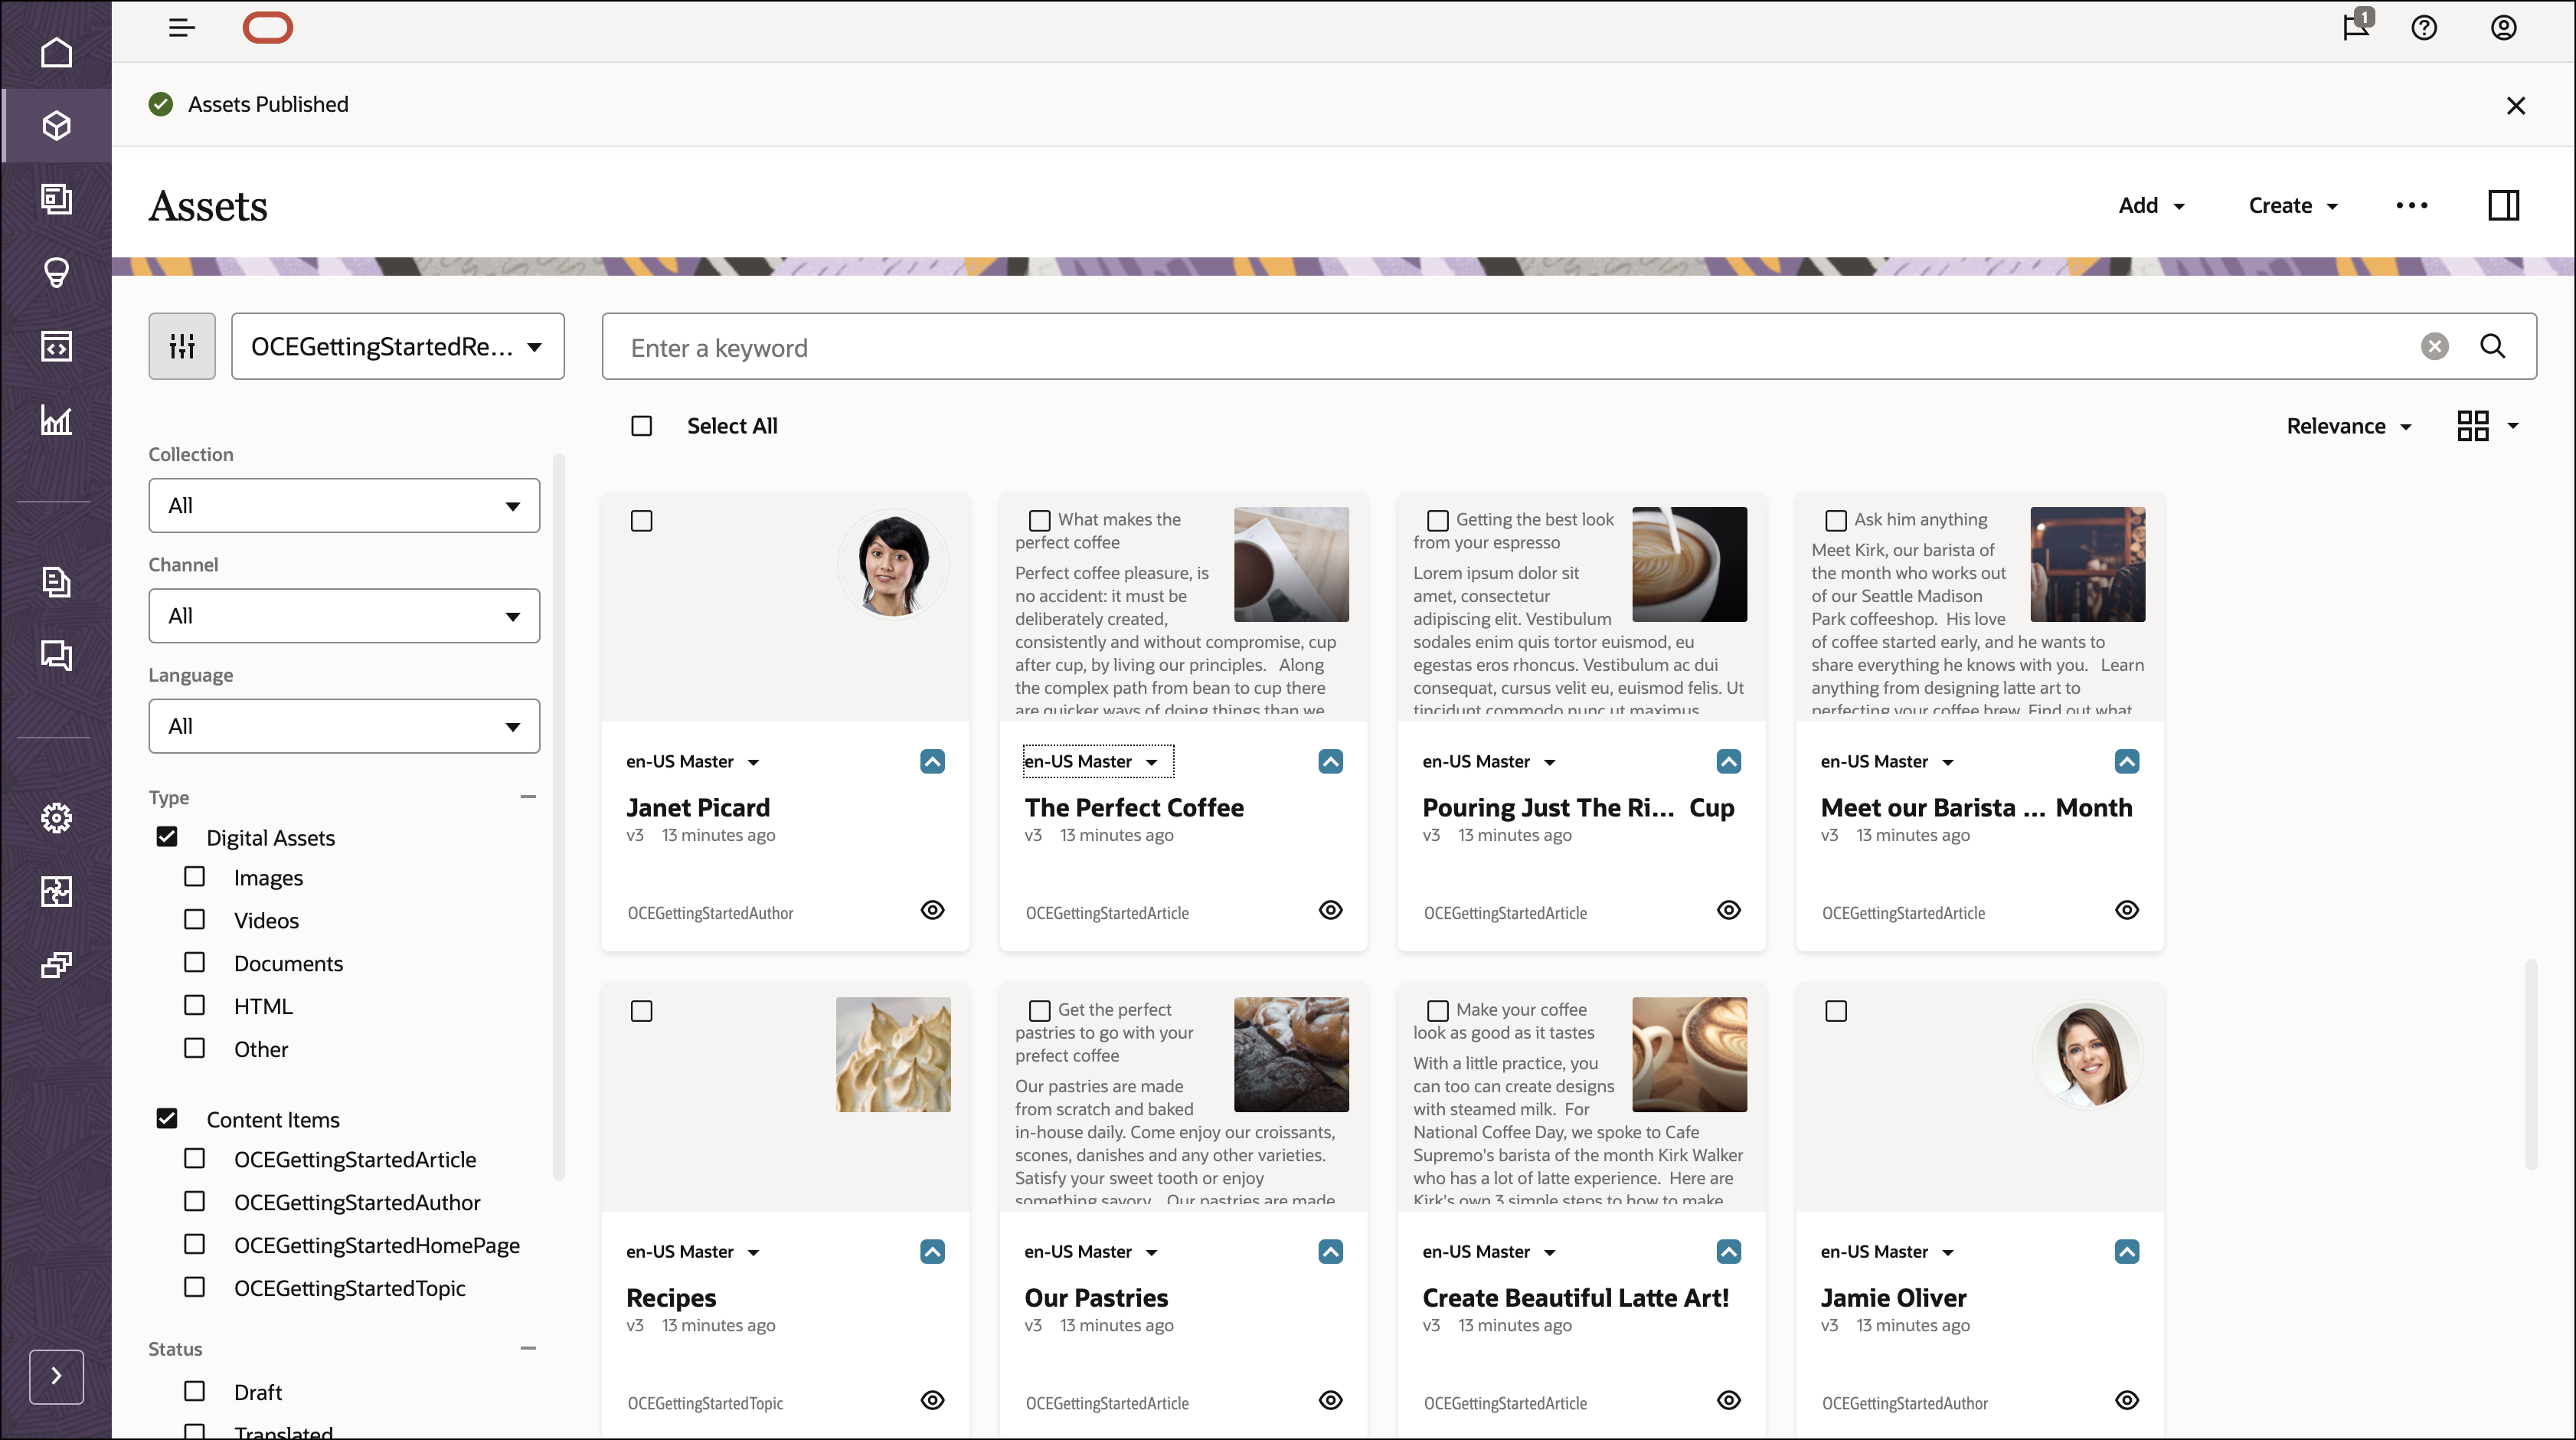
After the content has been imported successfully, navigate to the Assets page and open the OCEGettingStartedRepository repository. You’ll see that all the related images and content items have now been added to the asset repository.
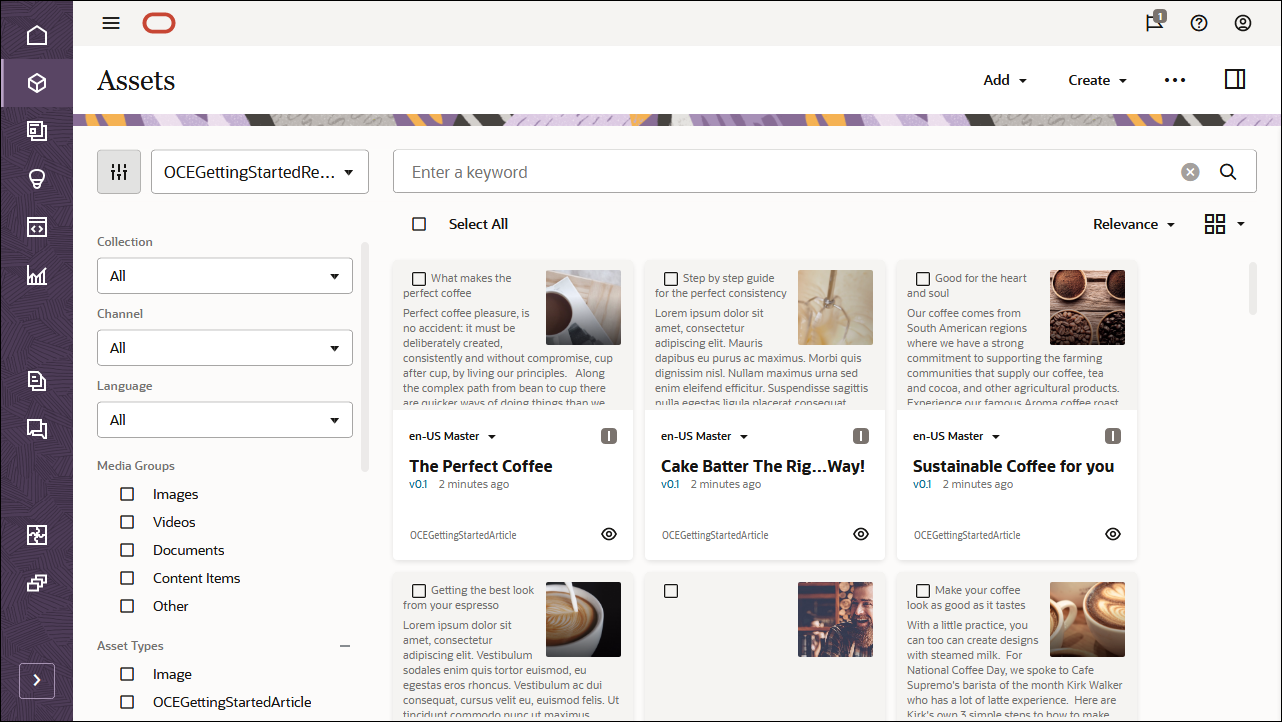
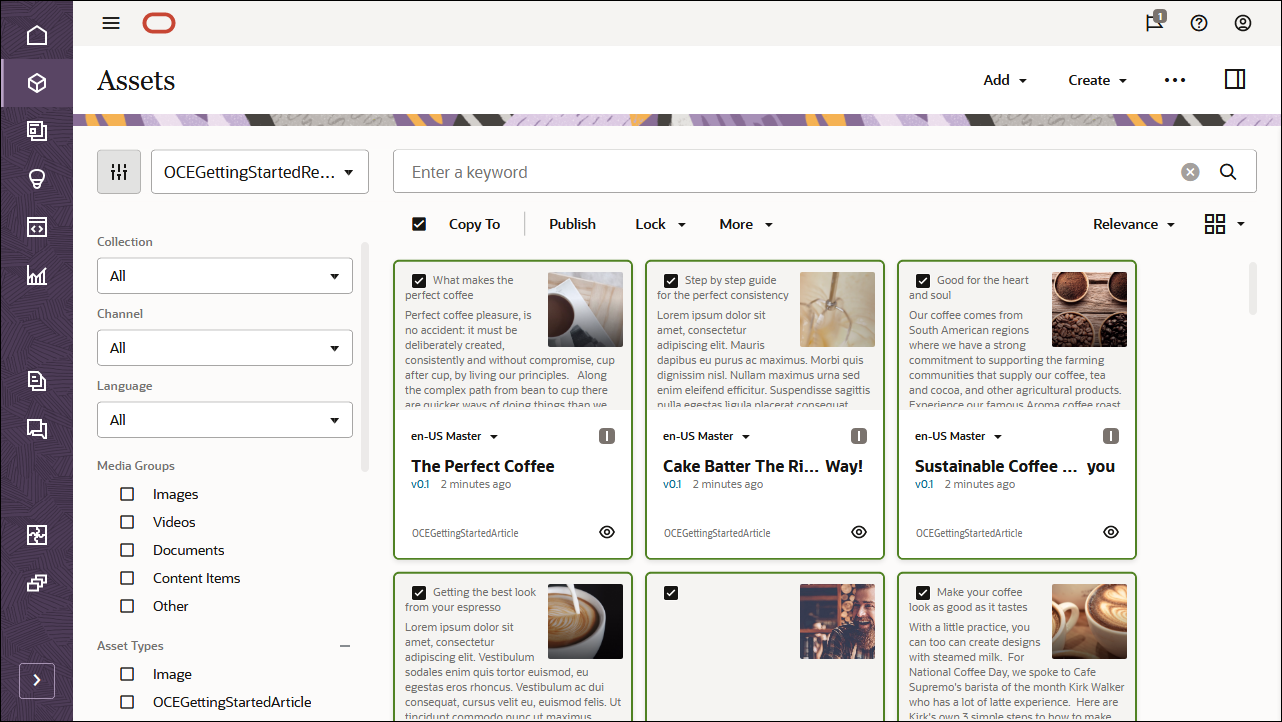
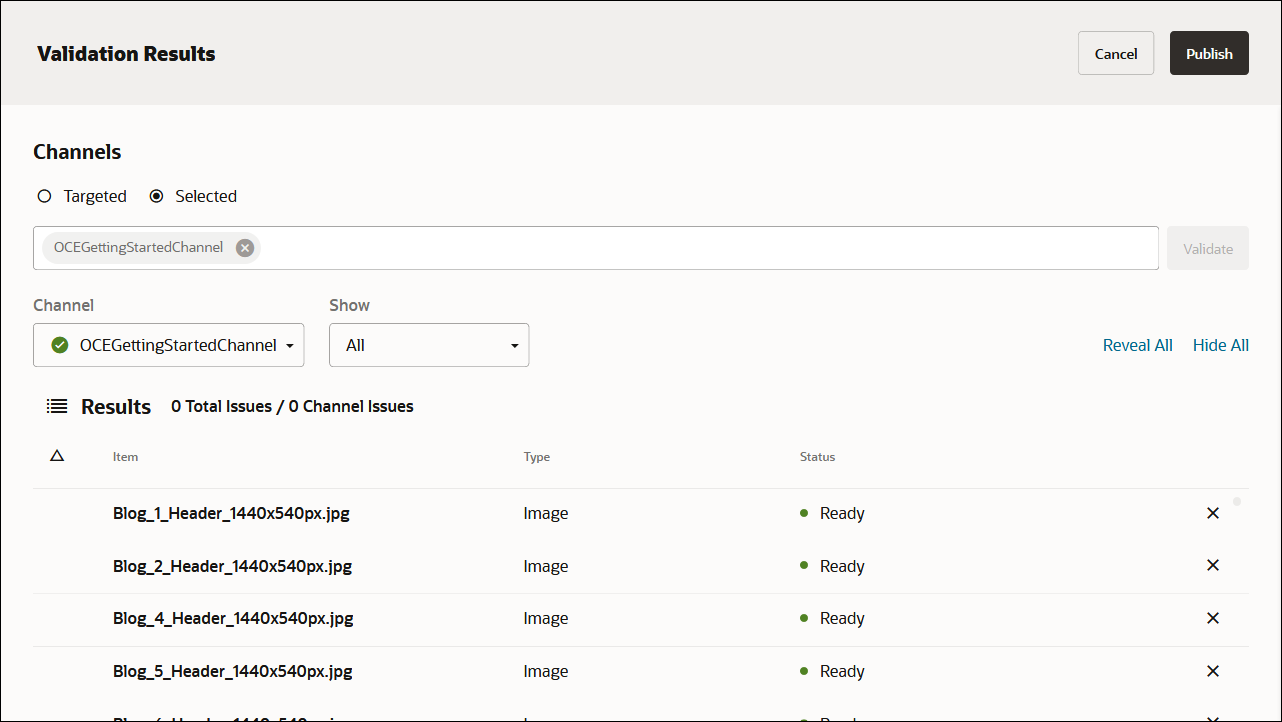
Click Select All on the top left and then Publish to add all the imported assets to the publishing channel that you created earlier, OCEGettingStartedChannel.
Before publishing, you need to validate all the assets. First add OCEGettingStartedChannel as a selected channel, and then click the Validate button.
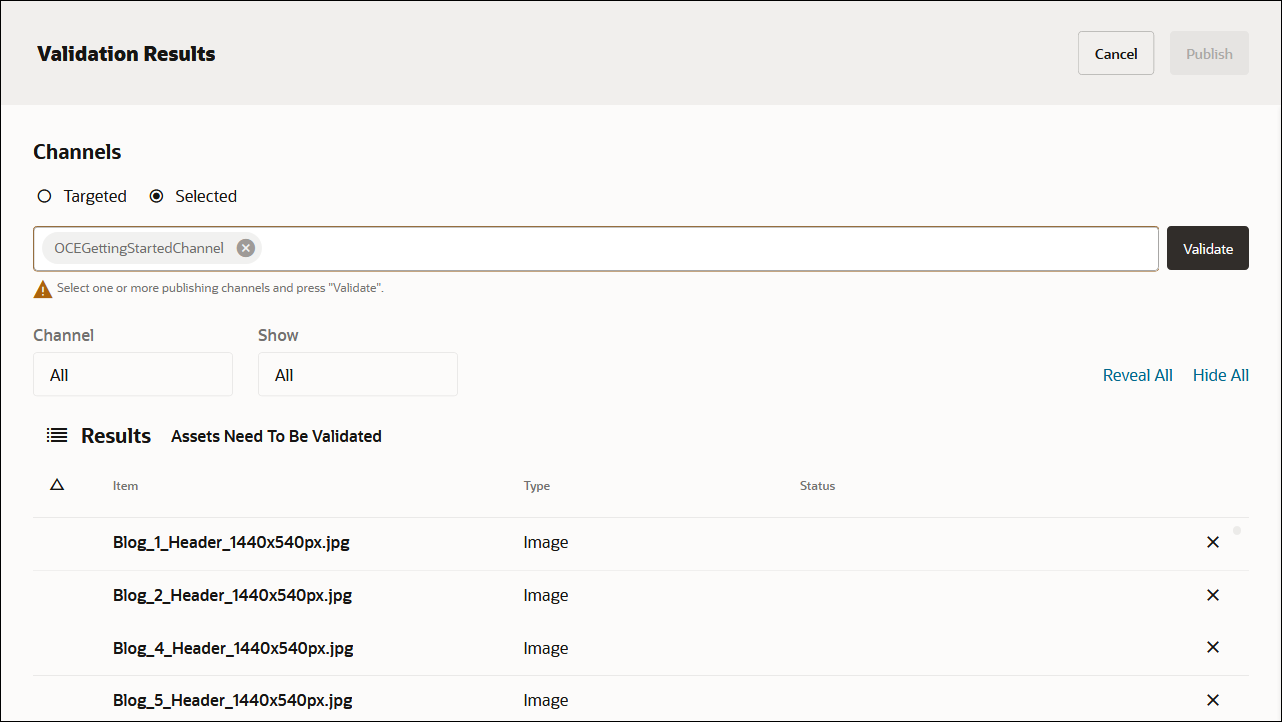
After the assets have been validated, you can publish all the assets to the selected channel by clicking the Publish button in the top right corner.
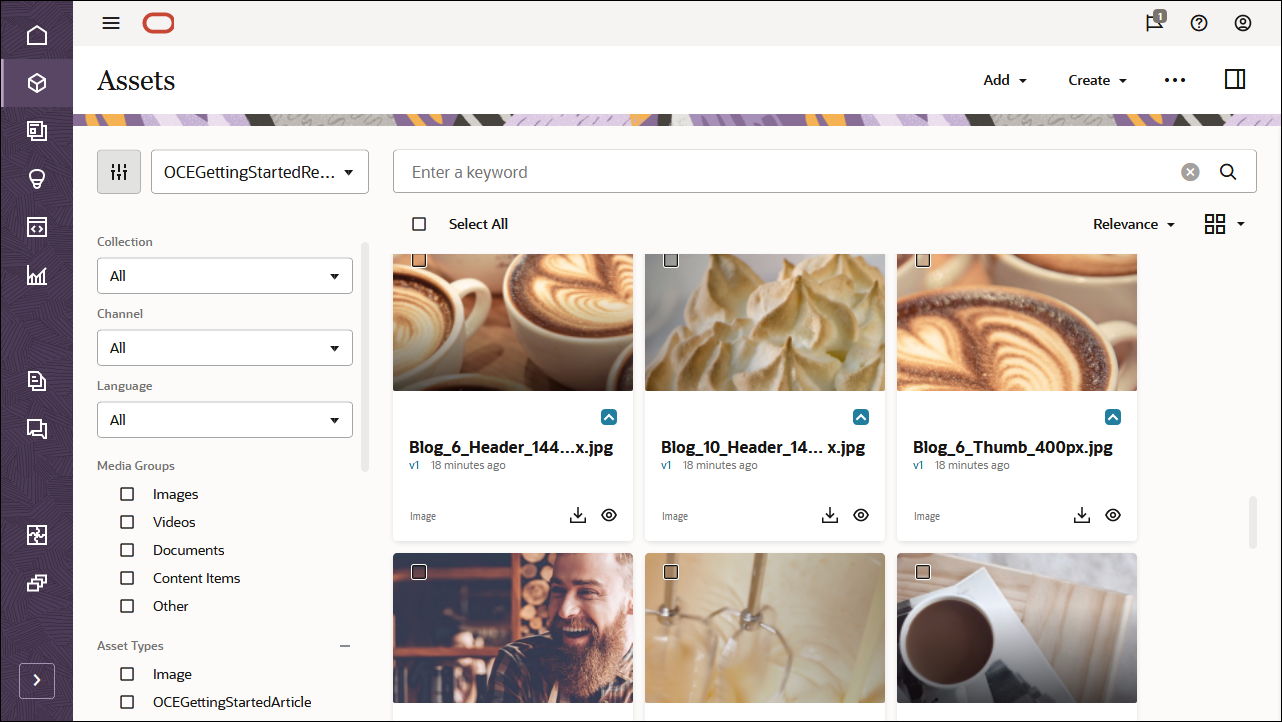
Once that’s done, you can see on the Assets page that all assets have been published. (You can tell by the icon above the asset name.)
After importing the Oracle Content Management Samples Asset Pack, you can start building the blog in Xcode.
Create Your Own Content Model
Instead of importing the Oracle Content Management Samples Asset Pack, you can also create your own content model.
For this tutorial, we’re using a content type called ‘OCEGettingStartedHomePage’ to build the home page for our blog. This home page consists of branding (company name and logo), some URLs for links, and a list of blog topics that should be included on the page.

To create content types for the content model:
- Log in to the Oracle Content Management web interface as an administrator.
- Choose Content in the left navigation menu and then choose Asset Types from the selection list in the page header.
- Click Create in the top right corner.
- Choose to create a content type (not a digital asset type). Repeat this for all required content types.
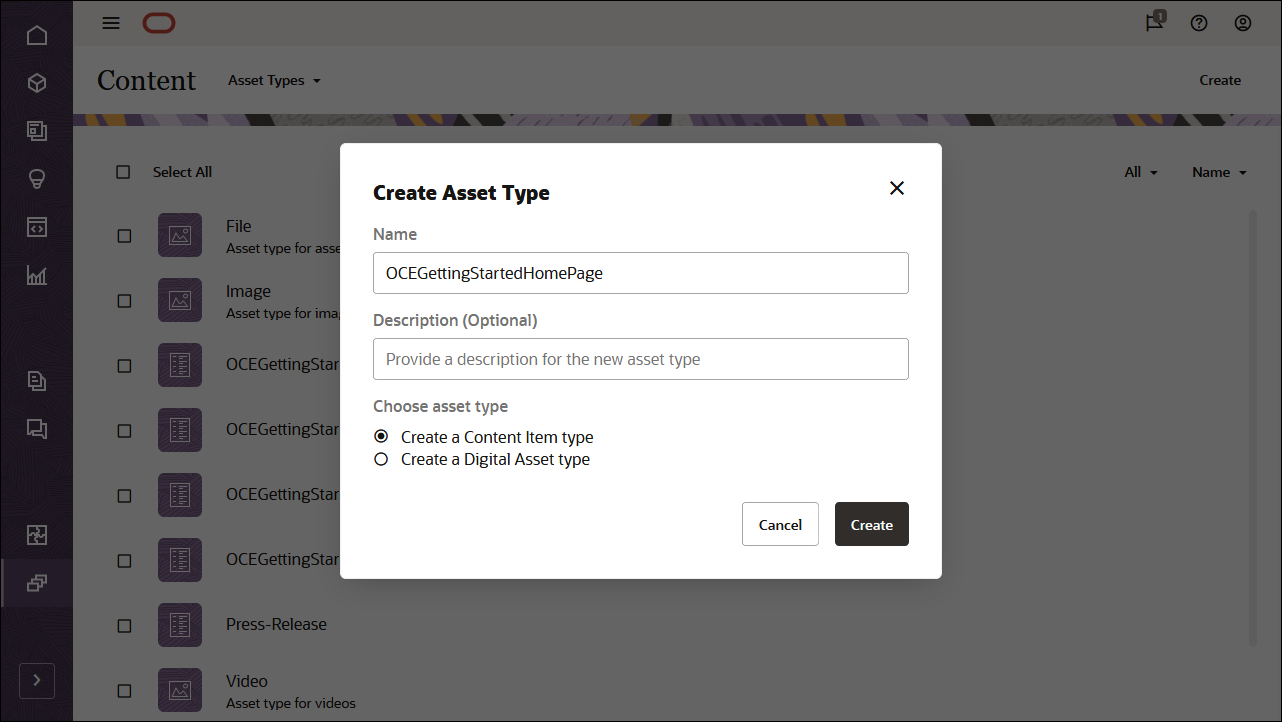
We’ll create four content types, each with its own set of fields:
- OCEGettingStartedHomePage
- OCEGettingStartedTopic
- OCEGettingStartedAuthor
- OCEGettingStartedArticle
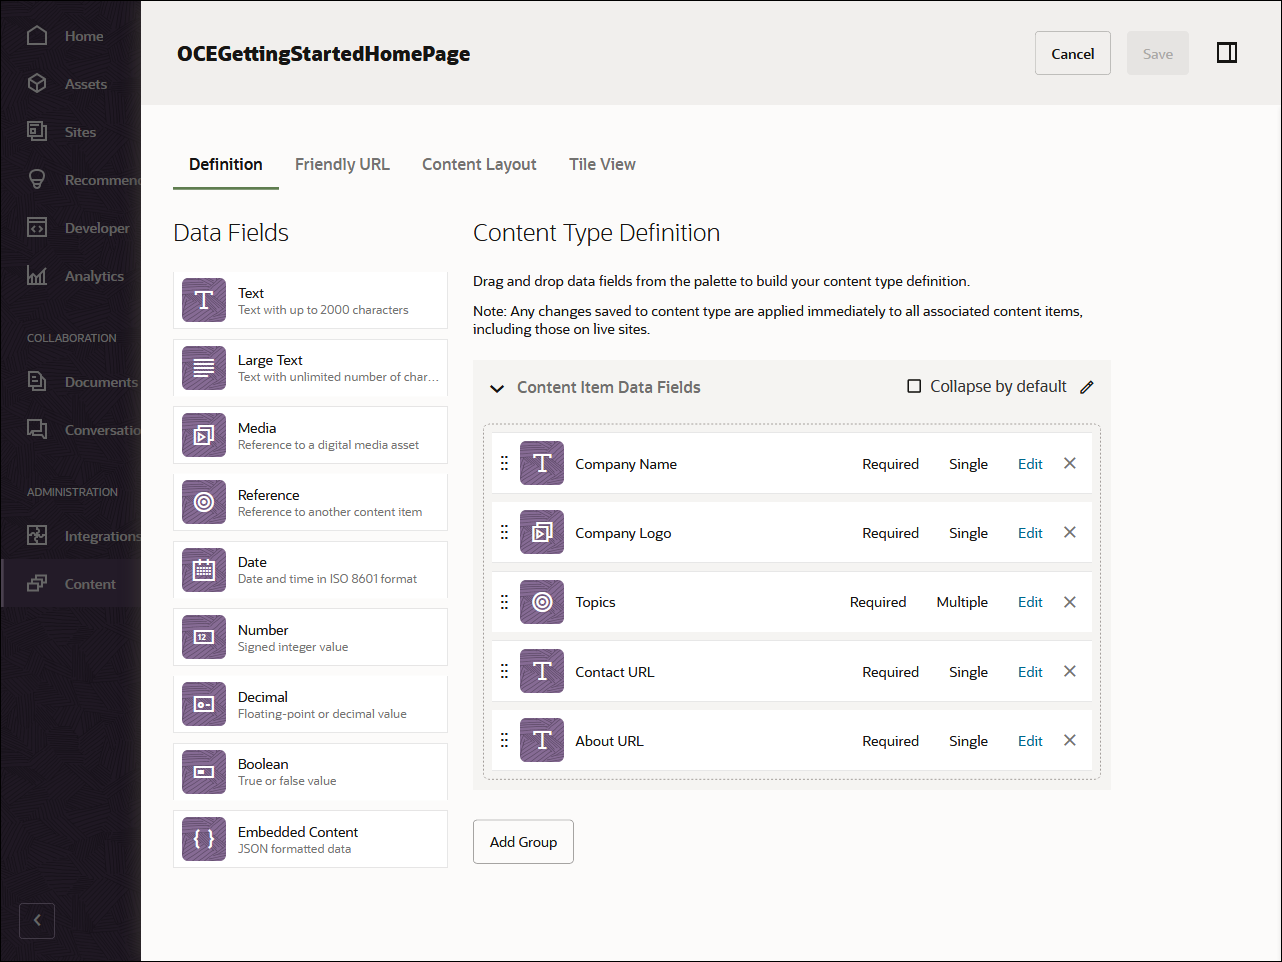
The first content type, OCEGettingStartedHomePage, should have the following fields:
| Display Name | Field Type | Required | Machine Name |
|---|---|---|---|
| Company Name | Single-value text field | X | company_name |
| Company Logo | Single-value text field | X | company_logo |
| Topics | Multiple-value reference field | X | topics |
| Contact URL | Single-value text field | X | contact_url |
| About URL | Single-value text field | X | about_url |
This is what your OCEGettingStartedHomePage content type definition should look like:
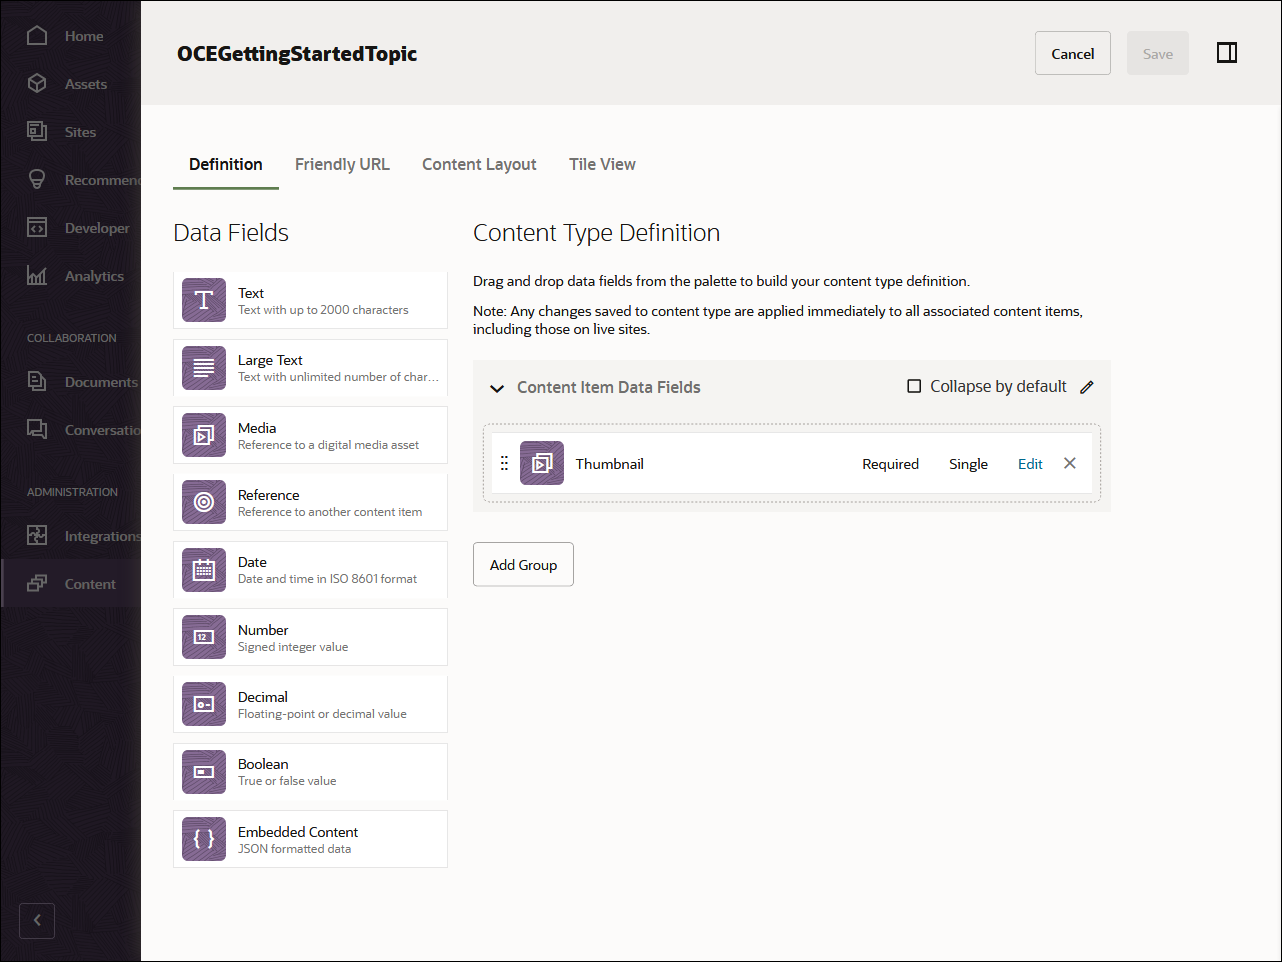
The second content type, OCEGettingStartedTopic, should have the following field:
| Display Name | Field Type | Required | Machine Name |
|---|---|---|---|
| Thumbnail | Single-value image field | X | thumbnail |
This is what your OCEGettingStartedTopic content type should look like:
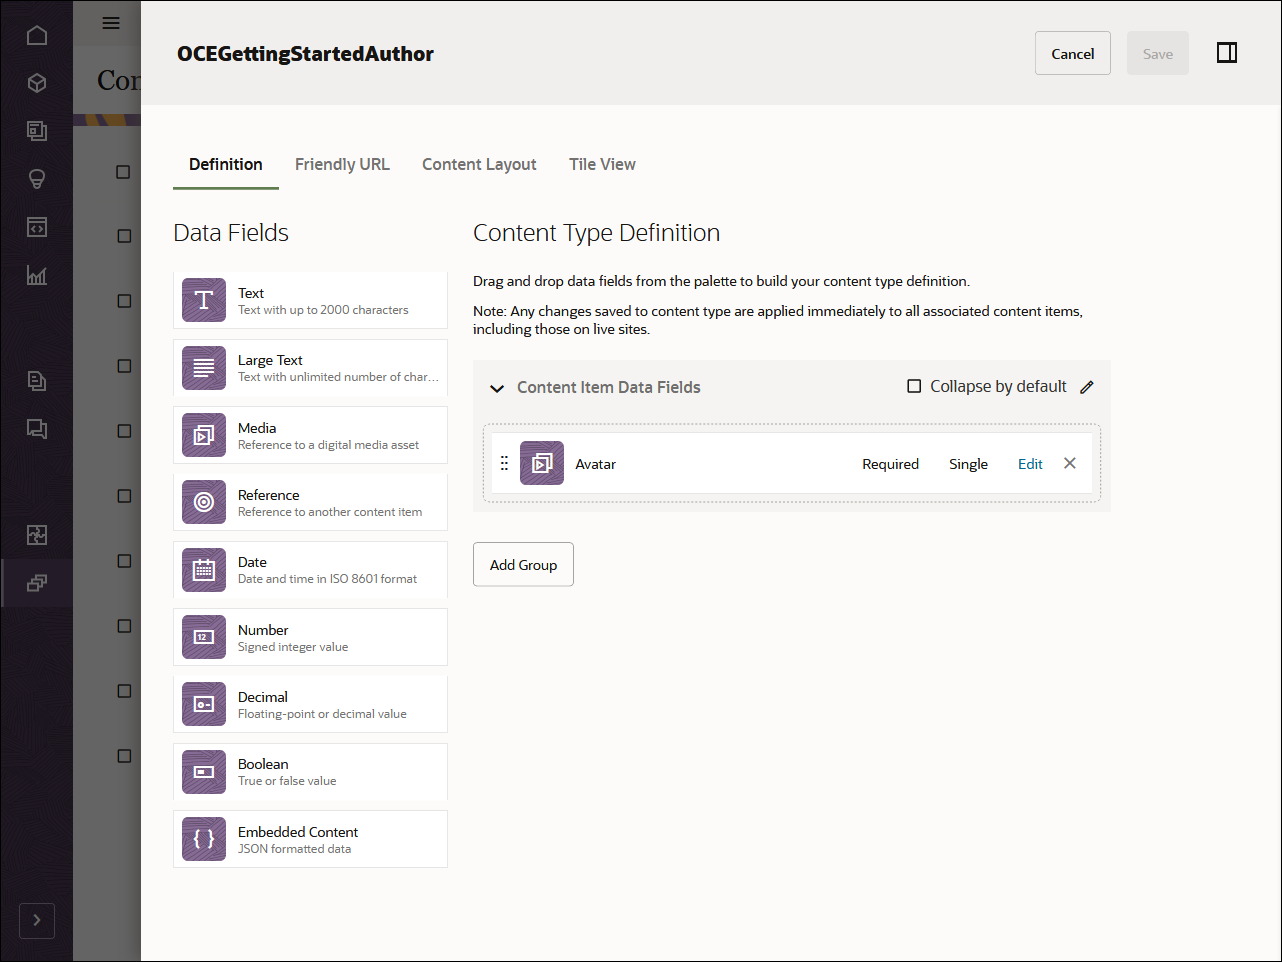
The third content type, OCEGettingStartedAuthor, should have the following fields:
| Display Name | Field Type | Required | Machine Name |
|---|---|---|---|
| Avatar | Single-value image field | X | avatar |
This is what your OCEGettingStartedAuthor content type should look like:
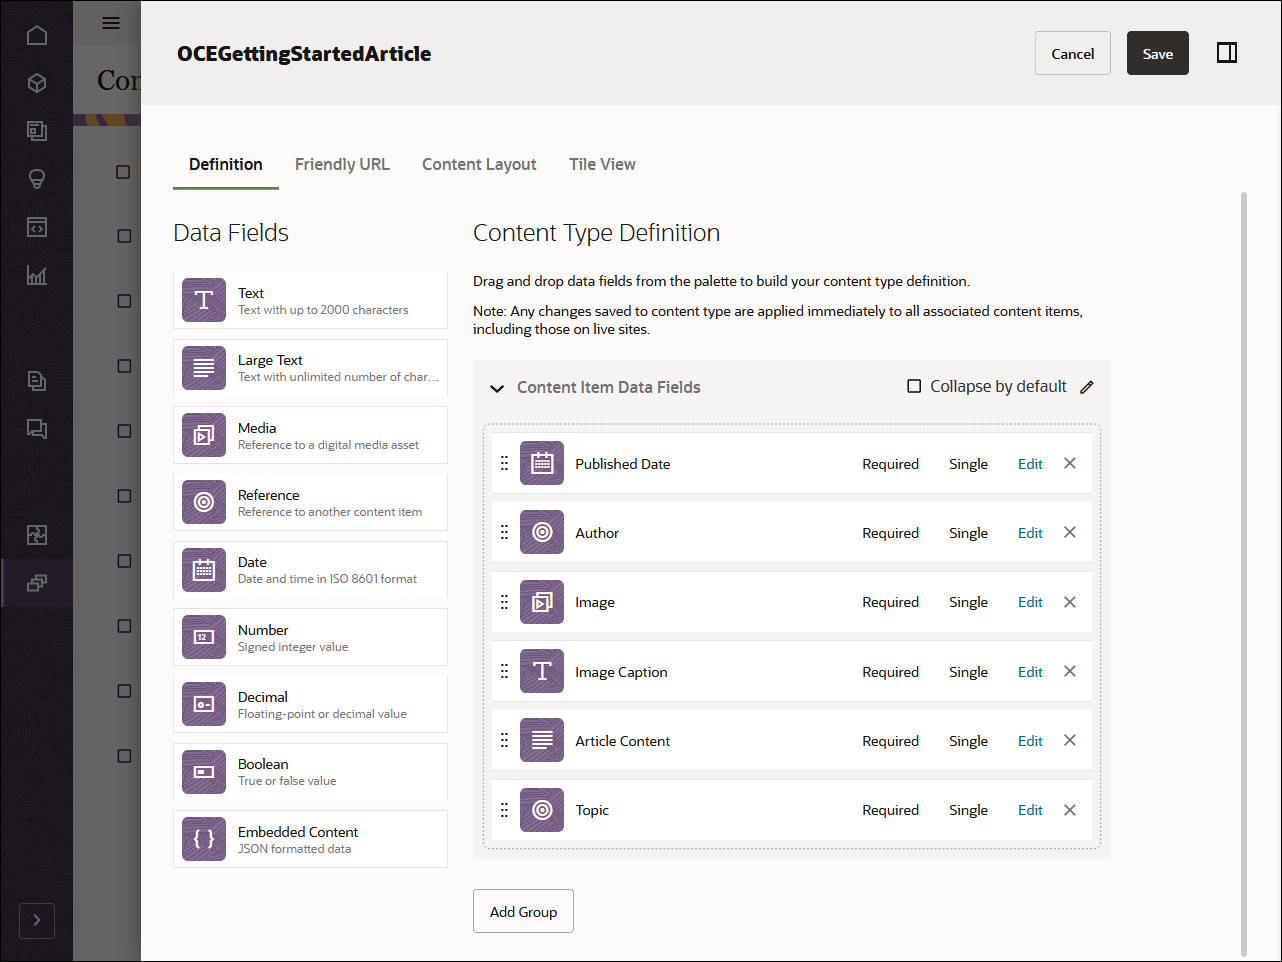
The fourth and final content type, OCEGettingStartedArticle, should have the following fields:
| Display Name | Field Type | Required | Machine Name |
|---|---|---|---|
| Published Date | Single-value date field | X | published_name |
| Author | Single-value reference field | X | author |
| Image | Single-value image field | X | image |
| Image Caption | Single-value text field | X | image_caption |
| Article Content | Single-value large-text field | X | article_content |
| Topic | Single-value reference field | X | topic |
This is what your OCEGettingStartedArticle content type should look like:
Once you’ve created your content types, you can add these content types to the repository that you created earlier, OCEGettingStartedRepository:
- Log in to the Oracle Content Management web interface as an administrator.
- Navigate to OCEGettingStartedRepository.
- Edit the repository and, under Asset Types, specify all four newly created content types. Click the Save button to save the changes.
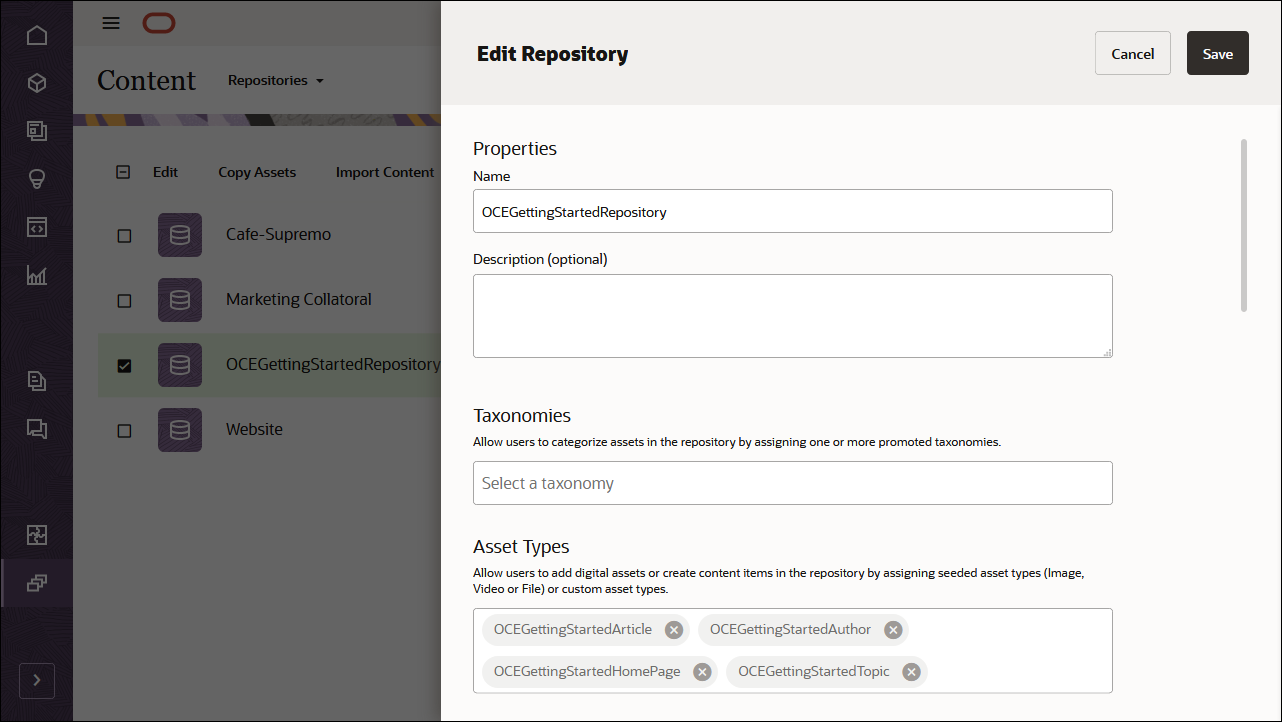
After adding the content types to the repository, you can open the OCEGettingStartedRepository repository on the Assets page and start creating your content items for all the content types.
Step 2: Build the Blog Application in Xcode
To consume our Oracle Content Management content in an iOS application, we can use the iOS blog sample, which is available as an open-source repository on GitHub.
Note: Remember that using the iOS sample is optional, and we use it in this tutorial to get you started quickly. You can also build your own iOS application.
To build the blog in Swift:
Clone the Sample Repository
The iOS blog sample is available as an open-source repository on GitHub.
You’ll first need to clone the sample from GitHub to your local computer:
git clone https://github.com/oracle-samples/oce-ios-blog-sample.gitOnce you’ve cloned the sample, open the Xcode project file, BlogDemo.xcodeproj.
When you open the sample project in Xcode, it will automatically pull in the dependency for content-management-swift, the Swift package that implements the Oracle Content Delivery SDK.
There are no other third-party dependencies for this application, so no other manual installs are required. However, before running the application, there is some additional configuration that is required.
Configure the iOS Application
In this iOS blog sample, you need to configure a few pieces of information so that the Oracle Content Management Content SDK can target the correct instance URL with the correct channel token. These values are used each time your application requests data from your Oracle Content Management instance.
Open the file credentials.json and change both key-value pairs to reflect your instance URL and the channel token associated with your publishing channel. The channel for this tutorial is OCEGettingStartedChannel.
{
    "url": "https://samples.mycontentdemo.com",
    "channelToken": "47c9fb78774d4485bc7090bf7b955632"
}
Use the Content SDK to Fetch Content
Oracle Content Management offers a Swift package (content-management-swift) consisting of the OracleContentCore and OracleContentDelivery libraries to help discover and use content in your applications. The package is hosted on GitHub.
Learn more about the Content SDK for Swift in the Oracle Content Management documentation library:
You can leverage these Content SDK libraries to fetch content so that we can render it in our iOS application.
Onboard the Application
In order to request data, you need to provide some required information to your library, which is referred to as onboarding the application. You assign particular pieces of information so that requests are properly formed and point to the correct instance URL.
In this demo, when the application first starts, Onboarding.urlProvider is assigned to be an instance of your own class, MyURLProvider. This establishes the instance URL and channel token that are used by the content library for each request made.
While specifying a URL provider isn’t strictly necessary (as URL and token information may be specified on a per-request basis), assigning them reduces the amount of code required for each call site.
@main
struct BlogDemo: App {
    init() {
        // ...

        // The sample code expects the URL and channel token to be provided by ``OracleContentCore.Onboarding``
        // Assign your ``OracleContentCore.URLProvider`` implementation to the ``OracleContentCore.Onboarding.urlProvider`` property
        Onboarding.urlProvider = MyURLProvider()

        // ...

    }
}
The MyURLProvider implementation reads data from credentials.json to obtain the URL and channel token.
{
    "url": "https://samples.mycontentdemo.com",
    "channelToken": "47c9fb78774d4485bc7090bf7b955632"
}
Each time the Oracle content library needs to build a request, it retrieves the following property:
/// This function provides the URL to be used for each OracleContentCore request
///
/// Services which implement ``OracleContentCore.ImplementsOverrides`` may provide a different URL and
/// authorization headers (if required) on a call-by-call basis
public var url: () -> URL? = {
  return URL(string: MyURLProvider.credentials.url)
}
Each time the library needs to build a request, it will also retrieve the delivery token:
/// This function provides the delivery channel token to be used for each OracleContentCore request
///
/// Services which implement ``OracleContentCore.ImplementsChannelToken`` may override this value
/// on a call-by-call basis
public var deliveryChannelToken: () -> String? = {

  return MyURLProvider.credentials.channelToken
}
Additionally, assigning to Onboarding.logger provides the opportunity to define your own logging implementation. For this demo, the MyLogger implementation consists of simply “printing” to the console. In production environments, your logger could utilize universal logging, core data, or any technology you choose.
@main
struct BlogDemo: App {
    init() {
        // ...

         Onboarding.logger = MyLogger()

        // ...

    }
}
Request Data Using the Oracle Content Library
Note: All network request code for this demo can be found in BlogNetworking.swift.
We can now leverage the Content SDK to fetch content so that we can render it in the iOS application.
The BlogNetworking.swift file contains all the code to get data for the application. The model object associated with each page will call into various methods in order to retrieve Oracle Content Management data.
Home Page Data
The home page of our application is BlogDemoMain.swift, a SwiftUI file with an associated model object. The model object is reponsible for maintaining the state of the page and issuing the function calls necessary to start the data retrieval process. As data is received, the state of the page changes and SwiftUI will refresh the UI accordingly.
Initially, the main page requests two different pieces of data:
- First, we query for the content item representing the home page of the blog.
- Then we download the logo referenced by the content item.
Open BlogNetworking.swift and find the fetchHomePage() function, which performs the initial request.
/// Retrieve the content item which represents the home page of the blog
/// - returns: Asset
public func fetchHomePage() async throws -> Asset {
    let typeNode = QueryNode.equal(field: "type", value: "OCEGettingStartedHomePage")
    let nameNode = QueryNode.equal(field: "name", value: "HomePage")
    let q = QueryBuilder(node: typeNode).and(nameNode)

    let result = try await DeliveryAPI
        .listAssets()
        .query(q)
        .fields(.all)
        .limit(1)
        .fetchNextAsync()
        .items
        .first

    guard let foundResult = result else {
        throw BlogNetworkingError.homePageNotFound
    }

    return foundResult
}
This function uses Swift concurrency to request data. Note that all request objects (or services) are namespaced to DeliveryAPI. In this example, our request object is listAssets().
Following the request object are a series of builder components which allow us to fine-tune our request. Here we have specified some query details, asked to retrieve all fields, and have limited our response data to only a single object.
Our request to Oracle Content Management is submitted using the invocation verb fetchNextAsync().
Note: Since our request object starts with “list”, the invocation verb will start with “fetchNext”.
“List” requests will return data indicating how many records were returned, whether more data exists, and a collection of results (in the “items” property).
Our function grabs the first value from the “items” property and returns it. This is the asset representing our blog and it contains the logo ID, the company name, the about and contact URLs, and a list of topics.
With the logo ID available, we can issue our second request to download the logo:
/// Download the logo for display on the home page
/// - parameter logoId: The identifier of the logo to download
/// - returns: BlogImageState
public func fetchLogo(logoId: String?) async throws -> BlogImageState {

    do {
        guard let logoID = logoId else {
          throw BlogNetworkingError.missingLogoId
        }

        let result = try await DeliveryAPI
            .downloadNative(identifier: logoID)
            .downloadAsync(progress: nil)

        guard let image = UIImage(contentsOfFile: result.result.path) else {
            throw OracleContentError.couldNotCreateImageFromURL(URL(string: result.result.path))
        }

        return .image(image)

    } catch {
        return .error(error)
    }

}
Our request and invocation are much simpler in this function. We create the request object using downloadNative(identifier: logoID) and submit it using the invocation verb downloadAsync.
When the object has been downloaded, we convert the data to a UIImage and return it as a BlogImageState enumeration with the image itself as the associated value.
Note: This sample uses the
BlogImageStateenum because it allows us to represent the various states of image without having to utilize optional values. This makes uptake in SwiftUI very easy.
Topic Data
When our model requested the home page data, it executed a call that looked like this:
self.home = try await self.networking.fetchHomePage() With the home page successfully retrieved, we need to find the collection of asset values that represent the topics in our blog. To do that, we ask for the field named “topics” whose type is an array of assets.
self.topics = try self.home.customField("topics") as [Asset]BlogDemoMain.swift will iterate over this collection of topics and represent each as an element in a grid view. That UI representation is defined in Topic.swift and its associated model object, TopicModel.swift.
In order to display information about an individual topic, we must perform two tasks:
- We need to retrieve the detailed information about each topic.
- We must download the image referenced by each topic.
In TopicModel.swift, we call into the networking code to obtain the full asset:
let fullAsset = try await self.networking.readAsset(assetId: self.topic.identifier)Obtaining detailed information about topic is a simple process. Construct a read request using the given identifier and then fetch the data.
/// Obtain detailed information about an Asset
/// - parameter assetId: The identifier of the asset to read
/// - returns: Asset
public func readAsset(assetId: String) async throws -> Asset {
    let result = try await DeliveryAPI
        .readAsset(assetId: assetId)
        .fetchAsync()

    return result
}
Note: All read requests return a single object and are submitted using an invocation verb that begins with “fetch”.
Once we have retrieved the detailed information about our topic, we need to extract the data that defines the thumbnail and then download it.
In TopicModel.swift, we obtain the thumbnail information by asking for the custom field that is named “thumbnail”. Because custom fields can be one of many different types, we need to explicitly specify that this field is an asset type. Once we have successfully found the asset, we can grab its identifier.
imageIdentifier = (try fullAsset.customField("thumbnail") as Asset).identifierWith the identifier available, TopicModel.swift can now ask the networking code to retrieve the medium rendition of the thumbnail image.
let imageState = await self.networking.downloadMediumRendition(identifier: imageIdentifier)
return imageState
The networking code to obtain the image creates a “downloadRendition” request object to retrieve a rendition named ‘Medium’ in jpg format. The invocation verb used to submit the request is “downloadAsync”.
When the object has been downloaded, we convert the data to a UIImage and return it as a BlogImageState enumeration with the image itself as the associated value.
/// Downloads the "Medium" rendition of an asset and returns the value as a `BlogImageState`
/// Note that any error while downloading the image will result in a placeholder image
public func downloadMediumRendition(identifier: String) async -> BlogImageState {

    do {
        let result = try await DeliveryAPI
                                .downloadRendition(identifier: identifier,
                                                   renditionName: "Medium",
                                                   format: "jpg")
                                .downloadAsync(progress: nil)

        guard let uiImage = UIImage(contentsOfFile: result.result.path()) else {
            throw OracleContentError.couldNotCreateImageFromURL(result.result)
        }

        return .image(uiImage)

    } catch {
        return .image(UIImage(systemName: "questionmark.circle")!)
    }

}
Now that we have both the detailed topic information and the thumbnail image, SwiftUI can construct the visual representation of a topic.

Article Listing Data
Tapping on a topic navigates the user to a new page containing a listing of articles assigned to the selected topic.
Building the articles pages is very similar to the process used to build the topics listing. Given a topic identifier, we need to:
- Retrieve the listing of articles for that topic, and
- For each article, retrieve the thumbnail rendition of the asset contained in its “image” field.
When retrieving the list of assets, our request object is .listAssets().
Absent any other builder components, this would retrieve all published assets from the publishing channel specified in credentials.json. What we want, however, is to retrieve only those assets whose type is OCEGettingStartedArticle and whose topic property matches the topic identifier passed in.
/// Obtain the collection of articles for a given topic. Limited to a maximum of 50 articles for demo purposes.
/// - parameter topic: Asset
/// - returns: [Asset] representing the articles for the specified topic
public func fetchArticles(for topic: Asset) async throws -> [Asset] {

    let typeNode = QueryNode.equal(field: "type", value: "OCEGettingStartedArticle")
    let fieldsTopicNode = QueryNode.equal(field: "fields.topic", value: topic.identifier)
    let fullQuery = QueryBuilder(node: typeNode).and(fieldsTopicNode)

    let result = try await DeliveryAPI
        .listAssets()
        .query(fullQuery)
        .order(.field("fields.published_date", .desc))
        .limit(50)
        .fetchNextAsync()

    return result.items
}
For each of the articles retrieved, we need to determine what image to download. We get the identifier of the asset referenced in the “image” field and use that to submit a request to download its thumbnail.
let identifier = (try article.customField("image") as Asset).identifier
let image = await self.networking.downloadThumbnail(identifier: identifier, fileGroup: article.fileGroup)
The networking code to request the download looks like this:
/// Downloads the thumbnail rendition of an asset and returns the values as a ``BlogImageState``
/// Note that any error while downloading the image will result in a placeholder image
/// - parameter identifier: The identifier of the asset
/// - parameter fileGroup: The file group of the asset - used to differentiate thumbnails for digital assets, videos and "advanced videos"
public func downloadThumbnail(identifier: String, fileGroup: String) async -> BlogImageState {
    do {
        let result = try await DeliveryAPI
            .downloadThumbnail(identifier: identifier, fileGroup: fileGroup)
            .downloadAsync(progress: nil)

        guard let uiImage = UIImage(contentsOfFile: result.result.path()) else {
           throw OracleContentError.couldNotCreateImageFromURL(result.result)
        }

        return .image(uiImage)
    } catch {
        Onboarding.logError(error.localizedDescription)
        return .image(UIImage(systemName: "questionmark.circle")!)
    }
}
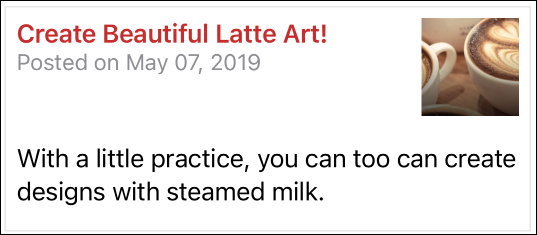
We can now display a preview of each article:
Article Data
Tapping on an article preview causes the final page of the sample application to display—that is, the article itself. As before, several data requests need to be performed:
- Given the identifier of the article selected, we need to retrieve its detailed information.
- Download the author’s avatar.
- Download the article image to display.
@MainActor
func fetchArticle() async throws {

    self.article = try await self.networking.readArticle(assetId: article.identifier)

    let author: Asset = try self.article.customField("author")
    let authorAvatar: Asset = try author.customField("avatar")

    Task {
        self.avatar = await self.networking.downloadNative(identifier: authorAvatar.identifier)
    }

    Task {
        let hero: Asset = try self.article.customField("image_16x9")
        self.heroImage = await self.networking.downloadNative(identifier: hero.identifier)
    }
}
Reading the detailed information for an asset is a straightforward process:
/// Obtain detailed information about an Asset
/// - parameter assetId: The identifier of the asset to read
/// - returns: Asset
public func readAsset(assetId: String) async throws -> Asset {
    let result = try await DeliveryAPI
        .readAsset(assetId: assetId)
        .fetchAsync()

    return result
}
Downloading the avatar and article images both follow the same general pattern that was used to obtain other images:
/// Downloads the native rendition of an asset and returns the values as a ``BlogImageState``
/// Note that any error while downloading the image will result in a placeholder image
public func downloadNative(identifier: String) async -> BlogImageState {
    do {
        let result = try await DeliveryAPI
            .downloadNative(identifier: identifier)
            .downloadAsync(progress: nil)

        guard let uiImage = UIImage(contentsOfFile: result.result.path()) else {
           throw OracleContentError.couldNotCreateImageFromURL(result.result)
        }

        return .image(uiImage)
    } catch {
        Onboarding.logError(error.localizedDescription)
        return .image(UIImage(systemName: "questionmark.circle")!)
    }

}
The result is a fully-formatted blog article:
Step 3: Run Your Application
With your application complete, you can run it in the simulator or deploy it to any iPhone or iPad running iOS or iPadOS 16.0 or greater.
Conclusion
In this tutorial, we created an iOS blog application site, which can be found on GitHub. This application uses Oracle Content Management as a headless CMS. After setting up and configuring Oracle Content Management with a channel of published content for the blog tutorial, we ran the application to fetch the required content.
For more information on Swift, go to the Swift website.
Learn about important Oracle Content Management concepts in the documentation.
You can find more samples like this on the Oracle Content Management Samples page in the Oracle Help Center.
Build a Blog App in Swift for iOS with Headless Oracle Content Management
F82145-01
May 2023
Copyright © 2021, 2023, Oracle and/or its affiliates.
Primary Author: Oracle Corporation