Build an Image Gallery in Swift for iOS with Headless Oracle Content Management
Introduction
This tutorial will introduce you to the basic steps of building an image viewer using Swift for iOS, with Oracle Content Management as the content management system (CMS) and its Content SDK. You’ll see how taxonomies can be used to categorize content and how different renditions of digital assets can be used for various use cases. This Swift sample is available on GitHub.
The tutorial consists of three steps:
Prerequisites
Before proceeding with this tutorial, we recommend that you read the following information first:
To follow this tutorial, you’ll need:
- an Oracle Content Management subscription
- an Oracle Content Management account with the Content Administrator role
- a Mac computer with Xcode version 14.0 or higher
What We’re Building
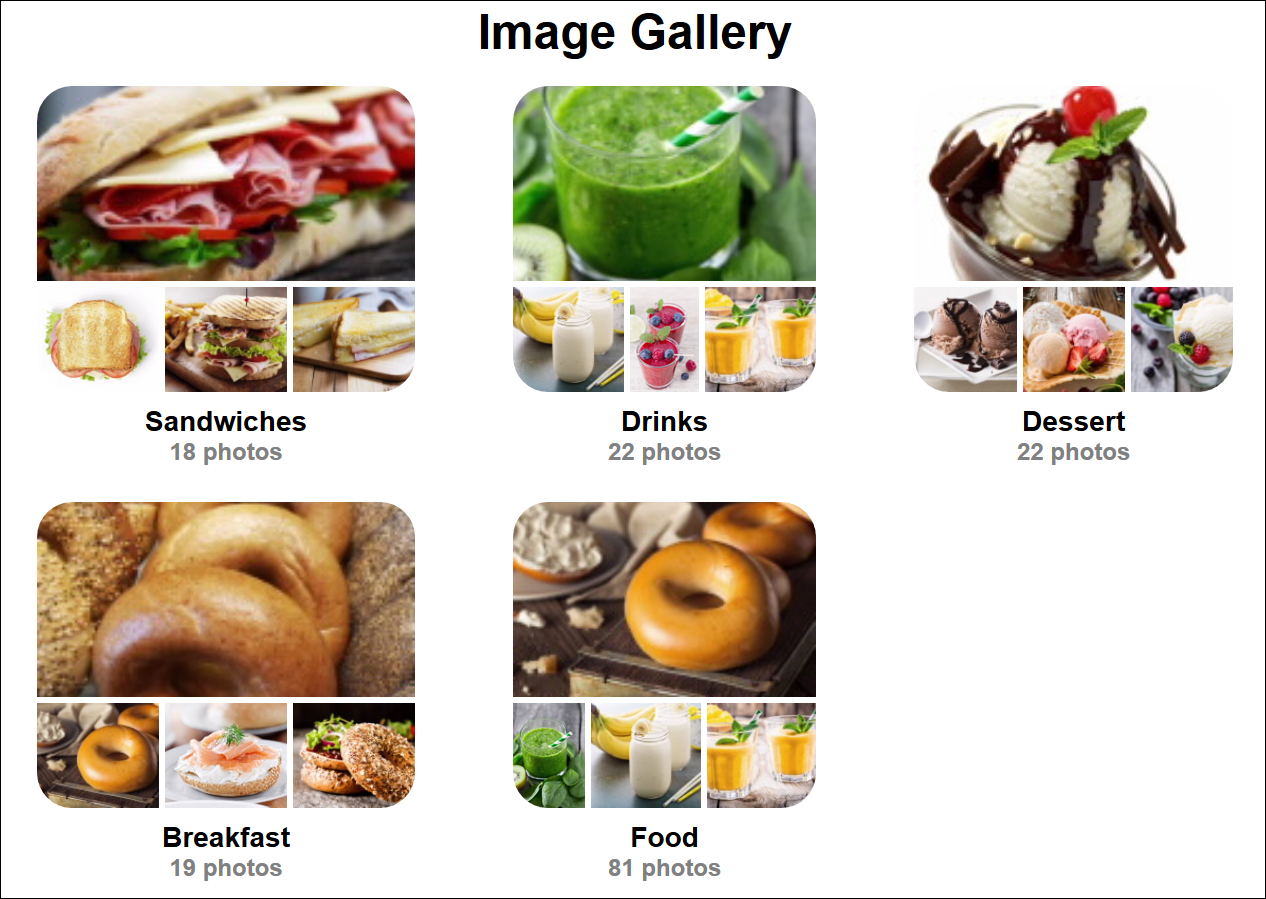
Our image gallery will consist of several pages of images of food and drinks available at a coffee shop.
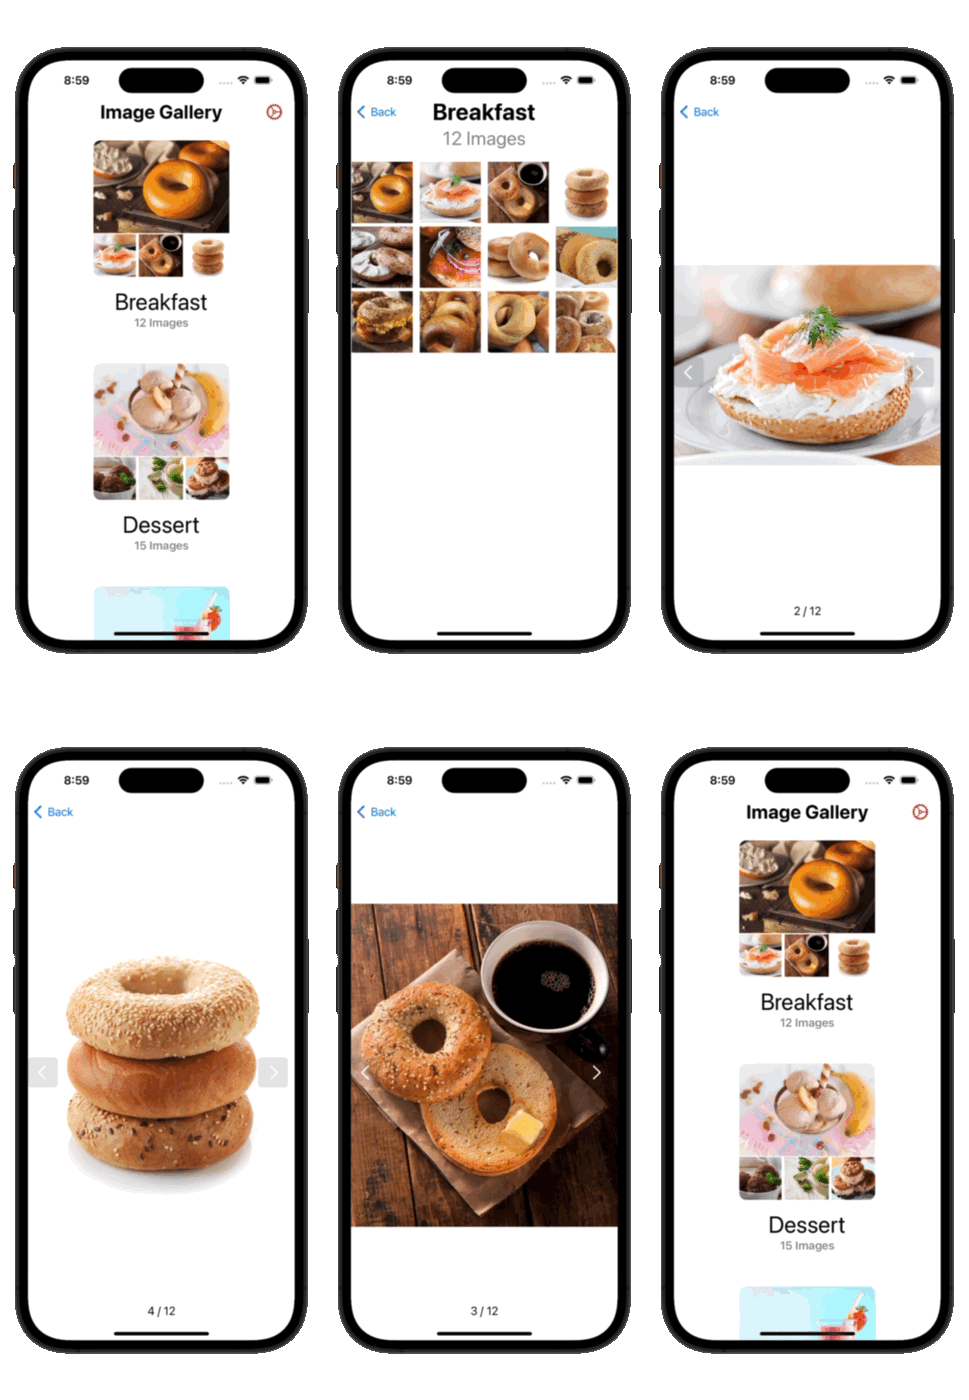
Categories are child nodes of a taxonomy and can be organized into hierarchies. For our image gallery, we want to show all available categories regardless of the organization. To accomplish this, we first need to find the available taxonomies, which we do using the Oracle Content Management library’s listTaxonomies() method.
Note: The implementation of listTaxonomies() uses the REST API resource GET /published/api/v1.1/taxonomies.
For each taxonomy found, we get its set of categories. This is done using the Oracle Content Management library’s listTaxonomyCategories() method.
Note: The implementation of listTaxonomyCategories() uses the REST API GET /published/api/v1.1/taxonomies/{id}/categories.
For each taxonomy category returned, we display a preview consisting of the category name, the number of images in the category, and thumbnail renditions for the first four images.
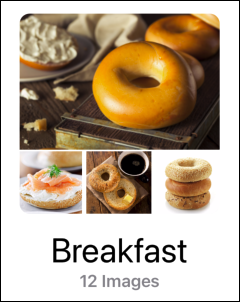
To optimize the image loading, we’ll request a rendition of the image named ‘Thumbnail’ while utilizing a CacheProvider implementation which handles persistence of downloaded files on device.
Note: In addition to publishing the digital assets that we want to view, you also need to publish the taxonomies to the channel.
To proceed, you’ll need to have an active subscription to Oracle Content Management and be logged in with the Content Administrator role.
Step 1: Prepare Oracle Content Management
This tutorial is based on the assumption that you’ve created your asset repository and currently have an empty content model (that is, no content types created).
If you don’t already have an Oracle Content Management instance, see the Quick Start to learn how to register for Oracle Cloud, provision an Oracle Content Management instance, and configure Oracle Content Management as a headless CMS.
For this tutorial, you’ll need to create a content model in either of two ways. There’s a downloadable asset pack available that will fill your empty repository with content types and associated content, or you can create your own content model and content.
To prepare Oracle Content Management:
- Create a channel and asset repository.
- Import the Oracle Content Management Samples Asset Pack
- Upload Your Own Image Assets
- Create Taxonomies and Link Them to Image Assets
Create a Channel and Asset Repository
You first need to create a channel and an asset repository in Oracle Content Management so you can publish content.
To create a channel and an asset repository in Oracle Content Management:
Log in to the Oracle Content Management web interface as an administrator.
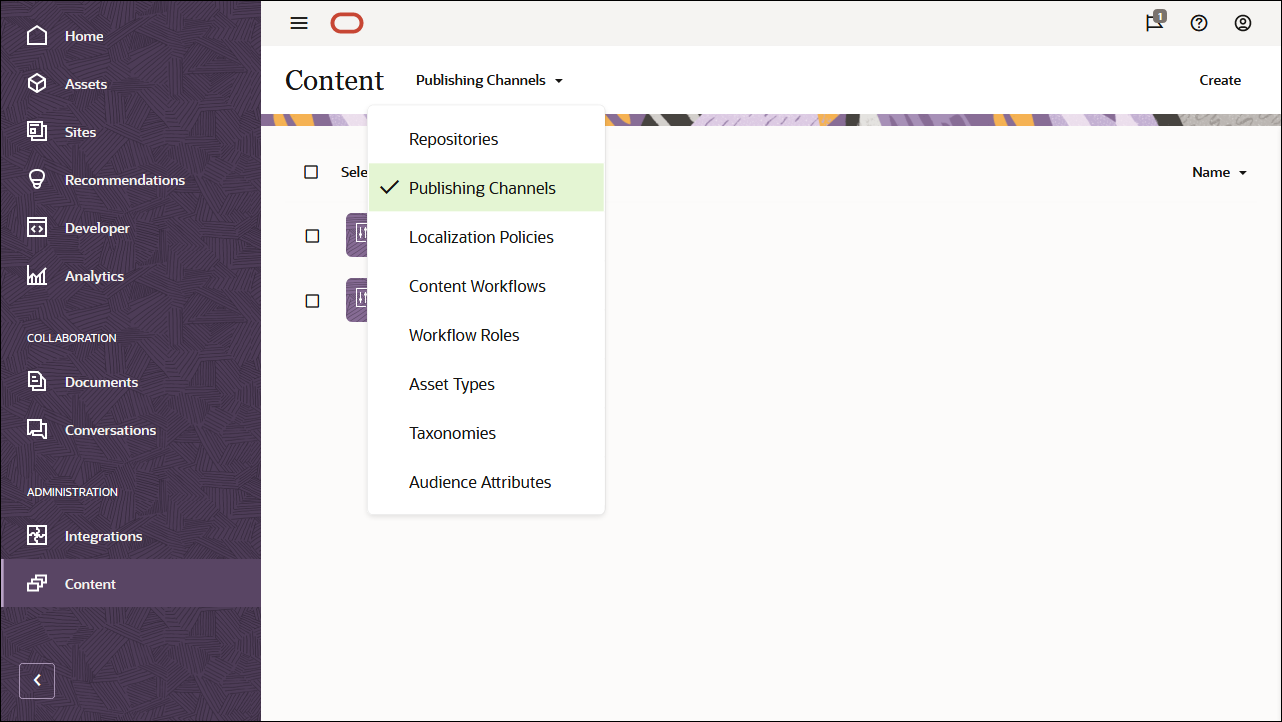
Choose Content in the left navigation menu and then choose Publishing Channels from the selection list in the page header.
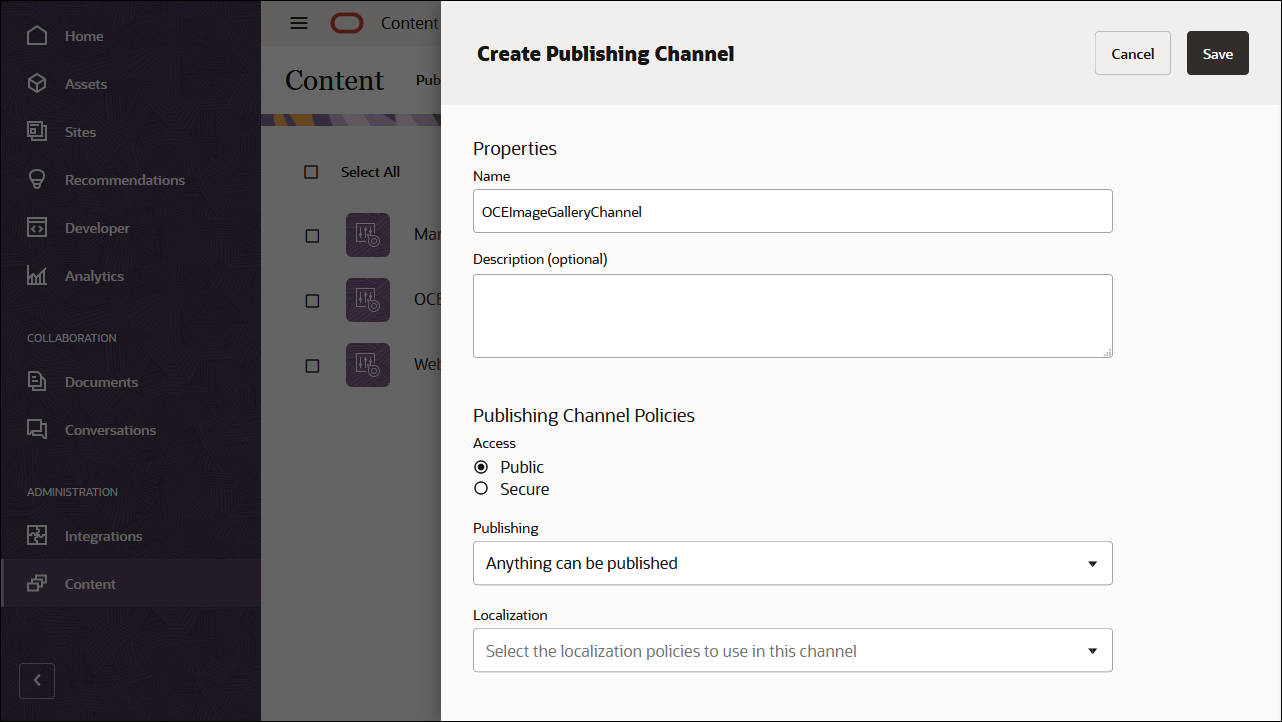
In the upper right corner, click Create to create a new channel. Name the channel ‘OCEImageGalleryChannel’ for the purpose of this tutorial, and keep the access public. Click Save to create the channel.
Choose Content in the left navigation menu and then choose Repositories from the selection list in the page header.
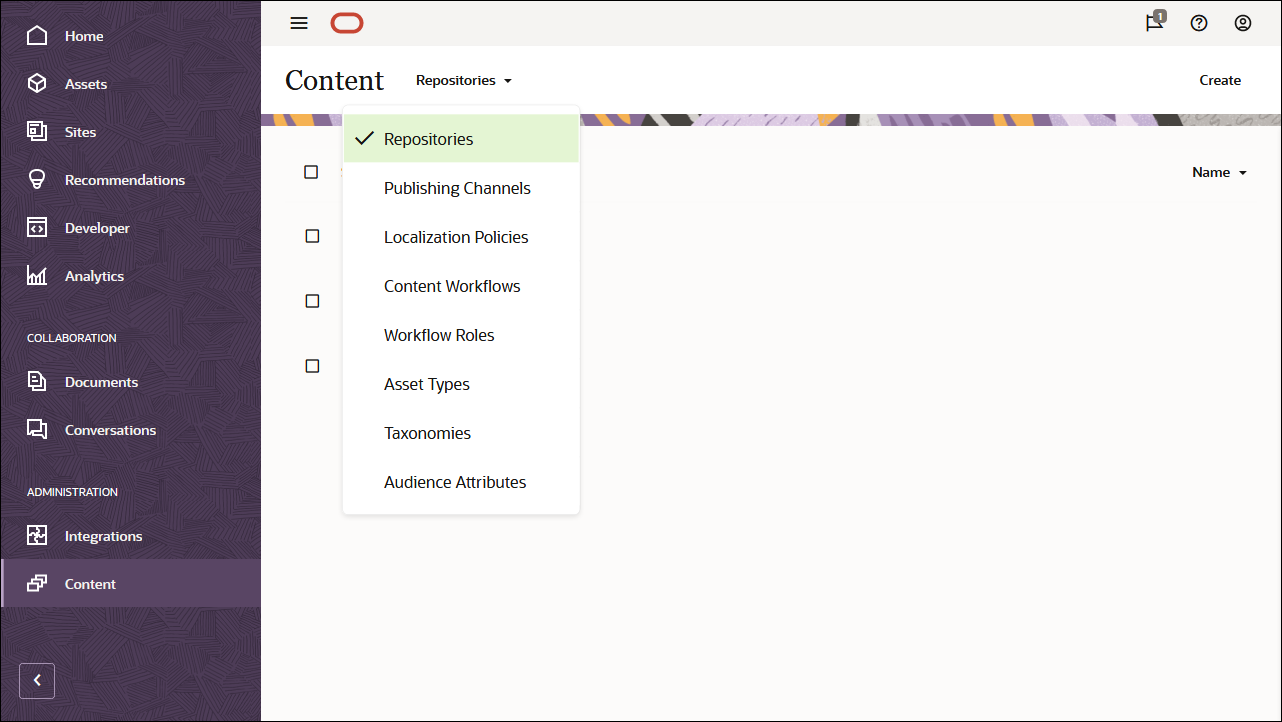
In the upper right corner, click Create to create a new asset repository. Name the asset repository ‘OCEImageGalleryRepository’ for the purpose of this tutorial.
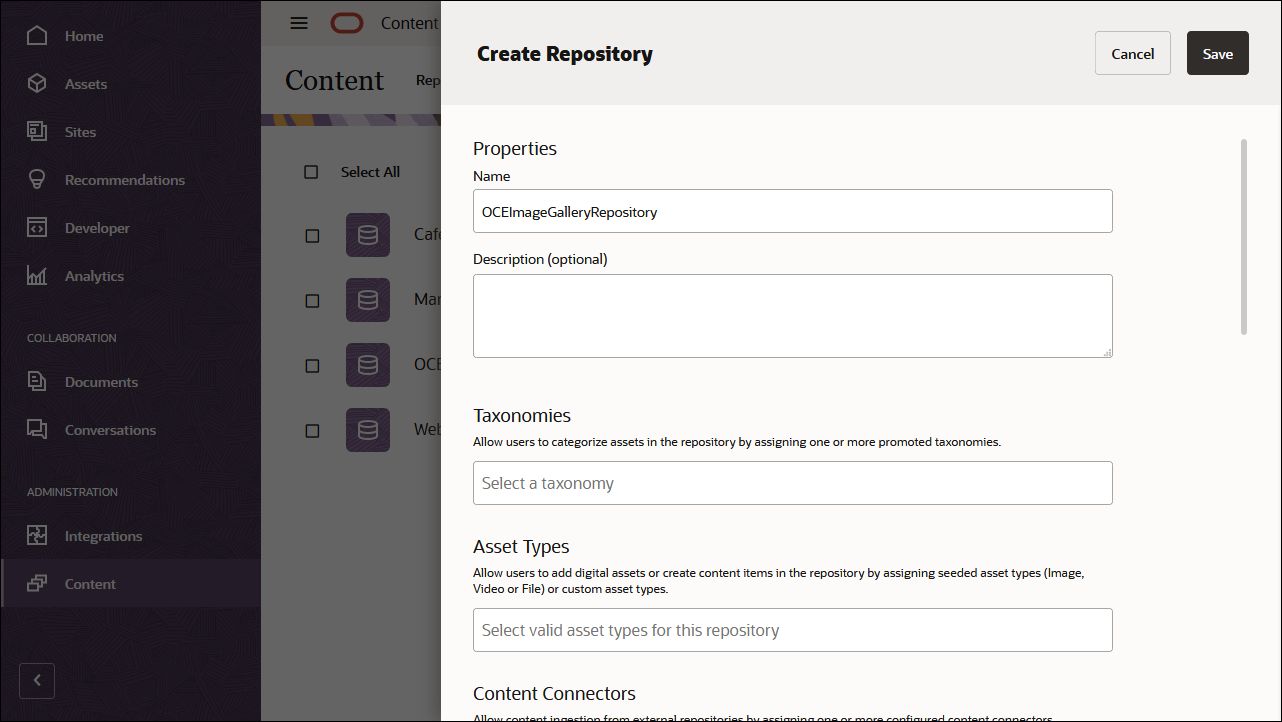
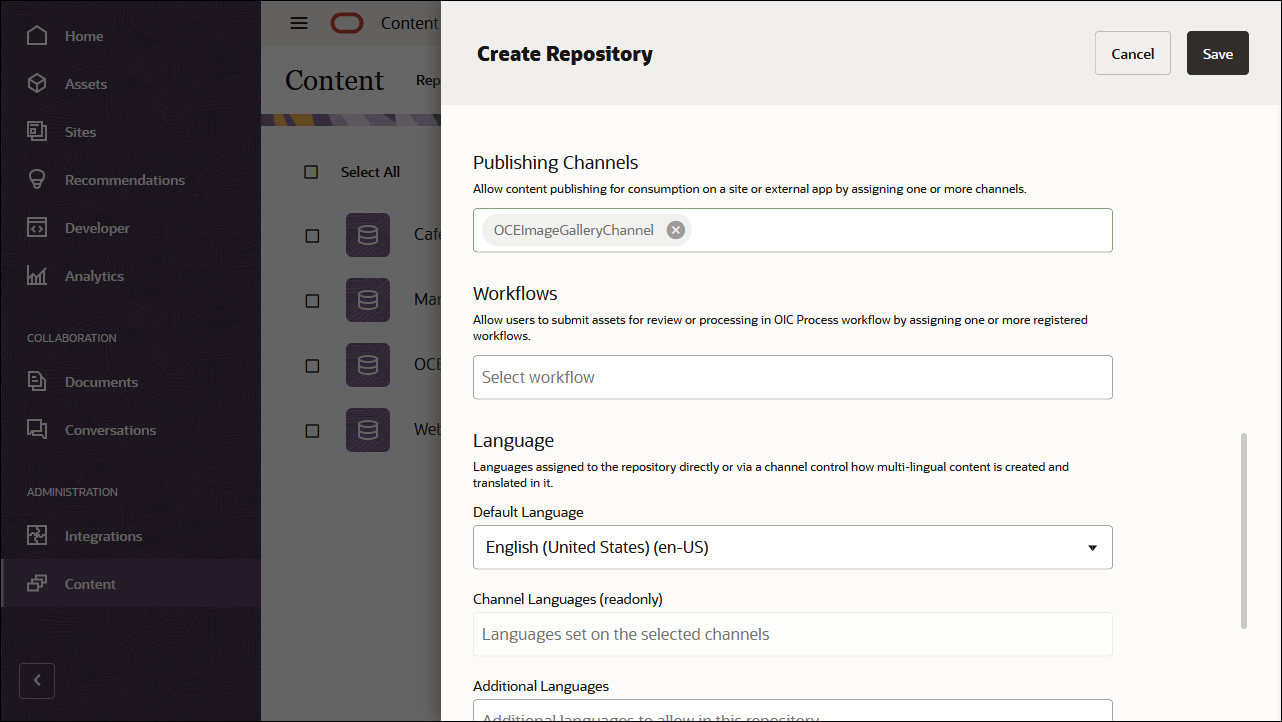
In the Publishing Channels field, select OCEImageGalleryChannel to indicate to Oracle Content Management that content in the OCEImageGalleryRepository repository can be published to the OCEImageGalleryChannel channel. Click Save when you’re done.
Import the Oracle Content Management Samples Asset Pack
You can download a preconfigured Oracle Content Management sample assets pack that contains all required content types and assets for this tutorial.
You can upload a copy of the content we’re using in this tutorial from the Oracle Content Management Samples Asset Pack. This will let you experiment with the content types and modify the content. You can download the asset pack archive, OCESamplesAssetPack.zip, and extract it to a directory of your choice:
Download the Oracle Content Management Samples Asset Pack (OCESamplesAssetPack.zip) from the Oracle Content Management downloads page. Extract the downloaded zip file to a location on your computer. After extraction, this location will include a file called OCEImageGallery_data.zip.
Log in to the Oracle Content Management web interface as an administrator.
Choose Content in the left navigation menu and then choose Repositories from the selection list in the page header. Now select OCEImageGalleryRepository and click the Import Content button in the top action bar.
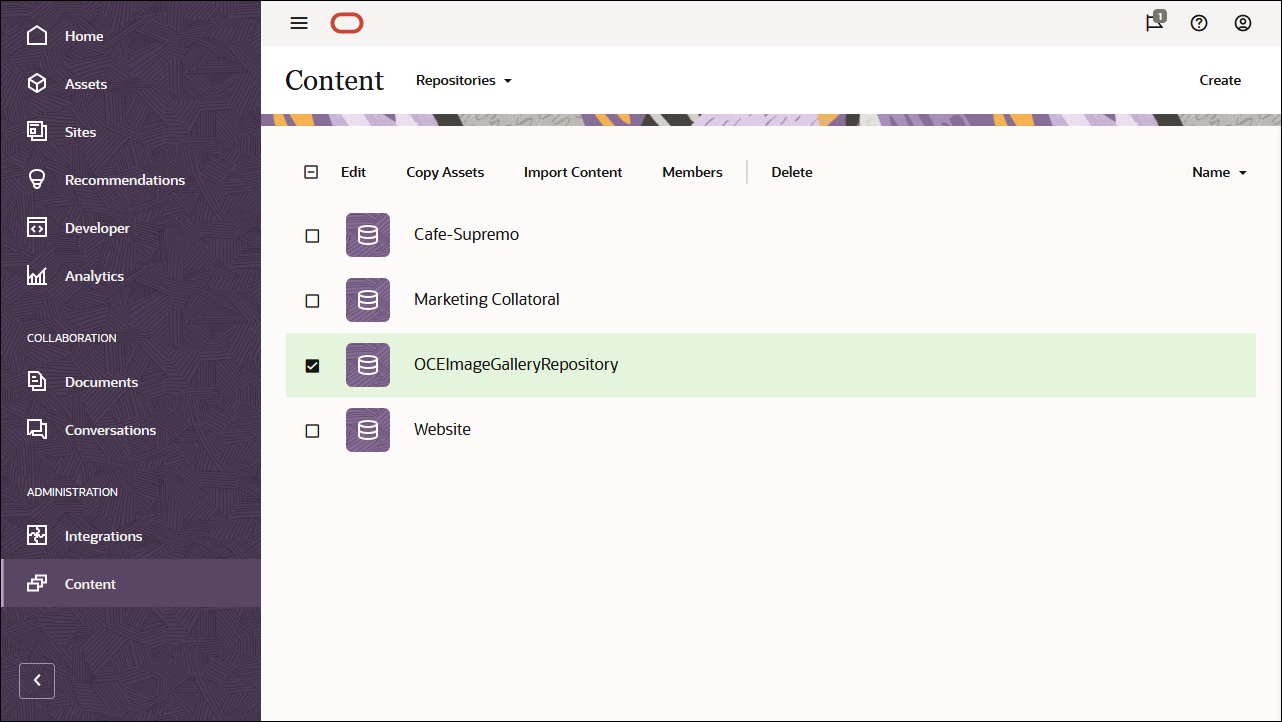
Upload OCEImageGallery_data.zip from your local computer to the Documents folder.
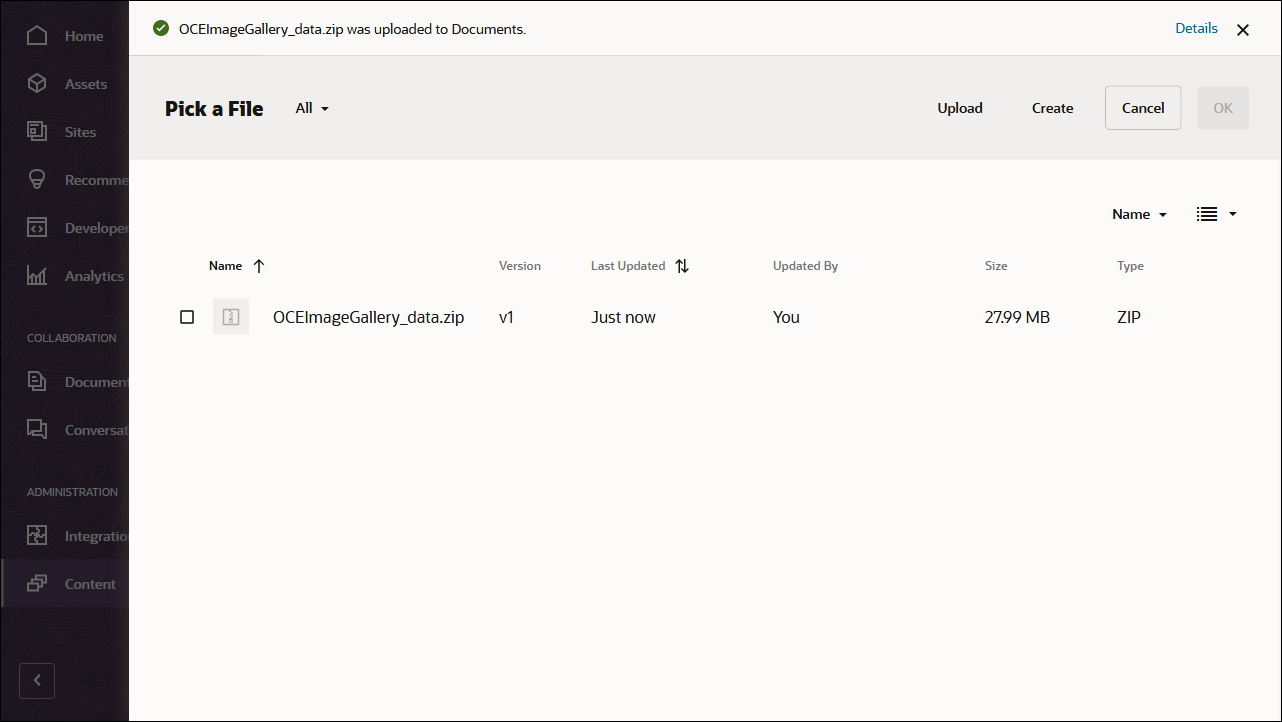
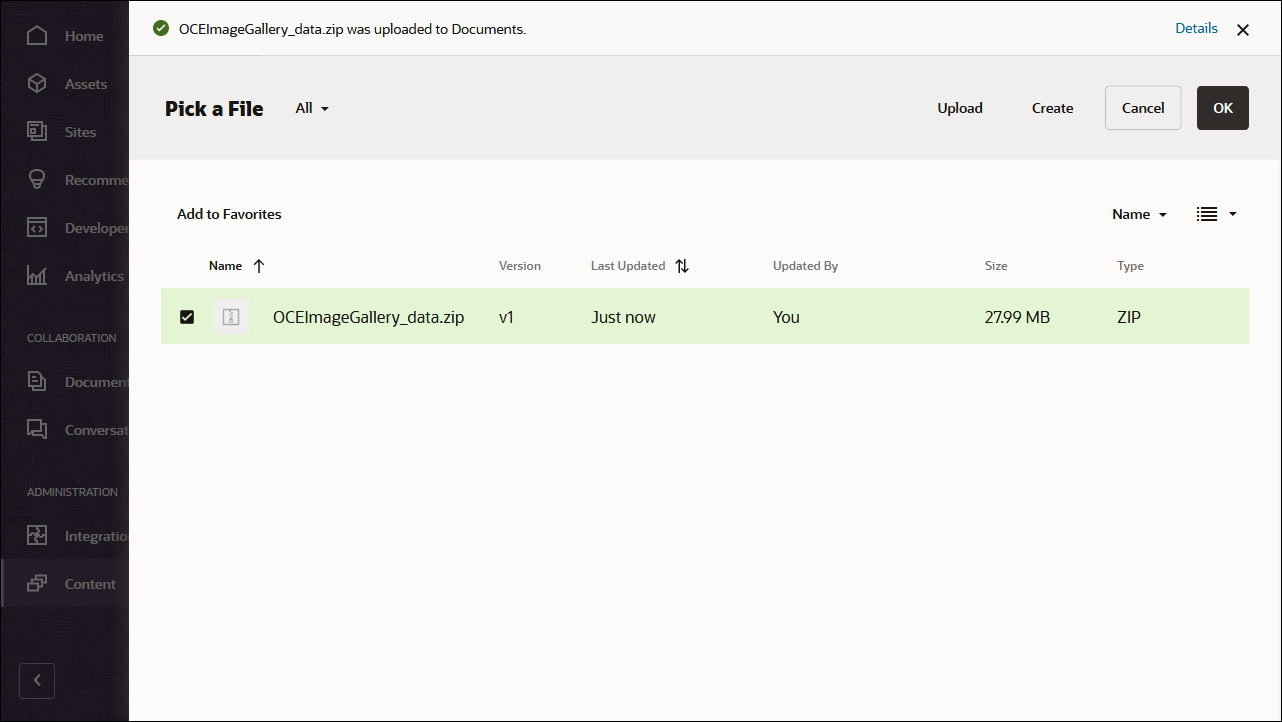
Once it’s uploaded, select OCEImageGallery_data.zip and click OK to import the contents into your asset repository.
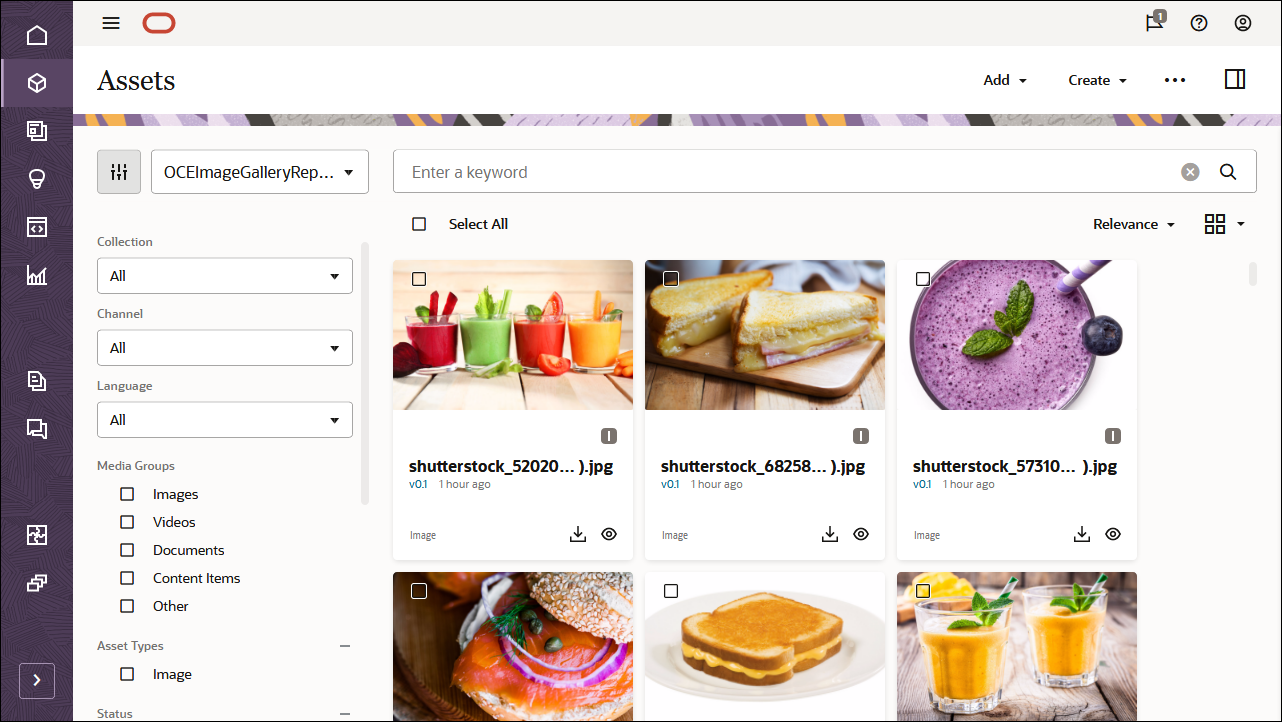
After the content has been imported successfully, navigate to the Assets page and open the OCEImageGalleryRepository repository. You’ll see that all the related images and content items have now been added to the asset repository.
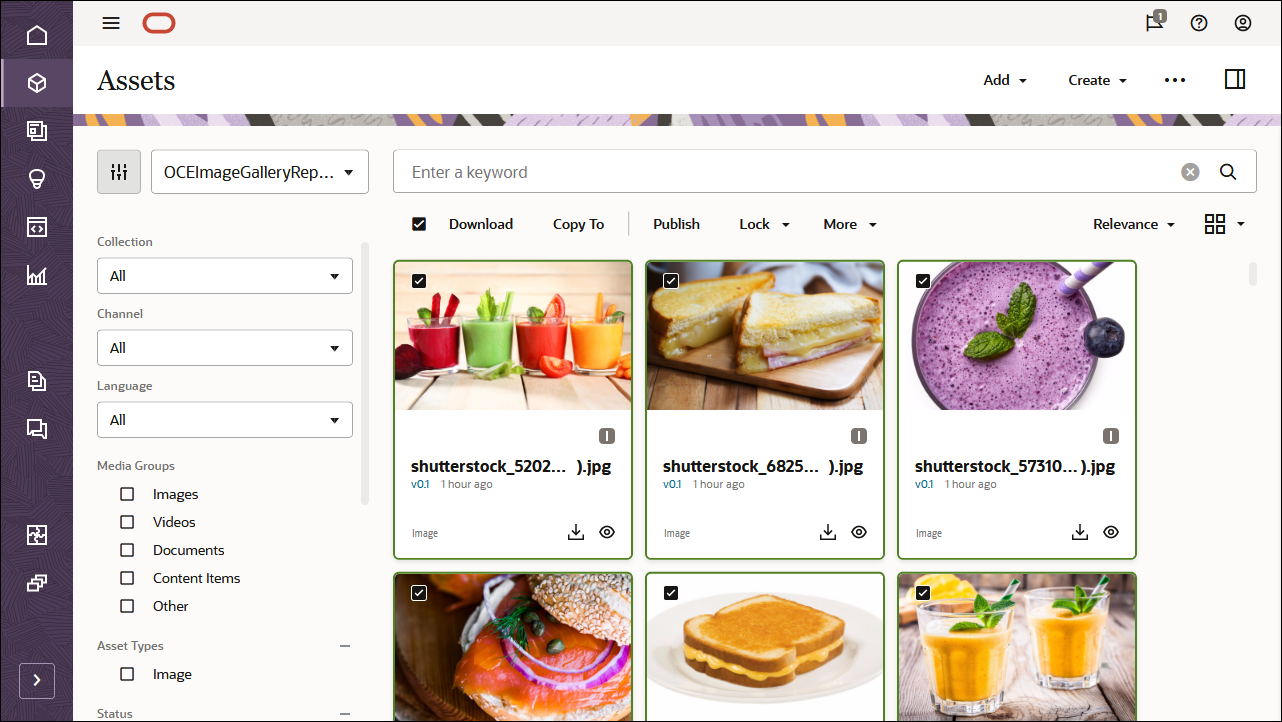
Click Select All on the top left and then Publish to add all the imported assets to the publishing channel that you created earlier, OCEImageGalleryChannel.
Before publishing, you need to validate all the assets. First add OCEImageGalleryChannel as a selected channel, and then click the Validate button.
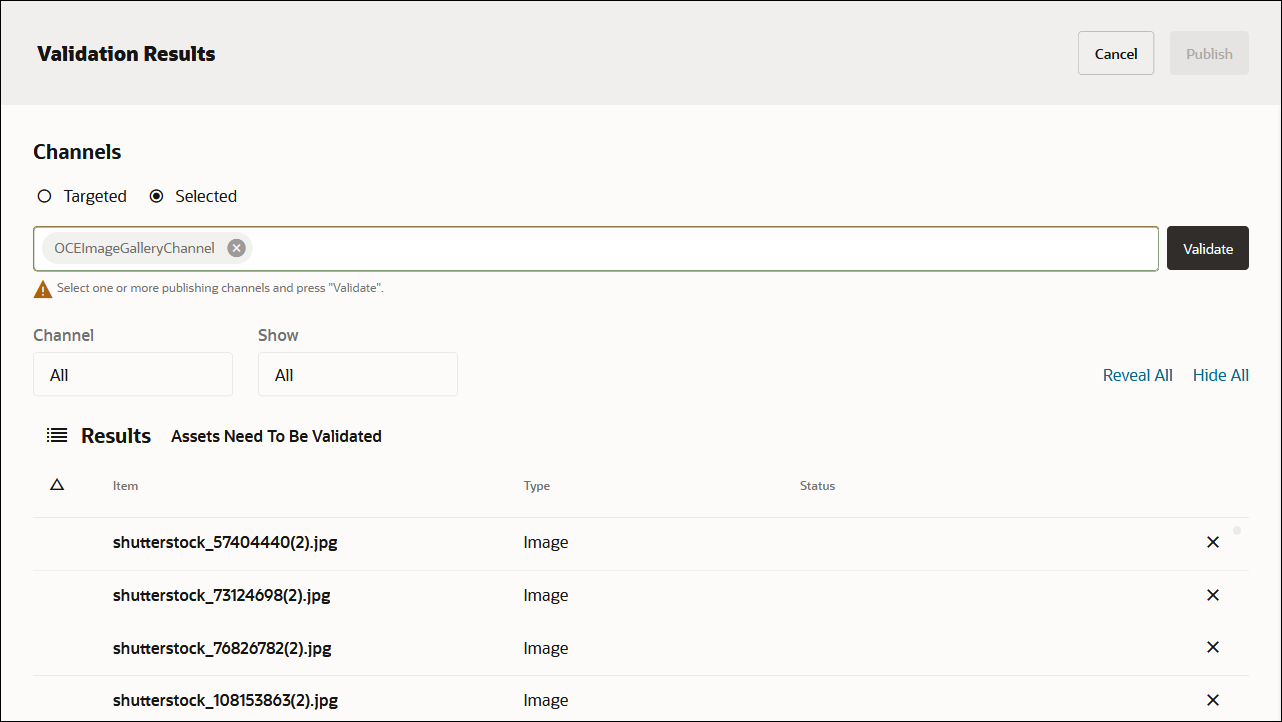
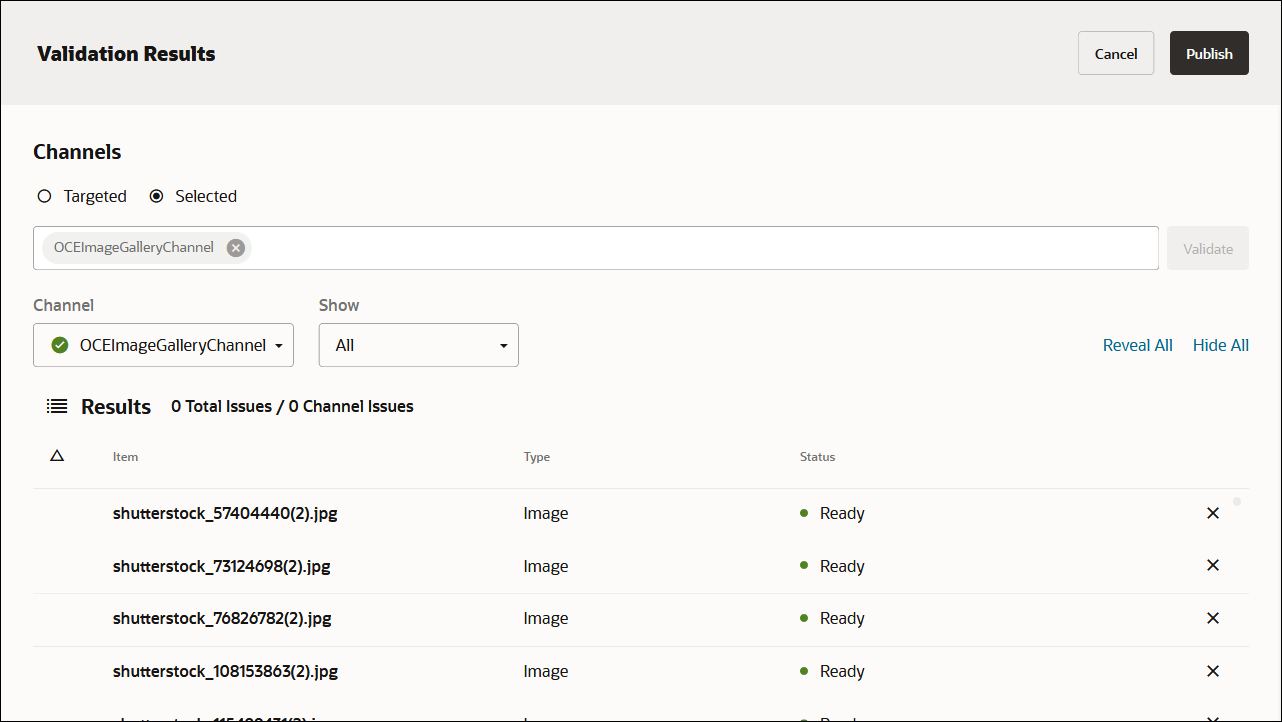
After the assets have been validated, you can publish all the assets to the selected channel by clicking the Publish button in the top right corner.
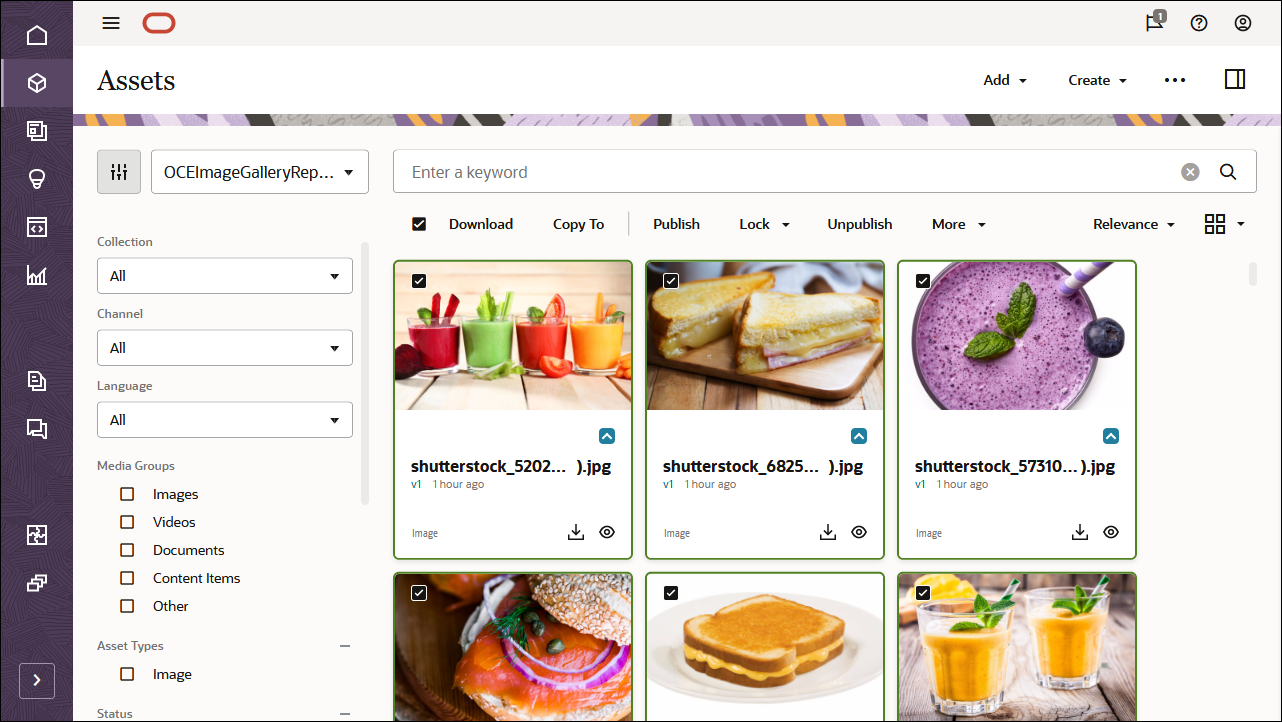
Once that’s done, you can see on the Assets page that all assets have been published. (You can tell by the icon above the asset name.)
After importing the Oracle Content Management Samples Asset Pack, you can start building the image gallery in Xcode.
Upload Your Own Image Assets
For this tutorial, we’re using an asset repository called ‘OCEImageGalleryRepository’ to build the home page for our gallery site. This home page consists of the title ‘Image Gallery’ as well as image collection albums that have image assets inside.
To add image assets to the gallery asset repository:
Log in to the Oracle Content Management web interface.
Click Assets in the left navigation menu.
Open the OCEImageGalleryRepository repository.
Click Add in the upper right corner of the page to add image assets to the gallery asset repository.
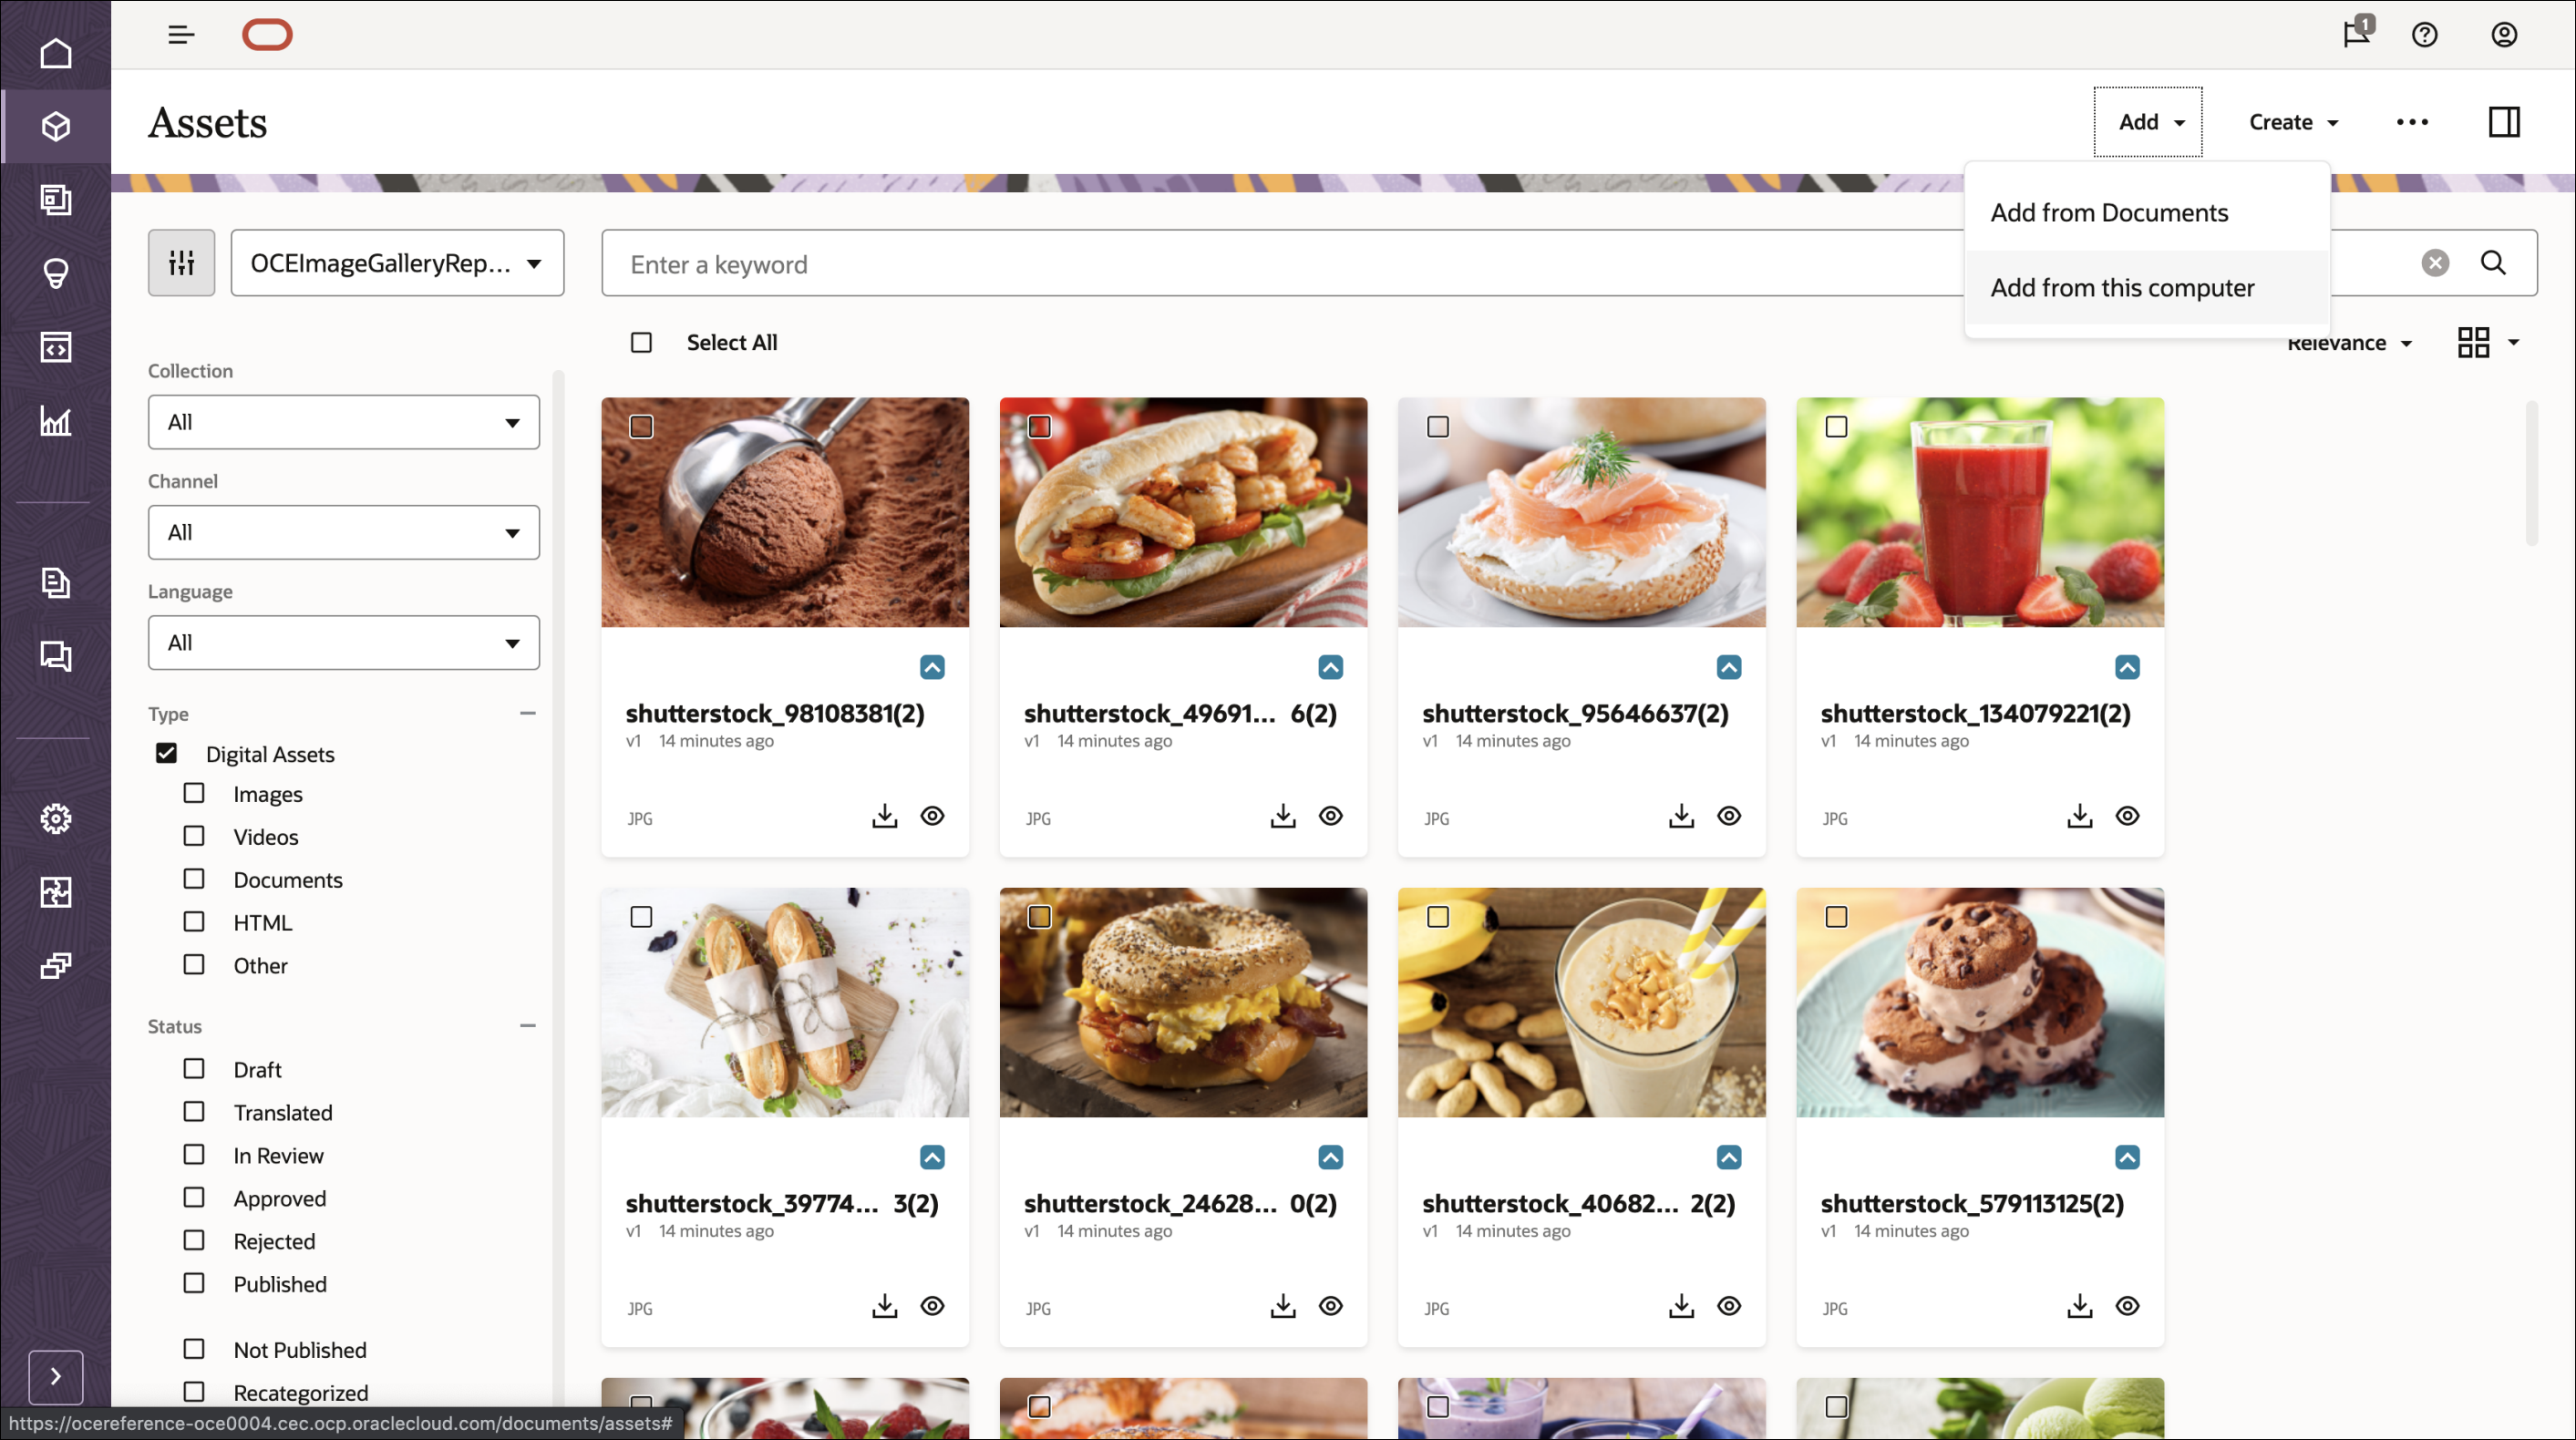
Upload your own new assets from your local computer or choose existing assets already in Oracle Content Management.
Create Taxonomies and Link Them to Image Assets
You need to create a taxonomy in Oracle Content Management and then assign categories to the assets in your repository.
To create a taxonomy in Oracle Content Management:
Log in to the Oracle Content Management web interface as an administrator.
Choose Content in the left navigation menu and then choose Taxonomies from the selection list in the page header.
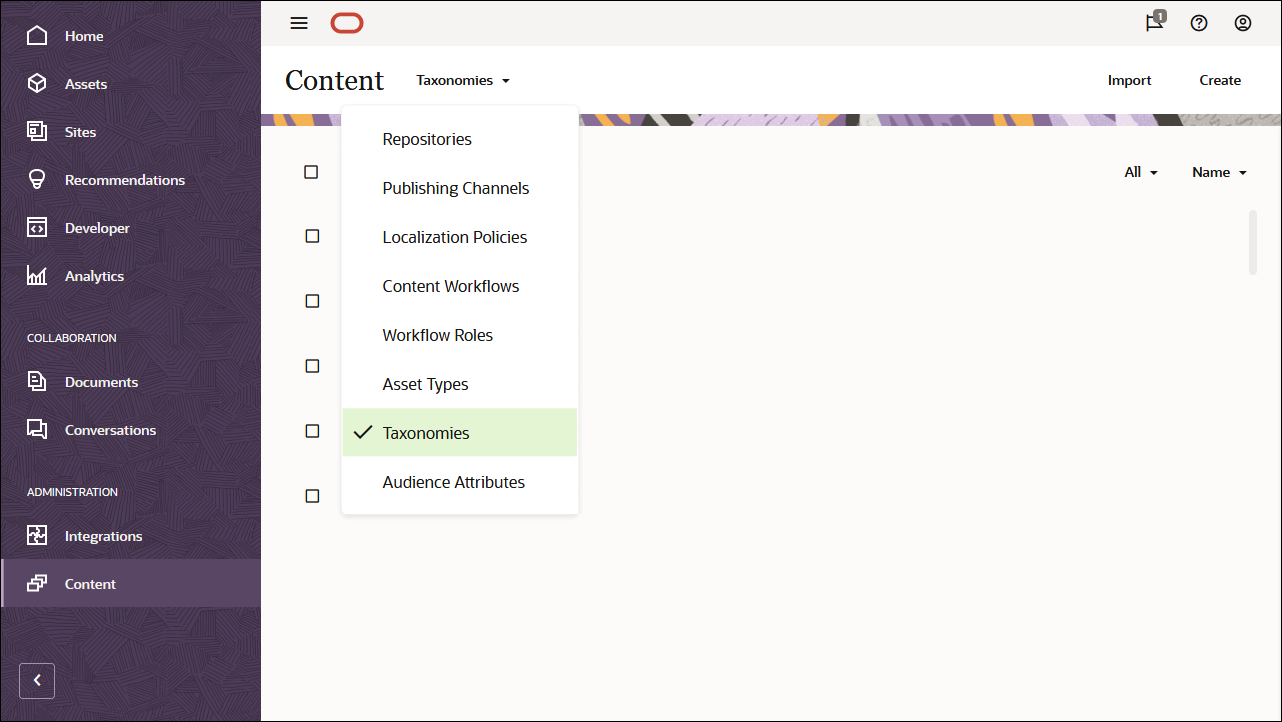
In the upper right corner, click Create to create a new taxonomy. Name the channel ‘OCEImageGalleryTaxonomy’ for the purpose of this tutorial.
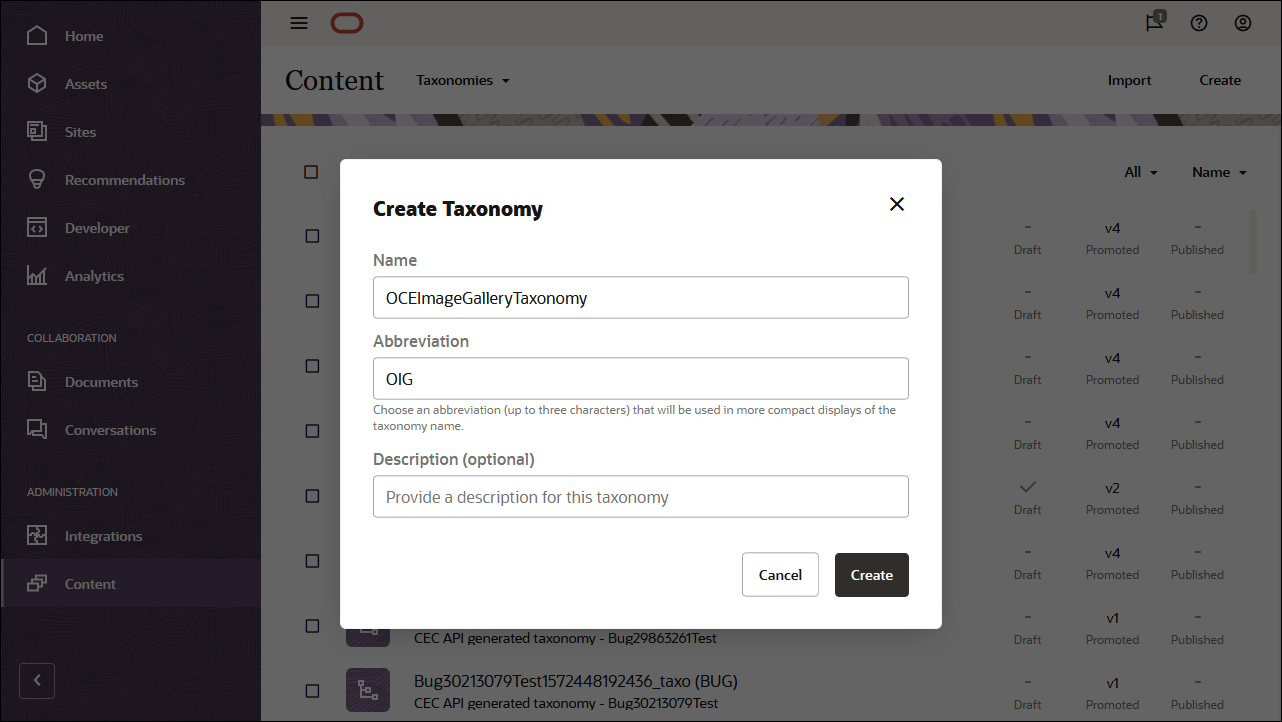
Click Create.
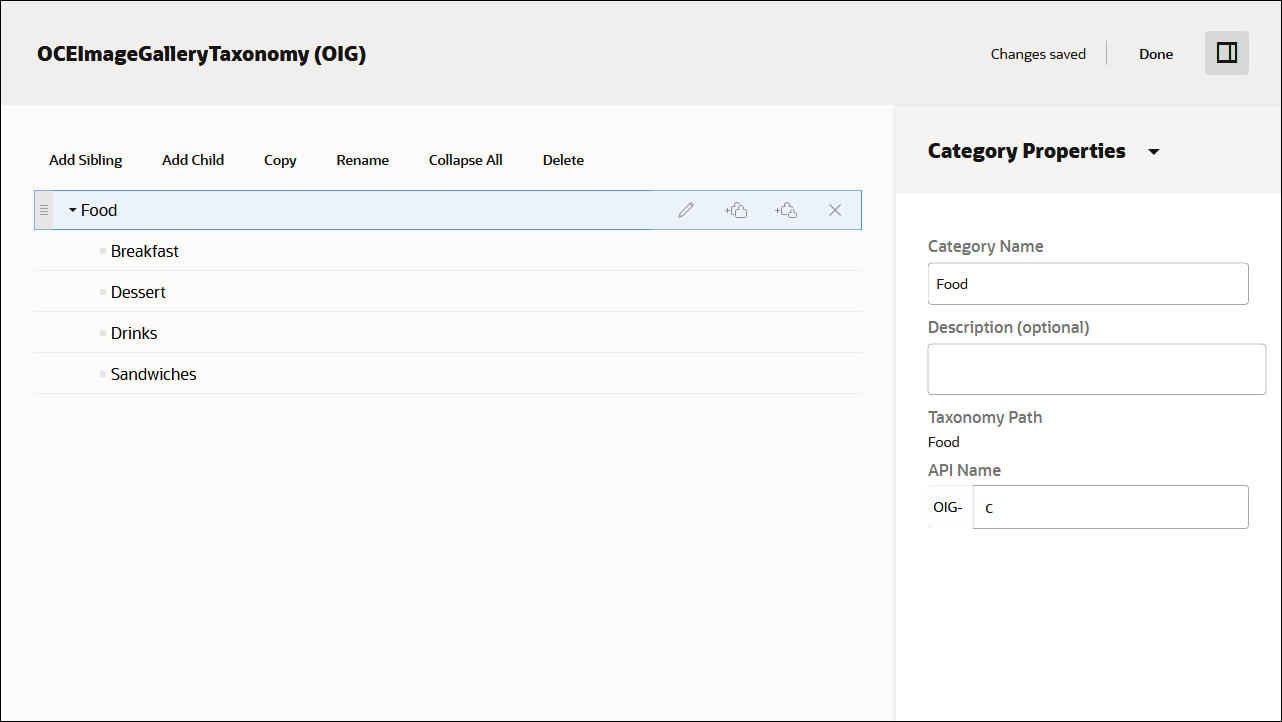
Now build your taxonomy by adding categories. Click Add a category.
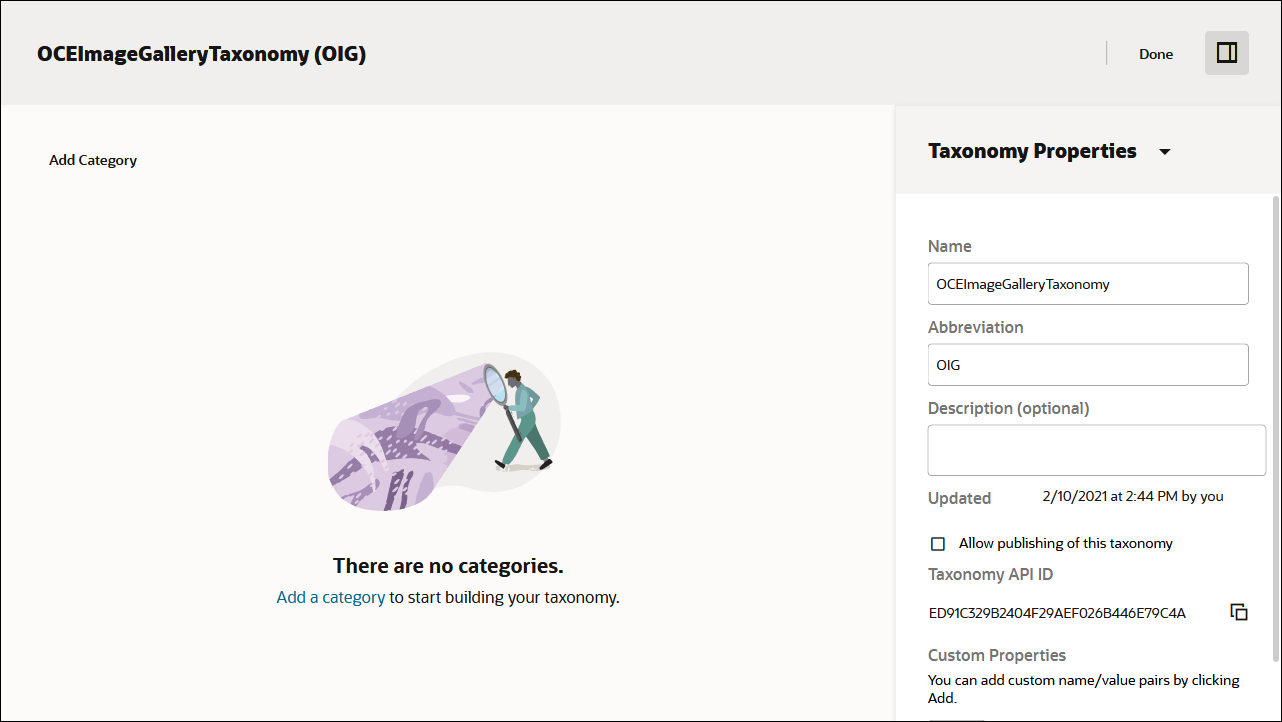
Name the parent category item ‘Food’, and add the following child categories:
- Breakfast
- Dessert
- Drinks
- Sandwiches
Click Done at the top right of the screen.
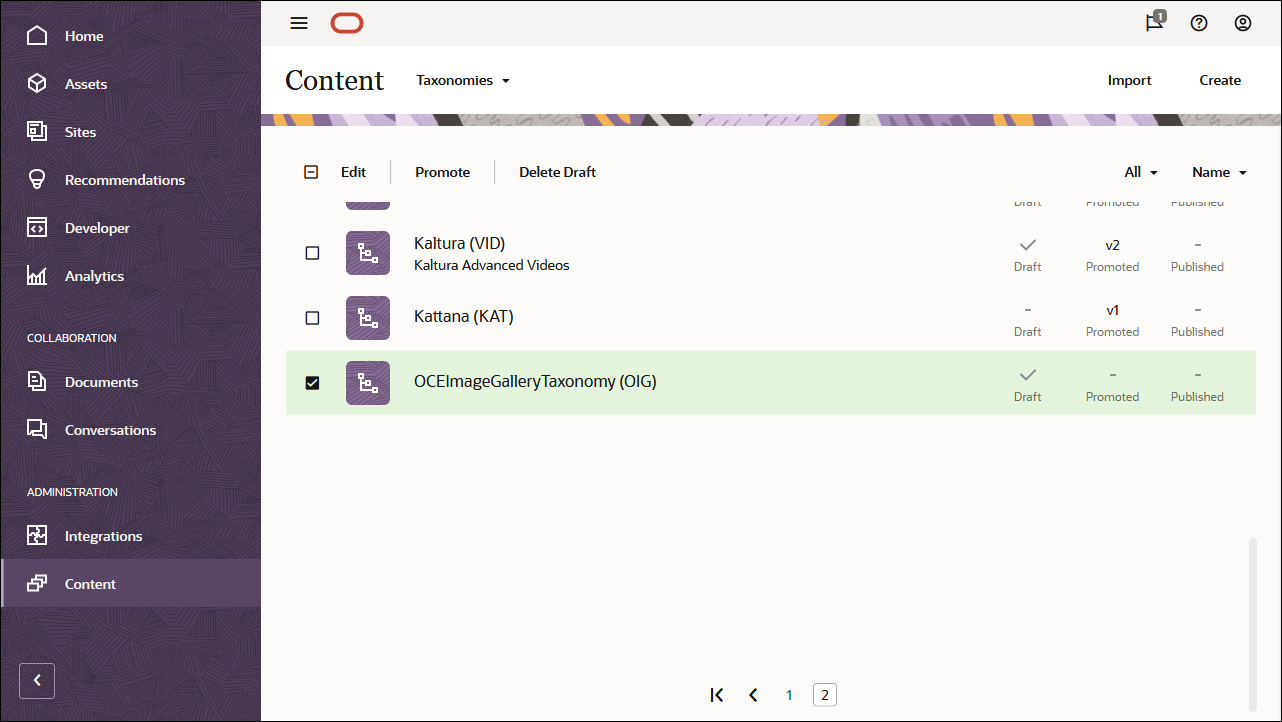
On the Taxonomies page, select the OCEImageGalleryTaxonomy taxonomy and click Promote in the actions bar to make it available for use in your asset repositories.
Next, edit the OCEImageGalleryRepository repository to enable the OCEImageGalleryTaxonomy taxonomy for that repository:
Log in to the Oracle Content Management web interface as an administrator.
Choose Content in the left navigation menu and then choose Repositories from the selection list in the page header.
Select and edit the OCEImageGalleryRepository repository.
In the Taxonomies field, select OCEImageGalleryTaxonomy, so you can assign categories from that taxonomy to the assets in the OCEImageGalleryRepository repository.
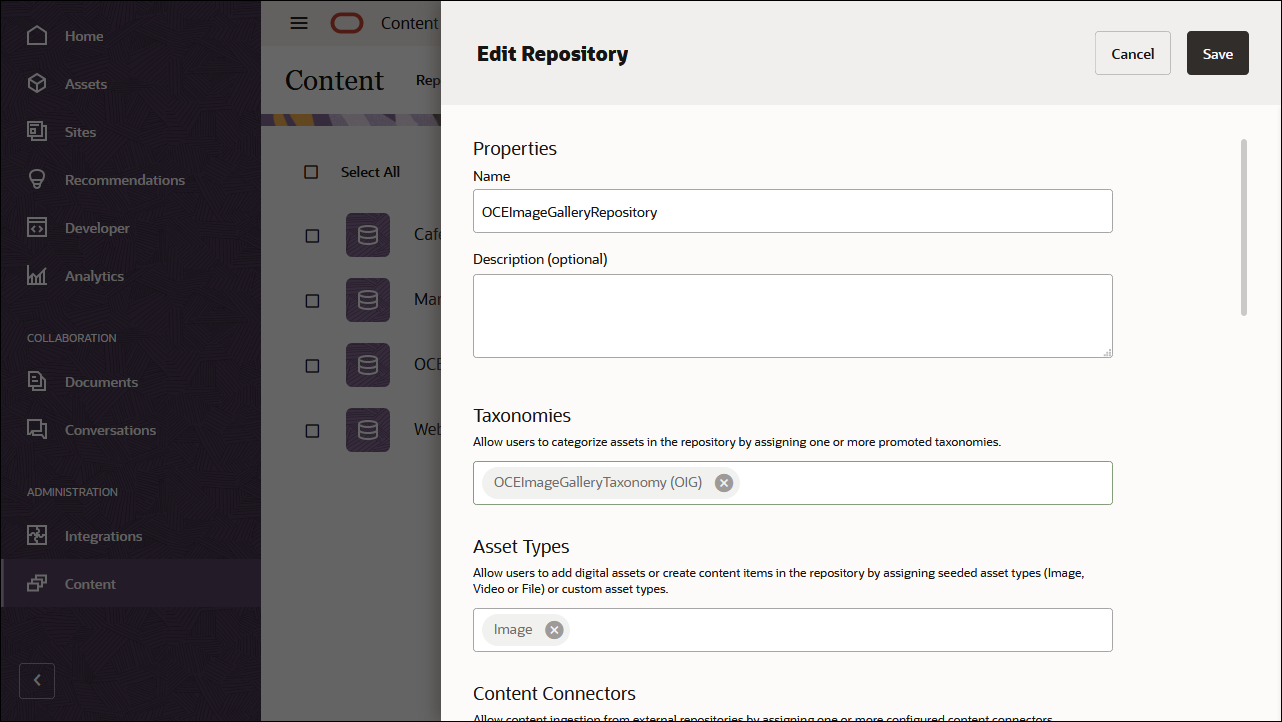
Click Save.
Then, assign taxonomy categories to each of the image assets in the OCEImageGalleryRepository repository:
Log in to the Oracle Content Management web interface.
Click Assets in the left navigation menu.
Open the OCEImageGalleryRepository repository.
Select one or more image assets, click More in the actions bar, and then choose Categories from the menu.
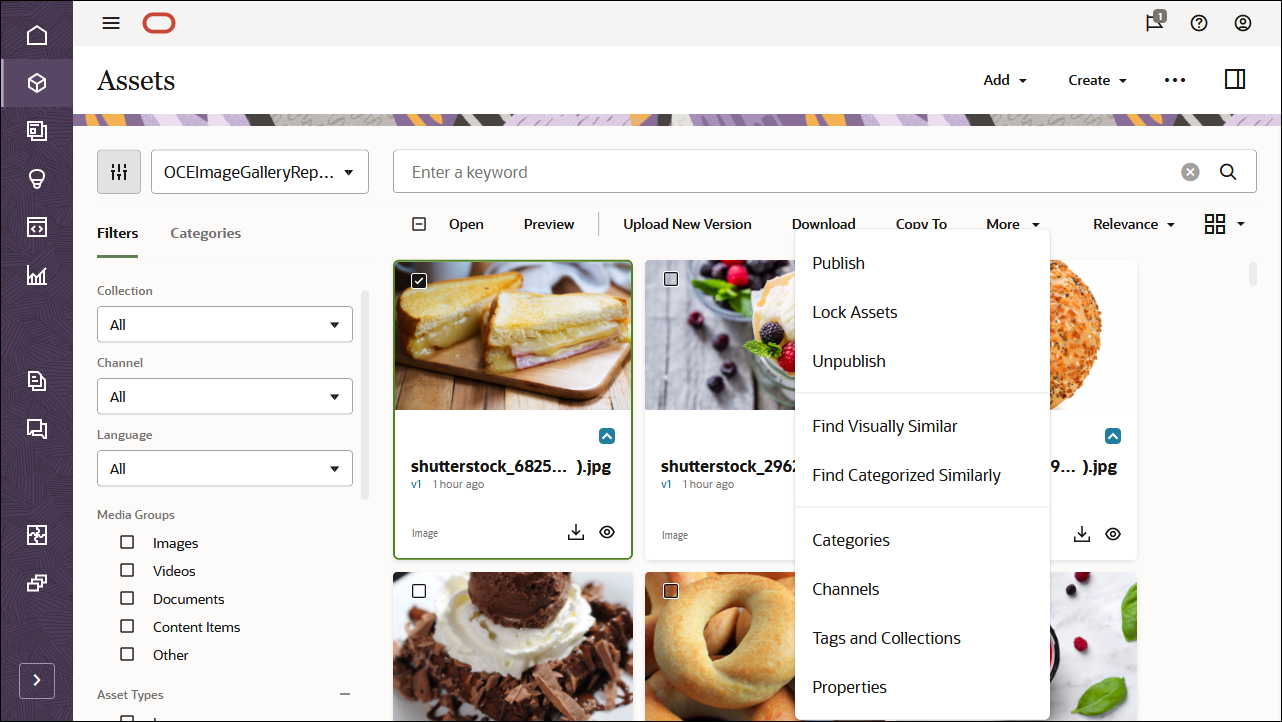
In the Categories panel, click Add Category. Search for the category name in the search bar or select a category from the taxonomy hierarchical structure, and click Add to assign the selected category. You can assign multiple categories to an asset.
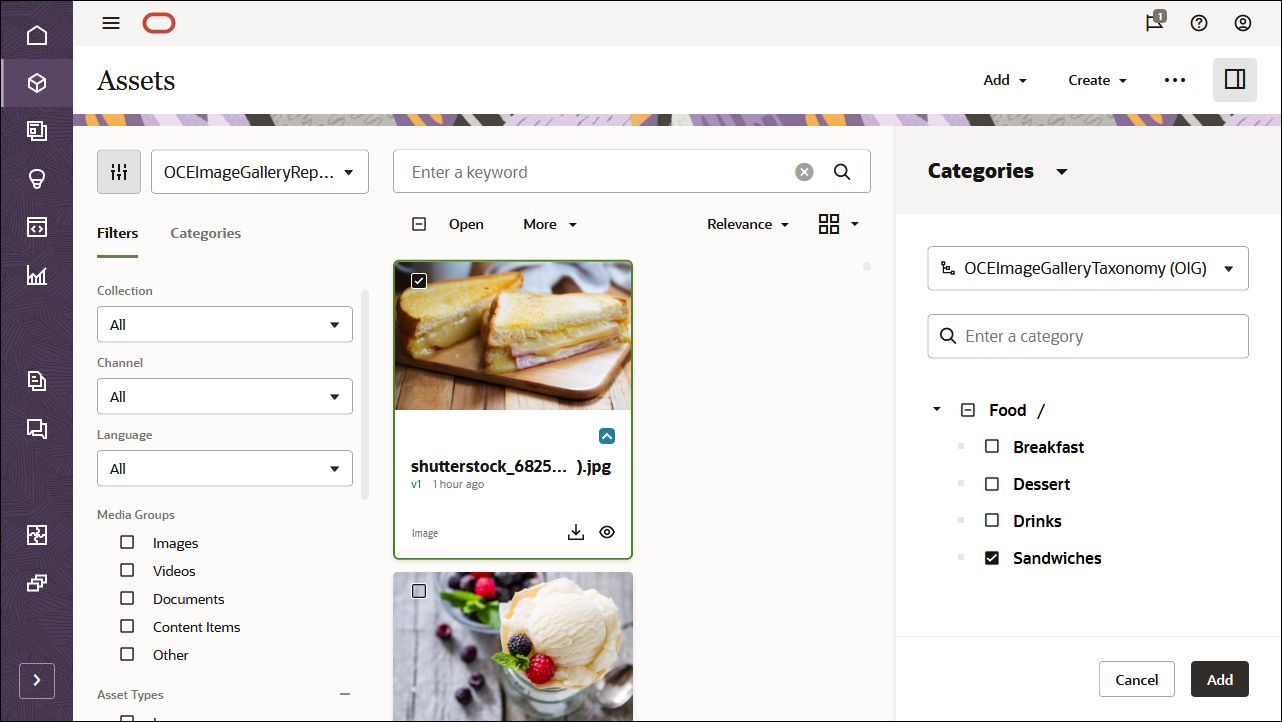
After you’re done assigning taxonomies to all the image assets, select all assets in your repository and publish them to the OCEImageGalleryChannel channel.
Step 2: Build the Image Gallery in Xcode
To consume our Oracle Content Management content in the iOS application, we can use the iOS image gallery sample, which is available as an open-source repository on GitHub.
Note: Remember that using the iOS sample is optional, and we use it in this tutorial to get you started quickly. You can also build your own application.
To build the image gallery in Xcode:
Clone the Sample Repository
The iOS blog sample is available as an open-source repository on GitHub.
You’ll first need to clone the sample from GitHub to your local computer.
When you open the sample project in Xcode, it will automatically
pull in the dependency for content-management-swift,
the Swift package that implements the Oracle Content Delivery
SDK.
There are no other third-party dependencies for this application, so no other manual installs are required. However, before running the application, there is some additional configuration that is required.
Configure the iOS Application
In this iOS image gallery sample, you need to configure a few pieces of information, so that your Oracle Content Management library can target the correct instance URL with the correct channel token.
Open the file /GalleryDemo/Source/credentials.json
and provide your Oracle Content Management instance URL and the the
channel token associated with your publishing channel.
The channel for this tutorial is OCEImageGalleryChannel.
Use the Content Library to Fetch Content
Oracle Content Management offers a Swift package
(content-management-swift) consisting of the
OracleContentCore and
OracleContentDelivery libraries to help discover and
use content in your applications. The package is hosted on GitHub.
Learn more about the Content SDK for Swift in the Oracle Content Management documentation library:
We can leverage the Content libraries to fetch content so that we can render it in our iOS application.
Onboarding
In order to request data, we need to provide some required information to our library. We refer to this as onboarding our application. We assign particular pieces of information so that requests are properly formed and pointing to the correct instance URL.
In this demo, when the application first starts, the
Onboarding.urlProvider is assigned to be an instance of
our own class, MyURLProvider. This establishes the
instance URL and channel token that are used by the Content library
for each request made.
While specifying a URL provider isn’t strictly necessary (as URL and token information may be specified on a per-request basis), assigning them reduces the amount of code required at each call site.
@main
struct GalleryDemoApp: App {
    init() {
        // ...

        // The sample code expects the URL and channel token to be provided by ``OracleContentCore.Onboarding``
        // Assign your ``OracleContentCore.URLProvider`` implementation to the ``OracleContentCore.Onboarding.urlProvider`` property
        Onboarding.urlProvider = MyURLProvider()

        // ...

    }
}
The MyURLProvider implementation reads data from
credentials.json to obtain the URL and channel
token.
{
    "url": "https://headless.mycontentdemo.com",
    "channelToken": "e0b6421e73454818948de7b1eaddb091"
}
Each time the Oracle Content Library needs to build a request, it will retrieve the following property:
/// This function provides the URL to be used for each OracleContentCore request
///
/// Services which implement ``OracleContentCore.ImplementsOverrides`` may provide a different URL and
/// authorization headers (if required) on a call-by-call basis
public var url: () -> URL? = {
  return URL(string: MyURLProvider.credentials.url)
}
Each time the library needs to build a request, it will also retrieve the delivery token:
/// This function provides the delivery channel token to be used for each OracleContentCore request
///
/// Services which implement ``OracleContentCore.ImplementsChannelToken`` may override this value
/// on a call-by-call basis
public var deliveryChannelToken: () -> String? = {

  return MyURLProvider.credentials.channelToken
}
Additionally, assigning to Onboarding.logger
provides the opportunity to define your own logging implementation.
For this demo, the MyLogger implementation consists of
simply “printing” to the console. In production environments, your
logger could utilize universal logging, core data, or any technology
you choose.
@main
struct GalleryDemoApp: App {
    init() {
        // ...

         Onboarding.logger = MyLogger()

        // ...

    }
}
Requesting Data Using the Oracle Content Library
Note: All network request code for this demo may be found in
GalleryNetworking.swift.
The initial page requires several data calls before the page can properly display:
- First we load the taxonomies for the channel token previously supplied.
- For each taxonomy returned, we get all the categories in that taxonomy.
- For each category returned, we get the list of assets in that category.
- The thumbnail rendition for each category’s first four items are are downloaded.
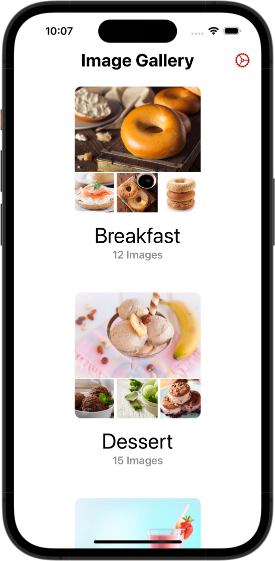
The entry point for the initial data fetch is the
fetchInitialData() method in GalleryNetworking.swift.
Note from its signature that this method is using Swift concurrency
(async/await).
 /// Retrieves the assets for each taxonomy category in each taxonomy
 /// Illustrates how multiple requests may be made one after the other
 /// - throws: Error
 /// - returns: [GalleryCategory]
 @MainActor
 public func fetchInitialData() async throws -> [GalleryCategory] {
   // ...
 }
The intial taxonomies data is retrieved using the listTaxonomies method and the fetchNextAsync invocation verb.
// First find the list of available taxonomies
// In this demo, we're limiting the number of responses to 50
let taxonomies = try await DeliveryAPI
   .listTaxonomies()
   .limit(50)
   .fetchNextAsync()
Note that all of the APIs are namespaced to
DeliveryAPI.
The request here is to listTaxonomies, which takes
no parameters. All of the request objects in the library start with
“list”, “read” or “download” and are followed by the type of object
to return.
The limit(<value>) builder method is available
because the ListTaxonomies object conforms to the
ImplementsFetchListing compositional element.
ImplementsFetchListing additionally provides the
invocation verbs that will invoke the request. While several
different invocation verbs are available, here we use
fetchNextAsync, because our demo is using Swift
concurrency. Other invocation verbs are available for callback and
Future forms of the request.
Note: All “list” type requests use an invocation verb that starts with “fetchNext”. Similarly, all “read” requests use an invocation verb that starts with “fetch”, and “download” requests use one that starts with “download”.
Once our request has successfully completed, we’ll get back an
object of type Taxonomies (see
/Sources/OracleContentDelivery/Models/Taxonomies.swift
for the model definition). The listing of individual taxonomies will
be contained in the items property.
Next, for each taxonomy in taxonomies.items, we need to get a
list of the taxonomy categories available. Since we are using Swift
concurrency in this demo, we need to create a collection of
Task objects which will each perform their own
asynchronous request. Additionally, we need to make sure that all
tasks have completed before we continue.
Creating the task is accomplished via standard map
functionality. Awaiting the async return of all tasks is handled
through the creation of a custom extension of Sequence
providing an async/await version of flatMap. See
Sequence+Extension.swift.
// For each taxonomy, retrieve the collection of taxonomy categories
// Utilizes the standard "map" functionality to create a collection of
// tasks to be executed - one for each taxonomy.
// It then utilizes a custom flatMap operator to execute each task concurrently
let taxonomyCategories = try await taxonomies
   .items
   .map(createListTaxonomyCategoriesTask(for:))        // standard map functionality
   .flatMap { task in                                  // custom flatMap in Sequence+Extension
       // execute each task concurrently
       try await task.value
   }
/// Returns a task that wraps an async request to list the taxonomy categories for a taxonomy
///
/// Each Task returned will ultimately be executed by an async/await flatMap operation.
/// While this code could be inlined inside the map, having this function makes the call-site much cleaner
/// - parameter taxonomy: The Taxonomy for which to fetch taxonomy categories
/// - returns: Task<[TaxonomyCateory>, Error>
internal func createListTaxonomyCategoriesTask(for taxonomy: Taxonomy) -> Task<[TaxonomyCategory], Error> {
Task {
try await DeliveryAPI
.listTaxonomyCategories(taxonomyId: taxonomy.identifier)
.limit(50)
.order(.name(.asc))
.fetchNextAsync()
.items
}
} For each category, we need to follow the same general process to
obtain the list of assets associated with the category. Use standard
map functionality to create a collection of
Task objects which will each call “listAssets” for the
taxonomy category. Call a custom tryMap operator
defined in Sequence+Extension.swift to await each
Task’s return.
// Retrieve the list of assets for each category
// Convert the collection of assets into a Gallery object.
// Utilizes standard map functionality to create a collection
// of tasks to be executed.
// It then utilizes a custom tryMap operator execute each task concurrently
let galleries = try await taxonomyCategories
   .map(createGalleryCategoryTask(for:))               // standard map functionality
   .tryMap { task in                                   // custom tryMap in Sequence+Extension
       try await task.value
   }
   .sorted(by: { left, right in
       left.categoryName < right.categoryName
   })
/// Returns a task that wraps an async request to list the assets for a given taxonomy category
///
/// Each task returned will ultimately be executed by an async/await tryMap operation
/// While this code could be inlined inside the map, having this function makes the call-site much cleaner
/// - parameter for: The taxonomy category for which assets should be retrieved
/// - returns: Task<GalleryCategory, Error>
internal func createGalleryCategoryTask(for taxonomyCategory: TaxonomyCategory) -> Task<GalleryCategory, Error> {
Task {
Onboarding.logDebug("GALLERY DEMO: - START Fetching assets for tc \(taxonomyCategory.identifier)")
let idNode = QueryNode.equal(field: "taxonomies.categories.nodes.id", value: taxonomyCategory.identifier)
let typeNode = QueryNode.equal(field: "type", value: "Image")
let query = QueryBuilder(node: idNode).and(typeNode)
let assets = try await DeliveryAPI
.listAssets()
.query(query)
.fields(.all) // need the fileGroup field to download the thumbnail
.limit(100)
.fetchNextAsync()
Onboarding.logDebug("GALLERY DEMO: - END Fetching assets for tc \(taxonomyCategory.identifier)")
return GalleryCategory(id: taxonomyCategory.identifier, categoryName: taxonomyCategory.name, assets: assets.items)
}
} Note: In the code sample above, we’re using the
.querybuilder component to specify the query as aQueryBuilderobject. This allows for the construction of complex queries without having to manually type the entire query. For simple queries, you may find it easier to use the.query(rawText:)builder component. See the unit tests inOracleContentCorefor examples of various queries.
Finally, for each of the first four assets in a category, we will
download the thumbnail rendition. The library’s
downloadThumbnail method is configured to download the
rendition with the name “Thumbnail”.
It’s worth noting the presence of the cacheProvider and cacheKey
parameters in the code below. See the
GalleryFileCache.swift file for the cache
implementation and how it conforms to
OracleContentCore.CacheProvider. The important notes
here are:
- Our cache implementation allows the download API to return early if an asset already exists in our cache.
- If a download is actually performed, it will be written to our cache automatically.
/// Downloads the thumbnail rendition for the specified asset
///
/// - parameter asset: The asset whose rendition will be downloaded
/// - parameter cacheProvider: The CacheProvider implementation to use
/// - parameter cacheKey: The key for the rendition in cache
/// - returns: UIImage?
public func downloadThumbnail(
  asset: Asset,
  cacheProvider: CacheProvider,
  cacheKey: String
) async -> ThumbnailImageState {

  do {
      let downloadResult = try await DeliveryAPI
          .downloadThumbnail(
              identifier: asset.identifier,
              fileGroup: asset.fileGroup,
              cacheProvider: cacheProvider,
              cacheKey: "\(asset.identifier)_thumbnail"
          )
          .downloadAsync(progress: nil)

      if let image = UIImage(contentsOfFile: downloadResult.result.path) {
          return .image(image)
      } else {
          Onboarding.logError(OracleContentError.couldNotCreateImageFromURL(downloadResult.result).localizedDescription)
          return .error
      }

  } catch {
      Onboarding.logError(error.localizedDescription)
      return .error
  }
}
Other Networking Requests
The page containing the previews of all images in the category uses a rendition named “Medium” with a .jpg file type.
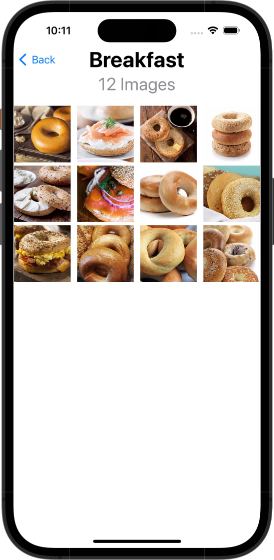
That rendition is requested using this code:
/// Downloads the rendition named "Medium" with a a JPG format
 /// - parameter for: The identifier of the asset
 /// - parameter cacheProvider: The CacheProvider implementation to use
 /// - parameter cacheKey: The key for the rendition in cache
 /// - returns CategoryAssetsMediumImageValue
 public func downloadMediumJPGRendition(
     for identifier: String,
     cacheProvider: CacheProvider,
     cacheKey: String
 ) async -> CategoryAssetsMediumImageValue {
     do {
         let downloadResult = try await DeliveryAPI
             .downloadRendition(identifier: identifier,
                                renditionName: "Medium",
                                cacheProvider: cacheProvider,
                                cacheKey: cacheKey,
                                format: "jpg")
             .downloadAsync(progress: nil)

         if let image = UIImage(contentsOfFile: downloadResult.result.path) {
             return .image(image)
         } else {
             Onboarding.logError("Could not obtain image from path")
             return .error
         }

     } catch {
         Onboarding.logError(error.localizedDescription)
         return .error
     }
 }
When you drill into a specific image, the full-sized preview using the “Native” rendition of the file.
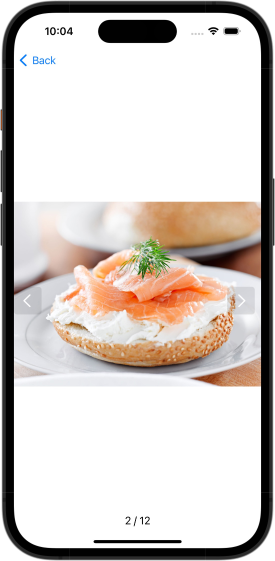
That object is requested using the following method:
/// Downloads the native file to use for previews
/// - parameter identifier: The identifier of the asset
/// - parameter cacheProvider: The CacheProvider implementation to use
/// - parameter cacheKey: The key for the rendition in cache
public func downloadPreview(
  identifier: String,
  cacheProvider: CacheProvider,
  cacheKey: String
) async throws -> UIImage {

  downloadNativeService?.cancel()

  downloadNativeService = DeliveryAPI
      .downloadNative(identifier: identifier,
                      cacheProvider: cacheProvider,
                      cacheKey: cacheKey)

  let downloadResult = try await downloadNativeService.downloadAsync(progress: nil)

  guard let image = UIImage(contentsOfFile: downloadResult.result.path) else {
      throw ImagePreviewError.assetNotFound
  }

  return image
 }
Step 3: Running your application
From Xcode, ensure that the Gallery Demo scheme is selected. Pick a deployment target of any iOS device or simulator running iOS version 16.0 or higher. Select “Run” from the Product menu or click the “Start Active Scheme” button.
For demo purposes, persisted cache files will be deleted each time the application is launched.
While the application is running, cache may be manually cleared in one of two ways:
- Pull-to-refresh from the main screen.
- Click the gear icon in the top right of the main screen.
Conclusion
In this tutorial, we created a gallery iOS application, which can be found on Github. This application uses Oracle Content Management as a headless CMS. After setting up and configuring Oracle Content Management with a channel of published content for the gallery site tutorial, we ran the application to fetch the required content.
For more information on Swift, go to the Swift website.
Learn about important Oracle Content Management concepts in the documentation.
You can find more samples like this on the Oracle Content Management Samples page in the Oracle Help Center.
Build an Image Gallery in Swift for iOS with Headless Oracle Content Management
F80561-01
April 2023
Copyright © 2021, 2023, Oracle and/or its affiliates.
Primary Author: Oracle Corporation