Build an Oracle Digital Assistant Chatbot with Headless Oracle Content Management
Introduction
Oracle Digital Assistant is a platform that allows you to create and deploy digital assistants, which are AI-driven interfaces that help users accomplish a variety of tasks in natural language conversations. But what happens when you need a content management system (CMS) to serve all of your content? Fortunately, Oracle Content Management, with its rich headless CMS capabilities, has a graceful solution for all your content administration and governance needs.
In this tutorial, we’ll build a chatbot in Oracle Digital Assistant by leveraging Oracle Content Management as a headless CMS as well as its software development kit (SDK) for content delivery in JavaScript. This chatbot sample is available on GitHub.
The tutorial consists of four steps:
- Prepare Oracle Content Management
- Build the Oracle Digital Assistant skill
- Set up a web application for your chatbot
- Deploy your application
Prerequisites
Before proceeding with this tutorial, we recommend that you read the following information first:
To follow this tutorial, you’ll need:
- an Oracle Content Management subscription
- an Oracle Content Management account with the Content Administrator role
- an Oracle Digital Assistant (ODA) subscription
- an ODA instance
- a Windows or Mac computer with Node.js and Node Package Manager (NPM) installed for global access
What We’re Building
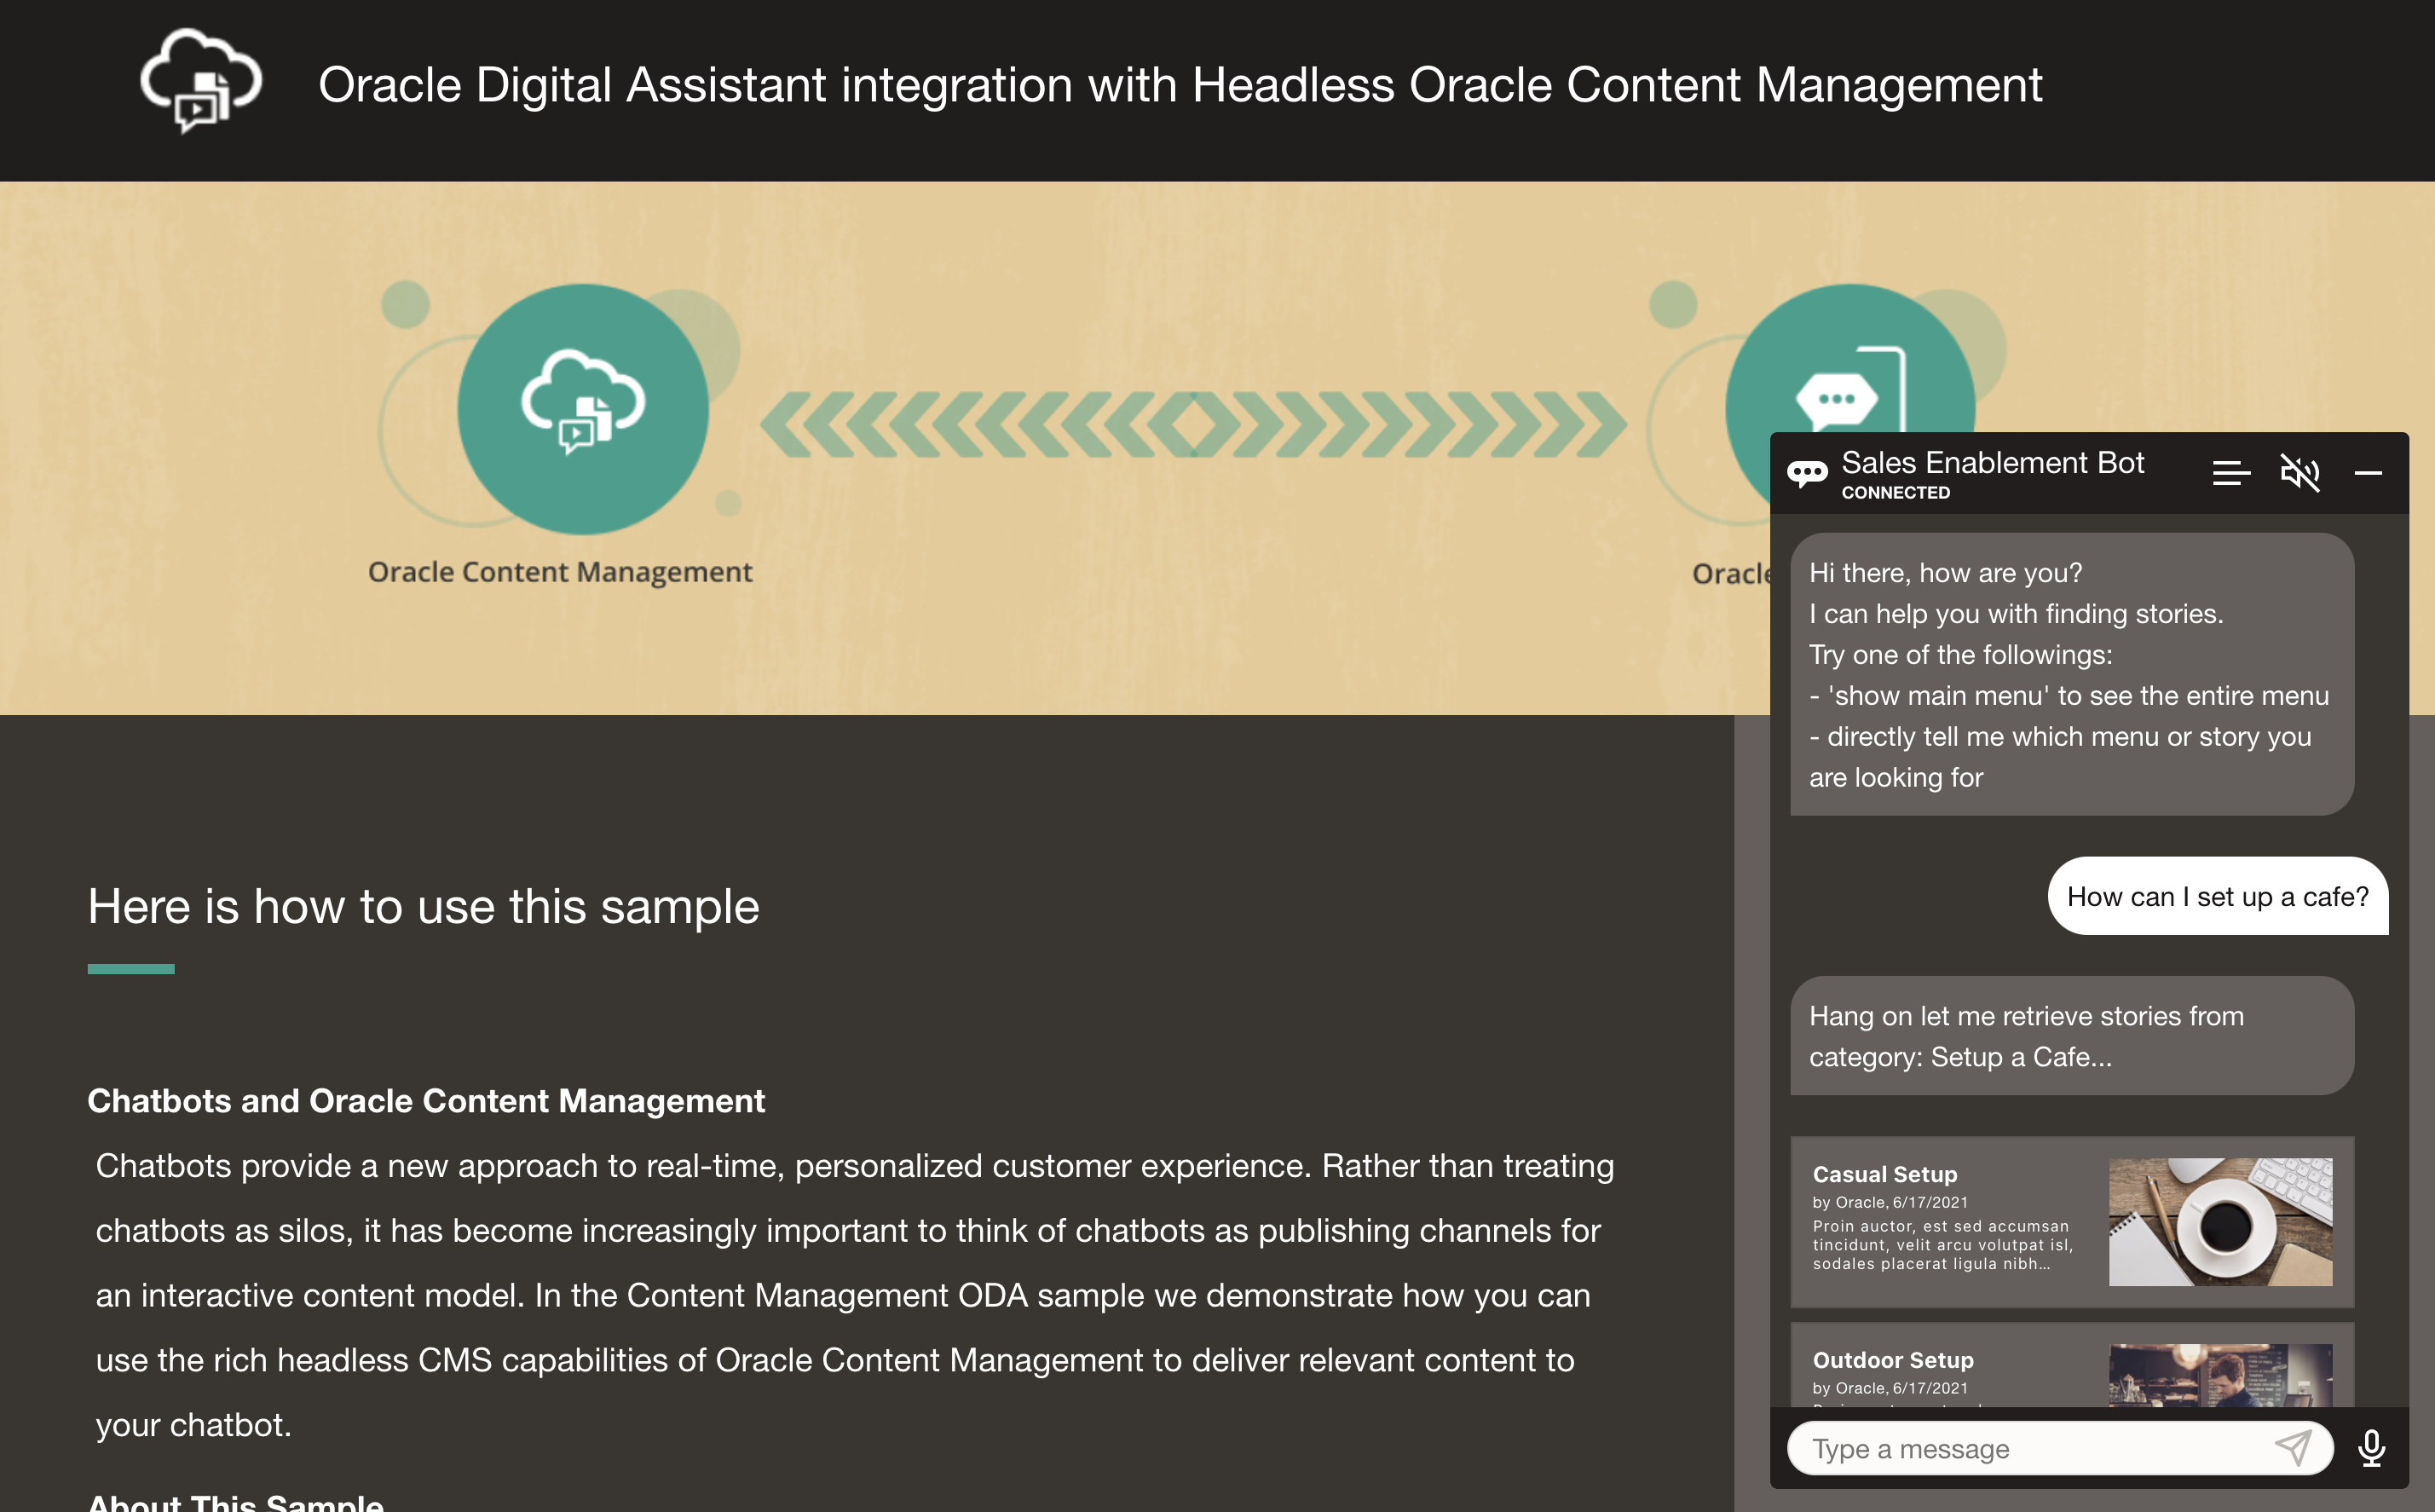
Our chatbot sample will consist of a single landing page with a bot that users can use to find sales collateral. Visitors can ask the Sales Enablement bot to show a list of menu items, categories in a menu item, or fetch stories and announcements relevant to a search query.
To take a look at what we’re building, here’s the end state of our tutorial, an ODA chatbot that consumes content from Oracle Content Management:
https://headless.mycontentdemo.com/samples/oce-oda-sample/
This is what the landing page and the Sales Enablement bot will look like at the end of this tutorial:
Content Management ODA Chatbot Flow
The flow of the Content Management ODA chatbot sample is as follows:
The client makes a request to the ODA channel via the chatbot interface.
The ODA channel has a skill associated with it, which resolves this user request.
Based on the resolved entity or intent, the ODA skill can perform different actions:
- If the resolved entity contains a category value, then:
- ODA makes a call to Content Management using the custom component service,
- The custom component service uses the category value and the server configuration for the Content Management instance, and sends a request to the instance
- Then the instance sends a response back to the custom component service, which is then sent to the client by ODA.
- Otherwise, ODA sends a message depending on the defined conversation flow.
- If the resolved entity contains a category value, then:
The response received by the client is rendered by the web SDK and shown to the user.
By the end of this tutorial, you’ll learn how to build a chatbot application powered by Oracle Content Management.
Task 1: Prepare Oracle Content Management
If you don’t already have an Oracle Content Management instance, see the Quick Start to learn how to register for Oracle Cloud, provision an Oracle Content Management instance, and configure Oracle Content Management as a headless CMS.
For this tutorial, you’ll need to create a content model. There’s a downloadable asset pack available that will fill your empty repository with content types and associated content.
To prepare Oracle Content Management:
Create a Channel and Asset Repository
You first need to create a channel and an asset repository in Oracle Content Management so you can publish content.
To create a channel and an asset repository in Oracle Content Management:
Log in to the Oracle Content Management web interface as an administrator.
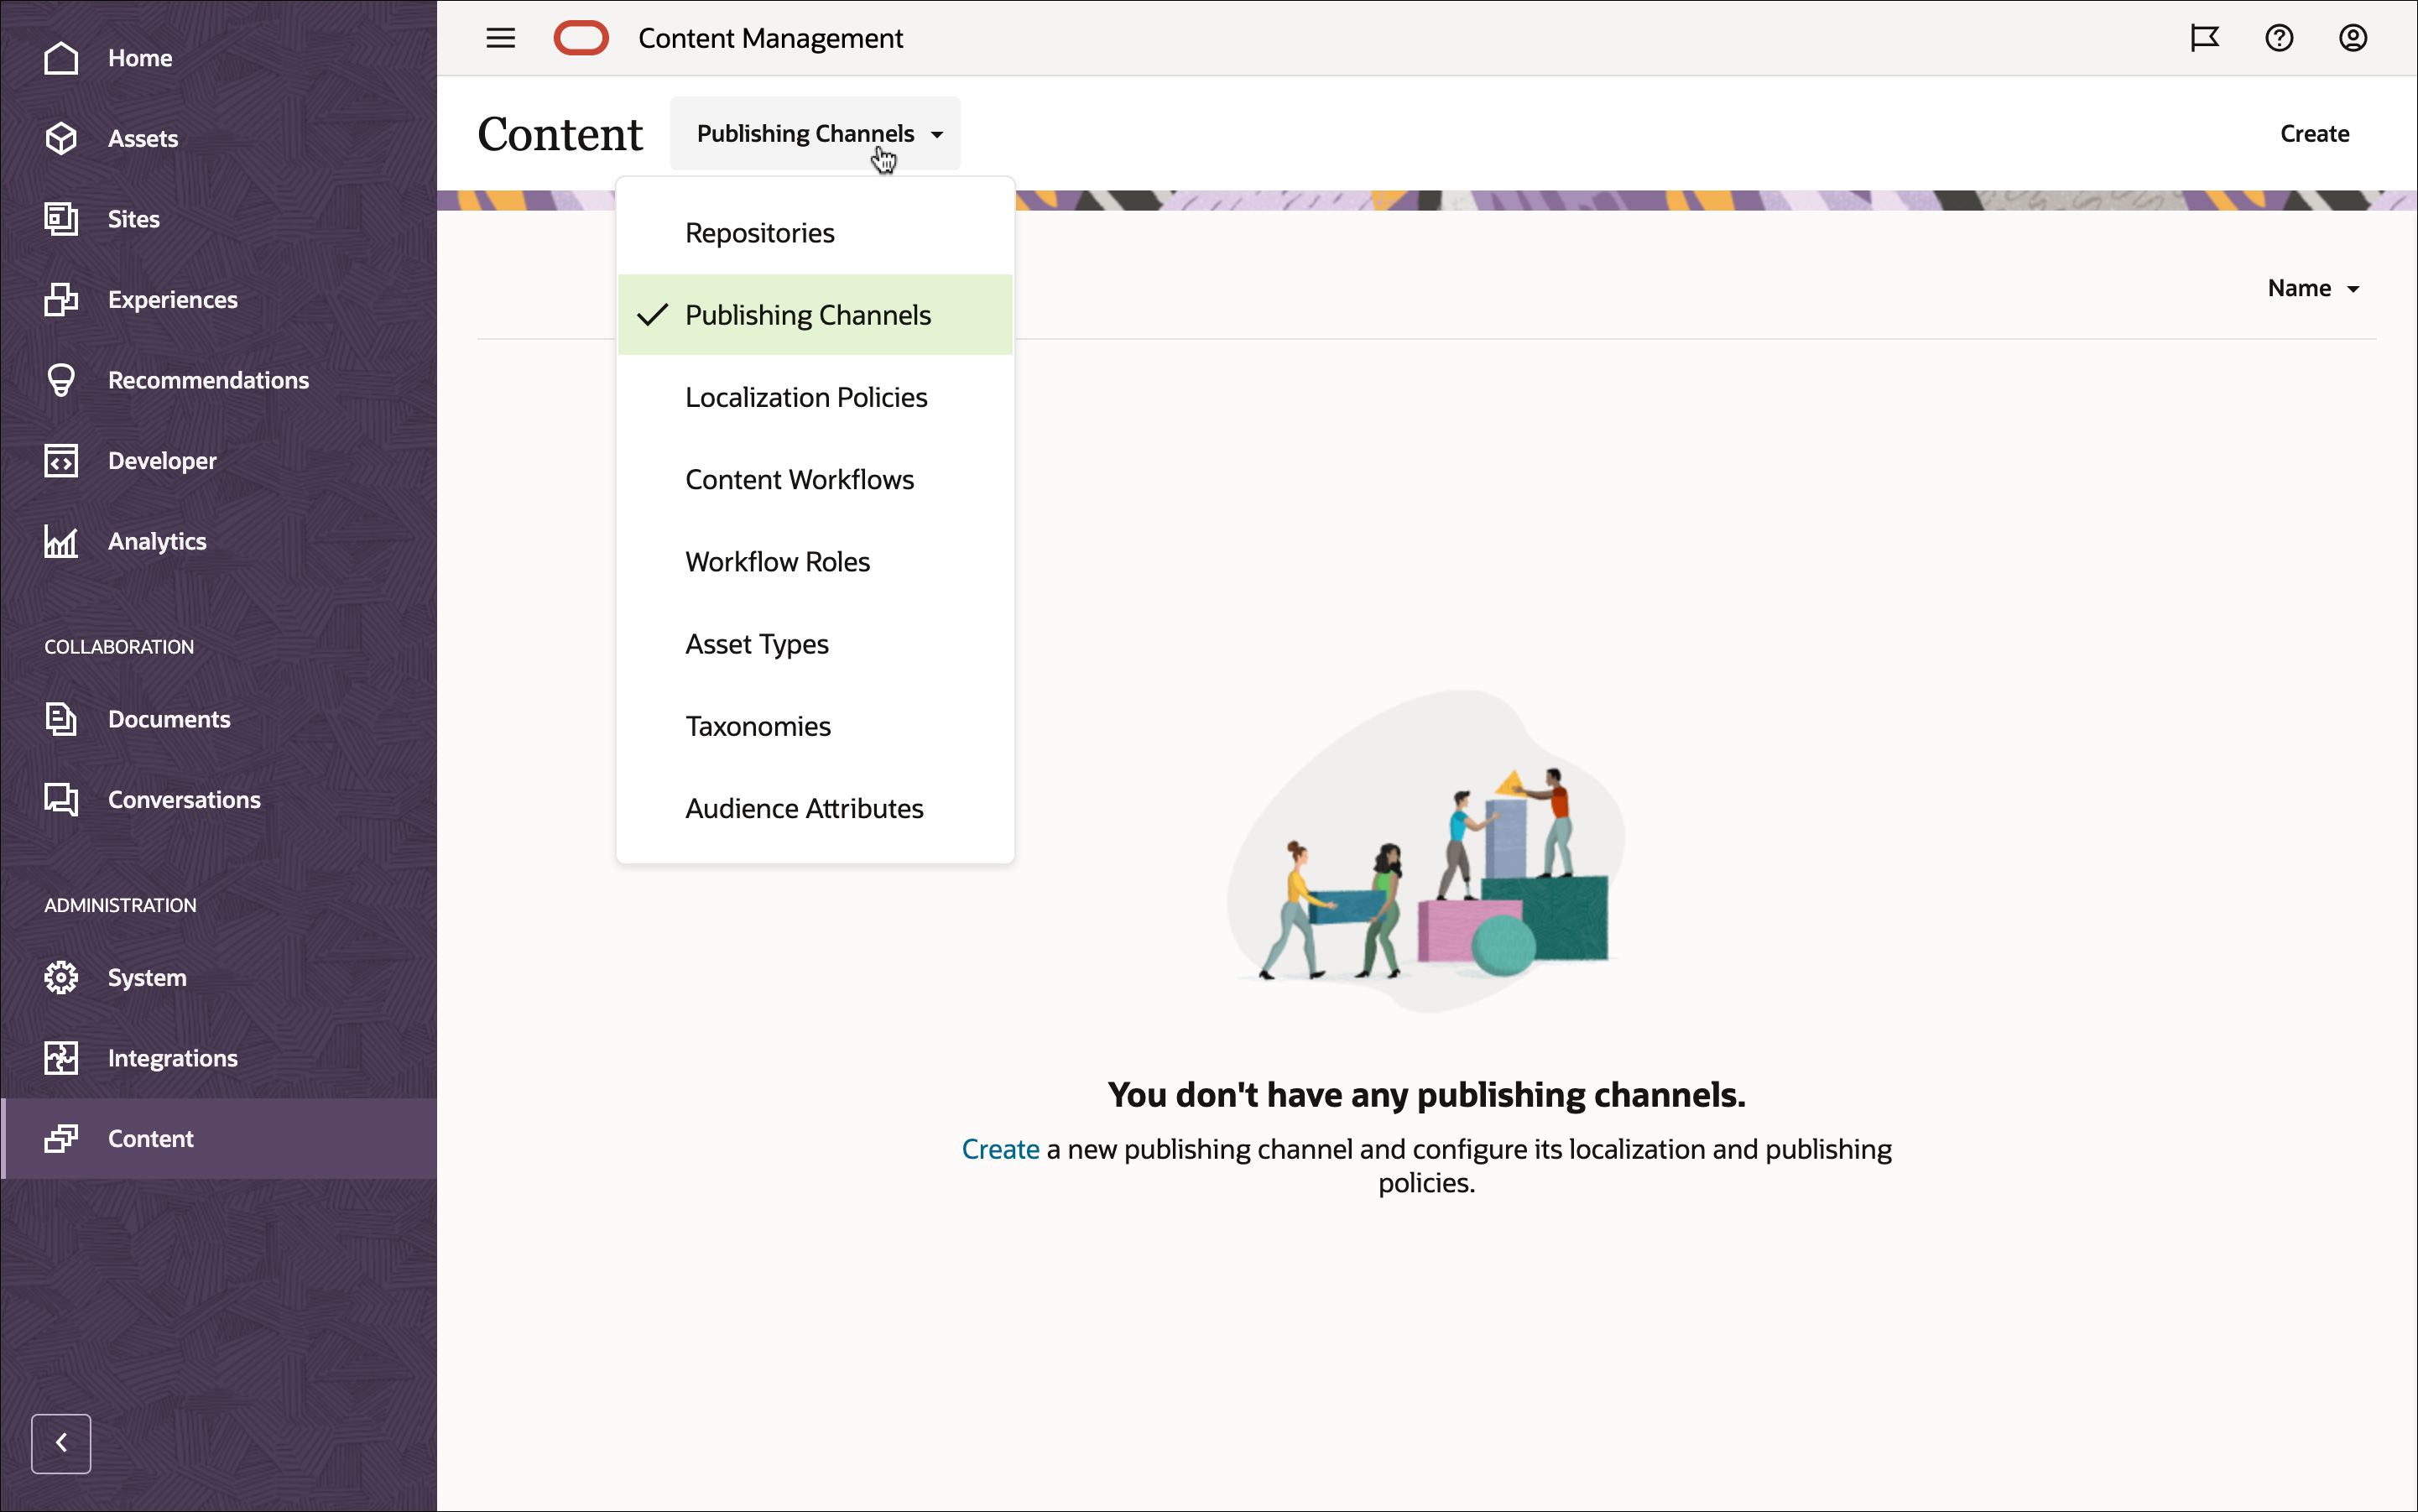
Choose Content in the left navigation menu and then choose Publishing Channels from the selection list in the page header.
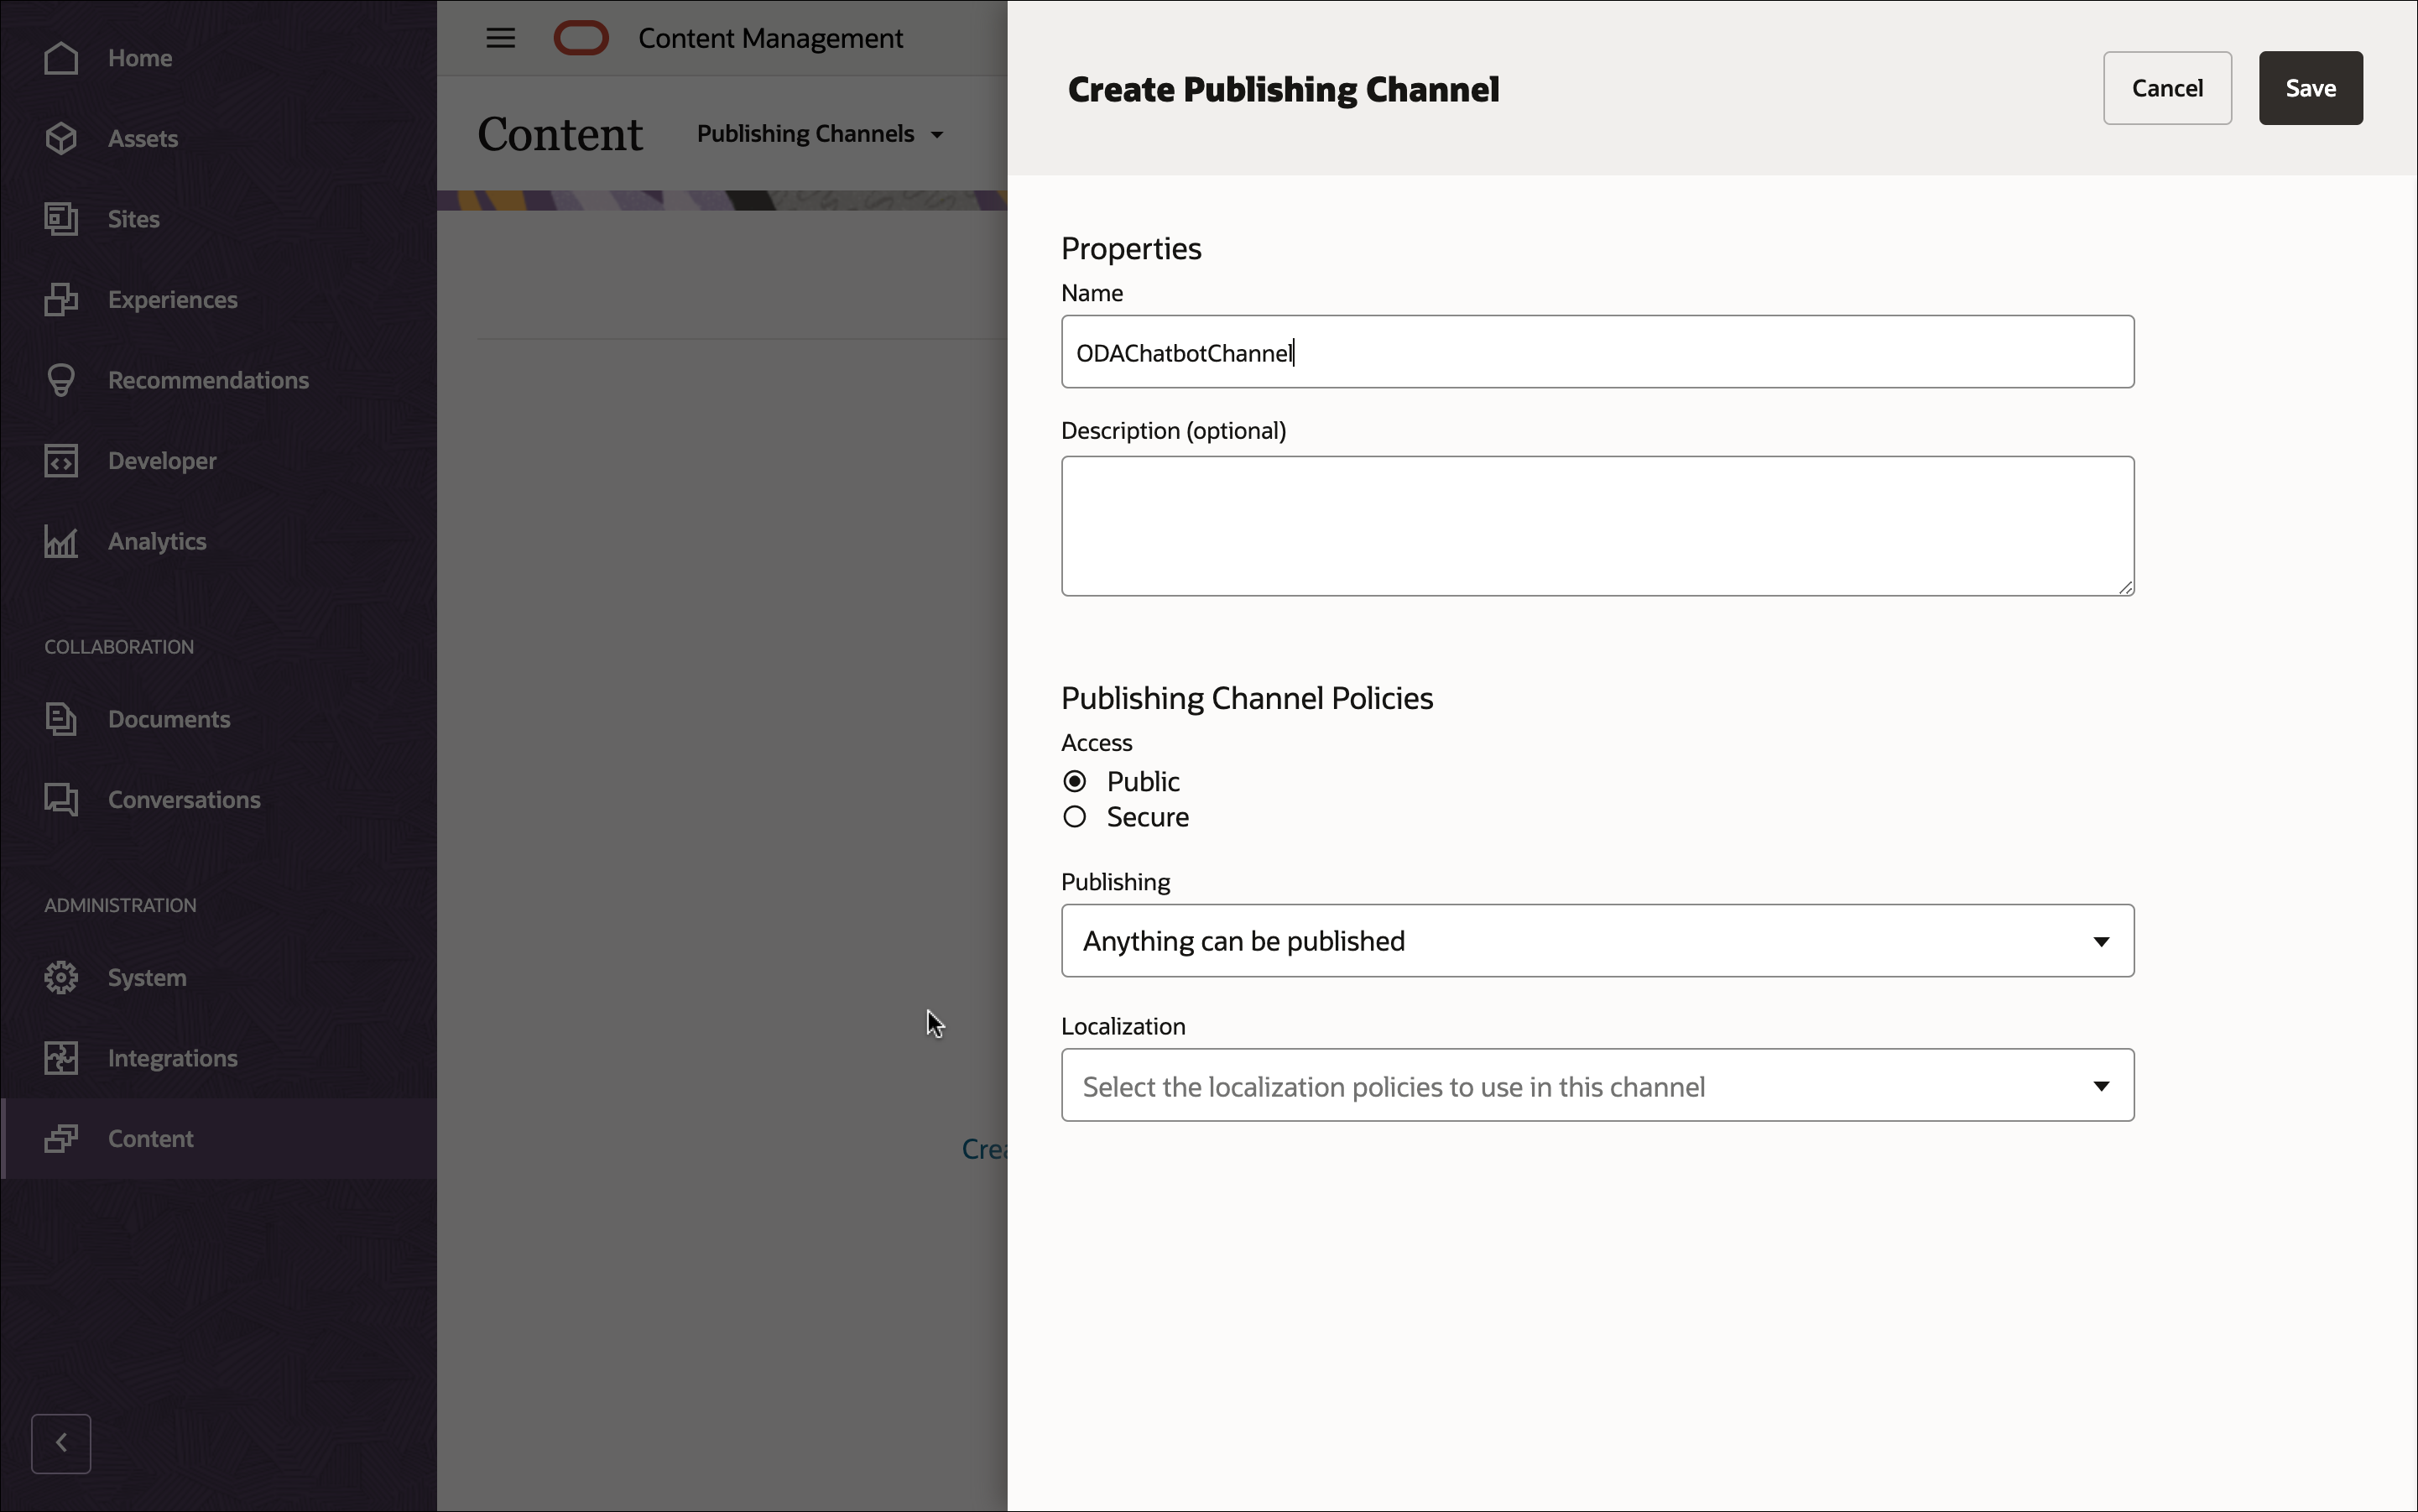
In the upper right corner, click Create to create a new channel. Name the channel ‘ODAChatbotChannel’ for the purpose of this tutorial, and keep the access public. Click Save to create the channel.
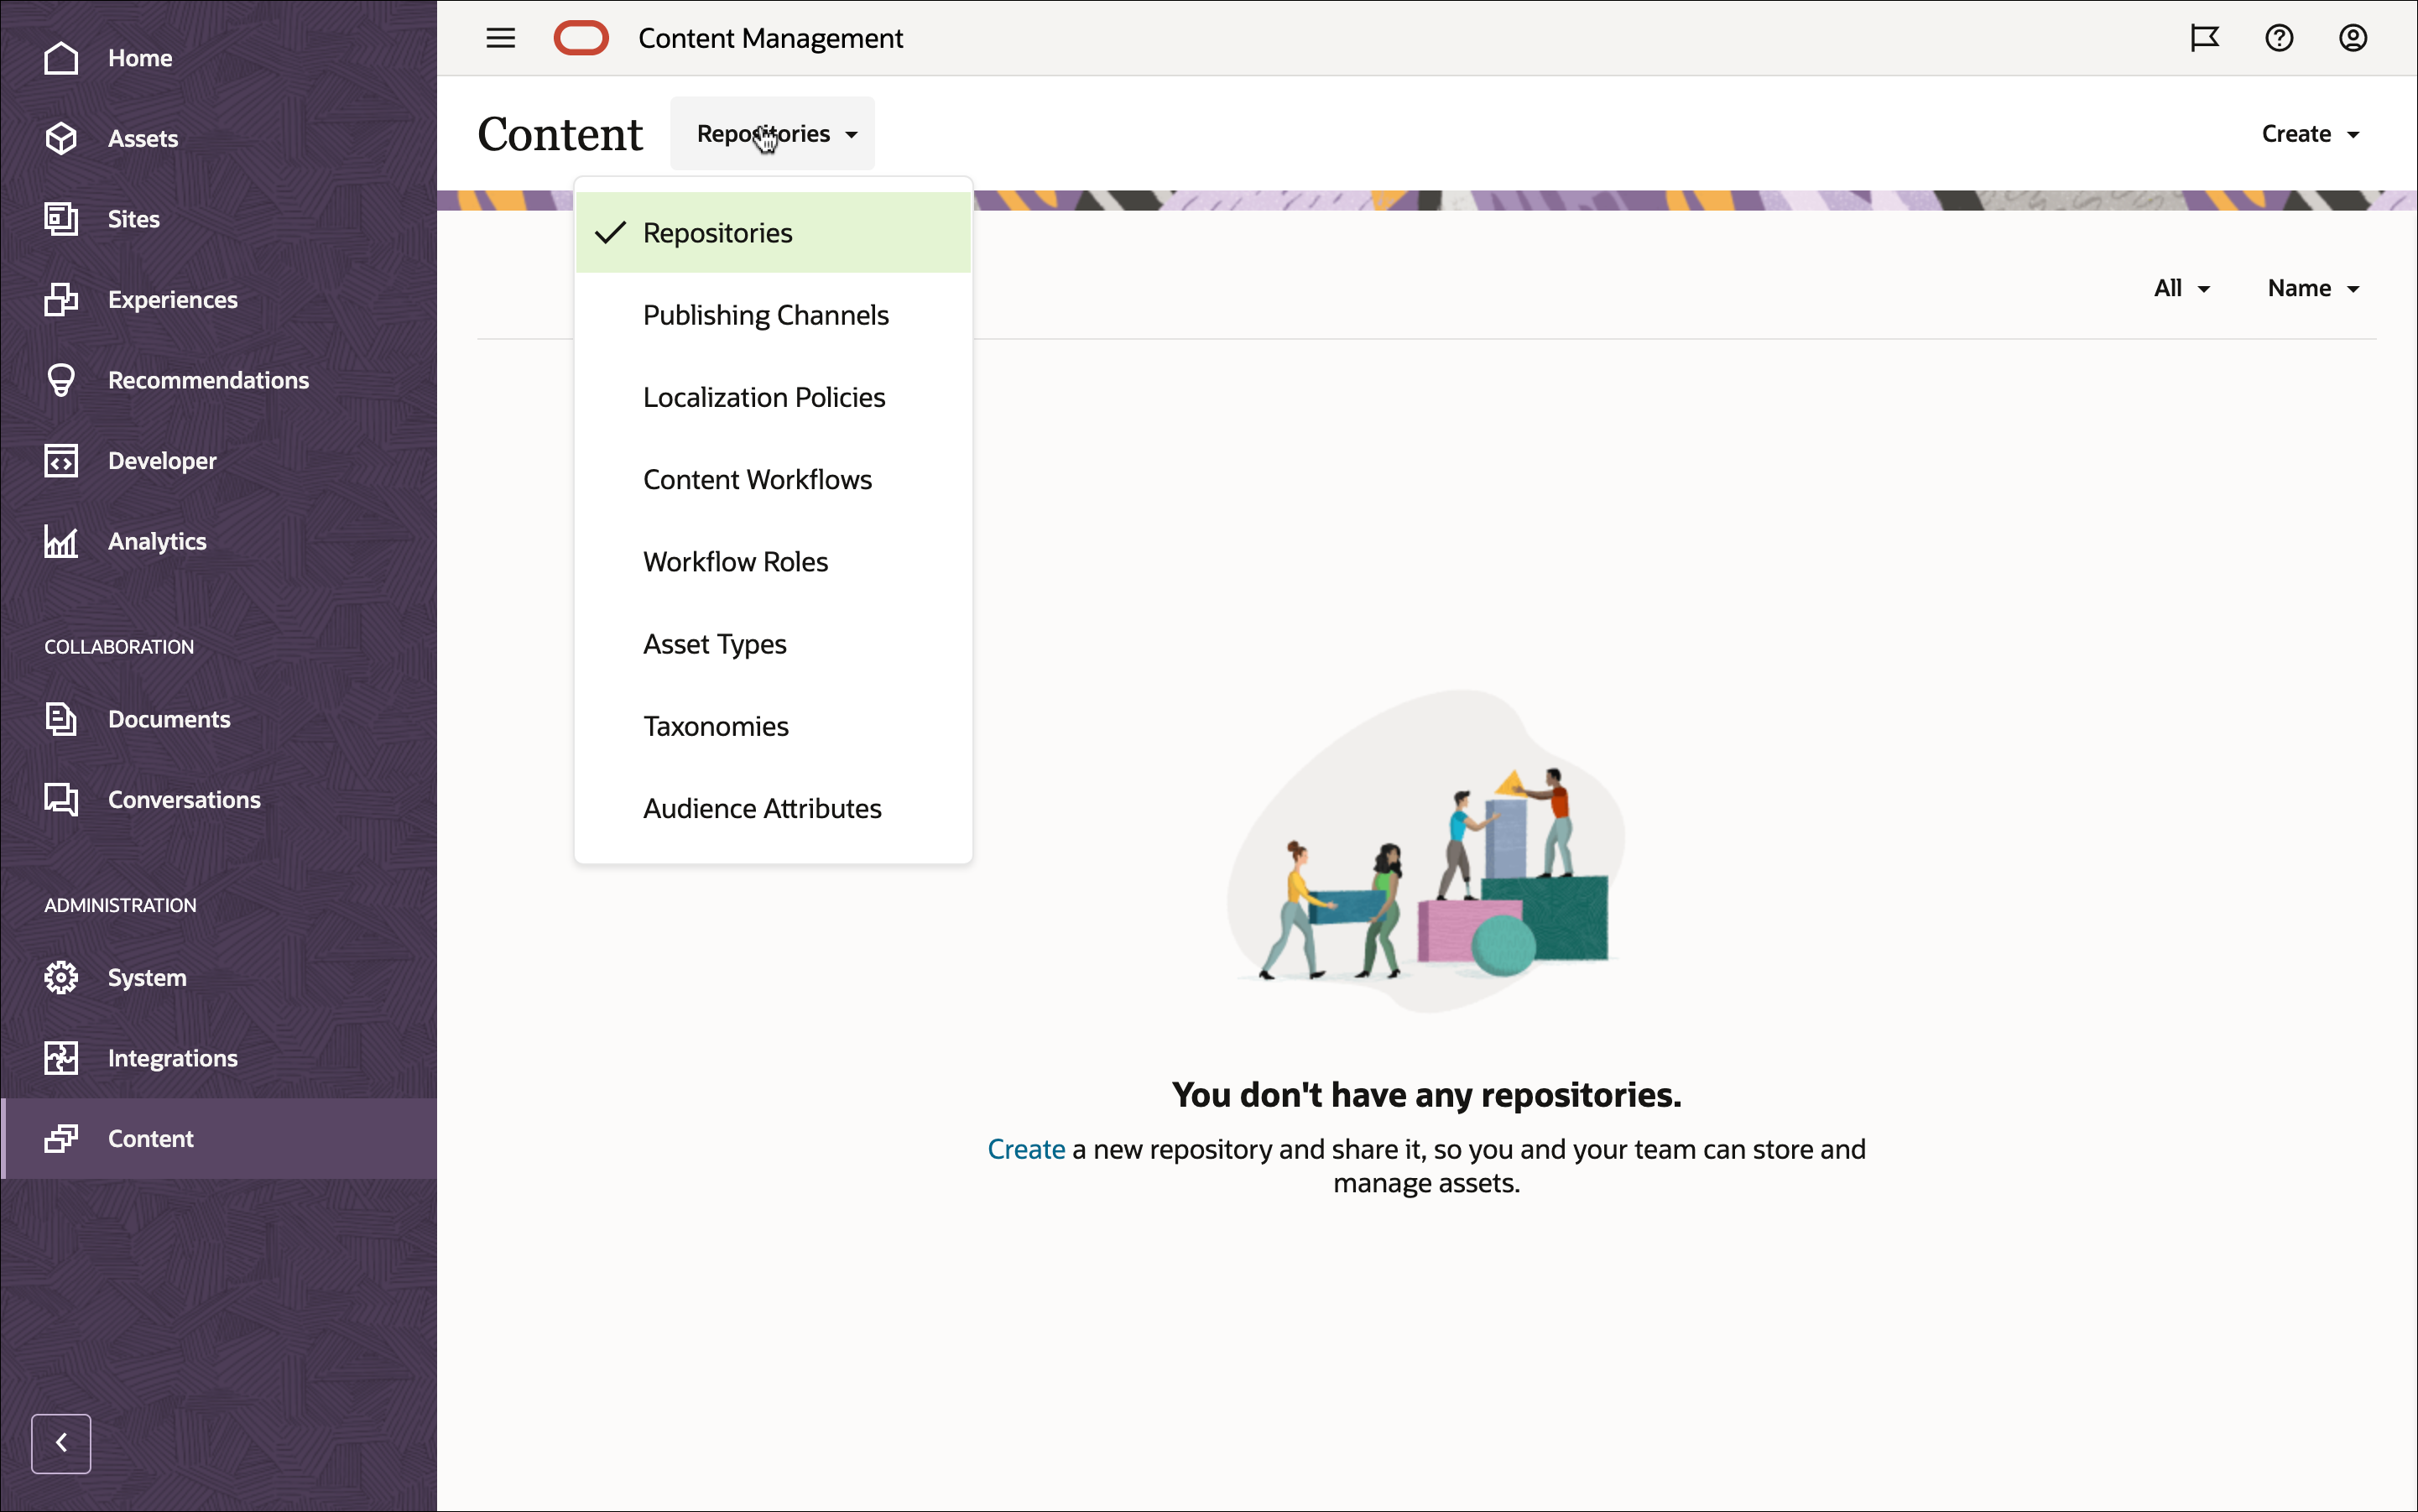
Choose Content in the left navigation menu and then choose Repositories from the selection list in the page header.
In the upper right corner, click Create to create a new asset repository. Name the asset repository ‘ODAChatbotRepository’ for the purpose of this tutorial.
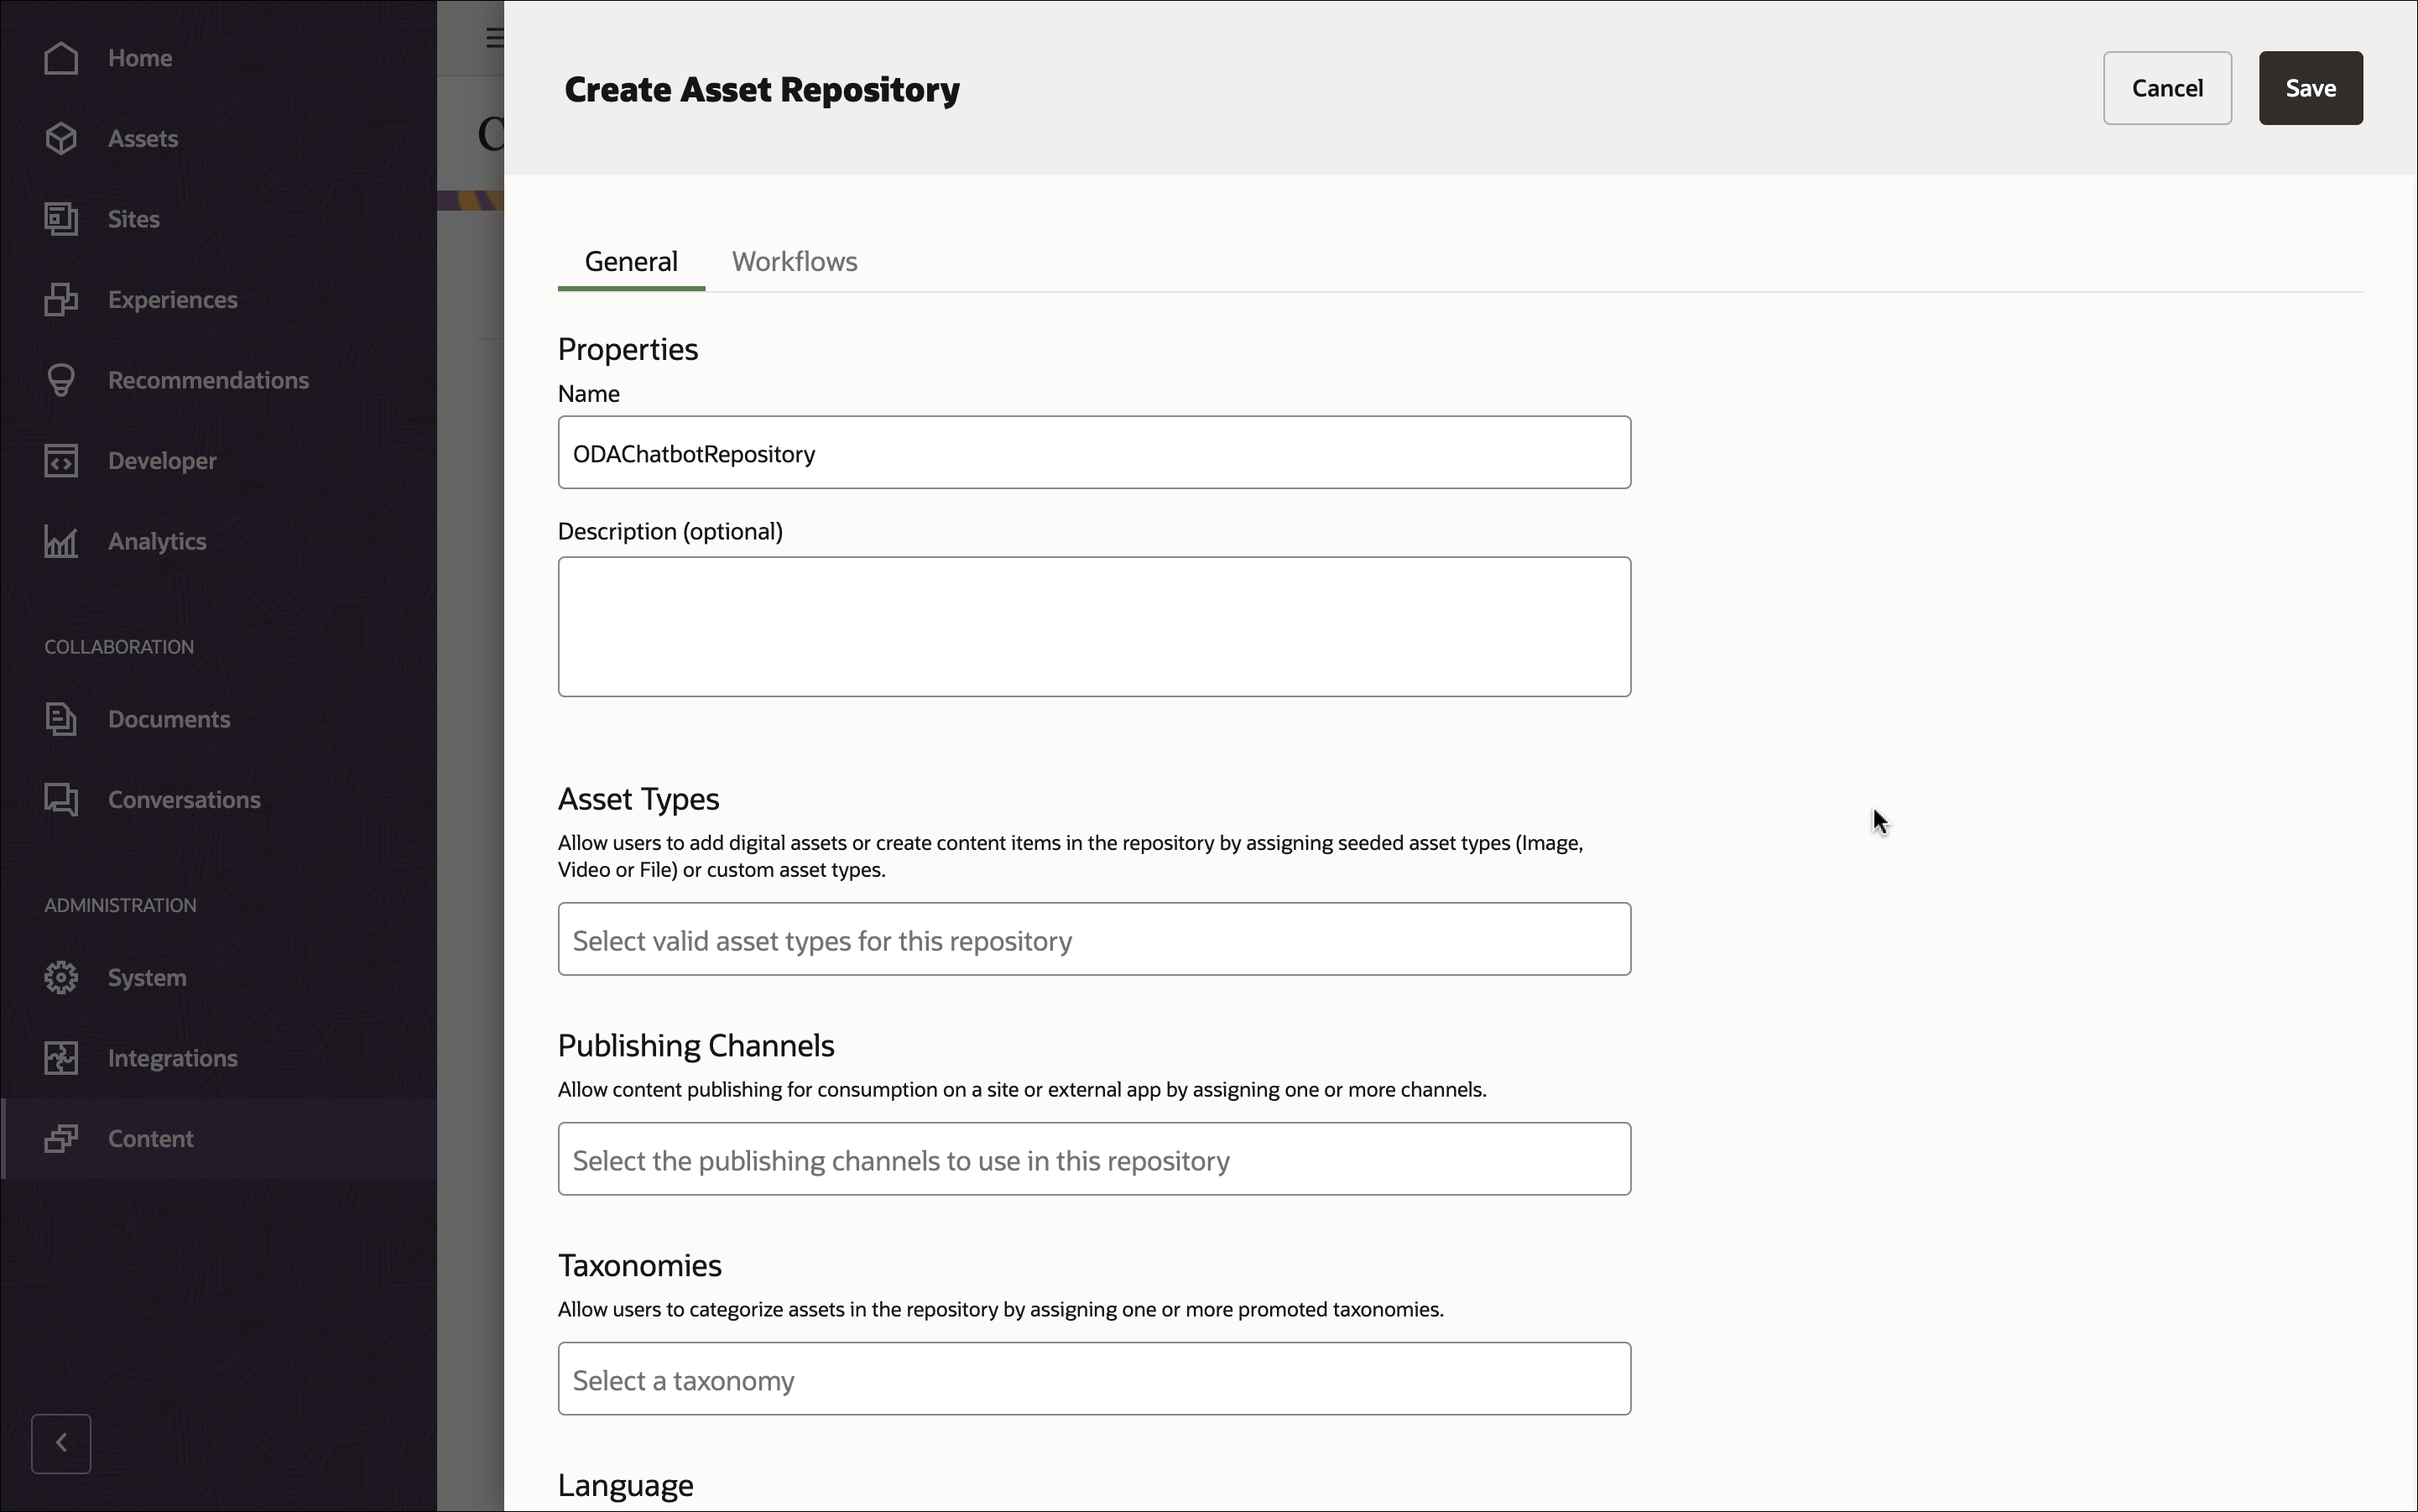
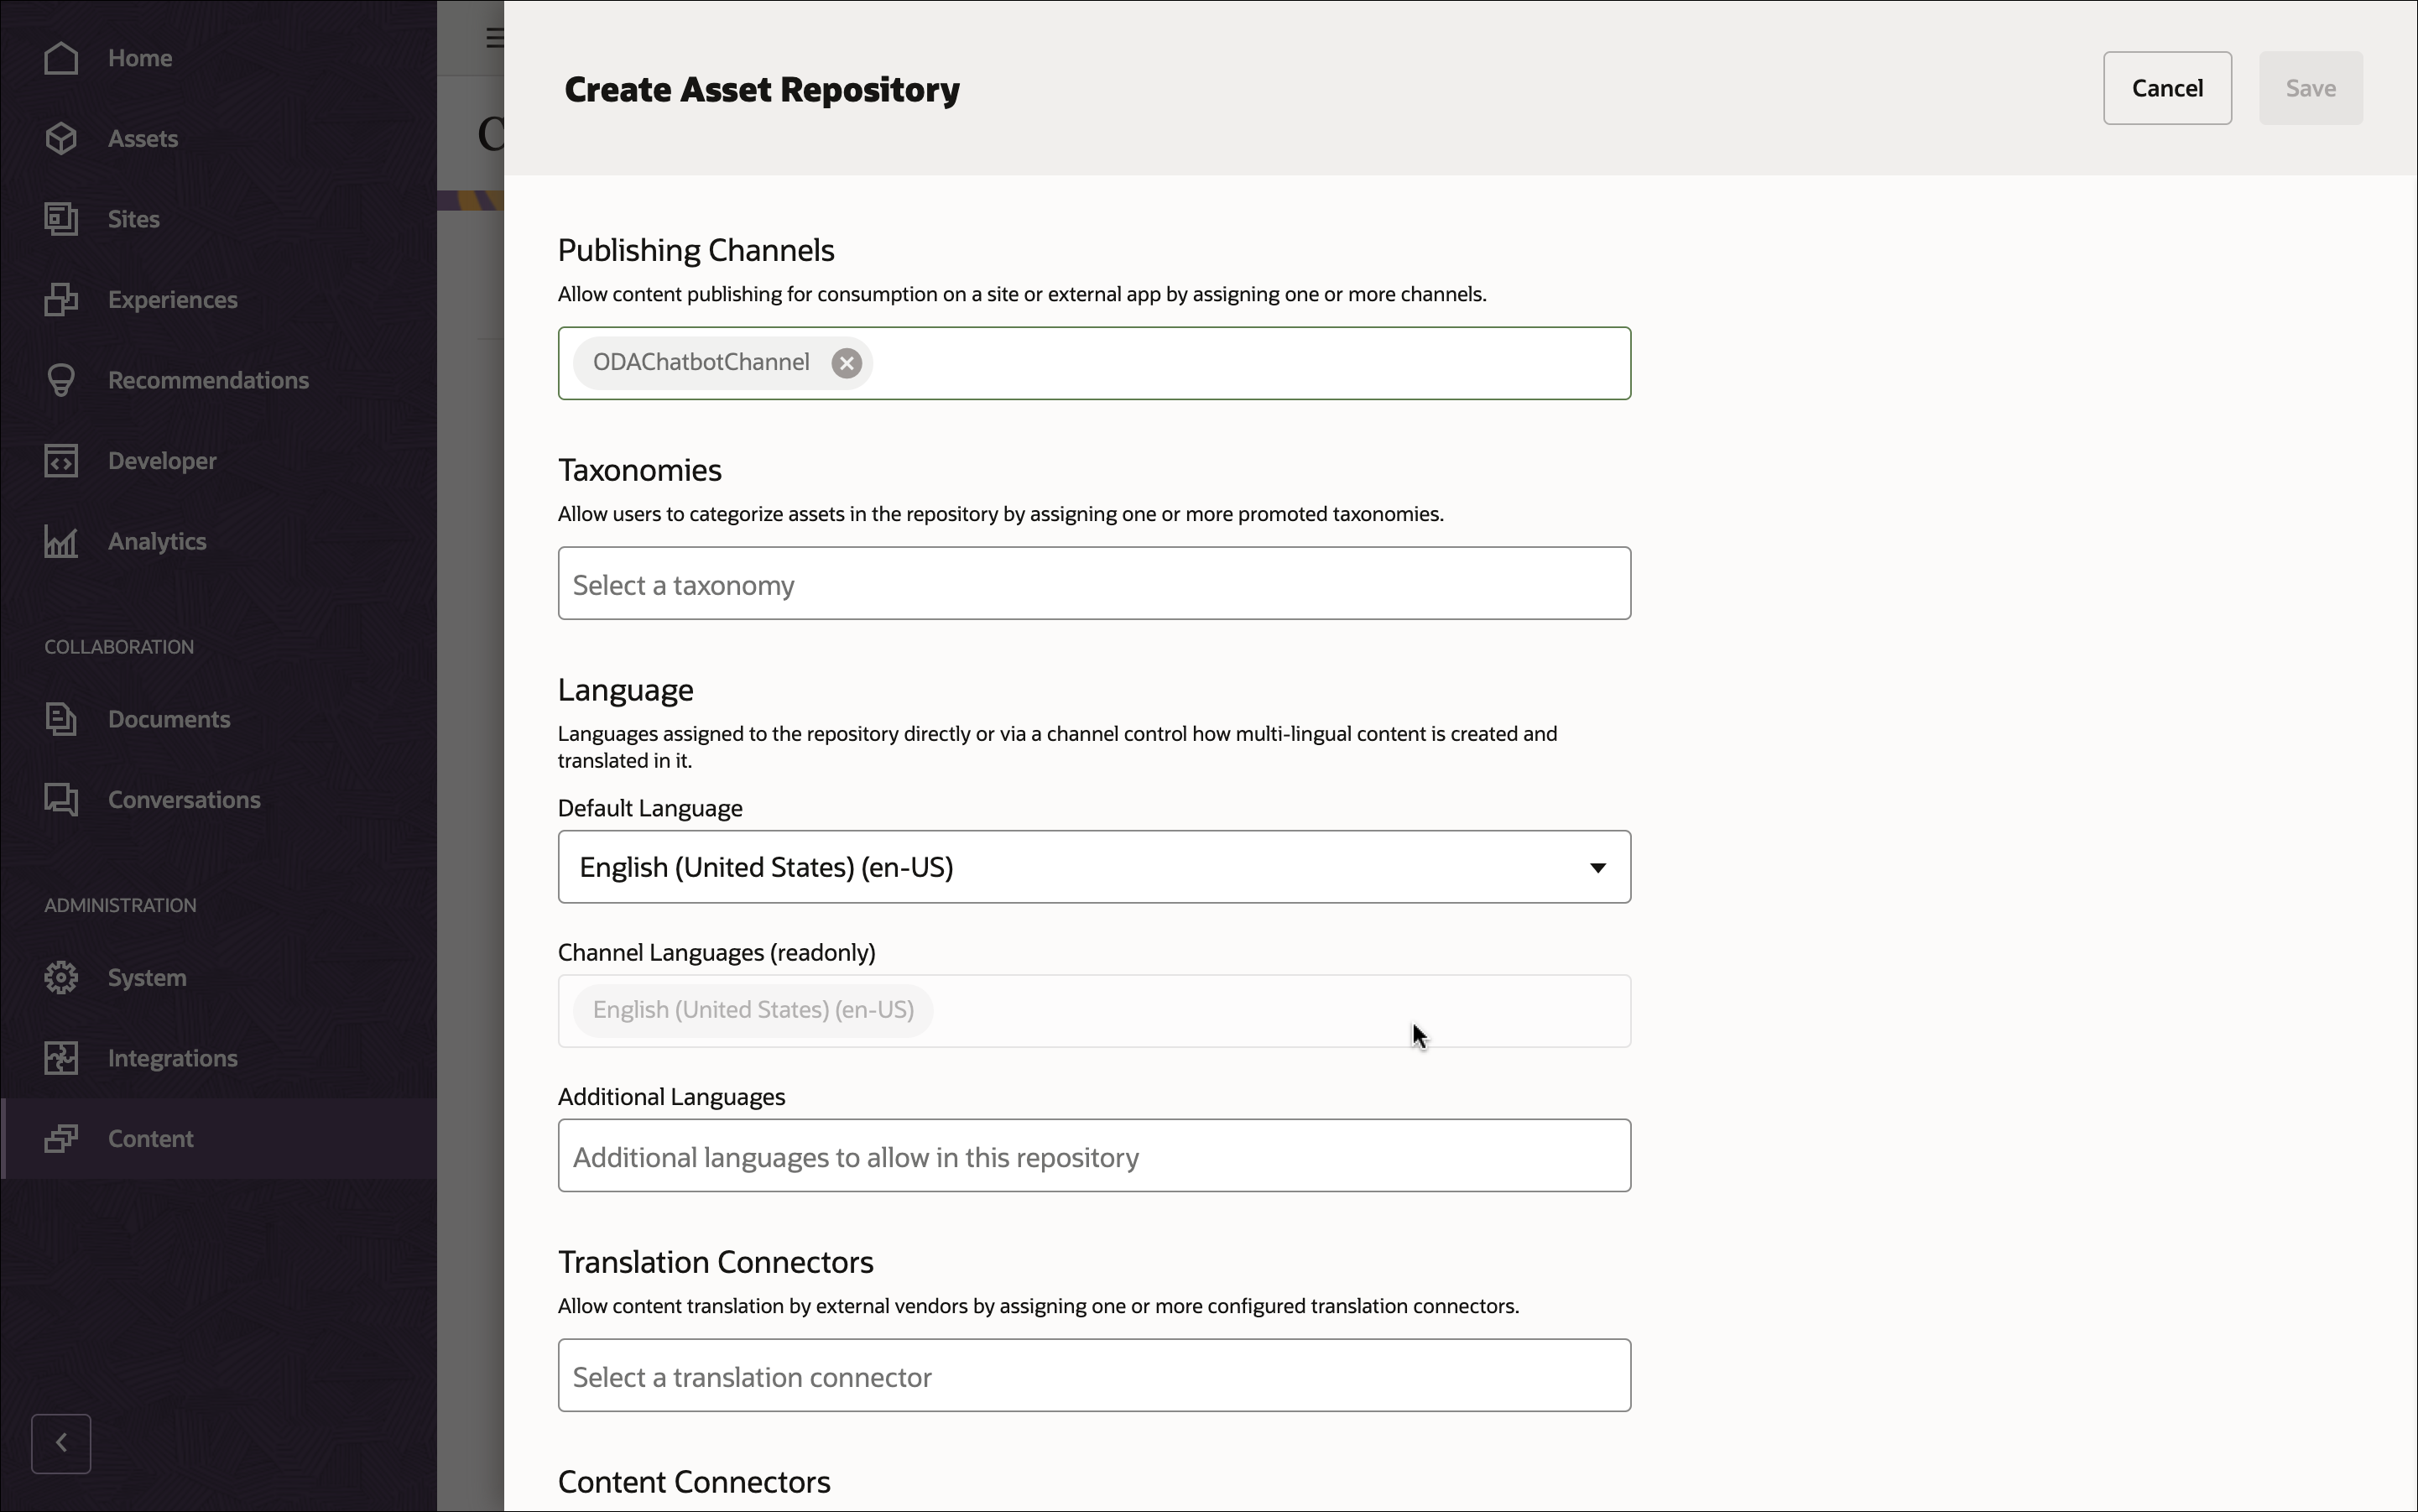
In the Publishing Channels field, select the ODAChatbotChannel channel to indicate to Oracle Content Management that content in the ODAChatbotRepository repository can be published to the ODAChatbotChannel channel. Click Save when you’re done.
Import the Oracle Content Management Samples Asset Pack
You can download a preconfigured Content Management sample assets pack that contains all required content types, assets, and taxonomies for this tutorial.
You can upload a copy of the content we’re using in this tutorial from the Content Management Samples Asset Pack. This will let you experiment with the content types and modify the content. If you want to import the Content Management Samples Asset Pack, you can download the asset pack archive, OCESamplesAssetPack.zip, and extract it to a directory of your choice:
Download the Content Management Samples Asset Pack (OCESamplesAssetPack.zip) from the Oracle Content Management downloads page. Extract the downloaded zip file to a location on your computer. After extraction, this location will include a file called OCEODAChatbot_data.zip.
Log in to the Oracle Content Management web interface as an administrator.
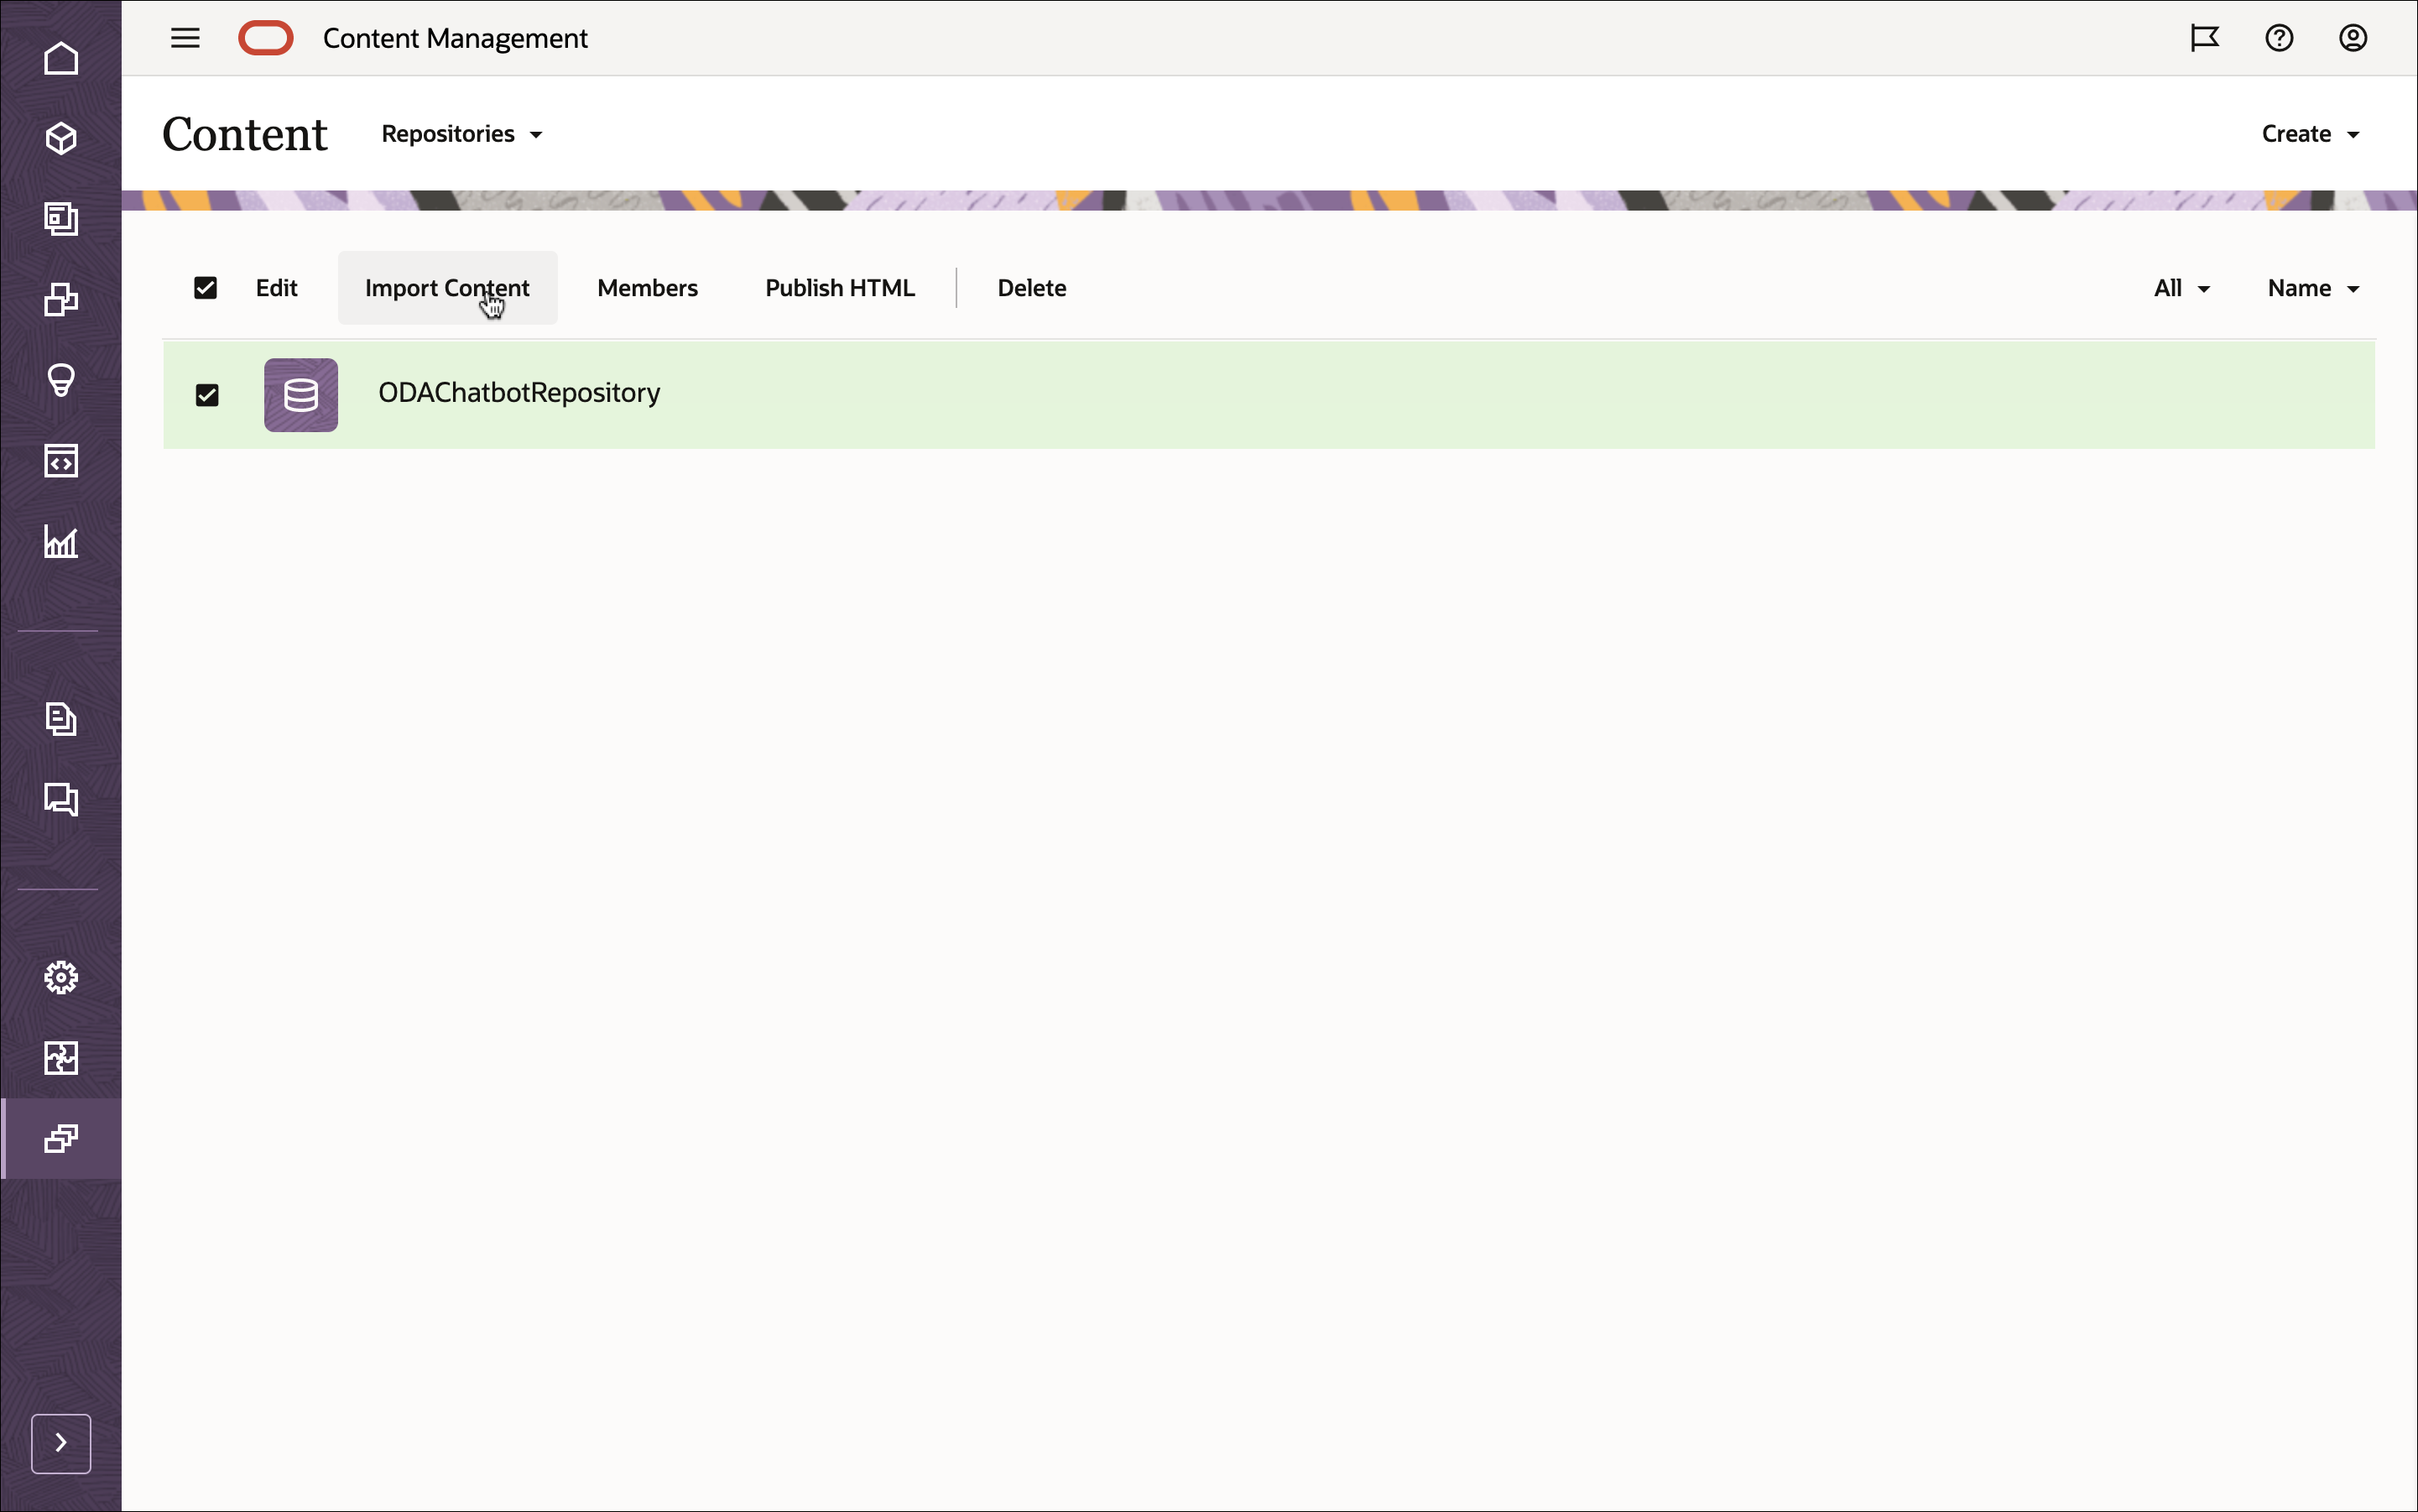
Choose Content in the left navigation menu and then choose Repositories from the selection list in the page header. Now select ODAChatbotRepository and click Import Content in the top action bar.
Upload OCEODAChatbot_data.zip from your local computer to the Documents folder.
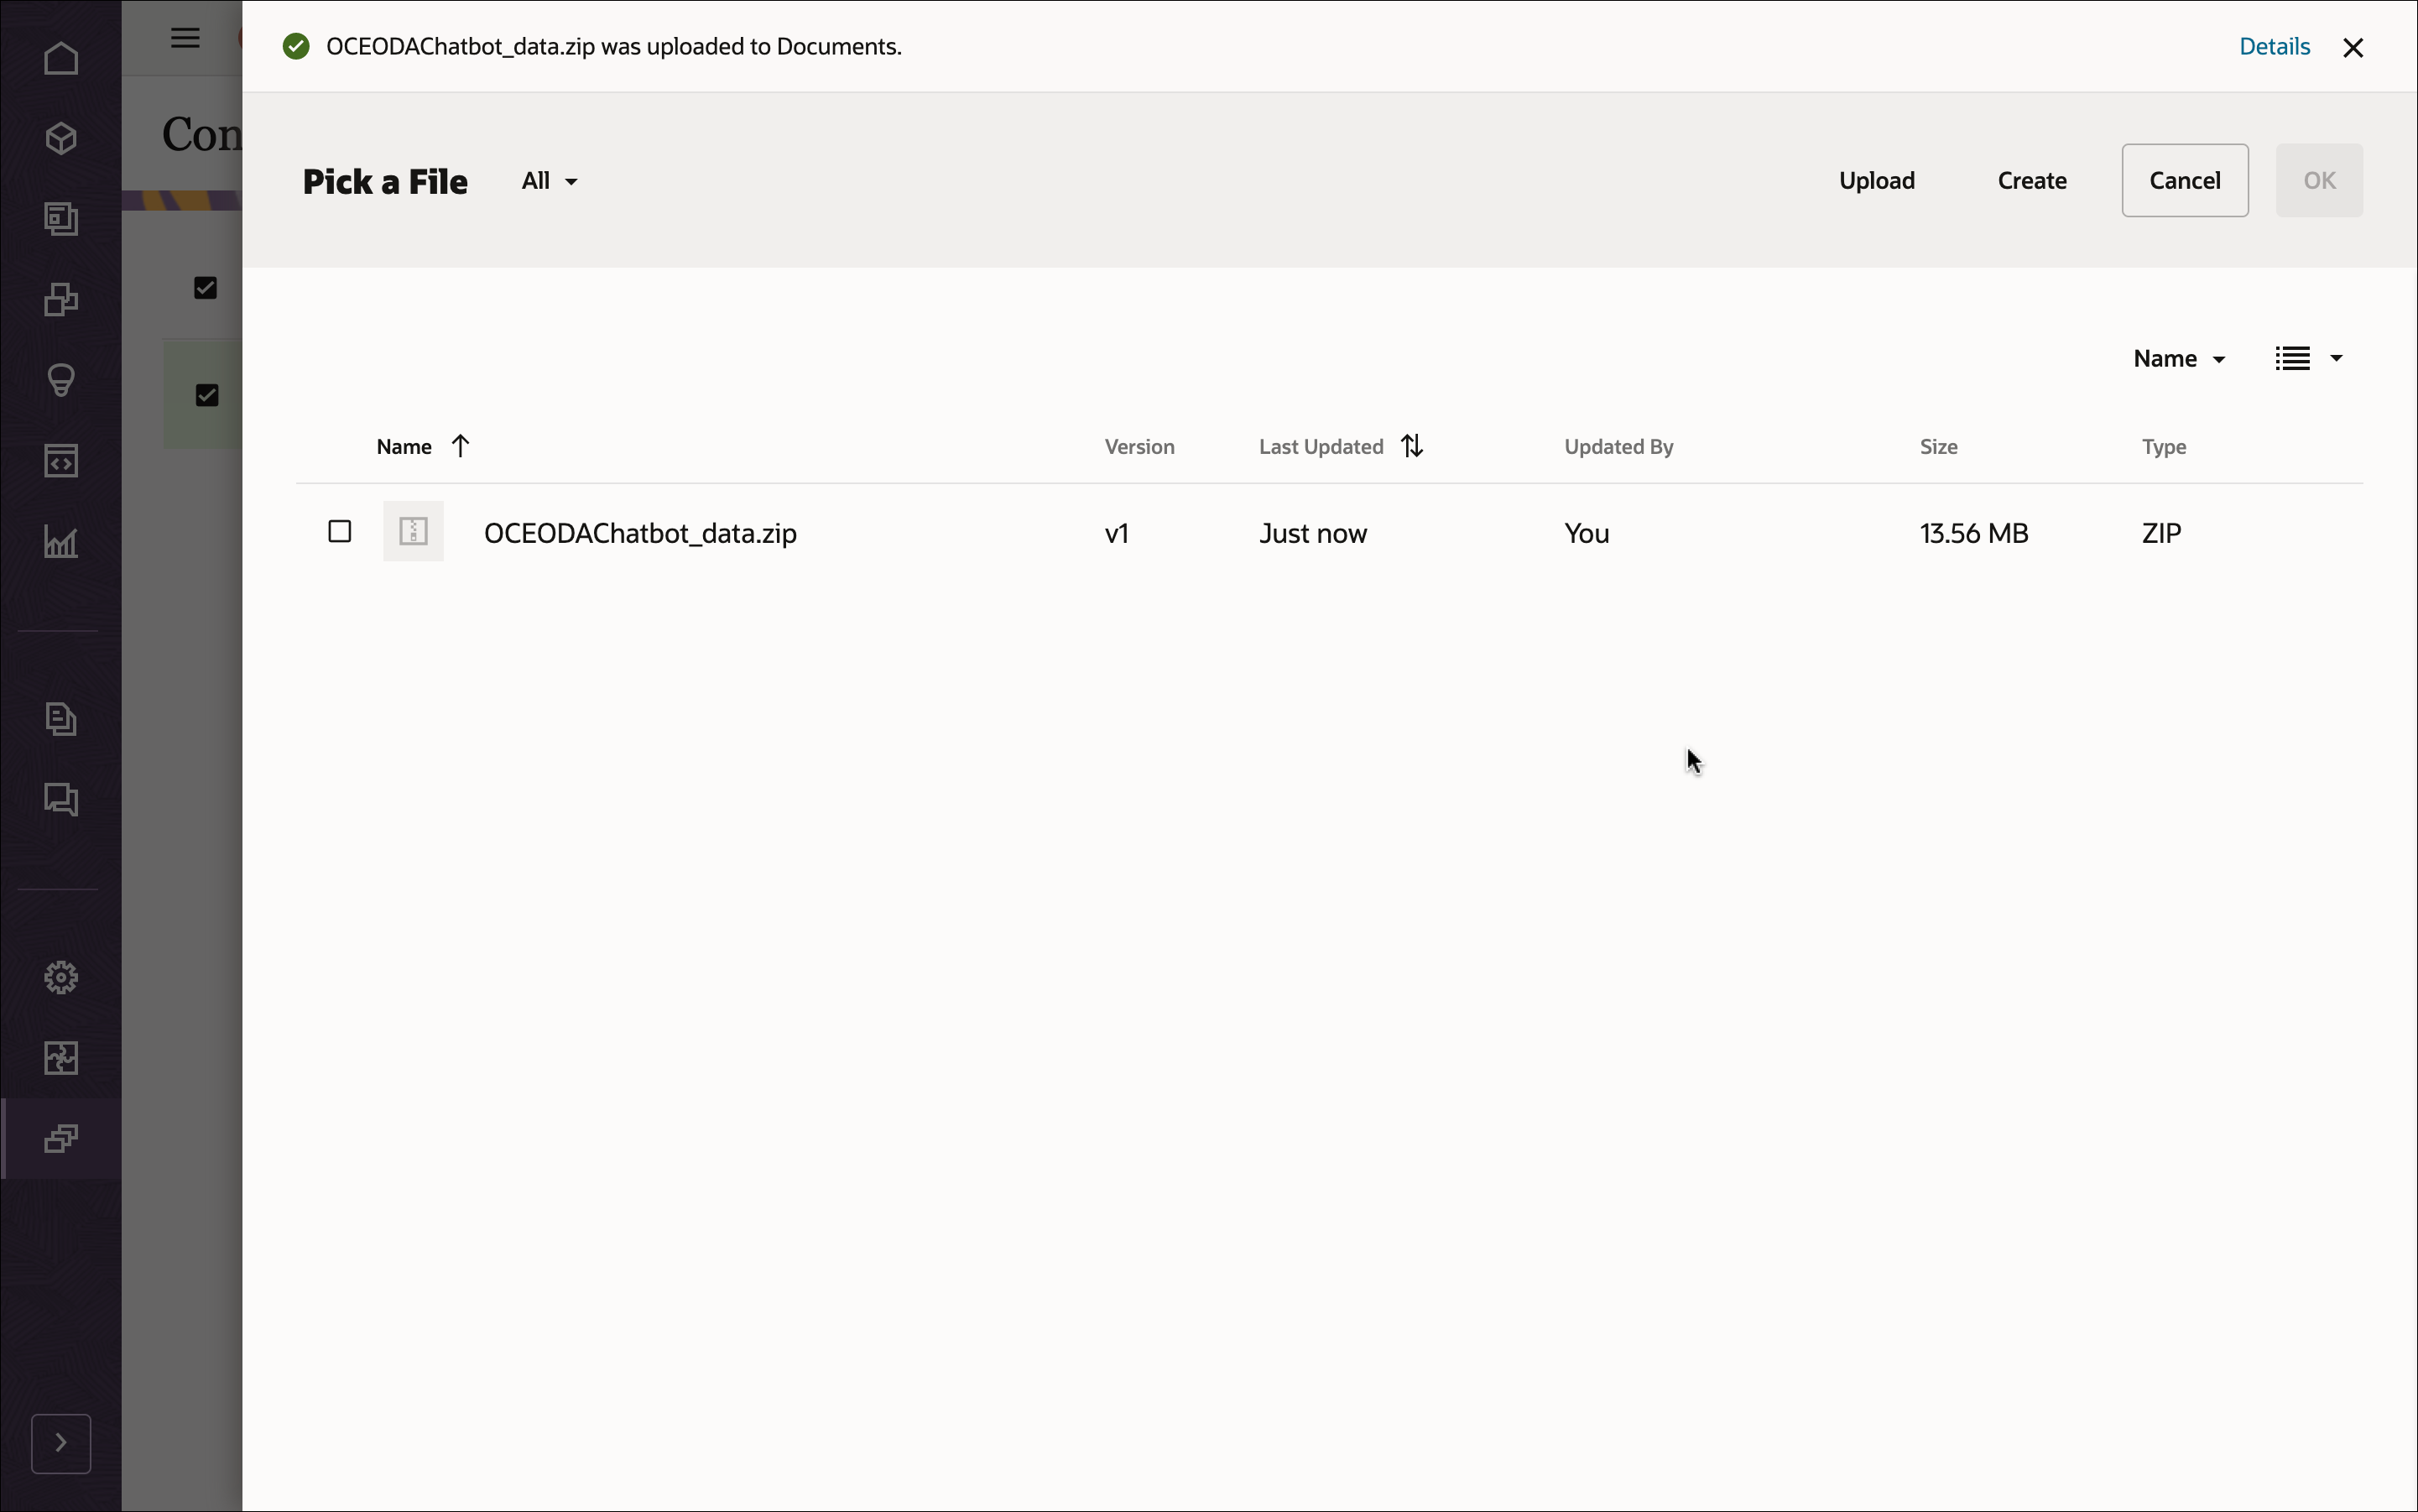
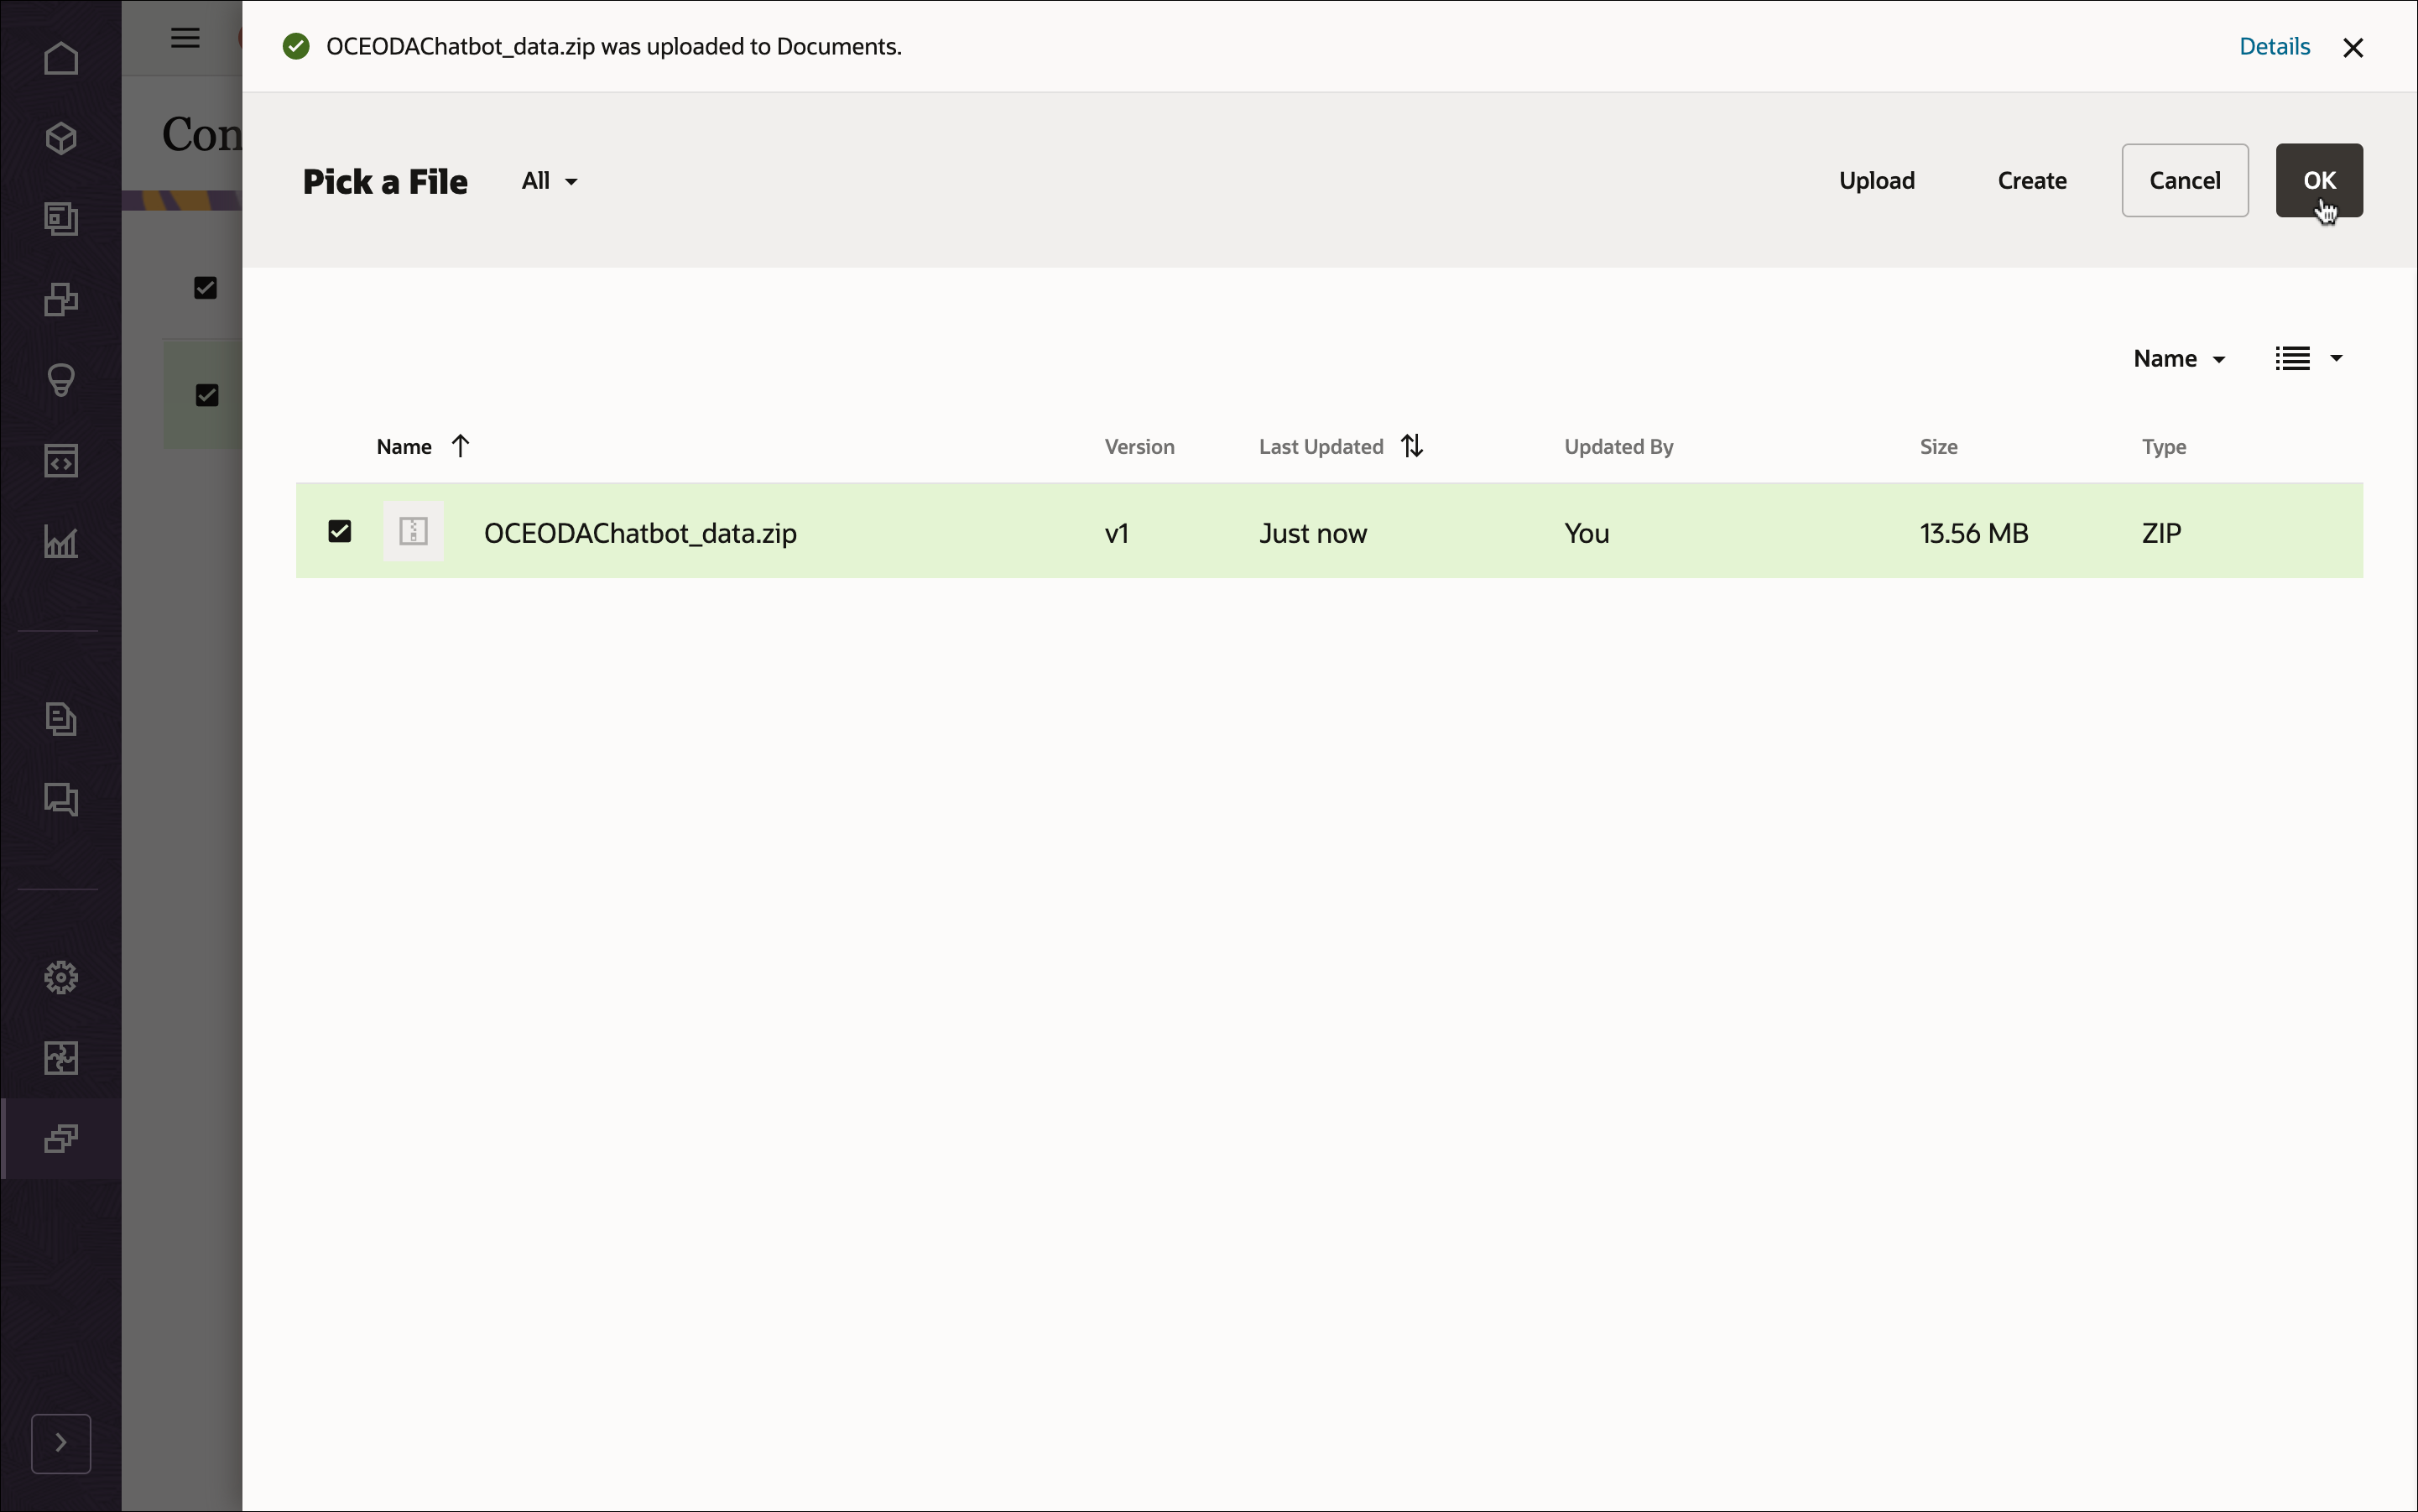
Once it’s uploaded, select OCEODAChatbot_data.zip and click OK to import the contents into your asset repository.
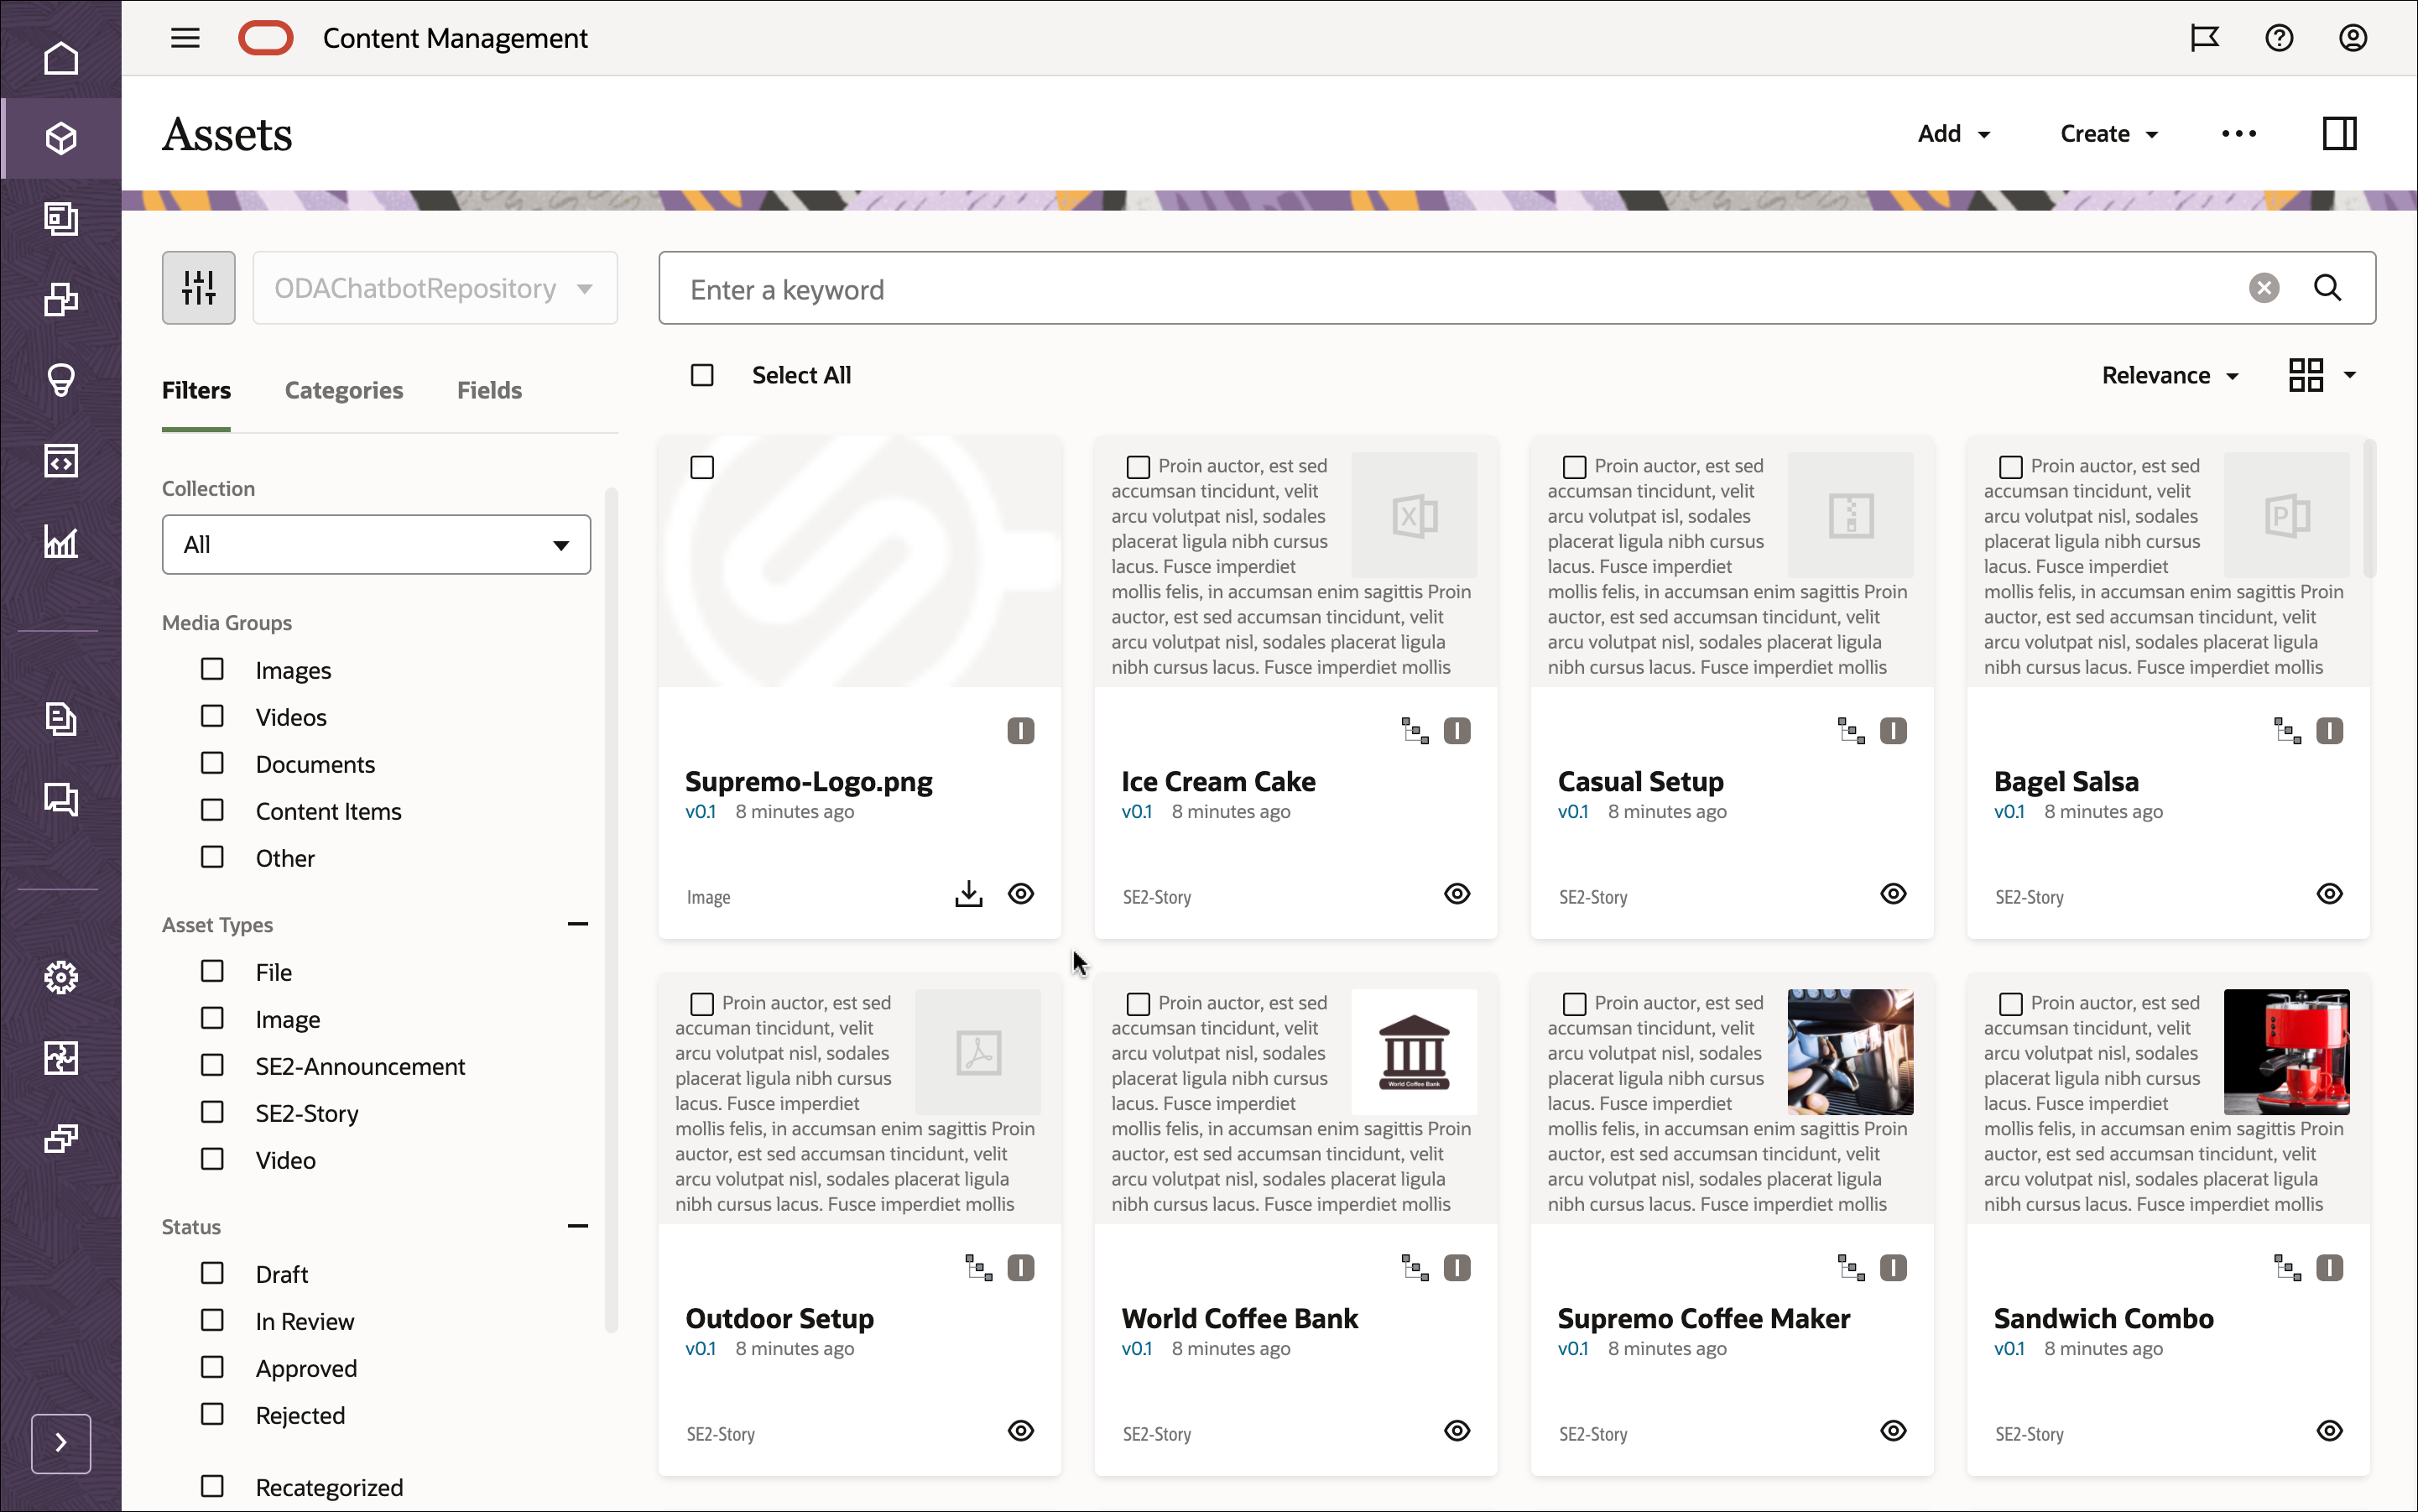
After the content has been imported successfully, navigate to the Assets page and open the ODAChatbotRepository repository. You’ll see that all the related images, content items, and taxonomies have now been added to the asset repository.
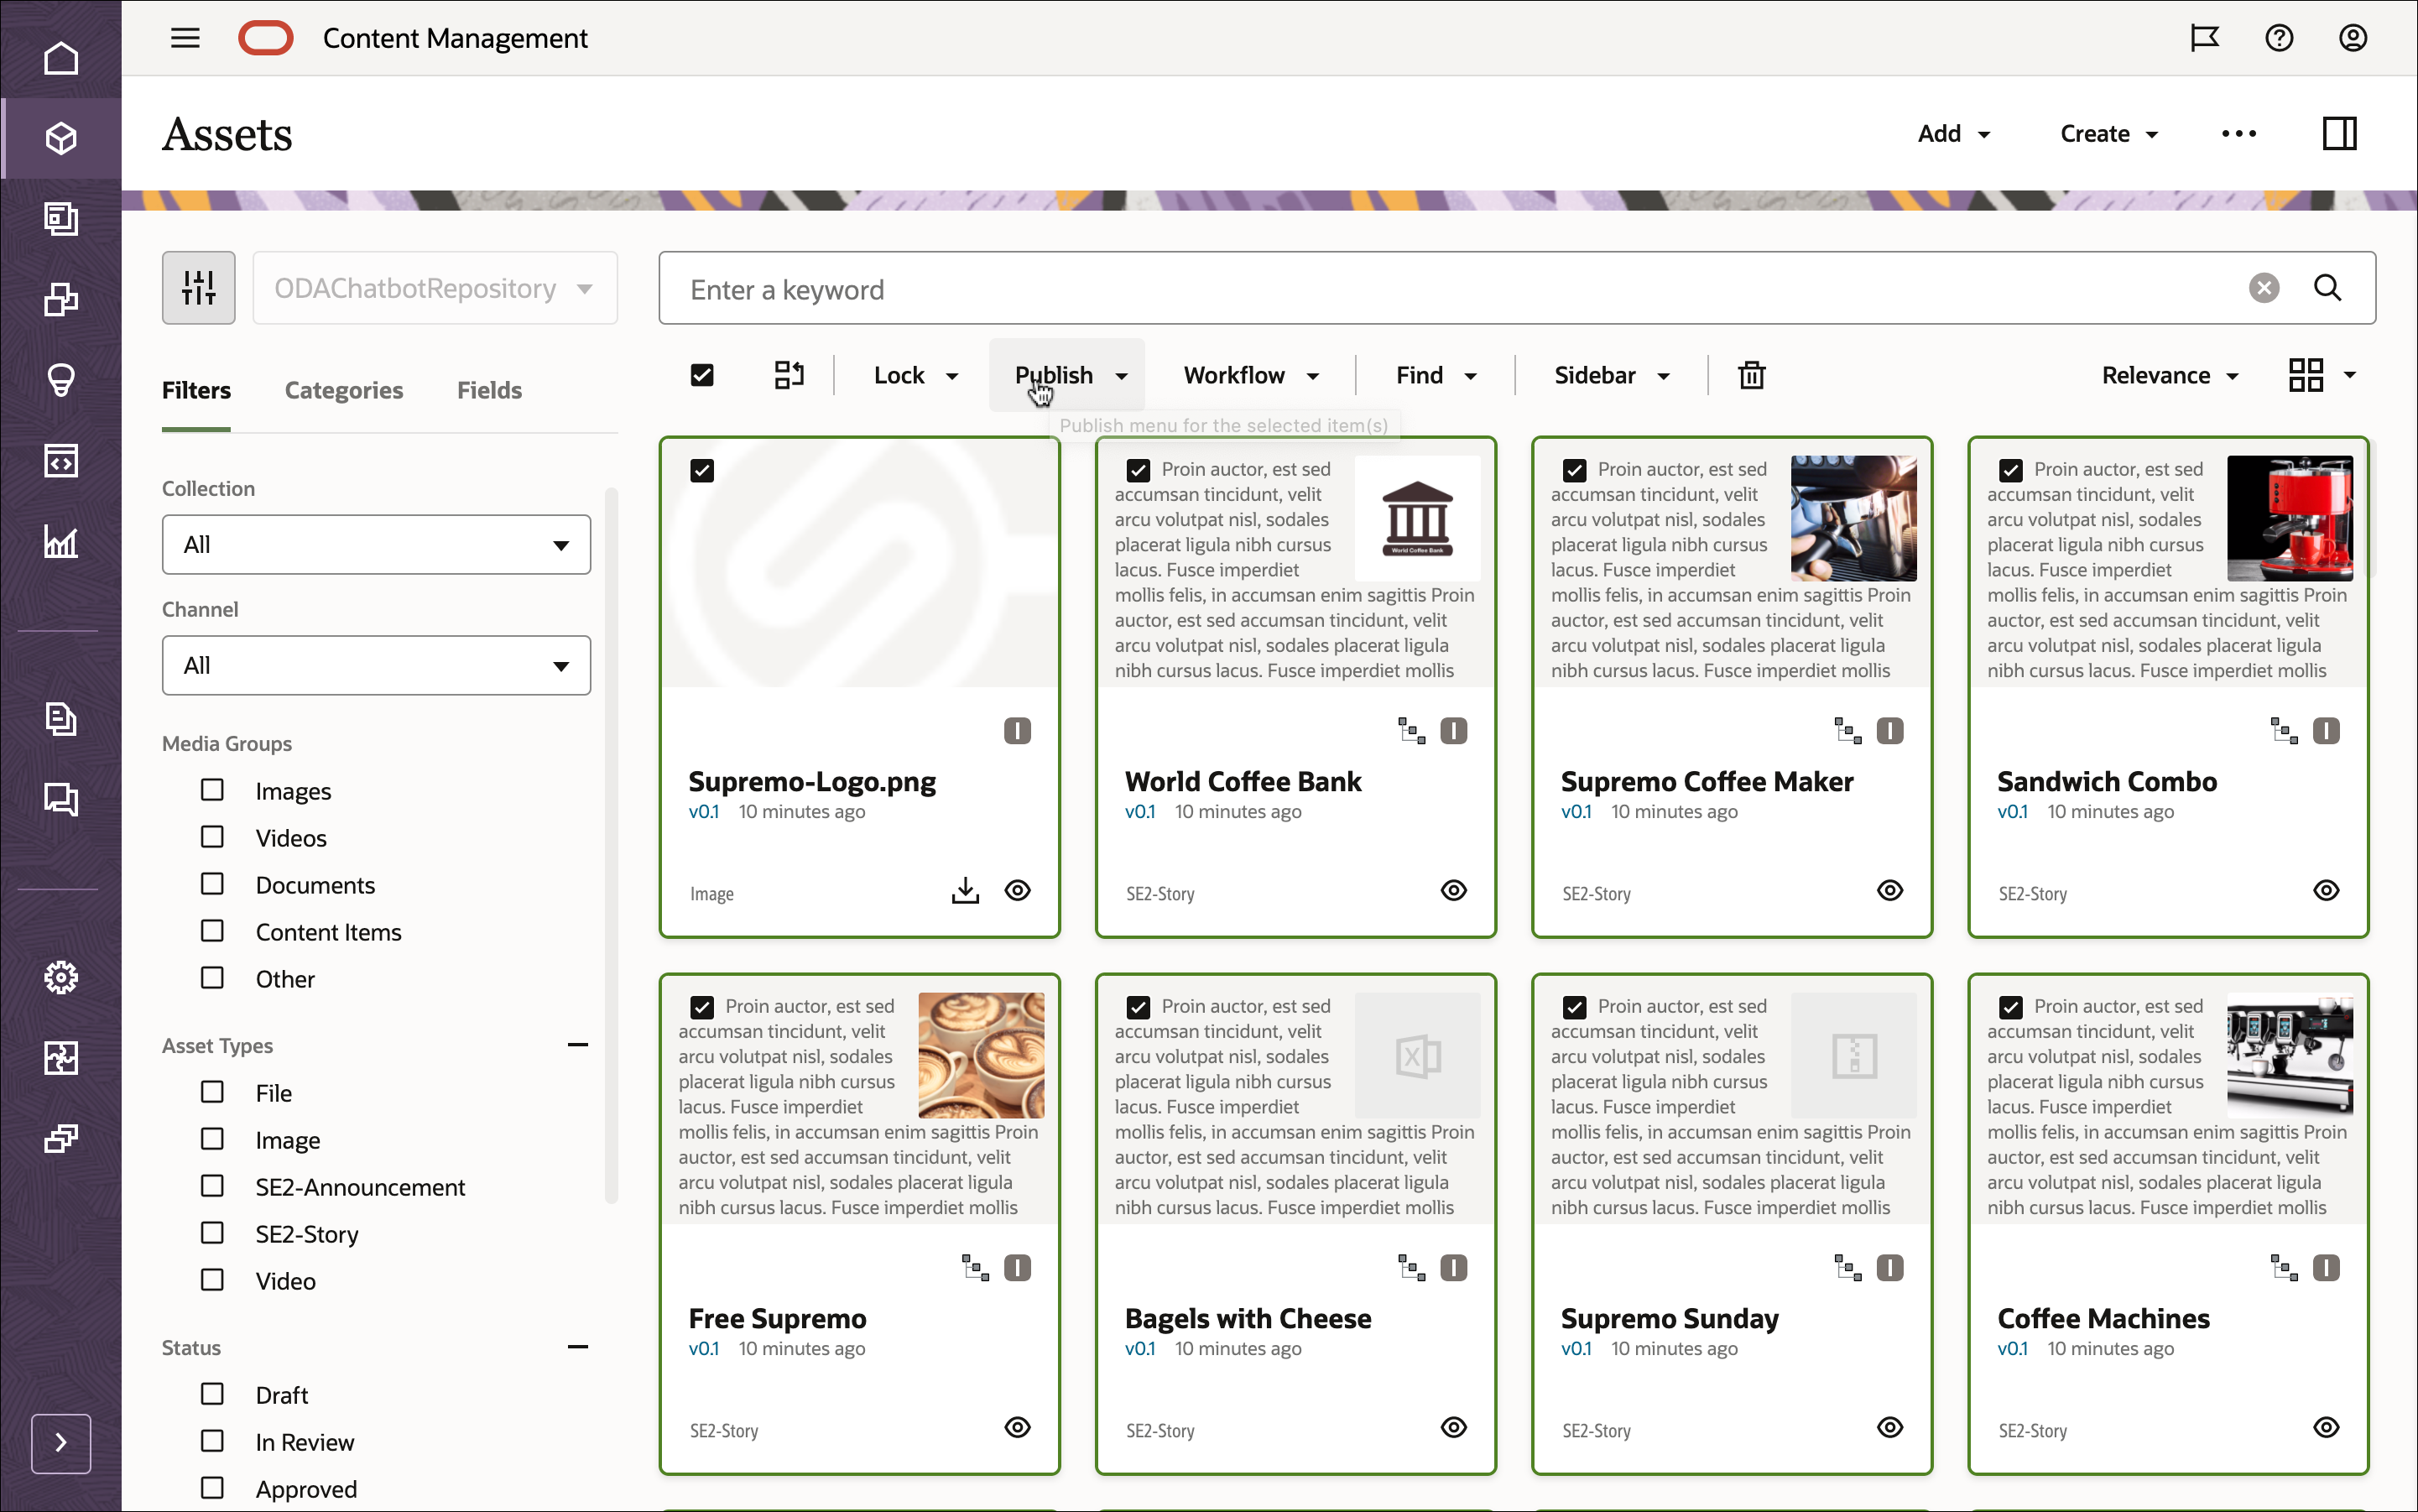
Click Select All on the top left and then Publish to add all the imported assets to the publishing channel that you created earlier, ODAChatbotChannel.
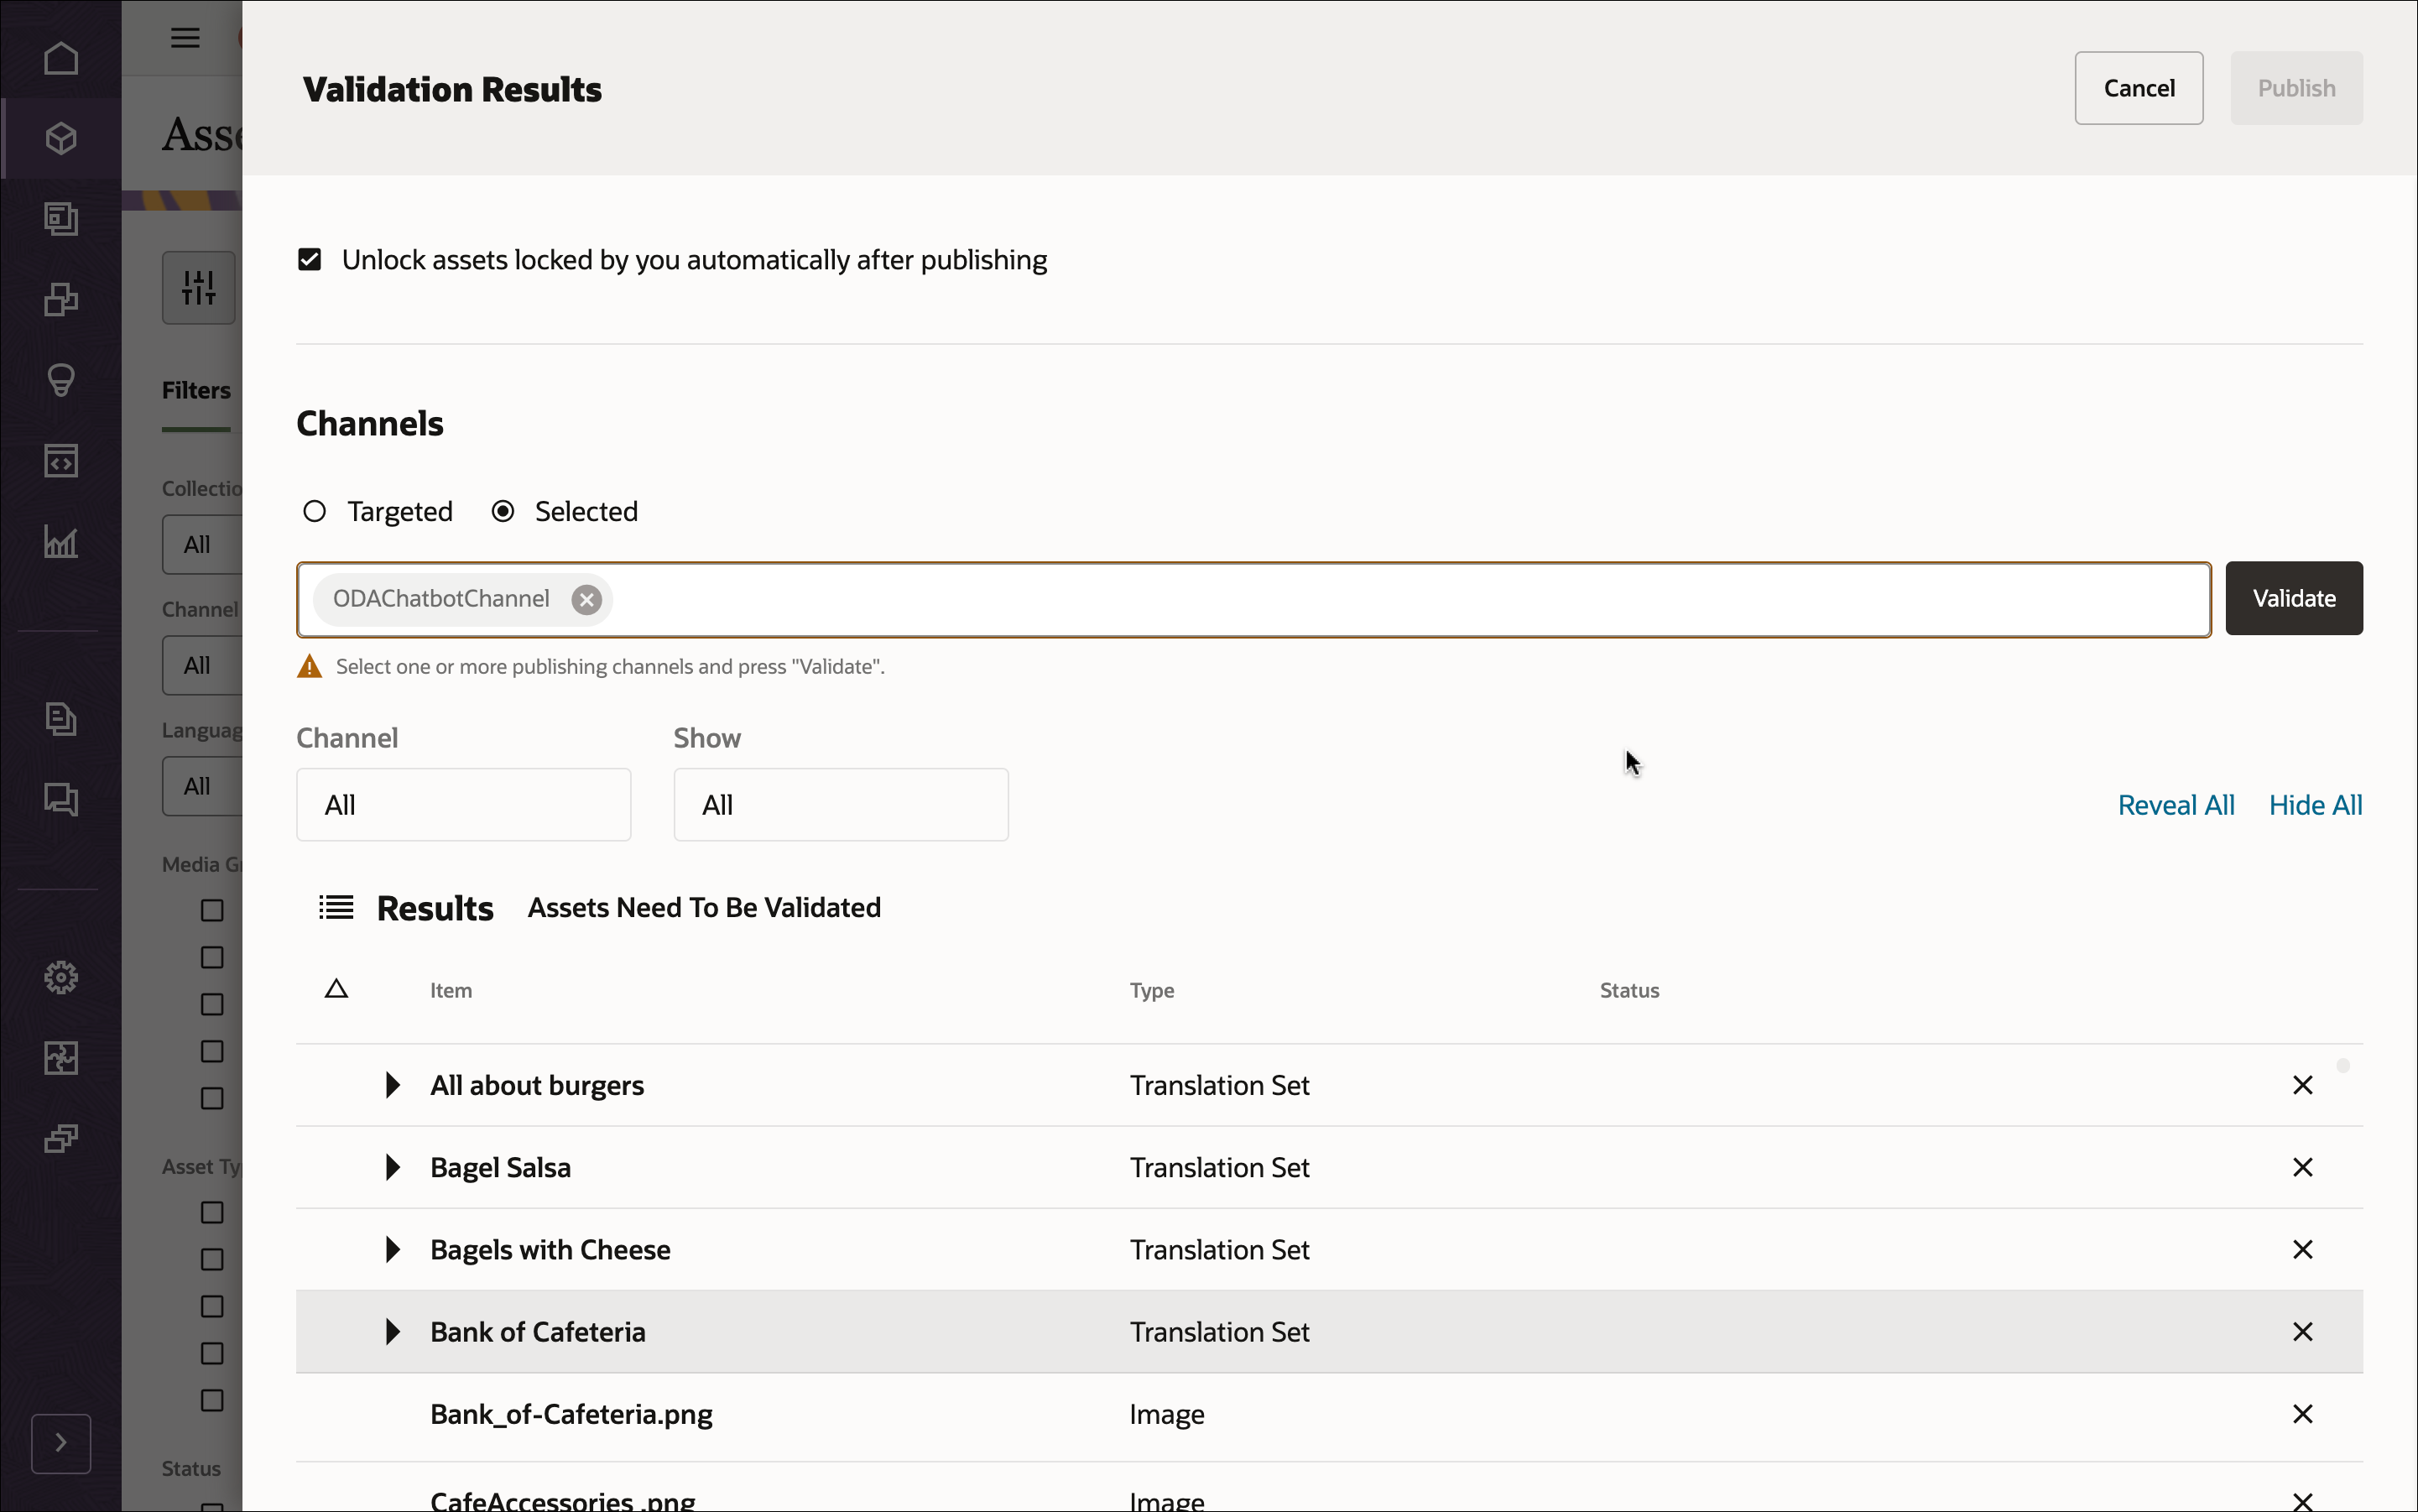
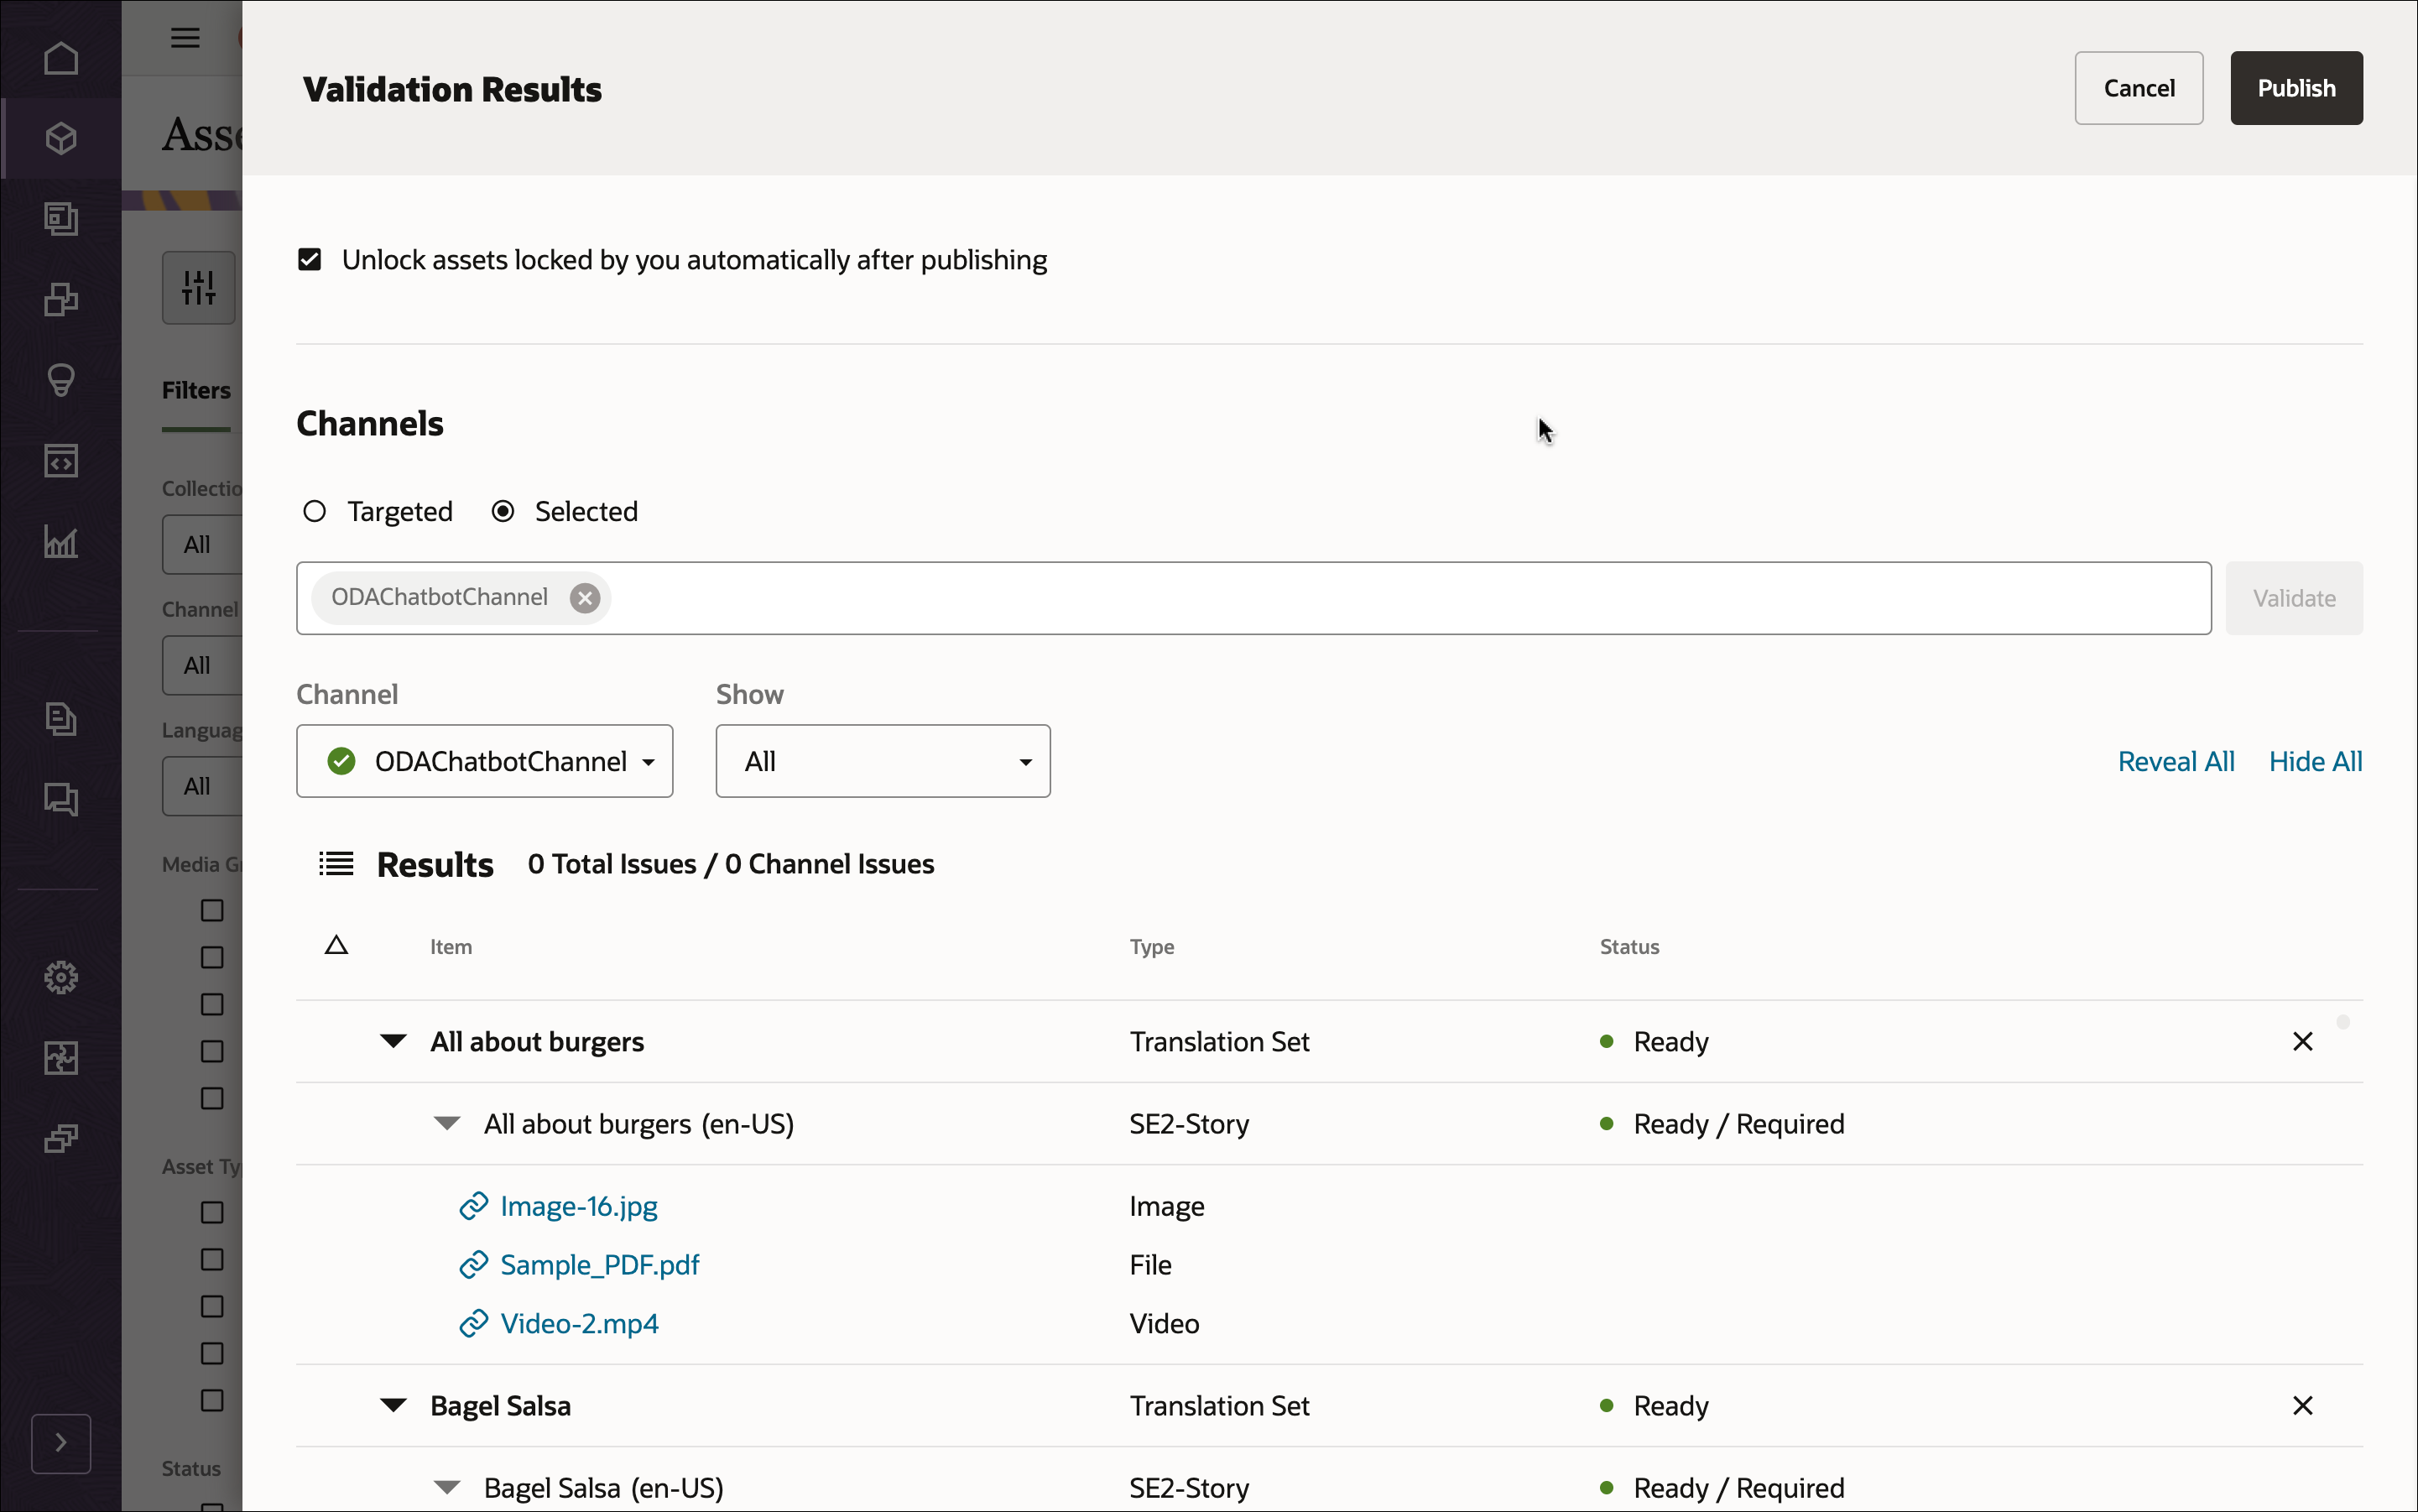
Before publishing, you need to validate all the assets. First add ODAChatbotChannel as a selected channel, and then click the Validate button.
After the assets have been validated, you can publish all the assets to the selected channel by clicking the Publish button in the top right corner.
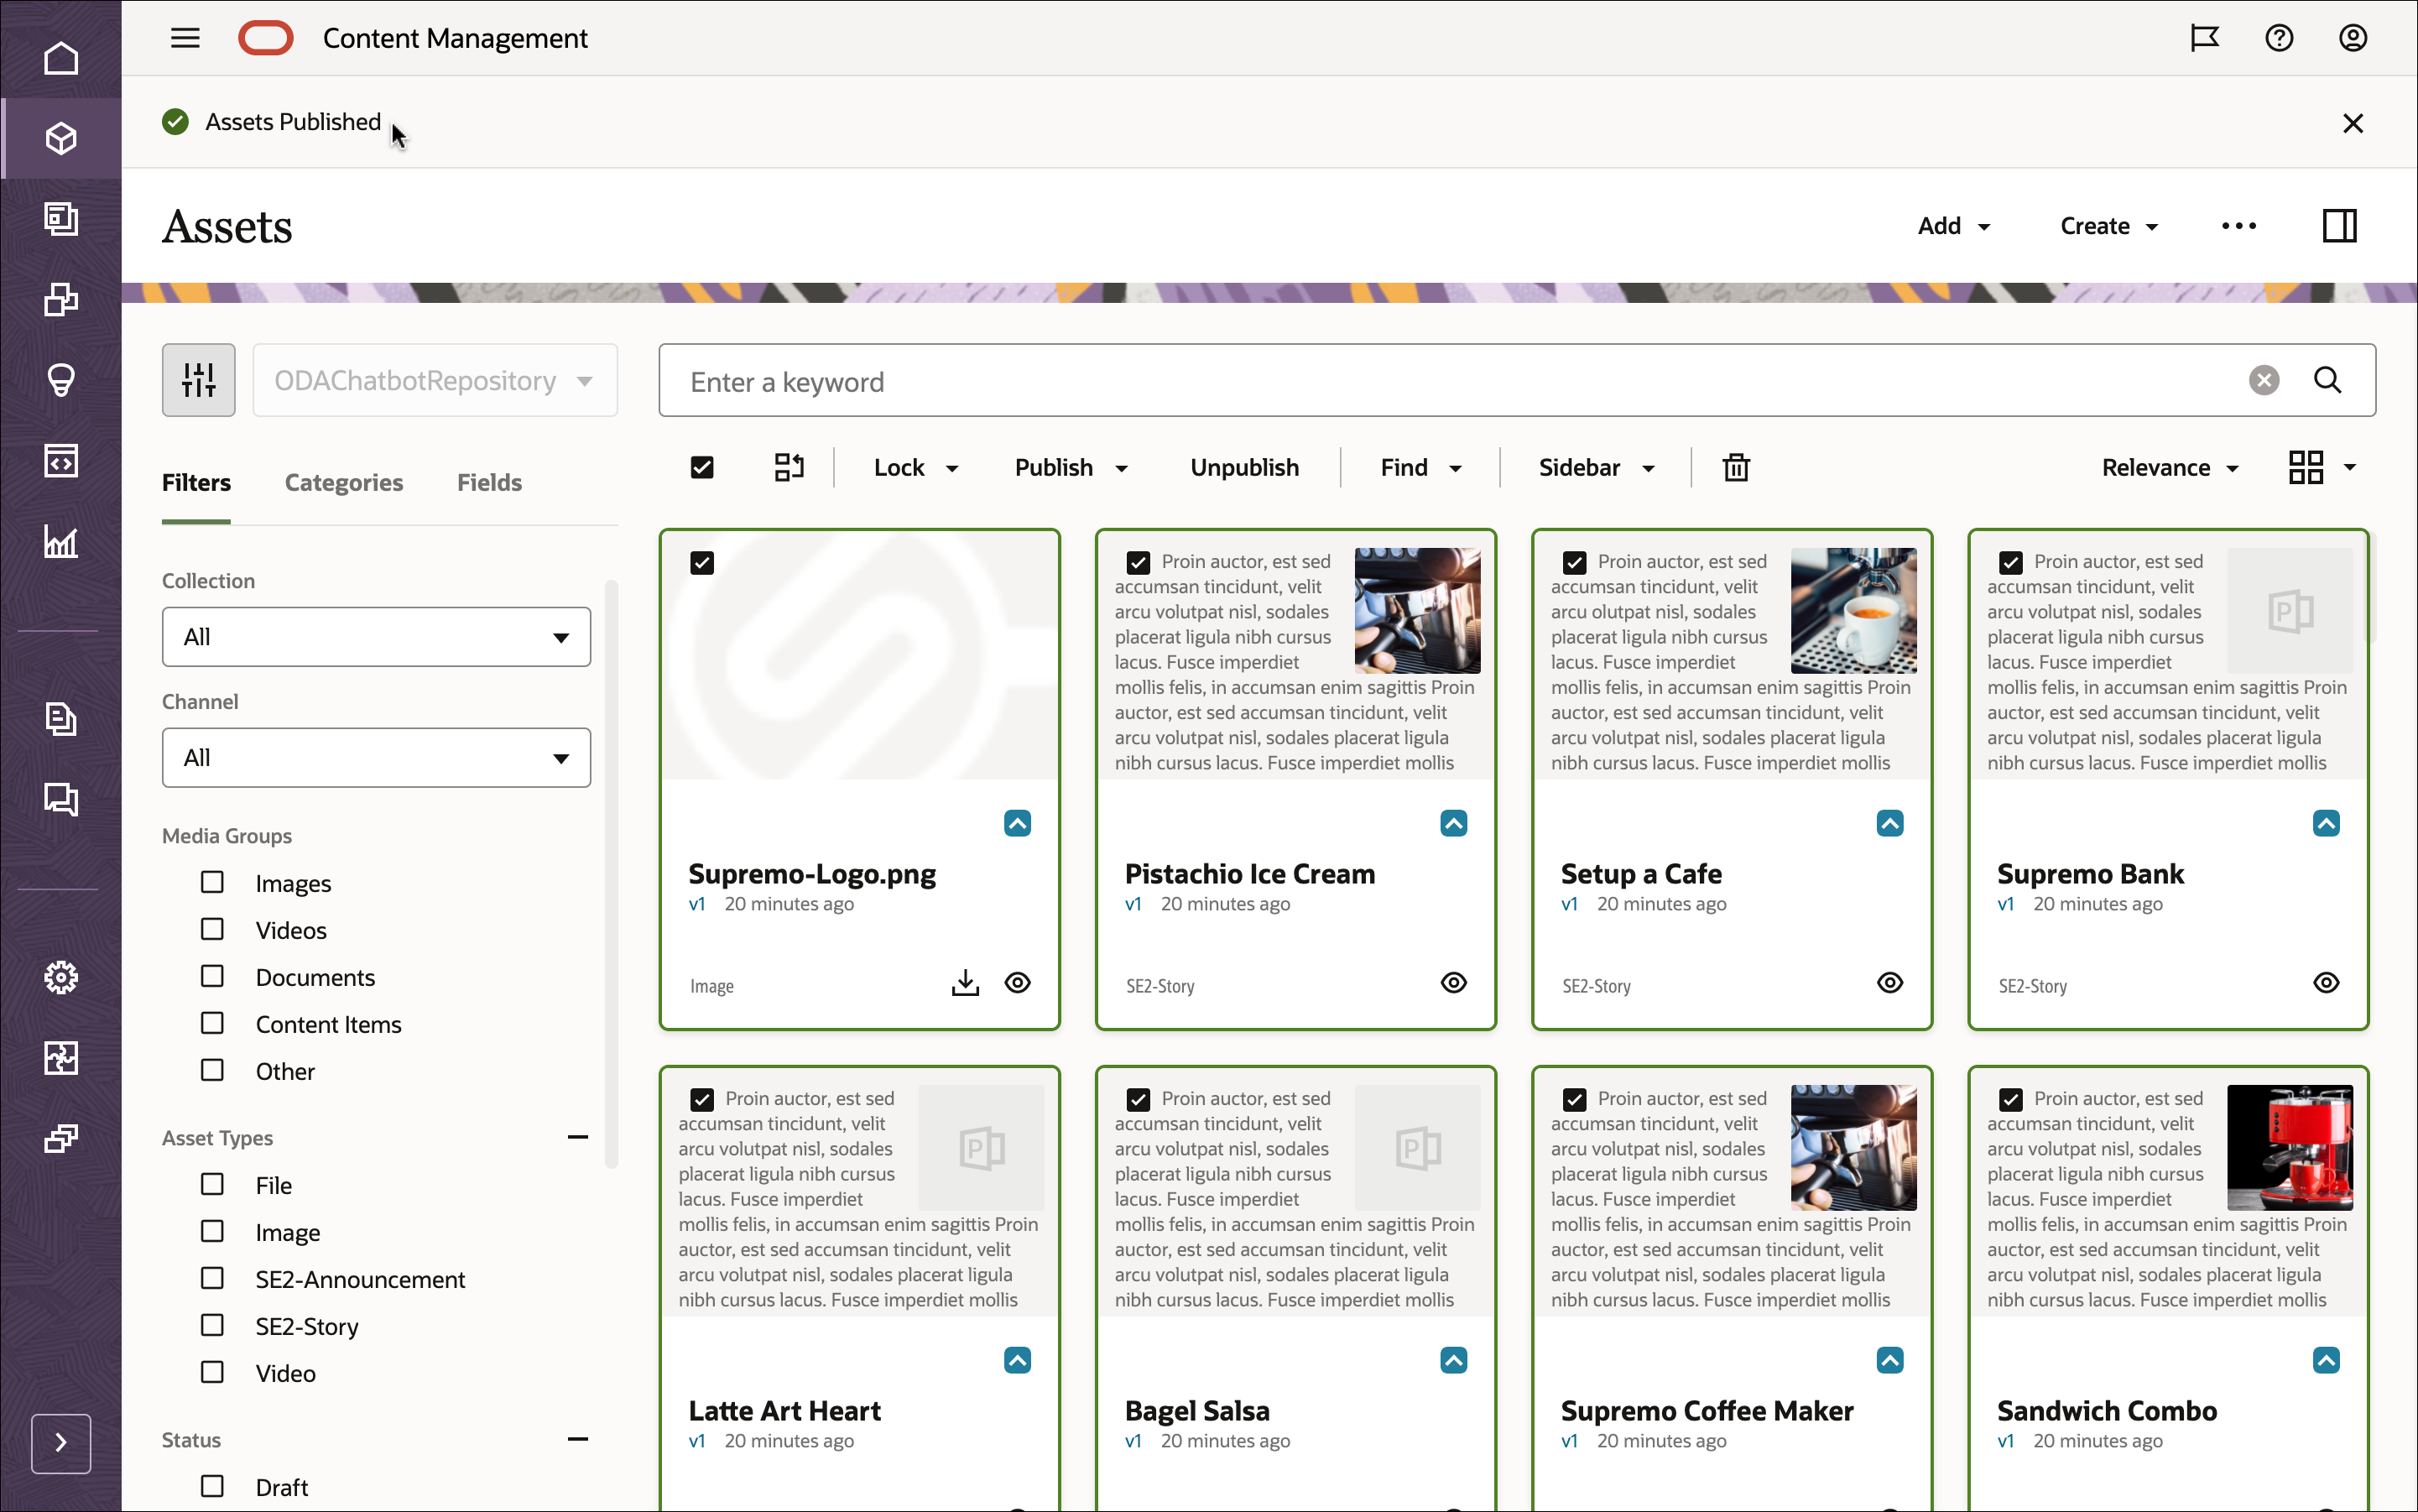
Once that’s done, you can see on the Assets page that all assets have been published. (You can tell by the icon above the asset name.)
Choose Content in the left navigation menu and then choose Taxonomies from the selection list in the page header.
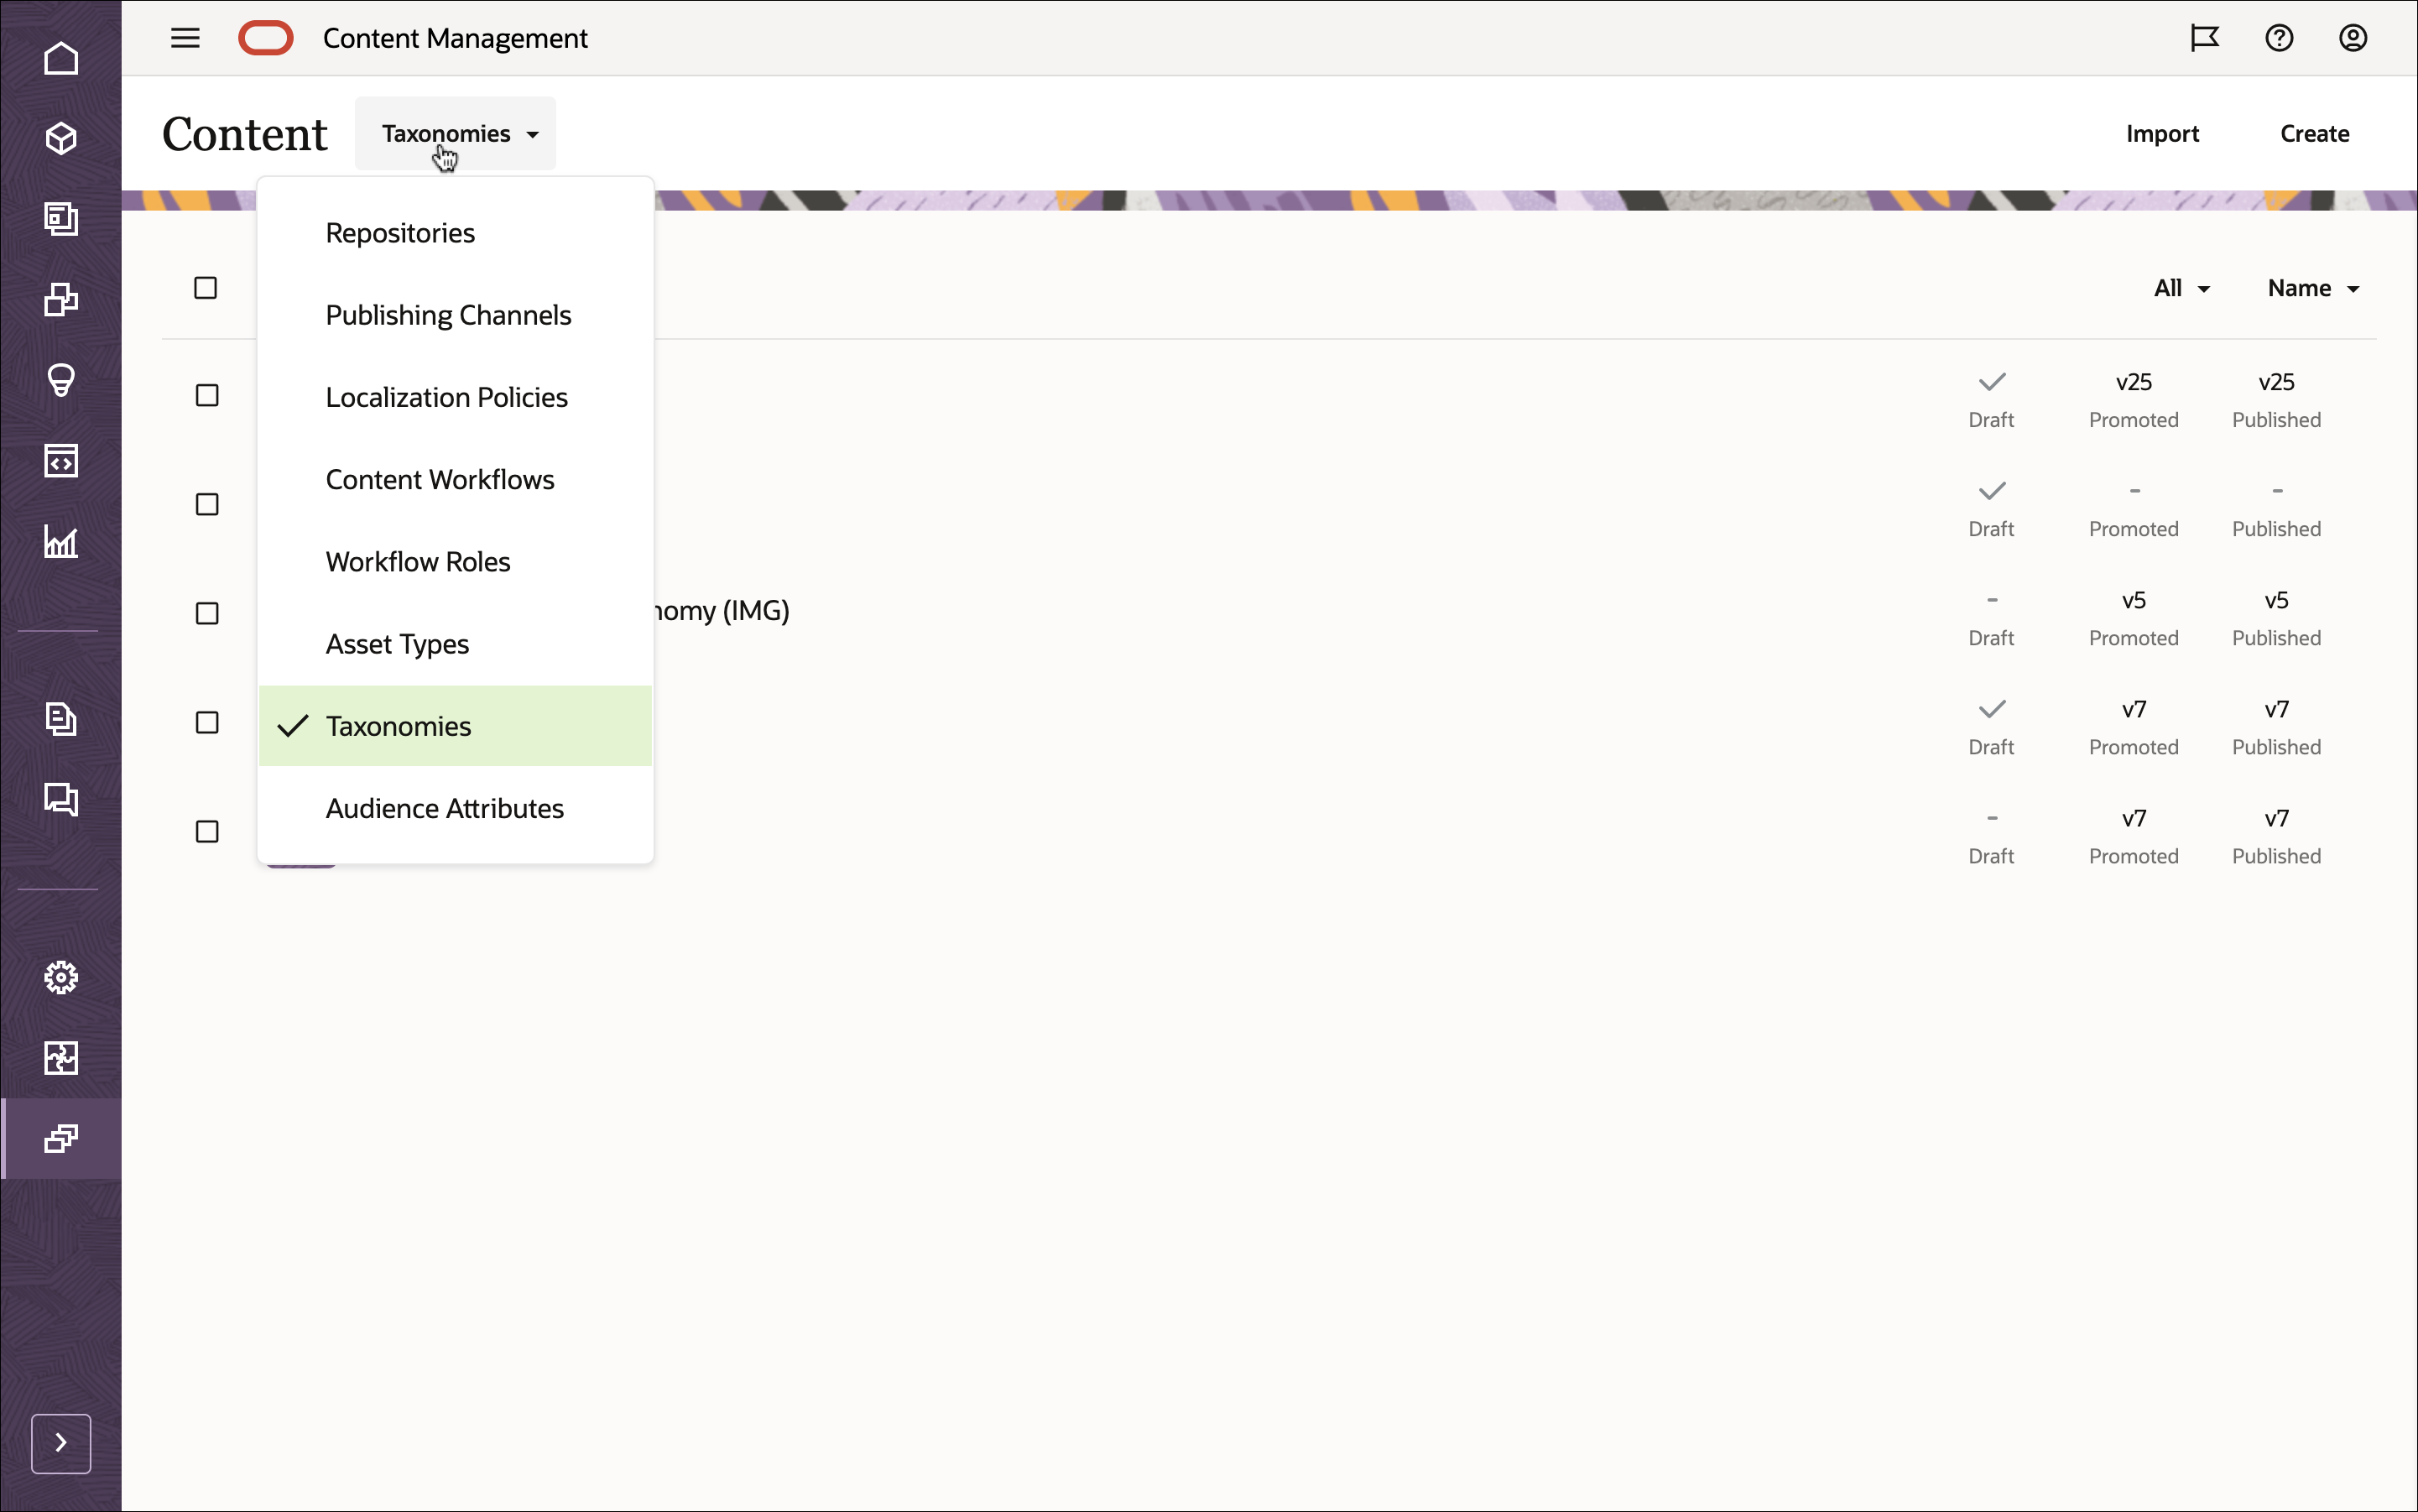
On the Taxonomies page, select the SE2 Categories (SEC) taxonomy and click Publish in the actions bar to make it available for use. Publish the SE2 Products (SEP) taxonomy in the same way.
Task 2: Build the Oracle Digital Assistant Skill
To consume our Oracle Content Management content in an ODA chatbot application, we can use the Content Management ODA chatbot sample, which is available in an open-source repository on GitHub.
Note: Remember that using the ODA chatbot sample is optional, and we use it in this tutorial to get you started quickly. You can also build your own chatbot application.
To build the chatbot skill in ODA:
- Clone the sample repository
- Import the ODA skill to your instance
- Set up and configure the custom component service
- Work with the Oracle Content Management Content SDK
- Use the Content SDK to fetch content
- Package and deploy the custom component service
Clone the Sample Repository
The Content Management ODA chatbot sample is available in the open-source repository on GitHub. You’ll first need to clone the sample repository from GitHub to your local computer and change your directory to work with this sample.
    git clone https://github.com/oracle/oce-integration-samples.git
    cd oce-integration-samples/oce-oda-chatbot-sample/headless-chatbot-sample
Now that you have your code base, let’s have a closer look at the folders that you’ll be using in this tutorial:
The ODAChatbot folder is a chatbot skill.
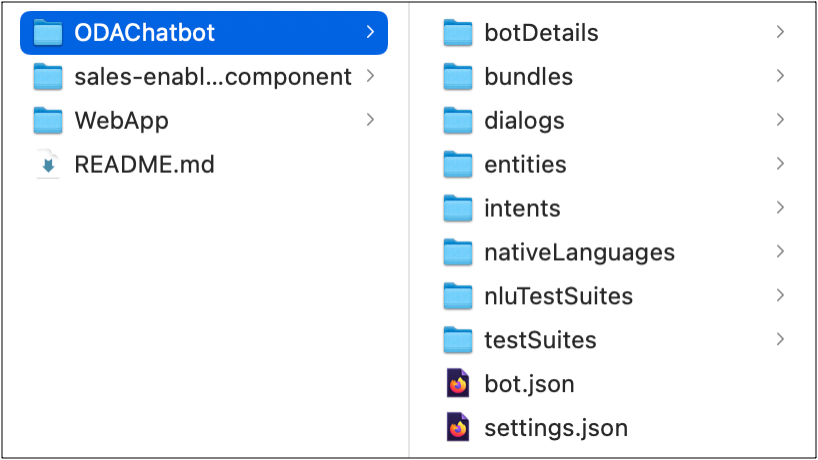
The sales-enablement-custom-component folder is an ODA custom component.

The WebApp folder is a web application.

Note: The site-integration-chatbot-sample folder is part of the site integration chatbot sample. You can learn more about this sample here.
Import the ODA Skill to Your Instance
The ODAChatbot folder in the code base is the ODA skill used in this tutorial. Follow these steps to create and train your skill on your ODA instance:
In your Oracle Digital Assistant instance, open the navigation menu on the left, then click Development, and then Skills.
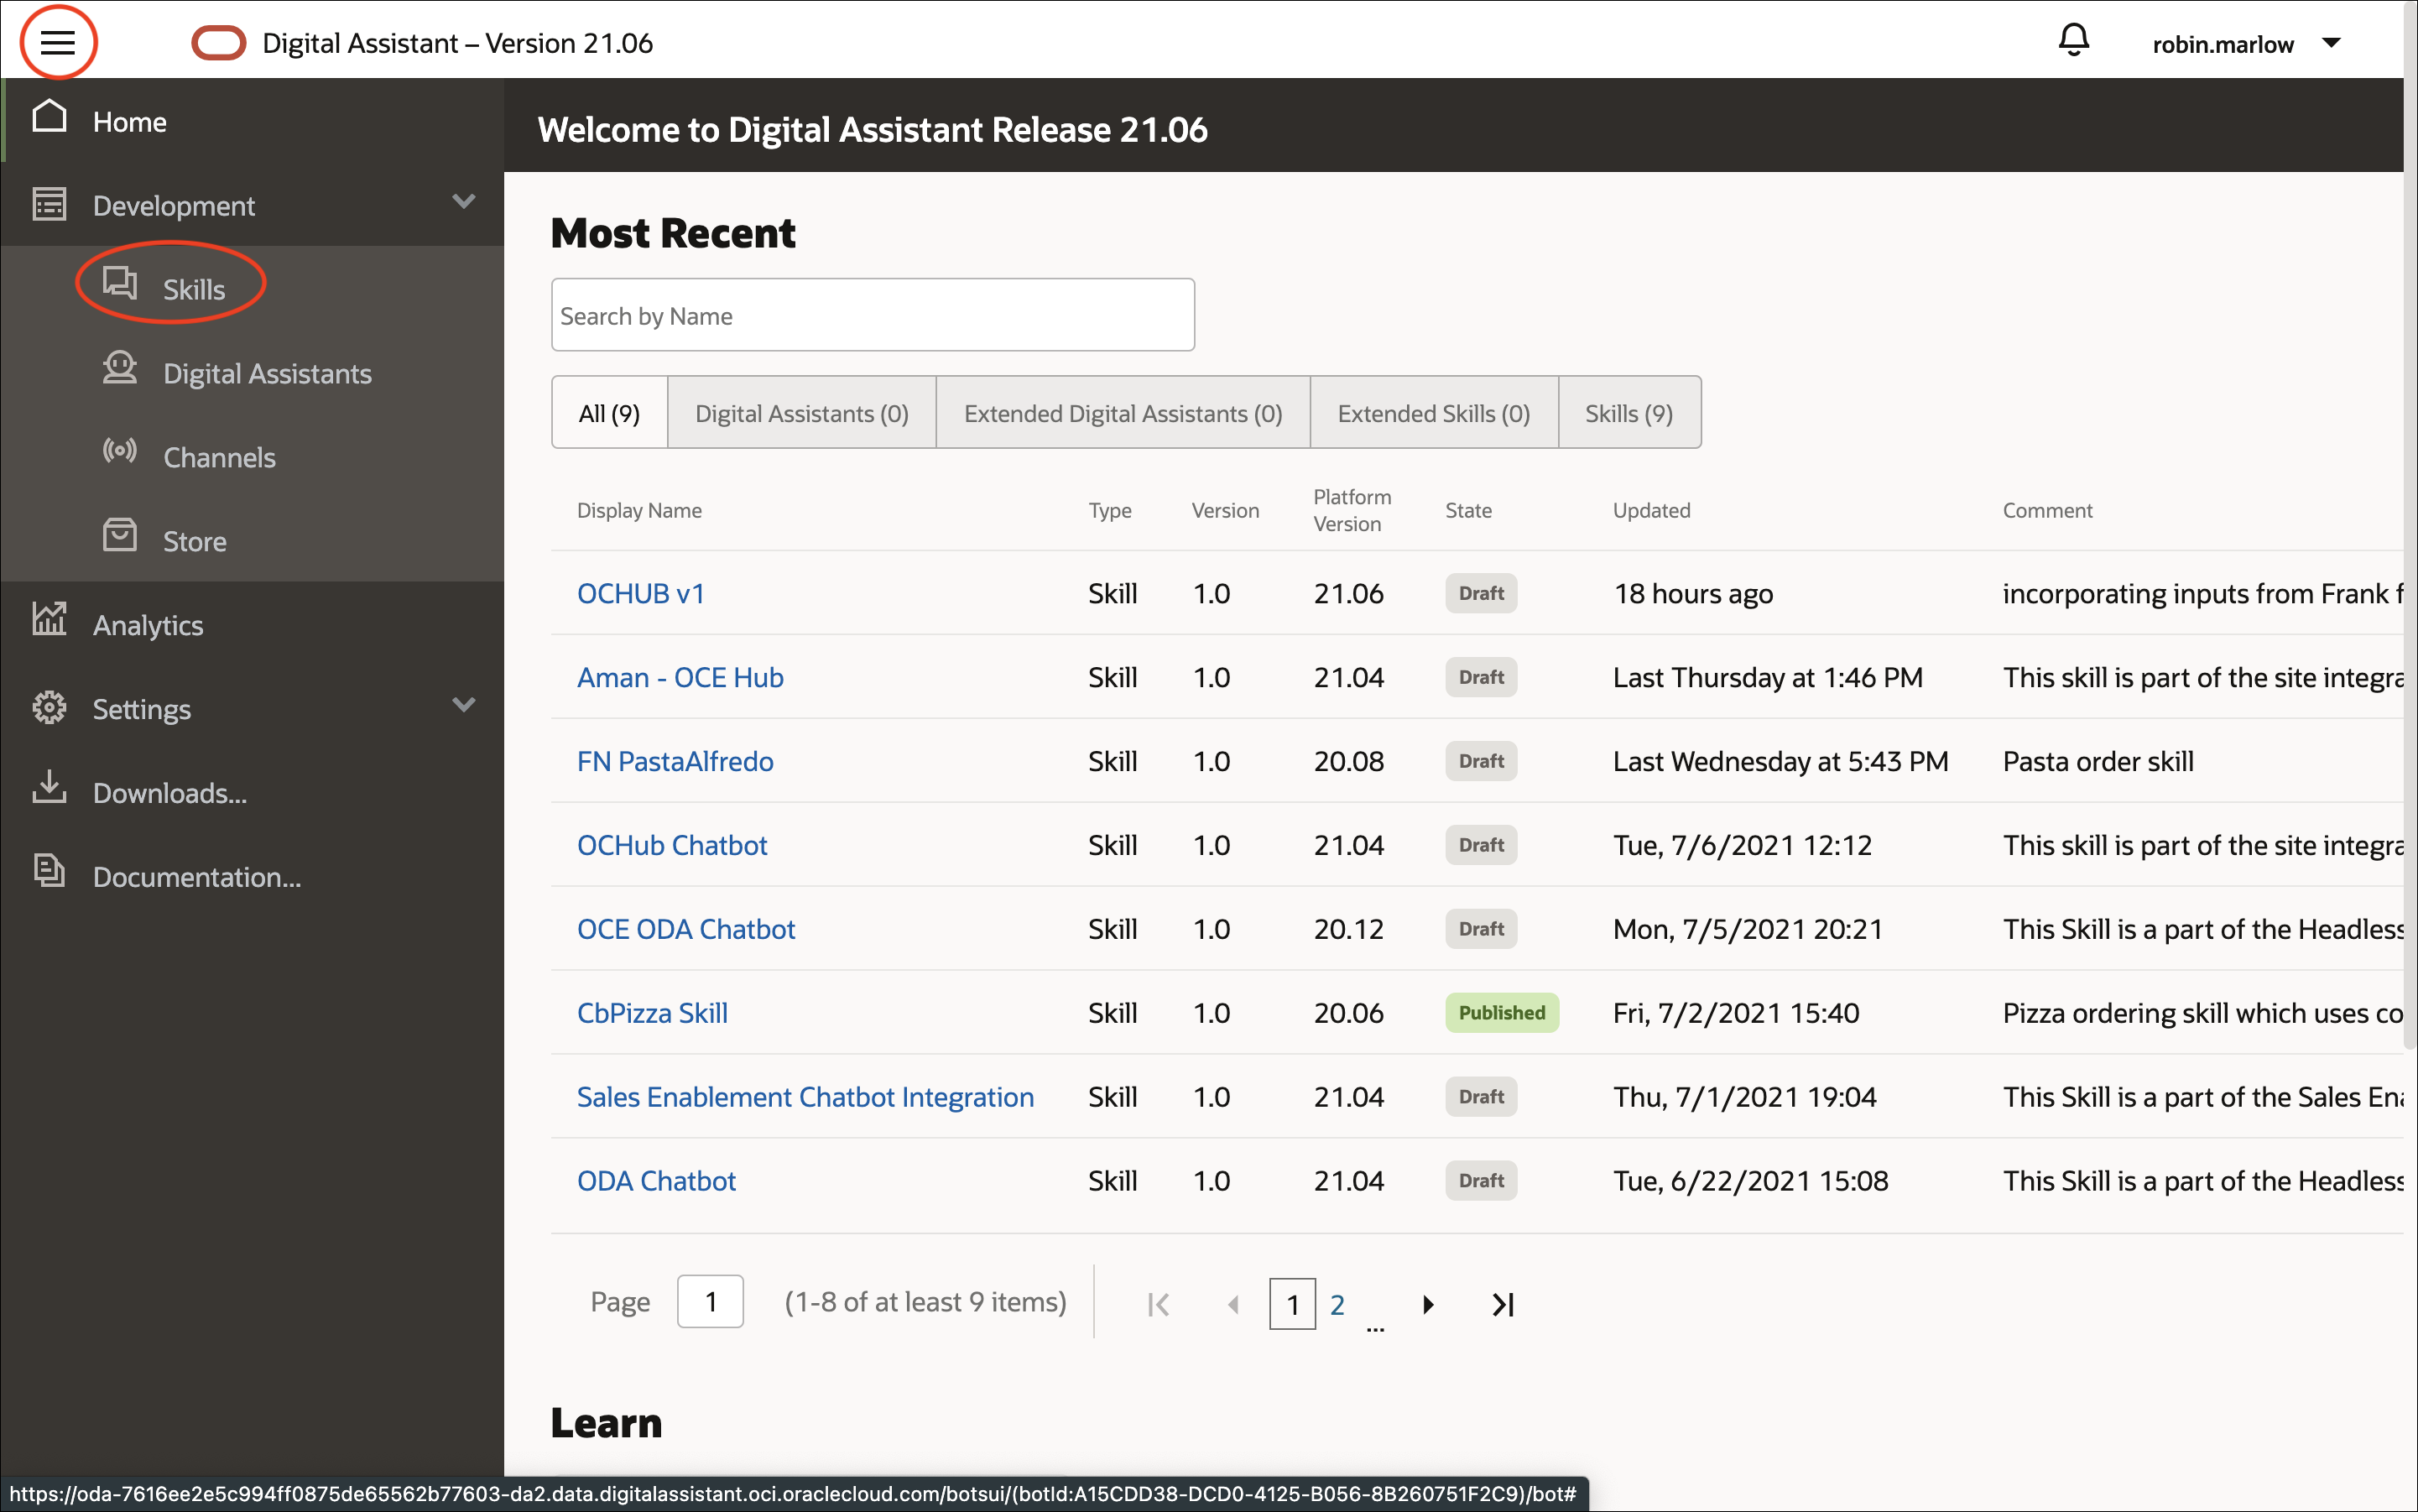
Search for the ODA Chatbot skill.
Note: If your instance doesn’t have this skill, then select the contents of the ODAChatbot folder and compress them to a single zip file. On the Skills page in your ODA instance, click Import Skill and import the zip file that you just created. Directly compressing the ODAChatbot folder will result in an error upon import.
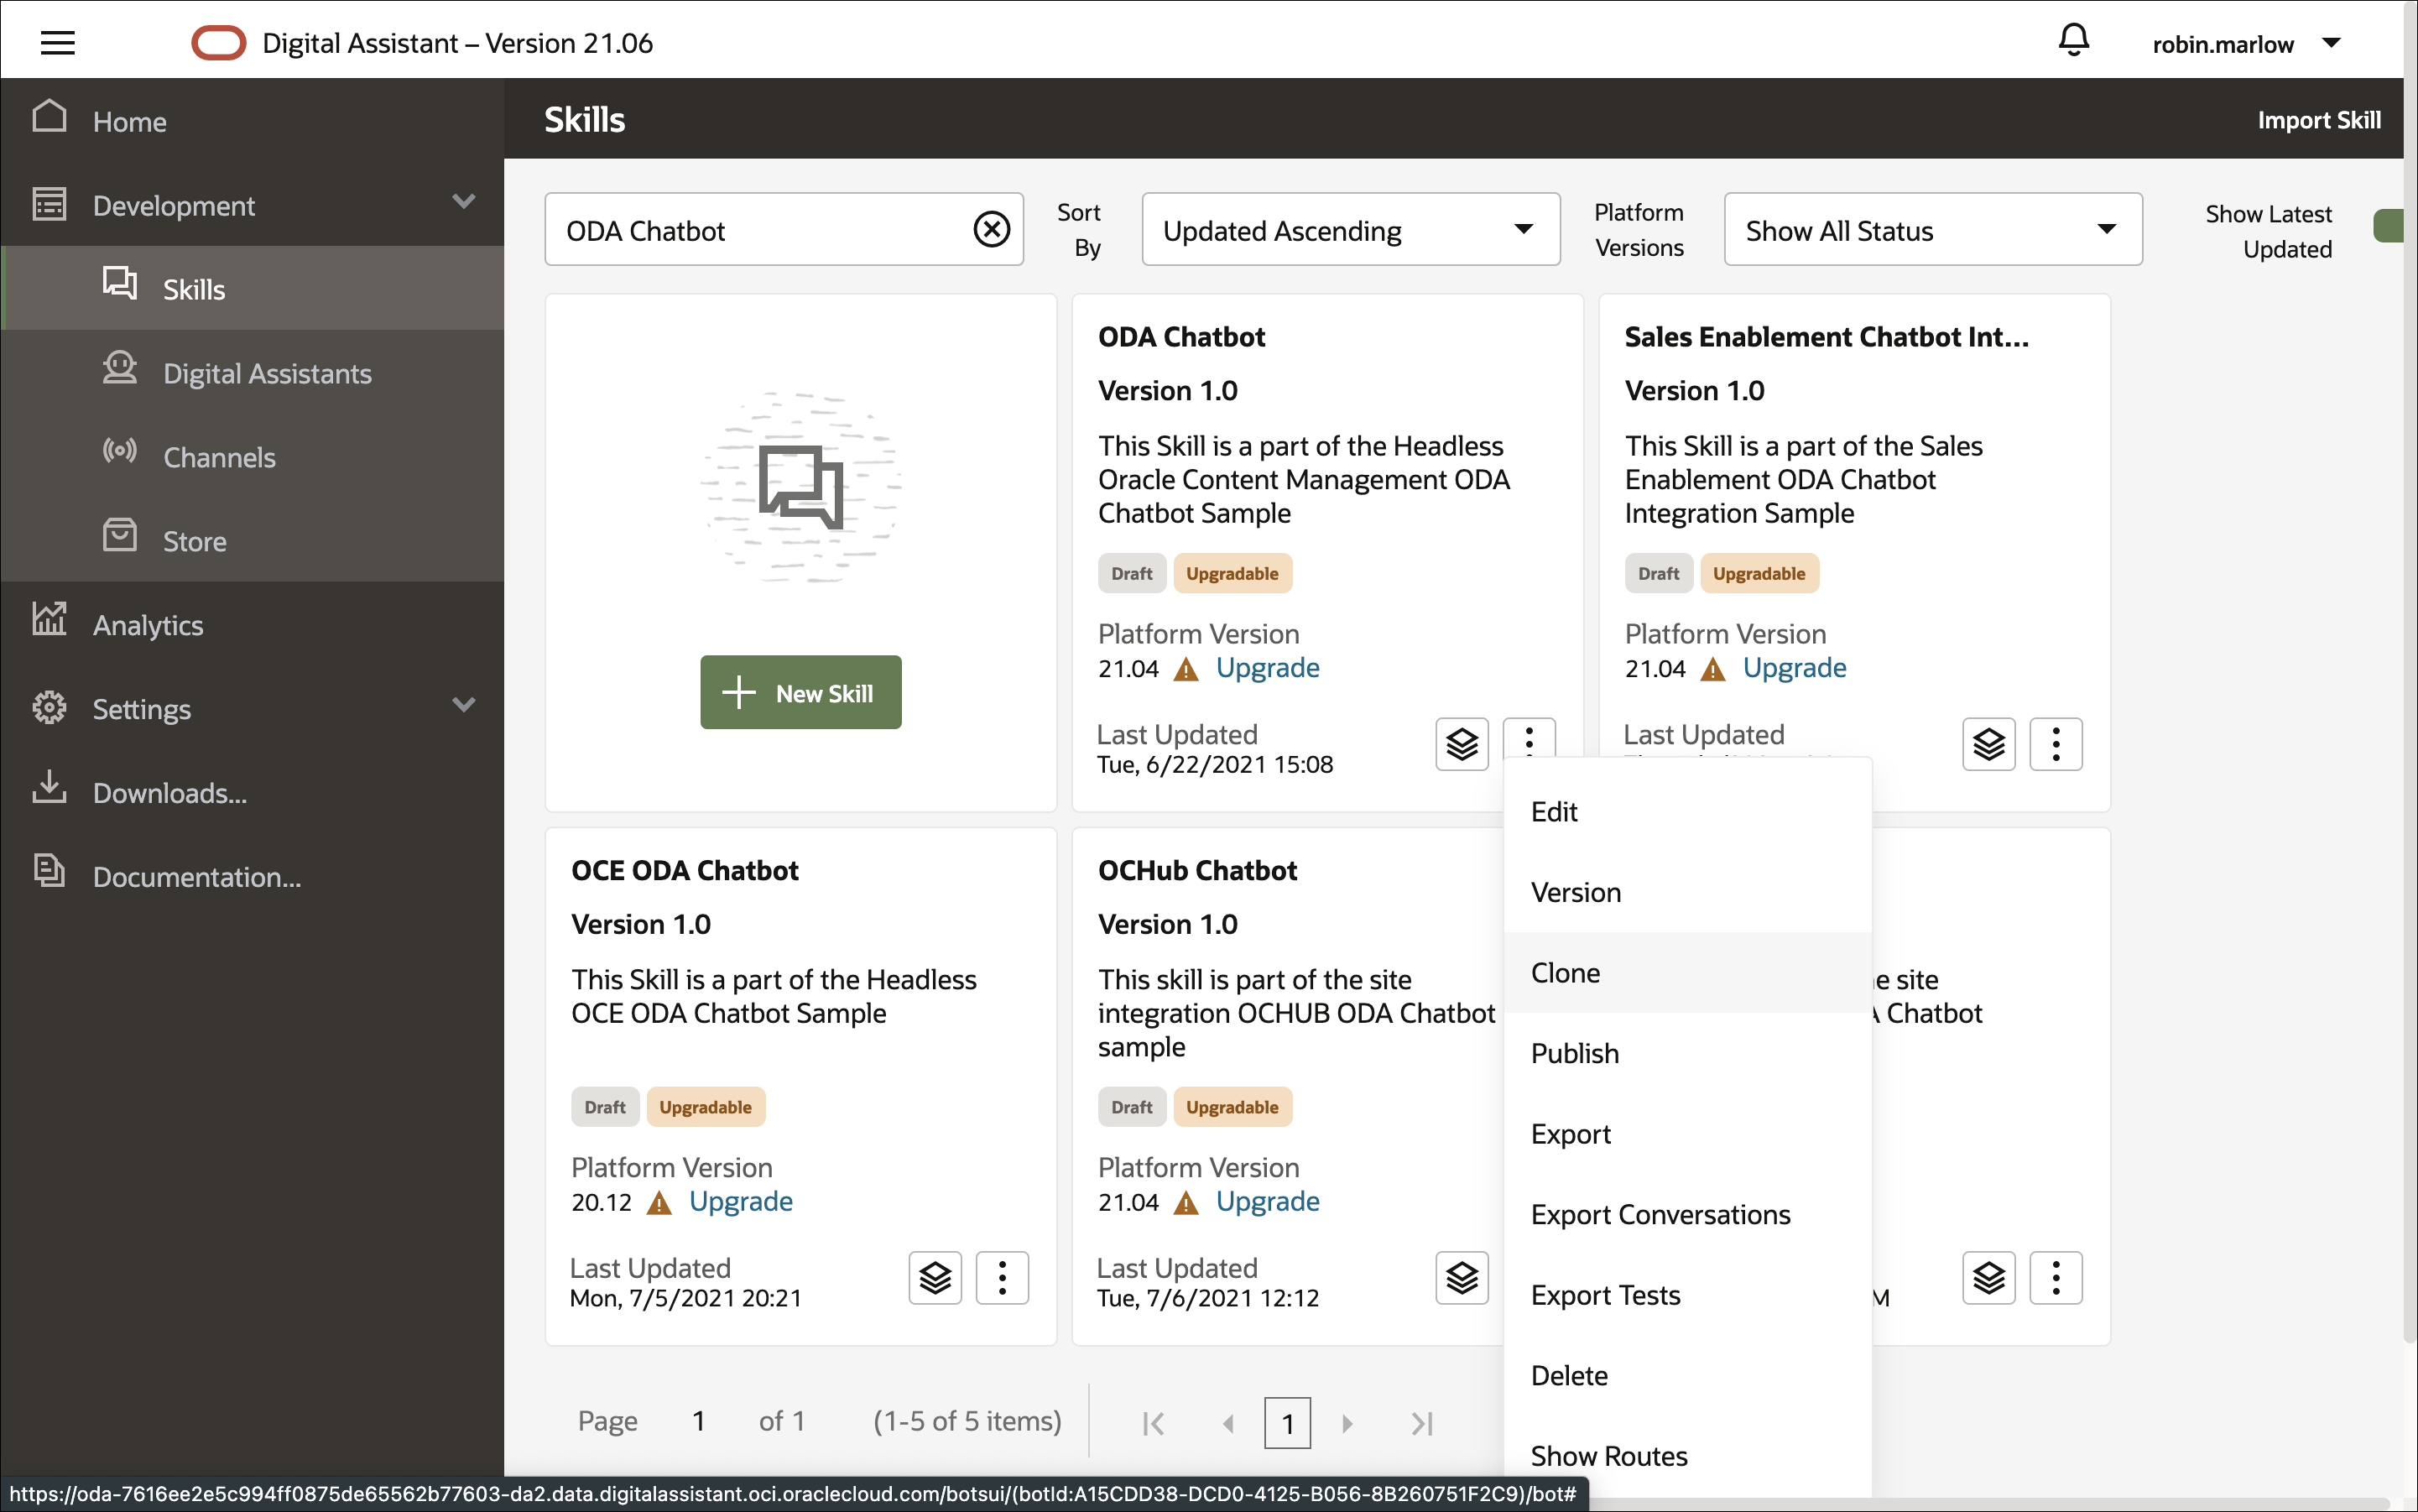
On the ODA Chatbot skill card, click the options icon and then Clone.
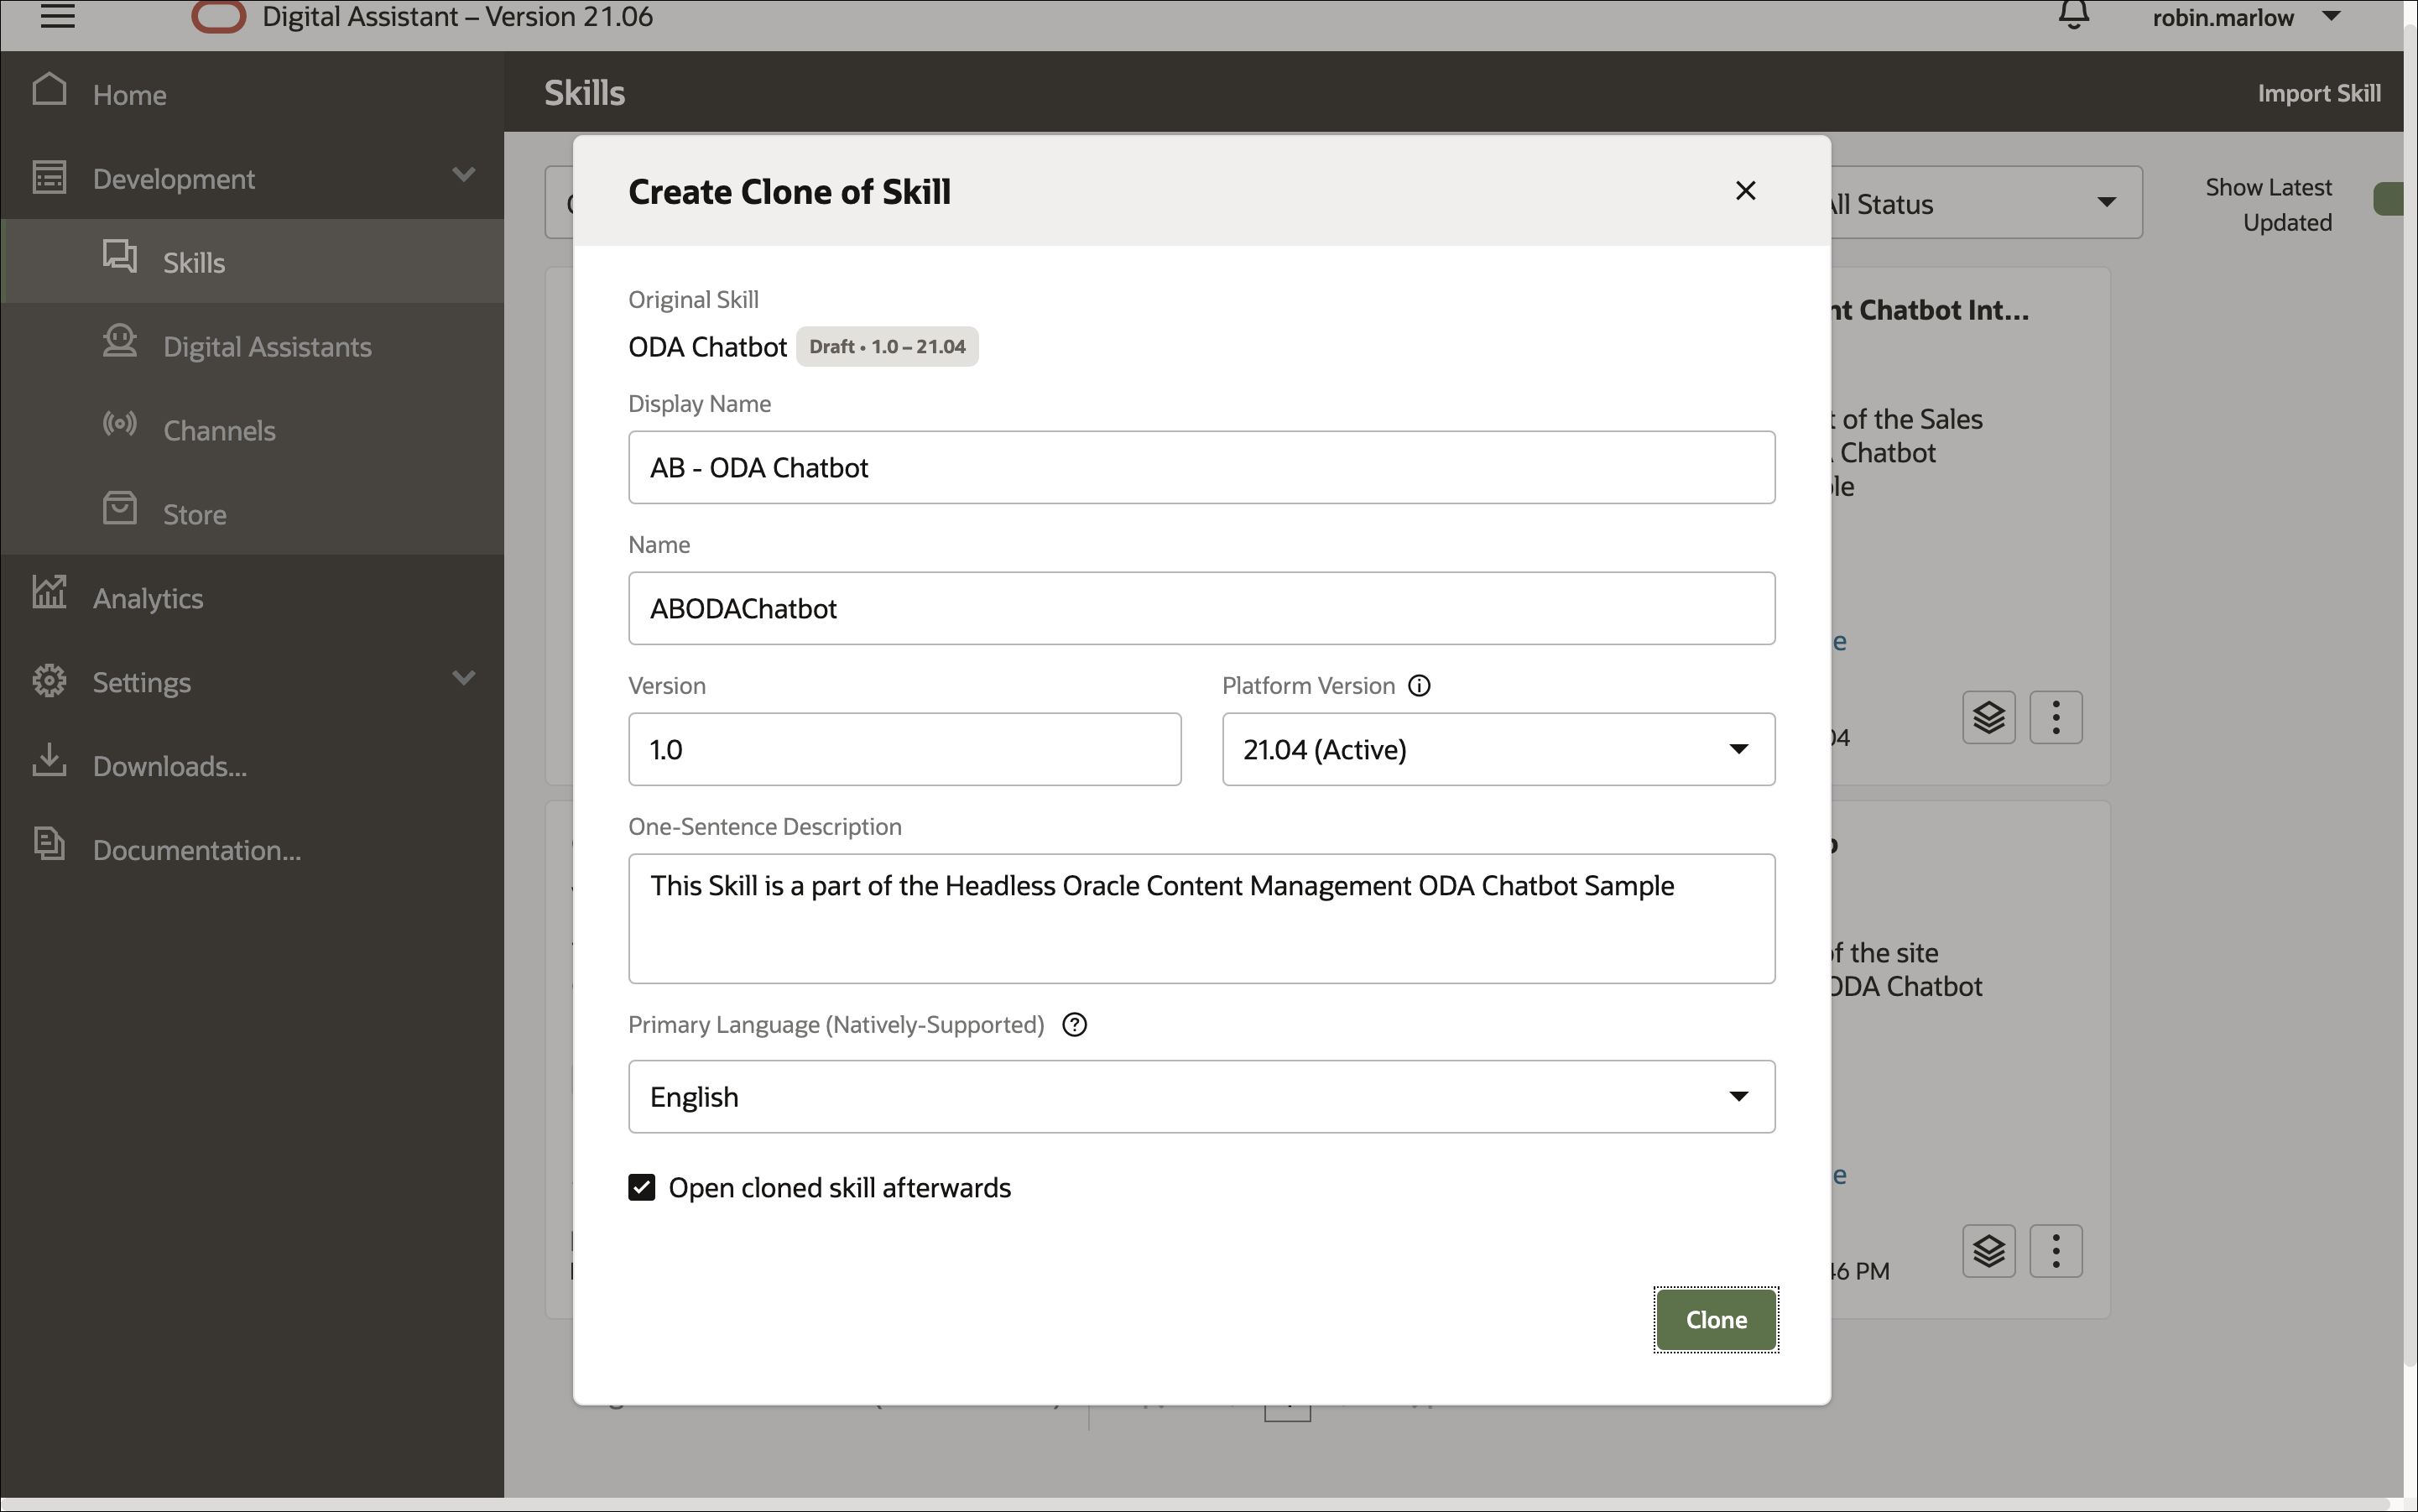
Give the cloned skill a unique display name; for example, add your initials at the beginning, such as ‘AB - ODA Chatbot’. Leave all other values unchanged. Select Open cloned skill afterwards and then click Clone.
Note: The name must begin with a letter and may contain only letters, numbers, periods, and underscores. It can’t exceed 100 characters.
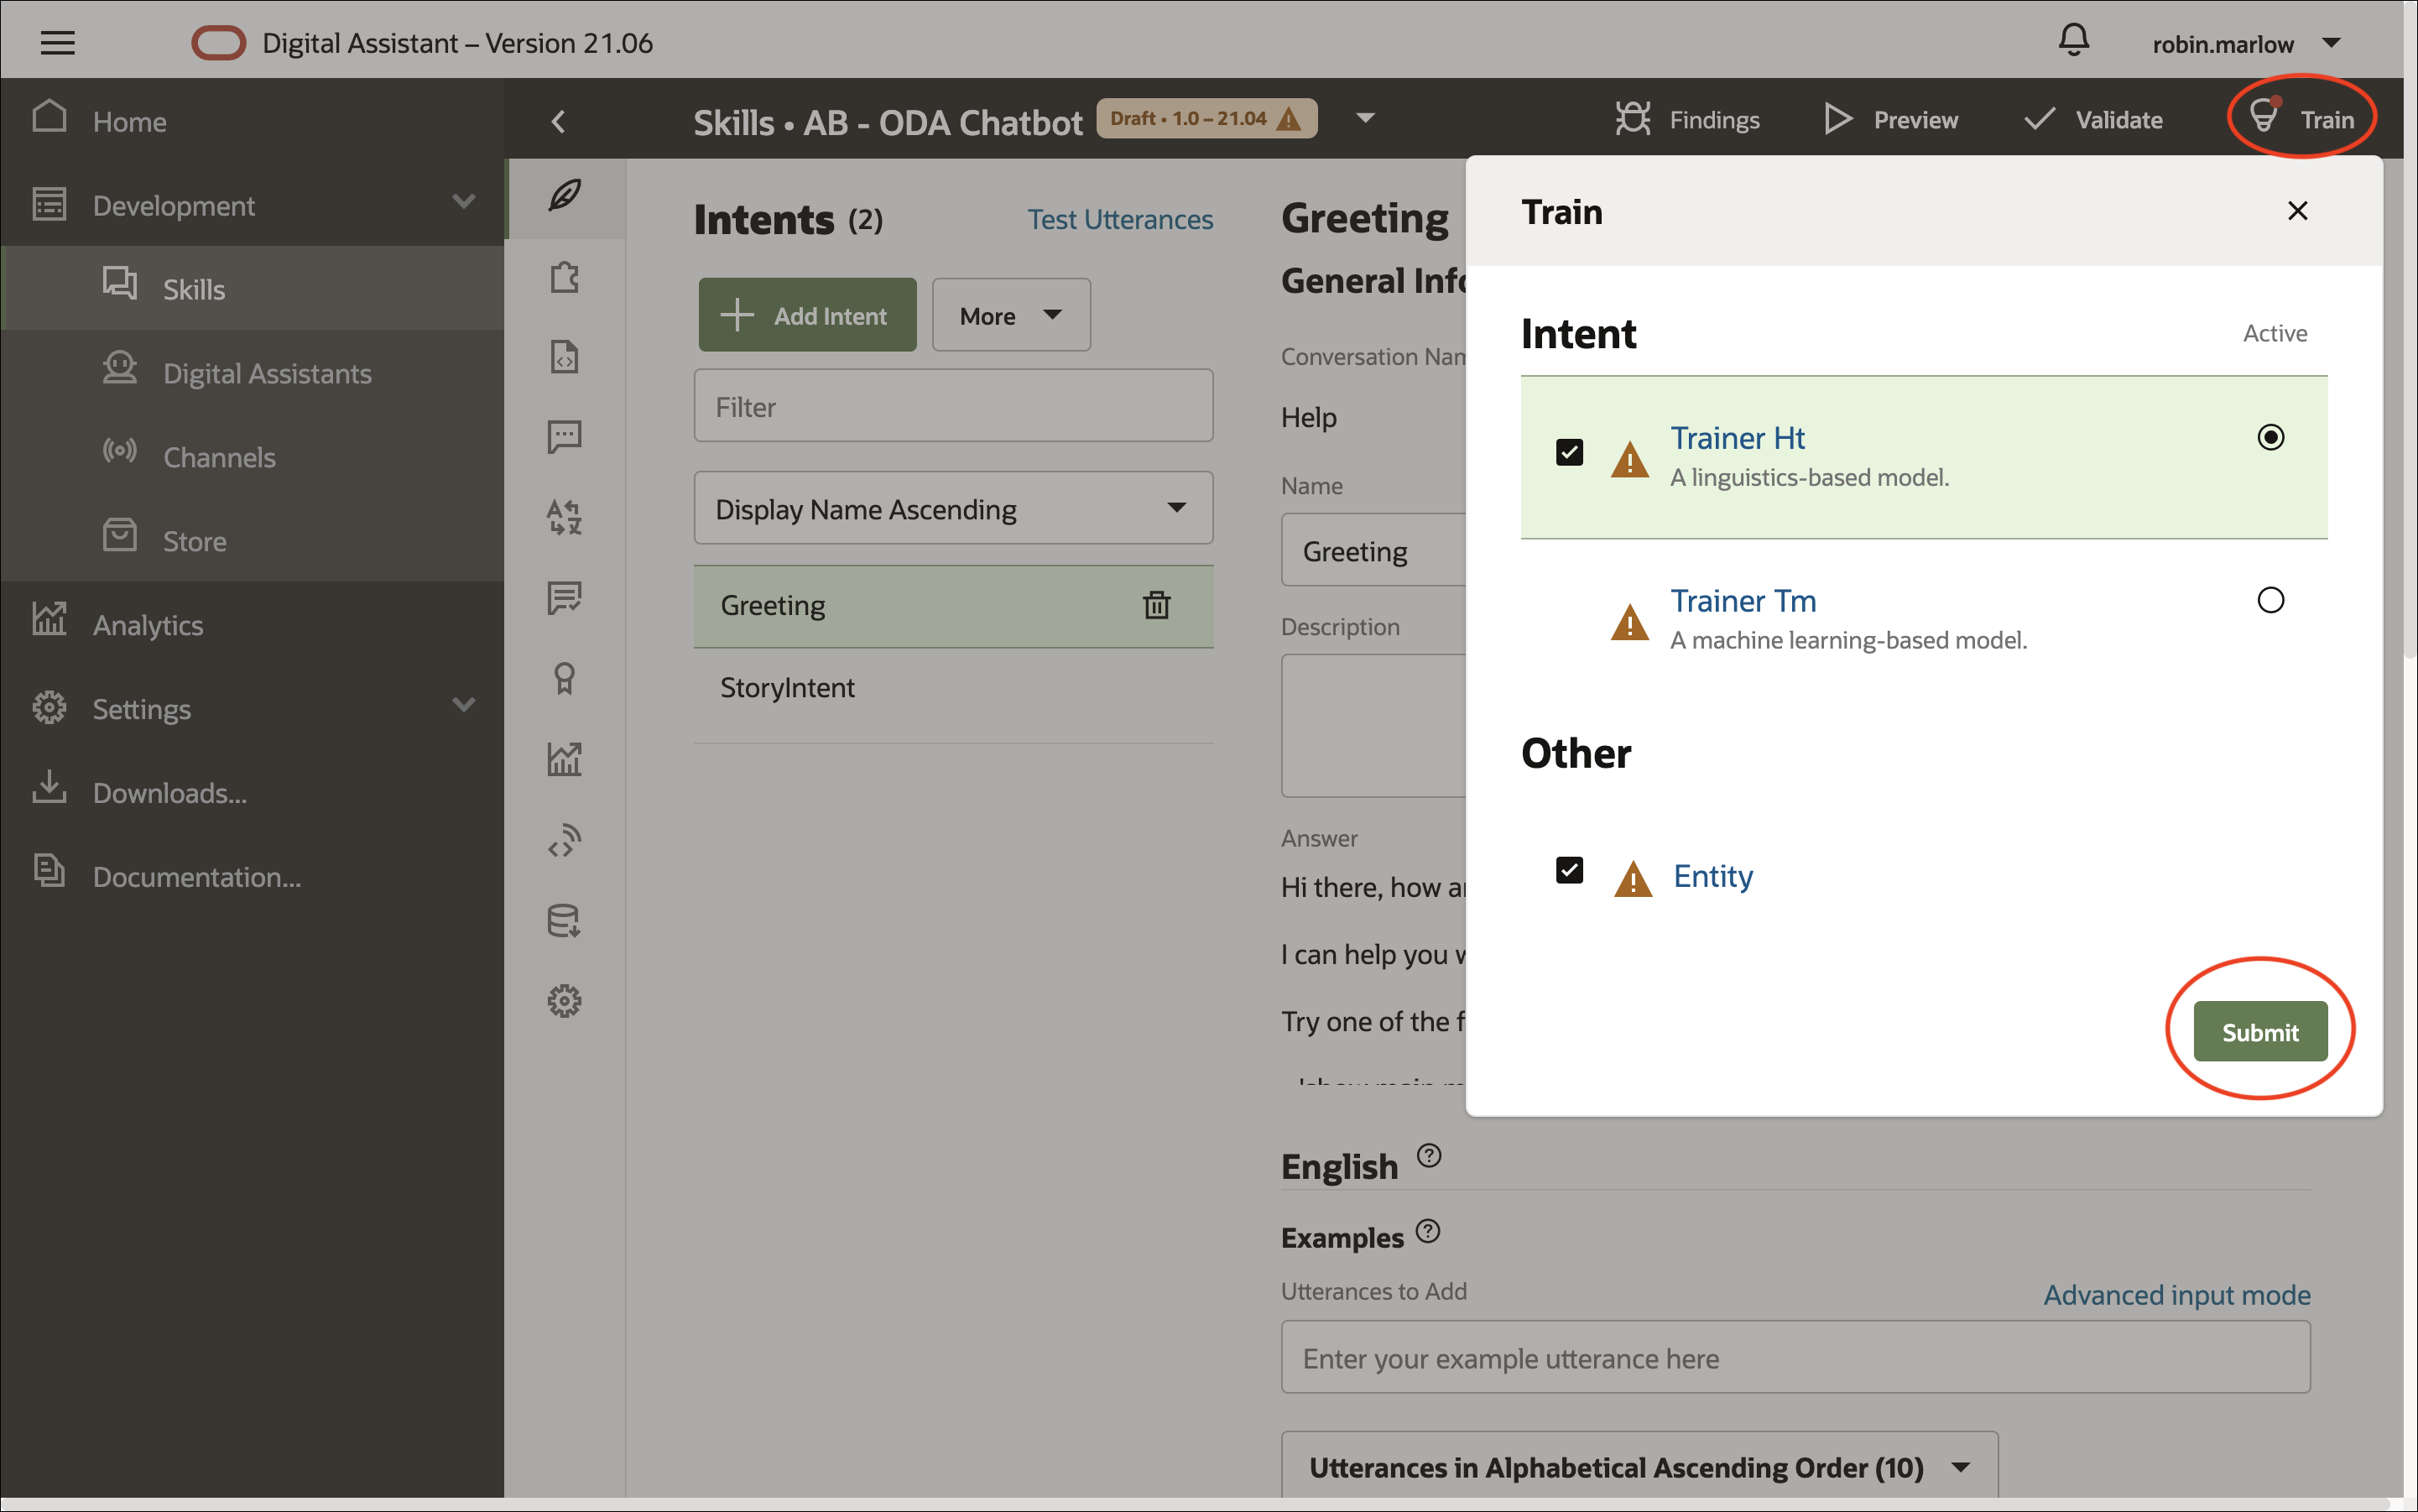
Click Train, make sure that Trainer Ht is selected, and then click Submit to train the skill.
Note: You use Ht training in this tutorial, which is quick but superficial. For production work, you should use Tm training, which results in better intent resolution.
ODA Chatbot Skill
Skills are individual chatbots that are designed to interact with users and fulfill specific types of tasks, such as ordering food, making reservations, and changing contact information. The ODAChatbot skill helps a user find appropriate sales enablement announcements and stories through a combination of text messages and simple UI elements such as selection lists.
Before you dive into digital assistant and skill development, here are some concepts you’ll want to become familiar with:
Intents — Categories of actions or tasks users expect your skill to perform for them. In our skill, there are two intents:
- Greetings: This intent shows a welcome message to the user.
- StoryIntent: This intent shows appropriate menus and content items from Oracle Content Management.
Entities — Variables that identify key pieces of information from user input that enable the skill to fulfill a task. In our skill, there are seven entities:
- TopMenu: This is a value list entity containing the menu items.
- HomeMenu: This is a value list entity containing the categories from the Home menu.
- CafeSupremoMenu: This is a value list entity containing the categories from the Cafe Supremo menu.
- LearningMenu: This is a value list entity containing the categories from the Learning menu.
- SellingMenu: This is a value list entity containing the categories from the Selling menu.
- MenuBag: This is a composite bag entity of menu item entities; that is, the HomeMenu, CafeSupremoMenu, LearningMenu and SellingMenu entities.
- StoryCategory: This is a value list entity containing all the story categories.
Both intents and entities are common Natural Language Processing (NLP) concepts. NLP is the science of extracting the intention of text and relevant information from text.
Components — These provide your skill with various functions so that it can respond to users. These can be generic functions like outputting text, or custom components that can return information from a backend and perform custom logic. In our skill, there is one custom component service, sales-enablement-custom-component, which fetches the content items from Oracle Content Management via REST APIs.
Dialog flow — The definition for the skill-user interaction. The dialog flow describes how your skill responds and behaves according to user input.
Channels — Users can access digital assistants and skills through messaging platforms or through client messaging apps. A single digital assistant or skill can have several channels configured for it so that it can run on different services simultaneously. In this tutorial, we use the Oracle Web channel to access our skill in a web application.
To learn more about Oracle Digital Assistant and skills, check out the product documentation.
Set Up and Configure the Custom Component Service
The sales-enablement-custom-component folder in the code base is the ODA custom component used in this tutorial. First, we need to download dependencies for this ODA custom component. Run the following command from the headless-chatbot-sample/sales-enablement-custom-component directory:
npm installNext, we need to configure a few pieces of information so that our Oracle Content Management Content SDK (and any other requests) can target the correct instance URL and API version with the correct channel token.
These values are used in components/server-config-utils.js to instantiate a new delivery client.
Open the server-config-utils.js file in a text editor. You’ll see the following:
    contentServer: "https://instance-name.cec.ocp.oraclecloud.com",
    contentVersion: "v1.1",
    channelToken: "4b7b22ad5f5245f28579641d5489a98f",
Change each key-value pair to reflect your instance URL, the API version you want to target, and the channel token associated with your publishing channel. For example, The channel we created in this tutorial is ODAChatbotChannel.
Work with the Oracle Content Management Content SDK
Oracle Content Management offers an SDK to help discover and use content in your applications. The SDK is published as an NPM module, and the project is hosted on GitHub.
Learn more about the SDK here.
The SDK has been registered as a runtime dependency of this project in the package.json files.
Use the Content SDK to Fetch Content
We can now leverage the Content SDK to fetch content for the chatbot skill through the ODA custom component.
The components/services.js folder contains the code for getting data from Oracle Content Management using the Content SDK.
The components/server-config-utils.js file imports the Content SDK and then creates a delivery client using the configuration specified in it.
The following command imports the SDK:
createDeliveryClient = require('@oracle/content-management-sdk');The following command creates the delivery client:
deliveryClient = createDeliveryClient(serverconfig);The sales-enablement-custom-component/components/services.js file contains all the code to get the content items for the chatbot. There’s one main function to fetch all the content for the chatbot.
The following functions are called to retrieve all of the data for a particular taxonomy category from the ODAChatbotRepository repository:
function getStoryData(client, categoryName) {
     if (categoryName === 'Announcements') {
       return fetchItemsForAnnouncements(client, false)
         .then((topLevelItem) => {
           const { totalResults } = topLevelItem;
           const promises = [];
           // for each item, retrieve the result object and add it to the promise
           topLevelItem.items.forEach((item) => {
             promises.push(
               retrieveAnnouncementsObject(client, item.id)
                 .then((resultobject) => ({ ...resultobject })),
             );
           });
           // execute all the promises before returning the data
           return Promise.all(promises)
             .then((arrayOfItems) => ({
               totalResults,
               items: arrayOfItems.flat(),
             }));
         });
     }
     return fetchItemsForCategoryName(client, categoryName, false)
       .then((topLevelItem) => {
         const { totalResults } = topLevelItem;
         const promises = [];
         // for each item, retrieve the result object and add it to the promise
         topLevelItem.items.forEach((item) => {
           promises.push(
             retrieveResultObject(client, item.id)
               .then((resultobject) => ({ ...resultobject })),
           );
         });
         // execute all the promises before returning the data
         return Promise.all(promises)
           .then((arrayOfItems) => ({
             totalResults,
             items: arrayOfItems.flat(),
           }));
       });
    }
The getStoryData function makes two different sets of calls depending on whether the request is made for the announcements or a story category.
Announcements Data
It requires one data call to get all the content items for the announcements.
The getStoryData function calls fetchItemsForAnnouncements, which gets all the content items of type ‘SE2-Announcements’. Next, the retrieveAnnouncementsObject function is called and the title and summary fields of the result object are populated with the data from fetchItemsForAnnouncements.
function fetchItemsForAnnouncements(client, limit) {
     return client.getItems({
       q: '(type eq "SE2-Announcement")',
       fields: 'all',
       expand: 'all',
       limit: limit ? 4 : 100,
       totalResults: true,
     });
    }
Story Data
It requires several data calls to get all the content items for the Stories.
First, we get all the content items for the user requested category.
For each content item we get, we make a call to retrieve the media URL.
The getStoryData function calls fetchItemsForCategoryName, which gets all the content items of type ‘SE2-Story’ and taxonomy category name as specified by the user.
function fetchItemsForCategoryName(client, categoryName, limit) {
     return client.getItems({
       q: `(taxonomies.categories.name eq "${categoryName}" and type eq "SE2-Story")`,
       fields: 'all',
       expand: 'all',
       limit: limit ? 4 : 100,
       totalResults: true,
     });
    }
The content item fetched by fetchItemsForCategoryName has a media id field. The retrieveMediaURL function uses this media id to fetch the media URL.
function retrieveMediaURL(client, identifier) {
     return client.getItem({
       id: identifier,
       fields: 'all',
       expand: 'all',
     }).then((asset) => {
       let url = null;
       if (asset.fields && asset.fields.renditions && asset.fields.fileType !== 'mp4') {
         const object = asset.fields.renditions.filter((item) => item.name === 'Small')[0];
         const format = object.formats.filter((item) => item.format === 'jpg')[0];
         const self = format.links.filter((item) => item.rel === 'self')[0];
         url = self.href;
       } else {
         url = asset.fields.native.links[0].href;
       }
       return [url, asset.fields.fileType];
     });
    }
Package and Deploy the Custom Component Service
You can deploy custom components to either an embedded container for a skill, a remote Node server, or Oracle Mobile Hub. In this tutorial, you’ll deploy your custom component service to an embedded container. To accomplish this, you first need to package the custom component service into a deployable file:
Save your work in your JavaScript IDE.
Open a terminal window and navigate into the sales-enablement-custom-component folder.
In the sales-enablement-custom-component folder, enter the following npm command
bots-node-sdk packBecause of the prepack script in the package.json file, the command first executes the prepack command to verify the package. The command then packages the Node project and its dependencies into a deployable tarball called sales-enablement-custom-component-1.0.0.tgz.
Your tarball must include all dependencies except for devDependencies.
In the ODA Chatbot skill, click the Components icon in the left bar to open the component service page. Click + Service to create a new service.
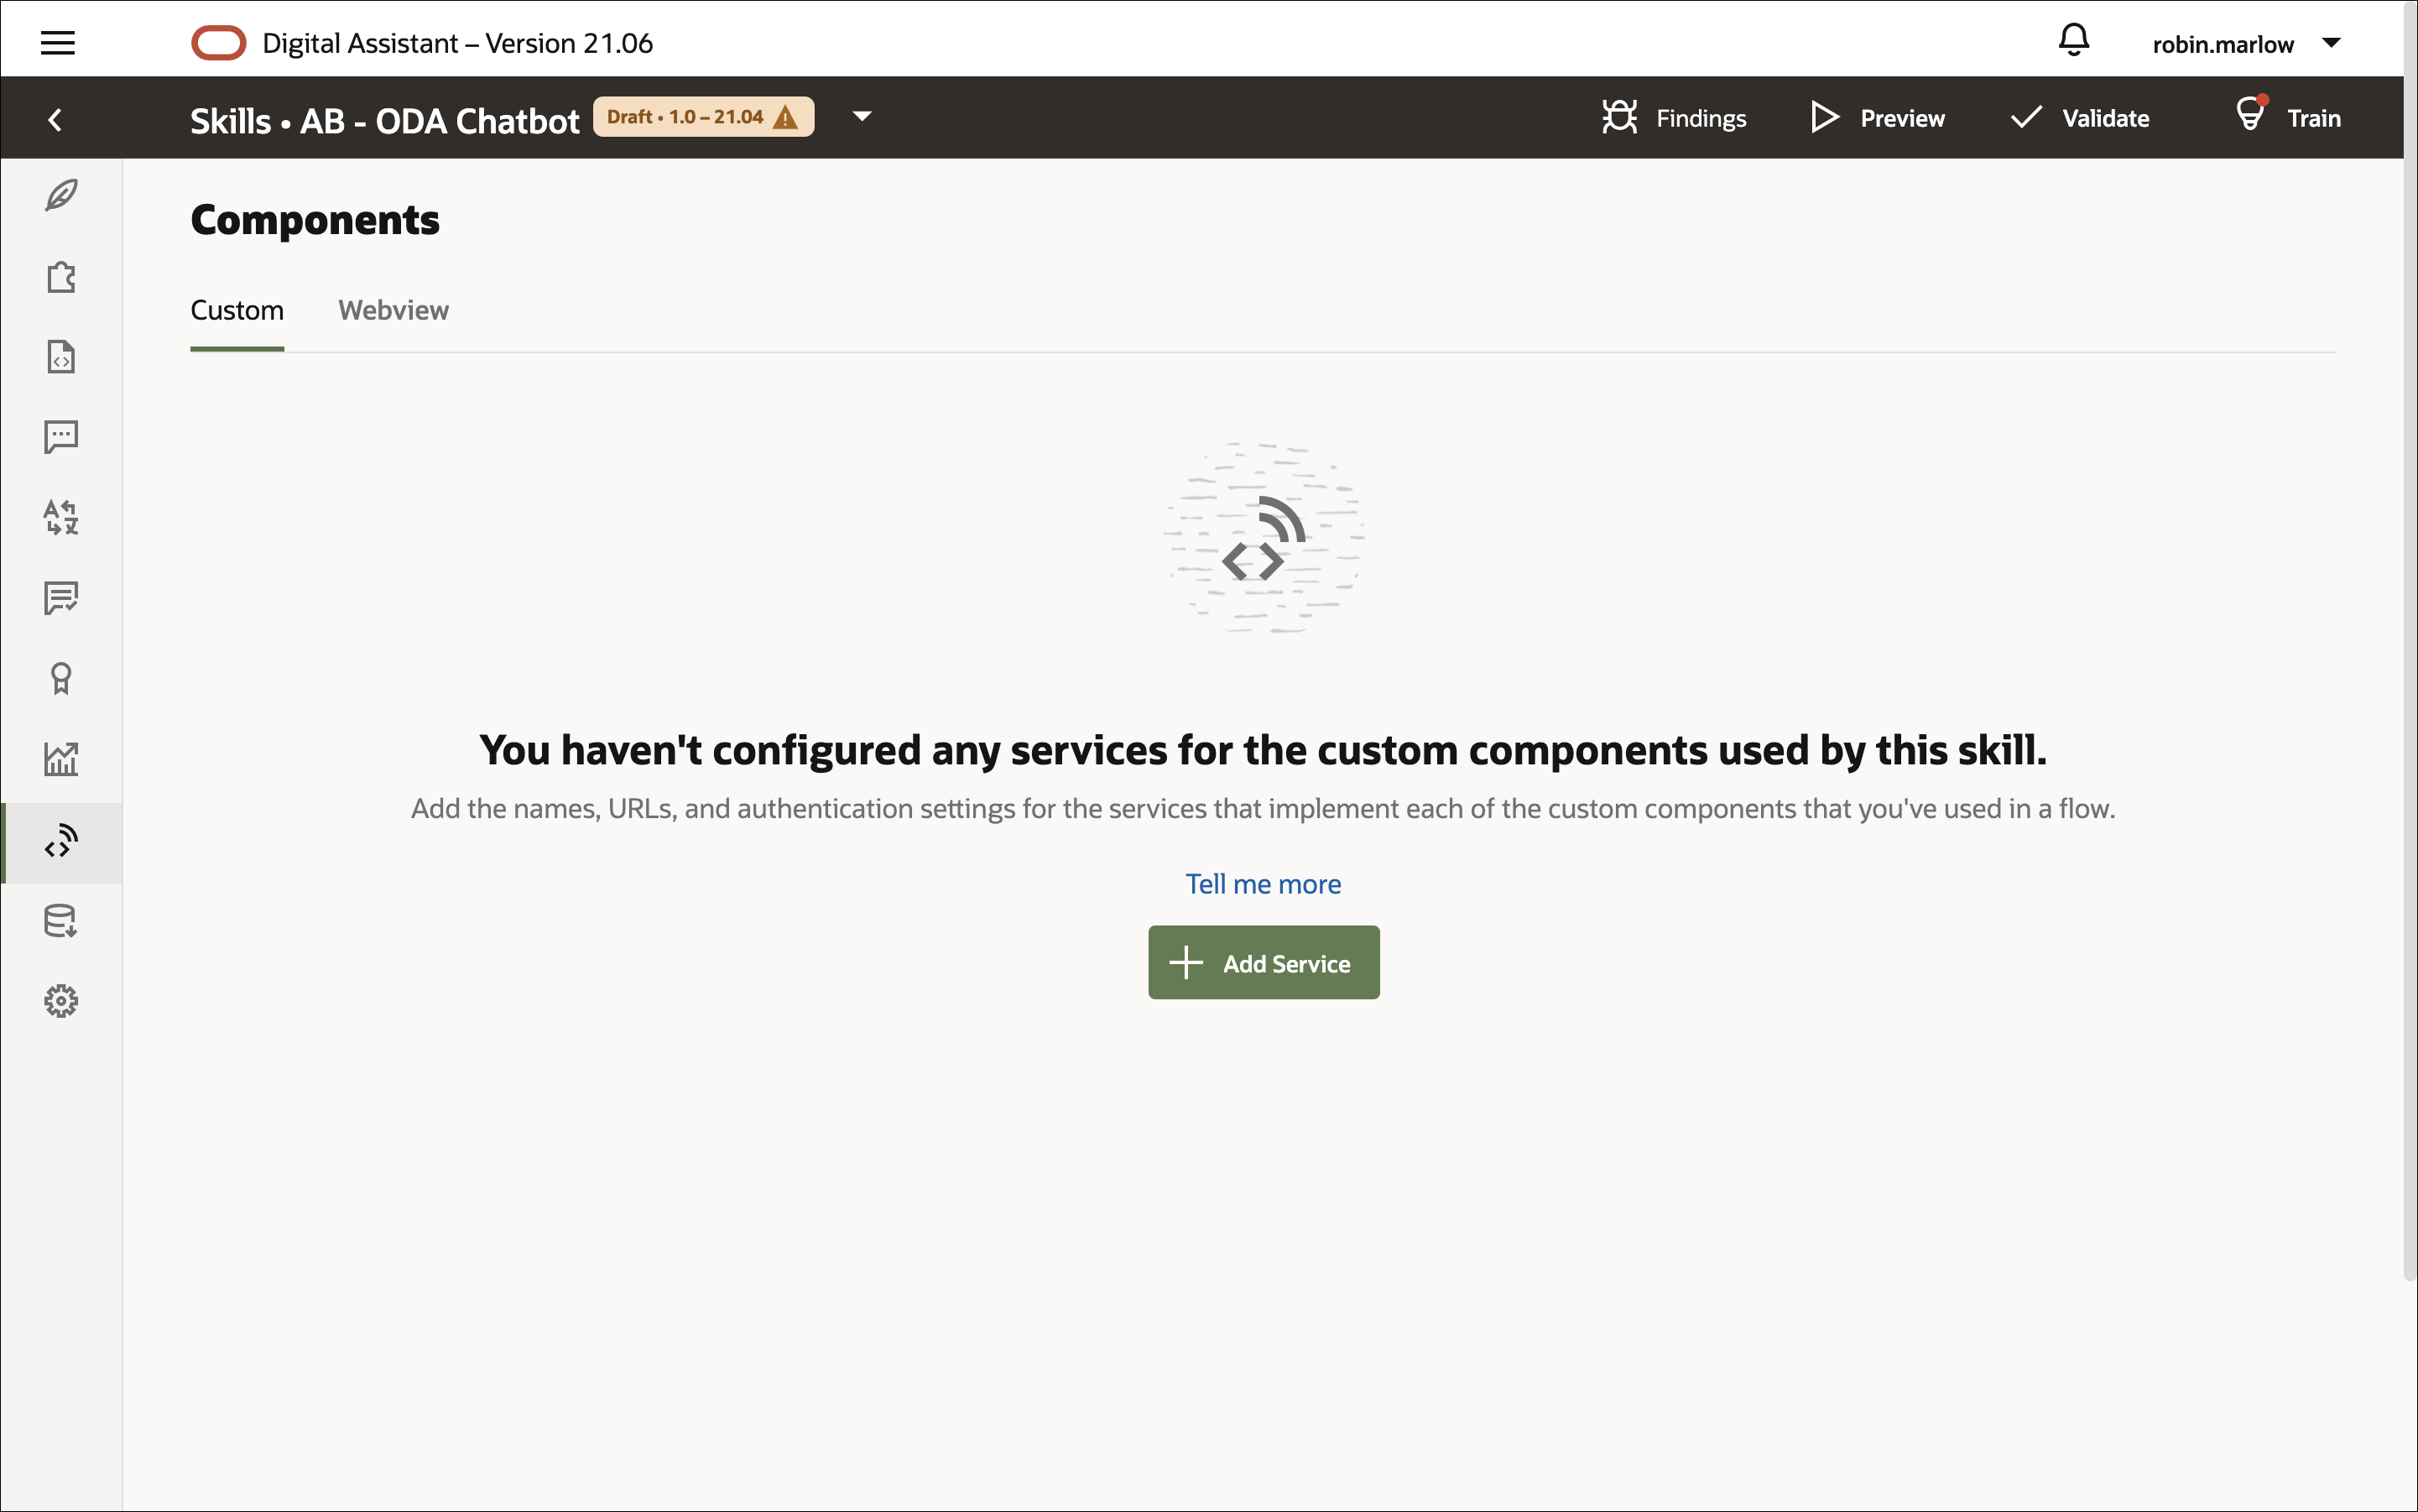
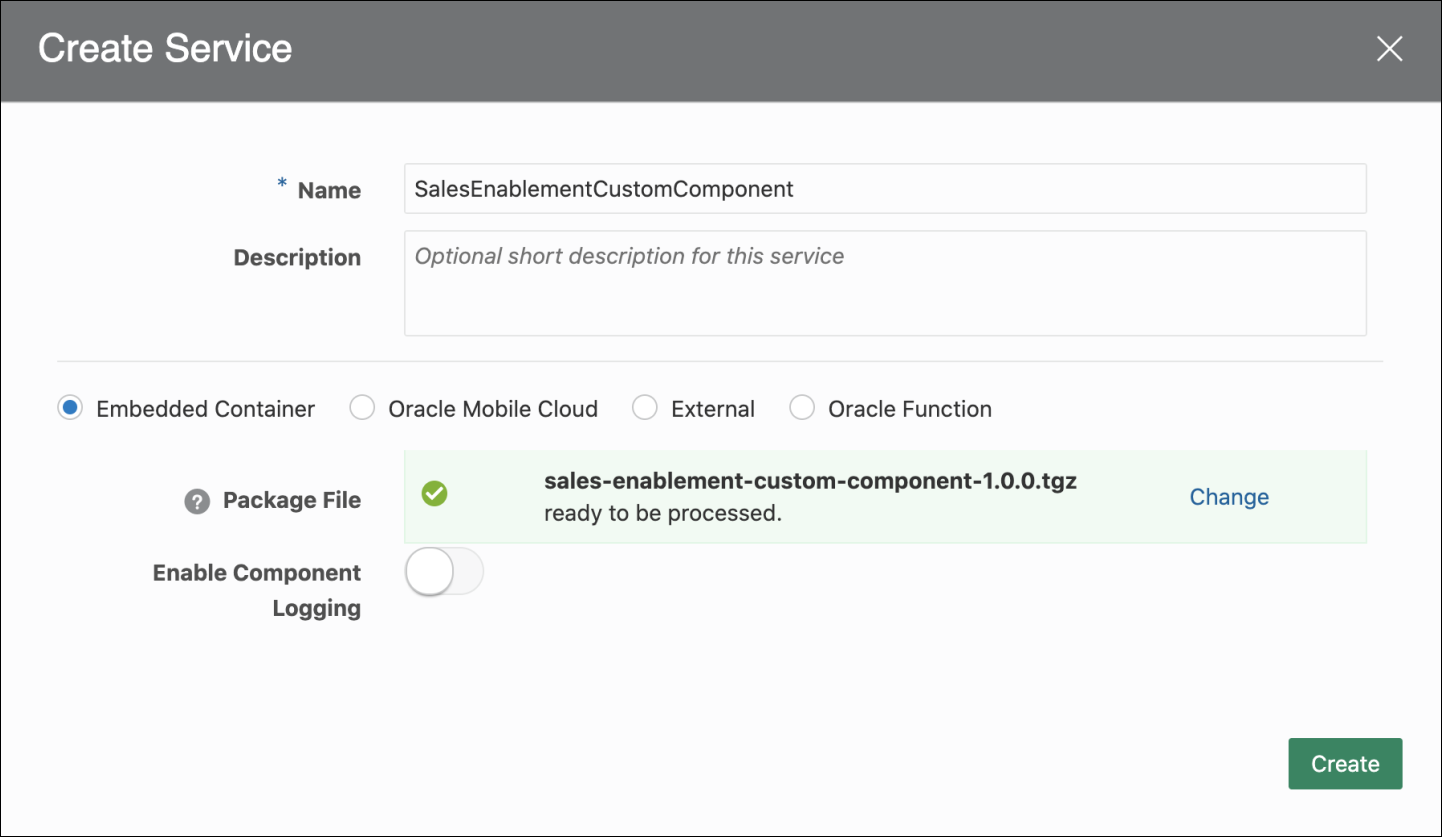
In the Create Service dialog, do the following:
In the Name field, enter SalesEnablementCustomComponent.
In the Description field, you can add an optional description.
Make sure that the Embedded Container option is selected.
Drag and drop or upload the sales-enablement-custom-component-1.0.0.tgz file into the Package File field.
Click Create.
Wait for the Status field to show Ready, which may take a few seconds.
With the custom component service deployed to the skill’s embedded container, you are ready to test the component.
To learn more about Oracle Digital Assistant and custom components, check out the training documentation.
Task 3: Set Up a Web Application for Your Chatbot
The ODA skill created earlier can be deployed and used on multiple platforms. To learn more about the different channels supported by ODA, check out the documentation.
In this tutorial we’ll create an Oracle Web channel to enable an Oracle Web chat widget to connect to your skill.
Note: One problem with adding chats to web clients is that hackers can access the skill and active conversations unless you secure access to the Oracle Web channel, web client, and chat session. With a simple browser console, they can inspect the REST URIs and get the conversation’s user ID and channel ID. To learn how to secure your Oracle Web channel, see this tutorial.
Deploying the ODA Chatbot skill to the web consists of two steps:
Create an Oracle Digital Assistant Web Channel
You’ll create an Oracle Digital Assistant user channel that enables an Oracle Web client to access your skill. To ensure that only your web clients can use this channel, you’ll configure it to require client authentication.
In your Oracle Digital Assistant instance, open the navigation menu on the left, then click Development, and then Channels.
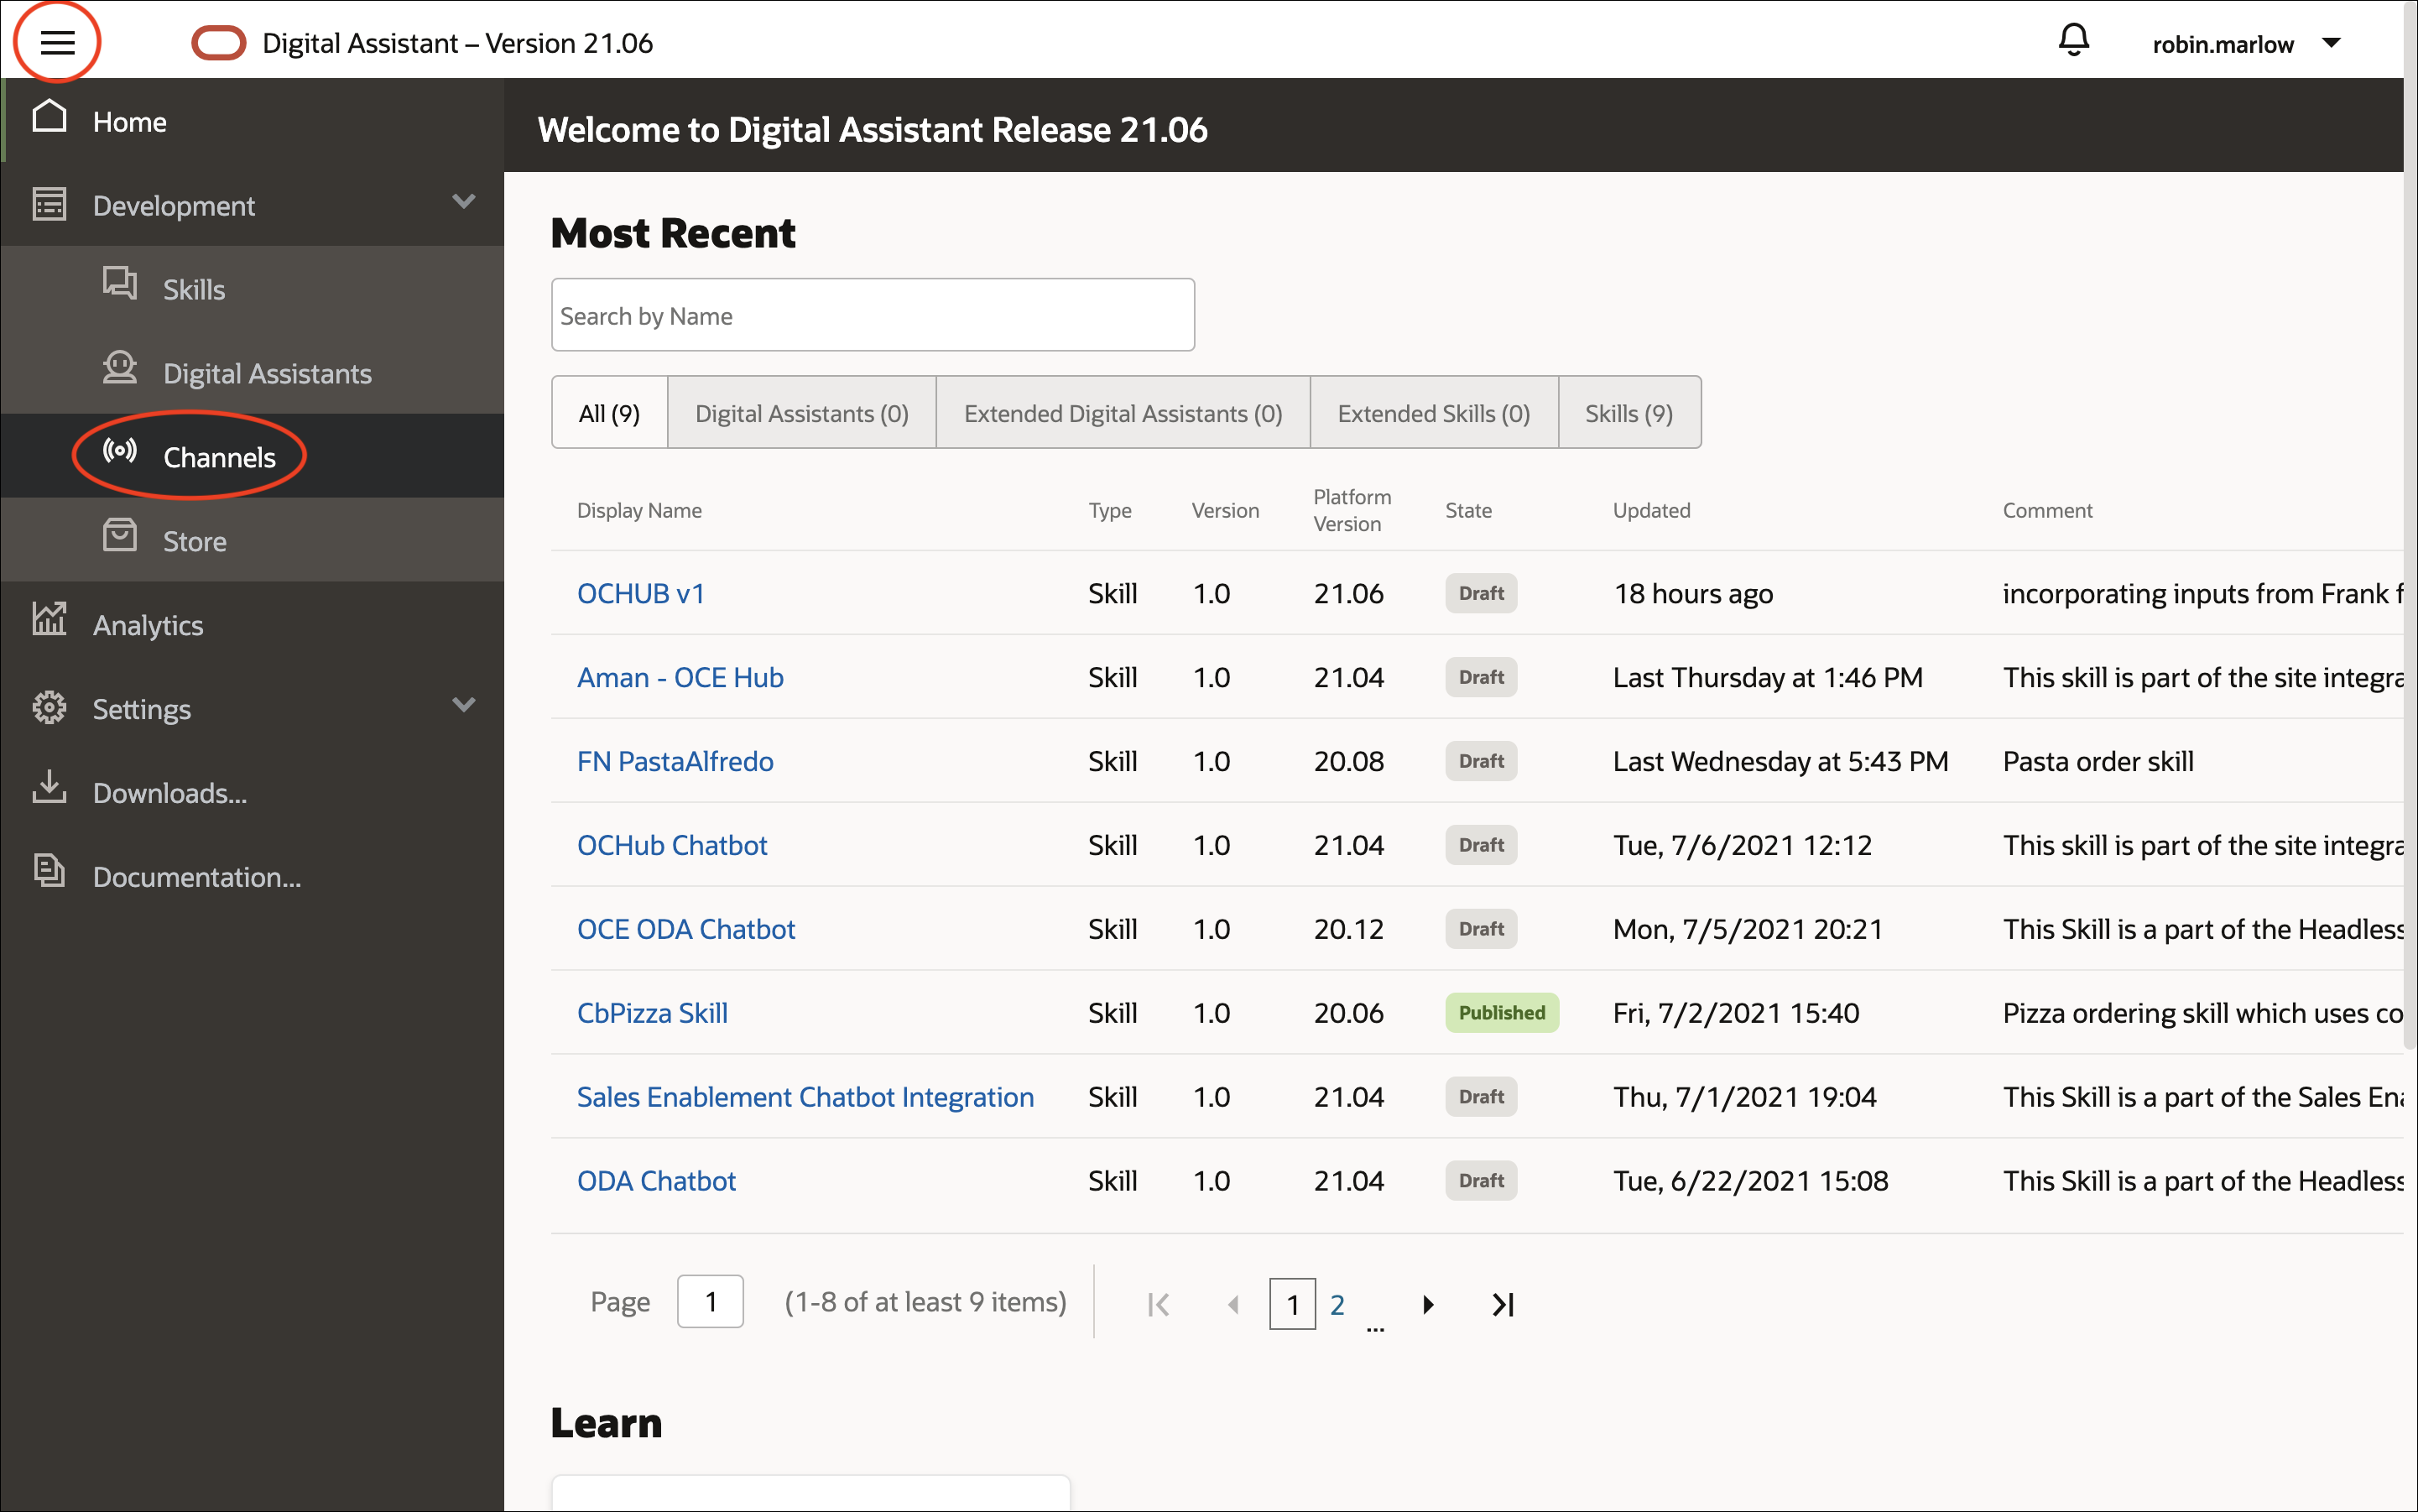
On the Channels page, click + Channel to add a channel.
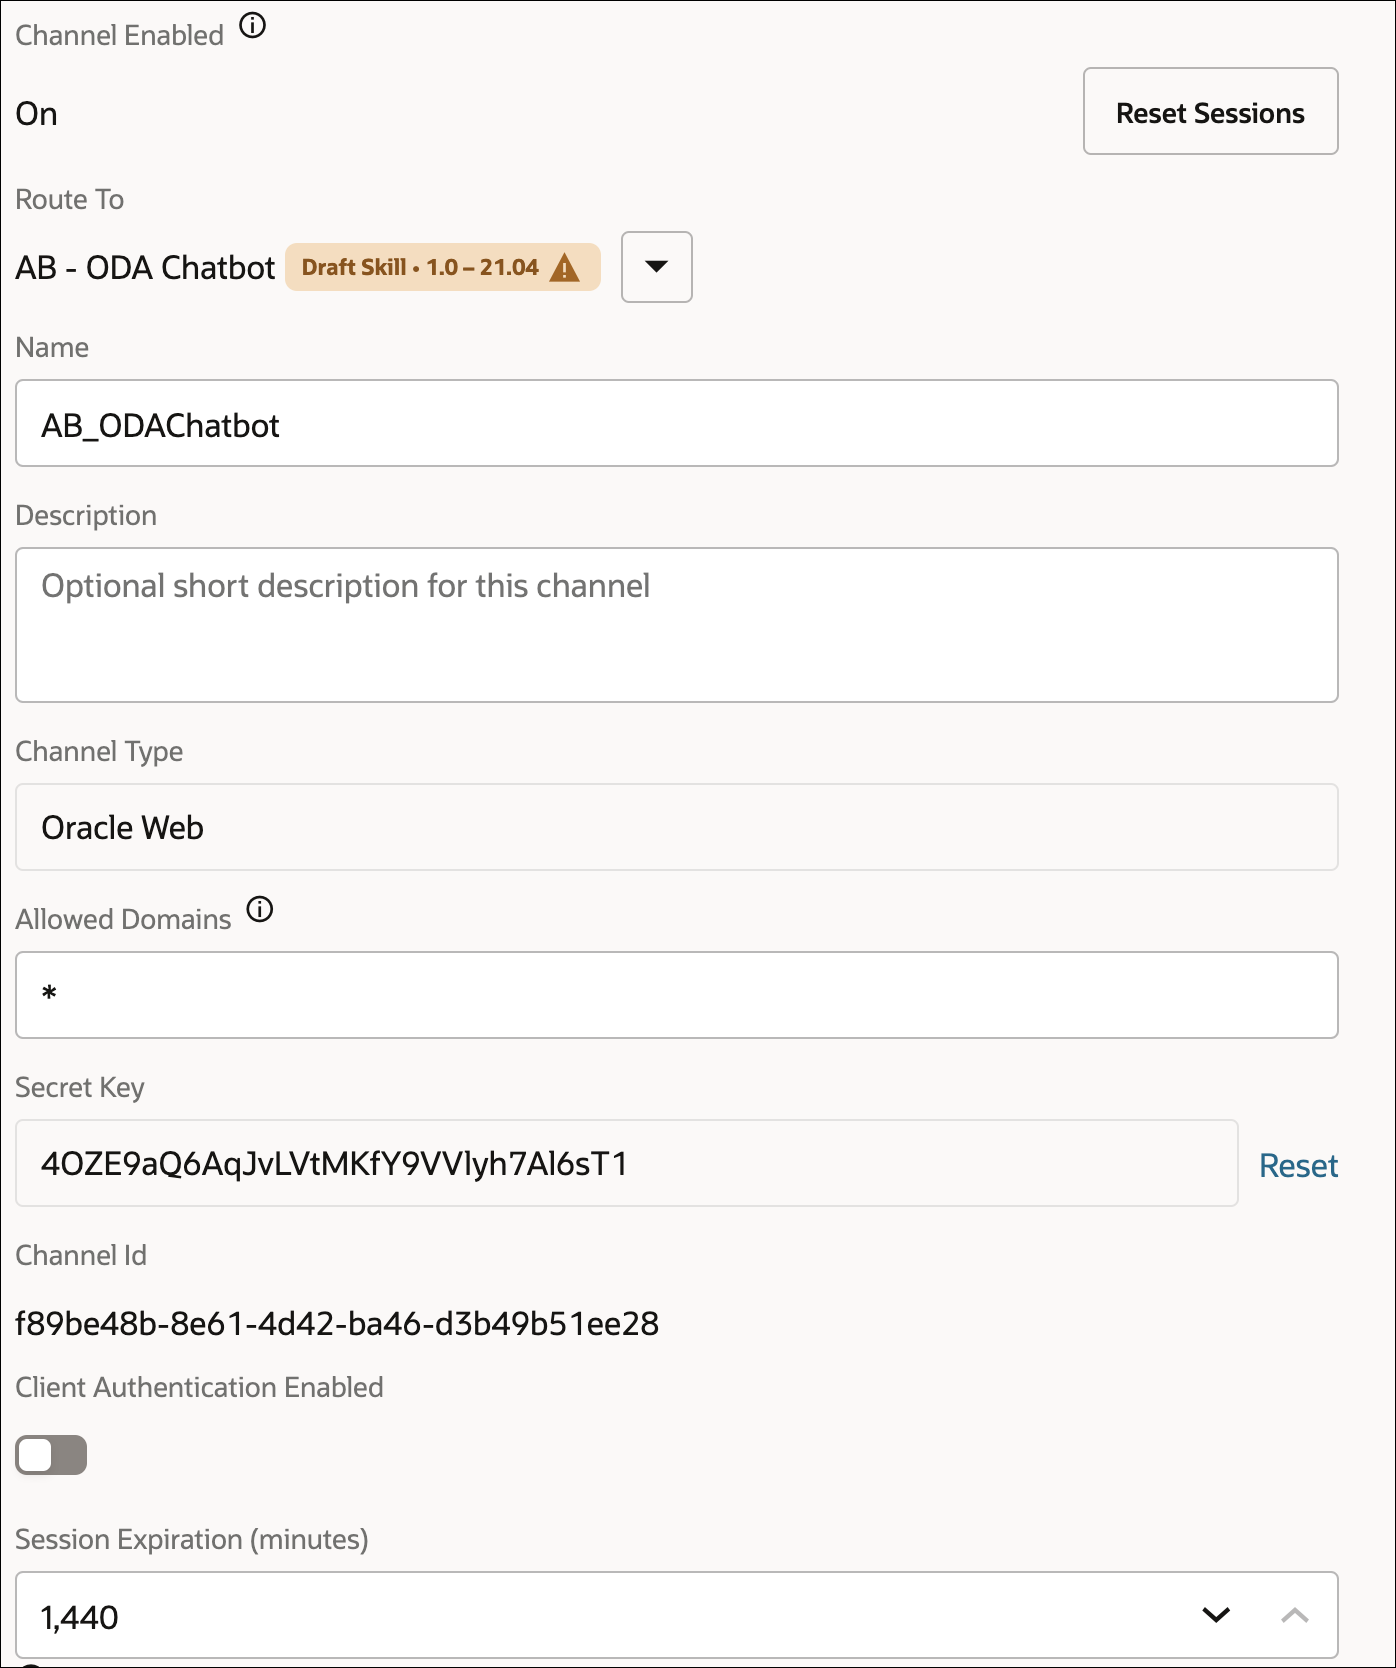
On the Create Channels page, enter this information as shown in the screenshot below:
- Name: A unique name that begins with a letter and contains only letters, numbers, periods, and underscores (_), for example AB_ODAChatbot.
- Description: (Optional) What the channel is used for.
- Channel Type: Oracle Web.
- Allowed Domains: * (A single asterisk allows any domain.)
- Client Authentication Enabled: Leave it in the off position.
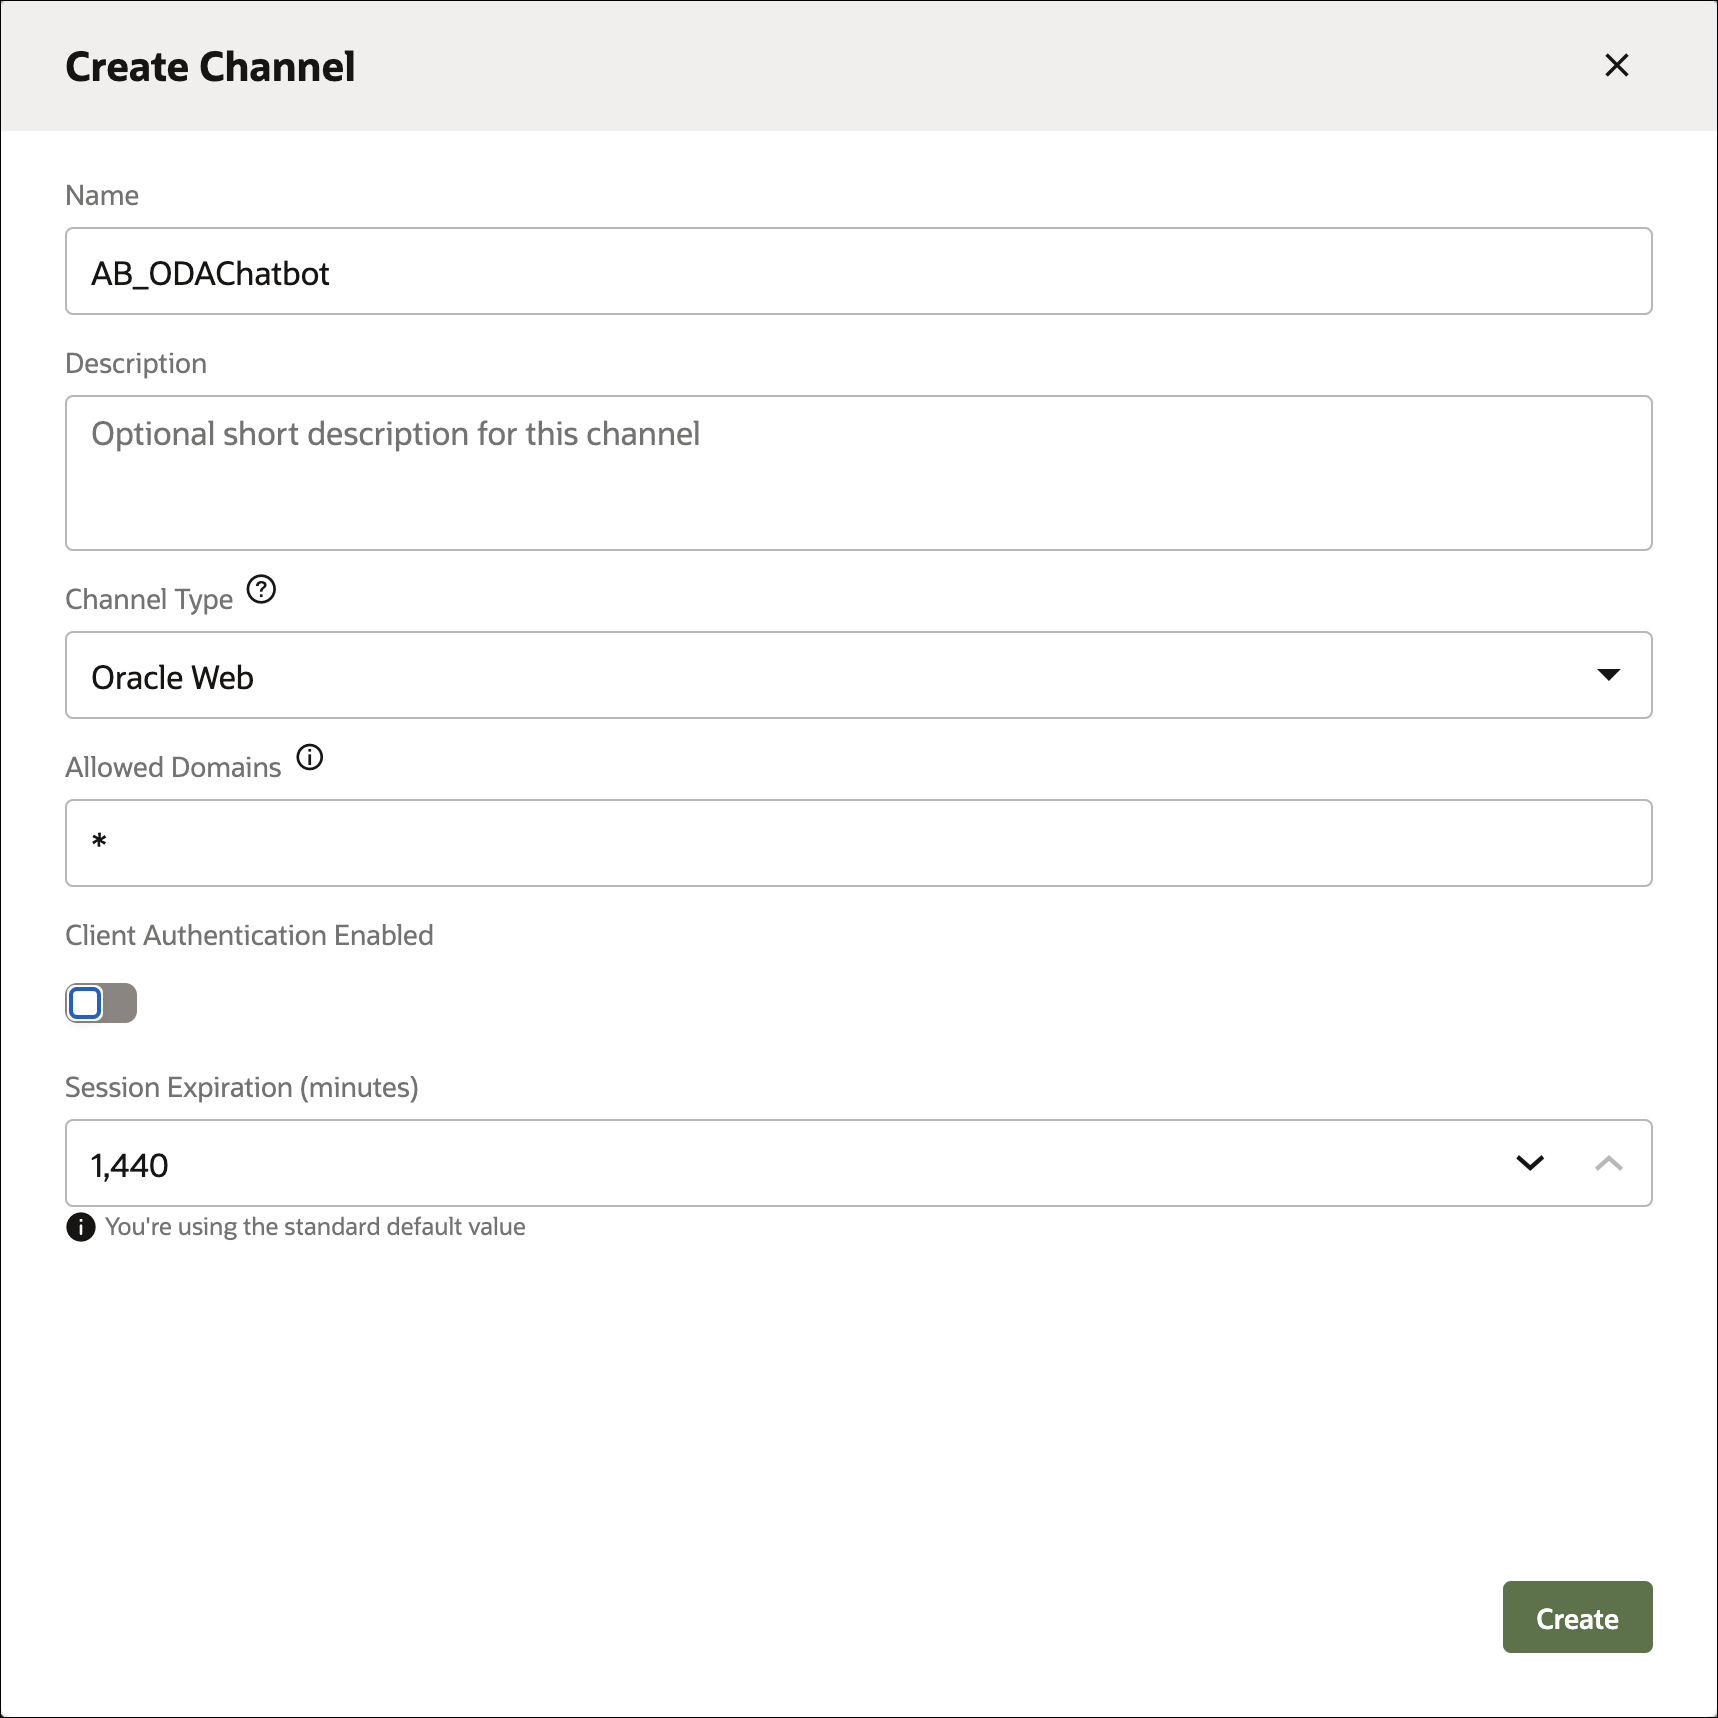
Click Create.
In the Route To dropdown list, select the skill that you want to use for this tutorial.
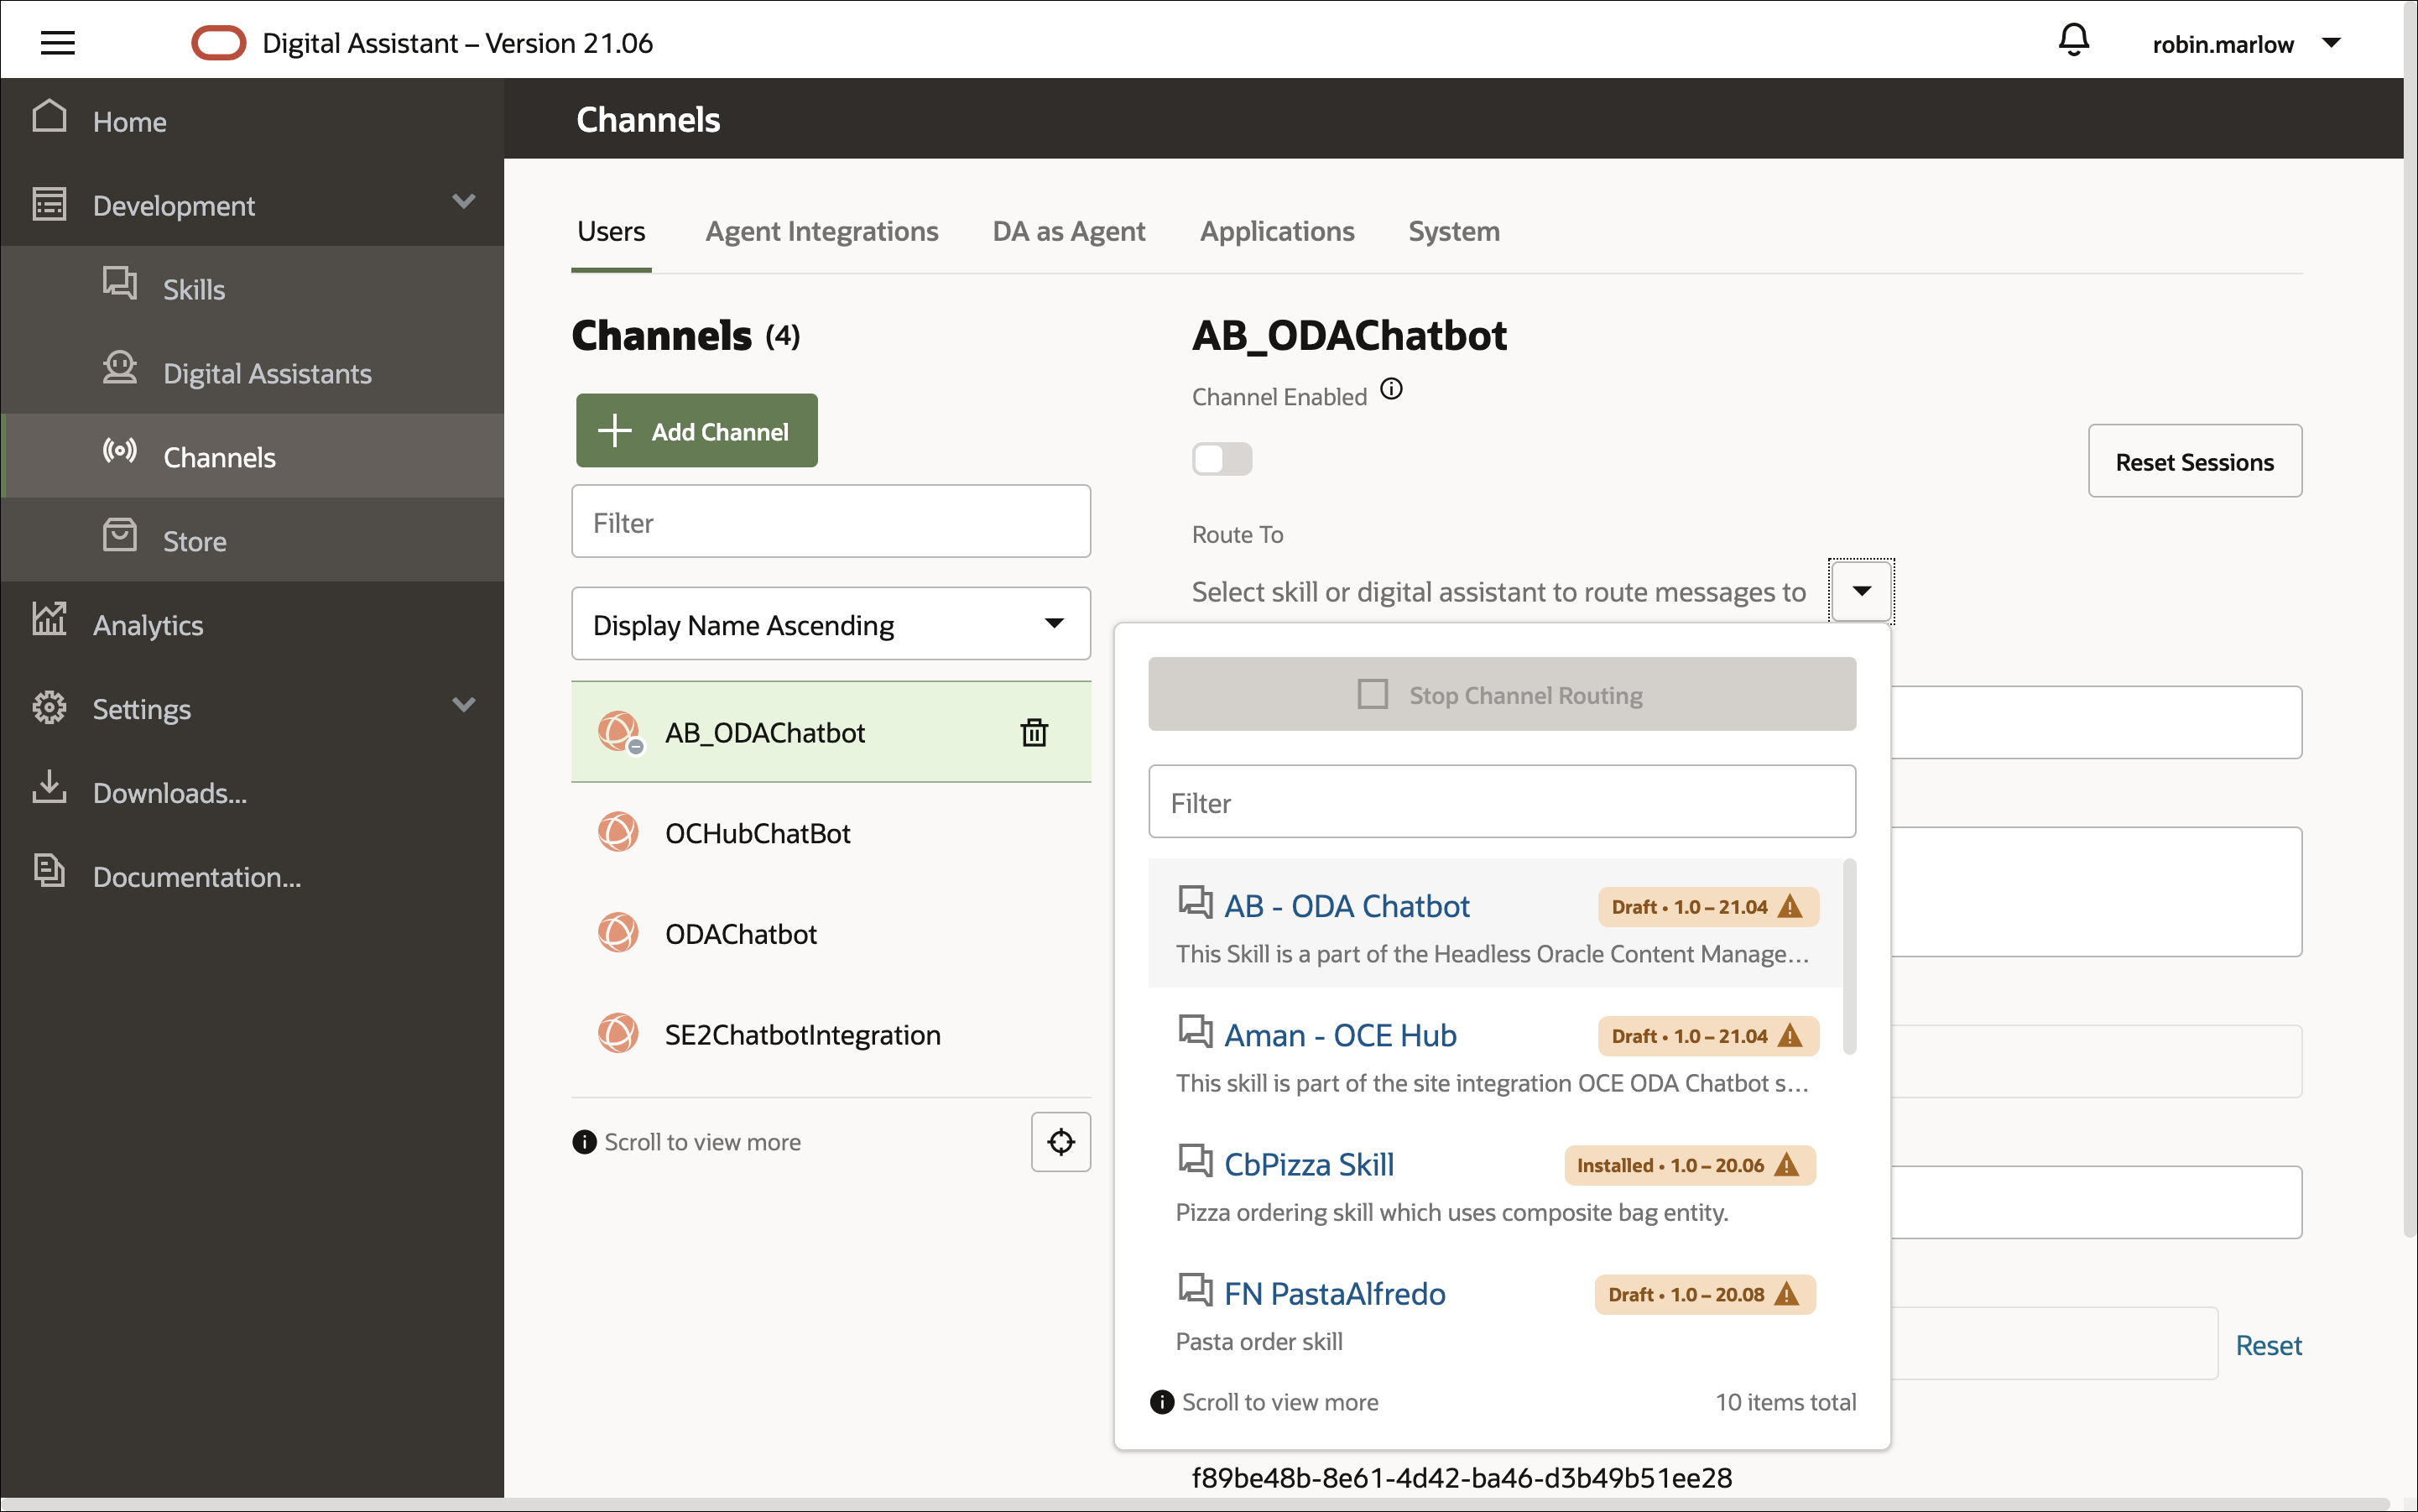
Switch the Channel Enabled option to On.
Note the channel ID that’s shown for this channel. Later in this tutorial, you’ll use this value in your web app.
Also note the Oracle Digital Assistant host and domain (which is referenced as the fully-qualified domain name) from the instance URL that appears in your web browser’s address field, for example oda-xxxx.data.digitalassistant.oci.oraclecloud.com. You’ll use this value later in the tutorial.
Your instance is now set up for you to connect a chatbot on a web page to the skill.
Configure Your Web App
The next step is to configure your web app:
Download the latest version of Oracle Web SDK and unzip into a folder of your choice. You can also go to the download page for this SDK from your Digital Assistant instance by opening the side menu and then clicking Downloads.
Copy native-client-sdk-js/web-sdk.js file from your Oracle Web SDK folder and put it in the WebApp/scripts folder.

The SDK connects to the Oracle Chat Server, which stands between Oracle Digital Assistant and the skill (or digital assistant). The chat server then passes messages to the skill for processing and delivers the skill’s response to the client.
Open the WebApp/scripts/settings.js file in an editor. Set these chatWidgetSettings properties:
URI: The host and domain name that you noted when you created the Oracle Web channel, for example xxxx.xxx.digitalassistant.xxx.xxx.com. Don’t include https://.
channelId: The channel ID for the channel that you created earlier.
Here’s an example:
let chatWidgetSettings = {
      URI: 'xxxx.xxx.digitalassistant.xxx.xxx.com',
      clientAuthEnabled: isClientAuthEnabled,
      channelId: '12a45b92-2c85-88aa-810d-1dc0d1cfe472'
      ...
Save and close the file.
Your Oracle web channel along with your web app are ready. You’re now ready to run your chatbot application and see it in action.
Task 4: Deploy Your Application
Now that we’ve built our Content Management ODA Chatbot sample, we need to see it in a local browser so we can debug any issues and preview the application before it goes live.
Open your WebApp/index.html file in a web browser.
Your web app should display with the chat window opened. If the chat widget isn’t open, click the chat icon to open it.
Converse with the skill to verify that your web app is properly configured.
Build an Oracle Digital Assistant Chatbot with Headless Oracle Content Management
F40618-02
January 2022
Copyright © 2021, 2022, Oracle and/or its affiliates.
Primary Author: Oracle Corporation