Build an Image Gallery in React with Headless Oracle Content Management
Introduction
React is a JavaScript framework widely used to build web applications.
This tutorial will introduce you to the basic steps of building an image viewer using React, with Oracle Content Management as the content management system and its Content SDK. You’ll see how taxonomies can be used to categorize content and how different renditions of digital assets can be used for various use cases. This React sample is available on GitHub.
The tutorial consists of three steps:
- Prepare Oracle Content Management
- Build the Image Gallery in React
- Prepare your application for deployment
Prerequisites
Before proceeding with this tutorial, we recommend that you read the following information first:
To follow this tutorial, you’ll need:
- an Oracle Content Management subscription
- an Oracle Content Management account with the Content Administrator role
- a Windows or Mac computer with Node version 10 or higher
What We’re Building
Our image gallery will consist of several pages of images of food and drinks available at a coffee shop.
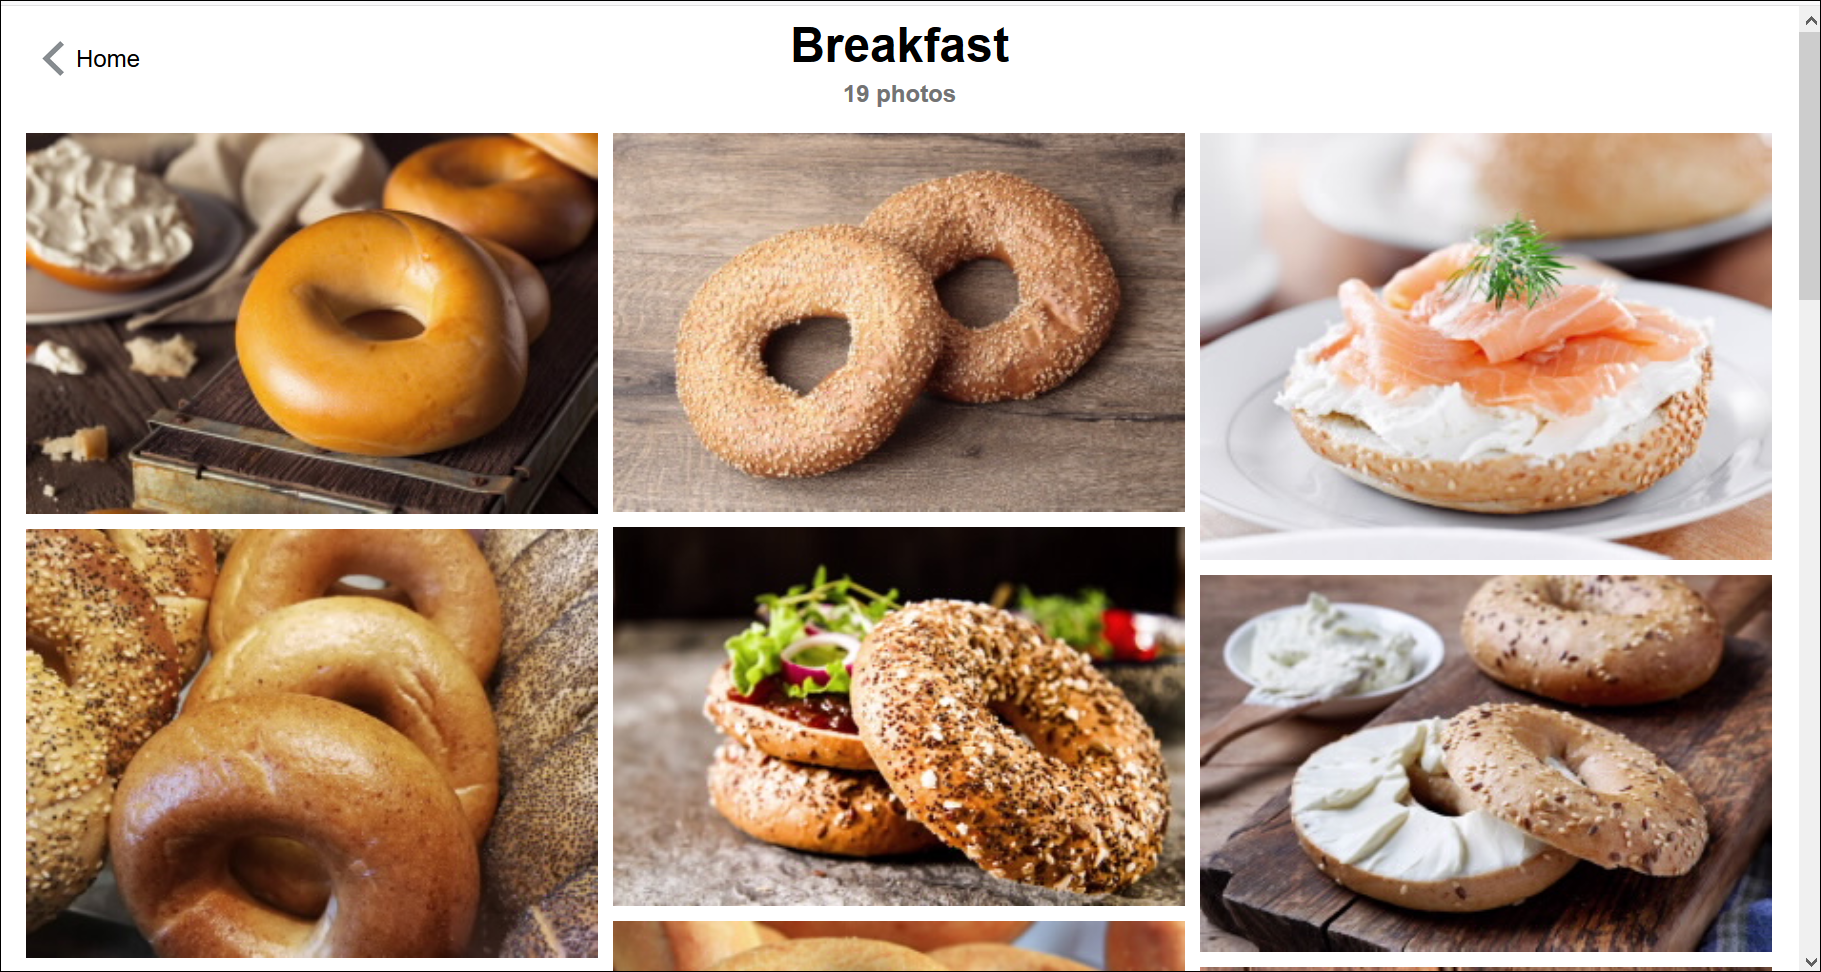
To take a look at what we’re building, here is the end state of our tutorial, a live version of this image gallery site:
https://headless.mycontentdemo.com/samples/oce-react-gallery-sample
Categories are child nodes of a taxonomy and can be organized into hierarchies. For our image gallery, we want to show all available categories regardless of the organization. To accomplish this, we first need to find the available taxonomies, which we do using the Content SDK’s getTaxonomies() method.
Note: The implementation of getTaxonomies uses the REST API resource GET /published/api/v1.1/taxonomies.
Next, we need to get the set of categories for each of the taxonomies. This is done using the Content SDK’s queryTaxonomyCategories() method.
Note: The implementation of queryTaxonomyCategories uses the REST API GET /published/api/v1.1/taxonomies/{id}/categories.
To build the preview of a category, such as Bagels, we need to get a count of the number of images and the URLs of the first four images.
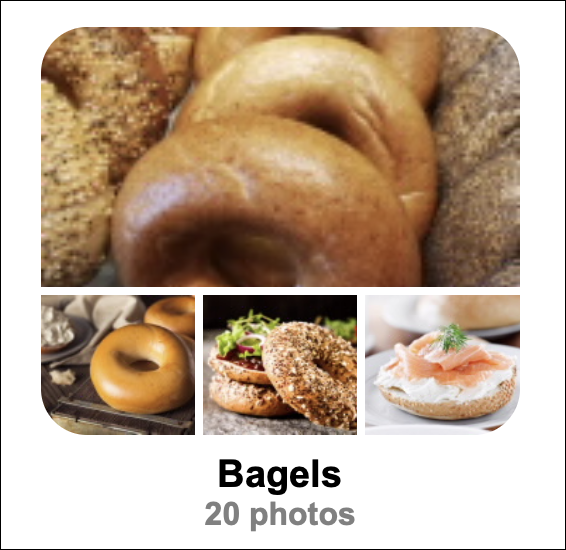
Our request to find the published assets in the category specifies the category criteria through a query string, as follows:
"(taxonomies.categories.nodes.id eq 892CD6BC4F654249A00CB7942EE8C773)"To optimize the image loading, we’ll use a rendition of the image named ‘Thumbnail’. See retrieveThumbnailURL(), in src/scripts/services.js, for the code that examines the set of available renditions for each image.
Note: In addition to publishing the digital assets that we want to view, you also need to publish the taxonomies to the channel.
To proceed, you’ll need to have an active subscription to Oracle Content Management and be logged in with the Content Administrator role.
Step 1: Prepare Oracle Content Management
This tutorial is based on the assumption that you’ve created your asset repository and currently have an empty content model (that is, no content types created).
If you don’t already have an Oracle Content Management instance, see the Quick Start to learn how to register for Oracle Cloud, provision an Oracle Content Management instance, and configure Oracle Content Management as a headless CMS.
For this tutorial, you’ll need to create a content model in either of two ways. There’s a downloadable asset pack available that will fill your empty repository with content types and associated content, or you can create your own content model and content.
To prepare Oracle Content Management:
- Create a channel and asset repository.
- Import the Oracle Content Management Samples Asset Pack
- Upload Your Own Image Assets
- Create Taxonomies and Link Them to Image Assets
Create a Channel and Asset Repository
You first need to create a channel and an asset repository in Oracle Content Management so you can publish content.
To create a channel and an asset repository in Oracle Content Management:
Log in to the Oracle Content Management web interface as an administrator.
Choose Content in the left navigation menu and then choose Publishing Channels from the selection list in the page header.
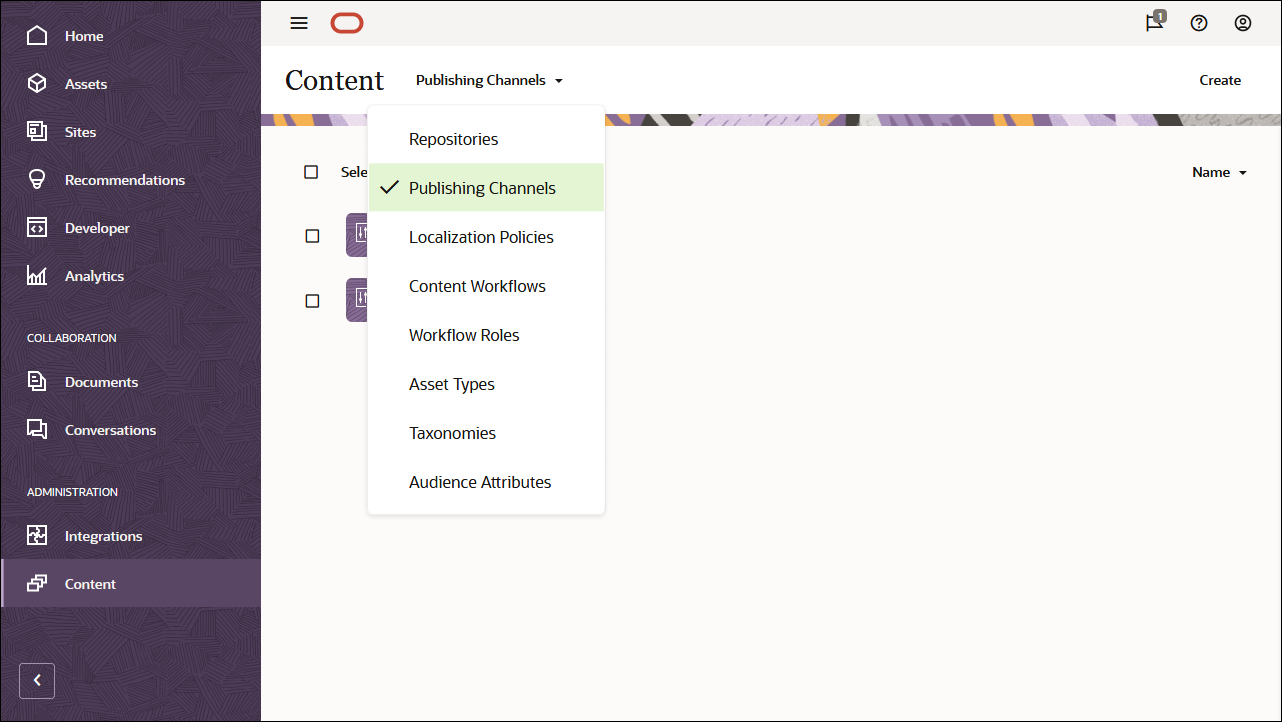
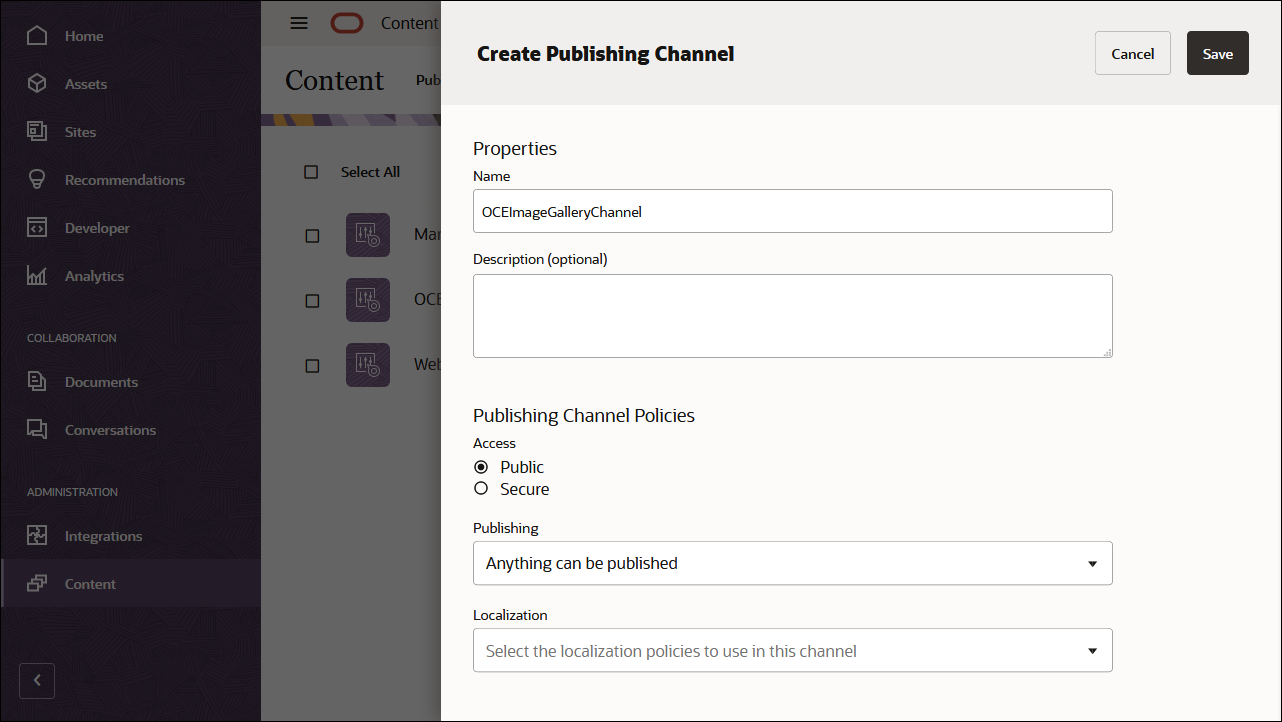
In the upper right corner, click Create to create a new channel. Name the channel ‘OCEImageGalleryChannel’ for the purpose of this tutorial, and keep the access public. Click Save to create the channel.
Choose Content in the left navigation menu and then choose Repositories from the selection list in the page header.
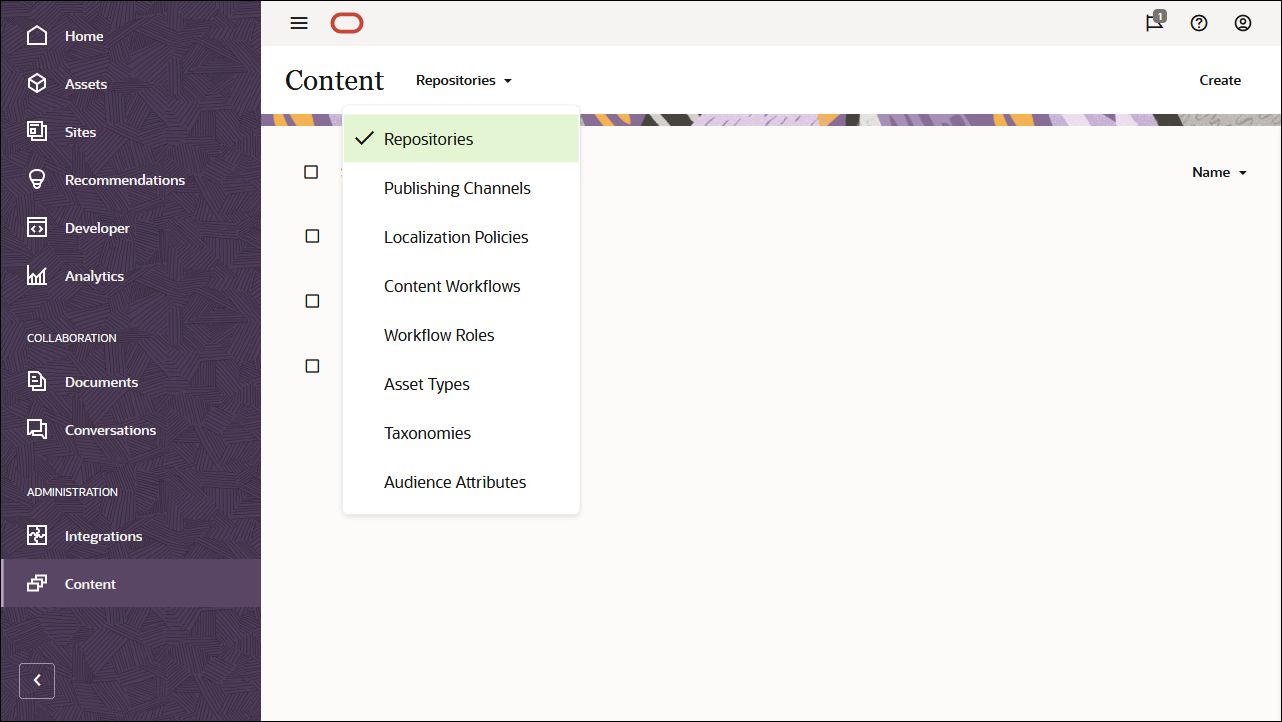
In the upper right corner, click Create to create a new asset repository. Name the asset repository ‘OCEImageGalleryRepository’ for the purpose of this tutorial.
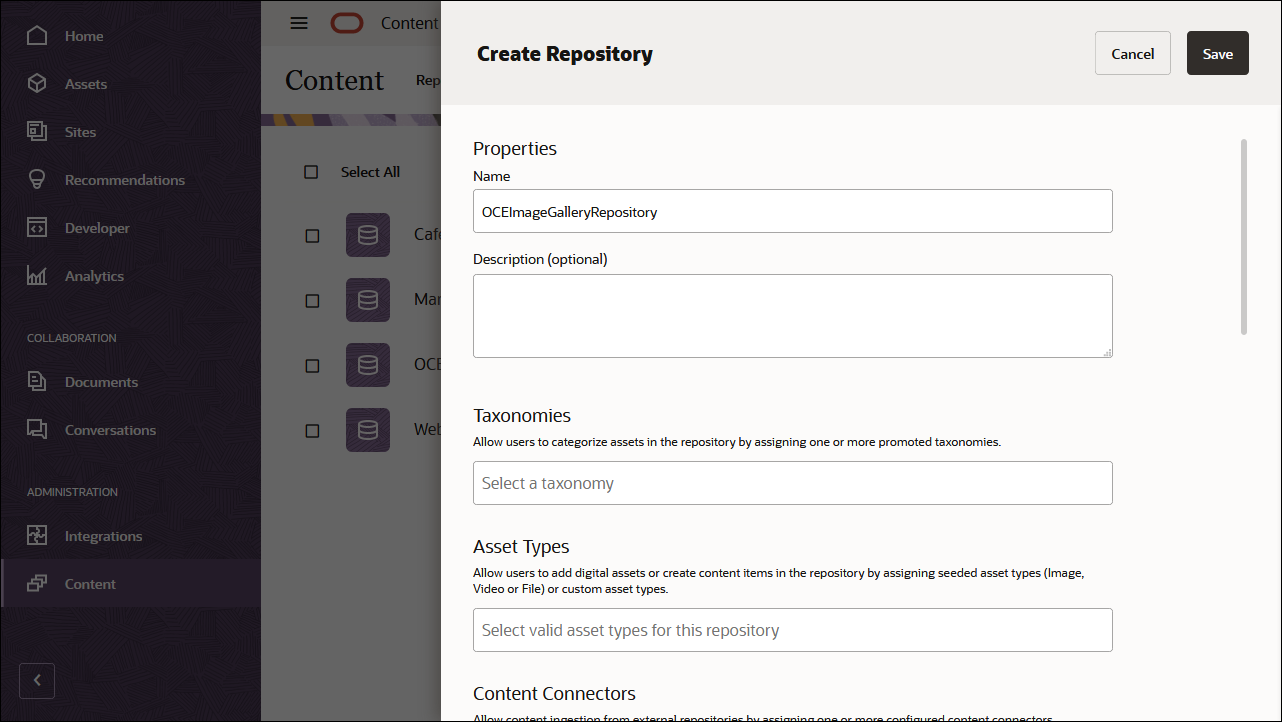
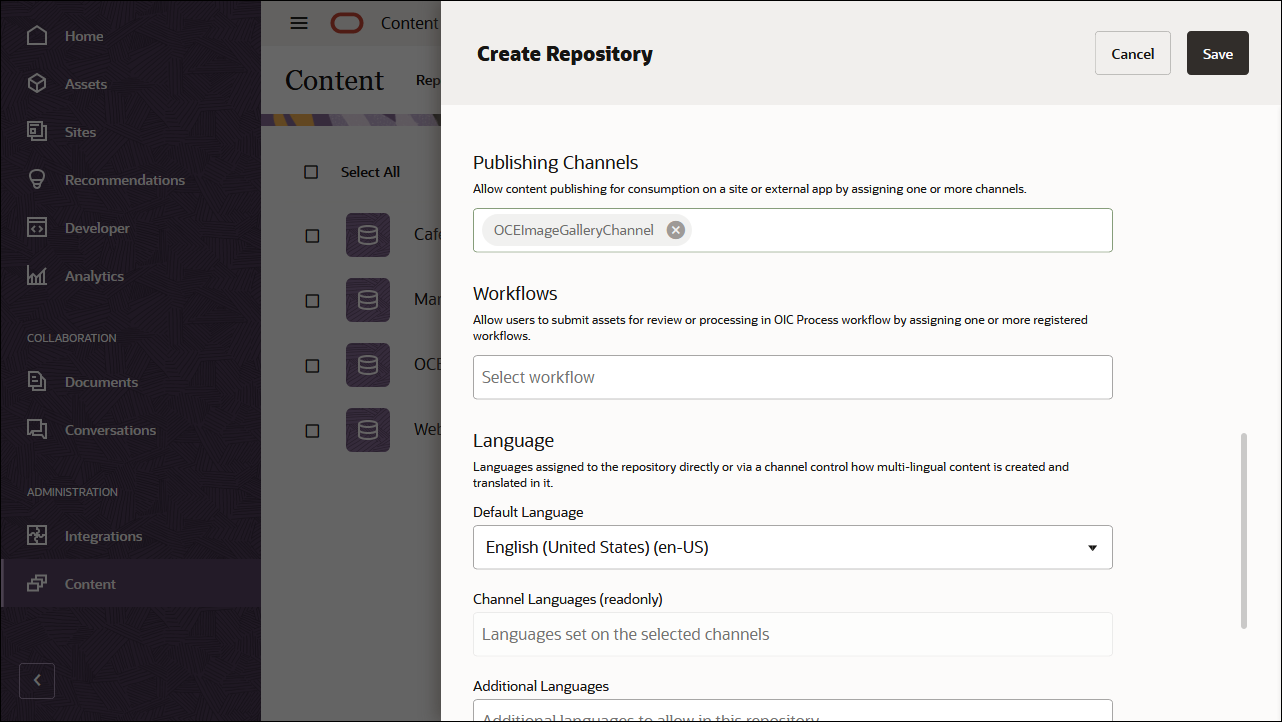
In the Publishing Channels field, select OCEImageGalleryChannel to indicate to Oracle Content Management that content in the OCEImageGalleryRepository repository can be published to the OCEImageGalleryChannel channel. Click Save when you’re done.
Import the Oracle Content Management Samples Asset Pack
You can download a preconfigured Oracle Content Management sample assets pack that contains all required content types and assets for this tutorial.
You can upload a copy of the content we’re using in this tutorial from the Oracle Content Management Samples Asset Pack. This will let you experiment with the content types and modify the content. You can download the asset pack archive, OCESamplesAssetPack.zip, and extract it to a directory of your choice:
Download the Oracle Content Management Samples Asset Pack (OCESamplesAssetPack.zip) from the Oracle Content Management downloads page. Extract the downloaded zip file to a location on your computer. After extraction, this location will include a file called OCEImageGallery_data.zip.
Log in to the Oracle Content Management web interface as an administrator.
Choose Content in the left navigation menu and then choose Repositories from the selection list in the page header. Now select OCEImageGalleryRepository and click the Import Content button in the top action bar.
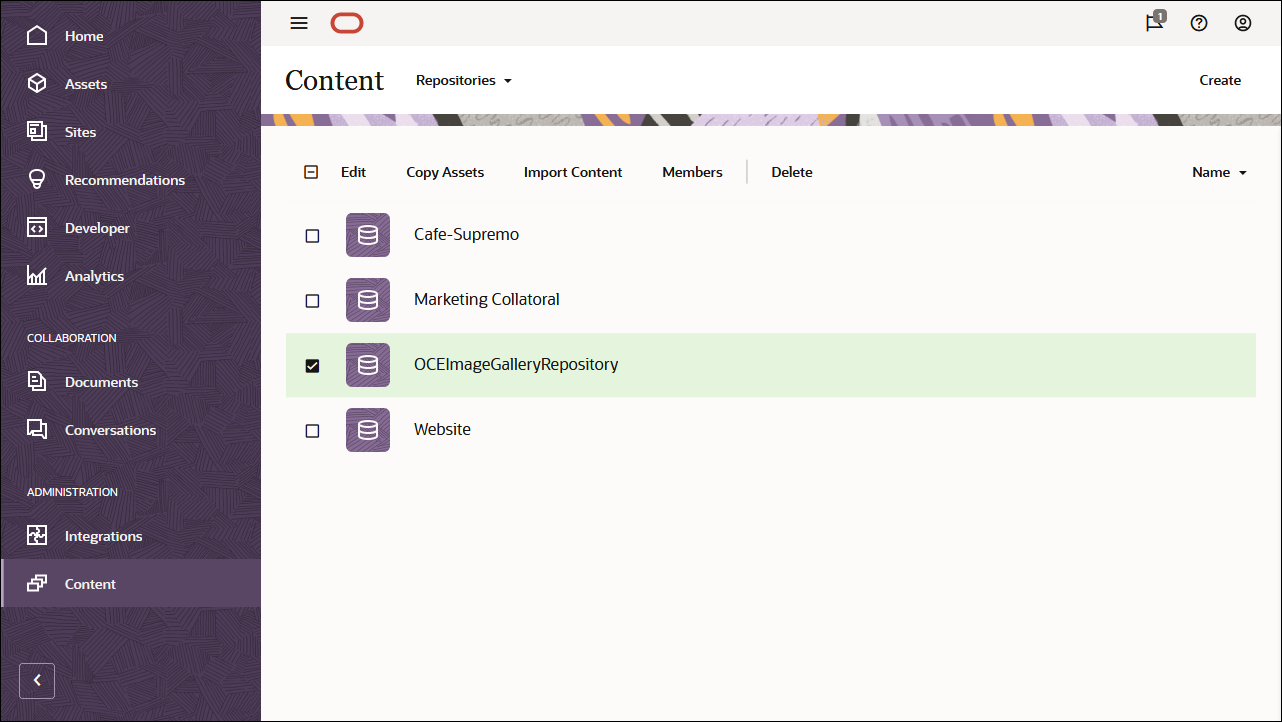
Upload OCEImageGallery_data.zip from your local computer to the Documents folder.
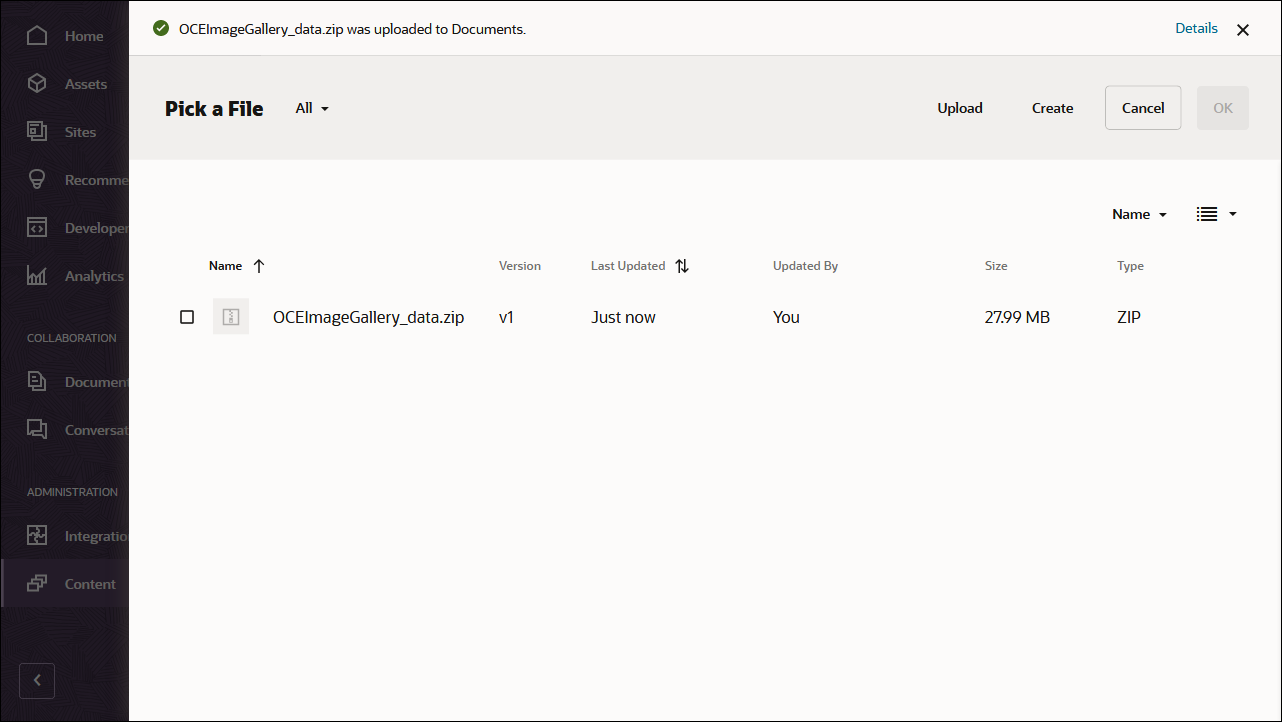
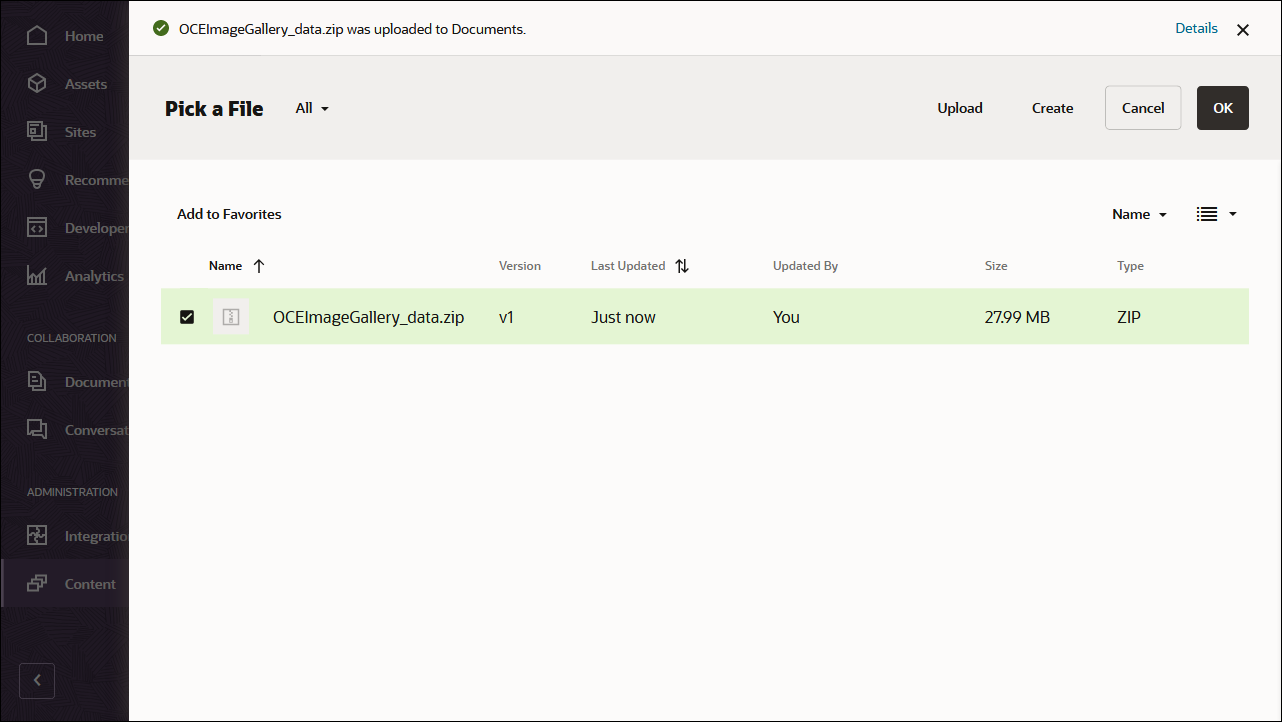
Once it’s uploaded, select OCEImageGallery_data.zip and click OK to import the contents into your asset repository.
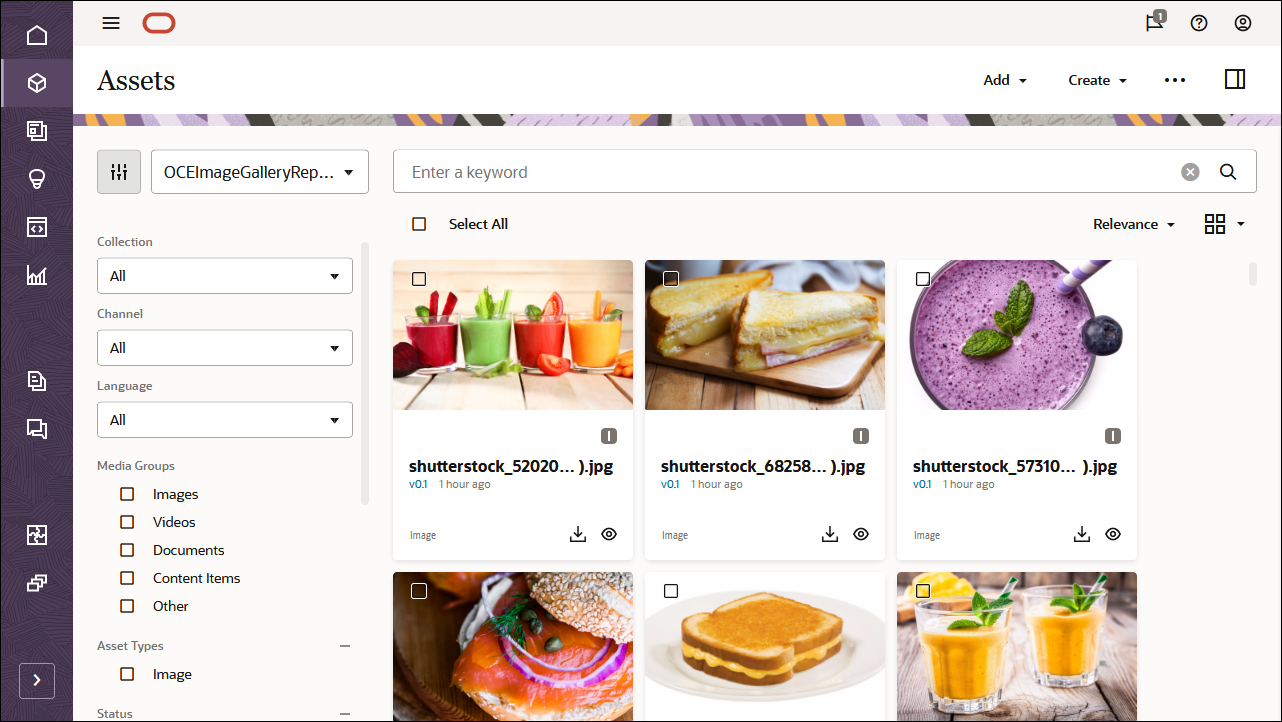
After the content has been imported successfully, navigate to the Assets page and open the OCEImageGalleryRepository repository. You’ll see that all the related images and content items have now been added to the asset repository.
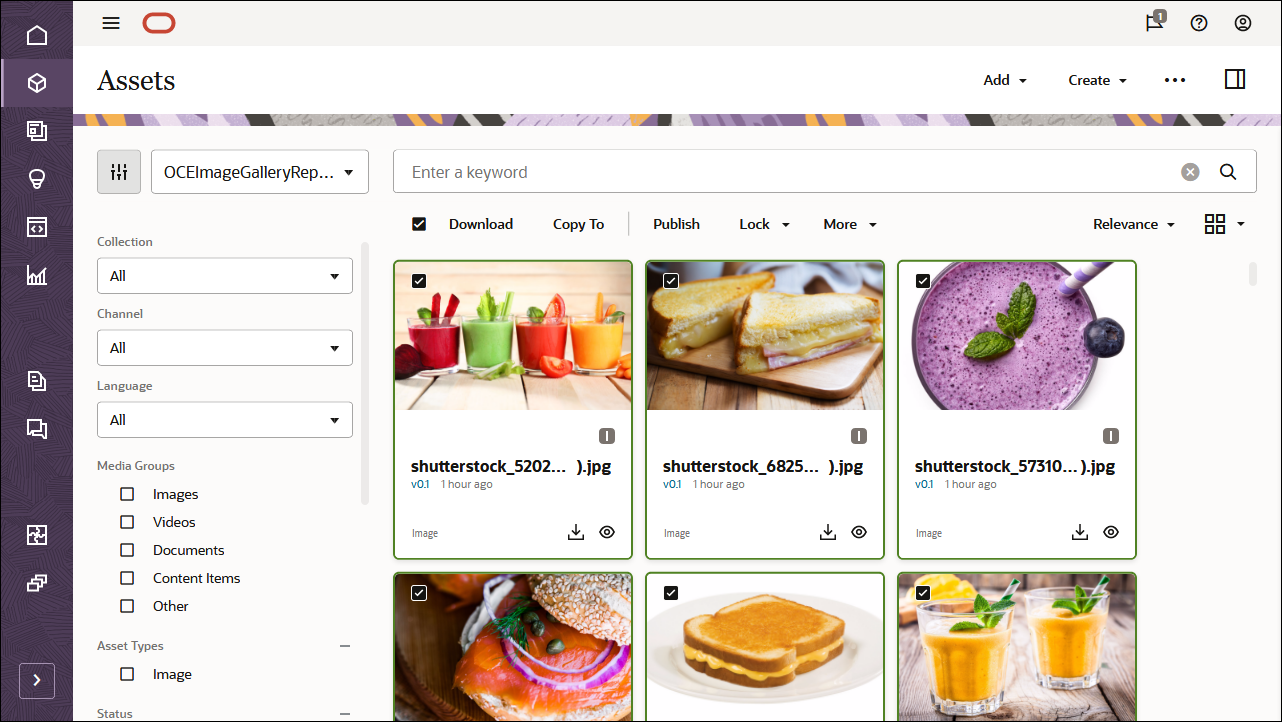
Click Select All on the top left and then Publish to add all the imported assets to the publishing channel that you created earlier, OCEImageGalleryChannel.
Before publishing, you need to validate all the assets. First add OCEImageGalleryChannel as a selected channel, and then click the Validate button.
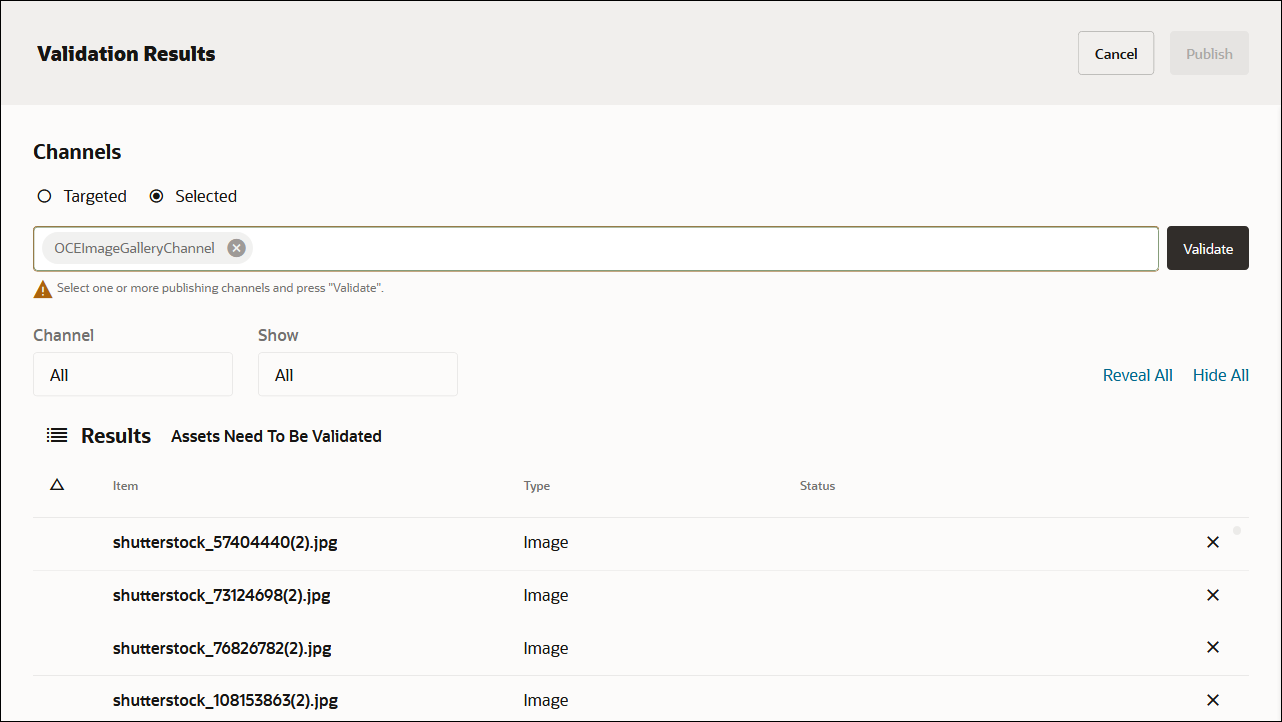
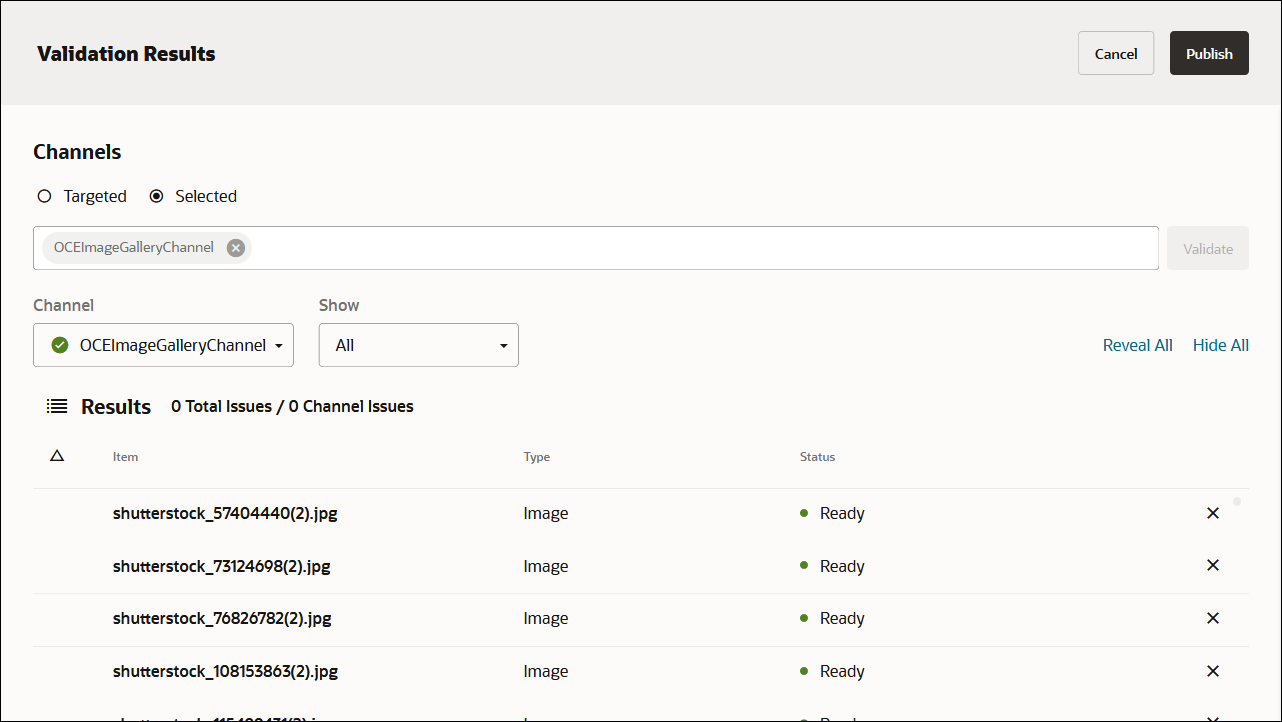
After the assets have been validated, you can publish all the assets to the selected channel by clicking the Publish button in the top right corner.
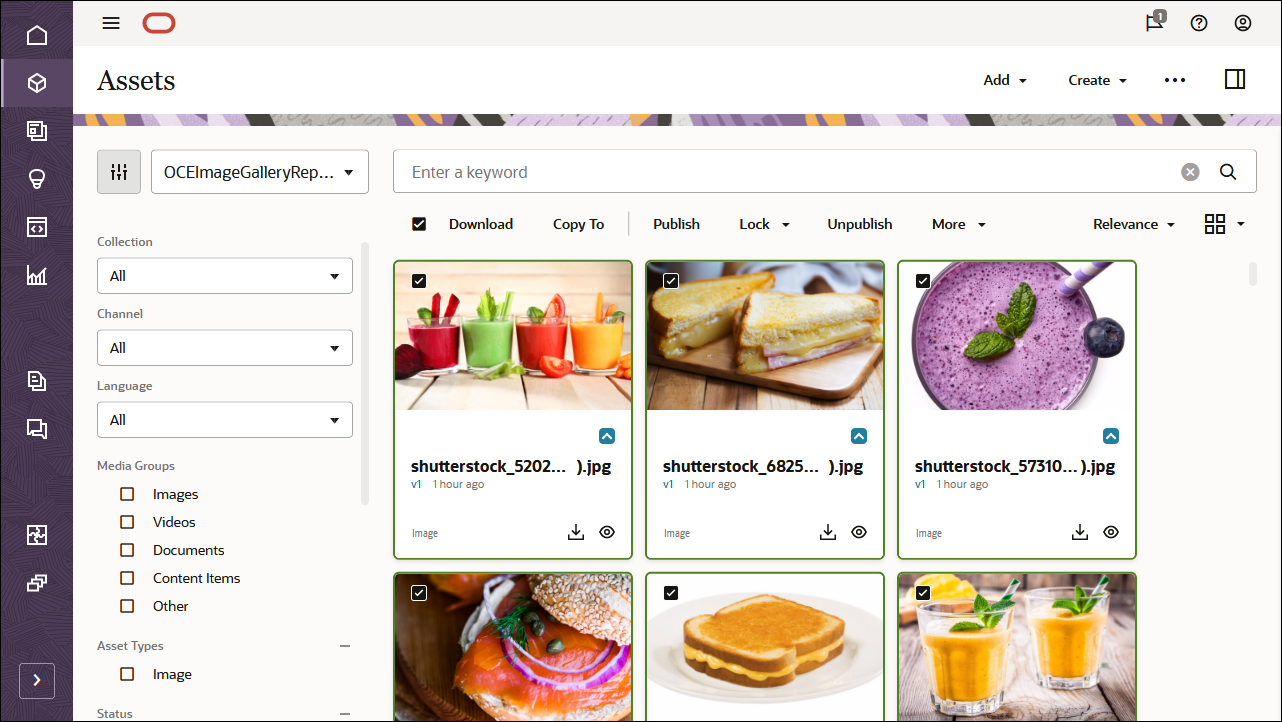
Once that’s done, you can see on the Assets page that all assets have been published. (You can tell by the icon above the asset name.)
After importing the Oracle Content Management Samples Asset Pack, you can start building the image gallery in React.
Upload Your Own Image Assets
For this tutorial, we’re using an asset repository called ‘OCEImageGalleryRepository’ to build the home page for our gallery site. This home page consists of the title ‘Image Gallery’ as well as image collection albums that have image assets inside.
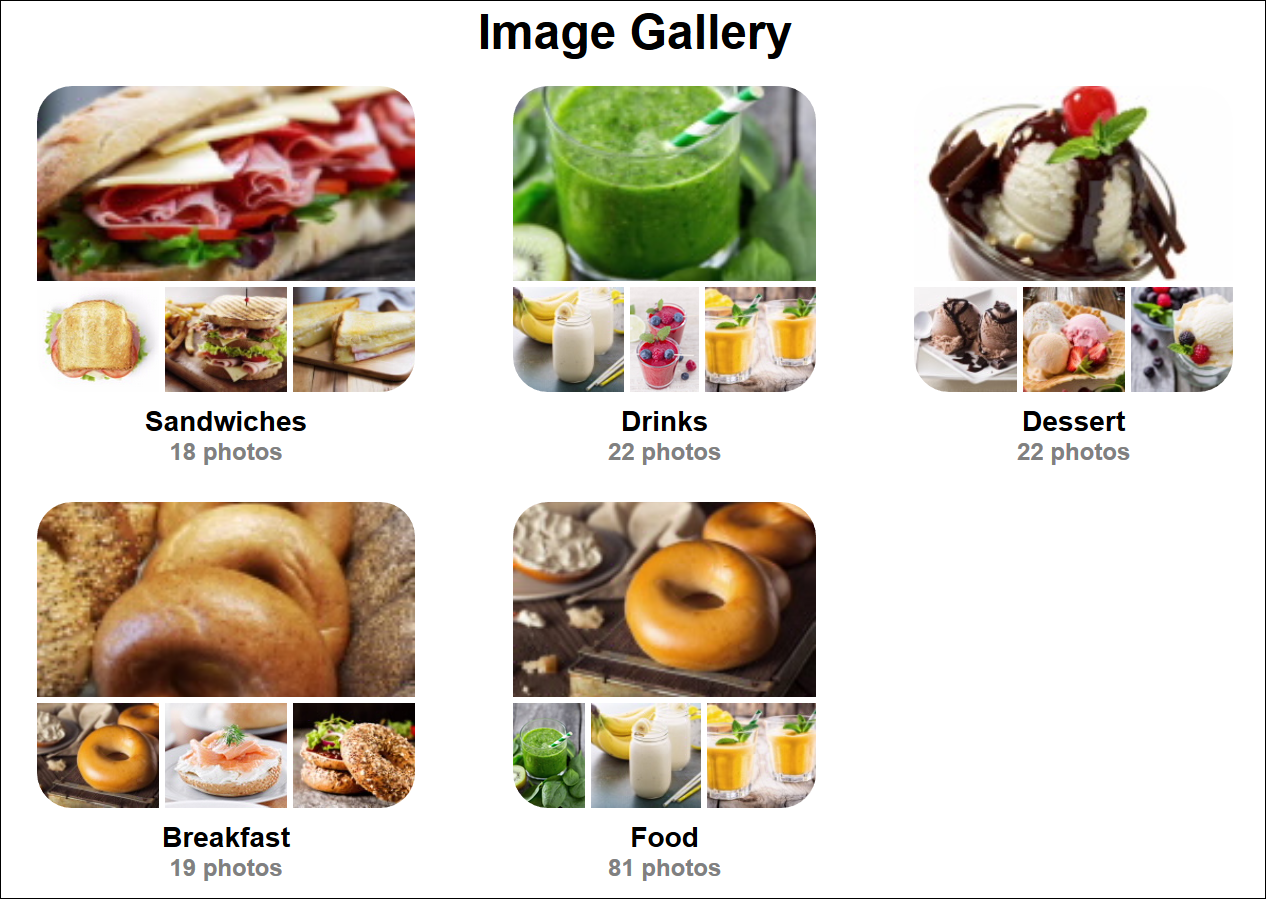
To add image assets to the gallery asset repository:
Log in to the Oracle Content Management web interface.
Click Assets in the left navigation menu.
Open the OCEImageGalleryRepository repository.
Click Add in the upper right corner of the page to add image assets to the gallery asset repository.
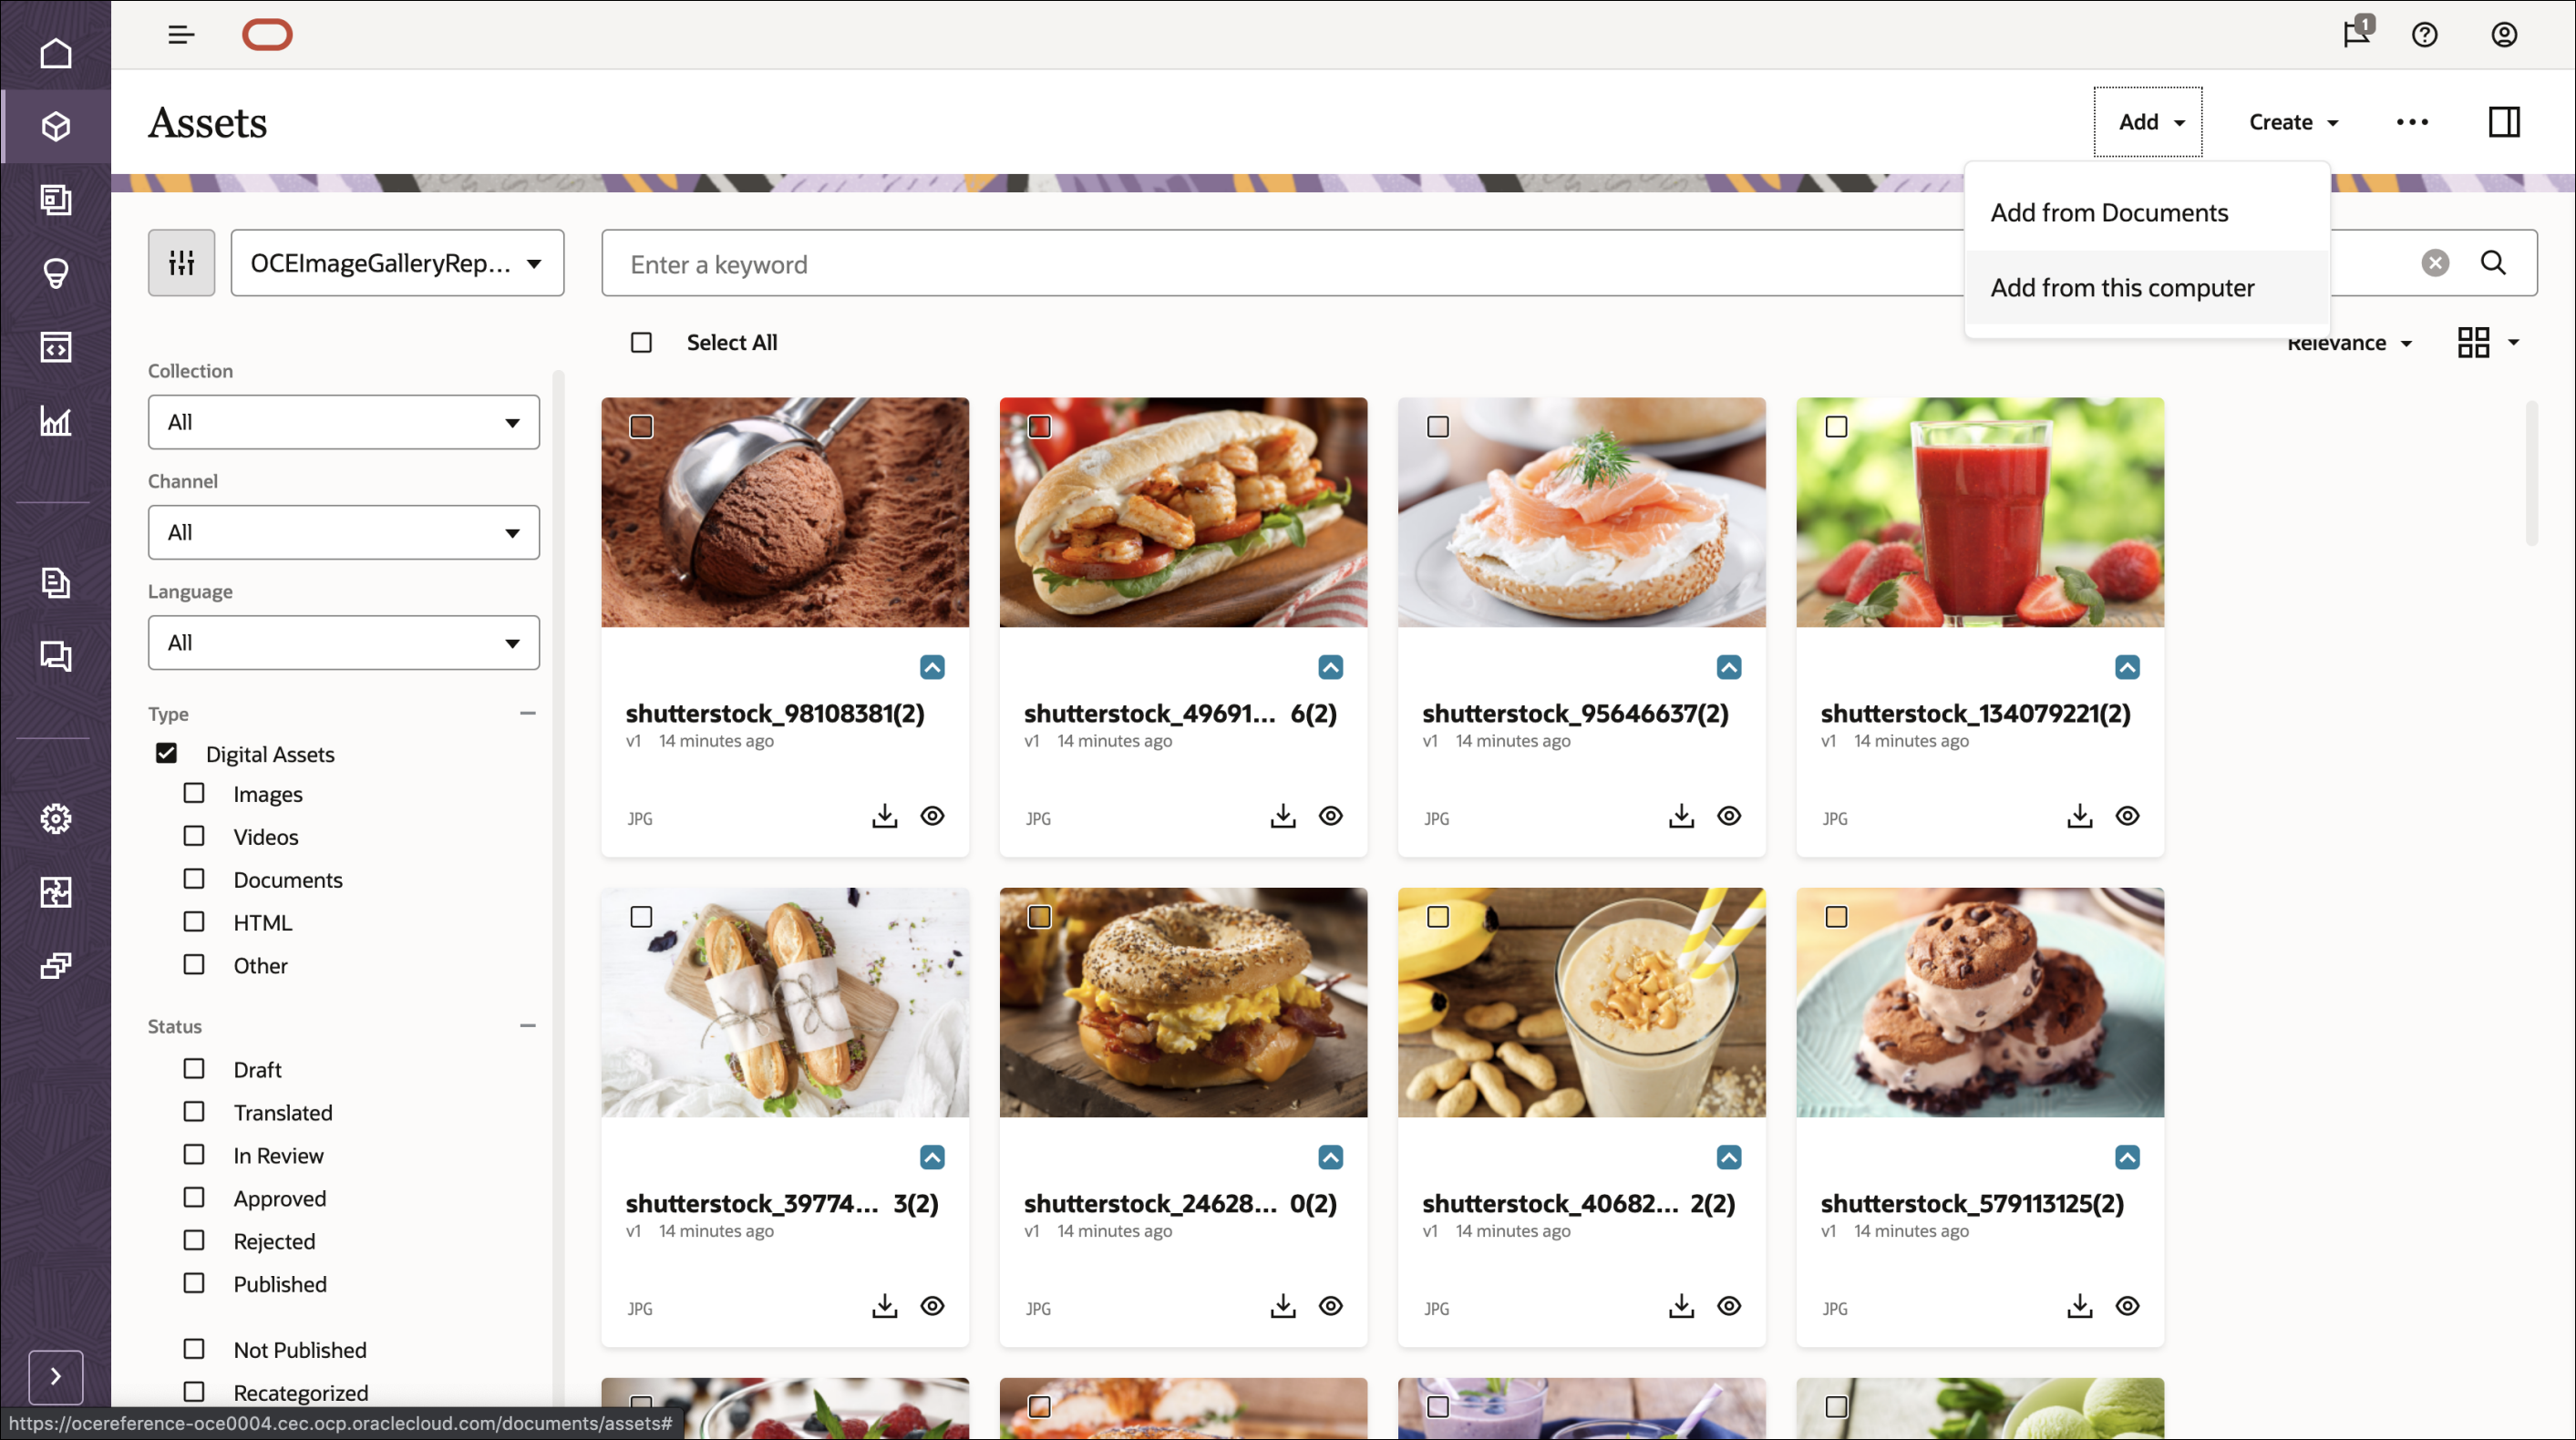
Upload your own new assets from your local computer or choose existing assets already in Oracle Content Management.
Create Taxonomies and Link Them to Image Assets
You need to create a taxonomy in Oracle Content Management and then assign categories to the assets in your repository.
To create a taxonomy in Oracle Content Management:
Log in to the Oracle Content Management web interface as an administrator.
Choose Content in the left navigation menu and then choose Taxonomies from the selection list in the page header.
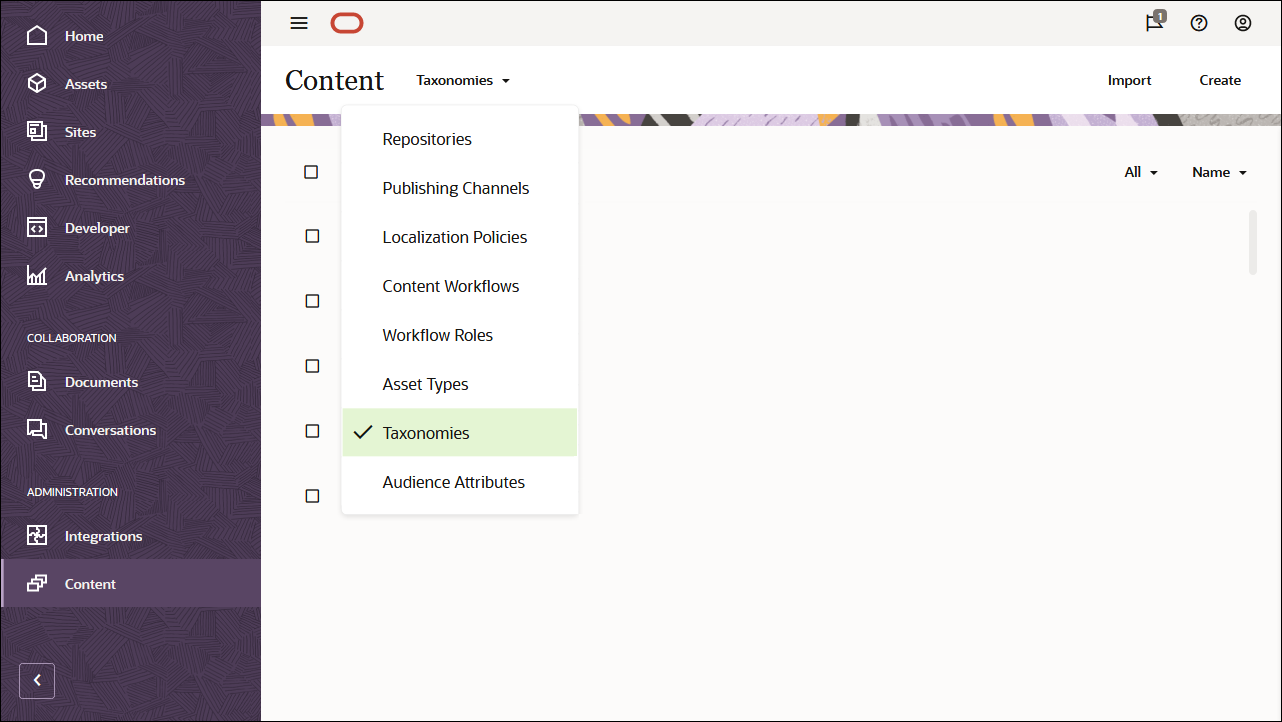
In the upper right corner, click Create to create a new taxonomy. Name the channel ‘OCEImageGalleryTaxonomy’ for the purpose of this tutorial.
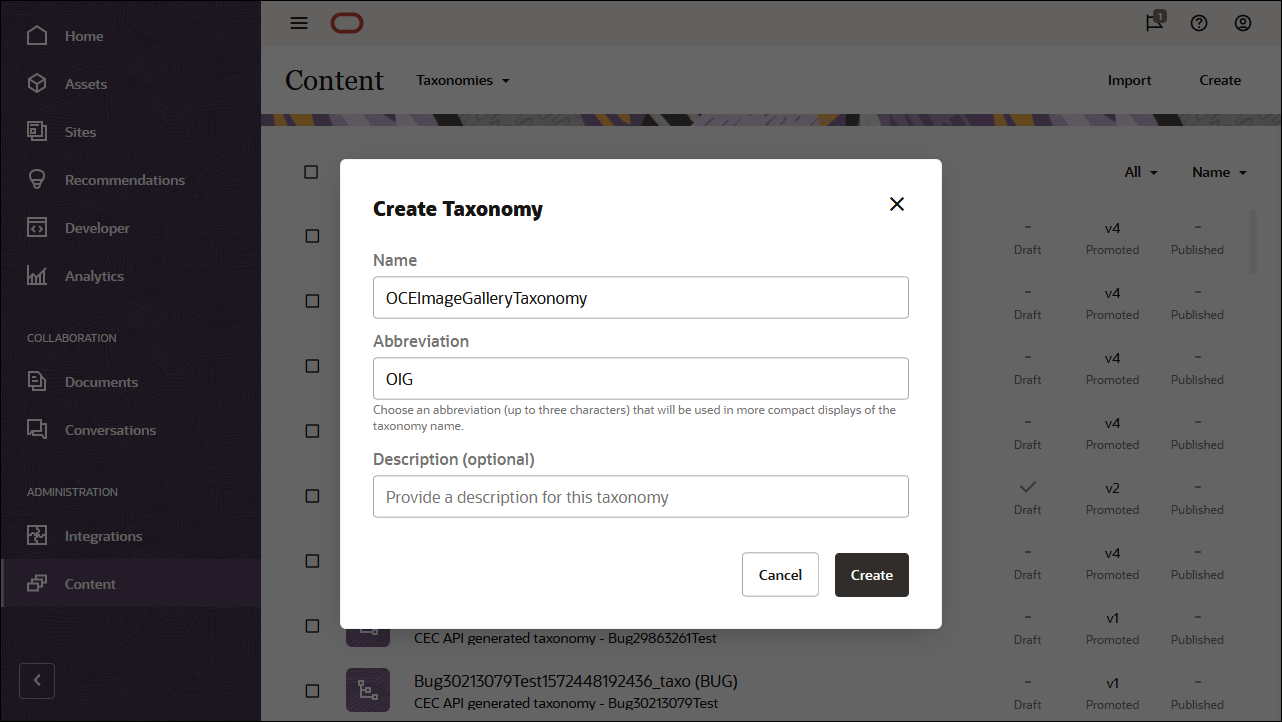
Click Create.
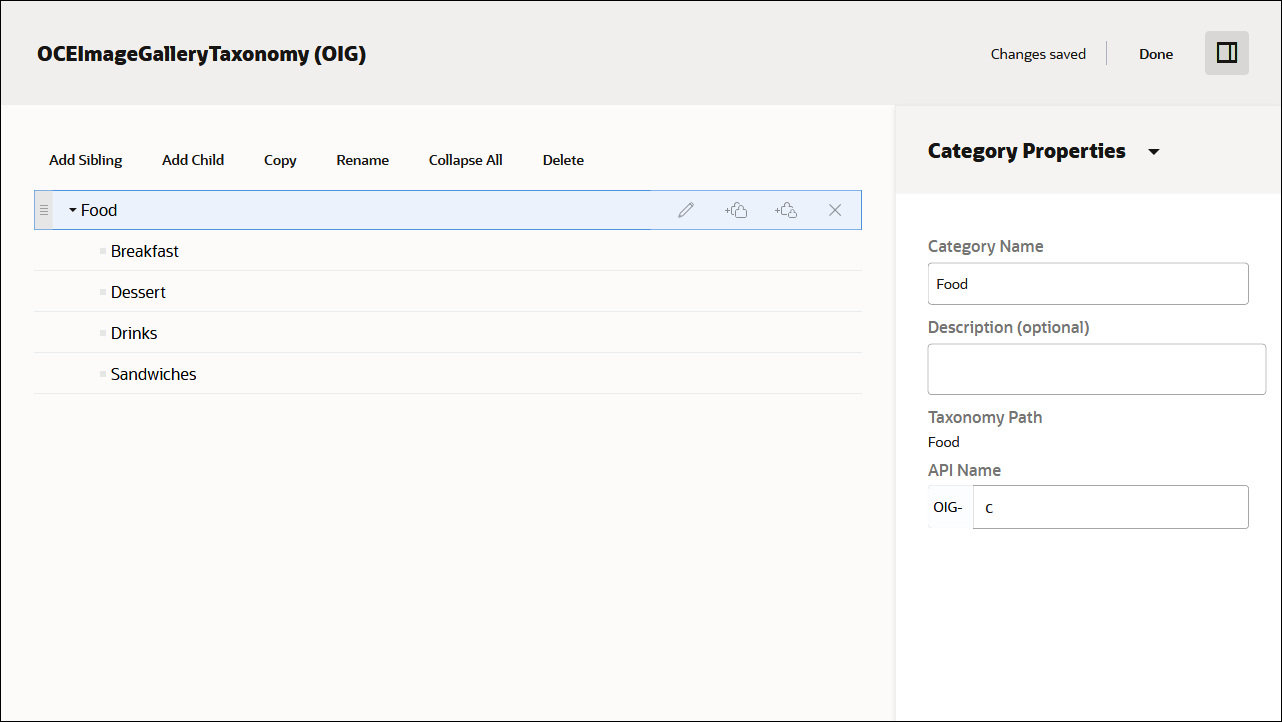
Now build your taxonomy by adding categories. Click Add a category.
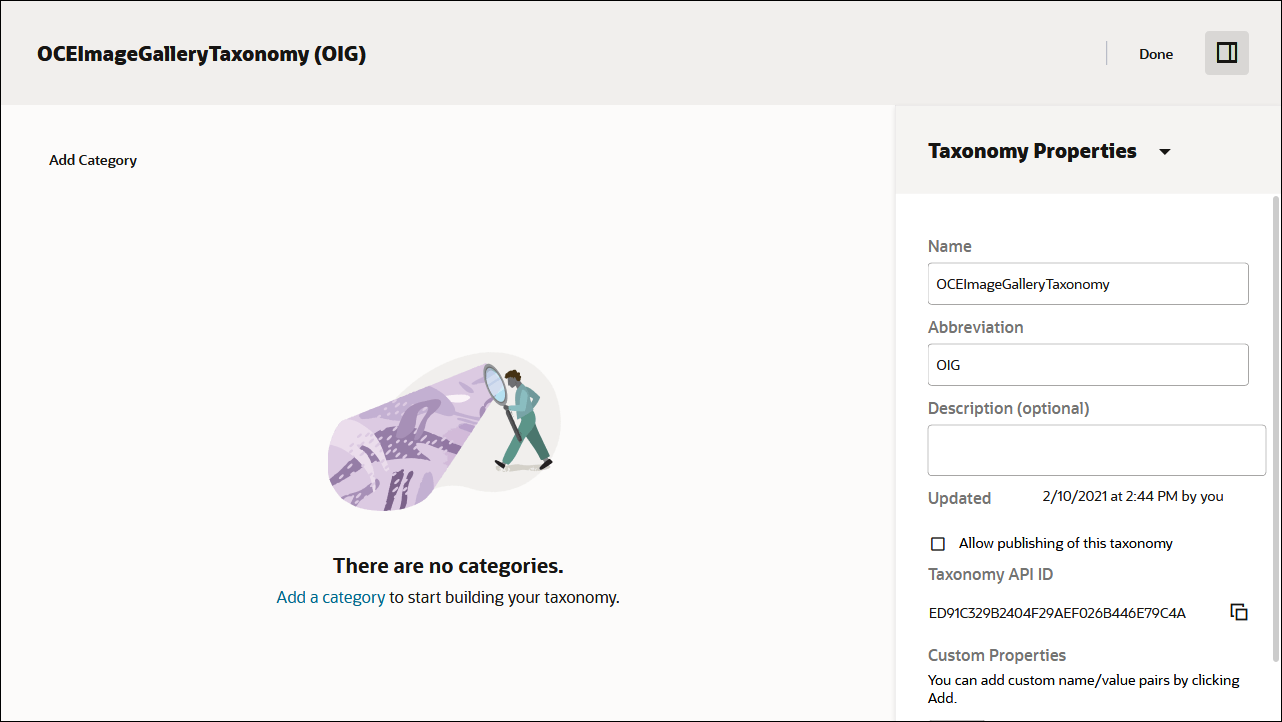
Name the parent category item ‘Food’, and add the following child categories:
- Breakfast
- Dessert
- Drinks
- Sandwiches
Click Done at the top right of the screen.
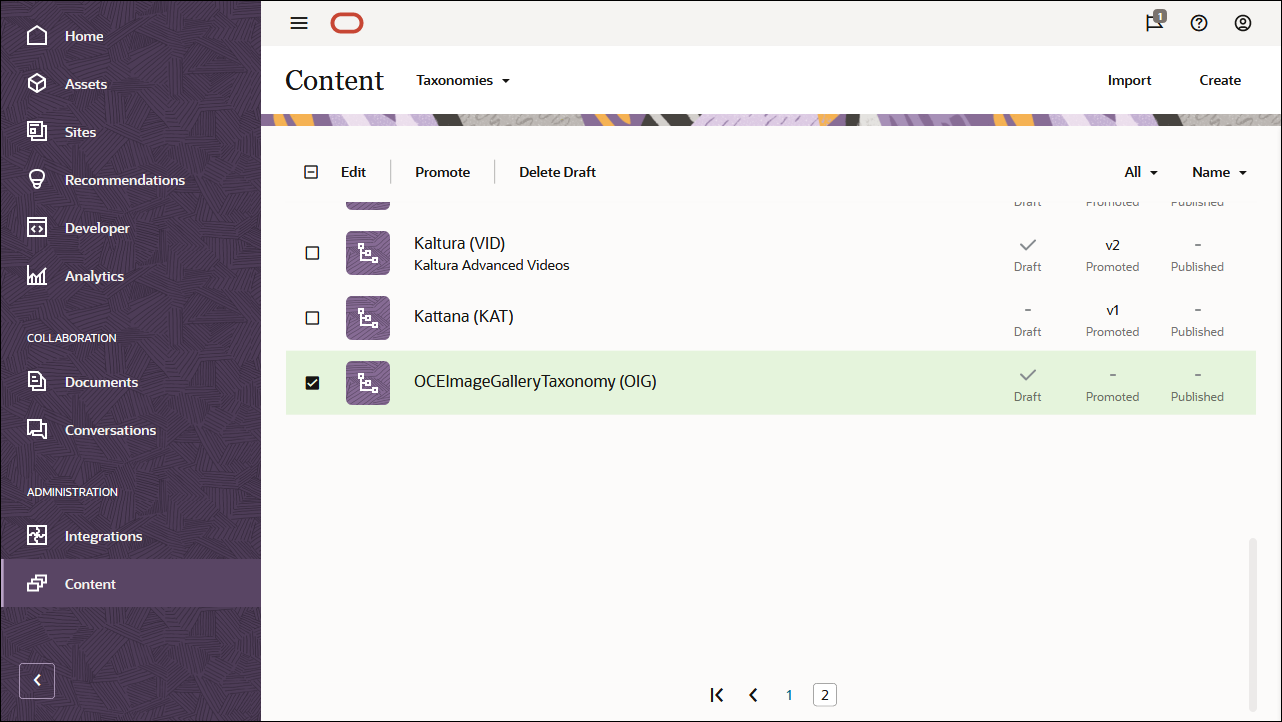
On the Taxonomies page, select the OCEImageGalleryTaxonomy taxonomy and click Promote in the actions bar to make it available for use in your asset repositories.
Next, edit the OCEImageGalleryRepository repository to enable the OCEImageGalleryTaxonomy taxonomy for that repository:
Log in to the Oracle Content Management web interface as an administrator.
Choose Content in the left navigation menu and then choose Repositories from the selection list in the page header.
Select and edit the OCEImageGalleryRepository repository.
In the Taxonomies field, select OCEImageGalleryTaxonomy, so you can assign categories from that taxonomy to the assets in the OCEImageGalleryRepository repository.
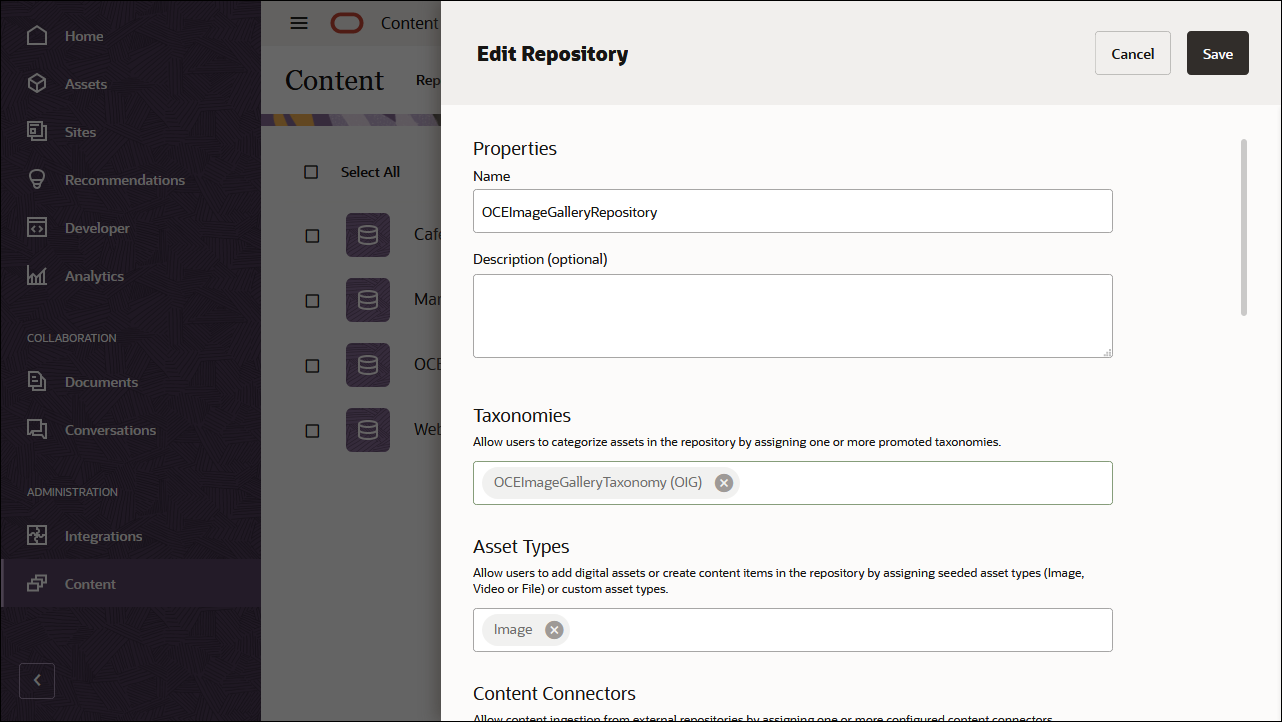
Click Save.
Then, assign taxonomy categories to each of the image assets in the OCEImageGalleryRepository repository:
Log in to the Oracle Content Management web interface.
Click Assets in the left navigation menu.
Open the OCEImageGalleryRepository repository.
Select one or more image assets, click More in the actions bar, and then choose Categories from the menu.
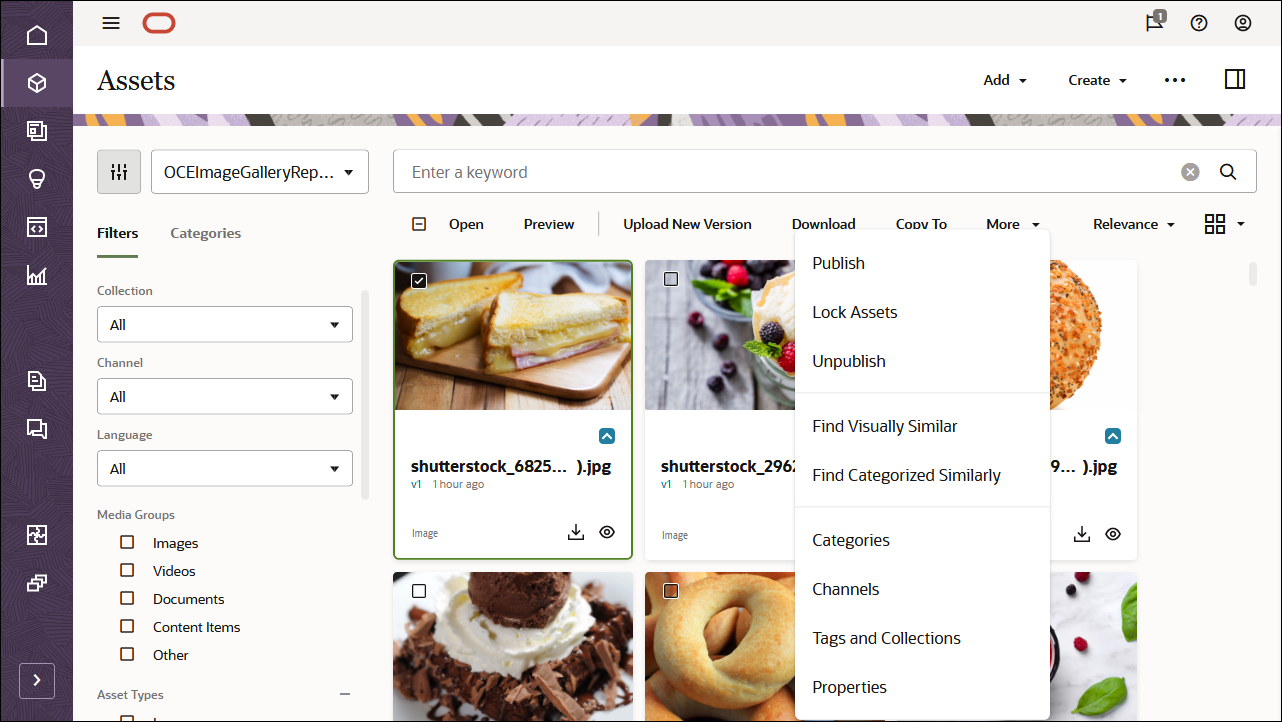
In the Categories panel, click Add Category. Search for the category name in the search bar or select a category from the taxonomy hierarchical structure, and click Add to assign the selected category. You can assign multiple categories to an asset.
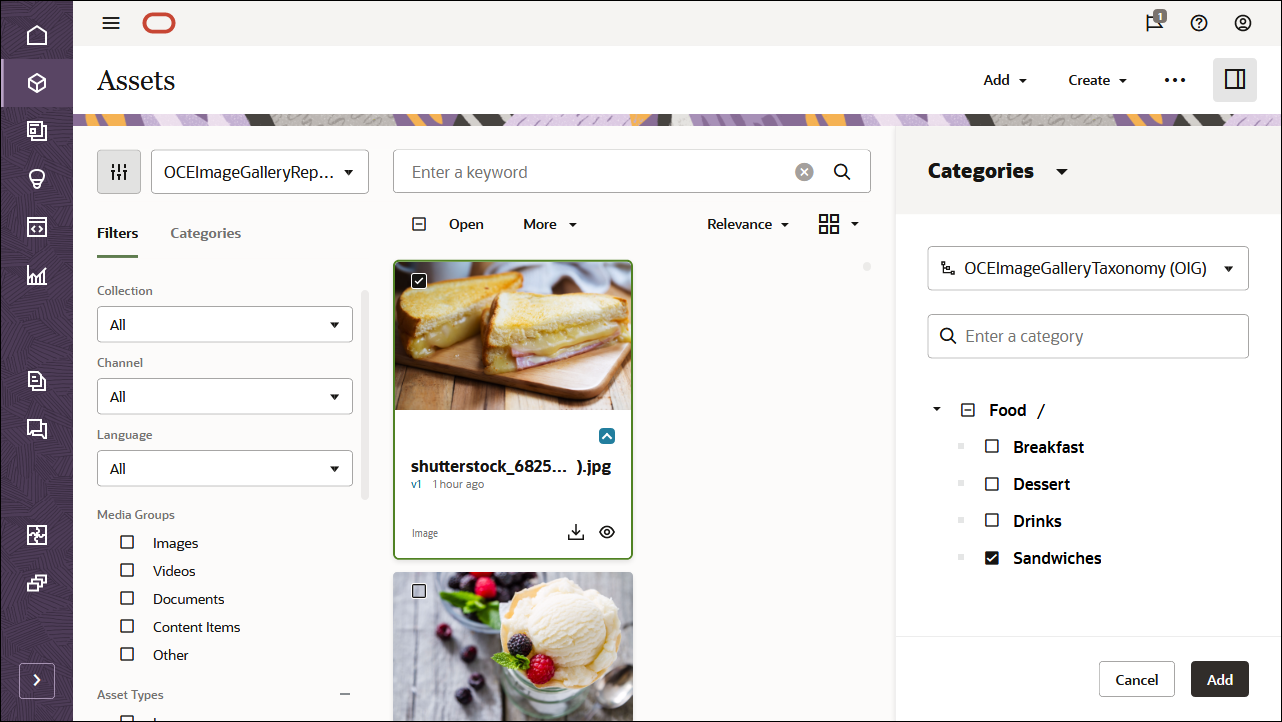
After you’re done assigning taxonomies to all the image assets, select all assets in your repository and publish them to the OCEImageGalleryChannel channel.
Step 2: Build the Image Gallery in React
To consume our Oracle Content Management content in a React application, we can use the React image gallery sample, which is available as an open-source repository on GitHub.
Note: Remember that using the React sample is optional, and we use it in this tutorial to get you started quickly. You can also build your own React application.
To build the image gallery in React:
- Clone the sample repository and install dependencies
- Configure the React application
- Work with the Oracle Content Management Content SDK
- Use the Content SDK to Fetch Content
Clone the Sample Repository and Install Dependencies
The React blog sample is available as an open-source repository on GitHub.
You’ll first need to clone the sample from GitHub to your local computer and change your directory into the repository root:
git clone https://github.com/oracle/oce-react-gallery-sample.git
    cd oce-react-gallery-sample
Now that you have your code base, you need to download dependencies for the application. Run the following command from the root directory:
npm installConfigure the React Application
In this React image gallery sample, you need to configure a few pieces of information so that your Oracle Content Management Content SDK (and any other requests) can target the correct instance URL and API version with the correct channel token. These values are used in src/scripts/server-config-utils.js to instantiate a new delivery client.
This application uses an .env file that is read by Webpack when it bundles the client and server applications. By using webpack.DefinePlugin, any values read from the .env file can be made available to anywhere in the application.
Open the .env file in a text editor. You’ll see the following information:
# The connection details for the Oracle Content Management server to be used for this application
    SERVER_URL=https://samples.mycontentdemo.com
    API_VERSION=v1.1
    CHANNEL_TOKEN=e0b6421e73454818948de7b1eaddb091
Change each key-value pair to reflect your instance URL, the API version you want to target, and the channel token associated with your publishing channel. The channel for this tutorial is OCEImageGalleryChannel.
The other setting in the file is the port on which your server application will run. Adjust the setting according to your environment.
# The port the Express Server is to run on
    EXPRESS_SERVER_PORT=8080
Work with the Oracle Content Management Content SDK
Oracle Content Management offers an SDK to help discover and use content in your applications. The SDK is published as an NPM module, and the project is hosted on GitHub.
Learn more about the SDK here.
The SDK has been registered as a runtime dependency of this project in the package.json file.
Use the Content SDK to Fetch Content
We can now leverage the Content SDK to fetch content so that we can render it in our React application.
The Content SDK uses a DeliveryClient object to specify the endpoint. You can make all requests using that client object.
The src/scripts folder contains the code for getting data from Oracle Content Management using the Content SDK.
The src/scripts/server-config-utils.js file imports the Content SDK and then creates a delivery client using the configuration specified in .env.
The following command imports the SDK:
import { createDeliveryClient, createPreviewClient } from '@oracle/content-management-sdk';The following command creates the delivery client:
return createDeliveryClient(serverconfig);The src/scripts/services.js file contains all the code to get data for the application. There’s one main function for each page component in the application to get all the data for that page.
For rendering the images, the services.js provides a helper method to retrieve the sourceset for an asset that is constructed from the renditions for the asset.
function getSourceSet(asset) {
      const urls = {};
      urls.srcset = '';
      urls.jpgSrcset = '';
      if (asset.fields && asset.fields.renditions) {
        asset.fields.renditions.forEach((rendition) => {
          addRendition(urls, rendition, 'jpg');
          addRendition(urls, rendition, 'webp');
        });
      }
      // add the native rendition to the srcset as well
      urls.srcset += `${asset.fields.native.links[0].href} ${asset.fields.metadata.width}w`;
      urls.native = asset.fields.native.links[0].href;
      urls.width = asset.fields.metadata.width;
      urls.height = asset.fields.metadata.height;
      return urls;
    }
Home Page Data
The home page requires several data calls to get all of its data:
- First we load the taxonomies for the channel specified in .env.
- For each of the taxonomies, we get all the categories in that taxonomy.
- For each category, we get four content items in that category.
- For each of those items, we get its rendition URLs.
Open src/scripts/services.js and find the getHomePageData() function, which is used to get all of the data for the home page.
export function getHomePageData() {
      const deliveryClient = getClient();
      // get the categories for all taxonomies then add all the category items to each category
      return fetchAllTaxonomiesCategories(deliveryClient).then(
        (initialCategories) => addItemsToCategories(deliveryClient, initialCategories).then(
          (categories) => {
            // pull out all of the items for all of the categories then
            // append the computed renditionUrls to each item.
            const allItems = categories.map((category) => category.items);
            const items = flattenArray(allItems);
            // for each item, retrieve the rendition urls and add it to the item
            items.forEach((item) => {
              item.renditionUrls = getSourceSet(item);
            });
            return { categories };
          },
        ),
      );
    }
getHomePageData() calls fetchAllTaxonomiesCategories() to get all the categories in all of the taxonomies.
function fetchAllTaxonomiesCategories(client) {
      return client
        .getTaxonomies()
        .then((topLevelItem) => {
          const taxonomyIds = topLevelItem.items.map((taxonomy) => taxonomy.id);

          const promises = [];
          // loop over each taxonomy id
          taxonomyIds.forEach((taxonomyId) => {
            // add a promise to the total list of promises to get the categories
            // for the specific taxonomy id
            promises.push(
              fetchCategoriesForTaxonomyId(client, taxonomyId)
                .then((categoriesTopItem) => categoriesTopItem.items),
            );
          });

          // execute all the promises returning a single dimension array of all
          // of the categories for all of the taxonomies (note: no taxonomy information)
          // is returned.
          return Promise.all(promises)
            .then((arrayOfCategoryArray) => flattenArray(arrayOfCategoryArray));
        })
        .catch((error) => logError('Fetching taxonomies failed', error));
    }
fetchAllTaxonomiesCategories() calls fetchCategoriesForTaxonomyId() to get all the categories in a specific taxonomy.
function fetchCategoriesForTaxonomyId(client, taxonomyId) {
      return client
        .queryTaxonomyCategories({
          id: `${taxonomyId}`,
        })
        .then((topLevelItem) => topLevelItem)
        .catch((error) => logError('Fetching categories for taxonomy failed', error));
    }
The addItemsToCategories function is then called to add the four category items to each category.
function addItemsToCategories(client, categories) {
      const promises = [];

      // loop over each category
      categories.forEach((category) => {
        // add a promise to the total list of promises to get the items
        // for the specific category
        promises.push(
          fetchItemsForCategory(client, category.id, true).then(
            (topLevelItem) => {
              // add the item to the category before returning it
              category.items = topLevelItem.items;
              category.totalResults = topLevelItem.totalResults;
              return {
                ...category,
              };
            },
          ),
        );
      });

      // execute all the promises before returning the data
      return Promise.all(promises).then((arrayOfItems) => flattenArray(arrayOfItems));
    }
Finally, getSourceSet seen previously is called to get the rendition URLs for each item.
Image Grid Page Data
The image grid page receives a category ID and requires several data calls to get all of its data:
- Get all the items for the specified category.
- For each item, get its rendition URLs.
Open src/scripts/services.js and find the getImageGridPageData() function, which is used to get all of the data for the image grid page.
export function getImageGridPageData(categoryId) {
      const client = getClient();

      return fetchItemsForCategory(client, categoryId, false).then(
        (topLevelItem) => {
          const { totalResults } = topLevelItem;
          // for each item, retrieve the rendition urls and add it to the item
          topLevelItem.items.forEach((item) => {
            item.renditionUrls = getSourceSet(item);
          });
          return {
            totalResults,
            items: topLevelItem.items,
          };
        },
      );
    }
It calls fetchItemsForCategory, like the home page, but with no limit, so that all the items are returned, not just four.
Now that we have our data query, we can render the responses in our React components.
Client-Side Versus Server-Side Rendering
With client-side rendering (CSR), the client is responsible for building and rendering the content of a web page using JavaScript. With server-side rendering (SSR), the whole page is built on the server, and a complete web page is returned to the client.
When the web page is requested from the server in client-side rendering, the HTML document returned contains skeleton HTML and no actual content. It contains a reference to a JavaScript bundle, which the client then requests from the server. On receiving this bundle, the client executes the JavaScript and populates the web page. Until the client has finished executing the JavaScript, all the user sees is a blank web page. One downside of client-side rendered applications is that when some web crawlers index the site, there is no actual content to index.
With server-side rendering (SSR), the whole page is built on the server, and a complete web page is returned to the client. The advantage of this is that web crawlers can index the entire content on the web page.
React Image Gallery Application Flow
The flow of the React image gallery application is as follows:
- The client makes a request to the server for a given route.
- The Express server receives the request.
- The Express server then performs the following tasks:
- It determines which components will be rendered for the given route, and calls the component’s fetchInitialData function to get all of the data for that component.
- It creates a string of all the content to render. (Each component will be asked to render to produce its HTML markup.)
- It creates an HTML document that contains the folowing items:
- The string of content to render
- A link to a style sheet, if applicable
- A script tag containing the client-bundle.js that the client will need
- The data obtained from all the components, serialized as JSON
- The server then returns the HTML to the client.
- The client receives the HTML and renders it. The user will see a fully formed web page.
- The JavaScript in the HTML will store the data in the web browser window on the client.
- The client requests the client-bundle.js file from the server. After receiving it, the client runs the JavaScript in the bundle.
- It “hydrates” the HTML, adding in any client-side JavaScript such as event listeners.
- Each component being rendered sees if their data is stored on the window. If it is, that data is used; otherwise, the component gets the data it needs by making requests to the Oracle Content Management server via the Content SDK.
- If the HTML document contained a style sheet, the client requests the style sheet.
Viewing the source of the web page, you will see all the content in the HTML, indicating that the page was rendered on the server.
Note: This sample application gets the data in the root components and then passes the data down to any child component that needs it. An alternative is to use a state-management tool such as Redux, which puts the data in a store, and any component can request the data from that store.
Server-Side Express Server and Rendering
The server application makes use of an Express server to receive the request, generate a React application instance, generate the HTML page, and return the response.
The Express server file is located at src/server/server.js.
The Express server accepts all requests and then uses React’s react-router-dom matchPath() to get the component that will render for the specified route. This in turn would call that component’s fetchInitialData method to get that component’s data, returning a promise. The promise is executed and a context object is created to contain the data. A renderer is then called to generate the HTML page before returning the HTML content to the client.
server.get('*', (req, res) => {
      const activeRoute = Routes.find((route) => matchPath(req.url, route)) || {};

      const promise = activeRoute.fetchInitialData
        ? activeRoute.fetchInitialData(req)
        : Promise.resolve();

      promise.then((data) => {
        const context = { data, requestQueryParams: req.query };

        // get the content to return to the client
        const content = renderer(req, context);

        // if the route requested was not found, the content object will have its "notFound"
        // property set, therefore we need to change the response code to a 404, not found
        if (context.notFound) {
          res.status(404);
        }

        // send the response
        res.send(content);
      });
    });
The renderer is located at src/server/renderer.jsx and it uses React’s react-dom/server renderToString() to get a string of all the content being rendered.
// generate the HTML content for this application
    const content = renderToString(
      <StaticRouter context={context} location={req.path} basename={process.env.BASE_URL}>
        <div>{renderRoutes(Routes)}</div>
      </StaticRouter>,
    );
The context object passed to the renderer is passed to the server-side router, StaticRouter. During server-side rendering, any component is able to get the data from the component’s props.
this.props.staticContext.dataThe renderer returns the HTML markup which contains the React content, the serialized data and a reference to the JavaScript bundle to run on the client.
<body>
      <div id="root">${content}</div>
      <script>
        window.INITIAL_DATA = ${serialize(context.data)}
      </script>
      <script src="${clientBundleFile}"></script>
    </body>
When the client receives the HTML, the data will be made available in the window and the client will request the client bundle from the server.
Client-Side Rendering
The client-side rendering is located in src/client/main.js. This client-side code goes through all the HTML of the web page and adds in any client-side JavaScript code.
This process is called hydrating.
ReactDOM.hydrate(
      <BrowserRouter basename={process.env.BASE_URL}>
        <div>{renderRoutes(Routes)}</div>
      </BrowserRouter>,
      document.querySelector('#root'),
    );
React Components
React uses a technology known as JSX, which is an HTML-like syntax extension to JavaScript, to render content. Even though you can write pure JavaScript to render data from Oracle Content Management, we strongly recommend that you use JSX.
The image gallery application breaks down each page into a number of smaller components, some of which are used in both the home and image grid pages.
The next few sections provide an overview of how React renders our application in each of our components:
IS_BROWSER Variable
Webpack is used to bundle the client and server code. There’s a configuration file instructing Webpack on how to create each bundle.
Open the configuration file for the client bundle, webpack.client.config.js. At the bottom of the file, a variable is set to indicate that the application is running in a browser.
new webpack.DefinePlugin({
      'process.env.IS_BROWSER': true,
    }),
Open the configuration file for the server bundle, webpack.server.config.js. At the bottom of the file, the same variable is set to indicate that the application is not running in a browser. This variable can be accessed from anywhere in the React application code to determine if the application is rendering on the server or in the client.
Routes File
In our site, we want to provide two routes: the home page, which shows a list of image categories, and the image grid page, which displays all the items for a given category ID.
The src/pages/Routes.js file defines the routes for the application. Here we’re using the ES6 spread operator for the first two pages references. This is because the imports for these items are objects containing the component and its ‘fetchInitialData’ function (if it has one), rather than just the component. The following sections, for each of these components, will show why an object is being exported from the component files rather than the component itself.
export default [
      {
        ...HomePage,
        path: '/',
        exact: true,
        title: 'Image Gallery',
      },
      {
        ...ImageGridPage,
        path: '/category/:categoryId',
        exact: true,
        title: 'Image Grid',
      },
      {
        NotFoundPage,
      },
    ];
HomePage Component
Any component in the pages directory is a route for the application. Any data required for a route must be obtained by these root components.
The home page consists of a list of categories for a taxonomy, with a preview of four items in that category.
Open the HomePage component, located at src/pages/HomePage.jsx. The component imports the API to get the data from the services.js file.
import { getHomePageData } from '../scripts/services';The constructor checks to see if the application is running in the client or the server, using the process.env.IS_BROWSER variable set in the Webpack bundling files. If the component is rendering in the client, the data is obtained from the window.
Note: If a user navigates to a page using client-side routing, server-side rendering will not occur. Instead, the content will be rendered using client-side rendering. As a result, the window will not contain any data, and the client will have to make a server call to get it.
If the component is being rendered on the server, the data is obtained from this.props.staticContext; that is, the data passed from the Express server file. The data, or default values, are then stored on the component’s state.
constructor(props) {
      super(props);

      let data;
      if (process.env.IS_BROWSER) {
        data = window.INITIAL_DATA;
        delete window.INITIAL_DATA;
      } else {
        const { staticContext } = this.props;
        data = staticContext.data;
      }

      this.state = {
        data,
        loading: !data,
      };
    }
During server-side rendering, fetchInitialData is called to get the data from the server. It returns a promise to the calling code, the Express server code.
function fetchInitialData() {
      return getHomePageData();
    }
During client-side rendering, componentDidMount is called. (This method is not called during server-side rendering.) If the component doesn’t already have the data, it’s obtained from the server and stored on the component’s state.
componentDidMount() {
      document.title = 'Image Gallery';

      const { data } = this.state;
      if (!data) {
        this.fetchData();
      }
    }

    // Client Side Data Fetching: called from client when doing client side routing/hydration
    fetchData() {
      this.setState(() => ({
        loading: true,
      }));

      getHomePageData()
        .then((data) => this.setState(() => ({
          data,
          loading: false,
        })));
    }
When the component renders using the render() method, it gets all the data from the component’s state. The category and image thumbnail map are then passed to the Gallery component.
src/pages/HomePage.jsx exports an object containing the fetchInitialData function and the component.
export default {
      fetchInitialData,
      component: HomePage,
    };
Gallery Component
The Gallery component represents the individual category in the list. It displays a preview of four of the items in the category.
The Layout component, located at src/components/Gallery.jsx, receives all of its data as properties. It does not get any additional data from the server.
ImageGridPage Component
The ImageGridPage component displays the items in the category whose ID is passed into the component on the URL.
Open the ImageGridPage component, located at src/pages/ImageGridPage.jsx. The component imports the API to get the data from the services.js file.
import { getImageGridPageData } from '../scripts/services';Like the HomePage component, the constructor sees if the application is running the client or the server, using the process.env.IS_BROWSER variable set in the Webpack bundling files. If the component is rendering in the client, the data is obtained from the window.
The constructor also gets the URL search query parameters based on whether server-side or client-side rendering is occurring. For server-side rendering, the URL search query parameters are on the staticContext object in the component props. For client-side rendering, this information is on the location object in the component props.
constructor(props) {
      super(props);

      let data;
      let categoryName;
      if (process.env.IS_BROWSER) {
        data = window.INITIAL_DATA;
        delete window.INITIAL_DATA;

        const { location } = this.props;
        const params = new URLSearchParams(location.search);
        categoryName = params.get('categoryName');
      } else {
        const { staticContext } = this.props;
        data = staticContext.data;
        categoryName = staticContext.requestQueryParams.categoryName;
      }

      this.state = {
        data,
        loading: !data,
        currentImage: -1, // the index of the image currently being rendered
        categoryName,
      };
    }
fetchInitialData is called during server-side rendering to get the data from the server. It uses the request passed in to get the category ID from the URL (the last path in the URL).
function fetchInitialData(req) {
      return getImageGridPageData(req.path.split('/').pop());
    }
During client-side rendering, componentDidMount is called. (This method is not called during server-side rendering.) It checks if data has been obtained, and if it hasn’t, fetchData() is called. The category ID is obtained from the match object in the components props.
// executed client side only
    componentDidMount() {
      const { categoryName } = this.state;
      document.title = categoryName;

      const { data } = this.state;
      if (!data) {
        const { match } = this.props;
        this.fetchData(match.params.categoryId);
      }

      // add event listener for keydown for navigating through large view of images
      document.addEventListener('keydown', (e) => this.handleKeypressFunction(e), false);
    }

    // Client Side Data Fetching: called from Client when doing client side routing/hydration
    fetchData(categoryId) {
      this.setState(() => ({
        loading: true,
      }));

      getImageGridPageData(categoryId)
        .then((data) => this.setState(() => ({
          data,
          loading: false,
        })));
    }
In the render() method, you can see that the data to render is obtained from the component’s state.
Like the HomePage component, the ImageGridPage component exports an object containing the fetchInitialData function and the component.
export default {
      fetchInitalData,
      component: ImageGridPage,
    };
Step 3: Prepare Your Application for Deployment
Now that we’ve built our React image gallery site, we need to see it in a local development server so we can debug any issues and preview the application before it goes live.
Prepare the application for deployment in three steps:
- Build the application using Webpack
- Run the application using Node
- Use scripts to build and run the application in development and production
Build the Application Using Webpack
Webpack is used to bundle the application. It creates two JavaScript bundles: server-bundle.js, which is run on the server, and client-bundle.js, which is downloaded and run on the client.
The React image gallery application has three Webpack configuration files:
- webpack.base.config.js is merged in with both the client and server Webpack configurations.
- webpack.client.config.js bundles the code for the client.
- webpack.server.config.js bundles the code for the server.
To build the client bundle, you must specify the client Webpack configuration:
webpack --config webpack.client.config.jsTo build the server bundle, you must specify the server Webpack configuration:
webpack --config webpack.server.config.jsRun the Application Using Node
Once the bundles have been created, the server bundle will be located in the dist directory. You can start the server by running the following command:
node build/server-bundle.jsUse Scripts to Build and Run the Application in Development and Production
The package.json file, located at the root of the project, contains scripts that make it easier to build the bundles and run the application.
Development
You can use the dev script during development. Run it using an npm command:
npm run devThis script runs all of the following scripts at the same time, in parallel:
- dev:run-server, which runs server.js. The Webpack –watch parameter means Webpack will watch for any changes to the bundlers and will restart the server if there is any change.
- dev:build-server-bundle, which builds the server-bundle.js for the server bundle. The Webpack –watch parameter means Webpack will watch for any changes to the source files and will rebuild the bundle when anything changes.
- dev:build-client-bundle, which builds the client-bundle.js for the client bundle. The Webpack –watch parameter means Webpack will watch for any changes to the source files and rebuild the bundle when anything changes.
Production
For production, the build script would be used to build the client and server bundles, using the following npm command:
npm run buildThis script runs all of the following scripts at the same time, in parallel:
- prod:build-server-bundle, which builds the server-bundle.js for the server bundle.
- prod:build-client-bundle, which builds the client-bundle.js for the client bundle.
Build an Image Gallery in React with Headless Oracle Content Management
F38762-04
July 2021
Copyright © 2021, Oracle and/or its affiliates.
Primary Author: Oracle Corporation