Build a Minimal Site in Svelte with Headless Oracle Content Management
Introduction
Svelte is a radical new approach to building user interfaces. Whereas traditional frameworks like React and Vue do the bulk of their work in the browser, Svelte shifts that work into a compile step that happens when you build your app. Sapper is an application framework powered by Svelte and provides routing, server-side rendering and static site generation. But what happens when you need a content management system (CMS) to serve all of your content? Fortunately, Oracle Content Management, with its rich headless CMS capabilities, has a graceful solution for your content administration and governance needs.
In this tutorial, we’ll build a simple minimal site in Svelte by leveraging Oracle Content Management as a headless CMS as well as its software development kit (SDK) for content delivery in JavaScript. This Svelte sample is available on GitHub.
The tutorial consists of three steps:
- Prepare Oracle Content Management
- Build the minimal site in Svelte
- Prepare your application for deployment
Prerequisites
Before proceeding with this tutorial, we recommend that you read the following information first:
To follow this tutorial, you’ll need:
- an Oracle Content Management subscription
- an Oracle Content Management account with the Content Administrator role
- a Windows or Mac computer with Node version 10 or higher
What We’re Building
With Svelte minimal, you can easily retrieve images and other content from your Oracle Content Management repository.
To take a look at what we’re building, here’s the end state of our tutorial, a basic Svelte minimal site that consumes content from Oracle Content Management:
https://headless.mycontentdemo.com/samples/oce-svelte-minimal-sample
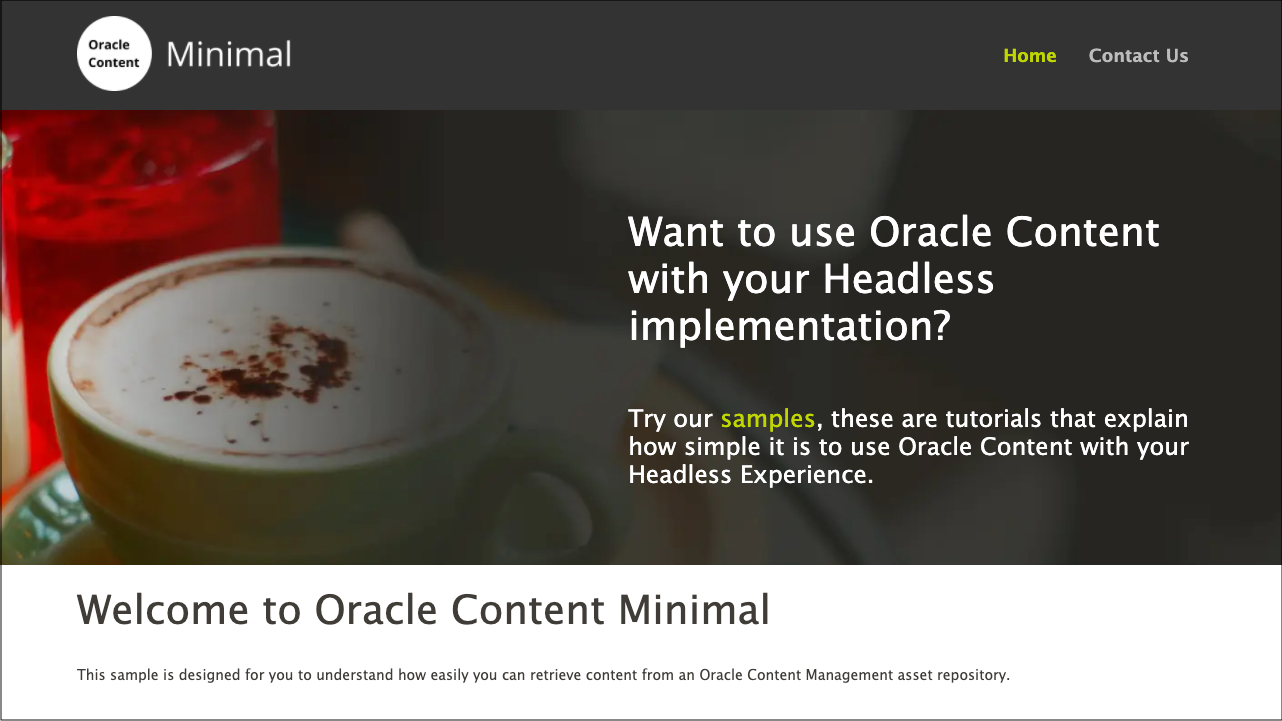
This is what the home page will look like at the end of this tutorial:
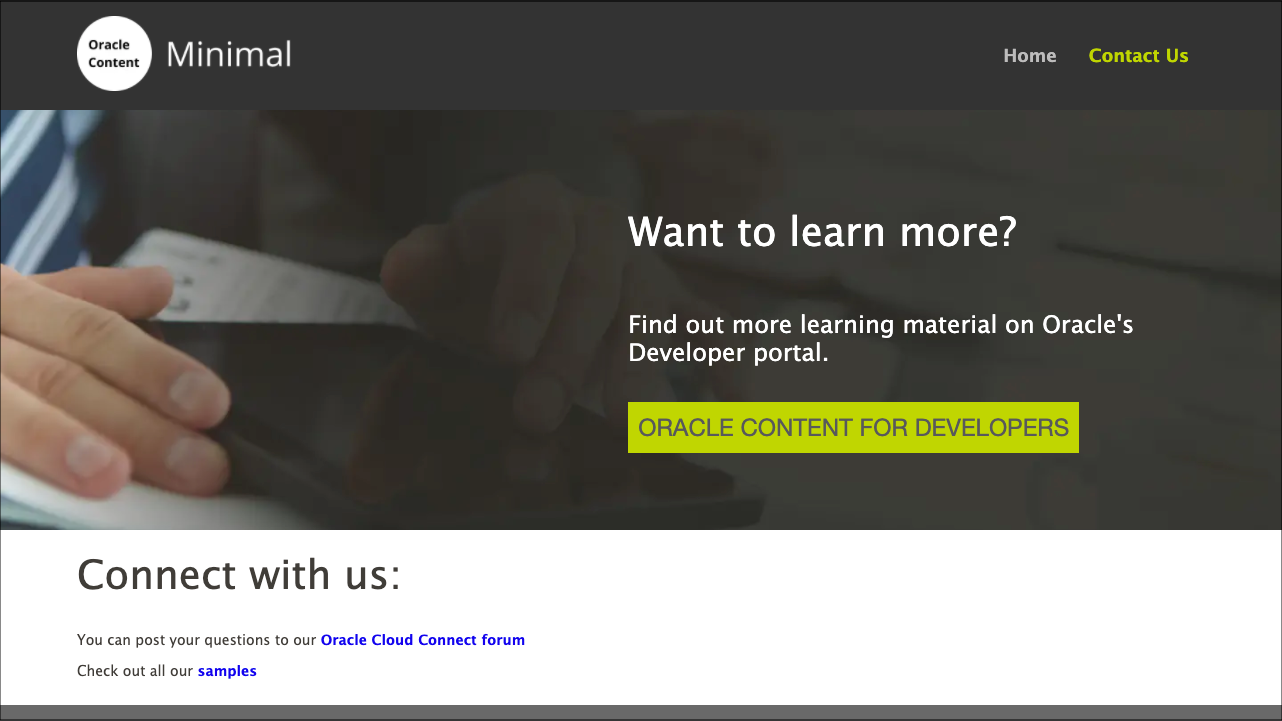
This is what the contact us page will look like at the end of this tutorial:
To proceed, you’ll need to have an active subscription to Oracle Content Management and be logged in with the Content Administrator role.
Task 1: Prepare Oracle Content Management
If you don’t already have an Oracle Content Management instance, see the Quick Start to learn how to register for Oracle Cloud, provision an Oracle Content Management instance, and configure Oracle Content Management as a headless CMS.
For this tutorial, you’ll need to create a content model. There’s a downloadable asset pack available that will fill your empty repository with content types and associated content.
To prepare Oracle Content Management:
- Create a channel and asset repository.
- Create a content model using either of two methods:
- Method 1: Import the Oracle Content Management Samples Asset Pack
- Method 2: Create your own content model
Create a Channel and Asset Repository
You first need to create a channel and an asset repository in Oracle Content Management so you can publish content.
To create a channel and an asset repository in Oracle Content Management:
Log in to the Oracle Content Management web interface as an administrator.
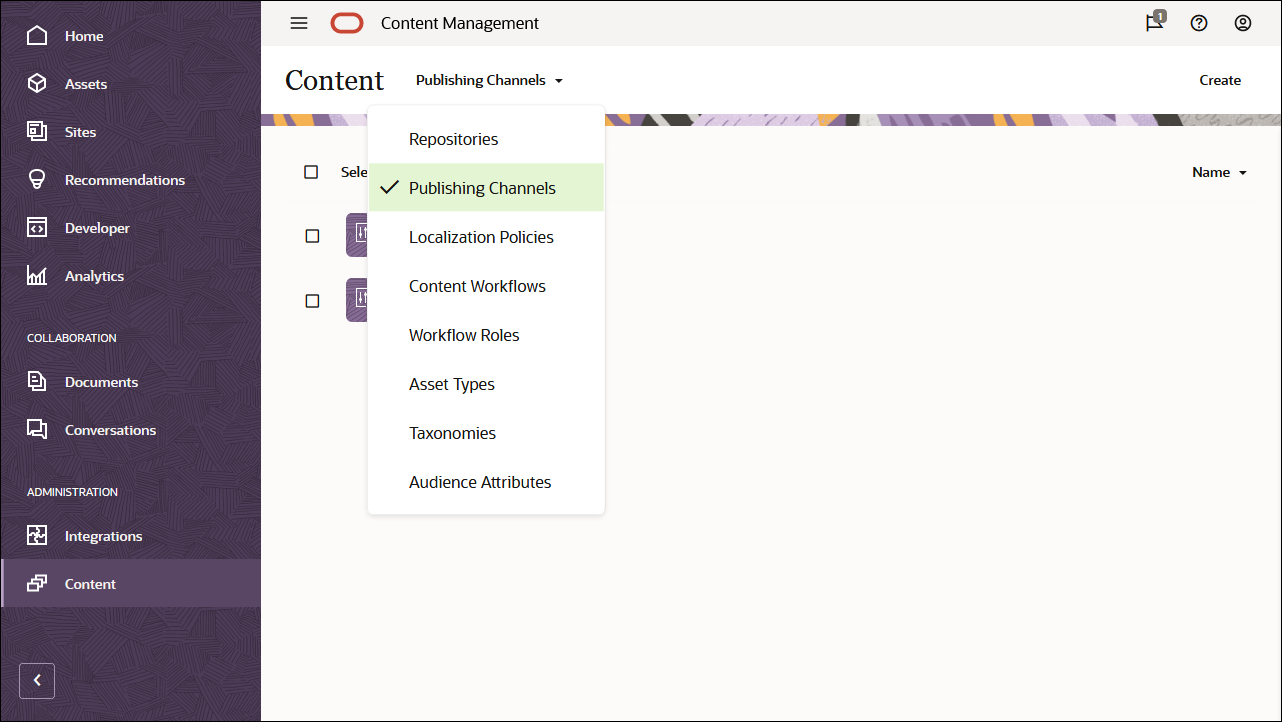
Choose Content in the left navigation menu and then choose Publishing Channels from the selection list in the page header.
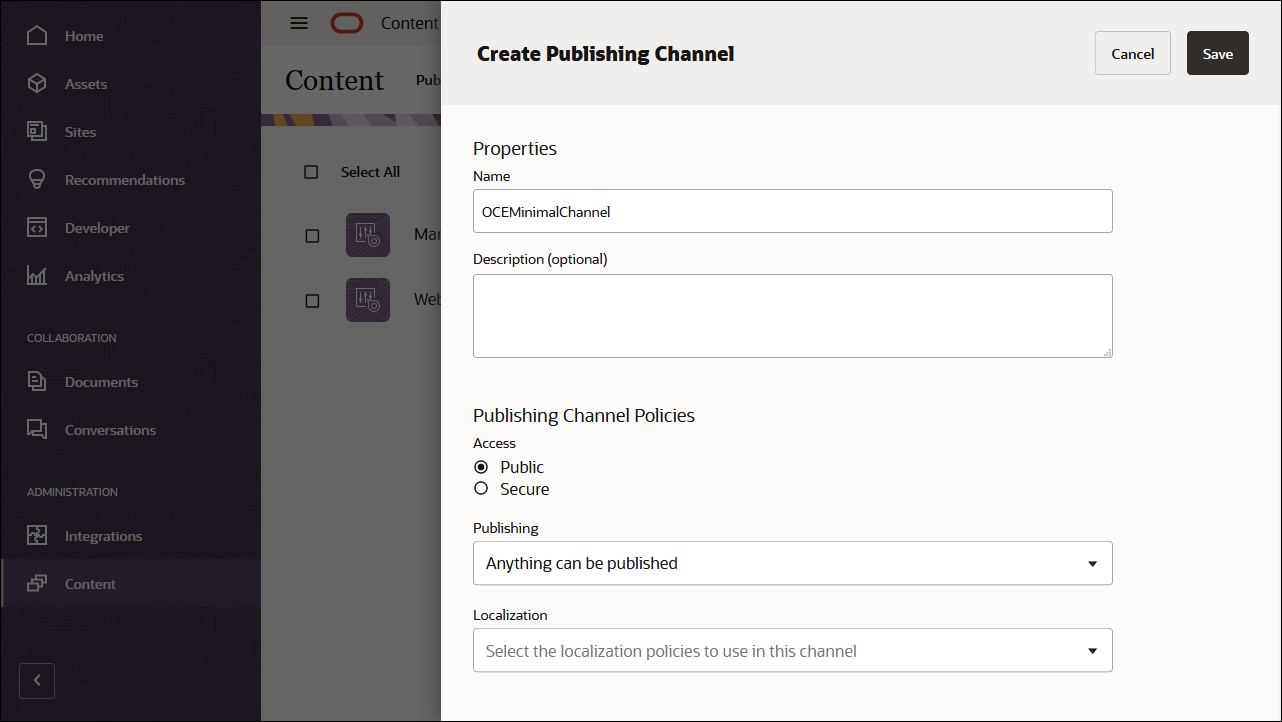
In the upper right corner, click Create to create a new channel. Name the channel ‘OCEMinimalChannel’ for the purpose of this tutorial, and keep the access public. Click Save to create the channel.
Choose Content in the left navigation menu and then choose Repositories from the selection list in the page header.
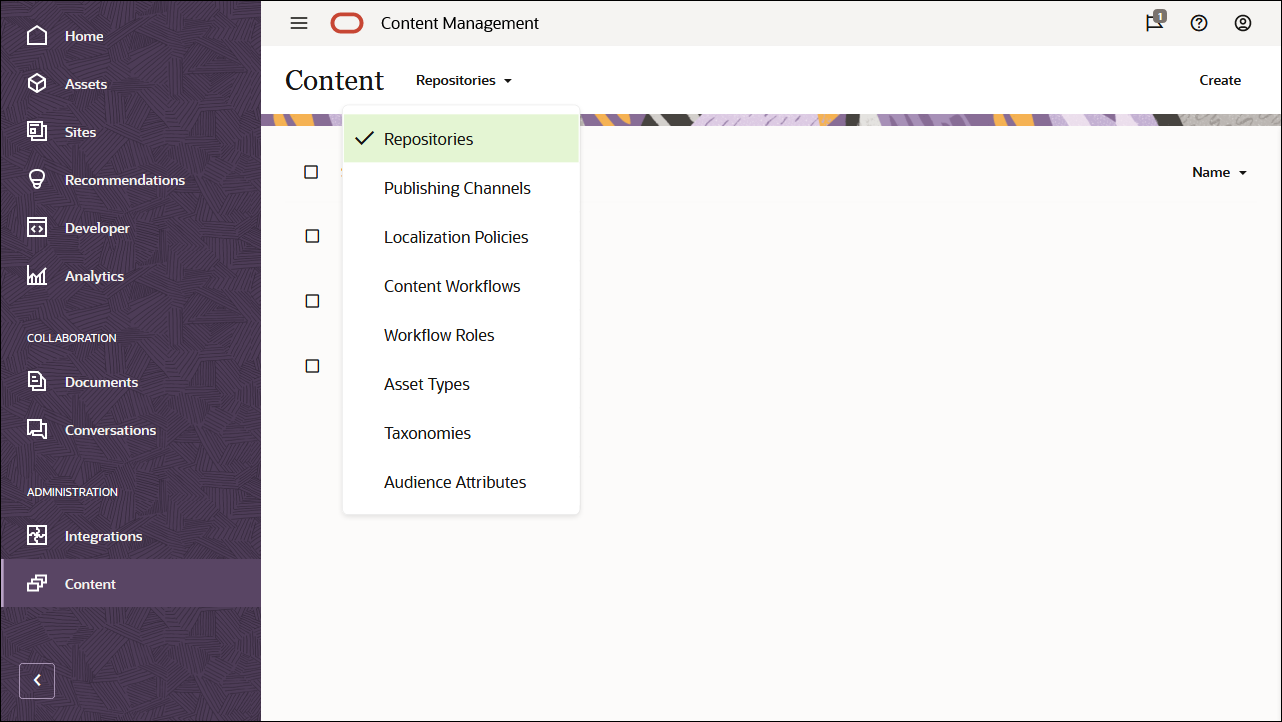
In the upper right corner, click Create to create a new asset repository. Name the asset repository ‘OCEMinimalRepository’ for the purpose of this tutorial.
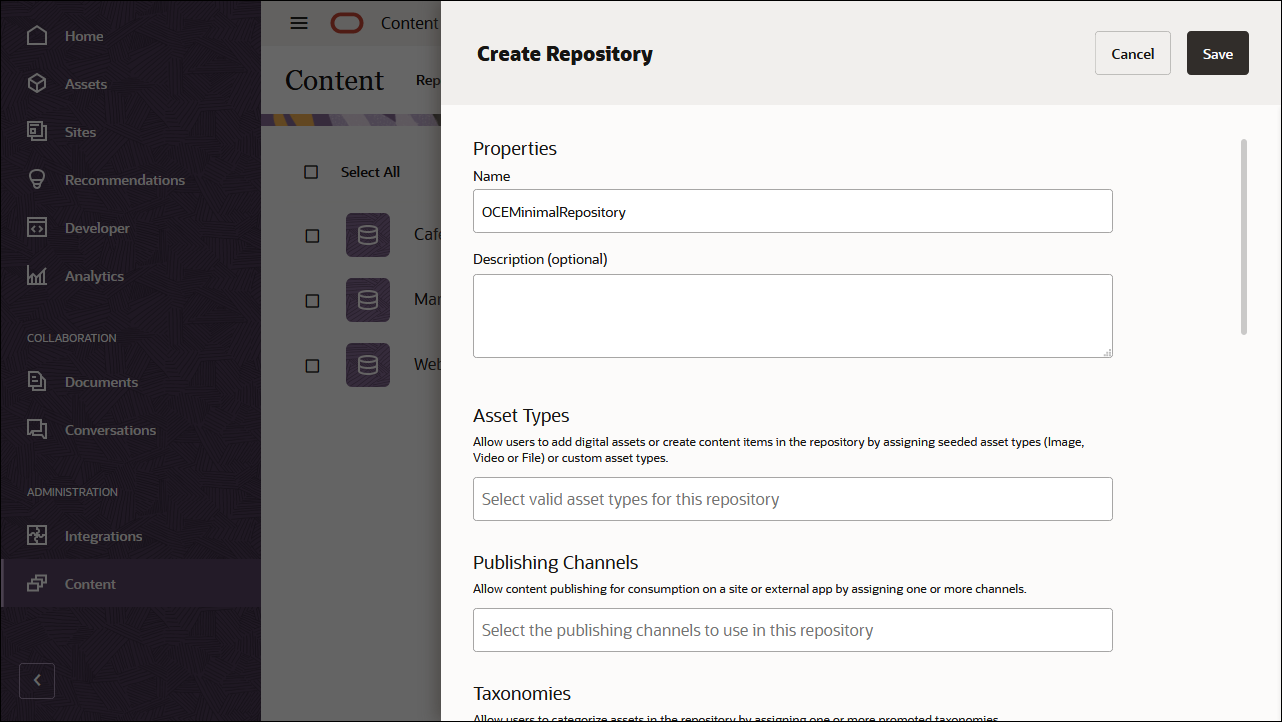
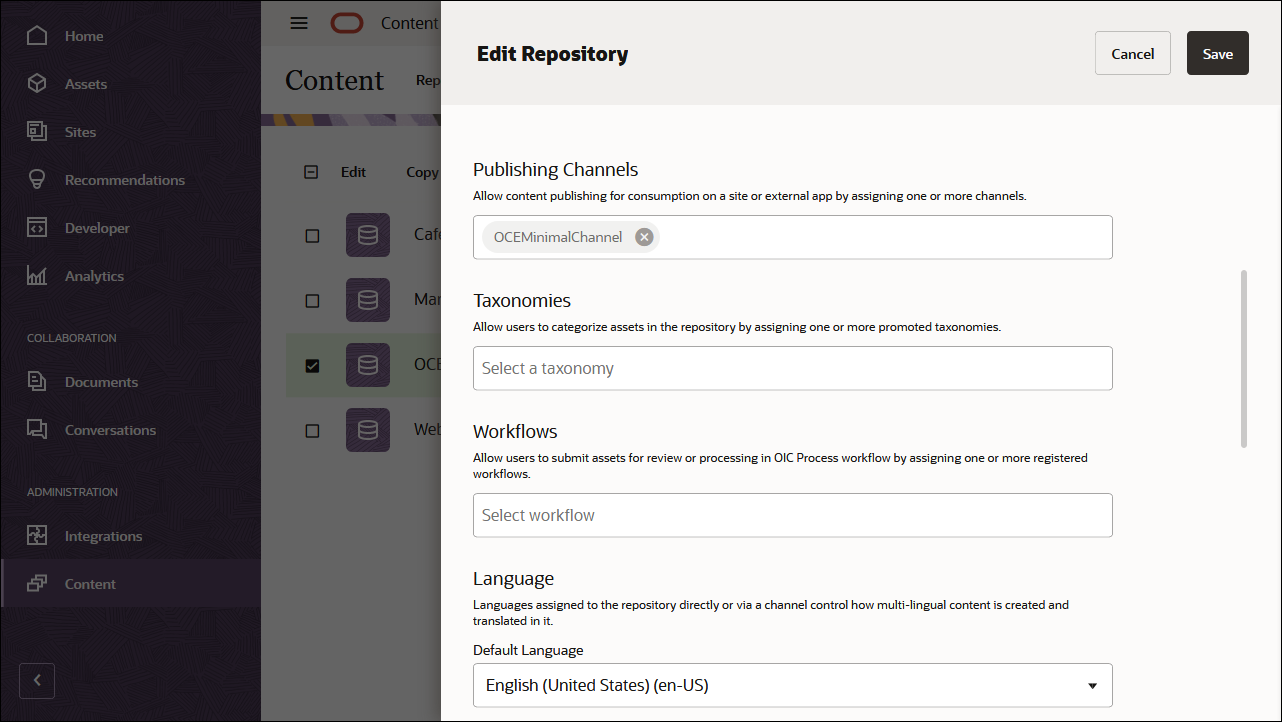
In the Publishing Channels field, select the OCEMinimalChannel channel to indicate to Oracle Content Management that content in the OCEMinimalRepository repository can be published to the OCEMinimalChannel channel. Click Save when you’re done.
Create a Content Model
The next step is to create a content model. You can use either of two methods:
- Method 1: Import the Oracle Content Management Samples Asset Pack
- Method 2: Create your own content model
Import the Oracle Content Management Samples Asset Pack
You can download a preconfigured Oracle Content Management sample assets pack that contains all required content types and assets for this tutorial.
You can upload a copy of the content we’re using in this tutorial from the Oracle Content Management Samples Asset Pack. This will let you experiment with the content types and modify the content. If you want to import the Oracle Content Management Samples Asset Pack, you can download the asset pack archive, OCESamplesAssetPack.zip, and extract it to a directory of your choice:
Download the Oracle Content Management Samples Asset Pack (OCESamplesAssetPack.zip) from the Oracle Content Management downloads page. Extract the downloaded zip file to a location on your computer. After extraction, this location will include a file called OCEMinimal_data.zip.
Log in to the Oracle Content Management web interface as an administrator.
Choose Content in the left navigation menu and then choose Repositories from the selection list in the page header. Now select OCEMinimalRepository and click the Import Content button in the top action bar.
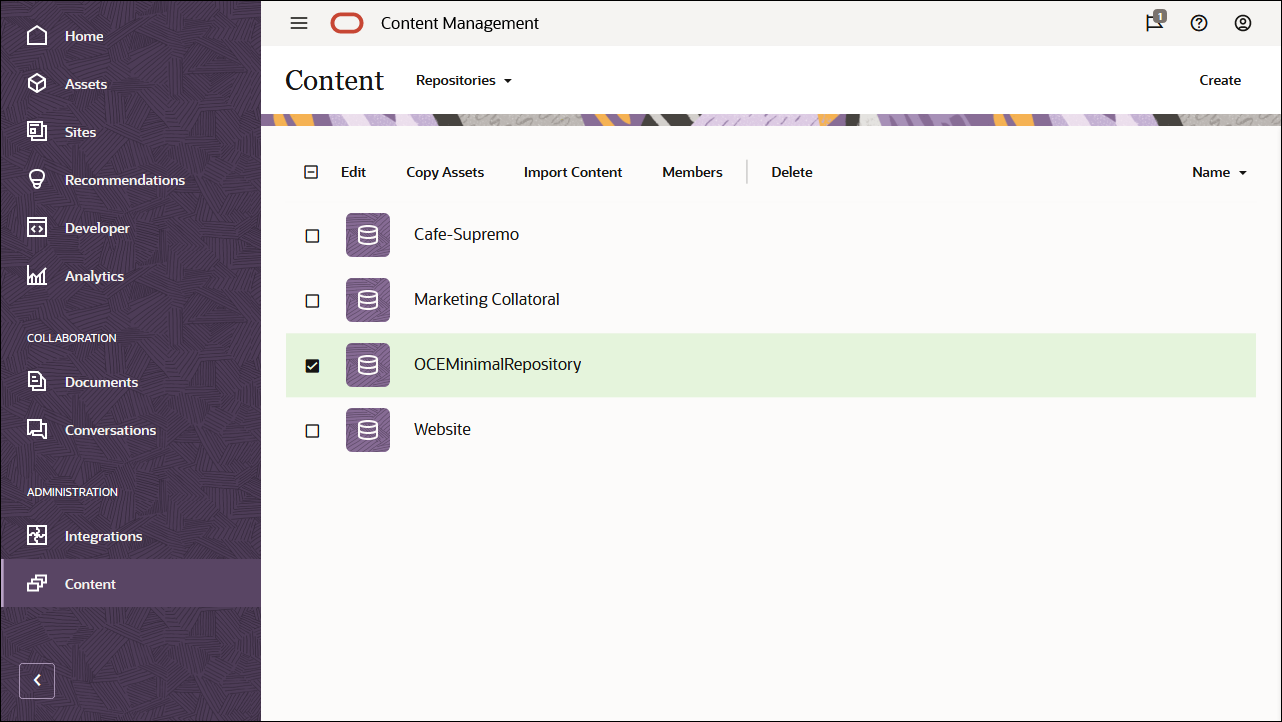
Upload OCEMinimal_data.zip from your local computer to the Documents folder.
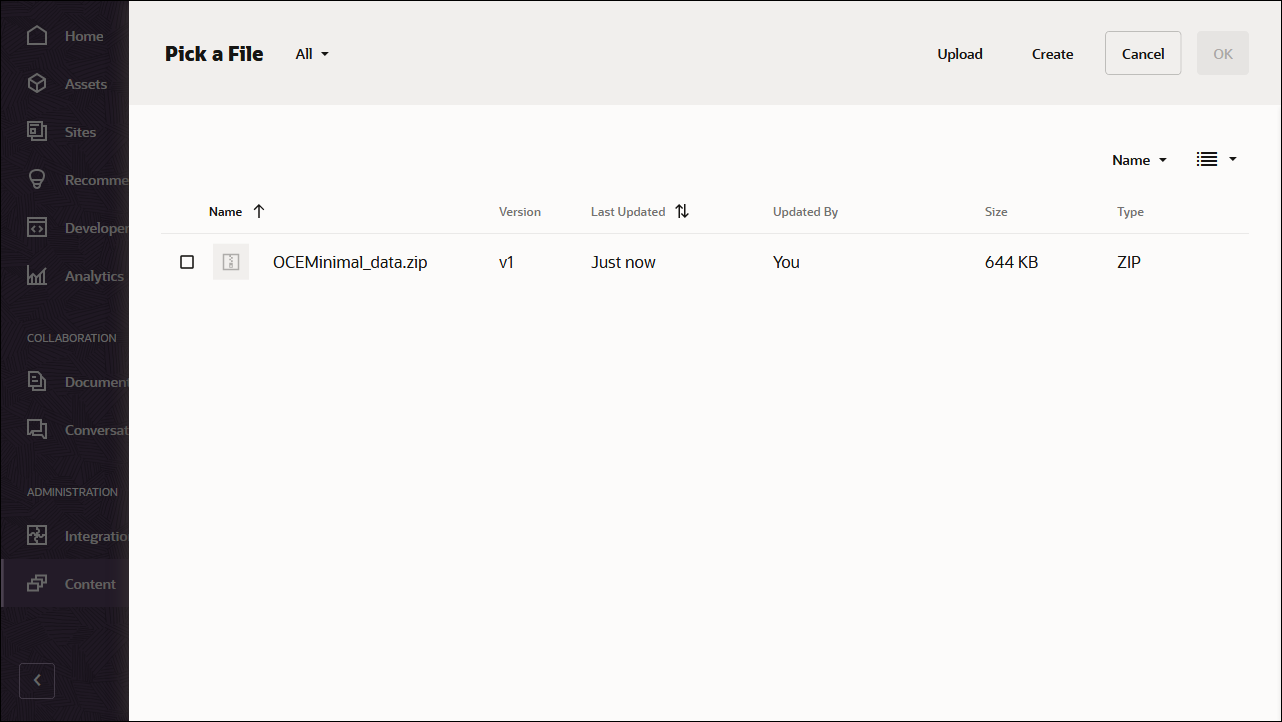
Once it’s uploaded, select OCEMinimal_data.zip and click OK to import the contents into your asset repository.
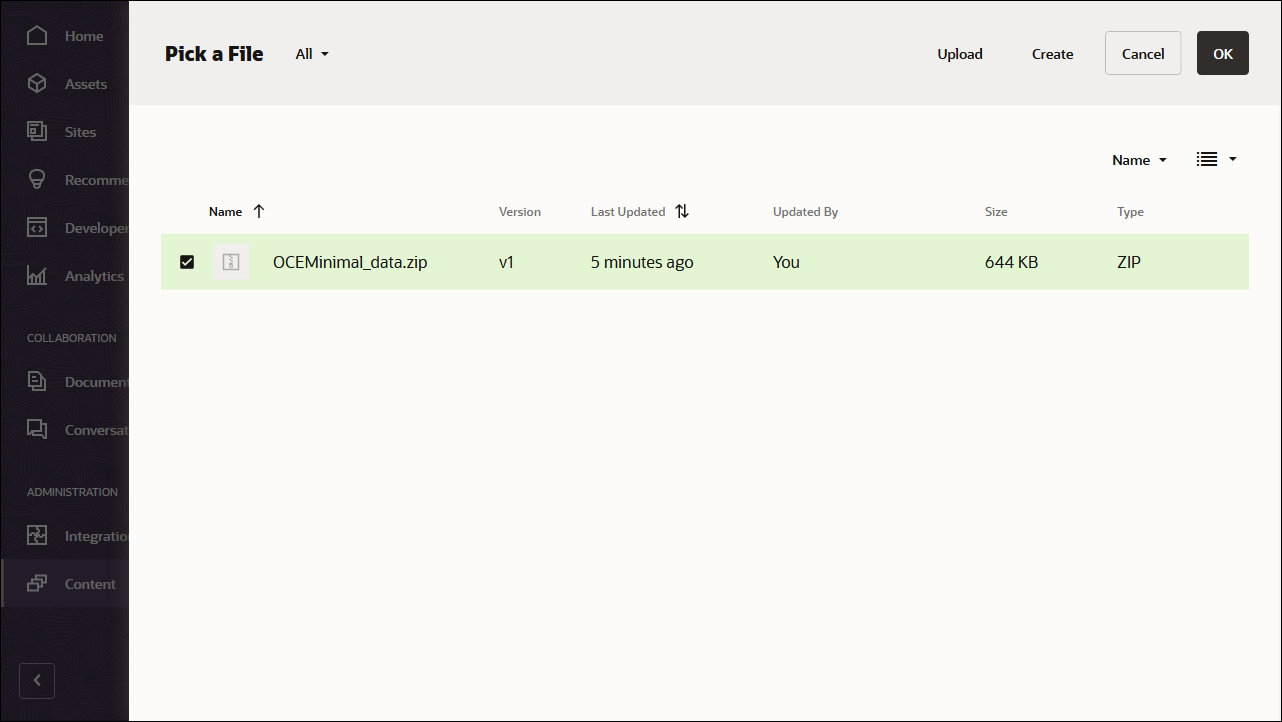
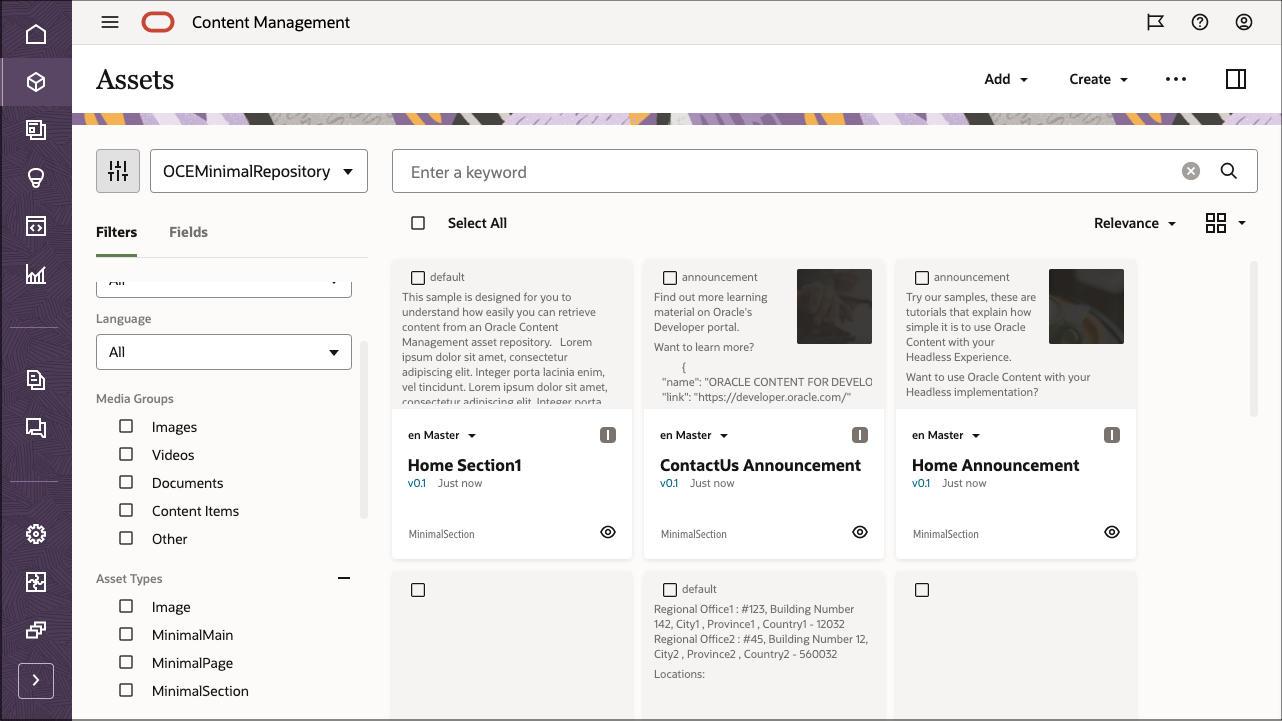
After the content has been imported successfully, navigate to the Assets page and open the OCEMinimalRepository repository. You’ll see that all the related images and content items have now been added to the asset repository.
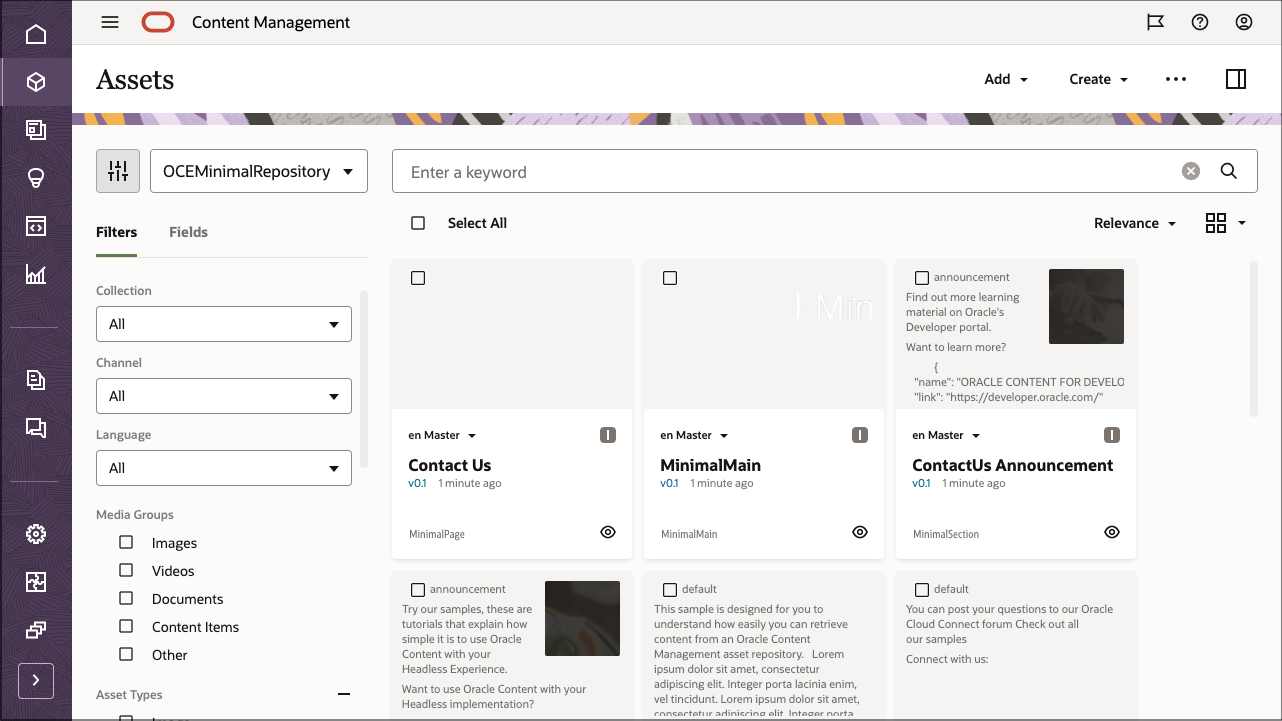
Click Select All on the top left and then Publish to add all the imported assets to the publishing channel that you created earlier, OCEMinimalChannel.
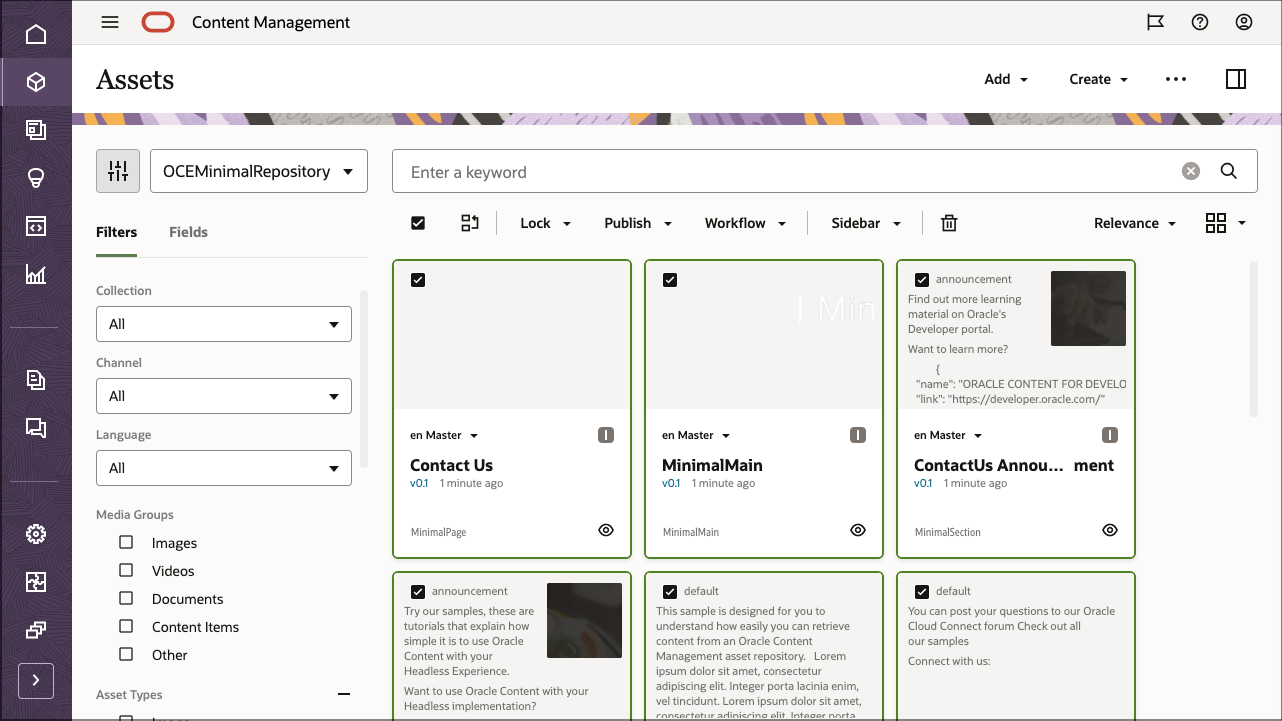
Before publishing, you need to validate all the assets. First add OCEMinimalChannel as a selected channel, and then click the Validate button.
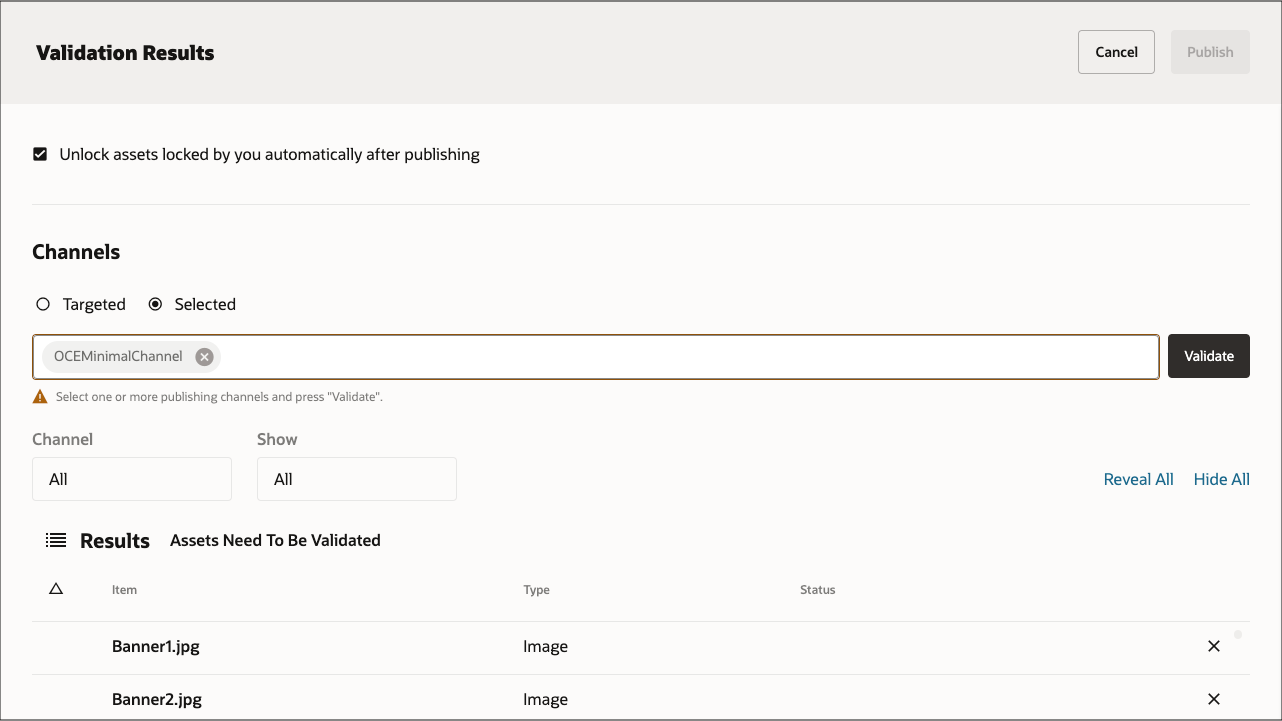
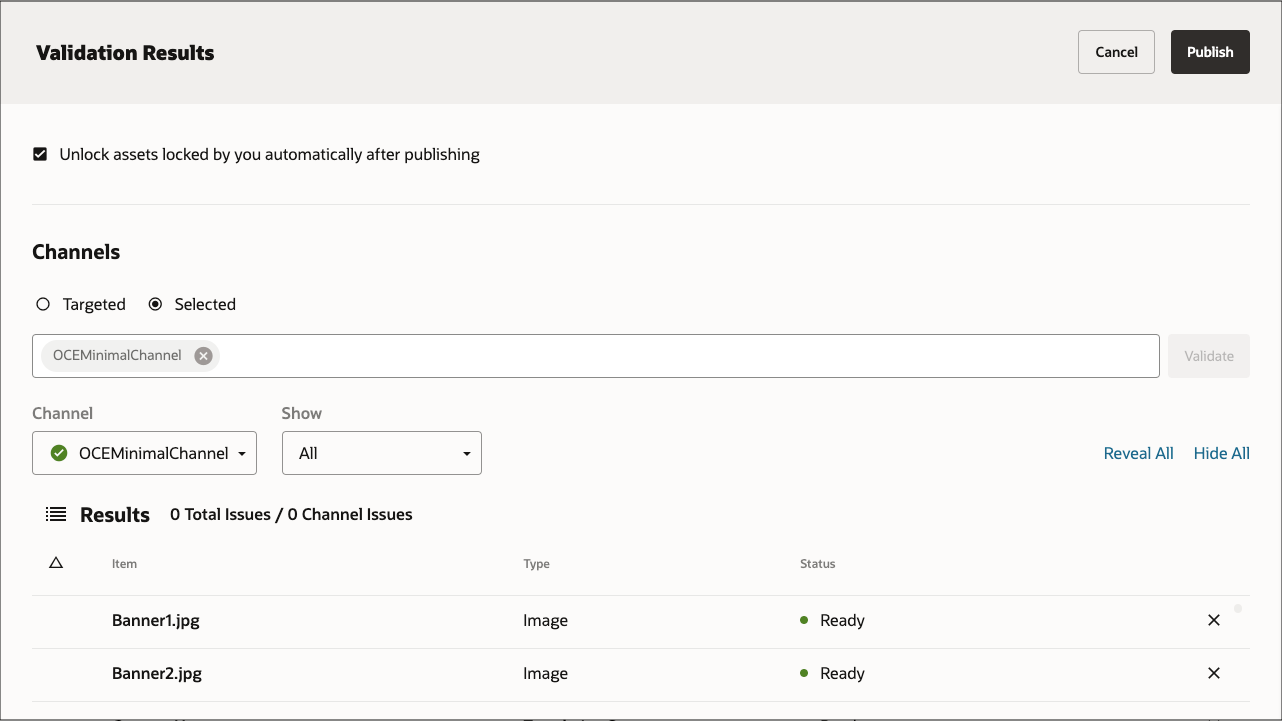
After the assets have been validated, you can publish all the assets to the selected channel by clicking the Publish button in the top right corner.
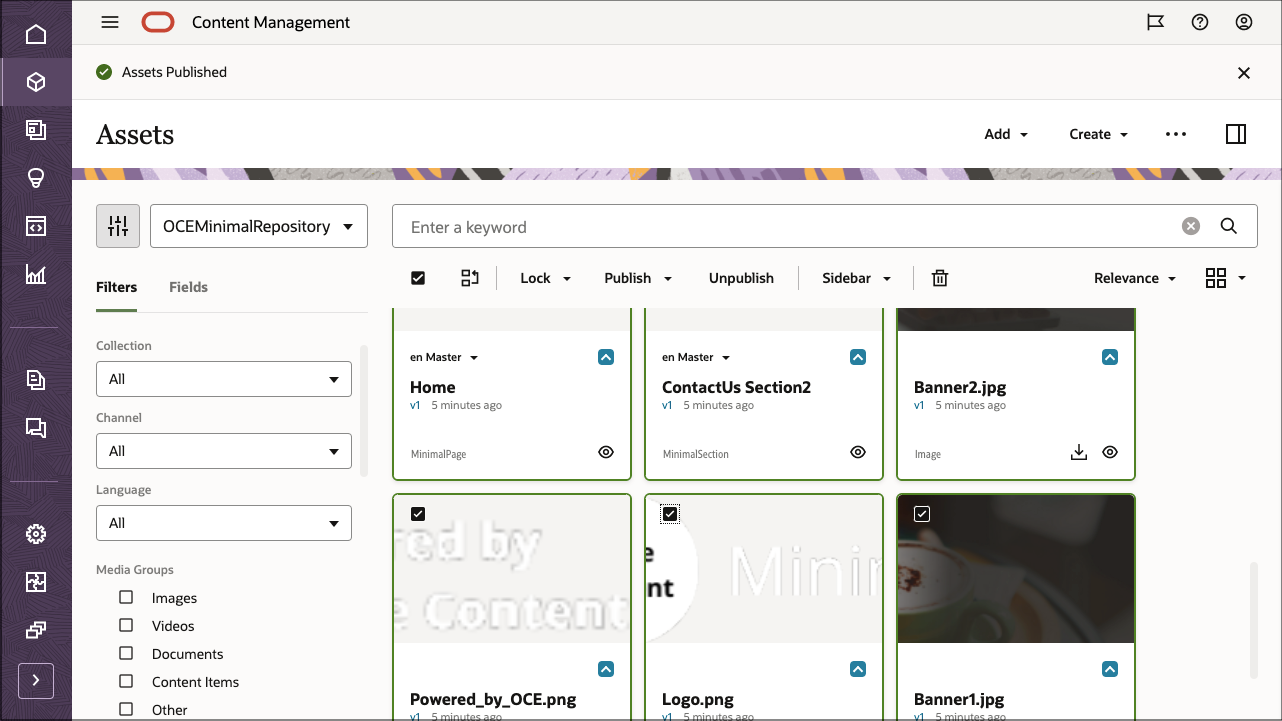
Once that’s done, you can see on the Assets page that all assets have been published. (You can tell by the icon above the asset name.)
Create Your Own Content Model
Instead of importing the Oracle Content Management Samples Asset Pack, you can also create your own content model.
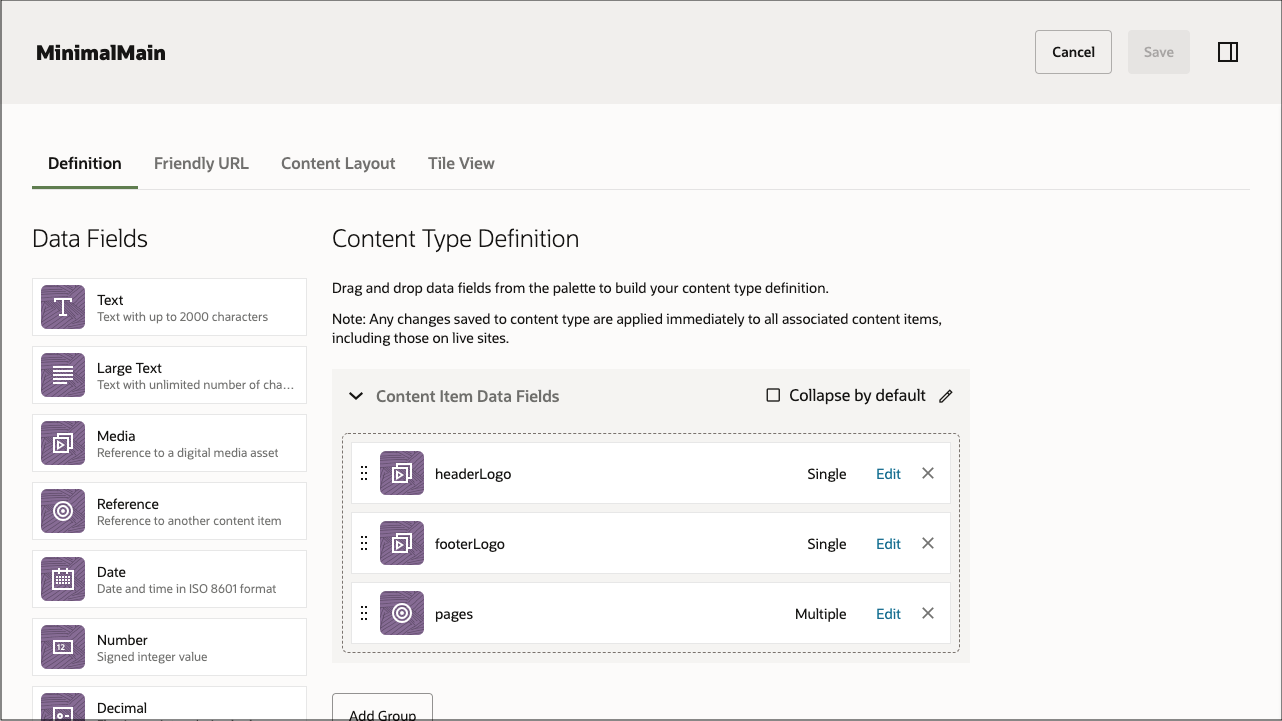
For this tutorial, we’re using a content type called ‘MinimalMain’ as the main content type for this sample. This content type consists of header and footer logos, and a list of pages that should be included on the nav.

To create content types for the content model:
- Log in to the Oracle Content Management web interface as an administrator.
- Choose Content in the left navigation menu and then choose Asset Types from the selection list in the page header.
- Click Create in the top right corner.
- Choose to create a content type (not a digital asset type). Repeat this for all required content types.
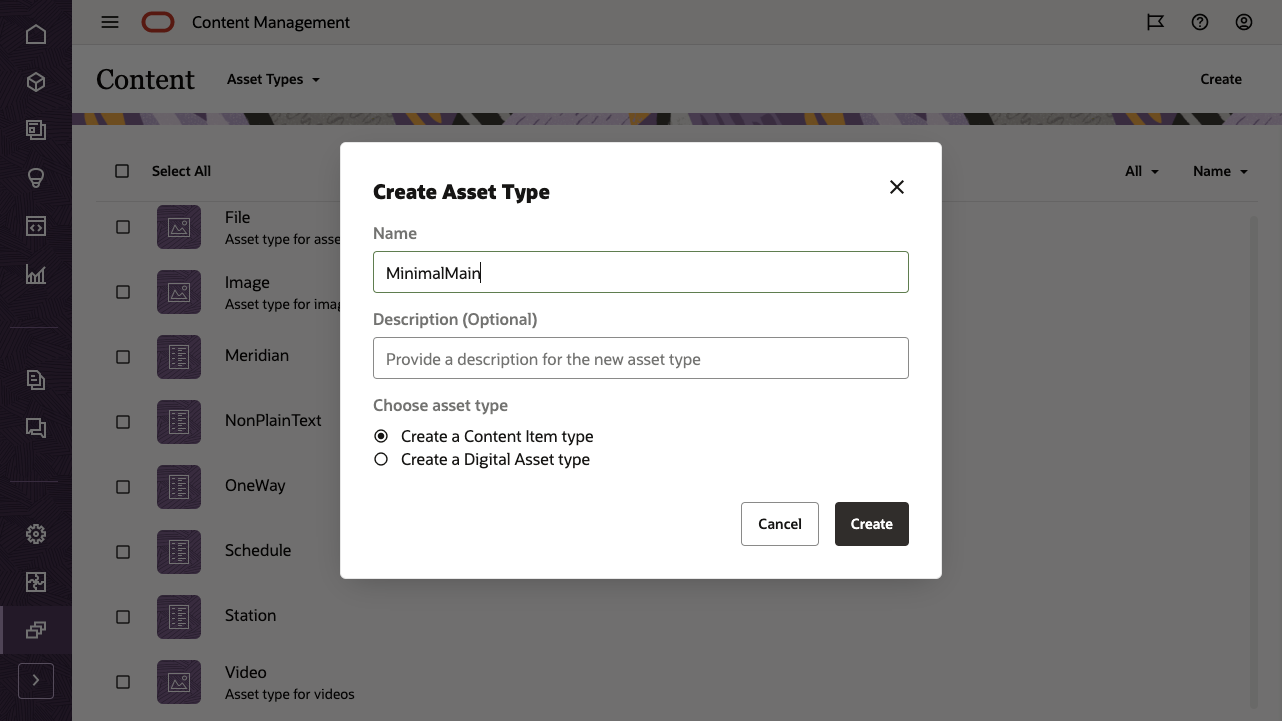
We’ll create three content types, each with its own set of fields:
- MinimalMain
- MinimalPage
- MinimalSection
The first content type, MinimalMain, should have the following fields:
| Display Name | Field Type | Required | Machine Name |
|---|---|---|---|
| headerLogo | Single-value media field | headerLogo | |
| footerLogo | Single-value media field | footerLogo | |
| pages | Multiple-value reference field | pages |
This is what your MinimalMain content type definition should look like:
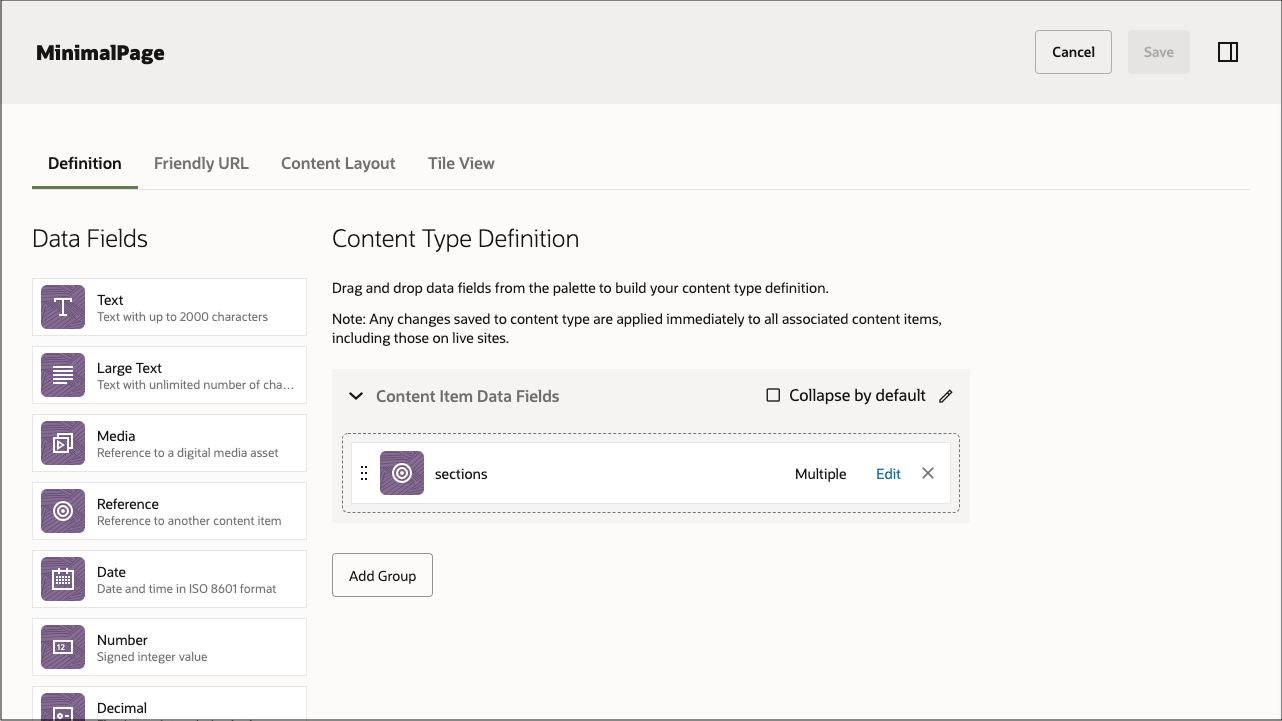
The second content type, MinimalPage, should have the following field:
| Display Name | Field Type | Required | Machine Name |
|---|---|---|---|
| sections | Multiple-value reference field | sections |
This is what your MinimalPage content type should look like:
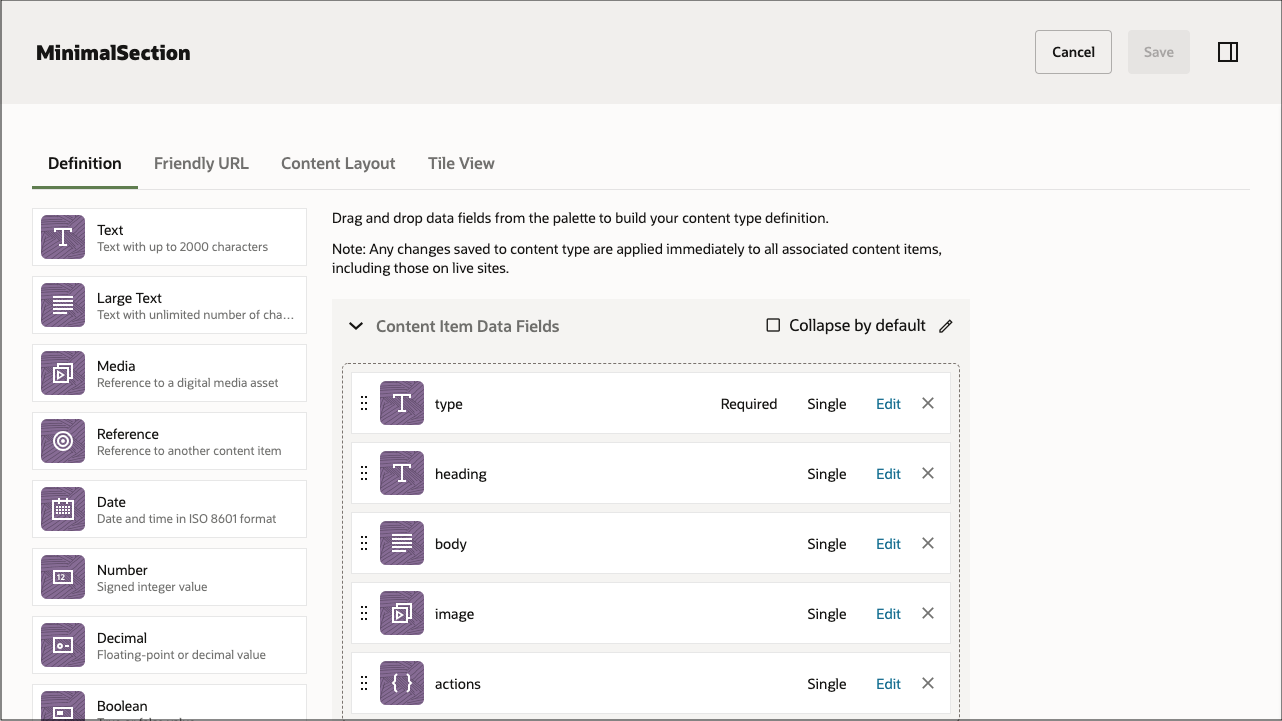
The third and final content type, MinimalSection, should have the following fields:
| Display Name | Field Type | Required | Machine Name |
|---|---|---|---|
| type | Single-value text field | X | type |
| heading | Single-value text field | heading | |
| body | Single-value large-text field | body | |
| image | Single-value image field | image | |
| actions | Single-value embedded content field | actions |
This is what your MinimalSection content type should look like:
Once you’ve created your content types, you can add these content types to the repository that you created earlier, OCEMinimalRepository:
- Log in to the Oracle Content Management web interface as an administrator.
- Navigate to OCEMinimalRepository.
- Edit the repository and, under Asset Types, specify all three newly created content types. Click the Save button to save the changes.
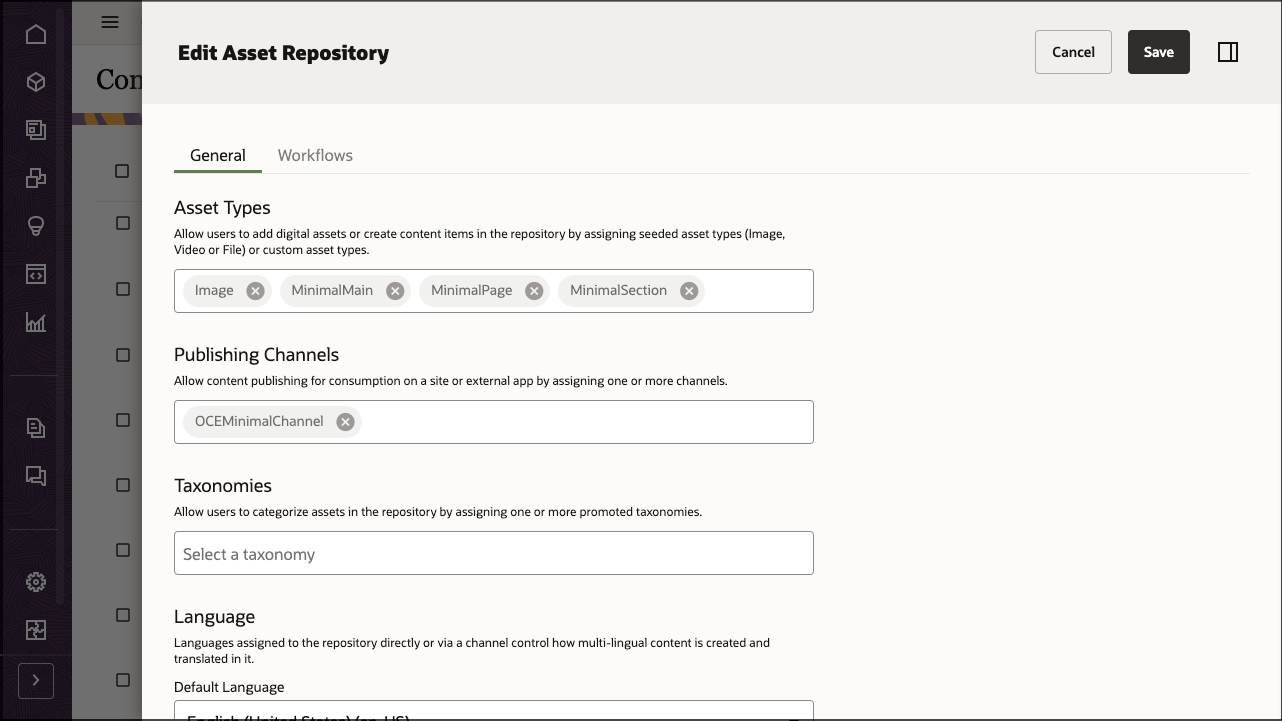
After adding the content types to the repository, you can open the OCEMinimalRepository repository on the Assets page and start creating your content items for all the content types.
Task 2: Build the Minimal Site in Svelte
To consume our Oracle Content Management content in a server-side rendered Svelte application, we can use the Svelte minimal site sample, which is available as an open-source repository on GitHub.
Note: Remember that using the Svelte sample is optional, and we use it in this tutorial to get you started quickly. You can also build your own Svelte application.
To build the minimal site in Svelte:
- Clone the sample repository and install dependencies
- Configure the Svelte application
- Work with the Oracle Content Management Content SDK
- Use the Content SDK to Fetch Content
Clone the Sample Repository and Install Dependencies
The Svelte minimal site sample is available as an open-source repository on GitHub.
You’ll first need to clone the sample from GitHub to your local computer and change your directory into the repository root:
git clone https://github.com/oracle/oce-svelte-minimal-sample.git
    cd oce-svelte-minimal-sample
Now that you have your code base, you need to download dependencies for the application. Run the following command from the root directory:
npm installConfigure the Svelte Application
In this Svelte minimal site sample, you need to configure a few pieces of information so that your Oracle Content Management Content SDK (and any other requests) can target the correct instance URL and API version with the correct channel token. These values are used in src/scripts/server-config-utils.js to instantiate a new delivery client.
This application uses an .env file that is read by Webpack when it bundles the client and server applications. By using webpack.DefinePlugin, any values read from the .env file can be made available to anywhere in the application.
Open the .env file in a text editor. You’ll see the following:
# The connection details for the Oracle Content Management server to be used for this application
    SERVER_URL=https://samples.mycontentdemo.com
    API_VERSION=v1.1
    CHANNEL_TOKEN=ba0efff9c021422cb134c2fd5daf6015
Change each key-value pair to reflect your instance URL, the API version you want to target, and the channel token associated with your publishing channel. The channel for this tutorial is OCEMinimalChannel.
Work with the Oracle Content Management Content SDK
Oracle Content Management offers an SDK to help discover and use content in your applications. The SDK is published as an NPM module, and the project is hosted on GitHub.
Learn more about the SDK here.
The SDK has been registered as a runtime dependency of this project in the package.json file.
Use the Content SDK to Fetch Content
We can now leverage the Content SDK to fetch content so that we can render it in our Svelte application.
The Content SDK uses a DeliveryClient object to specify the endpoint. You can make all requests using that client object.
The src/scripts folder contains the code for getting data from Oracle Content Management using the Content SDK.
The src/scripts/server-config-utils.js file imports the Content SDK and then creates a delivery client using the configuration specified in .env.
The following command imports the SDK:
import { createDeliveryClient, createPreviewClient } from '@oracle/content-management-sdk';The following command creates the delivery client:
return createDeliveryClient(serverconfig);The src/scripts/services.js file contains functions to get the data for this Svelte minimal application.
The fetchOceMinimalMain() method retrieves the content type MinimalMain with a slug of minimalmain.
export async function fetchOceMinimalMain() {
      const data = await getItem('minimalmain', 'fields.headerlogo,fields.footerlogo,fields.pages');
      if (!data.hasError) {
        const { fields } = data;
        const { headerlogo, footerlogo } = fields;
        // Extract the sourceset for the headerImage and footerImage and put it back in the data
        data.headerRenditionURLs = getSourceSet(headerlogo);
        data.footerRenditionURLs = getSourceSet(footerlogo);
      }
      return data;
    }
For rendering the images, the services.js provides a helper method to retrieve the sourceset for an asset that is constructed from the renditions for the asset.
function getSourceSet(asset) {
      const urls = {};
      urls.srcset = '';
      urls.jpgSrcset = '';
      if (asset.fields && asset.fields.renditions) {
        asset.fields.renditions.forEach((rendition) => {
          addRendition(urls, rendition, 'jpg');
          addRendition(urls, rendition, 'webp');
        });
      }
      // add the native rendition to the srcset as well
      urls.srcset += `${asset.fields.native.links[0].href} ${asset.fields.metadata.width}w`;
      urls.native = asset.fields.native.links[0].href;
      urls.width = asset.fields.metadata.width;
      urls.height = asset.fields.metadata.height;
      return urls;
    }
The fetchPage() method retrieves the content type MinimalPage using the slug value for the page obtained from the previous query.
export async function fetchPage(pageslug) {
      // Get the page details
      const page = await getItem(pageslug, 'fields.sections');
      return page;
    }
The getRenditionURLs() method retrieves the rendition urls for any image that may be defined in a section using the id for that image. This call is done client side.
export function getRenditionURLs(identifier) {
      const client = getClient();
      return client.getItem({
        id: identifier,
        expand: 'fields.renditions',
      }).then((asset) => getSourceSet(asset))
        .catch((error) => logError('Fetching Rendition URLs failed', error));
    }
Now that we have our data query, we can render the responses in our Svelte components.
Svelte Components
The minimal application breaks down each page into a number of smaller components.
The next few sections provide an overview of how Svelte renders our application in each of our components:
- Routes
- Index Component
- [slug].svelte Component
- Layout, Header, and Footer Components
- Section Component
Routes
Pages in Sapper are Svelte components written in .svelte files. When a user first visits the application, they will be served a server-rendered version of the route in question, plus some JavaScript that ‘hydrates’ the page and initializes a client-side router. From that point forward, navigating to other pages is handled entirely on the client for a fast, app-like feel. The filename determines the route.
In our site, we want to provide two routes:
- the root page
- any other page defined in the content item of type OceMinimalPage
All pages have a header, containing the company logo and links, and a footer, containing a logo and social media icons. The header and footer are rendered on each page of the application using the _layout component defined in the src/routes/_layout.svelte file.
Index Component
The root page is rendered by the Index component, located at routes/index.svelte.
This component imports the API and uses the preload() function to make a call to fetchOceMinimalMain. It then retrieves the first page from this content item and redirects to that page.
<script context="module">
      import { fetchOceMinimalMain } from "../scripts/services.js";

      export async function preload() {
        const appData = await fetchOceMinimalMain();
        return this.redirect(301, `/page/${appData.fields.pages[0].slug}`);
      }
    </script>
[slug].svelte Component
This component is responsible for rendering the page corresponding to the page slug that is passed in through the request url.
Open the component, located at src/routes/page/[slug].svelte.
<script context="module">
      import { fetchPage, getRenditionURLs } from "../../scripts/services.js";

      export async function preload(page) {
        // find the slug param from the page. If its null, default to home
        let slug = page.params.slug;
        if (slug == null) {
          slug = 'home';
        }
        // fetch the page corresponding to the slug
        const pageData = await fetchPage(slug);
        const { sections } = pageData.fields;

        // for each section in the page, if a image is present, get the corresponding rendition urls
        // and insert it back into the section
        const promises = [];
        sections.forEach((section) => {
          // add a promise to the total list of promises to get any section rendition urls
          if (section.fields.image) {
            promises.push(
              getRenditionURLs(section.fields.image.id)
                .then((renditionURLs) => {
                  // eslint-disable-next-line no-param-reassign
                  section.renditionURLs = renditionURLs;
                }),
            );
          }
        });

        // execute all the promises and return all the data
        await Promise.all(promises);
        return {
          pageData,
        };

      }
    </script>
Layout, Header, and Footer Components
As we have seen previously, the Layout component consists of a header and footer wrapping the child contents.
The Layout component, located at src/routes/_layout.svelte, fetches the data in the preload() function and passes that data to the Header and Footer components.
<script context="module">
      import { fetchOceMinimalMain } from "../scripts/services.js";

      export async function preload() {
        const appData = await fetchOceMinimalMain();
        return {
          appData,
        };
      }
    </script>
The Header component, located at src/components/Header.svelte, and the Footer component, located at src/components/Footer.svelte, simply use data passed to them. They do not get any additional data from the server.
Section Component
The Section component, located at src/components/Section.jsx, is used by Page component [slug].svelte and is used to render any content items of the type MinimalSection.
This component has data passed to it from the Page component.
Task 3: Prepare Your Application for Deployment
Now that we’ve built our Svelte minimal site site, we need to see it in a local development server so we can debug any issues and preview the application before it goes live.
Prepare the application for deployment in three steps:
- Build the application
- Run the application using Node
- Use scripts to build and run the application in development and production
Build the Application
Sapper allows you to export a static site with a single zero-config sapper export command. To build the application, run the following command.
npm run exportThis will create a sapper/export folder with a production-ready build of your site.
Run the Application
Once the build folder has been created, you can launch it like so:
npm run startThen, open your browser to http://localhost:5000 to see your site in action.
Use Scripts to Build and Run the Application in Development and Production
The package.json file located at the root of the project contains scripts that make it easier to build the bundles and run the application.
Development
You can use the dev script during development:
npm run devProduction
Sapper’s production script comes in two versions, build and export. The ‘build’ command will generate a hostable Node app and export will generate a static version of the site. For production, you can use either:
npm run build
    npm run startbuild
Or for static version, use
npm run export
    npm run start
Conclusion
In this tutorial, we created a minimal site in Svelte, which can be found on GitHub. This site uses Oracle Content Management as a headless CMS. After setting up and configuring Oracle Content Management with a channel of published content for the minimal site tutorial, we installed and ran the Svelte site to fetch the required content and build the site.
For more information on Svelte, go to the Svelte website.
Learn about important Oracle Content Management concepts in the documentation.
You can find more samples like this on the Oracle Content Management Samples page in the Oracle Help Center.
Build a Minimal Site in Svelte with Headless Oracle Content Management
F40890-01
December 2021
Copyright © 2021, Oracle and/or its affiliates.
Primary Author: Oracle Corporation