Build an Image Gallery Using Oracle Content Management Components in Oracle Visual Builder
Introduction
This tutorial will introduce you to the basic steps of building an image gallery application in Oracle Visual Builder using Oracle Content Management as the content management system and components built for Visual Builder that use the Content SDK. This Oracle Visual Builder sample is available on GitHub.
The tutorial consists of three steps:
- Prepare Oracle Content Management
- Build the Image Gallery in Oracle Visual Builder
- Prepare your application for deployment
Prerequisites
Before proceeding with this tutorial, we recommend that you read the following information first:
To follow this tutorial, you’ll need:
- access to an Oracle Content Management instance and an Oracle Content Management account with the Content Administrator role
- access to an Oracle Visual Builder subscription and an account with developer permission
- a Windows or Mac computer.
Step 1: Prepare Oracle Content Management
This tutorial is based on the assumption that you’ve created your asset repository.
If you don’t already have an Oracle Content Management instance, see the Quick Start to learn how to register for Oracle Cloud, provision an Oracle Content Management instance, and configure Oracle Content Management as a headless CMS.
For this tutorial, you’ll need to create a content model in either of two ways. There’s a downloadable asset pack available that will fill your empty repository with sample content, or you can create your own content.
To prepare Oracle Content Management:
- Create a channel and asset repository.
- Import the Oracle Content Management Samples Asset Pack
- Upload Your Own Image Assets
Create a Channel and Asset Repository
You first need to create a channel and an asset repository in Oracle Content Management so you can publish content.
To create a channel and an asset repository in Oracle Content Management:
Log in to the Oracle Content Management web interface as an administrator.
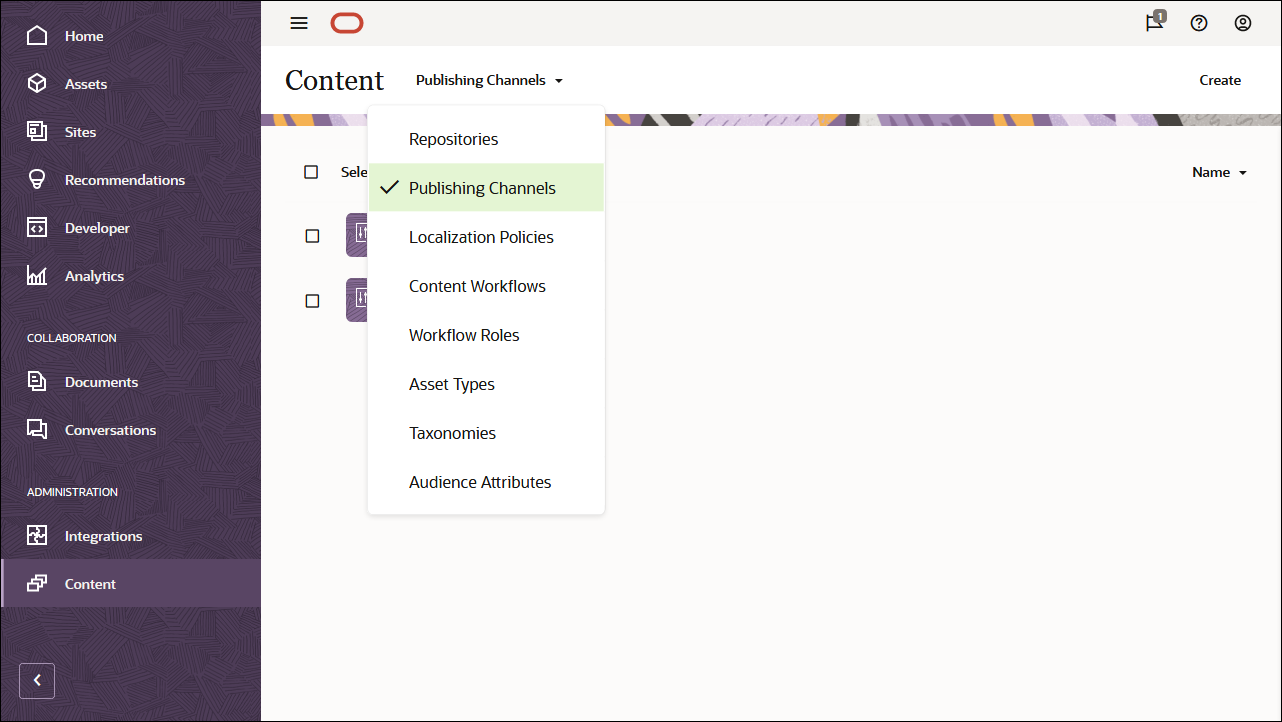
Choose Content in the left navigation menu and then choose Publishing Channels from the selection list in the page header.
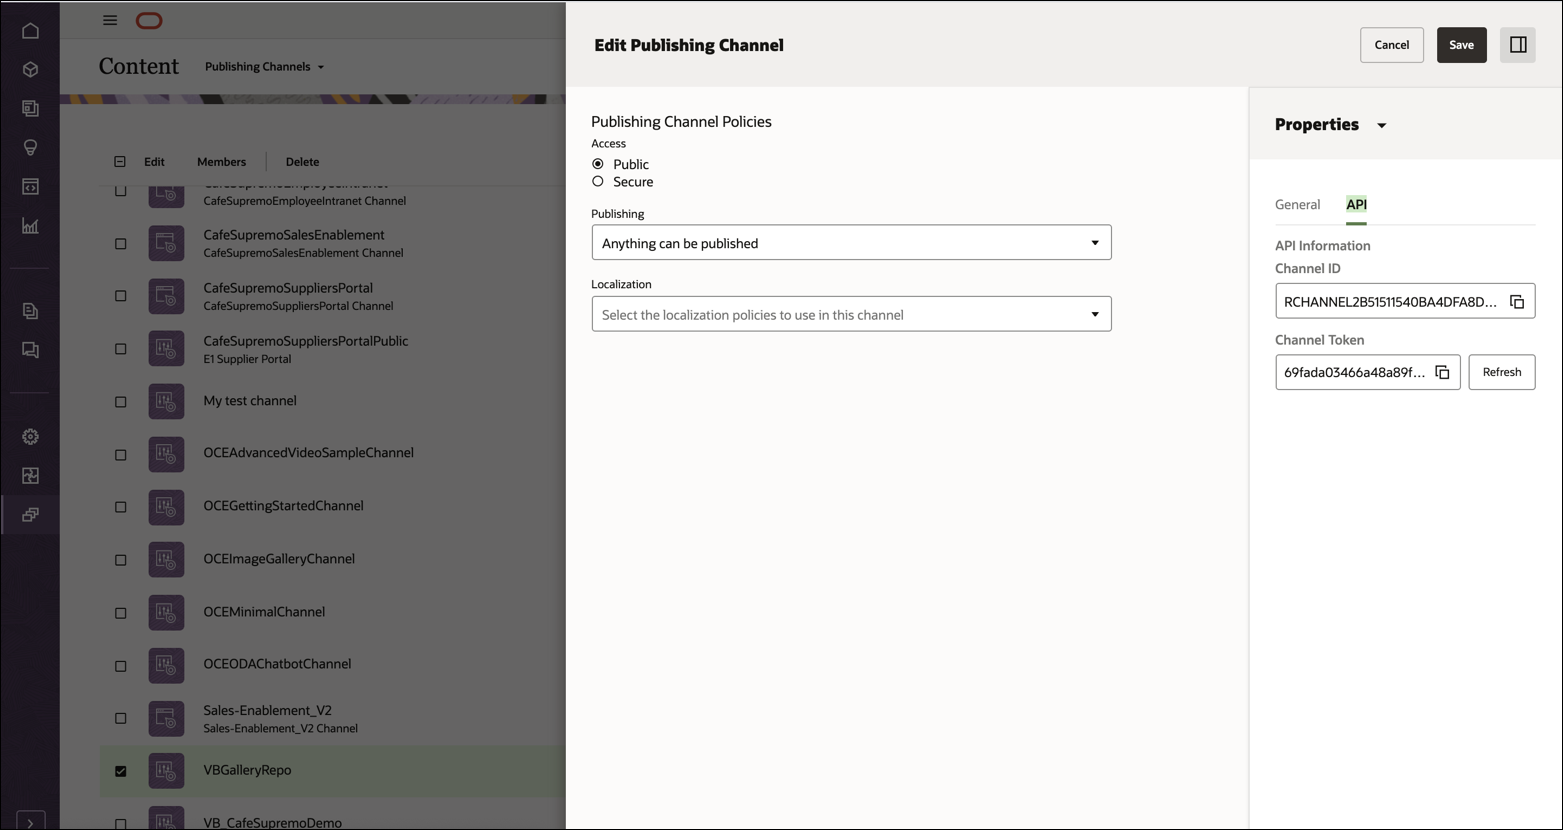
In the upper right corner, click Create to create a new channel. Name the channel ‘VBImageGalleryChannel’ for the purpose of this tutorial, and keep the access public. Click Save to create the channel.
From the Properties section, click on the API tab and copy the channel token value.
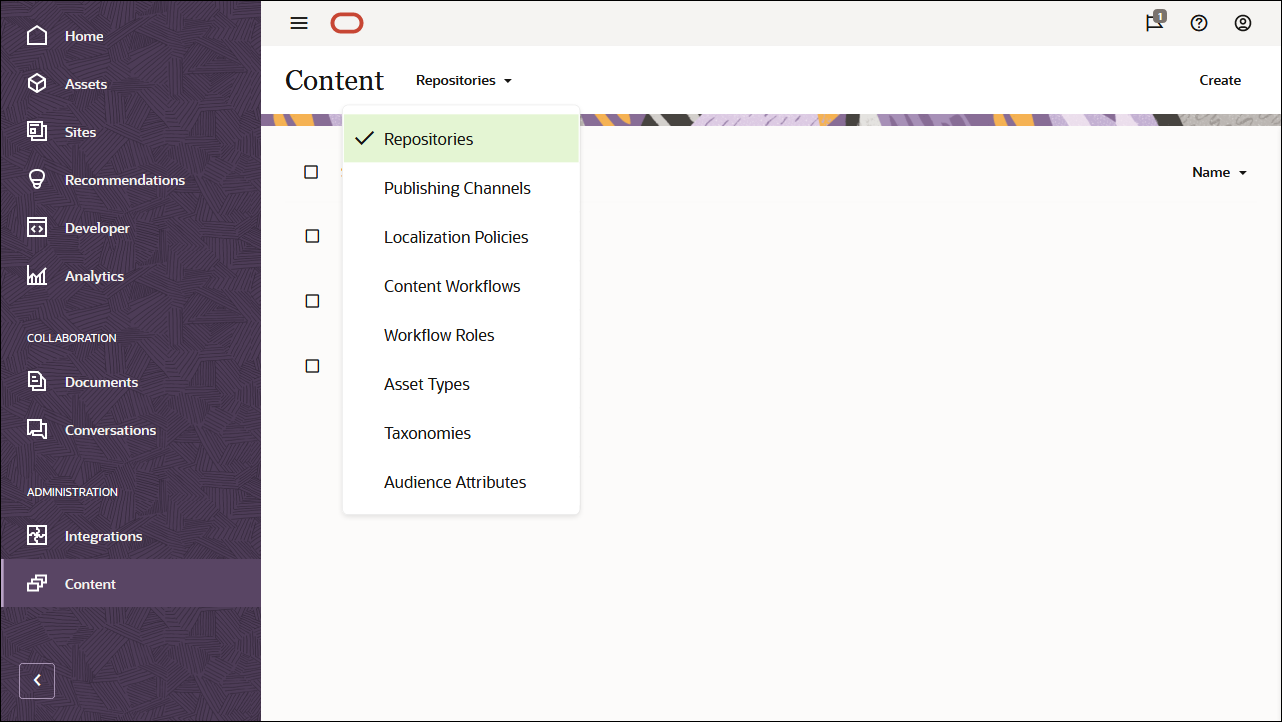
Choose Content in the left navigation menu and then choose Repositories from the selection list in the page header.
In the upper right corner, click Create to create a new asset repository. Name the asset repository ‘VBImageGalleryRepository’ for the purpose of this tutorial.
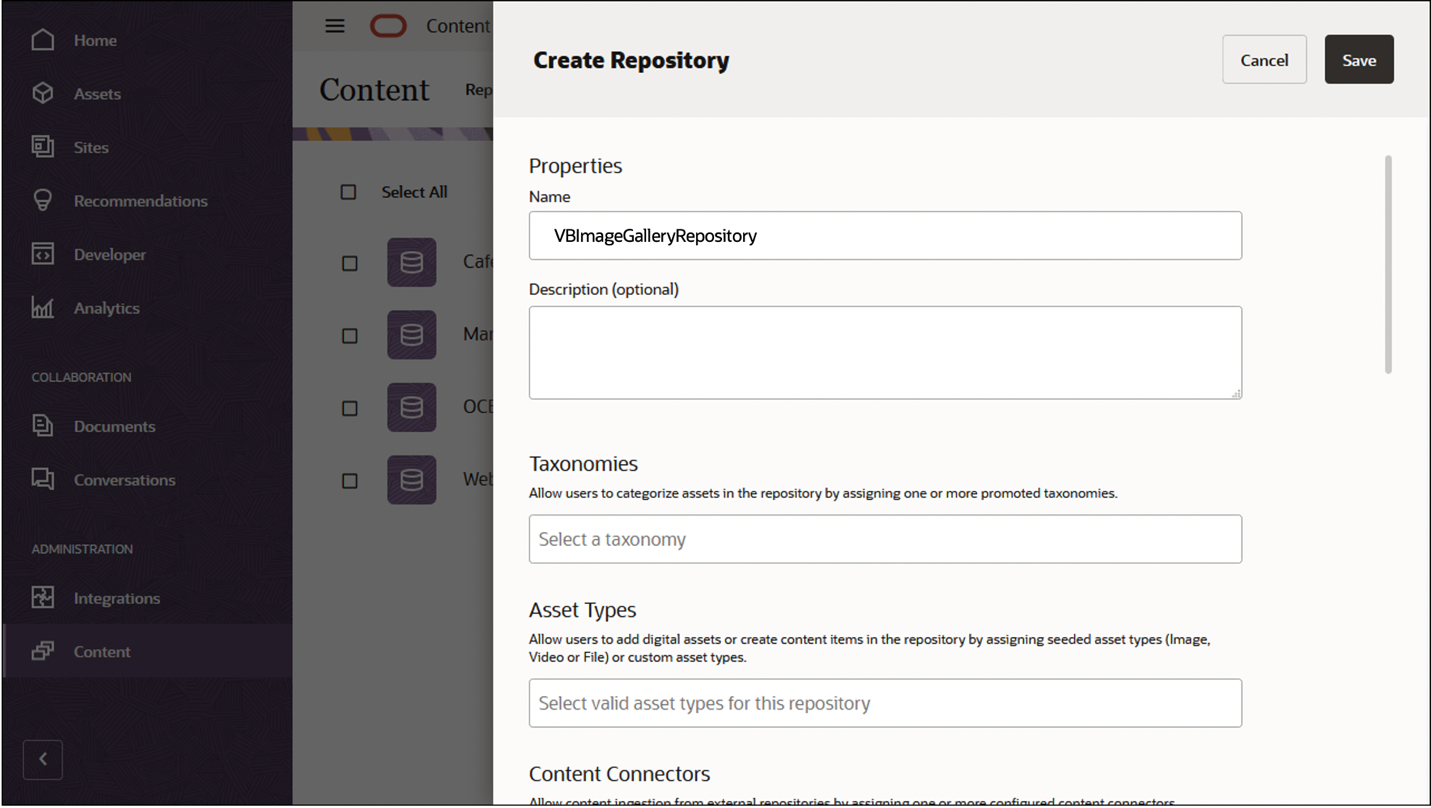
In the Publishing Channels field, select VBImageGalleryChannel to indicate to Oracle Content Management that content in the VBImageGalleryRepository repository can be published to the VBImageGalleryChannel channel. Click Save when you’re done.
Import the Oracle Content Management Samples Asset Pack
You can download a preconfigured Oracle Content Management sample assets pack which contains all required assets for this tutorial.
You can upload a copy of the content we’re using in this tutorial from the Oracle Content Management Samples Asset Pack:
Download the Oracle Content Management Samples Asset Pack (OCESamplesAssetPack.zip) from the Oracle Content Management downloads page. Extract the downloaded zip file to a location on your computer. After extraction, this location will include a file called OCEImageGallery_data.zip.
Log in to the Oracle Content Management web interface as an administrator.
Choose Content in the left navigation menu and then choose Repositories from the selection list in the page header. Now select VBImageGalleryRepository and click the Import Content button in the top action bar.
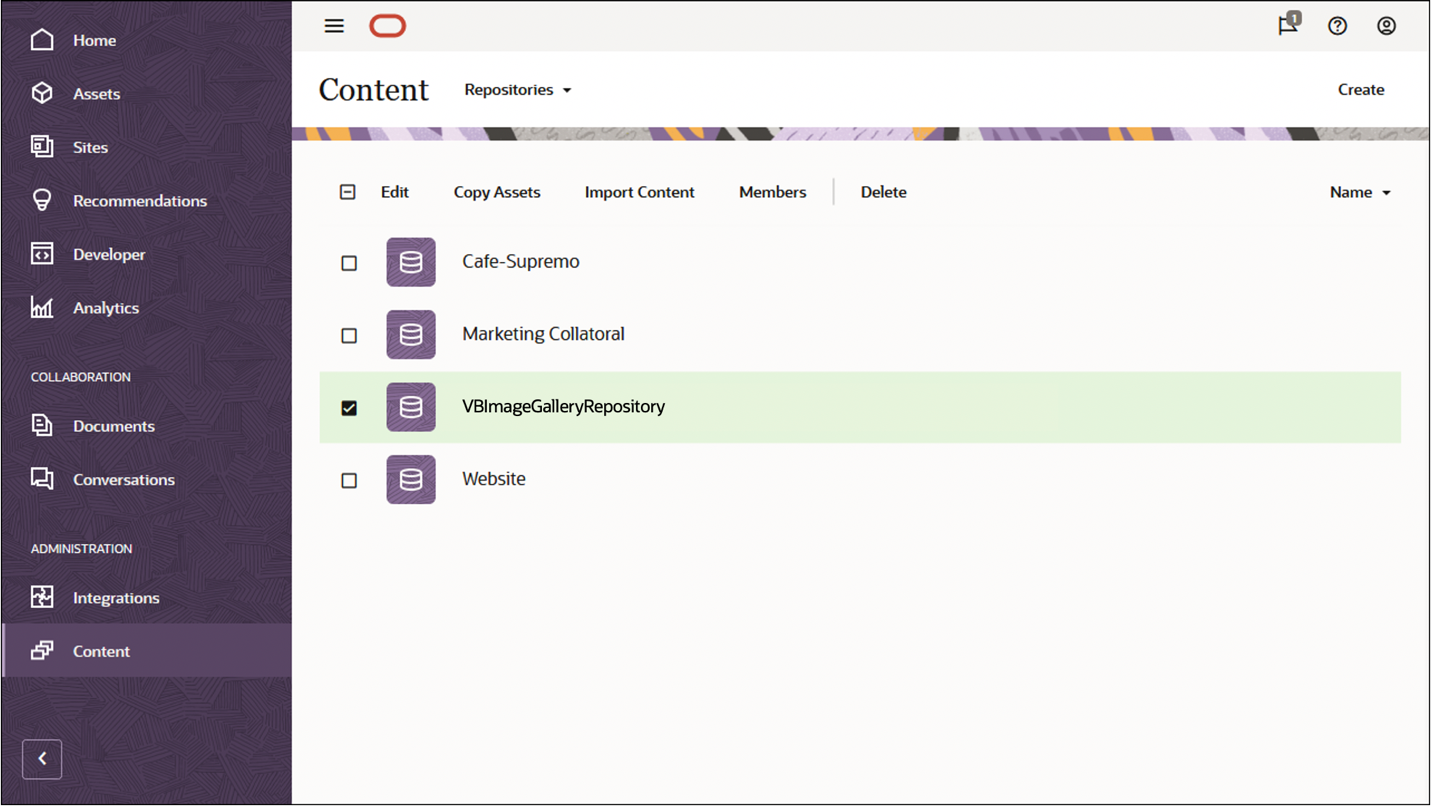
Upload OCEImageGallery_data.zip from your local computer to the Documents folder.
Once it’s uploaded, select OCEImageGallery_data.zip and click OK to import the contents into your asset repository.
After the content has been imported successfully, navigate to the Assets page and open the VBImageGalleryRepository repository. You’ll see that all the related images have now been added to the asset repository.
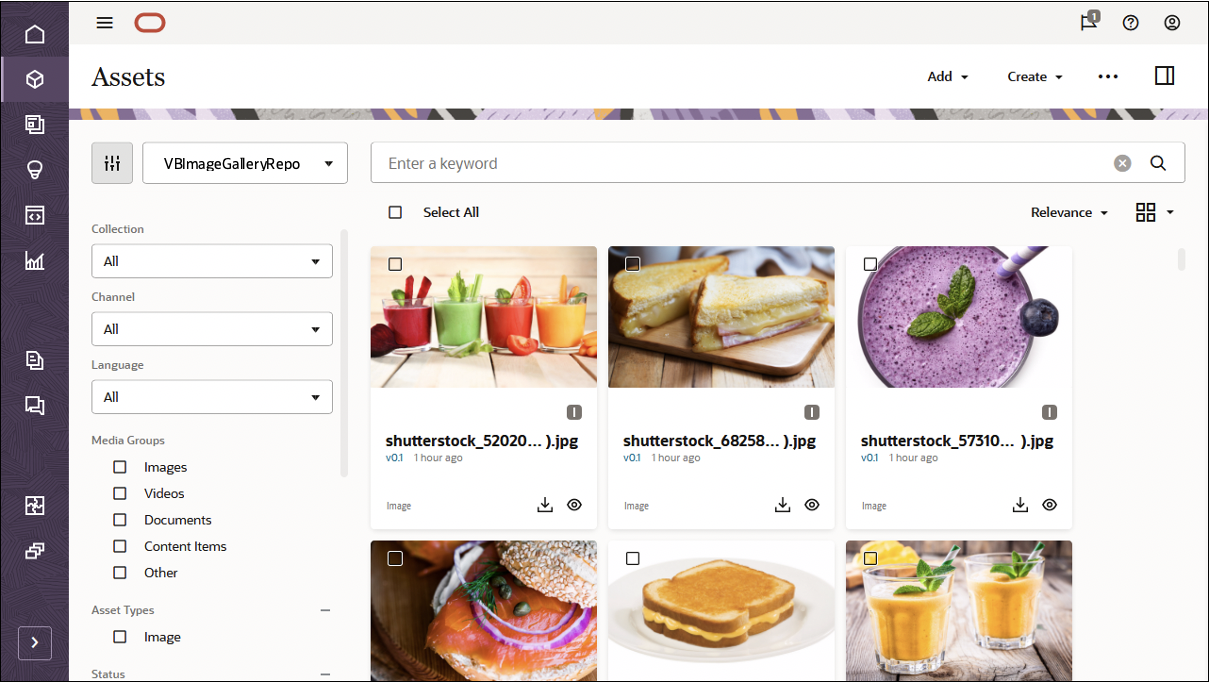
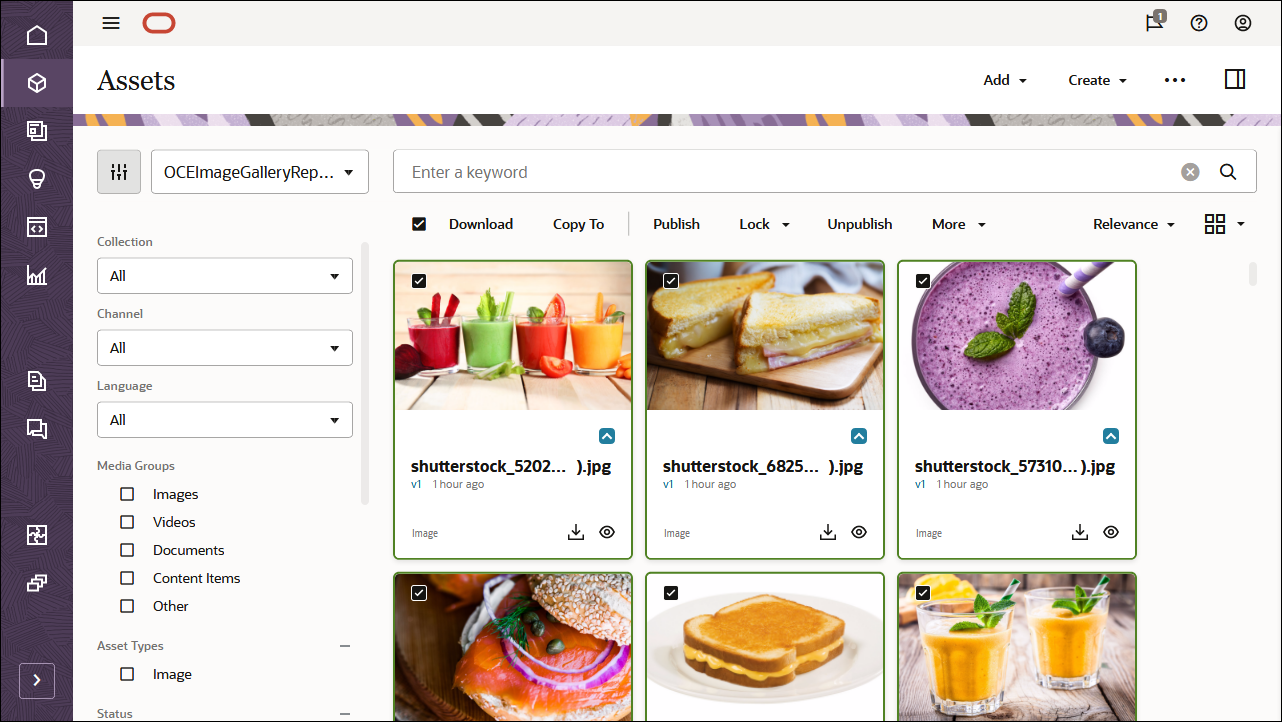
Click Select All on the top left and then Publish to add all the imported assets to the publishing channel that you created earlier, VBImageGalleryChannel.
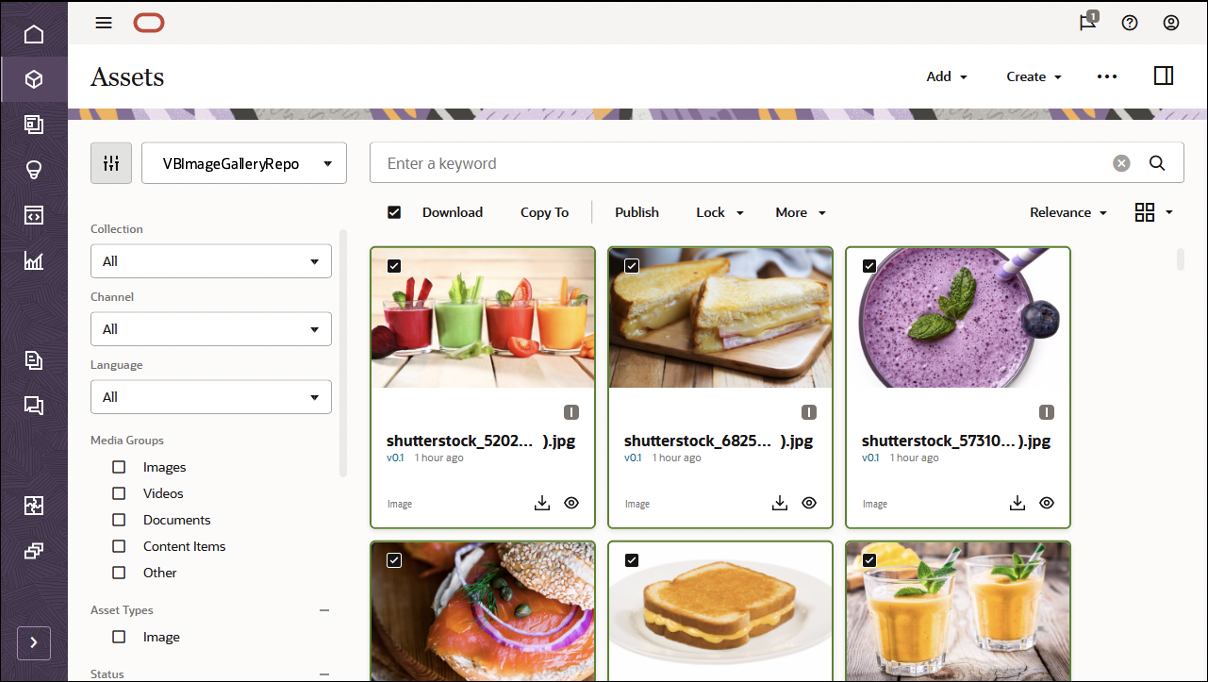
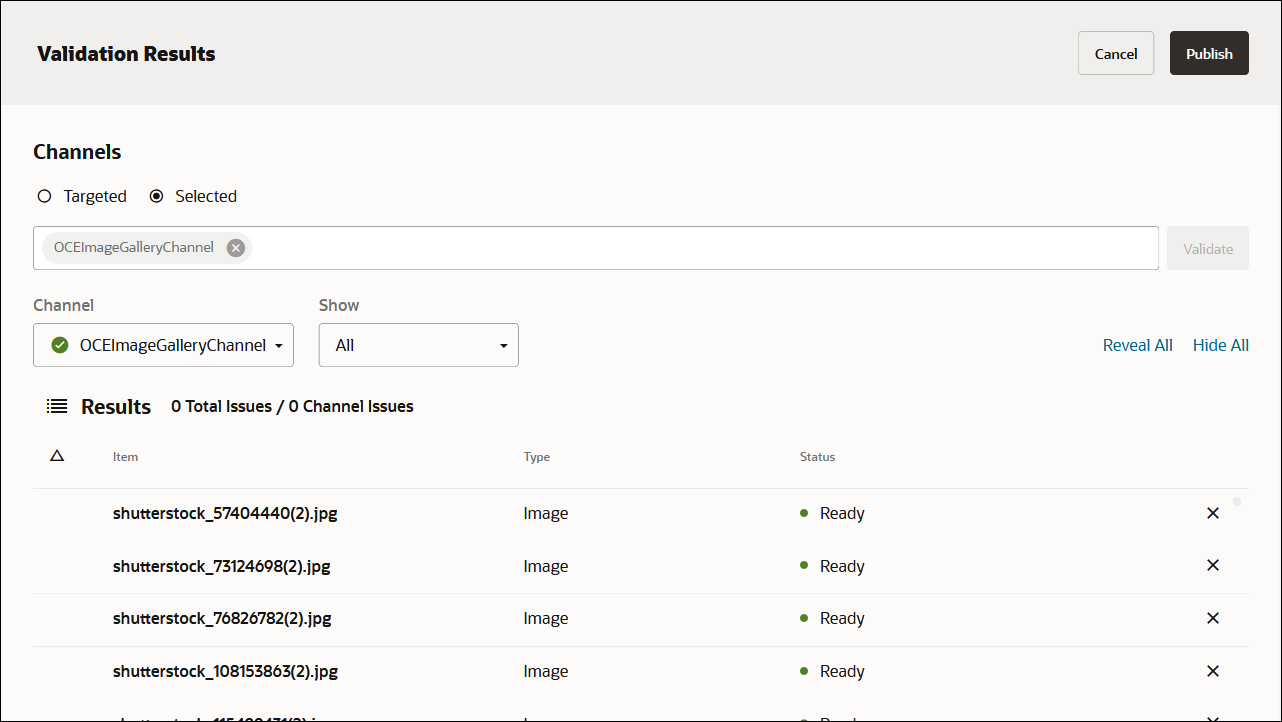
Before publishing, you need to validate all the assets. First add VBImageGalleryChannel as a selected channel, and then click the Validate button.
After the assets have been validated, you can publish all the assets to the selected channel by clicking the Publish button in the top right corner.
Once that’s done, you can see on the Assets page that all assets have been published. (You can tell by the icon above the asset name.)
Upload Your Own Image Assets
For this tutorial, we’re using an asset repository called ‘VBImageGalleryRepository’ to build the home page for our gallery site. Alternatively, you can also upload your own images.
To add image assets to the gallery asset repository:
Log in to the Oracle Content Management web interface.
Click Assets in the left navigation menu.
Open the VBImageGalleryRepository repository.
Click Add in the upper right corner of the page to add image assets to the gallery asset repository.
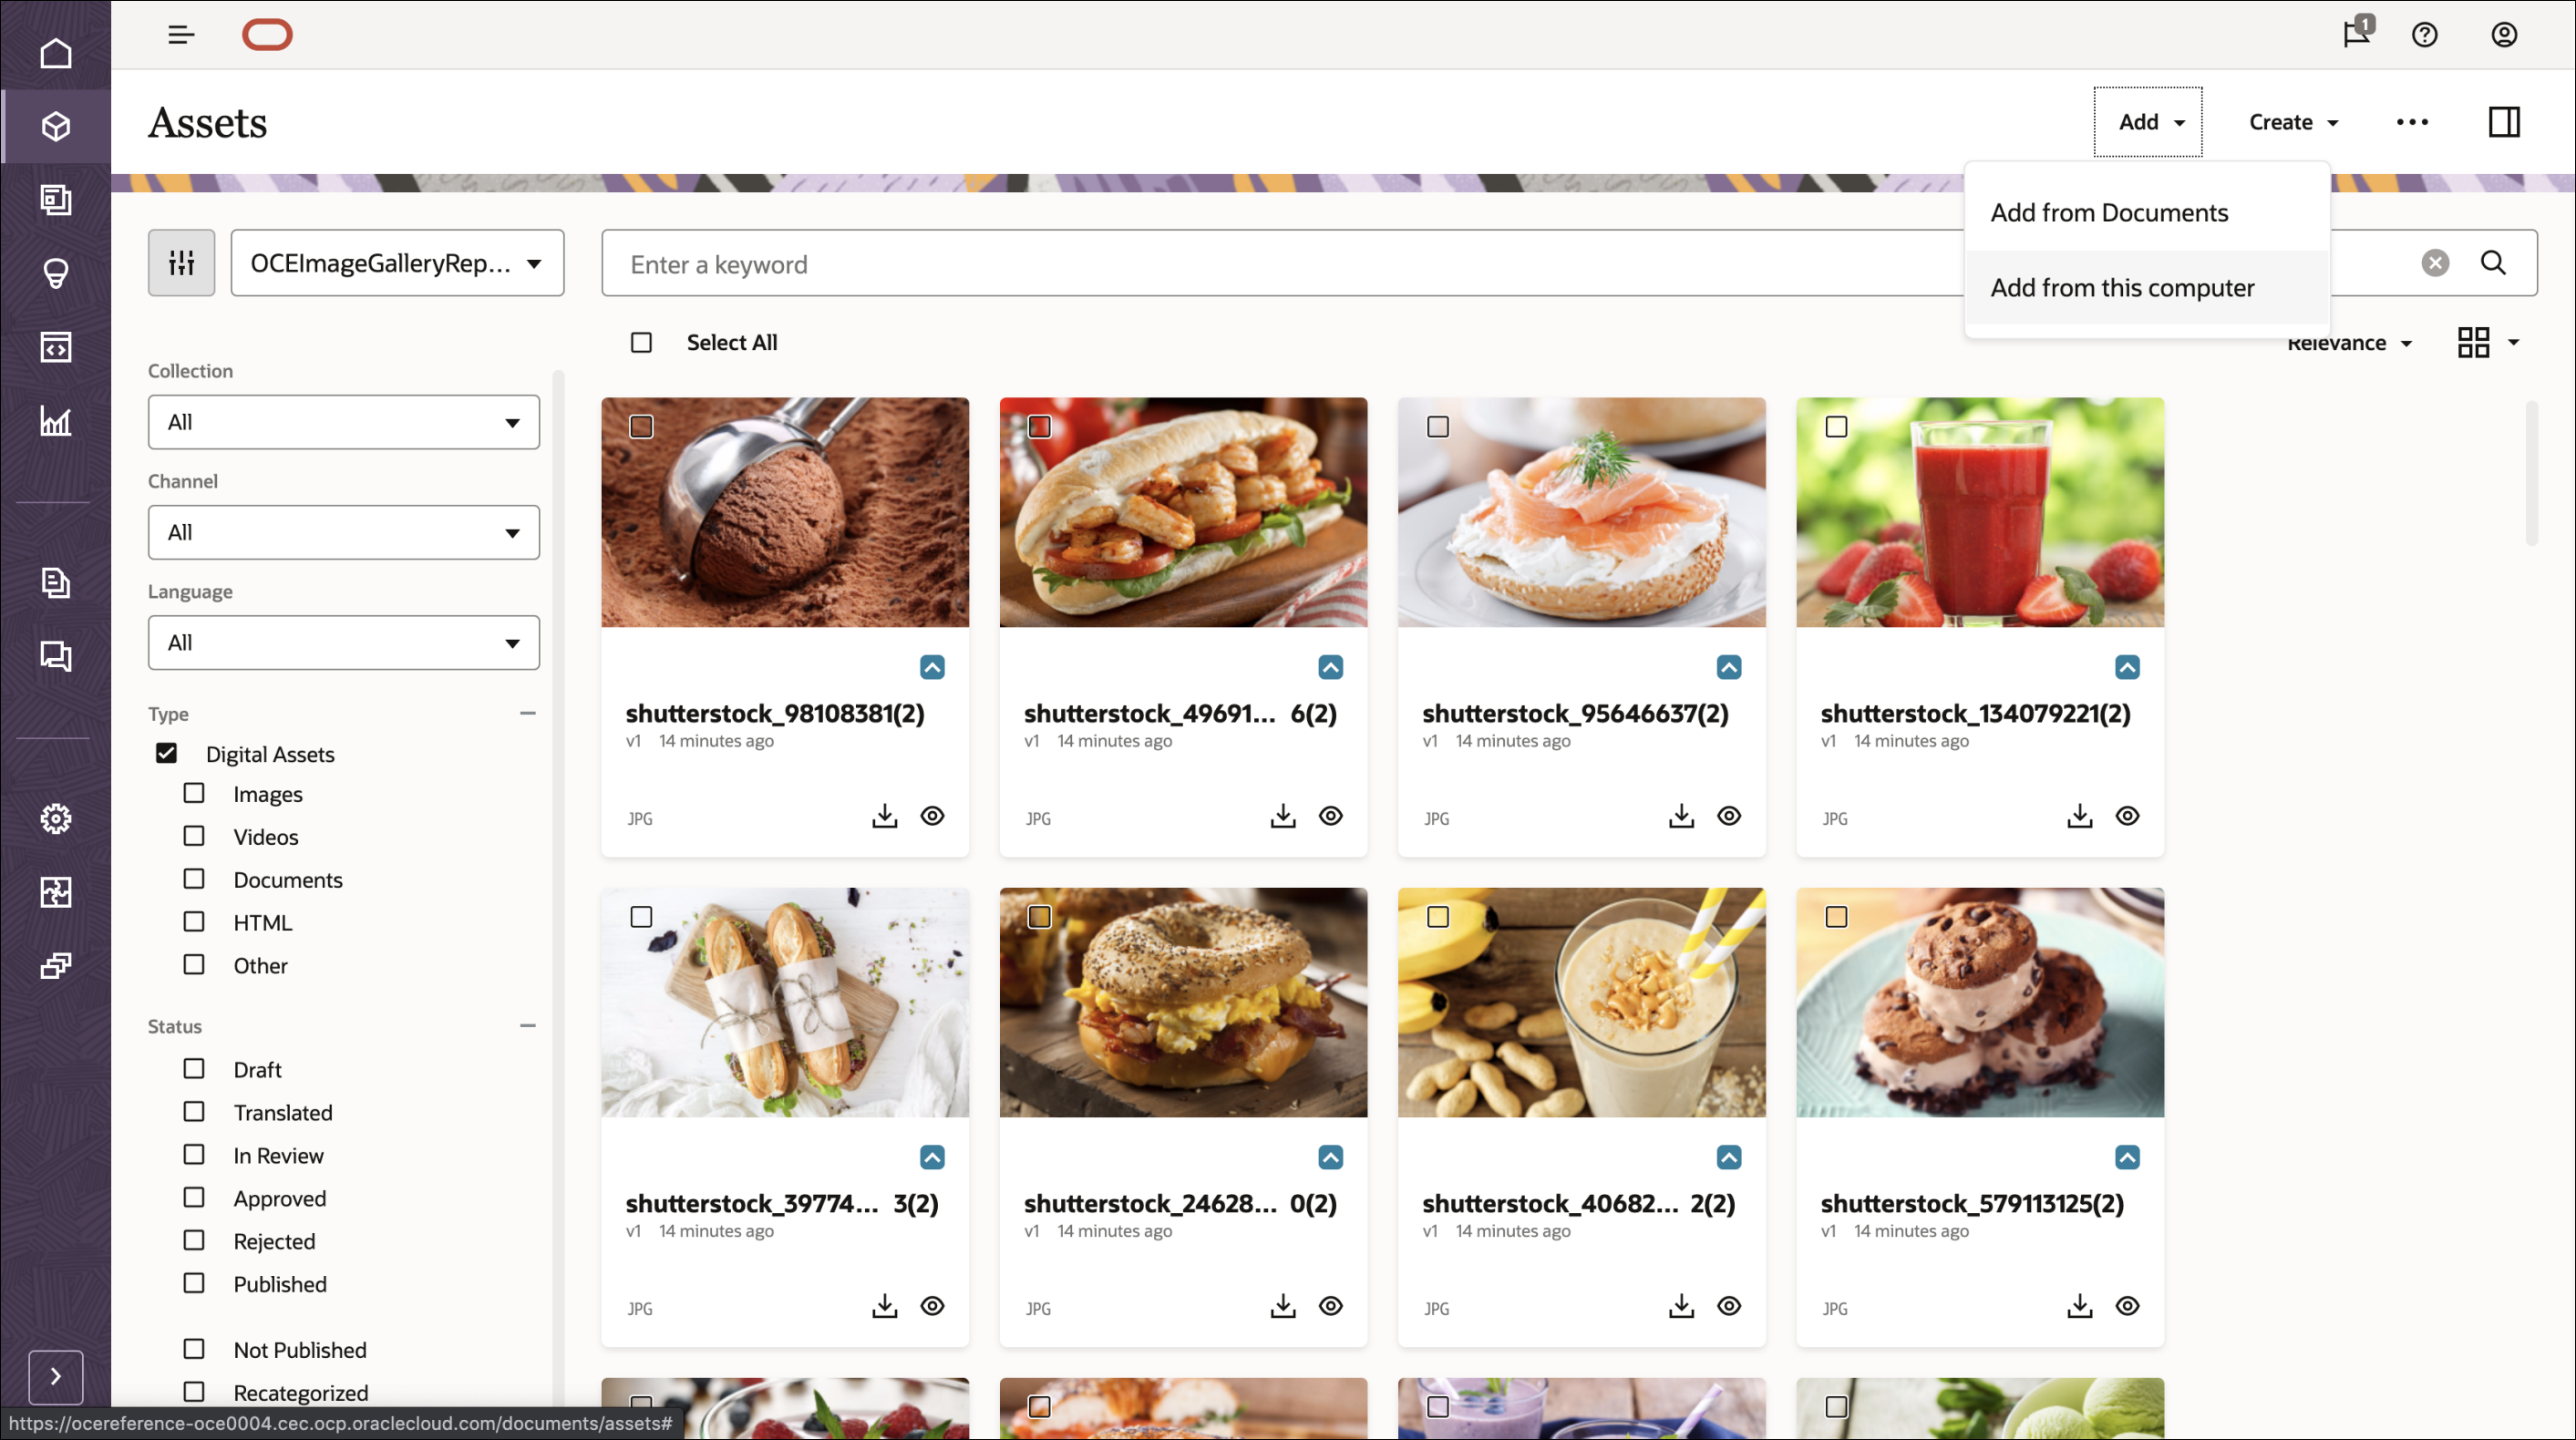
Upload your own new assets from your local computer or choose existing assets already in Oracle Content Management.
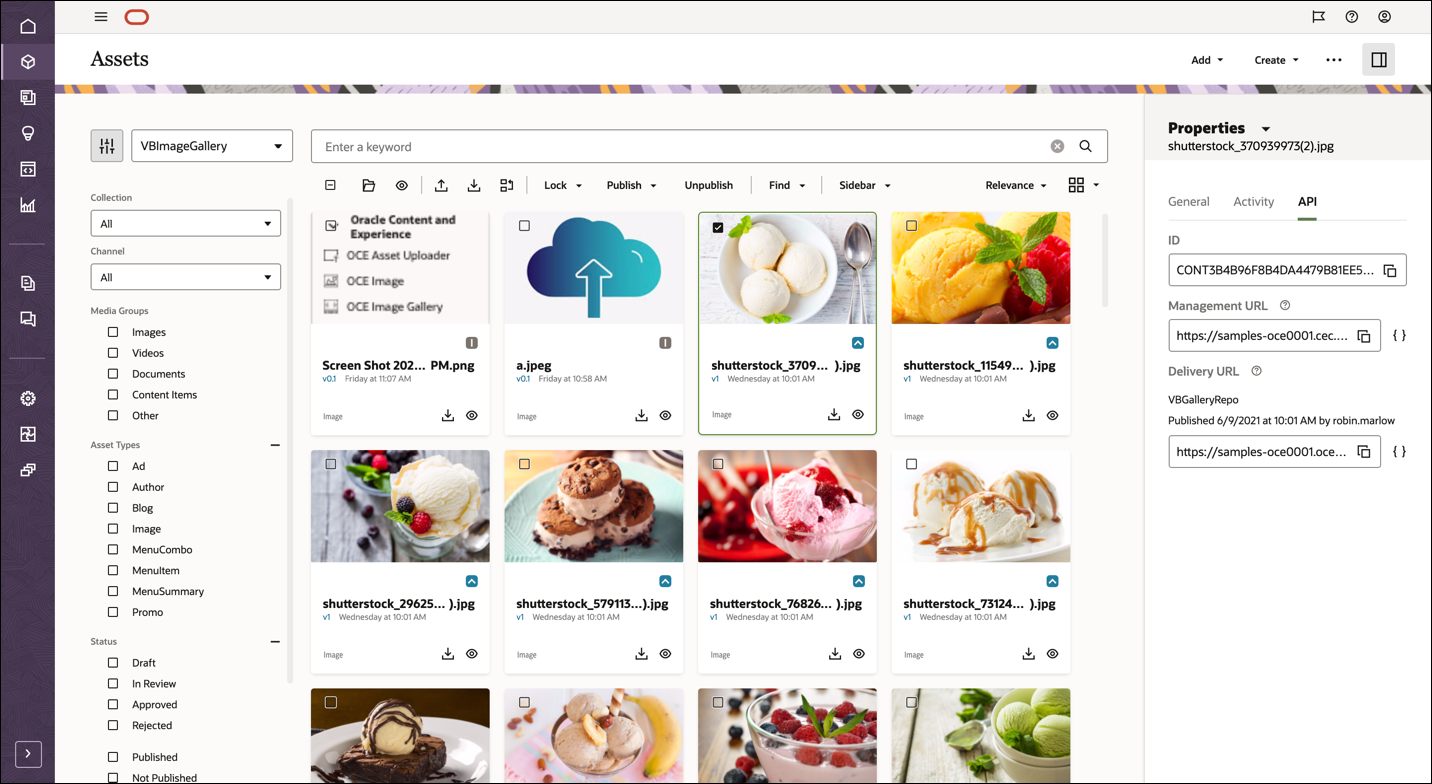
While we’re at it, let’s also learn how to copy the content ID of each image, which will come in handy when we develop our gallery sample:
Select a published image in the repository.
Click the side bar panel icon in the top right.
Open the Properties panel and then the API tab.
Copy the ID value.
Step 2: Build the Image Gallery in Oracle Visual Builder
To build the image gallery in React:
- Set up Oracle Visual Builder
- Configure the integration
- Learn about the Oracle Content Management components
- Review the website pages
Set Up Oracle Visual Builder
Download the oce-vb-image-gallery-sample.zip archive file, which is available as an open-source repository on GitHub.
Import the Visual Builder image gallery site application into Oracle Visual Builder:
Sign in to Oracle Visual Builder.
Click Import.
In the Import dialog, choose Application from file.
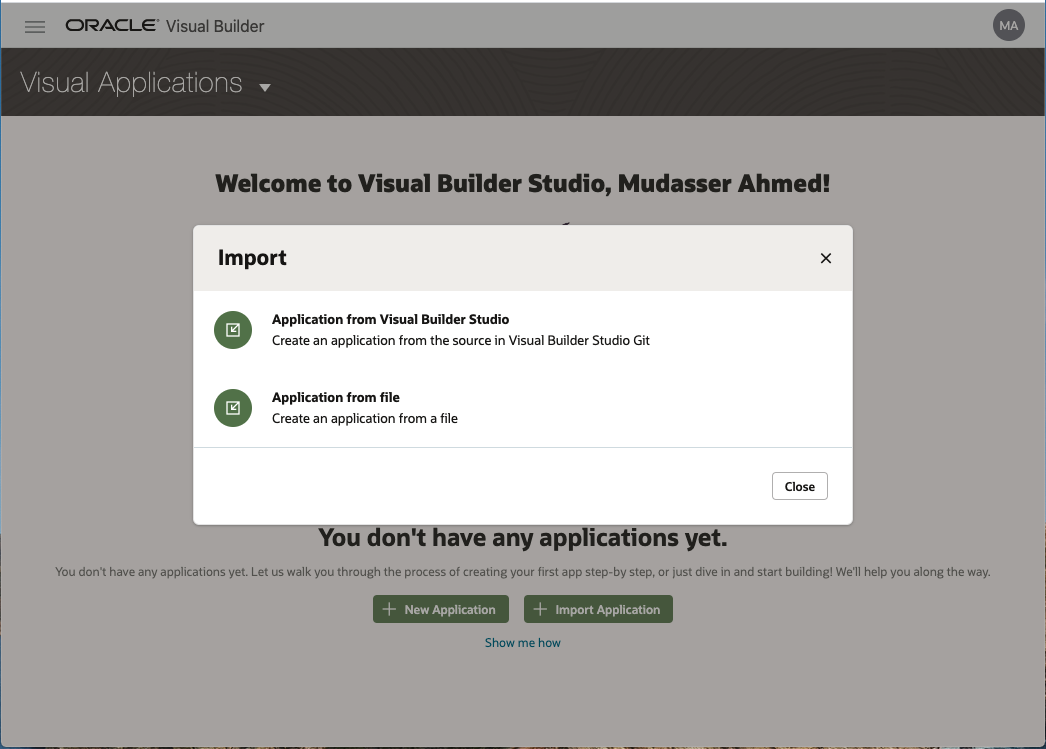
In the Import Application from File dialog, upload the zip file that you downloaded earlier from GitHub (oce-vb-marketing-sites-sample.zip). The Application Name and Application ID fields are automatically populated.
Edit the Application Name field to specify a name for your website application (such as ‘GallerySample’).
Click Import.
After the application has been successfully installed, it’s ready for use.
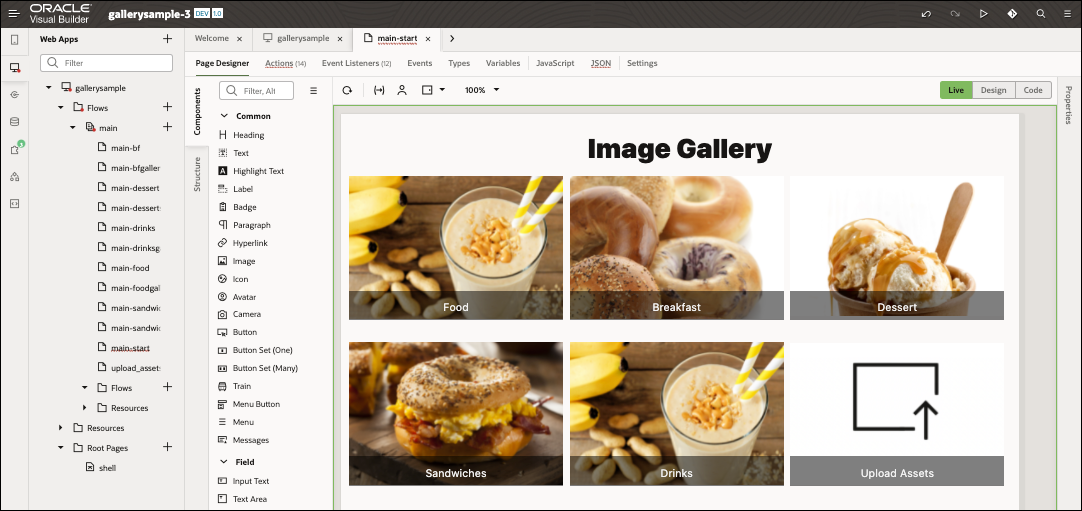
See the Oracle Visual Builder documentation for more information on setting up the Oracle Content Management components in Oracle Visual Builder.
Configure the Integration
There are some integration settings that you need to configure before you can use Oracle Content Management components in Oracle Visual Builder applications:
Add Connection to Component Exchange
To add a component to an Oracle Visual Builder application page, you must first install the Oracle Content Management component from a component exchange that’s connected to your Oracle Visual Builder instance.
First, add a connection to a component exchange:
Log in to your Oracle Visual Builder instance and open the Tenant Settings page.
In the Component Exchange panel, enter the URL and credentials for the component exchange.
If you’re adding a connection to a private component exchange, it’s recommended that the credentials you provide are for an administrator who’s a member of the VB Studio project hosting the exchange or the project owner.
After you’ve added an exchange to the Oracle Visual Builder instance, you’ll be able to use the Components tab in the navigator to install and manage the components you want to use in your applications from the exchange.
Set Variables
Next, the contentServer and channelToken variables need to be set in Oracle Visual Builder using the URL and channel token value in Oracle Content Management. You must set the contentServer variable if you’re accessing a public channel, and the channelToken variable must match the channel token value of the publishing channel you created earlier in Oracle Content Management.
To set the contentServer variable:
Navigate to the Oracle Content Management instance and copy the URL. Don’t worry about subdirectories. For example, both these URLs will work:
- https://example.cec.ocp.oraclecloud.com/documents/home
- https://example.cec.ocp.oraclecloud.com
This property will be initialized as an application-level variable by default when you add the component to your page. In Oracle Visual Builder, open your application, click oce-vb-image-gallery-sample in the left navigation tree, and then open the Variables tab.
The application-level variables are shown on the Variables tab.
Select contentServer from the list of variables and then expand its properties.
On the General tab, update the Default Value field to the Oracle Content Management URL value you copied earlier (for example, https://example.cec.ocp.oraclecloud.com).
Once the variable is updated, when you add another Oracle Content Management component that requires this attribute, the attribute will default to the same variable initiated by the first component that was imported.
To set the channelToken value:
On the Variables tab, select channelToken from the list of variables and then expand its properties.
On the General tab, update the Default Value field to the channel token value of the publishing channel that you noted earlier.
Oracle Content Management components that place assets on an Oracle Visual Builder application page only work for published content items.
Other Oracle Content Management components for Oracle Visual Builder applications may have additional requirements. Detailed component configuration instructions, including requirements and options, are included in the readme file of each component.
Oracle Content Management Components
The component exchange containing the Oracle Content Management components is available in Oracle Visual Builder in the Page Designer section (in the Components tab). You can drag and drop Oracle Content Management components from the component exchange onto the application designer pages and configure them as needed.
We’re using two components in this tutorial:
- OCE Image, which is used to surface approved and published Oracle Content Management images.
- OCE Image Gallery, which is used to present a set of approved and published Oracle Content Management images in gallery view or in a grid in rows and columns.
The benefit of using a cloud-based visual builder tool is its capability to rapidly create and host web and mobile applications with minimal coding required. This tutorial walks you through the basic code used in this sample and explains the components used in each screen.
Review the Website Pages
The next few sections provide an overview of each of the website pages:
Home page
The home page uses the built-in Flex component and OCE Image component to display a layout of categories. Using the page designer editor, you can view the structure of the home page.
To start off, it has a simple heading with the following sample code, which you can view in the page editor.
<h1> <div style="text-align: center;">Image Gallery</div> </h1>The built-in Flex component from the component’s palette is used to lay out the categories in a grid. The display settings are set to use a ‘Flex’ layout.
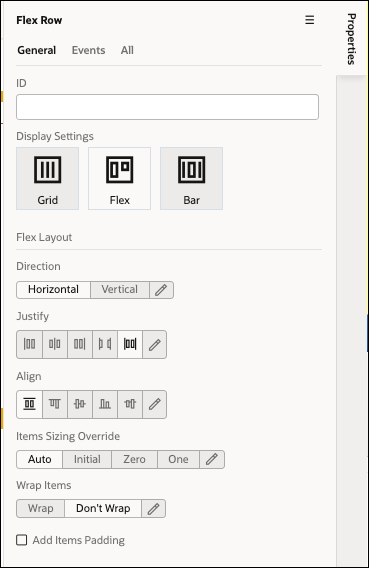
<div class="oj-flex oj-sm-align-items-center oj-sm-justify-content-center oj-sm-flex-wrap-nowrap"></div>OCE Image components are contained within the Flex component, one for each category. The Content Server and Channel Token properties make use of the default variable settings you configured earlier. The Content Image property contains the content ID for the image to be displayed.
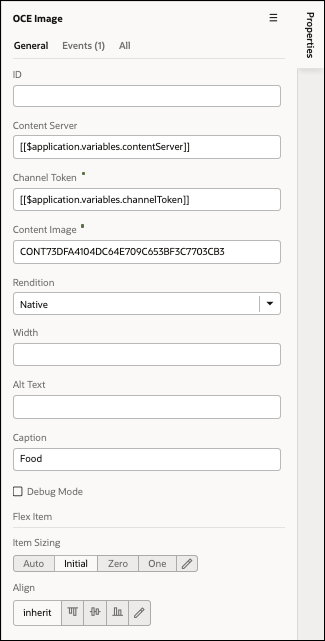
If you used the samples asset pack earlier, then images should already be showing for each category. There are five OCE Image components within the Flex component.
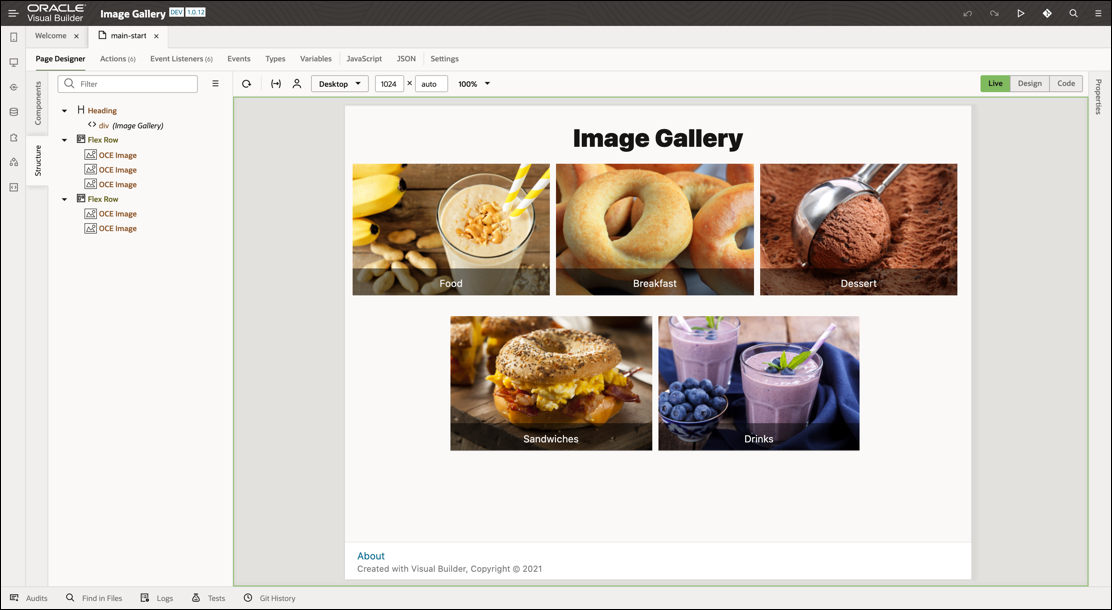
The code for each OCE Image component follows this pattern:
<oj-oce-image content-server="Content server ID goes here"
      channel-token= “Channel Token ID goes here" class="oj-flex-item oj-sm-flex-initial"
      content-image=" Content Image ID goes here" " rendition="Native"
      caption="Category name goes here"
    </oj-oce-image>
If you chose to populate the asset repository with your own images, then you can decide how many categories you want on the screen and configure each OCE Image component by copying and pasting the content ID for the published image you want to use.
Image Grid Pages
Each of the categories on the home page is associated with individual image grid pages. The association of pages is achieved using a click action from the events tab in the properties panel of the OCE Image component. Image grid pages are created for each of the image categories.
Image grid pages are associated using navigation. The ‘click’ start:‘click’ is used to create events from the properties panel.

After creating the action, you configure the navigation action to each of the relevant image grid page.
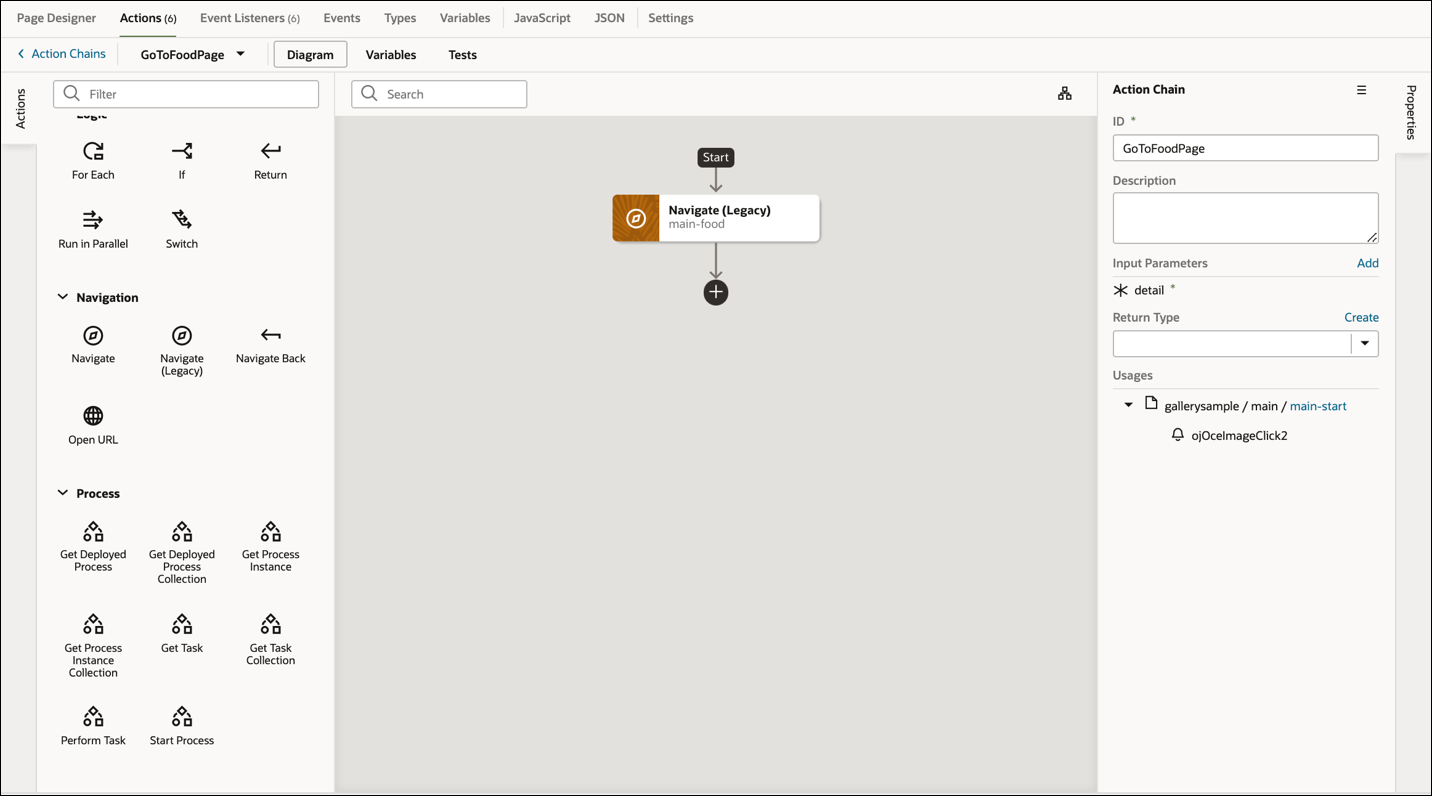
The code below shows the on-click action that’s triggered when a category on the home page is clicked to navigate to the associated image grid page:
"GoToDrinkPage": {
          "description": "",
          "root": "navigateToThePage",
          "actions": {
            "navigateToThePage": {
              "module": "vb/action/builtin/navigateToPageAction",
              "parameters": {
                "page": "Home-Start-Page to navigate from"
              }
            }
          },
          "variables": {
            "detail": {
              "required": true,
              "type": "any",
              "input": "fromCaller"
            }
          }
        },
A simple back button with an on-click action is used to navigate back to the home page from a grid page. You configure the back button using an OJet button, which is available from the component palette with a simple call to action.
<oj-button class="oj-button-sm" display="icons" on-oj-action="[[$listeners.ojButtonOjAction]]">Back</oj-button>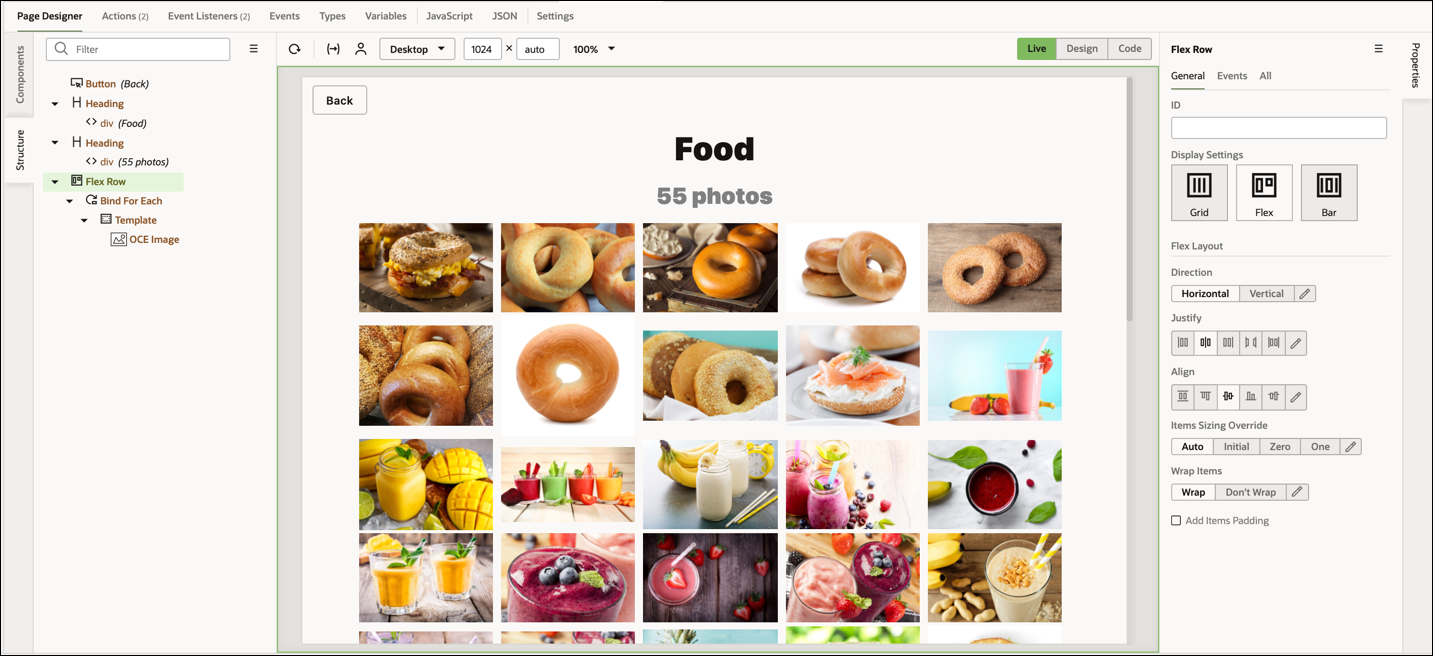
Here’s an illustration showing the page flow from the home page to an image grid page and back:
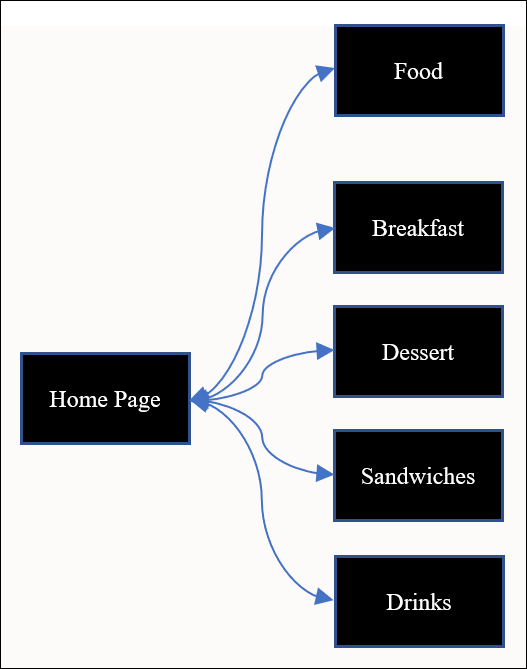
Image Grids
The generated grid pages are populated with the relevant images for each of the categories.

An image grid page is populated by adding variables of type ‘string’ in the home page, which populates all the relevant image content IDs from Oracle Content Management.
We defined the variable that contains the content IDs of the images to be displayed as a grid as variable or by using the following sample code for each of the categories with their content ID values:
"variables": {
        "DessertsGallery": {
          "defaultValue": [
            {"id": "CONTC953A9E360CB4D91BF26C44D1E2335D7"},
            {"id": "CONT3B4B96F8B4DA4479B81EE54B653D1A97"}
          ],
          "type": [
            {
              "id": "string"
            }
          ]
        }
    }
A bind-for-each loop calls the flow variables of each category using the following JavaScript code, which renders all the images in a grid format on the HTML page. The OJET bind for each of the components takes in an array of data and injects the HTML on the template.
<div class="oj-flex oj-sm-justify-content-center oj-sm-align-items-center">

      <oj-bind-for-each data="[[$flow.variables.FoodGallery]]">
        <template>
          <oj-OCE-image content-server="Content Server ID goes here" channel-token="ContentToken ID goes here" class="oj-flex-item oj-sm-12 oj-md-2" content-image="call the current Data ID of an Asset" rendition="Native" on-click="Onclick listener">
       </oj-OCE-image>
        </template>
      </oj-bind-for-each>
    </div>
Image Grid Gallery Pages
The onclick listener initiates a call to view the images in a gallery format using our OCE Image Gallery component. This creates the image grid gallery page associated with each of the image grid pages that initiates a gallery view. The image grid gallery view page includes a close button to navigate back to the image grid page.
<oj-button class="oj-button-sm" display="icons" on-oj-action="[[$listeners.ojButtonOjAction]]">Back</oj-button>The view is initiated in the image grid page when the user clicks the image to call the defined ‘onclick’ event, which also reorders the images. We did this using simple On-click JavaScript logic tied to On-click-Listener.
The images are based on the element trying to be viewed defined as variable above. The logic basically breaks the array of image variables into three parts to reorder the array. The image viewed is reordered to view based on the array of variables defined for each of the image grid variables flow.
PageModule.prototype.reorderImages = function (srcElement, contentImages) {
        var contentImageElement = srcElement.parentElement.parentElement;
        var id = contentImageElement.contentImage;
        var index = contentImages.findIndex(item => item.id == contentImageElement.contentImage);
        var result = contentImages.concat(contentImages.splice(0, index);
        return result;
      };
The OCE Image Gallery component is initiated, which renders the images from $flow.variables.ImageGridPage.
<oj-OCE-gallery content-server="[[$application.variables.contentServer]]"
       channel-token="[[$application.variables.channelToken]]"
       class="oj-flex-item oj-sm-flex-initial"
       content-images='[[$flow.variables.ImageGridPage]]'
       width="1000px">
    </oj-OCE-gallery>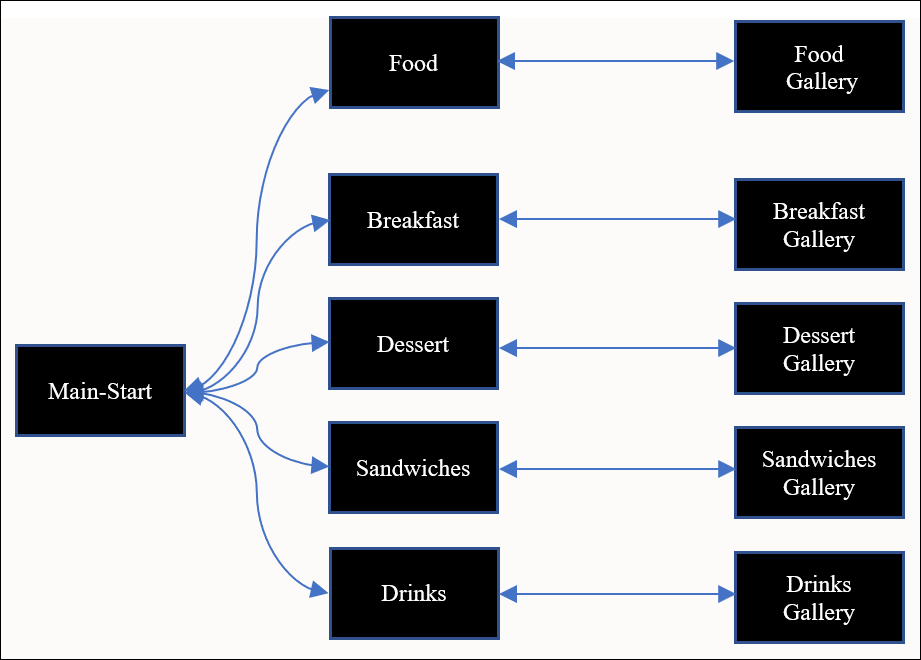
Step 3: Prepare Your Application for Deployment
Now that you’ve built your Oracle Visual Builder image gallery site, you need to see it in a local development server, so you can debug any issues and preview the application before it goes live.
Publish the Image Gallery Application
When you’re done testing the image gallery application, you can publish it and make it available for your customers to see.
To publish the website application:
Sign in to Oracle Visual Builder.
From the list of applications, click the menu icon next to the Cafe-Supremo application and select Stage. In the Stage Application dialog, select the Populate Stage with Development Data option and click Stage. The status of the application changes from Development to Stage.
Click the menu icon next to the GallerySample application and choose Publish. In the Publish Application dialog, select the Include data from Stage option and click Publish. The status of the application changes from Stage to Live.
That’s it. The application is now live to be viewed by others.
Build an Image Gallery Using Oracle Content Management Components in Oracle Visual Builder
F45463-01
July 2021
Copyright © 2021, Oracle and/or its affiliates.
Primary Author: Oracle Corporation