 Provisioning Oracle Data Integrator Cloud Service
Before You Begin
Purpose
This tutorial will show you how to install and configure Oracle Data Integrator (ODI) by provisioning an Oracle Java Cloud instance with the ODI option.
Time to Complete
The tutorial will take about four hours to complete.
Background
You should be familiar with how to install and configure ODI on premises. You can find most of that information on the web in the ODI home page, documentation, and in Oracle Learning Library (OLL) tutorials such as ODI Getting Started.
Scenario
ODI can run on Windows or Linux, can be managed with a web-based Console or standalone Studio GUI, with or without WebLogic Server (WLS). It can use agents deployed in Standalone, Collocated, and Java Enterprise Edition (JEE) mode. This tutorial will assume Linux for both the client workstation and server, managed by the Weblogic Administration Console, with WLS installed as JCS, and the agents deployed in JEE mode.
The topology of the domain you create can vary, depending upon how many virtual machines and how many Managed Servers you provision as part of your Java Cloud Service subscription.
Note — Only the Enterprise Installation is supported on ODI Cloud Service.
Context
This tutorial assumes a single node JCS deployment.
What Do You Need?
You will need to be familiar with the Oracle Java Cloud Service. If you are not then it is strongly recommended that you run through the Getting Started with Oracle Java Cloud Service tutorial before attempting this one.
Make sure you are familiar with the prerequisites required for Oracle Java Cloud Service on OCI.
The instructions in this tutorial assume that you have performed all of these tasks:
-
Ensure that you have subscriptions for Oracle Storage, Oracle Cloud Infrastructure (OCI) Database, Oracle Virtual Cloud Network, and Oracle Java Cloud Service environments.
For more information, see Signing Up for Oracle Cloud Infrastructure.
-
Create the VM public and private keys.
The VM public key is used by the new instance's VM for authentication when you connect to it using an SSH client. When you connect, you must provide the private key that matches the public key.
When creating an OCI Database instance and Java Cloud Service (JCS) instance you need to specify the public key. You generate an SSH public/private key pair using a standard SSH key generation tool. For more information, see Creating SSH Keys for Use with Oracle Cloud Services in the Oracle Learning Library.
-
Configure an OCI Database instance that meets the Java Cloud Service deployment requirements, including adding a specific policy so that the database appears on the Oracle Java Cloud Service web console as an infrastructure schema database choice.
For instructions, see:
- Create an Oracle Cloud Infrastructure Database in the Administering Oracle Java Cloud Service guide.
- Overview of the Database Service in the Oracle Cloud Infrastructure documentation.
- Allow service PSM to inspect vcns in compartment
- Allow service PSM to use subnets in compartment
- Allow service PSM to use vnics in compartment
- Allow service PSM to manage security-lists in compartment
- Allow service PSM to manage all-resources in compartment
Note: When creating the OCI Database instance to use with the Oracle Java Cloud Service, make sure you have created a policy to permit Oracle Platform Services to create instances in your VCN. Keep the policy current. The policy should include:
Pre-Installation Steps
While performing all of these tasks, be sure to note the user name and passwords you enter; you will need them later while provisioning or performing administration tasks.
If you are doing this just as a proof-of-concept, it is easier to make all of the passwords the same. In a production environment, you should not use shared passwords.
Noting Your Database Details
You will need the Compartment Name, Database Instance Name, PDB Name, and the Administrator user name and password. You will need to have generated a token to use as a password for back up and recovery.
Provisioning the Oracle Java Cloud Instance
To start with you will create a new Oracle Java Cloud instance that is linked to your database. This provision will also include the ODI installation software as part of its virtual machine setup.
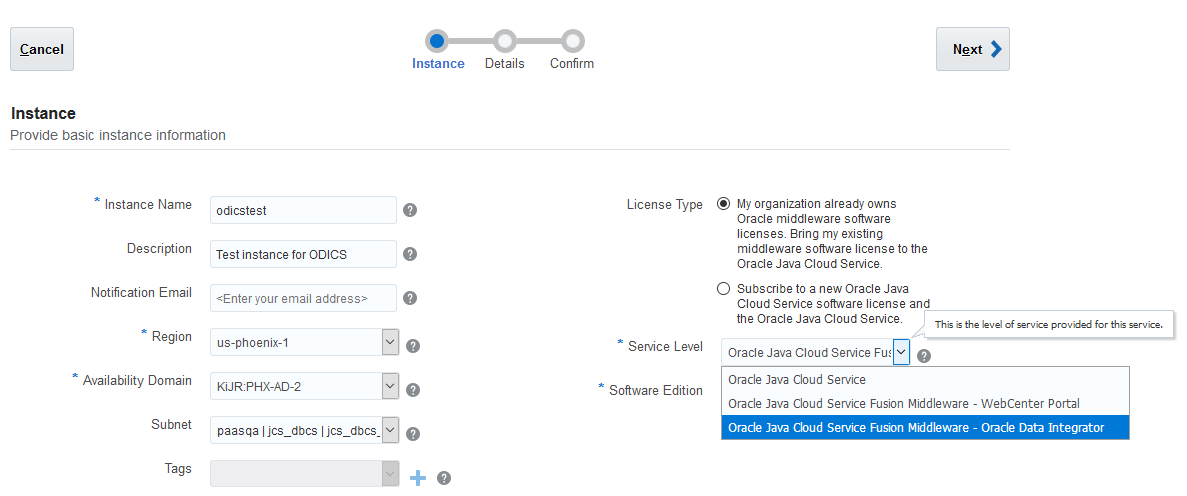
Log on to your Oracle Cloud service, selecting
jaasas the service type.From the Oracle Java Cloud Instances page, click the
Create Instancebutton. SelectJavafrom the drop-down list.-
On the first page you will fill out the service details:
-
Instance Name — This is the unique name you will assign to your service.
-
Description — This is optional text you can use to describe the service.
-
Notification Email — This is optional. You can enter an email address for alerts and notifications.
-
Region — This is the region where your instance is hosted. Select it from the drop-down list.
-
Availability Domain — This is the domain. Select it from the drop-down list.
-
Subnet — This is optional. Select, from the drop-down list, the subnet you want to use. Note, the value displayed is a combination of compartment, VCN name and subnet name.
-
Tags — This is optional. Select your tags from the drop-down list.
-
License Type — Click on one of the radio buttons to select the appropriate license type.
-
Service Level — From the dropdown, select Oracle Java Cloud Service Fusion Middleware - Oracle Data Integrator.
-
Software Edition — Select Enterprise Edition
Press when you have completed your entries.
-
-
The instance details page is where you fill in the parameters for your new instance. Click the button and then populate the form as described in the following table:
Parameter Description WebLogic Configuration WebLogic Clusters Click the Edit icon. In the Manage Clusters dialog box, leave all the parameter values at the default values, except for Compute Shape. Set this to VM.Standard1.4 - 4 OCPU, 28 GB RAMCompute shape Shows as VM.Standard1.4 - 4 OCPU, 28 GB RAMServer Count Since this is a single server installation, leave it as 1 Enable access to Administration Consoles Select this. Deploy Sample Application This is not necessary for the OBE, but you can select it if you want. WebLogic Access SSH Public Key You will need to supply a public SSH key for accessing the service securely. Use the one created in the Before You Begin section. Alternatively, you can generate one using a third-party utility, or you can have the service create one for you. Press the to create tke key or supply one of your own. Local Administrative Username Assign an administrator user name for the Weblogic server Password Assign a password for the Weblogic administrator Load Balancer Load Balancer Leave as None.Database Configuration Database Type Select the radio button that matches the type of database you want to use to store the ODI repository. For this example, select Oracle Cloud Infrastructure Database.
Note: If your database is not listed, then make sure you have set the policy to allow the database to appear in the drop-down list. Refer to Create an Oracle Cloud Infrastructure Database in the Administering Oracle Java Cloud Service guide.Compartment Name Select your compartment from the drop-down list. Database Instance Name Select in the drop down list the database you want to use to store the ODI repository. PDB Name Leave as the default. Administrator Username Enter the database cloud service administrator user name, usually sys.Password Enter the database cloud service administrator password. Backup and Recovery Configuration Backup Destination Select Both Remote and Disk Storagefrom the drop down list.Object Storage Container Enter the URL for your object storage container. User Name Enter the user name for your cloud storage container. Password Enter the password for the above user name. When you have entered all the details, click
-
On the instance creation confirmation page, click
-
After the service has been provisioned, you will be returned to the Oracle Java Cloud services page. Ensure the new service has been added to the list.


Installing ODI on the Oracle Java Cloud Service
Connecting to the Oracle Java Cloud Service Environment Using SSH
When you create an instance of the Oracle Java Cloud Service, all the Oracle Compute Cloud Service VMs required to support the service are provisioned and configured for you. You can access the services and resources provided by the VMs by logging in to the machine through an SSH tunnel. You'll access the VMs from your local machine by using the ssh command in a UNIX command shell.
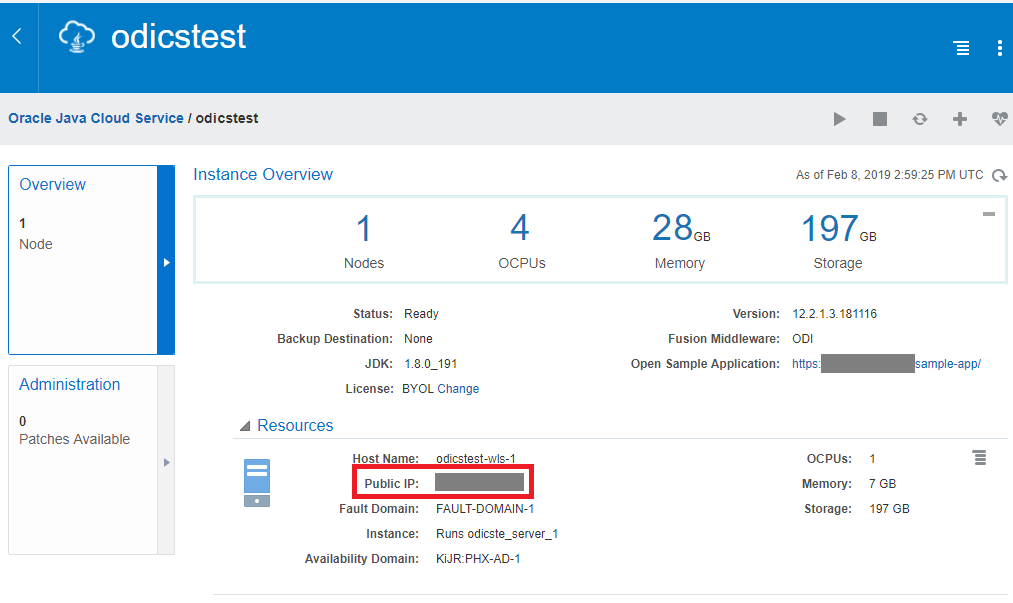
- To connect to the Oracle Java Cloud Service instance through SSH, you must find the IP address of the Administration Server VM hosting the instance.
- On the Oracle Java Cloud Service Instances page, click the instance you just created.
- The public IP address of the Administration Server is available under the Resources section. Make a note of the IP address.
Note: You must wait for the instance creation to complete before you can see the IP address.
Description of this image
- Start a Linux terminal shell and run the SSH utility.
ssh -i path_to_private_key opc@IP_of_JCS_Instance_Admin_ServerIn the preceding command:
Parameter Description path_to_private_key is the path to the SSH private key file that matches the public key used when your instance was created IP_of_JCS Instance_Admin_Server is the public IP address of the Admin Server VM in n.n.n.n format. opc is the user account. For example:
ssh -i keys/id_rsa opc@10.10.10.10You are now logged in as user opc.
- Switch to user
oracleon the JCS Admin Server VM.sudo su oracle - Turn off the lock screen on the JCS Admin server.
gconftool-2 -s -t bool /apps/gnome-screensaver/lock_enabled false - Start the VNC Server. If prompted for a password, enter one. Make a note of it.
vncserver -nolisten local -geometry 1680x1050 - Open a new local terminal to create an SSH tunnel the VNC server port on the Administration Server VM.
ssh -i path_to_private_key -L 5901:IP_of_Tunnel_Server:5901 opc@IP_of_Admin_Server -NIn the preceding command:
Parameter Description path_to_private_key Path to your private key file. IP_of_Tunnel_Server The address of the server through which the tunnel is run. IP_of_Admin_Server The destination server (the address of the administration server for your Oracle Java Cloud instance). For example:
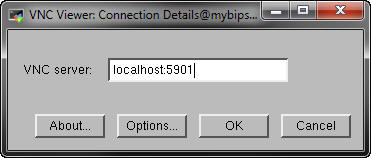
ssh -i keys/id_rsa -L 5901:127.0.0.1:5901 opc@10.10.10.10 -N - To get desktop access for the Oracle Java
Cloud Server instance,use
the VNC Viewer on your local machine to connect to
localhost:5901. You will be prompted for the password you entered in step 4.
vncviewerlocalhost:5901 and click OK.
Installing Oracle Data Integrator
As with all things Linux, directories are case sensitive.
Note: Since Oracle WebLogic Server is already installed in your Java Cloud Service instance, there is no need to install the Fusion Middleware Infrastructure. It is already there. However, once you have unzipped the ODI installer files, you must apply patch 22384876 before installing ODI.
-
From the vncviewer, open a terminal session and navigate to the
/tmpdirectory. Check there are no temporary files present. If there are any, delete them using thermcommand, so removing any possiblity of running out of disk space whilst installing ODI.Then navigate to the
/u01/zips/upperstackdirectorycd /u01/zips/upperstackInside the folder you will find the odi installer archive file. You can check by executing the
lscommand. -
Unpack the archive file using the
unzipcommand.unzip ODI.zip -
This will unpack two jar files into the current directory. These files make up the ODI installer, from which you can also apply patch 22384876. To run the installer. Use the Java command:
java -jar fmw_12.2.1.3.0_odi_generic.jarto initiate the installation.
-
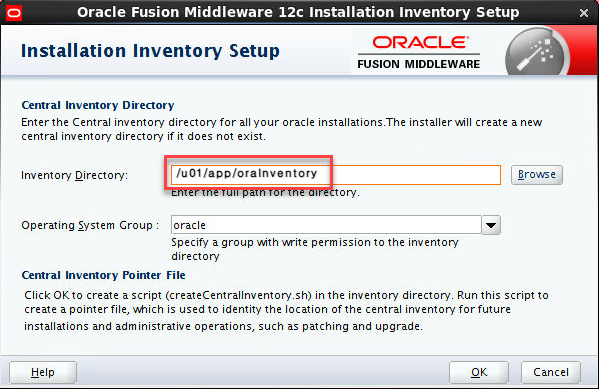
When prompted, set the Inventory Directory to /u01/app/oraInventory, then click to create the Central Inventory Directory.
-
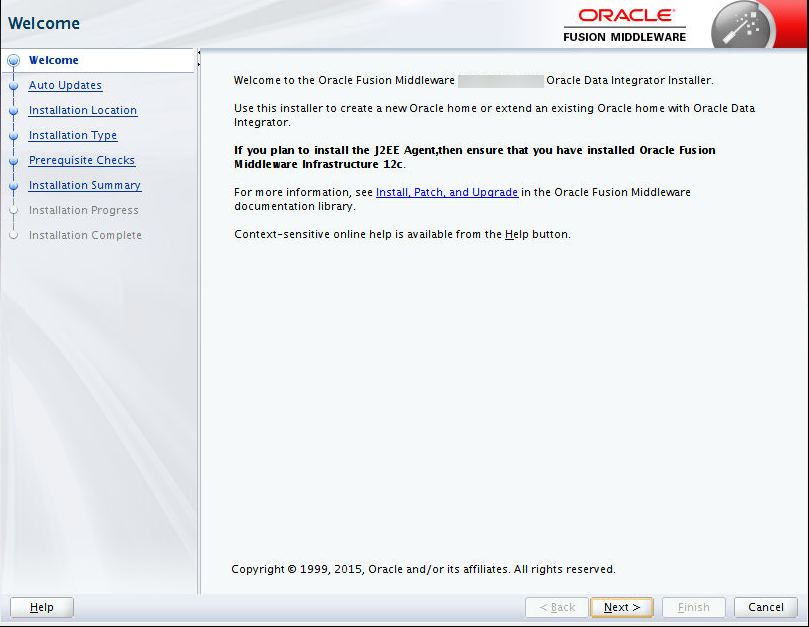
When the Welcome screen opens, click .
-
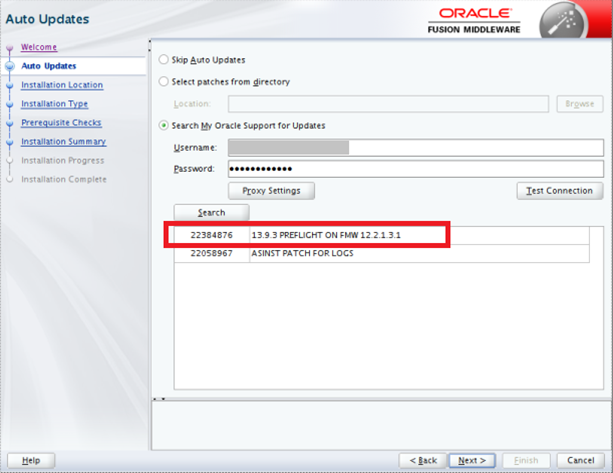
On the Auto Updates screen, select Search My Oracle Support for Updates.
Enter your user name and password for My Oracle Support. Click .
Select 22384876 13.9.3 PREFLIGHT ON FMW 12.2.1.3.1. Click .
Click on the popup dialog box Some of the updates require restart of the installer. Do you want to continue?. The installer will restart.
Click .
-
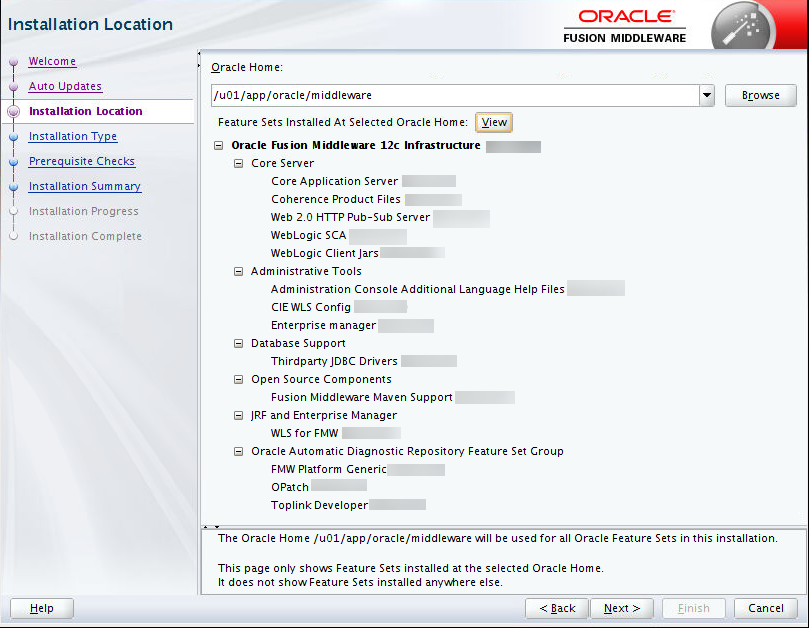
For the installation location enter /u01/app/oracle/middleware. Click to move to the next step.
-
In the Installation Type form, select Enterprise Installation. Click .
Note – The Standalone Installation is not supported in this configuration. Do not select it.
-
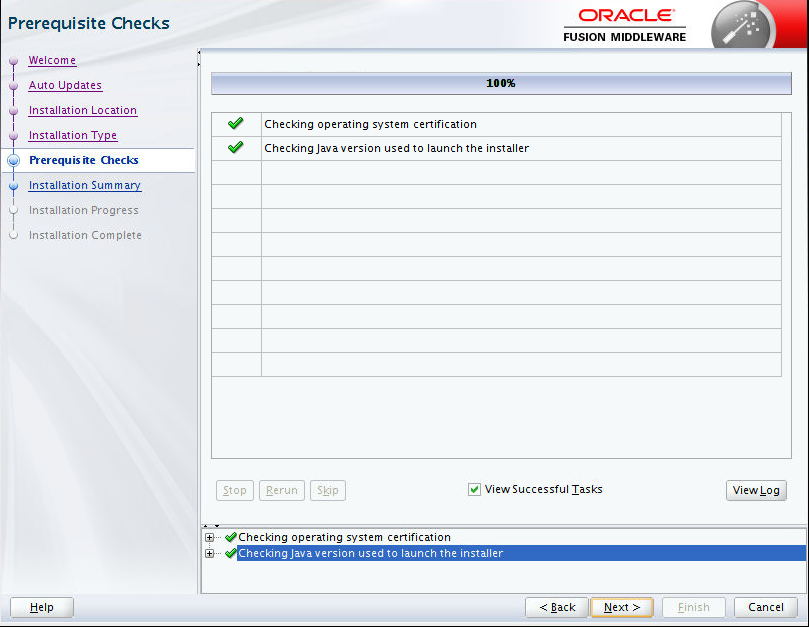
Click on the Prerequisite Check screen
Note – Depending on the configuration of instance, the ODI installer may display a warning stating that the JDK version is not certified. You can ignore the message.
-
On the Installation Summary form, click .
-
The Installation Progress screen will show the name and status of each component as it copied and configured. When the operation has completed, click
-
Click on the Installation Complete screen.

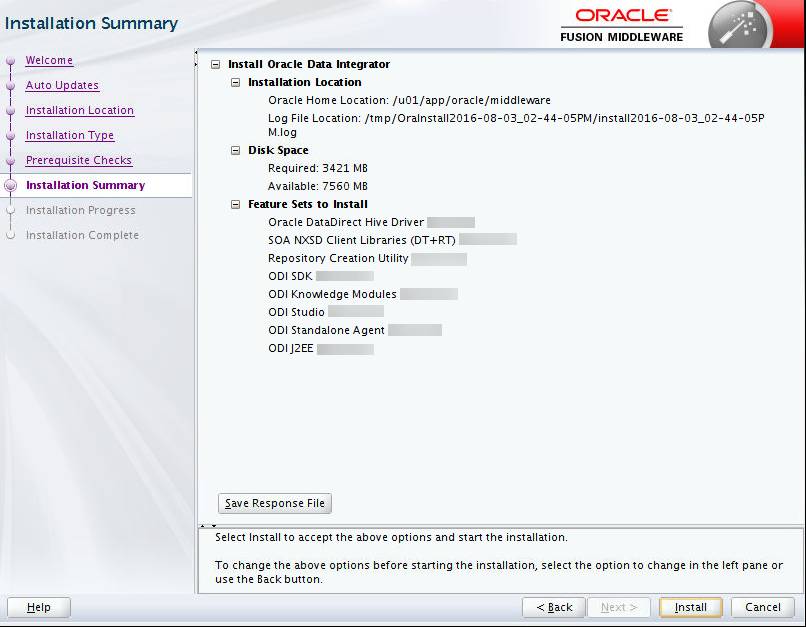
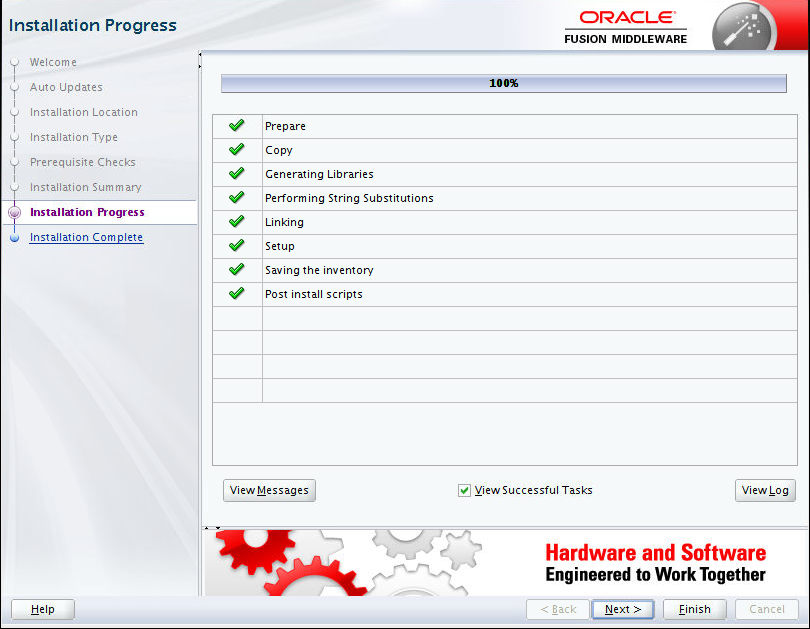
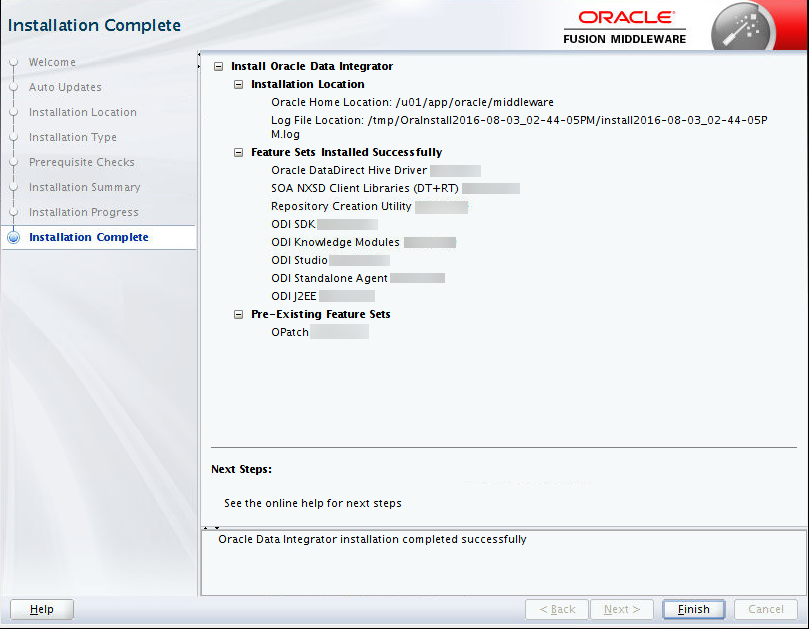
You have successfully installed Oracle Data Integrator.
Apply Patch 26669648 to update ODI to version 12.2.1.3.1.
- Open a browser in the JCS instance.
- Log on to My Oracle Support https://support.oracle.com, and search for patch 26669648. Download it to your instance.
- Verify your OPatch version. Execute the command:
cd /u01/app/oracle/middleware/OPatch
./opatch version
The command should not error and must return an OPatch version of 13.3 or later.
- Verify the OUI Inventory. Execute the command:
./opatch lsinventory -jre $JAVA_HOME/jre. This command should NOT error out. - In your Oracle Home, edit file .bashrc and add the following lines at the end:
export ORACLE_HOME=/u01/app/oracle/middleware export PATH=${ORACLE_HOME}/OPatch:${PATH} - Navigate to the directory where the patch downloaded, for example:
/home/oracle/Downloads.Unzip patch 26669648, using the command:
unzip p26669648_122130_Generic.zip - Navigate to the patch directory (for example
/u01/app/oracle/tools/home/oracle/Patches/26669648). - Run the command:
to apply the patch.opatch apply
Locating your Database Prefix
You will need to locate the user prefix of your database before moving on to the next section. Once you have located the prefix then note it down.
The database prefix is located in the JDBC setting file for your server domain. Use the more
command to examine the mds-owsm-jdbc.xml file using the following form:
more /u01/data/domains/server_domain/config/jdbc/mds-owsm-jdbc.xmlwhere the server_domain is the name assiged to your provisioned weblogic server. In this example,
our server domain is called MyJCSODI_domain, so the command would be:
more /u01/data/domains/MyJCSODI_domain/config/jdbc/mds-owsm-jdbc.xmlThe terminal window will display the file, which will look similar to this:
<name>mds-owsm</name>
  <jdbc-driver-params>
    <url>jdbc:oracle:thin:@connect_string</url>
    <driver-name>oracle.jdbc.OracleDriver</driver-name>
    <properties>
      <property>
        <name>user</name>
        <value>SP435951274_MDS</value>
      </property>
      <property>
        <name>oracle.net.CONNECT_TIMEOUT</name>
        <value>120000</value>
      </property>
      <property>
        <name>SendStreamAsBlob</name>
        <value>true</value>
      </property>
    </properties>
    <password-encrypted></password-encrypted>
  </jdbc-driver-params>
  <jdbc-connection-pool-params>
    <initial-capacity>0</initial-capacity>
    <connection-creation-retry-frequency-seconds>10</connection-creation-retry-frequency-seconds>
    <test-frequency-seconds>300</test-frequency-seconds>
    <test-connections-on-reserve>true</test-connections-on-reserve>
    <test-table-name>SQL SELECT 1 FROM DUAL</test-table-name>
    <seconds-to-trust-an-idle-pool-connection>0</seconds-to-trust-an-idle-pool-connection>
  </jdbc-connection-pool-params>
  <jdbc-data-source-params>
    <jndi-name>jdbc/mds/owsm</jndi-name>
    <global-transactions-protocol>None</global-transactions-protocol>
  </jdbc-data-source-params>
</jdbc-data-source>
Where connect_string in the URL line represents the database connect string.
You will find the prefix under the user property. (All the characters before the underscore). Also make a note of the URL to connect to the database.
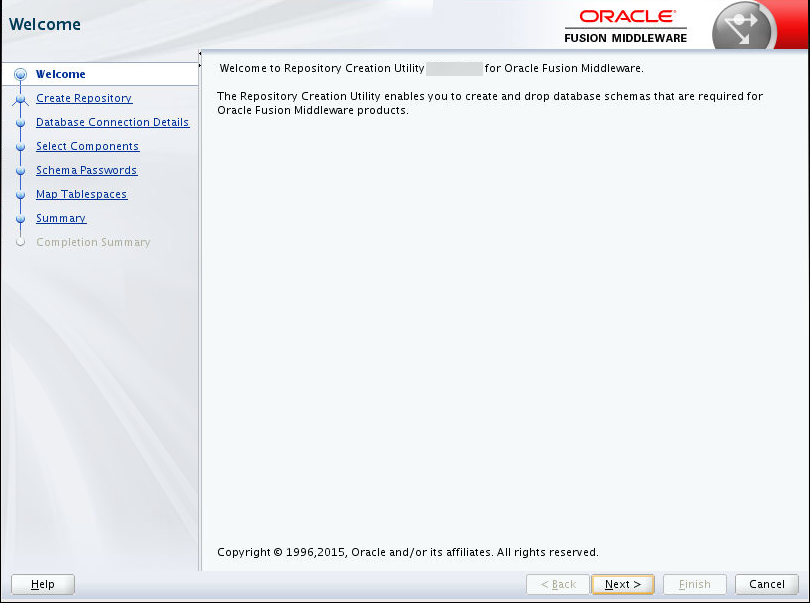
Creating Oracle Data Integrator Repository using the Repository Creation Utility (RCU)
This section describes how to use the Repository Creation Utility (RCU) to create the required Oracle Data Integrator schemas.
-
Run the following commands to start the Repository Creation Utility (RCU) and create the ODI schema:
cd /u01/app/oracle/middleware/oracle_common/bin
./rcu
Click when the opening screen is displayed.
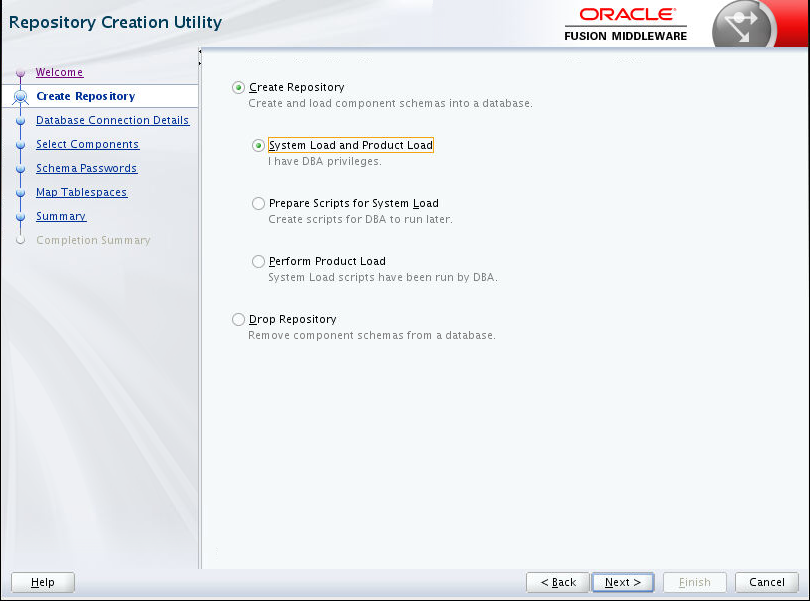
-
On the Create Repository panel, accept the defaults and click .
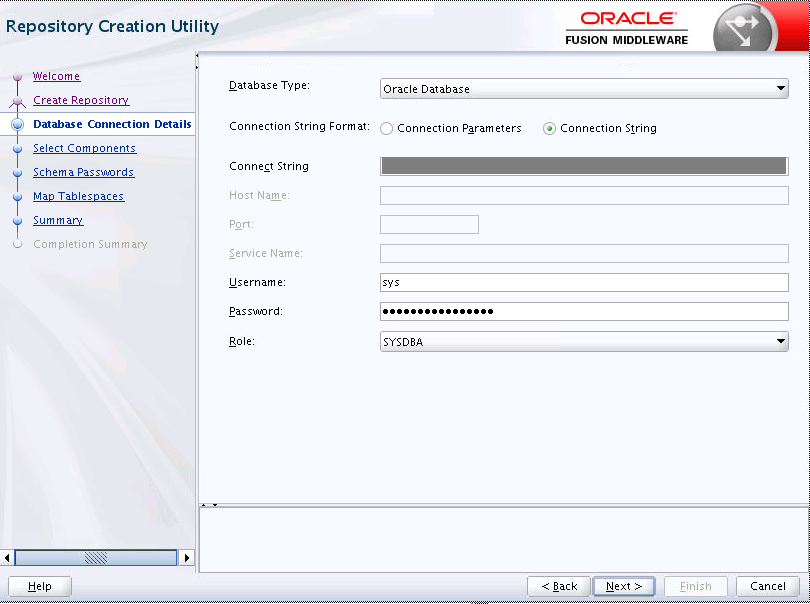
-
You must use the Database you seleted when creating you ODI Cloud Service instance. The database details you define here will be designated as the supervisor database:
Field Description Database Type At the time of writing, only Oracle is supported for the repository. Connection String Format Select the appropriate radio button if you want to supply the connection parameters individually or as a connection string. Connect String Populate with the connection string for your database. This field is active if you selected the Connection String radio button. Host Name This is the instance name of main Oracle database you attached to your Java Cloud instance. This field is active if you selected the Connection Parameters radio button. Port The designated port the database instance communicates through. For Oracle databases this is usually port 1521. This field is active if you selected the Connection Parameters radio button. Service Name The external name of the service can be found in the service details page of your Oracle Java Cloud instance. This field is active if you selected the Connection Parameters radio button. For more information, click here. Username The system administrator user name of the database. Password The database administrator password. Role This will be SYSDBA and will be selected automatically when you set the Username to SYS.To get the dbhost:dbport/dbservice details, review the DBaaS properties. When you have filled in the details click
-
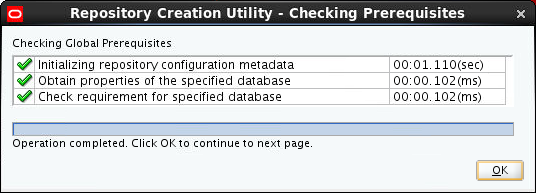
The Repository Creation Utility will check the entries by connecting to the specified database. When the checks have been completed click
-
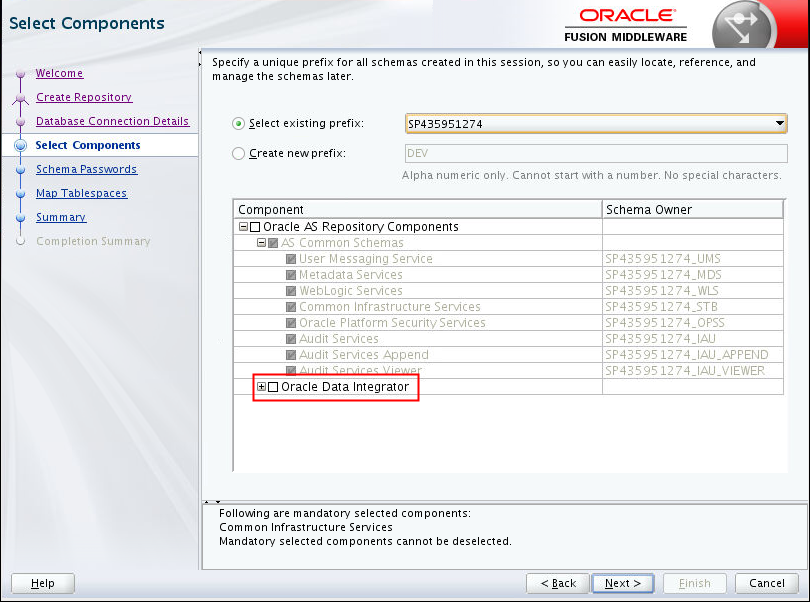
Click the Select existing prefix. Select the correct user prefix from the drop down list. It should match the prefix you found in the previous section from the datasource in the Weblogic Administrator Console. Select Oracle Data Integrator component. Click .
-
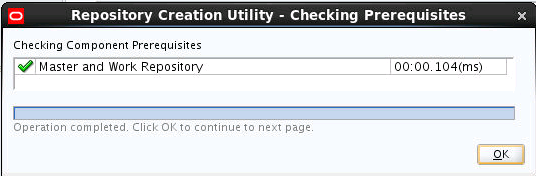
The Repository Creation Utility will display a message window while it is checking prerequisites for creating the database. Press when it has finished.
-
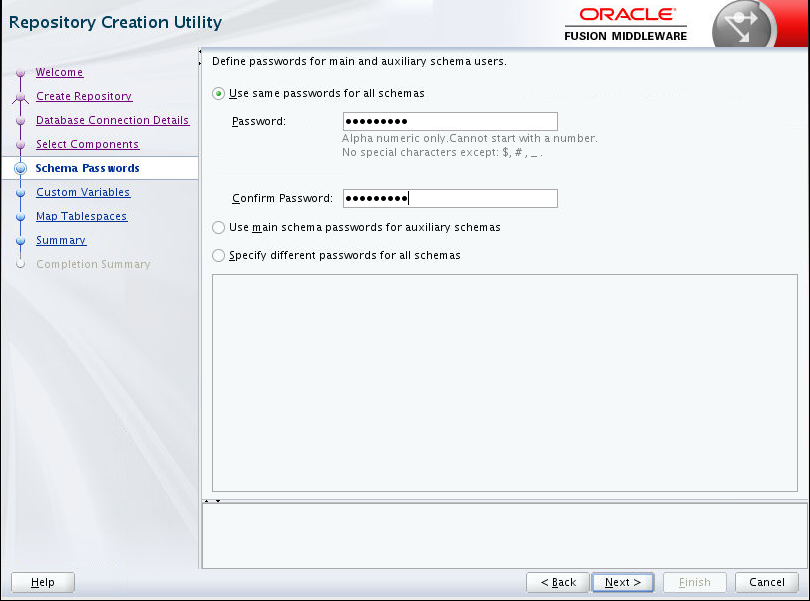
Enter a new password for schema users.For a proof-of-concept, you can use the same passwords for all schemas. In a production environment, you might not want to do that. Note that RCU has different password complexity rules than the VM images, in particular about special characters. Click when you have entered and confirmed the password
-
On this page you will enter details for the ODI master and work repositories in the database you attached to your Oracle Java Cloud instance.
Custom Variable Value Supervisor password The password of the SUPERVISOR user. Work Repository Name Use the default name WORKREP. Work Repository Password The password for the work repository. NOTE: Make a note of the Supervisor password. It will be required for step 23 of the next section, “Updating the Java Cloud Service Domain”
-
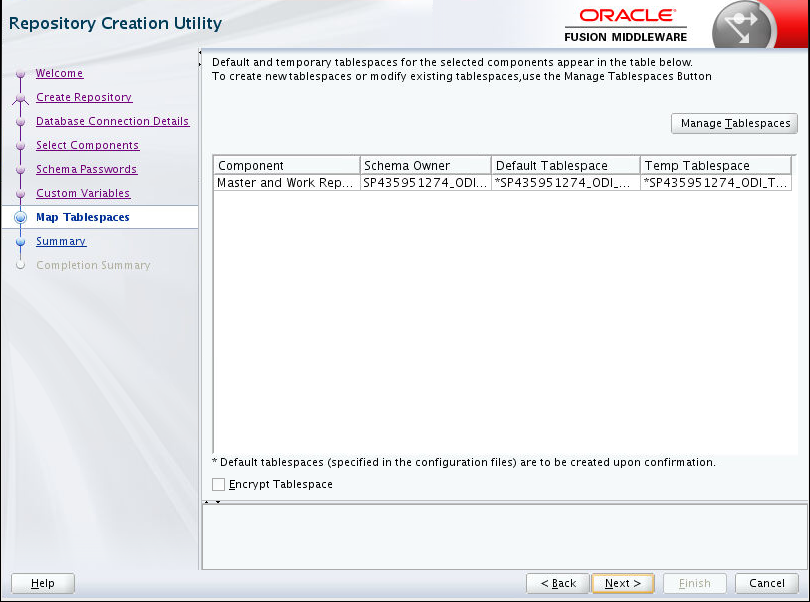
The default tablespaces are fine, just click .
-
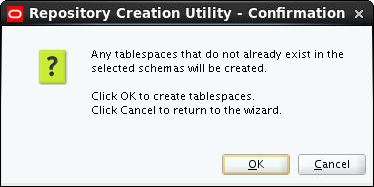
You will now receive a warning stating that the RCU is about to create any missing table spaces. Press to continue.
-
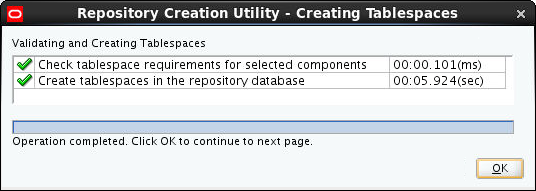
The Repository Creation Utility will now proceed to create the tablespaces. Press when it's finished.
-
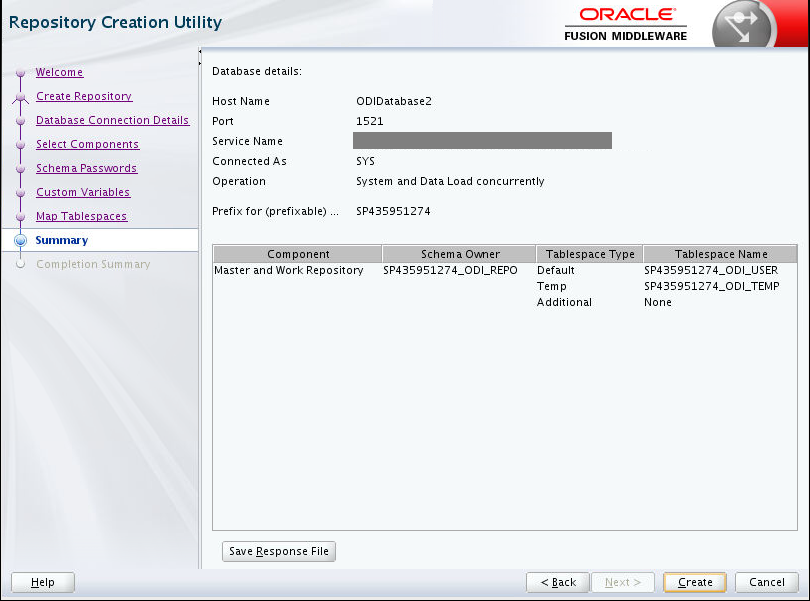
Make a note of the Service Name and the Schema Owner; you will need them when are running the ODI Studio later on in this tutorial. When you have noted them down, click to continue.
-
On the Summary screen, click .
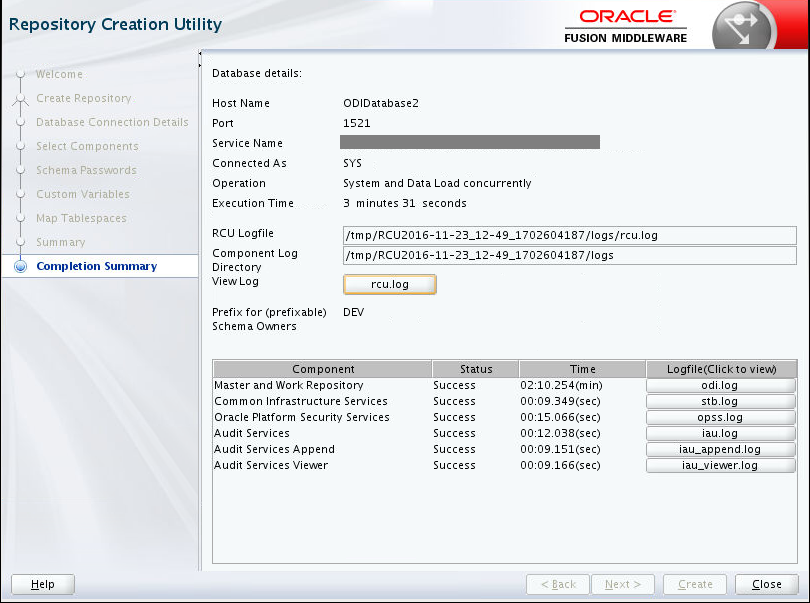
Description of this image

You now have the tablespaces and schemas needed to support ODI Repositories in the DCS.
Updating the Java Cloud Service Domain
Before you begin updating the Java Cloud Service Domain, use the WebLogic Administration Console to shutdown all Managed Servers and the Administration Server. If they are already shut down, go straight to step 4.
-
Access the Administration Server Console by using the following link: http://admin_server_host:admin_server_port/console.
-
In the Domain Structure, expand [+] Environment and click Servers. Click the Control tab. Select the managed server (not the adminserver), and click Shutdown > Force Shutdown Now.
Click to continue. Wait a minute.
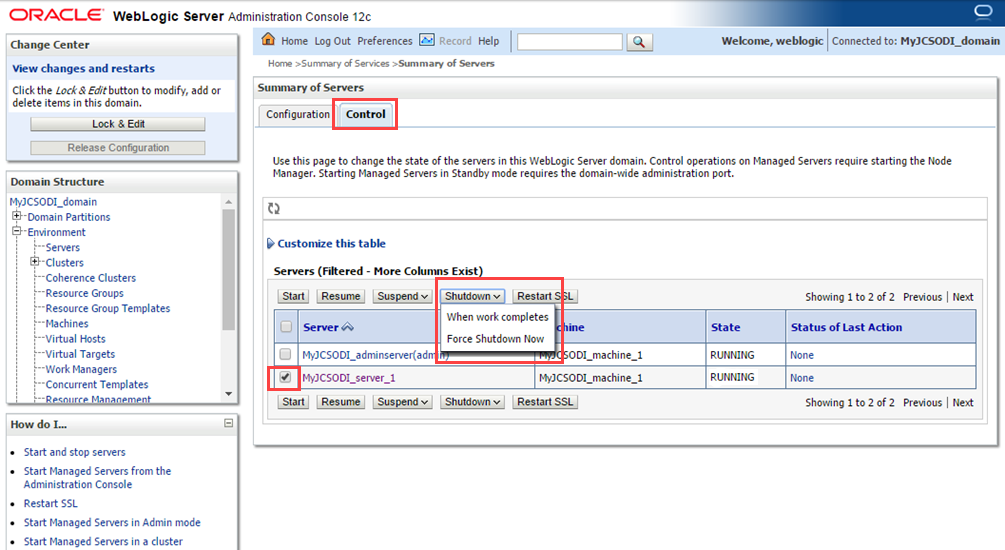
Description of this image -
On the same panel, select the adminserver and shut it down in the same way. This also kills the Console.
Click .
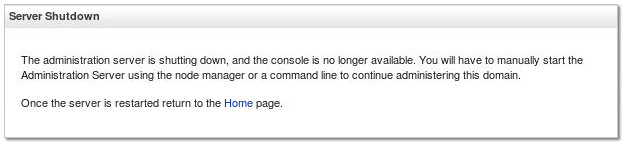
Description of this image Just ignore the web browser for the moment.
-
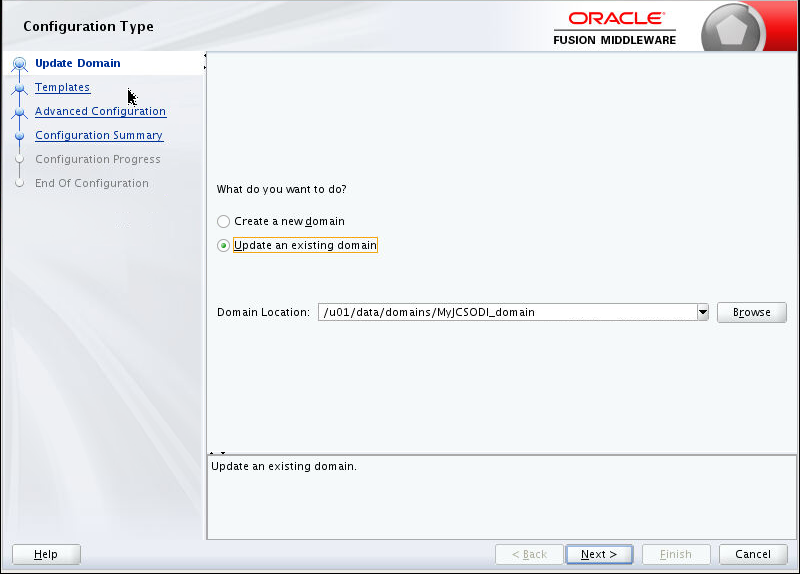
To update your domain, use the Configuration Wizard to extend (update) the Java Cloud Service domain with ODI. Open a terminal session and enter the following commmands:
cd /u01/app/oracle/middleware/oracle_common/common/bin ./config.sh -
In the Create Domain form, select Update an existing domain. (The name will change to Update Domain.) In the Domain Location, select the following WebLogic domain directory. The
domain_namewill automatically point to the default domain created when provisioning this JCS instance:u01/data/domains/domain_name. Click to continue on to the next screen. -
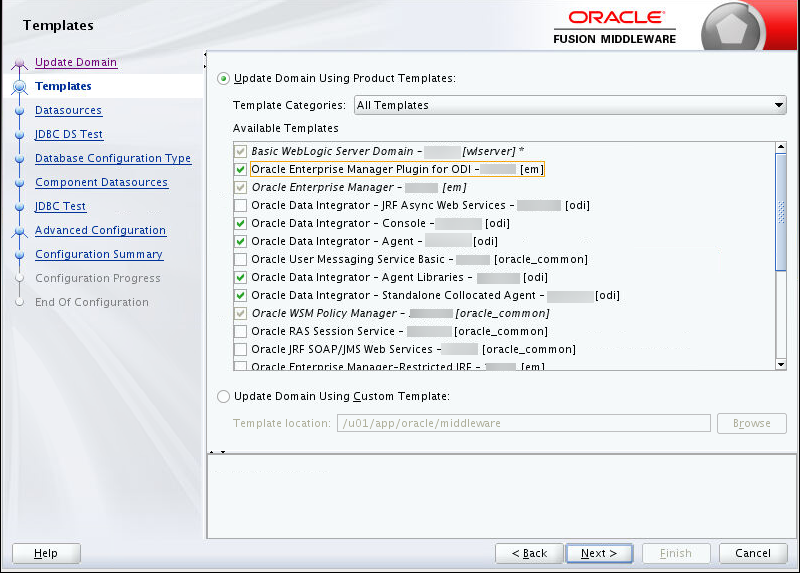
In the Templates form, do the following:
- Select Update Domain Using Product Templates.
- Select the following items (selecting one will cause others to be selected with green checks):
- Oracle Data Integrator - Agent
- Oracle Data Integrator - Agent Libraries
- Oracle Data Integrator SDK Shared Library Template
- Oracle Data Integrator - Console
- Oracle Data Integrator – Standalone Collocated Agent
- Oracle Enterprise Manager Plugin for ODI
- Basic WebLogic Server Domain
- Oracle Enterprise Manager
- Oracle WSM Policy Manager
- Oracle JRF
Click .
Description of this image -
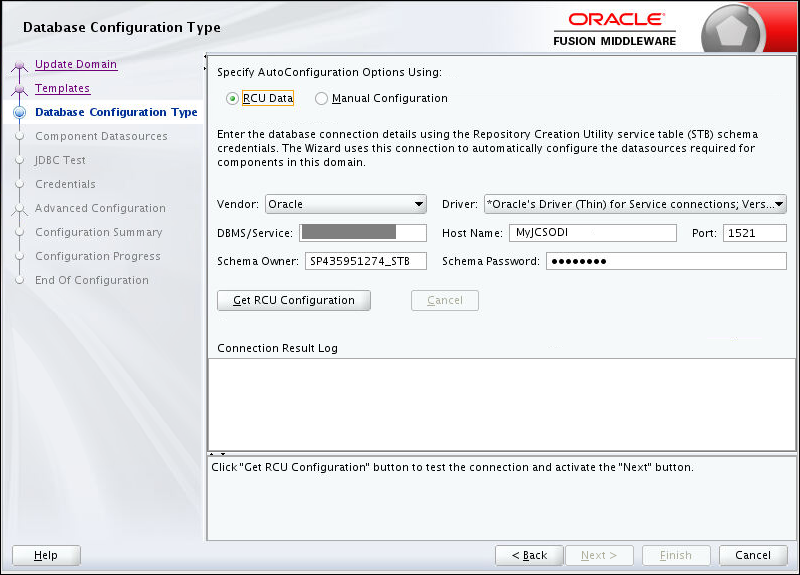
The next screen is the for configuring the database type that the Repository Creation Utility requires for internal use. Again, the installer can fill in the details for you.
Click . When the Connection Result Log displays "Successfully Done", press
-
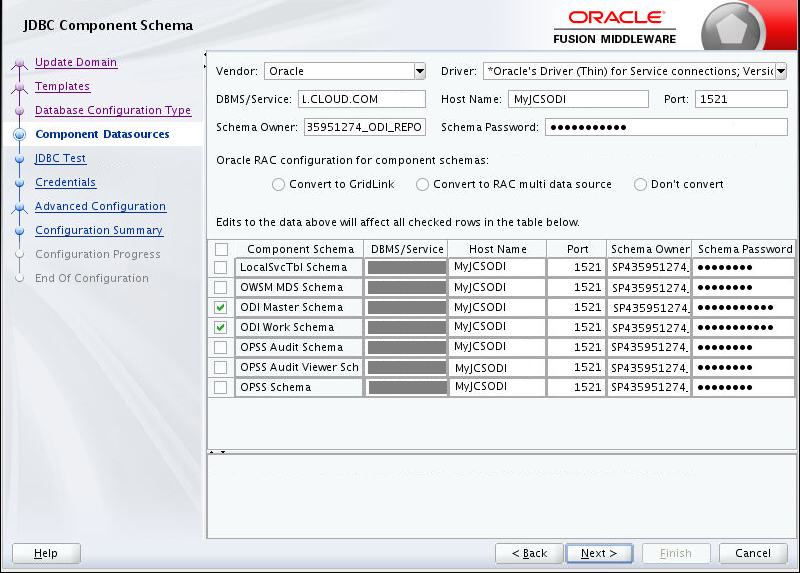
On the Datasources form, click the checkbox next to your ODI repositories configuration details. The installer will fill in the rest of the details for you. Then click
-
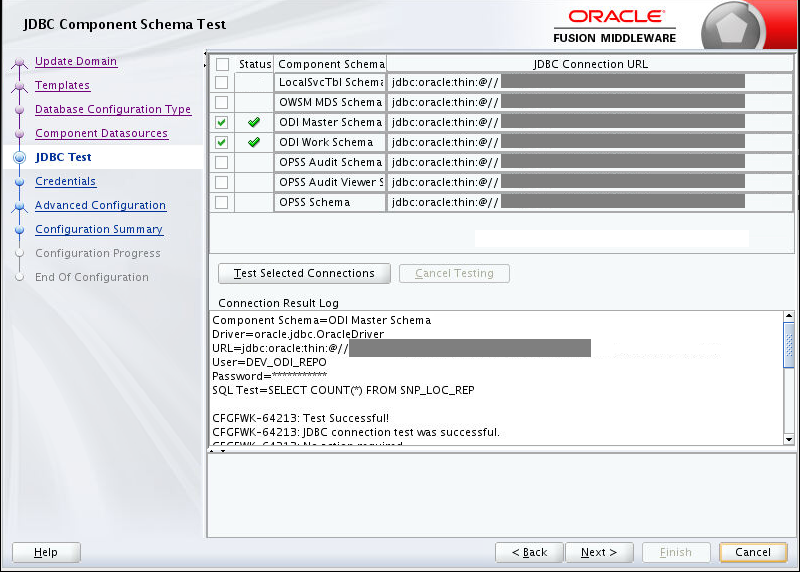
The JDBC Test screen is used to make sure that your database connections are working correctly. Select your database connection and then press . When the test has completed, press
-
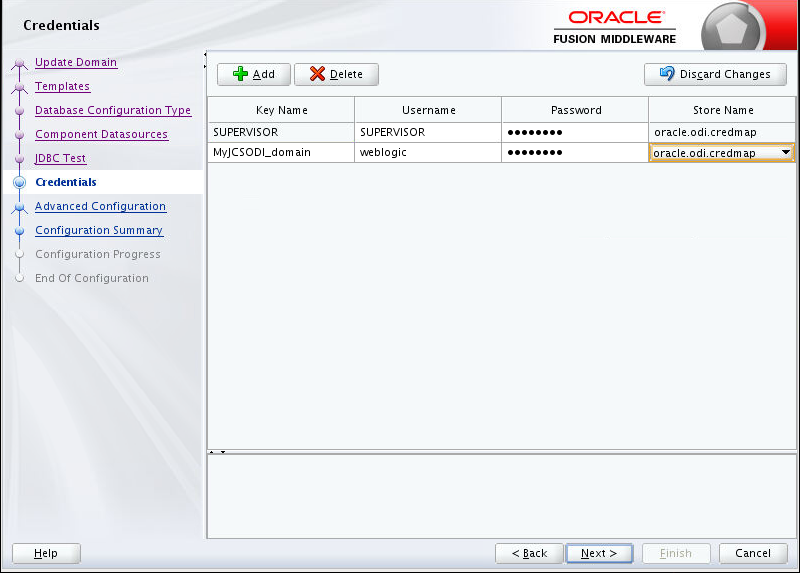
In the Credentials form, enter the ODI Supervisor username and password for the
SUPERVISORkey. (The password for the supervisor should be the variable you entered in the Repository Creation Utility section). Then add a new domain key.- Click Add
 to add a new credential.
 - In Key Name, enter the name of this domain as the key. This is the domain created for the JCS.
- In Username and Password, provide the Administrator user's Username and case-sensitive Password.
- In Store Name, select
oracle.odi.credmapfrom the pull-down.
Click .
- Click Add
-
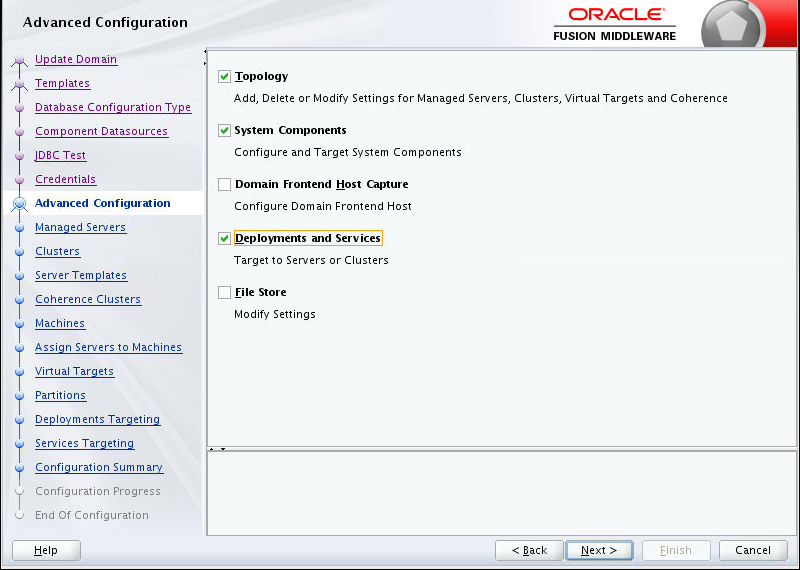
In the Advanced Configuration form, select Topology, System Components and Deployments and Services. On many of the panels you will just accept the defaults.
-
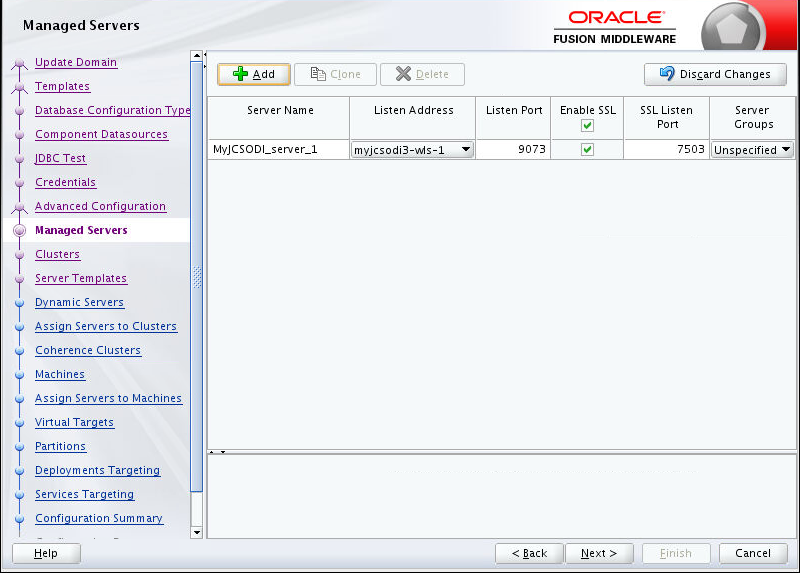
In the Managed Servers form, update the required managed servers.
- To avoid targeting related libraries and applications to the default ODI server instead of the ODI cluster, delete the default ODI server from the list (you don't physically delete it) by selecting ODI_server1 and click .
- By default, the remaining managed server will be pre-populated. You can either rename it or use it as it is. For the purpose of this documentation, the Managed Server has been left with the default entry, however select Enable SSL if it is unchecked.
Click .
Description of this image -
In the Clusters form, just note the Cluster Name. It will be the first eight letters of your domain name (which is the same as the first eight letters of your JCS instance name) and the suffix of
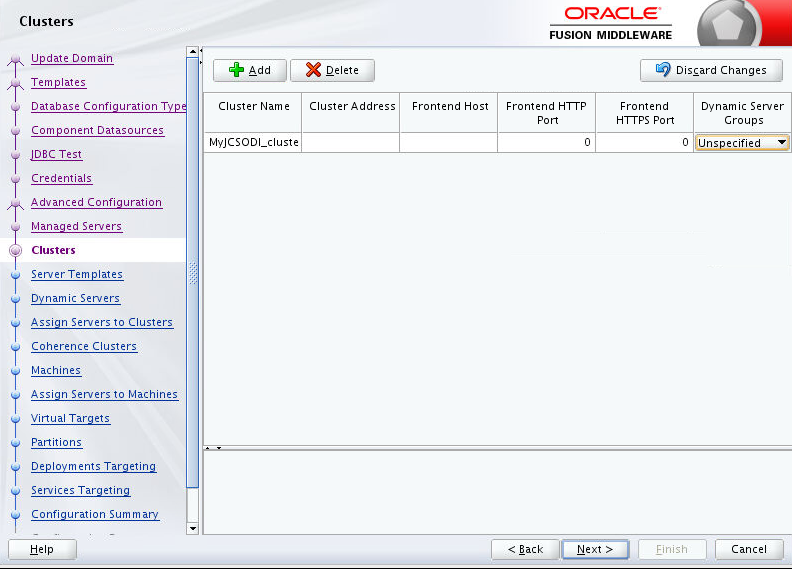
_cluster. WARNING: If you try to change the Cluster Name, it appears to work but will generate a Coherence error later, do not change the cluster name. Click . -
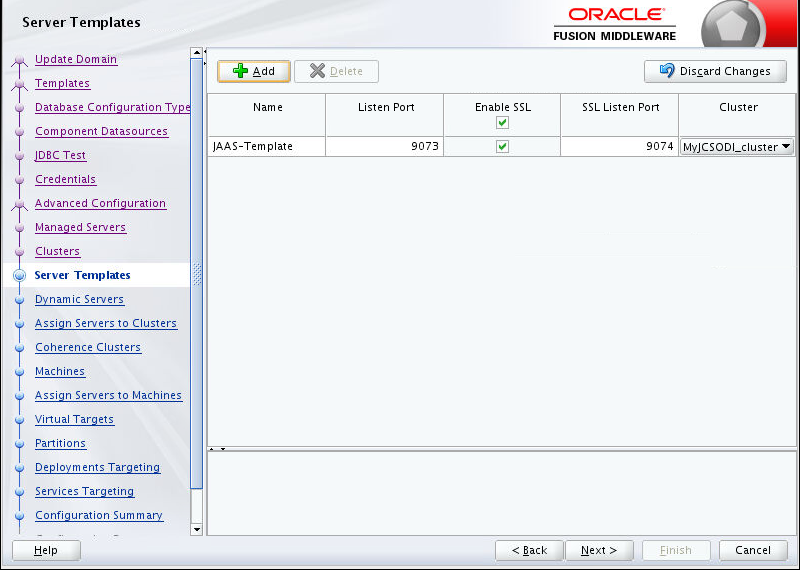
Leave the Server Templates settings as they are and click the .
-
Leave the Dynamic Servers settings as they are and click the .
-
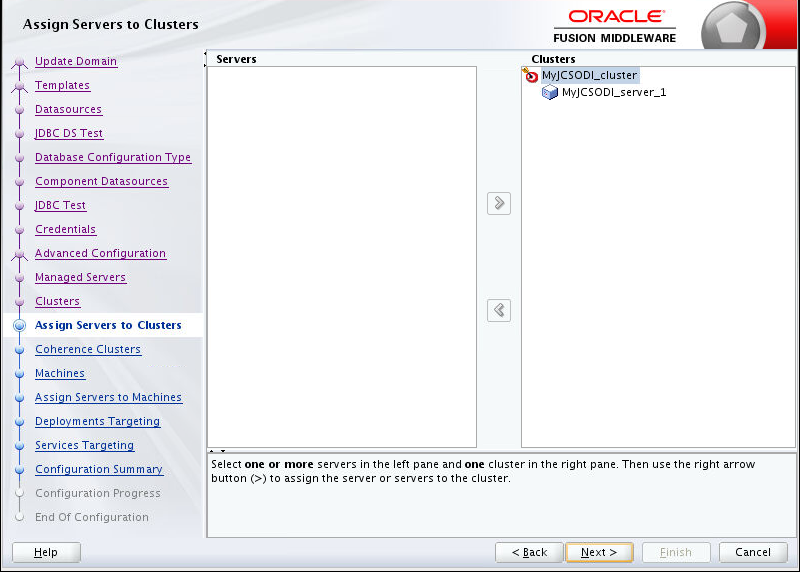
In the Assign Servers to Clusters form, ensure that the servers are assigned to the cluster. Click
-
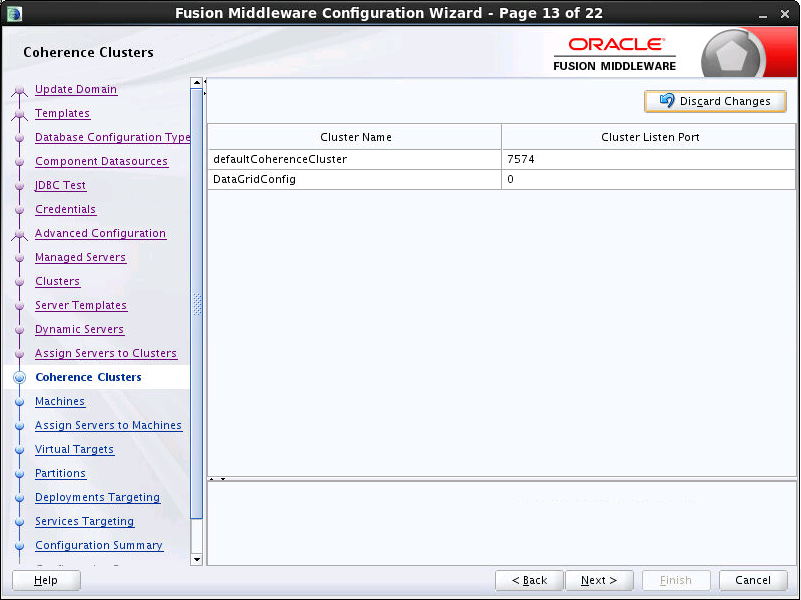
In the Coherence Clusters form, accept the defaults and click .
-
In the Machines form, click the Unix Machine tab to verify that it is populated. Give the machine a suitable name. Leave all other fields at their default values. Click .
-
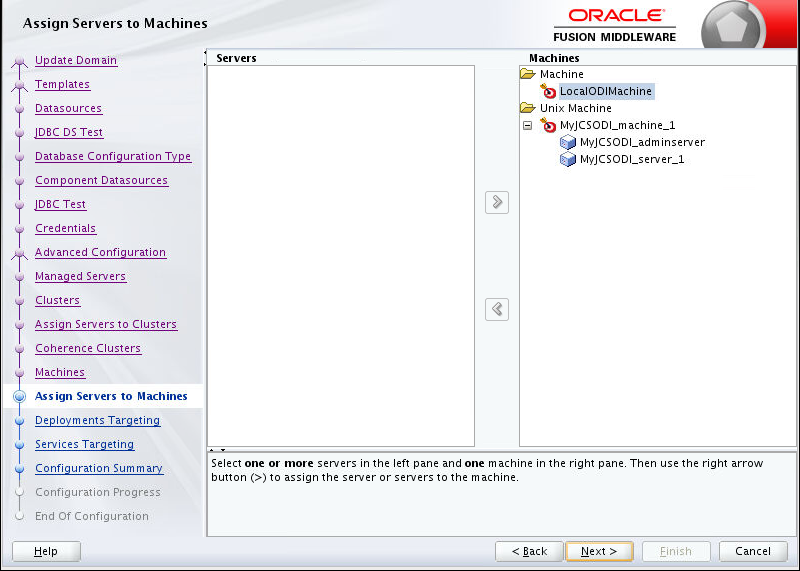
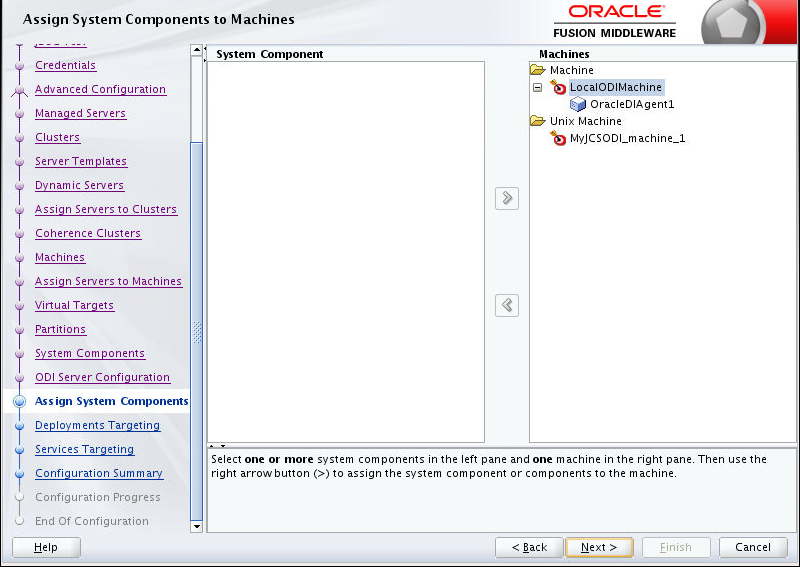
In the Assign Servers to Machines form, ensure that the servers are assigned as shown in the image below. then click
Click .
-
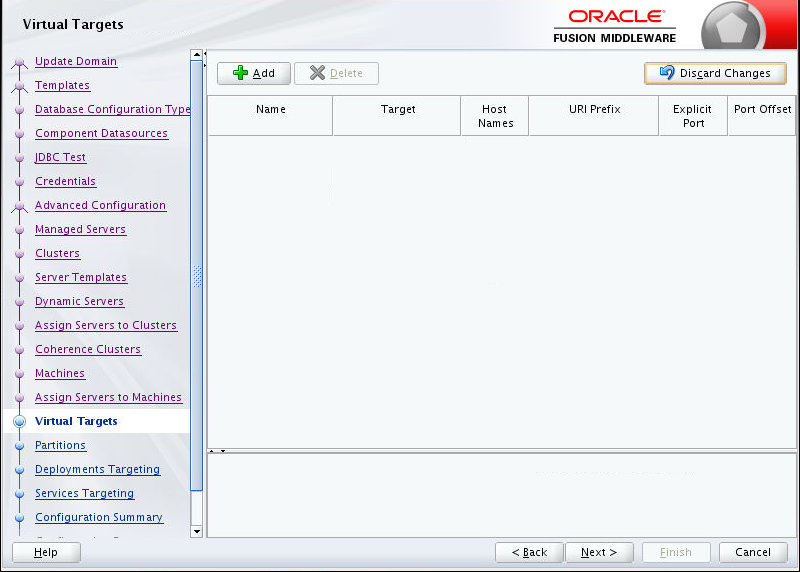
Leave the Virtual Targets settings as they are and click .
-
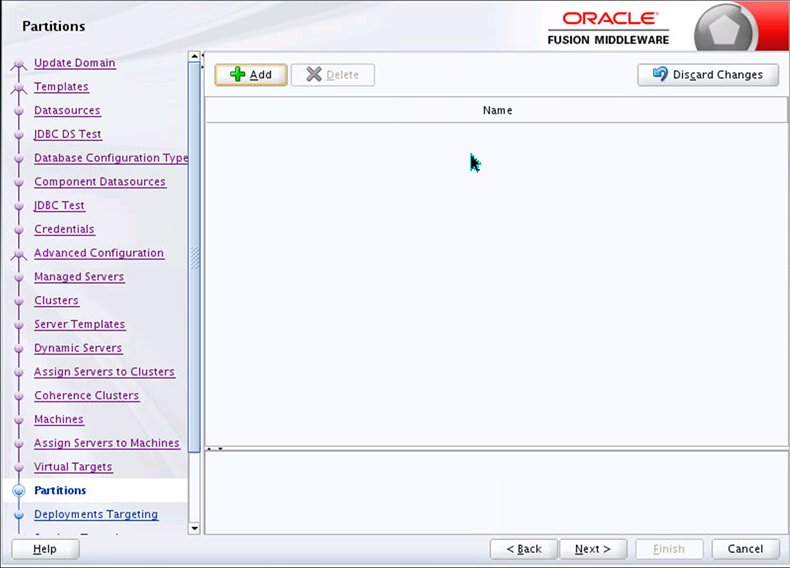
Do not change anything on the Partitions screen. Click
-
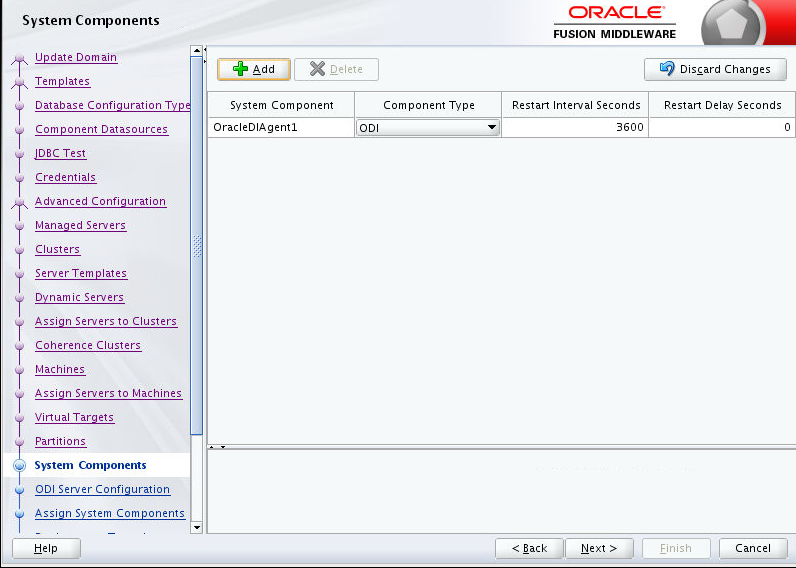
Do not change anything on the System Components page. This screen is used to configure an optional standalone collocated agent. If you are going to use a standalone collocated agent, make a note of the System Component, which is the agent's name, for use when you define the agent in ODI's Topology. Click .
-
On the ODI Configuration page, set a SUPERVISOR password for the optional Oracle Data Integrator standalone collocated agent. If you are going to use a standalone collocated agent, make a note of the values from this page for use when you define the agent in ODI's Topology.
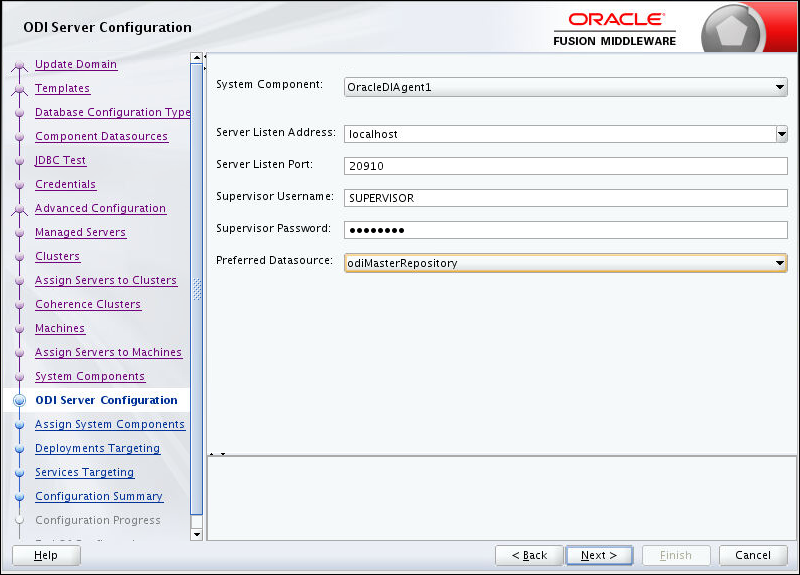
Description of this image -
Do not change anything on the Assign System Components screen. Click
-
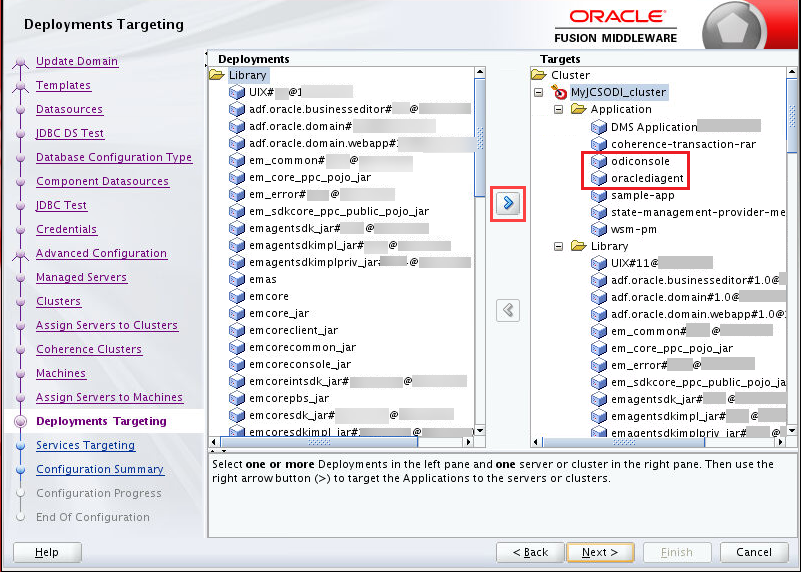
The ODI applications are deployed to the cluster. Check that they have been deployed correctly. On the right side under Targets, confirm that you can see odiconsole and oraclediagent under your cluster > Application. If they are still on the left-hand side, follow the instructions in the Configuration Wizard to transfer them to the right-hand side.
By default, the ODI libraries are under the Admin Server. Move them into the cluster and out of Admin Server (these are two separate steps).
- In the Deployments Targeting form, on the left side under Deployments > Library, select
oracle.odi-agent#2.0@12.2.1.3.0andoracle.odi-sdk#2.0@12.2.1.3.0. - On the right side under Targets, select the cluster name (your cluster name will be different).
- Click the middle to move the items from the left to the right. They will go in alphabetically under Library.
Do not click Next yet.
Last you move the Libraries out of the Admin Server:
- On the right side under Targets, under Server > domain_adminserver > Library (your adminserver name will be different), select
oracle.odi-agent#2.0@12.2.1.3.0andoracle.odi-sdk#2.0@12.2.1.3.0. - Click the middle to move the items from the right. They don't actually go to the left, they just go away from the right.
Now click .
- In the Deployments Targeting form, on the left side under Deployments > Library, select
-
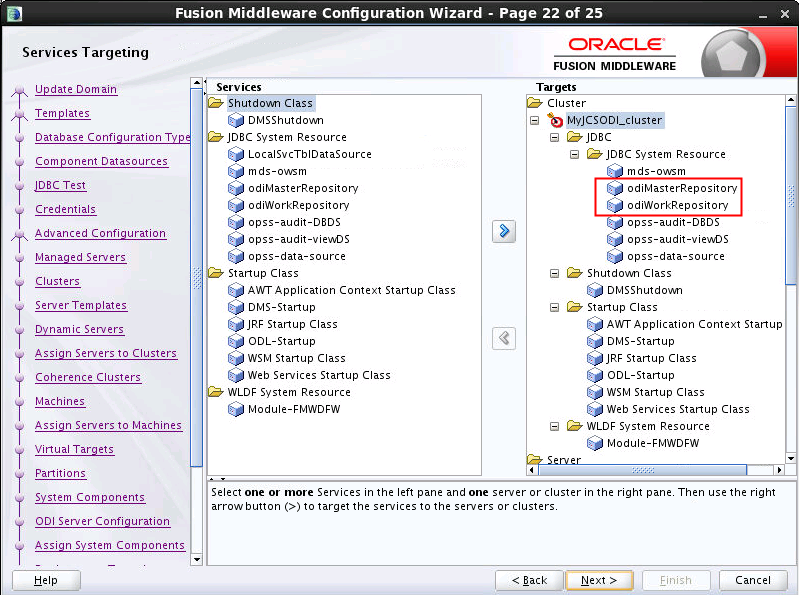
Confirm that
odiMasterRepositoryandodiWorkRepositoryare in the right side under Targets/cluster/JDBC/JDBC System Resource. If not, copy them across using described in the previous step. -
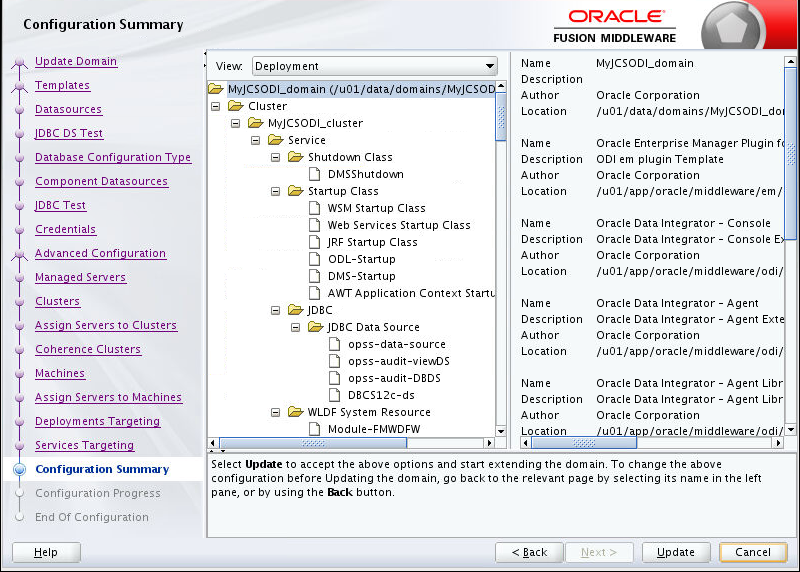
In the Configuration Summary form, leave the defaults and click .
You can safely ignore the warning about
No system component instance. -
Click once the domain is configured, then click .


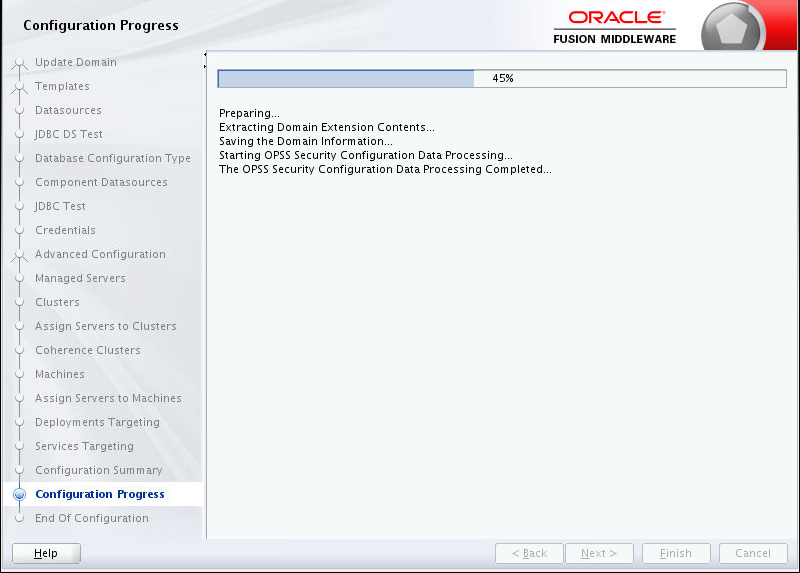
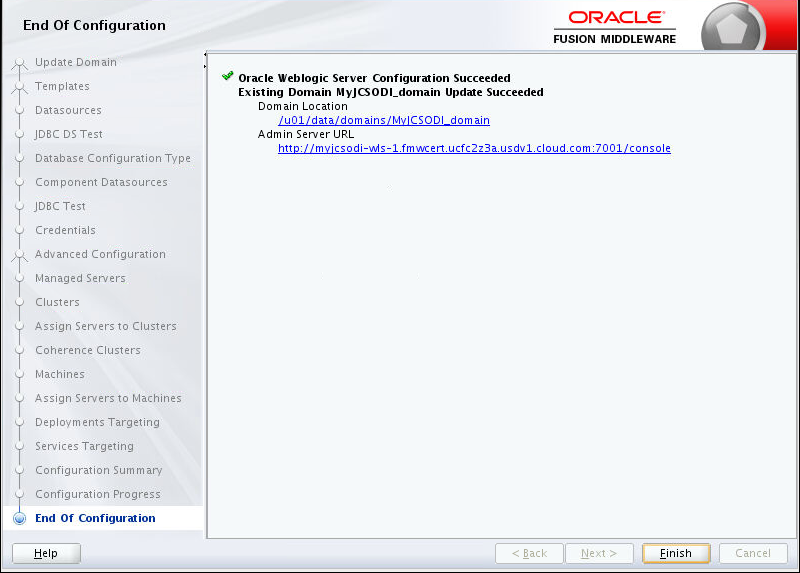
You have successfully updated the JCS domain to support ODI JEE Agents.
Creating Agents in the Master Repository Using ODI Studio
If there is no physical agent entry for an agent, then the agent startup will fail when starting the WLS Administration Server.
To create an agent using ODI Studio, see Section 5.3 "Creating an Agent in the Master Repository Using ODI Studio" in Installing and Configuring Oracle Data Integrator.
Note — Running ODI Studio on-premises on your local laptop or desktop is not supported as it may slow down the user interface to the point of being unusable. You should use VNC connected to the JCS instance to run ODI Studio.
-
Start ODI Studio from the command line by using the following commands:
.cd /u01/app/oracle/middleware/odi/studio
./odi.sh -
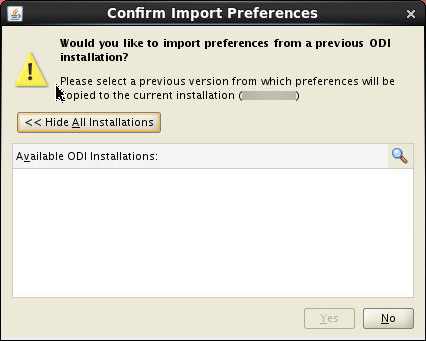
You will be asked if you would like to import preferences from a previous ODI installation. Click
-
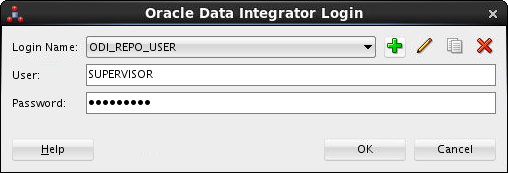
Login to the Repository created by RCU.
-
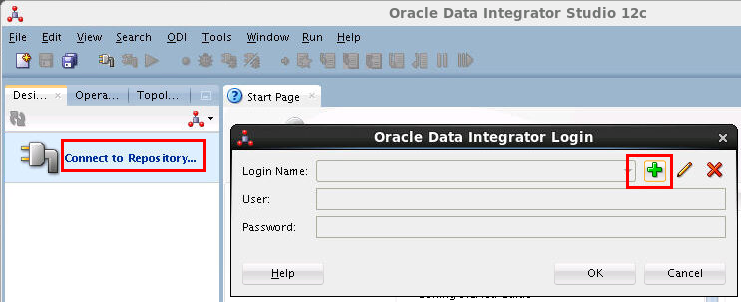
Create a Login by clicking on Connect to Repository and then click the green plus.
-
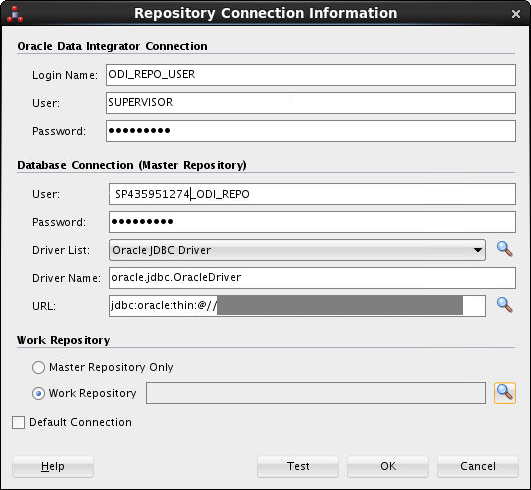
Fill in all of the connection information that match the entries you made in the RCU.
Field Description Oracle Data Integrator Connector Login Name Choose a suitable login name for the connection. User This is the name you picked when creating the tablespaces in the Repository Creation Utility. Click here to return to the RCU section of the tutorial. Password The password you created for the SUPERVISOR Database Connection (Master Repository) User The user name created for the master repository in Repository Creation Utility. You should already have made a note of this value earlier on. Password The password for the master repository user. Driver List The list contains the JDBC drivers supported by the ODI Studio. Select Oracle JDBC driver. Driver Name The name of the JDBC driver will be filled in when you select from the Driver List. URL This is the location of the database given as a standard JDBC connection string. -
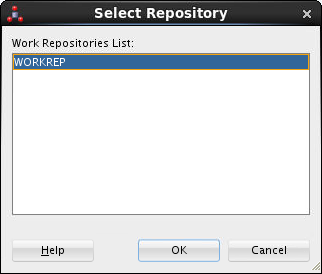
Select Work Repository and click Browse (
 ).
to display the Work Repository selection window.
).
to display the Work Repository selection window. -
Select WORKREP and click .
-
Click . (If the selection worked, then the Test should work…)
-
If successful, click .
-
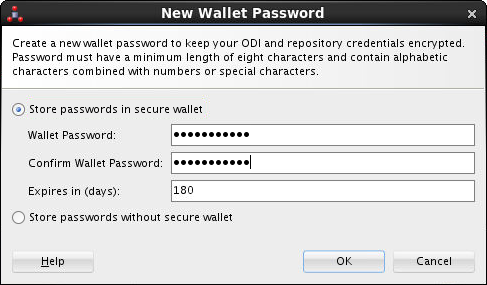
Enter a Wallet password twice. Click .
-
All the information should be saved and pre-populated. Just click and the Designer, Operator, and Topology tabs should appear on the left.
-
-
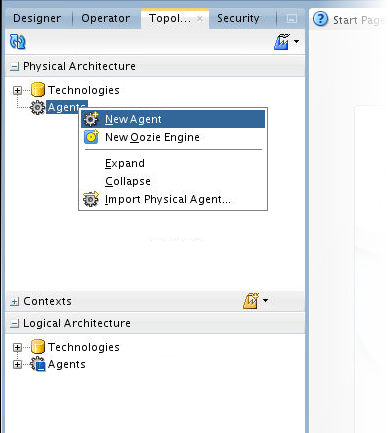
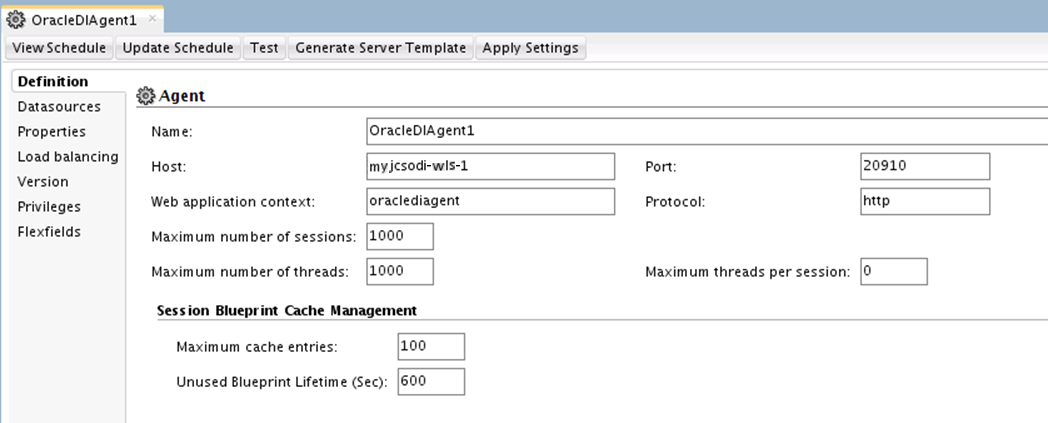
Create a Physical Agent. On the Topology tab, expand (
Update image ) Physical Architecture, right-click Agents, and select New Agent.
 Fill in the information for for Oracle Data Integrator J2EE agent:
-
Name — This is unique name given for the agent, and it must match the name of the J2EE agent application running on your server
-
Host — The IP address, or host name, of the server that the J2EE agent is running on.
-
Port — The port of the server that the J2EE agent is running on. This is the same value (9073 in our example) as the listen port set in step 12 of Updating the Java Cloud Service Domain section.
Click Save (
 )
) -
-
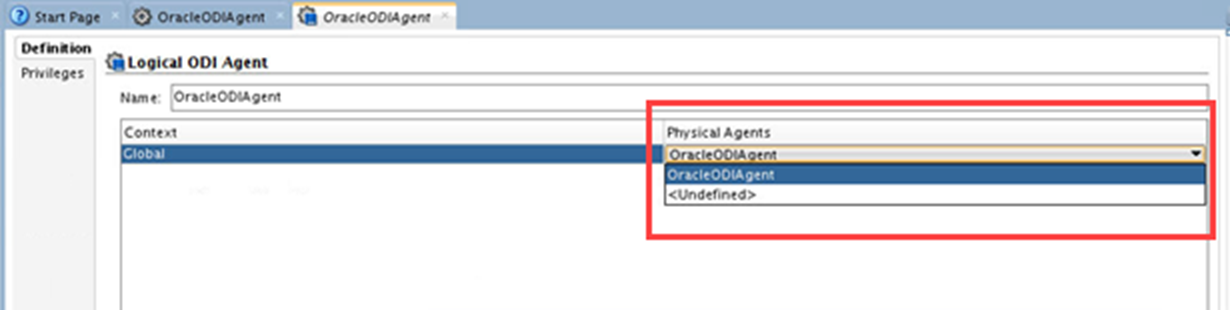
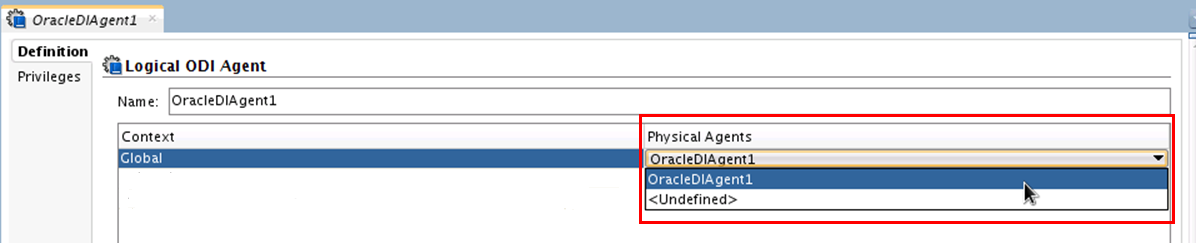
Create a Logical Agent. On the Topology tab, expand (
) Logical Architecture, right-click Agents, and select New Agent. 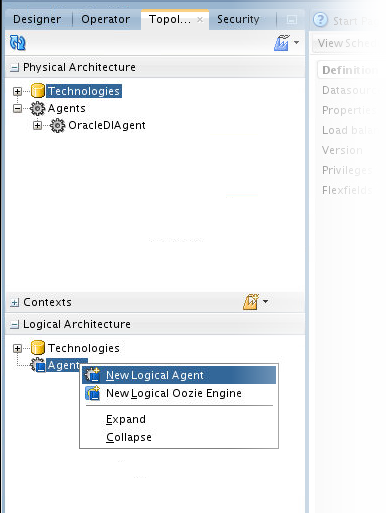
Description of this image -
For simplicity, keep all the names the same: OracleDIAgent. Click Save (
). Close the OracleDIAgent tab. -
Optionally, you can repeat steps 4, 5 and 6, but for the standalone collocated agent.
Create a Physical Agent. On the Topology tab, expand (
Update image) Physical Architecture, right-click Agents, and select New Agent. Fill in the information for for Oracle Data Integrator standalone collocated agent:
-
Name — This is unique name given for the agent, and it must match the name of the standalone collocated agent application running on your server
-
Host — The IP address, or host name, of the server that the standalone collocated agent is running on.
-
Port — This is the same value as the server listen port, 20910, set in step 23 of Updating the Java Cloud Service Domain section.
Click Save (
) -
-
Create a Logical Agent. On the Topology tab, expand (
) Logical Architecture, right-click Agents, and select New Agent. 
Description of this image -
For simplicity, keep all the names the same: OracleDIAgent1. Click Save (
). Close the OracleDIAgent1 tab.

You now have a physical and logical agents, but WLS (and therefore the agents) is not started yet, so you cannot test it yet.
Starting the Administration Server
The Administration Server normally does not host any user applications, it simply controls the other Managed Servers. Once the Managed Servers are running, the Administration Server only collects statistics and logs.
Weblogic servers in the cloud environment are usually monitored and controlled by the Node Manager, so it is better to use the Node Manager to restart the Administration Server.
From your vncviewer console, open a new terminal window and run the Weblogic Scripting Tool using the following commands:
cd /u01/app/oracle/middleware/oracle_common/common/bin
./wlst.sh
The command prompt should change to show that you are now in the WLST environment.
Now connect to the Node manager using the nmConnect command.
nmConnect('weblogic_admin_user', 'admin_password', 'cloud_service_ip', 'port', 'domain','domain_path')where
parameter meaning weblogic_admin_user is the administrator user name for your Oracle Cloud Service admin_password is the administrator password. cloud_service_ip is the ip address of your Oracle Java Cloud service instance port is the listener port for the Node Manager. This is usually 5556 domain is the name of your Weblogic domain. This can be found in the service details page of the Oracle Java Cloud service console. domain_path is the fully qualified path where the domain resides on your virtual machine. For example:
nmConnect('weblogic', 'gTY78Hcv', '10.10.10.10', '5556', 'MyJCSODI_domain','/u01/data/domains/MyJCSODI_domain')Note– all the parameters are enclosed in single quotes.
-
Now you are connected to the Node Manager, you can start your administration server. Use the following command:
nmStart('MyJCSODI_adminserver')Remember to replace the parameter with the name of your own administration server domain.
Post-Configuration Tasks
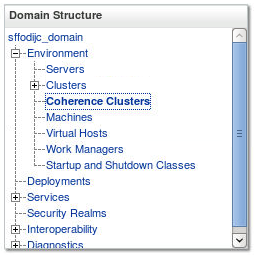
Use the WLS Administration Console to update the Oracle Coherence parameters. To configure Oracle Coherence:
-
Log into the Oracle WebLogic Server Administration Console.

Description of this image -
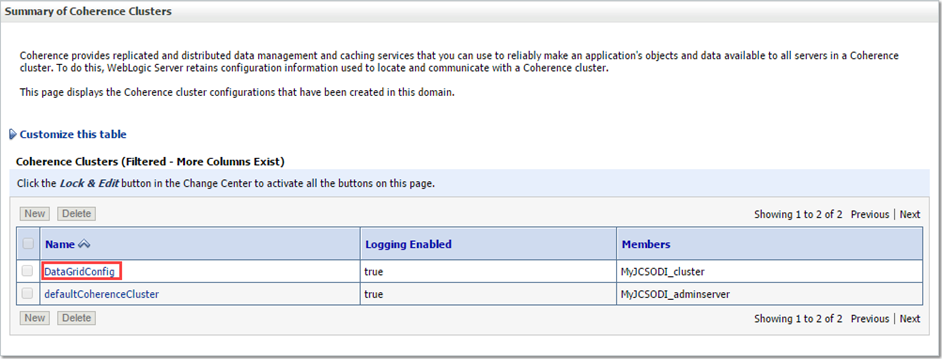
In the Domain Structure panel, expand the Environment node. Click Coherence Clusters.
Description of this image -
In the Coherence Clusters table, click DataGridConfig.
-
Select the Configuration tab and ensure that the Cluster Listen port has been set. If there is no value then click and set Cluster Listen port to 9000. (If this port is in use then you may have to change it later on)
-
Click the , then change to the Members tab. Select Part of the cluster under the Clusters section, and then select your managed server.
Now click and

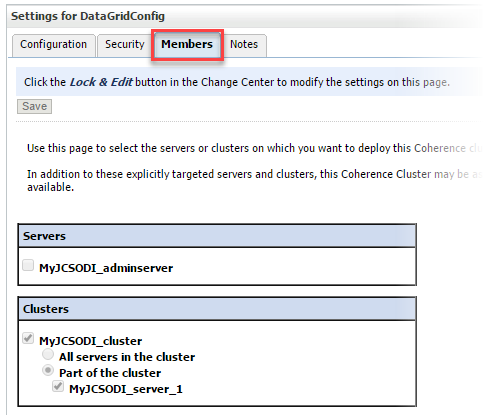
The post-configuration tasks pertaining to Coherence membership are done. When you start the servers (next section), you may need to come back here to adjust the Coherence membership again.
Starting the Servers
To get your deployments up and running, you must start the Administration Server and Managed Servers that were created during domain extension.
Start (or if necessary restart) the servers. Use the command line script to restart the Admin Server, and use the WebLogic Server console to start the Managed Servers. The Admin Server may already be running!
-
You can now access the WLS Administration Server Console by using the following link: http://admin_server_host:admin_server_port/console.
-
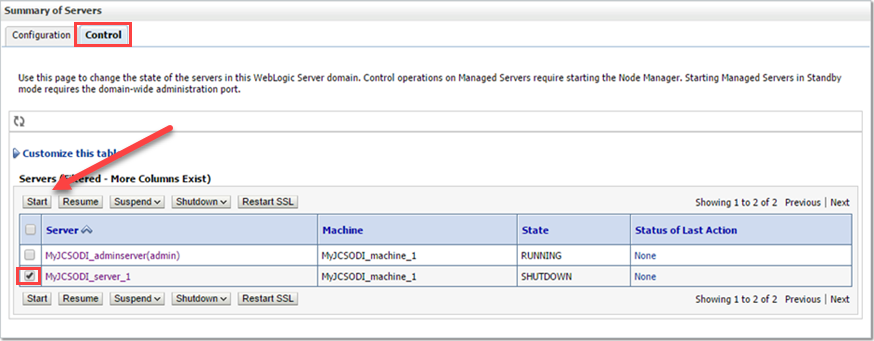
In the Domain Structure panel, expand the Environment node. Click Servers.

Description of this image -
Click the Control tab, select your managed server (click the checkbox, not the server name), click . (This assumes your Node Manager is running.)
-
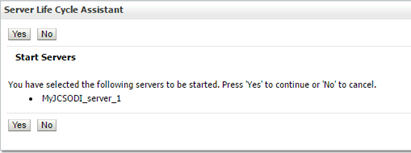
Click to continue. Wait a minute.
Troubleshooting Starting Managed Server:
Problem Statement: When you start the your managed server, it may fail with the following message in the/u01/data/domains/myjcs_domain/servers/managed_server/logs/managed_server.logfile:
This member could not join the cluster because of a configuration mismatch between this member and the configuration being used by the rest of the cluster. This member specified a cluster name of "DataGridConfig" which did not match the name of the running cluster. This indicates that there are multiple clusters on this network attempting to use overlapping network configurations..
Cause: Your server is trying to join another Coherence cluster, perhaps from another node.
Workaround: In the WLS Console, go to Domain Structure > Environment > Coherence Clusters then click DataGridConfig and change the Listen Port from the default of8088to something else, perhaps 9000. -
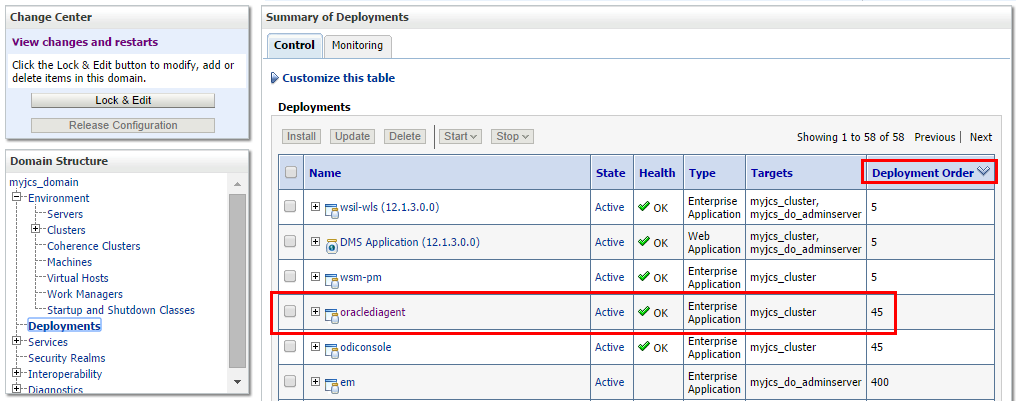
The agent should now be deployed in JCS. You can see it by going to Domain Structure > Deployments then in Summary of Deployments panel click Deployment Order twice to get it sorted low-to-high. You should see
oraclediagentnear the top, and it should be State=Active and Health=OK.Troubleshooting oraclediagent State and Health:
Problem Statement: The agent oraclediagent may fail to start with the following message:
weblogic.application.ModuleException: com.tangosol.net.RequestPolicyException: No storage-enabled nodes exist for service oracle.wls.internal.odi:OdiDistributedCache:com.tangosol.net.RequestPolicyException:No storage-enabled nodes exist for service oracle.wls.internal.odi:OdiDistributedCache

			/!\ Warning Errors were encountered while performing this operation.
Cause: Your managed server is failing to fully join the Coherence cluster.
Workaround: In the WLS Console, go to Domain Structure > Environment > Coherence Clusters then click DataGridConfig > Members tab and and change the Clusters from the default of All servers in the cluster to just Part of the cluster > managed_server, then click and and View changes and restarts to restart the managed server. -
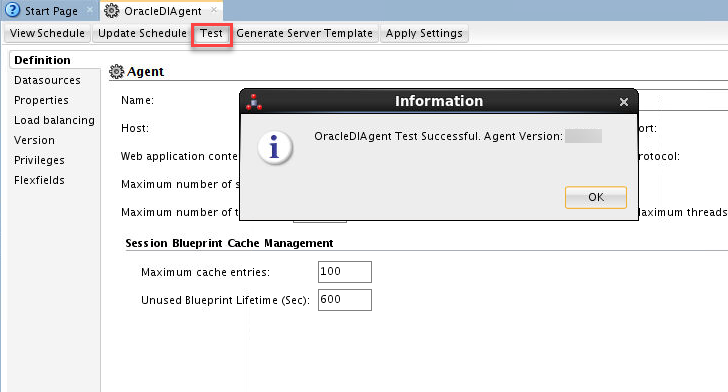
Go back to ODI Studio to test the agent. In Topology > Physical Architecture > Agents > OracleDIAgent, click .
-
If you chose to configure the standalone collocated agent, then you can test it by repeating step 6, but for OracleDIAgent1.
Note: This Agent would need to be started first, which you do from the command line. For more information on how to do this, see: section 7.5 - Starting a Standalone or Standalone Collocated Agent Using Node Manager - of the Oracle Fusion Middleware Installing and Configuring Oracle Data Integrator.
The WLS admin server and managed servers are now running. All deployed applications are running.
ODI is now provisioned on the JCS instance. The agents are running and available for ad hoc and scheduled work.
Want to Learn More?
- Configuring the Domain for the Java EE Agent, part of Oracle Fusion Middleware Installing and Configuring Oracle Data Integrator documentation.
- Oracle Data Integrator 12c: Getting Started Series on Oracle Learning Library (OLL).
- Oracle WebLogic Server 12c: Administration I, the root of all WLS (and therefore JCS) training. Includes Training on Demand (ToD), Instructor-Led Training (ILT), and Live Virtual Class (LVC) formats.
- Leveraging On-Premises Licenses in the Oracle Public Cloud. This document will tell you which middleware products can be used in conjunction with the Oracle Java Cloud Service.
- Oracle® Fusion Middleware Developer's Guide for the Oracle Data Integrator. This document will tell you how to get started with the Oracle Data Integrator.