 Migrate
an On-Premises Oracle Database to Database Cloud Service
Migrate
an On-Premises Oracle Database to Database Cloud Service Before You Begin
This tutorial shows you how to migrate an Oracle database to a database in Oracle Database Cloud Service. You first back up the Oracle database to a Cloud storage container by using Database Backup Cloud Service. You then use the backup to create a new Database Cloud Service database deployment. This tutorial takes approximately 30 minutes to complete.
Background
Oracle Database Cloud Service provides you the ability to deploy Oracle databases in the Cloud, with each database deployment containing a single Oracle database. You have full access to the features and operations available with Oracle Database, but with Oracle providing the computing power, physical storage and (optionally) tooling to simplify routine database maintenance and management operations.
Oracle Database Backup Cloud Service is a secure, scalable, on-demand storage solution for backing up Oracle databases to Oracle Cloud. You can also use the backup to create an Oracle Database Cloud Service database deployment.
What Do You Need?
- A supported Oracle Database version and operating system. See Supported Databases and Operating Systems.
- An Oracle Database Backup Cloud Service account and storage capacity.
- An Oracle Database Cloud Service account.
- Install the Oracle Database Cloud Backup Module on your server before starting this tutorial.
 Configure
RMAN Settings
Configure
RMAN Settings
- Log in to Recovery Manager (RMAN).
[oracle@host01 opc]$ rman target /
Recovery Manager: Release 12.1.0.2.0 - Production on Fri Sep 8 19:06:05 2017
Copyright (c) 1982, 2014, Oracle and/or its affiliates.  All rights reserved.
connected to target database: ORCL (DBID=1481873977)
Be sure to note the value of DBID because you will need it when you create your Database Cloud Service database deployment.
- Configure RMAN for a backup to the cloud as shown in this
example. When you installed the Database Cloud Backup Module,
the
opcorcl.orafile was created in the$ORACLE_HOME/dbsdirectory.RMAN> CONFIGURE CHANNEL DEVICE TYPE sbt PARMS='SBT_LIBRARY=/u01/app/oracle/product/12.1.0/dbhome_1/lib/libopc.so, SBT_PARMS=(OPC_PFILE=/u01/app/oracle/product/12.1.0/dbhome_1/dbs/opcorcl.ora)'; - Verify that autobackup of the control file and server
parameter file (SPFILE) is configured.
RMAN> show controlfile autobackup; RMAN configuration parameters for database with db_unique_name ORCL are: CONFIGURE CONTROLFILE AUTOBACKUP ON; # default - If autobackup is not configured, then configure it.
RMAN> CONFIGURE CONTROLFILE AUTOBACKUP ON;
 Configure
Backup Compression
Configure
Backup Compression
You can optionally use compression when backing up Oracle databases to Oracle Database Backup Cloud Service. Compression conserves bandwidth by reducing the size of your backups before they are sent to the cloud.
If you have the Oracle Advanced Compression option, Recovery Manager (RMAN) supports binary compression using one of the following compression levels: HIGH, MEDIUM, BASIC, and LOW. The recommended level for cloud backups is MEDIUM.
- If you have the Oracle Advanced Compression option,
configure MEDIUM level compression
RMAN> CONFIGURE COMPRESSION ALGORITHM 'MEDIUM'; - If you do not have the Oracle Advanced Compression option,
configure default compression.
RMAN> CONFIGURE COMPRESSION ALGORITHM 'BASIC'; - Configure RMAN to create compressed backup sets by default
on the SBT device type.
RMAN> CONFIGURE DEVICE TYPE sbt BACKUP TYPE TO COMPRESSED BACKUPSET;
 Back
Up the Database
Back
Up the Database
A default storage container is created automatically when you install the Oracle Database Cloud Backup Module, and backups are stored as objects in this default container.
- Log in to RMAN if you are not logged in.
- Set the encryption password as shown in this example:
RMAN> SET ENCRYPTION ON IDENTIFIED BY 'my_pswd' ONLY; - Create a backup of the entire database:
RMAN> BACKUP DEVICE TYPE sbt DATABASE PLUS ARCHIVELOG; - After the backup completes, log out of RMAN.
 View
the Backup
View
the Backup
- Sign in to Oracle Cloud.
- Expand the navigation menu on the Dashboard page.
- Click Storage to open the service console.
- On the Containers tab you can view the container that was
created when you backed up the database, as shown in this
example:

Description of the illustration Storage_ContainerList.png - Return to the My Services Dashboard.
 Create
a Database Deployment
Create
a Database Deployment
- Expand the navigation menu on the Oracle Cloud My Services
Dashboard and select Database.

Description of the illustration MyServices_Menu_Database.png - Click Create Service.
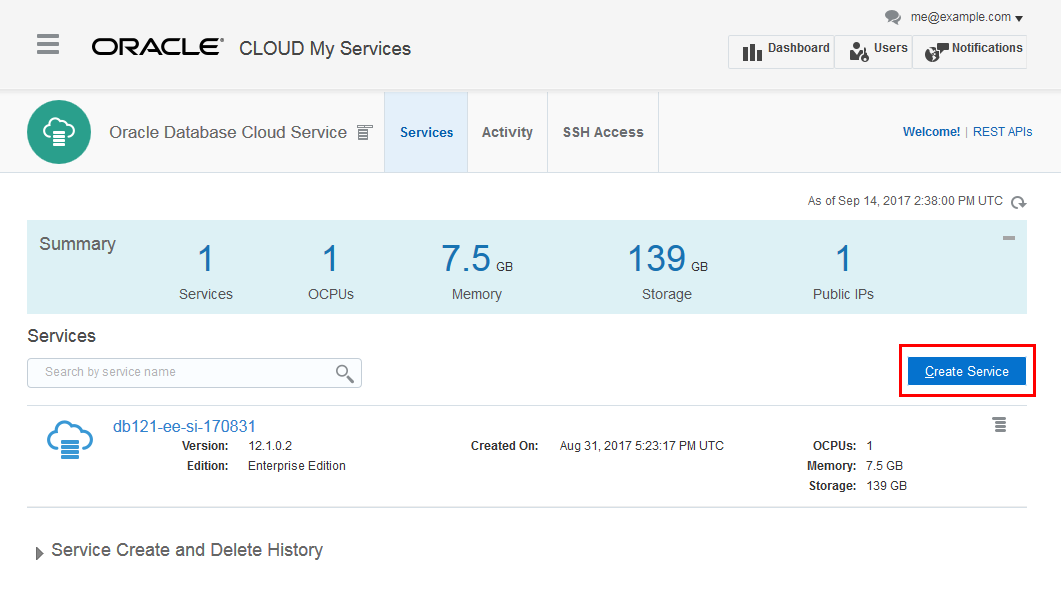
Description of the illustration DBCS_ServiceConsole.png - The Create Service wizard starts and the Service page is
displayed. On the Service page, provide a name and description
for the database deployment, and provide information about its
high-level characteristics. For Software Release, be sure to
select the same Oracle Database release that your on-premises
system is using.

Description of the illustration Service.png - Click Next to advance to the Service Details page.
- On the Service Details page, complete the Database
Configuration section by providing information about the
Oracle Database you want to create.

Description of the illustration ServiceDetails_DBConfig.png - Click Edit for the SSH Public Key field. Select Create a New
Key and click Enter.

Description of the illustration SSHPublicKey.png - Click Download to download the SSH key pair zip file.
- Select Save File and click OK.
- Select a location to store the zip file and click Save.
- Click Done after you’ve downloaded the zip file.
- You can see the SSH Public Key field has been filled in with
the generated key value.

Description of the illustration SSHKey_Value.png - On the Service Details page, complete the Backup and
Recovery Configuration section, choosing a backup option for
the database deployment and, depending on your choice,
providing information about the Oracle Storage Cloud Service
container where cloud backups are to be stored. If you choose
to back up to Cloud storage, then you must specify a Cloud
Storage Container name, and the username and password of your
Oracle Cloud account. If the container does not exist, select
Create Cloud Storage Container.

Description of the illustration ServiceDetails_BackupRec.png - On the Service Details page, Select Yes in the Create Instance from Existing Backup menu.
- Click OK for the informational message about storage.
- Enter the Database ID of your on-premises database and click
Edit.
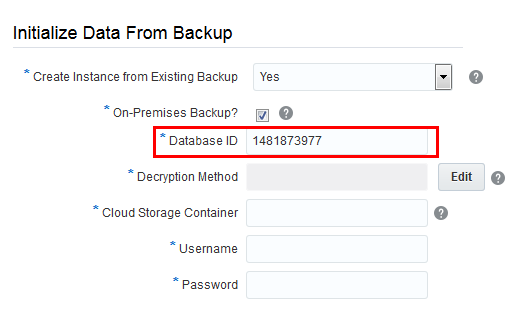
Description of the illustration InitFromBackup.png - Select Paste RMAN Key Value and enter the password you
specified when you created the backup. Click Enter.

Description of the illustration Decryption.png - Enter the name of the Cloud Storage container where your
on-premises backup is stored. Enter the Cloud account username
and password.

Description of the illustration InitFromBackup_Complete.png - Click Next to advance to the Confirmation page.
- On the Confirmation page, review the information listed.
Notice that the Cloud Storage container for backups was
created. If you are satisfied with the information, click
Create.

Description of the illustration Confirm.png - You receive a message that the service creation request was
accepted and the creation begins.
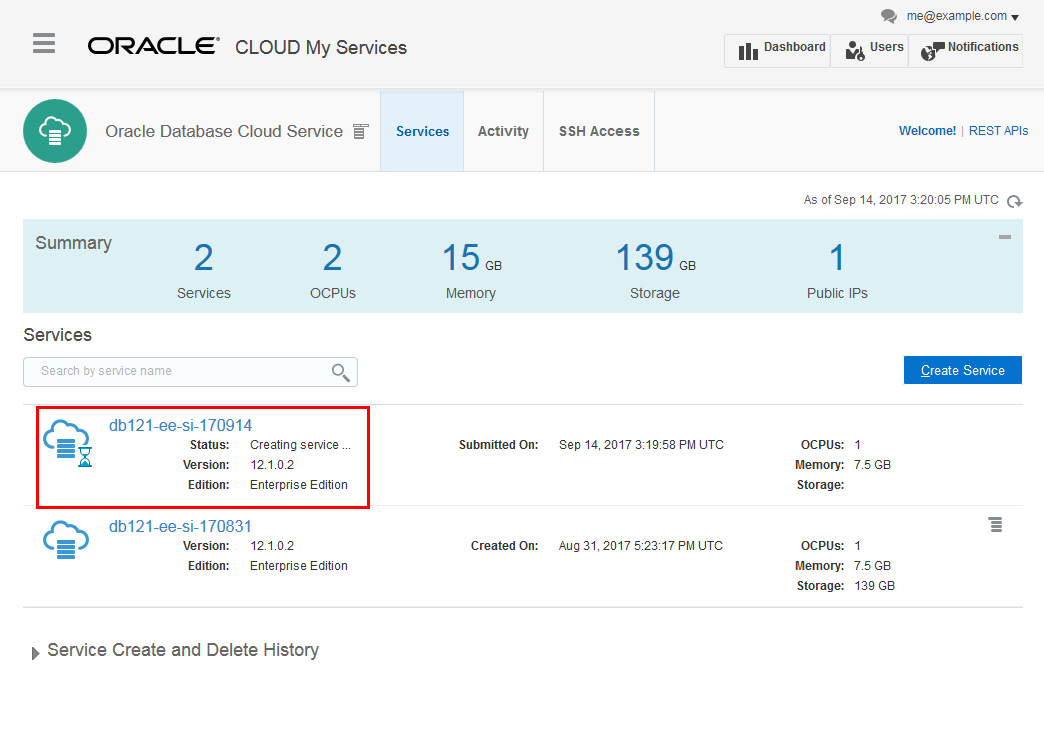
Description of the illustration CreatingService.png - You can monitor the database deployment creation by click
the refresh icon. You may see a status of “Service
Maintenance.” This is normal for a database deployment that is
created from an existing backup.

Description of the illustration CreatingService_Maint.png - After the database deployment is created, you can begin administering your database in Oracle Database Cloud Service.
 Want
to Learn More?
Want
to Learn More?
- Using Oracle Database Backup Cloud Service
- Oracle Database Backup Cloud Service videos
- Using Oracle Database Cloud Service
- Oracle Database Cloud Service tutorials
- Oracle Database Cloud Service videos