 Transfer a Chat Session to a
Live Chat Queue
Transfer a Chat Session to a
Live Chat Queue Before
You Begin
Before
You Begin
This 45-minute tutorial shows you how to create a live chat queue and configure an Oracle Digital Assistant skill to transfer a chat session to the queue automatically.
This is the third tutorial in a series. Read the tutorials in this order:
- Transfer a Conversation to an Oracle Service Cloud Agent
- Pass Customer Information to a Live Chat
- Transfer a Chat Session to a Live Chat Queue
Background
Oracle Service Cloud Chat uses queues, chat rules, and agent profiles to route chats to the appropriate agents automatically.
- Chat rules define which queue to route a chat to.
- Agent profiles identify which agents can accept chats from a queue.
Here’s the scenario for this tutorial:
You run a pizza store and your customers can order pizzas through live chat on your website. To reduce support costs, you added a PizzaBot skill, which customers can access from either Facebook Messenger or a digital assistant on your website. This skill can transfer digital conversations to a live chat when necessary.
Both the live chat and the skill funnel all conversations to a default queue. These conversations start with a greeting message from the agent asking "How may I help you?" However, when conversations are transferred from a skill, the user has already discussed a few things and this context is passed to the live chat so that the conversation can start from where the skill left off.
You want your skill's chat sessions funneled to a special queue so that the agents know to handle them differently from conversations that come directly from the website's live chat. You've decided to use an Incident custom field to let Oracle Service Cloud know that the incoming chat request came from a skill and needs to be funneled to the special queue.
Here's what you'll need to do:
- Install the Oracle Service Cloud Service Console.
- Use the Service Console to:
- Create a
Botchat queue. - Create a
Bot Agentprofile and add the chat queue to it. - Add an agent account and associate it with the profile.
- Add a
frombotIncident custom field. - Create a
Bot Queuechat rule to funnel skill conversations to the new queue based on the custom field value.
- Create a
- Enhance the PizzaBot skill to pass the new Incident custom field.
- Test your changes.
What Do You Need?
Before you can start this tutorial, you must first complete Transfer a Conversation to an Oracle Service Cloud Agent and Pass Customer Information to a Live Chat, which are the first and second tutorials in this series. You'll enhance the skill that you built during those tutorials.
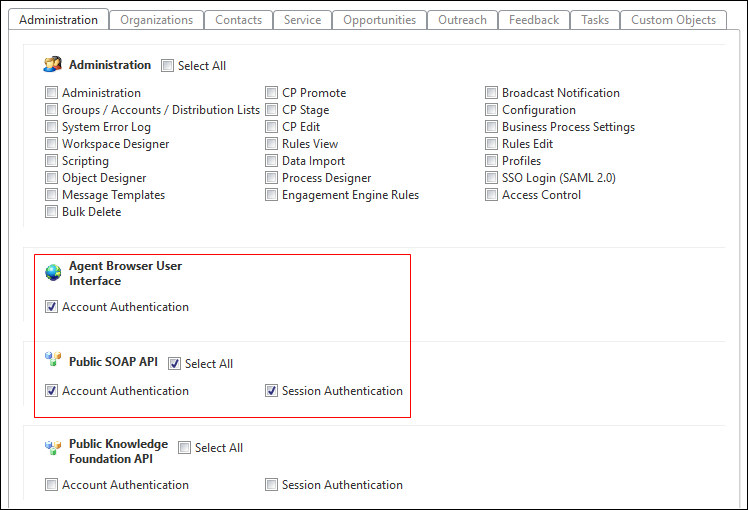
Because you'll configure staff accounts, profiles, queues, and rules, you need an administrator staff account with the following profile permissions:
- Account Authentication for Agent Browser User Interface
- Account Authentication and Session Authentication for Public SOAP API
You'll use the Oracle Service Cloud Service Console, which you download to a local system, to configure the staff account, profile, queue, and rule. This requires a local system that has Internet Explorer or Microsoft Edge and .NET framework installed.
As with the second tutorial, you also need:
- Access to Oracle Digital Assistant 20.01 or later. If you are using an earlier version, then instead see The Legacy customFields Object in Using Oracle Digital Assistant to learn how to pass custom field values.
- Access to Oracle Service Cloud release 19A or
later with Chat enabled and with the following
chat configuration settings set to
true:- Chat Custom Interface API
(
CHAT_CONSUMER_WS_API_ENABLED) - Chat Third Party Queue Integration API
(
CHAT_UQ_WS_API_ENABLED)
Contact your Oracle account manager to set these configurations.
This tutorial is specifically for Service Cloud 19A or later. If you are using a version earlier than 19A, see instead The Legacy customFields Object in Using Oracle Digital Assistant to learn how to pass custom field values.
- Chat Custom Interface API
(
- A chat-enabled Oracle Service Cloud interface. You can use the Oracle Service Cloud Configuration Assistant, which you access from My Services, to verify that the interface is enabled for chat.
- The Service Console app installed on your desktop.
 Install the Service Console
You use the Oracle Service Cloud Service Console, which is an app that you use on a local system, to configure the queue, profile, account, custom field, and rules. You only can install this app on a local system that has Internet Explorer or Microsoft Edge and .NET framework installed. If you don't have .NET, install it from the Microsoft website.
- Verify that your browser is set to accept cookies.
-
In the fields below, enter the site name and
domain name of your Oracle Service Cloud
instance. For example, if the URL to your Oracle
Service Cloud instance is
https://sitename.example.com, then the site name issitenameand the domain name isexample.com. If your instance has multiple interfaces, then you must include the interface ID in the site name . For example, for the interface that has an ID of 2, you would use something like sitename-2.exampledomain.com.
- From Internet Explorer or Microsoft Edge, go to
http://./cgi-bin/.cfg/php/admin/launch.phpThe launch page displays.
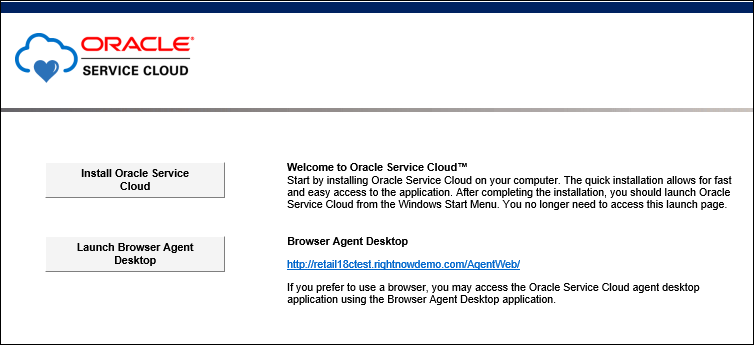
- Click Install Oracle Service Cloud.
Note: The Service Console app will be named "RightNow" on your system.
- Click Install.
After the application is downloaded, the Login window opens.
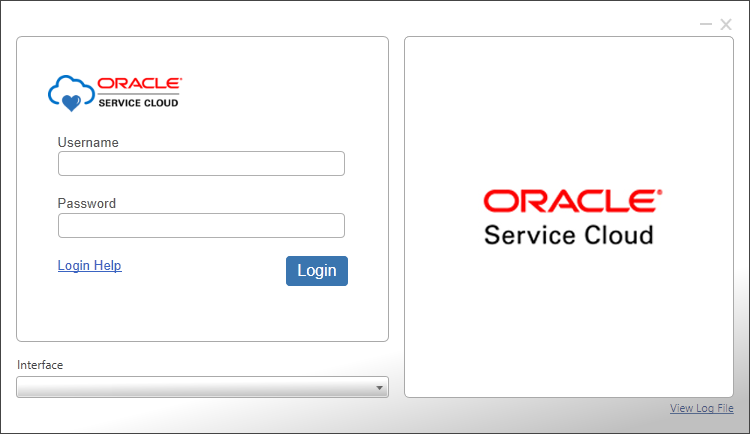
- By default, the Interface field displays the name of the interface from which you launched the installer. Use this interface.
- Sign in with the user name and password of a staff member who has the administrative profile permissions that are listed in What Do You Need?, and then click Login.
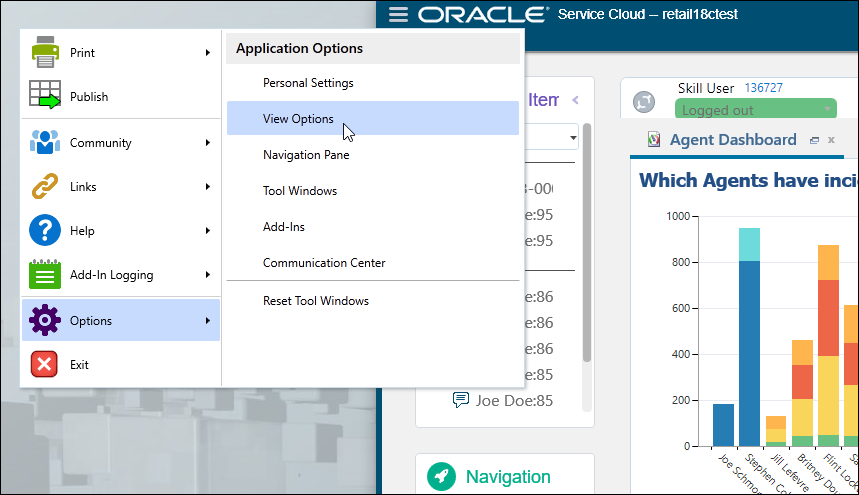
- Click File (or
 in
some schemes), select Options, and then
select View Options.
in
some schemes), select Options, and then
select View Options.
- Select the Default color scheme.
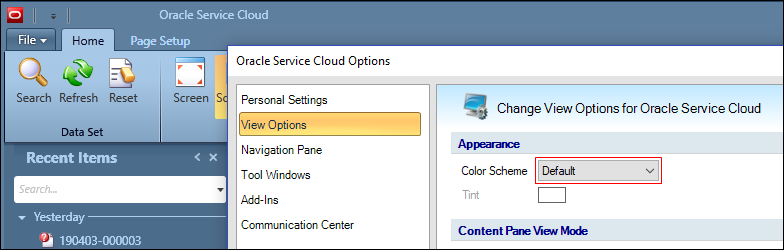
This scheme makes it easier to navigate the menus.
 Create a Chat Queue
When used with chat rules and profiles, queues enable automatic sorting of incoming chats. You'll use the Service Console to create a special queue for chat sessions that come from Digital Assistant skills.
- In the Service Console, click
Configuration
 to display the Configuration menu in the
Navigation pane. (You might need to
scroll the buttons to see the
Configuration button.)
to display the Configuration menu in the
Navigation pane. (You might need to
scroll the buttons to see the
Configuration button.) - Expand Application Appearance, and then double-click Customizable Menus.
- Expand System Menus, and then select
Chat Queues.
A list of chat session queues is displayed.
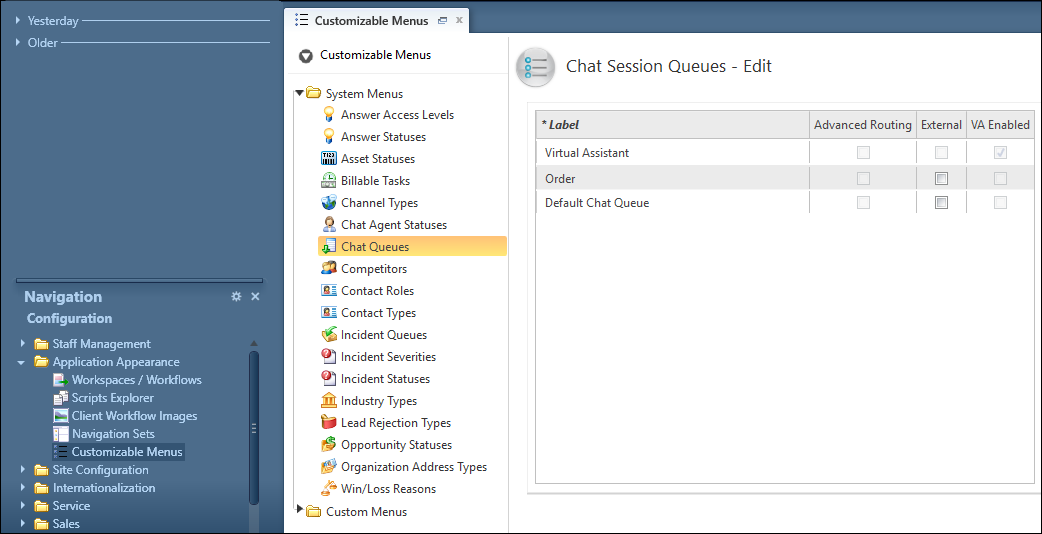
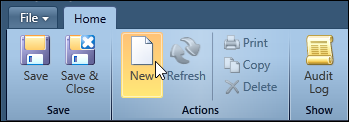
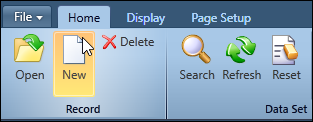
- On the Home tab, click New.
A row with the New Chat Queue label appears in the list of chat session queues.
- Click the
New Chat Queuelabel and change its name toBot. - On the Home tab, click Save & Close.
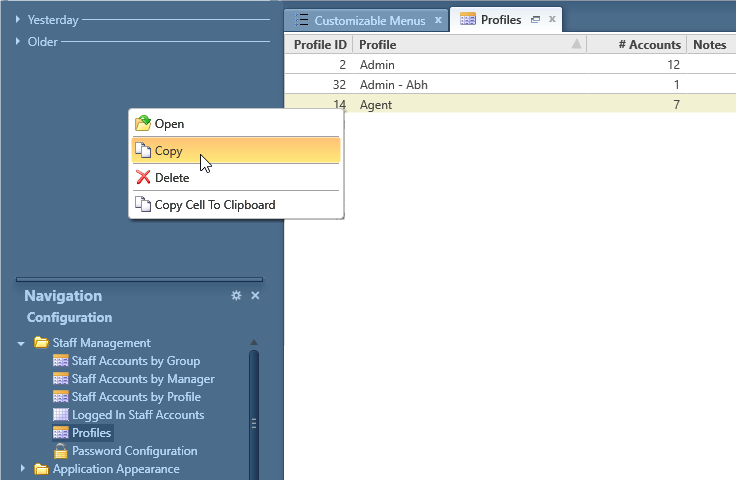
 Create a Profile
You use profiles to manage account permissions and to assign agents to queues. Let's create a profile for our special queue.
- In the Configuration menu, expand
Staff Management, double-click
Profiles, right-click a similar agent
profile that includes Chat permissions, and then
select Copy.
- On the Profile Interfaces - Edit page, change
the name to
Bot Agent. - In the Interfaces section, enable
Access for the interface and verify that
the navigation set is suited for the agents.
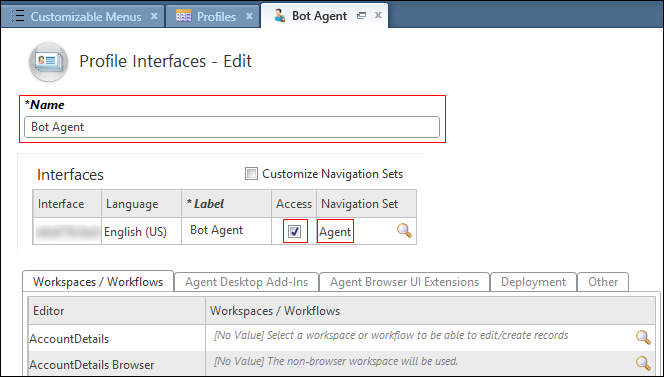
- On the Home tab, click
Permissions.

- In the Profile Permissions - Edit page, select
the following options:
- Account Authentication in the Agent Browser User Interface section.
- Account Authentication and Session Authentication in the Public SOAP API section.
- Click the Service tab and select Chat in the Chat section.
- Ensure that the Pull Chat option is not selected and that the Pull Policy is set to Strict Priority.
- In the Chat Queues section, select
Bot and click Add +.
The queue should appear in the queue list.
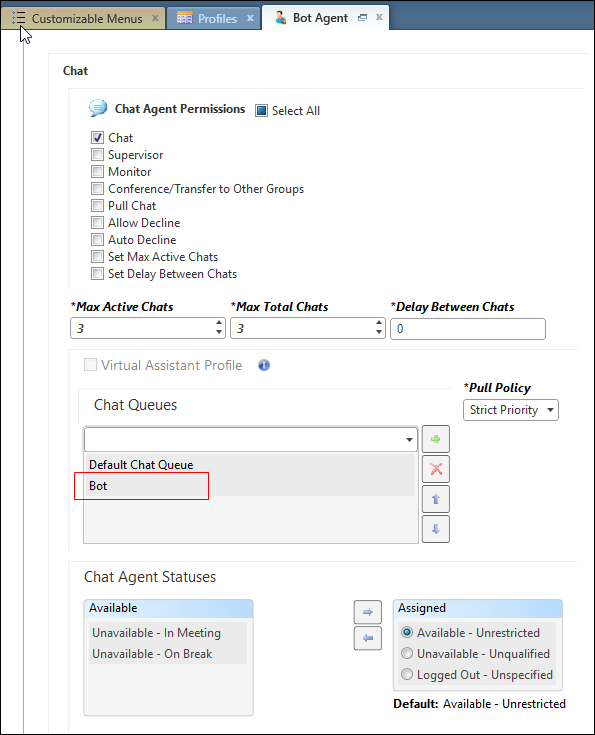
- In the Chat Agent Statuses section, ensure that Available - Unrestricted is assigned.
- Select Available - Unrestricted as the
default status.
This insures that when you sign into the Service Console, your chat window will be set to wait for incoming requests automatically.
- On the Home tab, click Save and Close.
 Add an Agent Account
Let's create an account for an agent who'll receive chat requests from the Bot queue.
- Return to the Profiles page and then, in
the Home tab, click Refresh.
Notice that the # Accounts column for Bot Agent displays
0because we haven't associated any agents with the profile. Let's do that now. - From the Configuration menu, double-click Staff Accounts by Profile.
- On the Home tab, click New.
- On the Account Details page, enter these
values:
- User Name: For example,
botagent. - First Name: For example,
Bot. - Last Name: For example,
Agent. - Display Name: For example,
Bot Agent.
- User Name: For example,
- Click Change Password and enter a password for the account.
- (Optional) Clear Password Expires.
- Click
 next to the
Profile field, and then select Bot
Agent.
next to the
Profile field, and then select Bot
Agent. - Click next to the Group
field, and then select an appropriate group or
create one.
- Select a default currency and a default country.
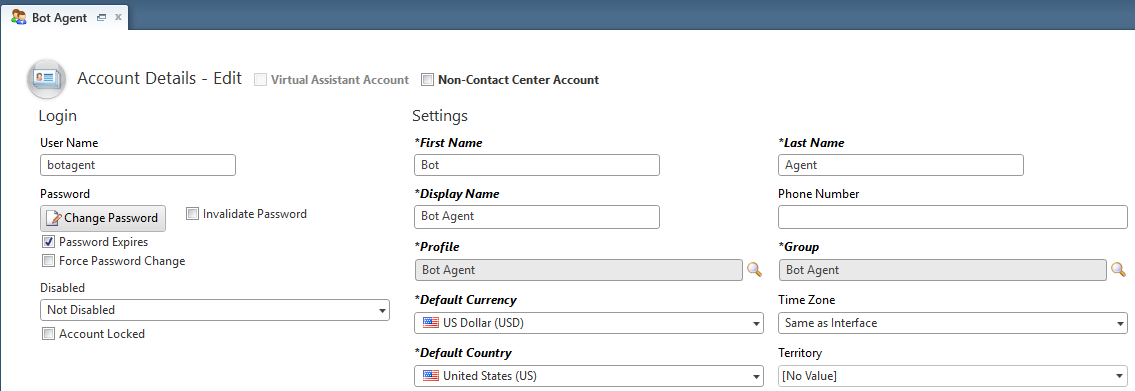
- On the Home tab, click Save and Close.
 Add an Incident Custom Field
You might remember from
Pass Customer Information to a
Live Chat
that you can use Incident custom fields to pass data
to Oracle Service Cloud.
You'll use an Incident custom field named
frombot to filter skill chat sessions
to the Bot queue.
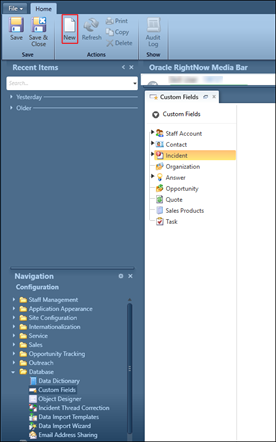
- From the Configuration menu, expand Database, and then double-click Custom Fields.
- From the list of custom field types, select
Incident, and then on the Home
tab, click New.
- Enter these values:
- Name:
From Bot - Data Type: Yes/No
- Column Name:
frombot. - Default Value: No
- Name:
- In the Interface Visibility section,
select Display in the Chat column.

This insures that the custom field is available to the chat session.
- On the Home tab, click Save & Close.
 Create a Chat Rule
When used with queues and profiles, chat rules enable
automatic sorting of incoming skill chat sessions
based on Incident custom field values or Chat
Customer Information (or both).
We'll create a chat rule to filter an incoming
request to the Bot queue if the frombot
custom field is set to Yes.
- From the Configuration menu, expand Site Configuration, and then double-click Rules.
- On the Home tab, click Chat to
display the chat states, and then click
Edit to add rules to the states.

- In the Rules page, right-click the state that's displayed in bold (this is typically 01.Initial), and then select New Rule.
- On the Edit Chat Rule page, name the rule
Bot Queue. - In the Add Options section, click Add
IF Condition Based On, select
Incident, and then select From
Bot.
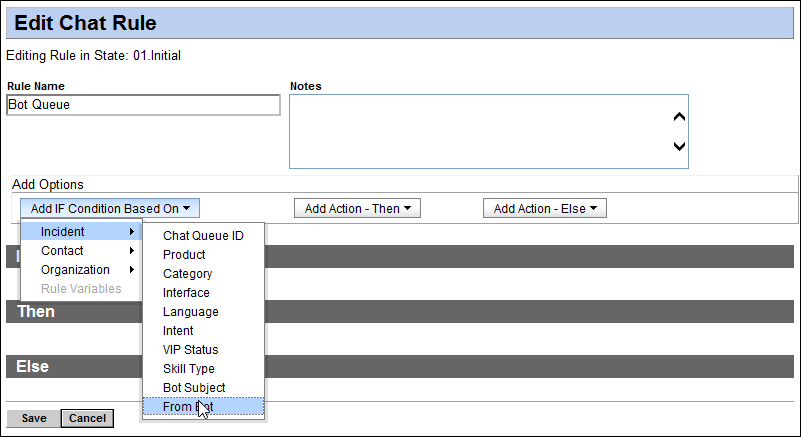
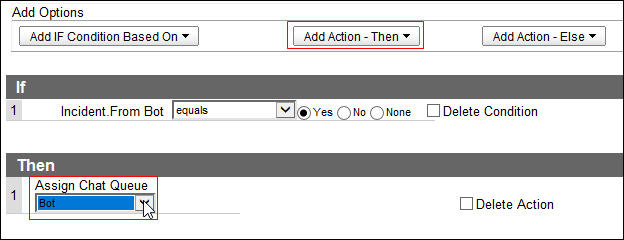
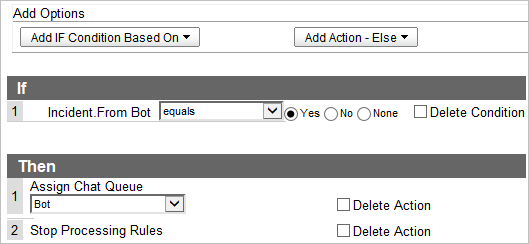
- In the Select Operator field, select equals, and then select Yes.
- Click Add Action - Then, select Chat
Queue ID, and then select Bot
from the Assign Chat Queue drop-down
list.
- Once again, click Add Action - Then, and
then select Stop Processing Rules.
- Click Save.
- Click Compile.
- Click Activate.
- On the Home tab, click Edit.
- Expand the state that's displayed in bold (this
is typically 01.Initial), select Bot
Queue and drag it to the top position.
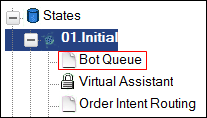
- Click Compile.
- Click Activate.
 Add the Custom Field to the
Dialog Flow
Add the Custom Field to the
Dialog Flow
Now that Oracle Service Cloud is configured to route
your skill's chat session based on the
frombot custom field,
let's add that field to the
agentProperties map.
- In Oracle Digital Assistant, open your PizzaBot skill and go to the dialog flow.
- Find the
setupLiveChatInfostate, and add acustomFieldsnode to thevalueproperty as shown here:setupLiveChatInfo: component: "System.SetVariable" properties: variable: "liveChatInfo" value: customerInformation: categoryID: id: 61 #Set this property customFields: - name: "c$frombot" type: "BOOLEAN" # yes/no (1=yes and 0=no) value: 1 transitions: next: "agentInitiation"Notice that the custom field name has a
c$prefix. That indicates that it is a custom field. When you pass a custom field value from a skill, you set thenameproperty toc$plus the field's column name using all lower case letters.Also notice that the custom field is of type Yes/No, but here we use
BOOLEANfor thetype. You can learn how to pass values for all the data types at The Standard customFields Object in Using Oracle Digital Assistant - Click Validate to make sure that your dialog flow doesn't have syntax errors.
 Test Your Changes
If everything has been configured correctly, then your skill's chat sessions should transfer to the Bot queue. You'll use te Oracle Service Cloud Agent Browser User Interface (BUI) to verify that the chat session goes to the right queue.
- In a browser, go to the BUI, and sign in with
the
botagentuser name (or whatever user name you used for your bot agent).The URL for the Agent Browser UI is typically:
https://./AgentWeb/ - If you aren't signed into the chat, click
Chat Logon
 .
. - Because of how you configured the profile, your status should be
unrestrictedand you shouldn't have to request (pull) chats.Ensure that the status is
unrestricted. If you do see the Request a chat button, click it.
You are ready to accept the chat.
- In your PizzaBot skill in the Digital Assistant UI, if the Train button doesn't show a check mark next to it, click Train and train the skill.
- Click Skill Tester
 , and then enter this
text in the message field.
, and then enter this
text in the message field.
I want to speak to a human - When the Agent Browser UI prompts you to accept
the chat, click Accept.
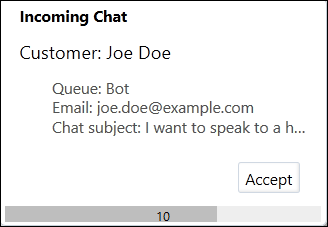
Notice that the Incoming Chat notice shows that the request came from the Bot queue. You also should see
Queue: Botin the Chats section.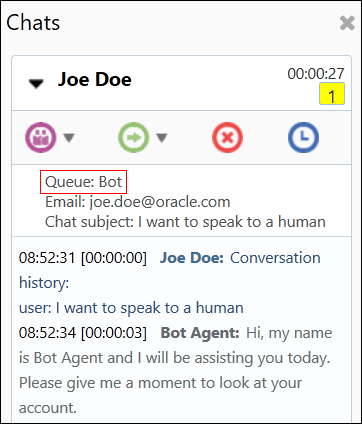
- To terminate the live chat, click Terminate
the chat session
 .
.
Congratulations! You've completed all the tutorials in this series.
 Want to Learn More?
See Agent Integration in Using Oracle Digital Assistant.