 Optimize
Insights Reports with Conversation Markers
Optimize
Insights Reports with Conversation Markers Before You Begin
Background
This 30-minute tutorial shows you how conversation markers make the skill-level Insights reports easier read. In this tutorial, you'll explore the following use cases:
- You want the various subflows, or intent-specific execution paths in the dialog flow definition, reported separately.
- You want to limit the reporting to certain states in the dialog flow. Consequently, you want to exclude the states you consider extraneous from the Insights reports.
What Do You Need?
- To complete this lab, you need an instance of Oracle Digital Assistant (ODA), Release 20.4 or higher.
- The starter skill for this tutorial, which you can download here.
 Get
Acquainted with Insights Reports
Get
Acquainted with Insights Reports
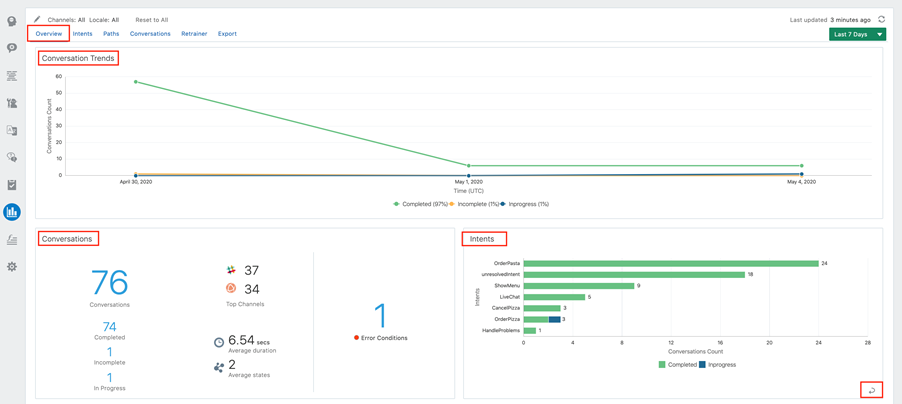
Before you change the Insights reporting by adding conversation markers to the dialog flow definition, let's first take a quick tour of a skill-level Insights, starting with the Overview dashboard. The Overview report gives you an at-a-glance view of how your skill has been performing. We're not going to delve into all aspects of the report, but here are some highlights:
- Conversation Trends: This multiple line chart compares the number of completed, incomplete, and in-progress conversations for the selected time period.
- Conversations: The Conversations section displays separate tallies for complete, incomplete, and in-progress conversations. It also displays the most-used channels.
- Intents: Ranks the intent resolution using a stacked bar chart. Each bar represents one of the skill's intents. The bars themselves are segmented by the number of complete and incomplete conversations.
 Create
the Skill
Create
the Skill
We’ll start by importing the InsightsDemo_starter skill
- Log into Oracle Digital Assistant.
- Click the menu icon in the top left corner to open the side menu
- Expand Development and then click Skills.
- Click Import Skill in the upper right and select the
InsightsDemo_starterfile. If you receive an error message saying that the bot already exists, it means that someone has already imported the skills and you can skip to the next step. - Return to the Skills landing page by clicking Skills in the left navigation menu.
- Locate the
InsightsDemo_starterfile. - Within the tile for InsightsDemo_starter skill, click the Options menu icon and then select Clone.
- Name the clone <Your Initials>_InsightsDemo_starter. (For example: DSM_ InsightsDemo_starter.)

 Set Up
the Skill
Set Up
the Skill
- Open the skill.
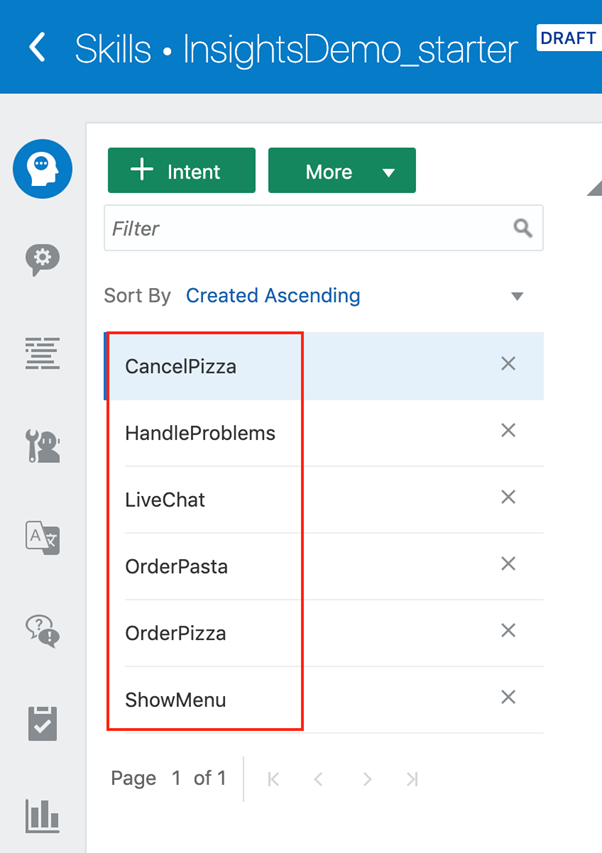
- Take a look at its intents.
- Click Settings
 .
. - In the General tab, make sure that Insights Enabled is switched on.
- Click Train, choose Trainer Tm, then click Submit.
- Click Validate to make sure that the the dialog flow has no errors.

 Separate
Conversations Reporting by Intents or Transitions
Separate
Conversations Reporting by Intents or Transitions
In this section, we're going to update the ShowMenu
state in the dialog flow to log the different user interactions
or requests that occur within the same chat session as different
conversations. But before we get to that, let's take a look at
the OBotML, have an initial chat, and then find out how it's
reported in Insights.
Take a Look at the showMenu State
- Click Flows
 in the left navbar.
 - In the dialog flow definition, locate the
showMenustate. In particular note its transitions:transitions: actions: pizza: "orderPizza" pasta: "orderPasta" textReceived: "intent"These transitions enable the dialog flow to branch at this state, which is the execution path for the ShowMenu intent. After the Dialog Engine moves to this state, users might choose to do something more than view the menu options. They can continue their order because of theorderPizzaandorderPastatransition actions, or because of thetextReceivedtransition action that resolves user messages to the other intents defined for the skill, OrderPasta and OrderPizza.
View the showMenu Intent Reporting
In this step, we'll see how the Conversations report records a
conversation that's routed to the showMenu state.
- Click
 (located at the top right) to open the Skill Tester.
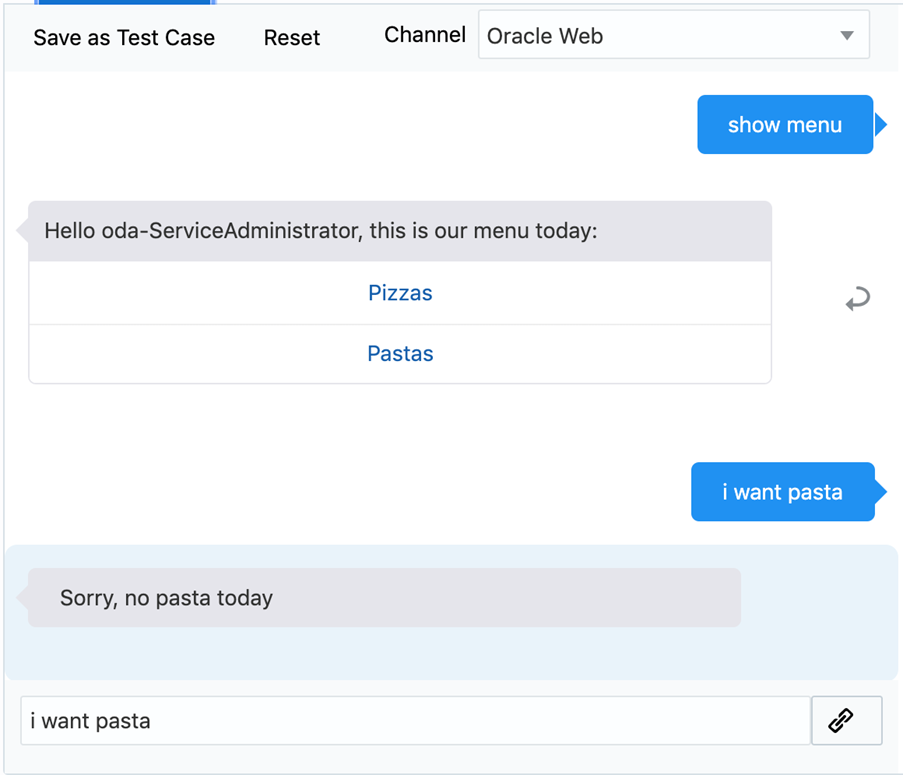
 - Enter show menu, then click Send.
- After the skill replies with the Pizzas or Pastas message, enter I want pasta.
- Click
 to close the Skill Tester.
 - Click Insights
 in the left navbar (if it isn't
already open) and then click Conversations.
in the left navbar (if it isn't
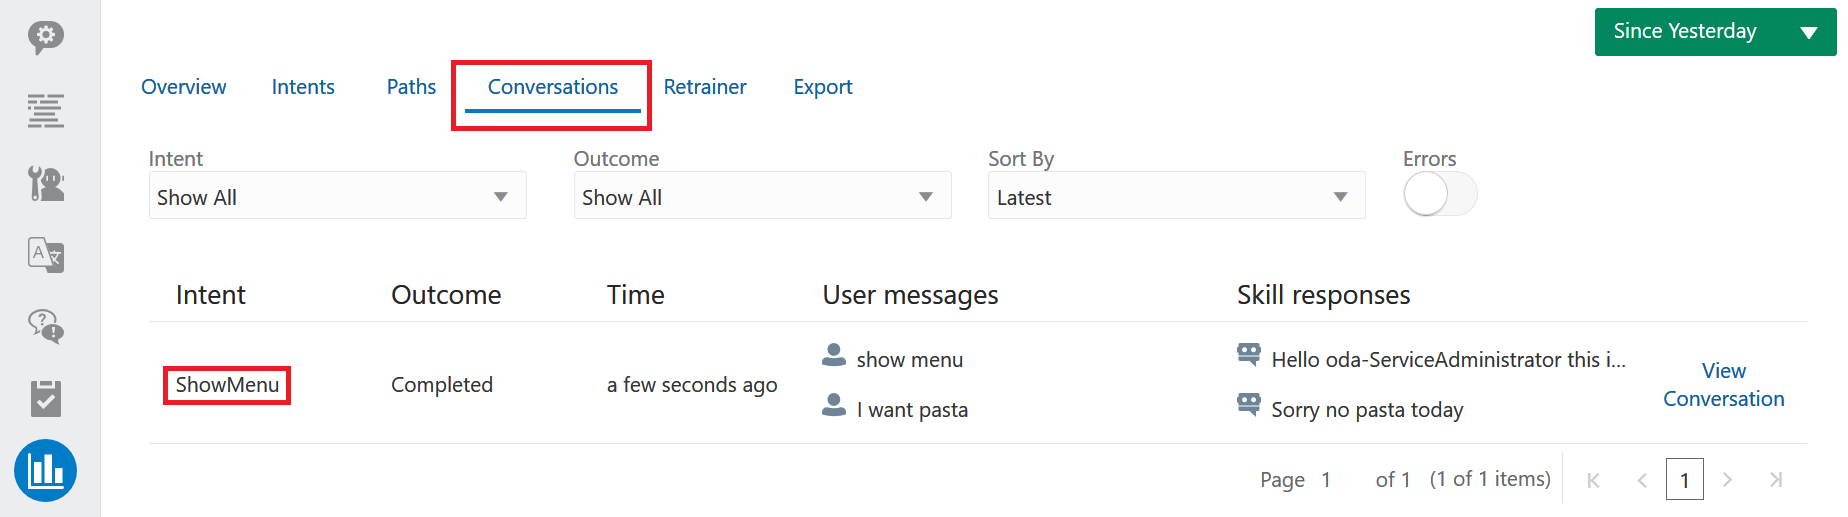
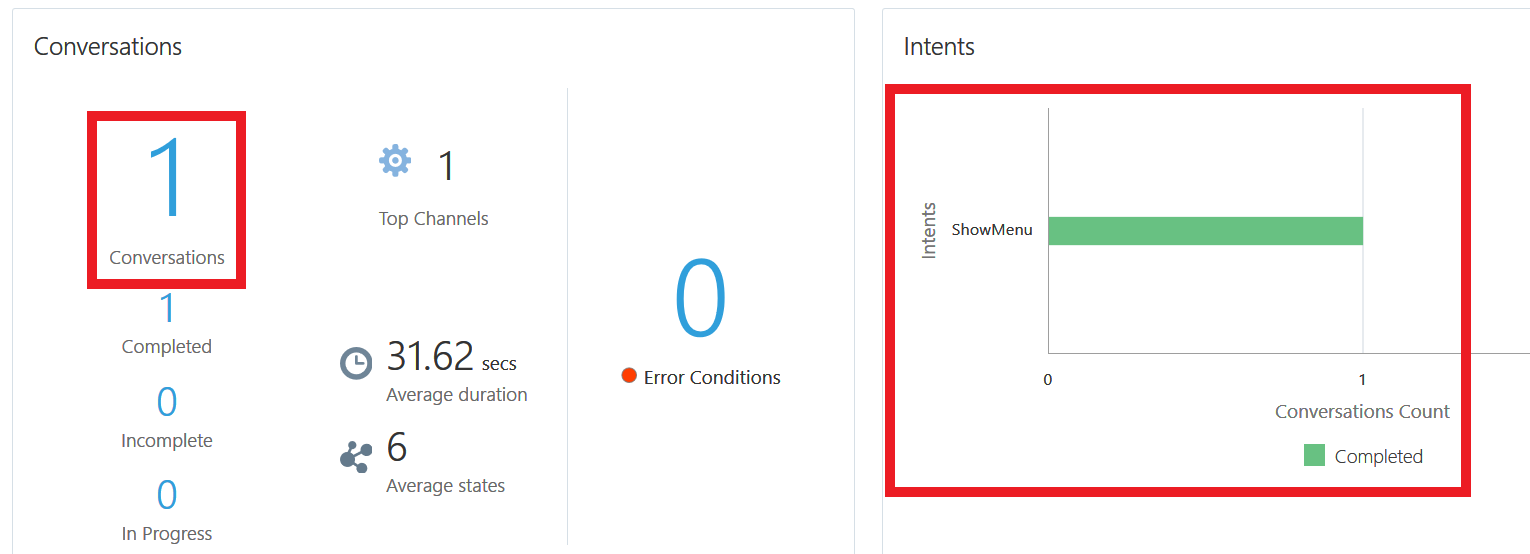
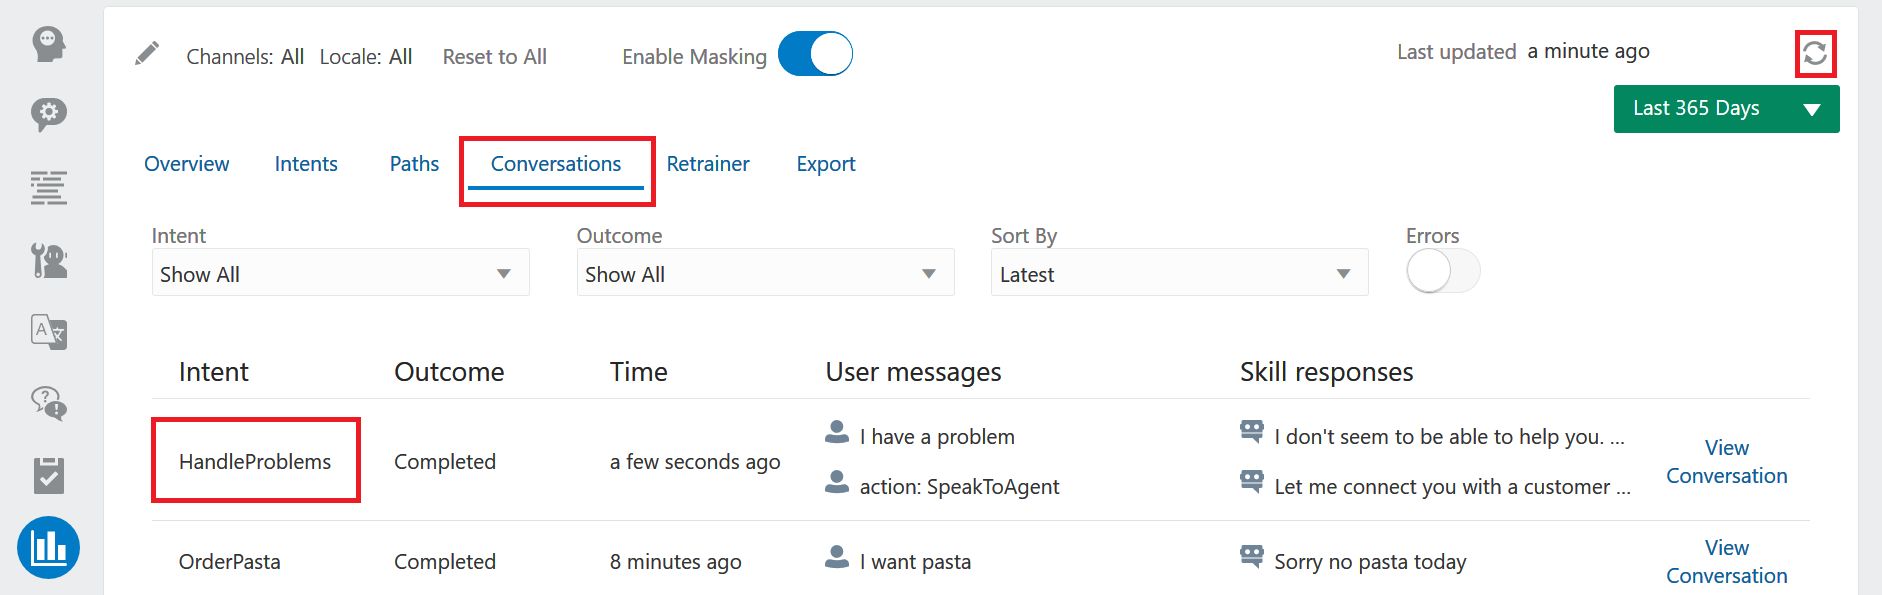
already open) and then click Conversations. - In the Conversation report, notice that ShowMenu is the intent that was resolved for the entire conversation. This only tells part of the story. For a business user who wants to see separate transactions for pizza and pasta orders, this isn't enough.
- Click Overview. If this is your first chat, there will one conversation recorded and showMenu will be the only entry in the Intents bar chart.

Add Conversations Markers to the showMenu State
To enable the Insights to create a precise report of the
interaction, you're going to add the insightsEndConversation:
true conversation marker to the showMenu
state:
- Click Flows in the left navbar.
- In the
showMenustate, add theinsightsEndConversation: trueconversation marker underproperties:ShowMenu: component: "System.CommonResponse" properties: processUserMessage: true insightsEndConversation: true - Click Validate to check for errors (particularly ones involving indentation -- the conversation marker should be six spaces from the left margin).
View the Updated Report
Because of the addition of the insightsEndConversation:
true property, Insights now considers any further
interaction enabled by the orderPizza, OrderPasta,
or textReceived transitions as a separate
conversation. Let's test that out.
- Click
to open the Skill Tester.
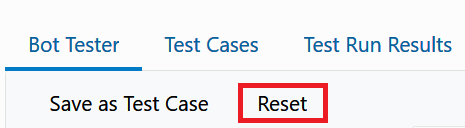
- Click Reset to clear your input.
- Enter show menu.
- Enter I want pasta.
- Click Close to close the Skill Tester.
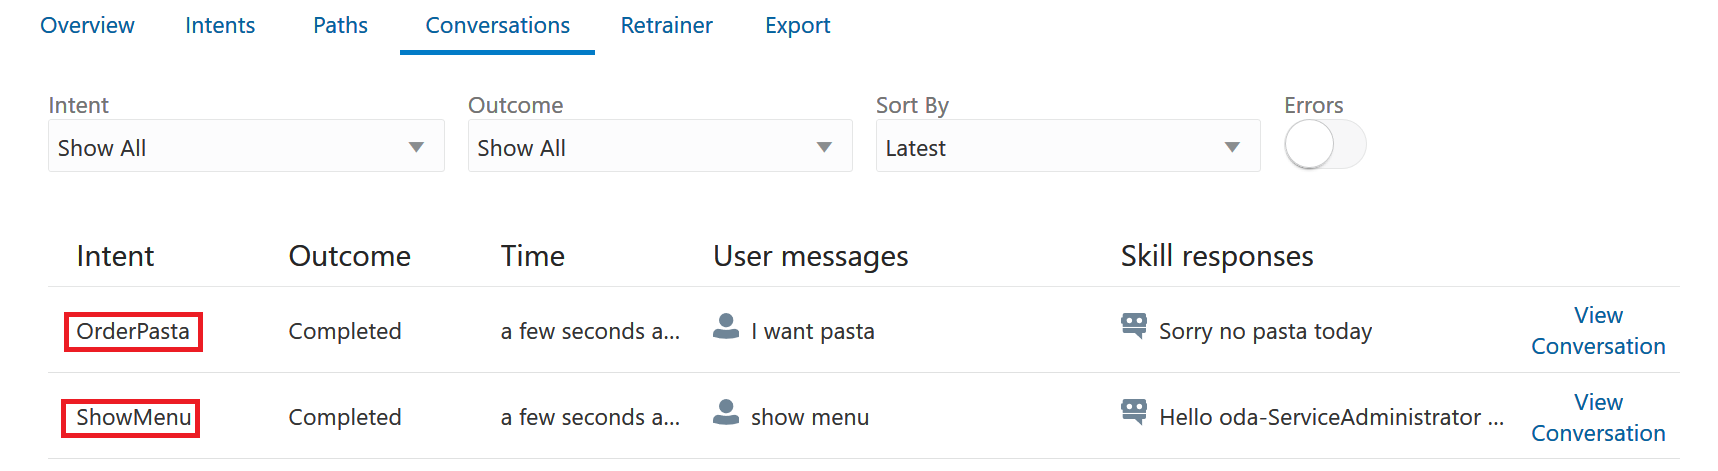
- Open the Conversations report. There are now two separate conversations: one for the ShowMenu intent and another for the OrderPasta intent.
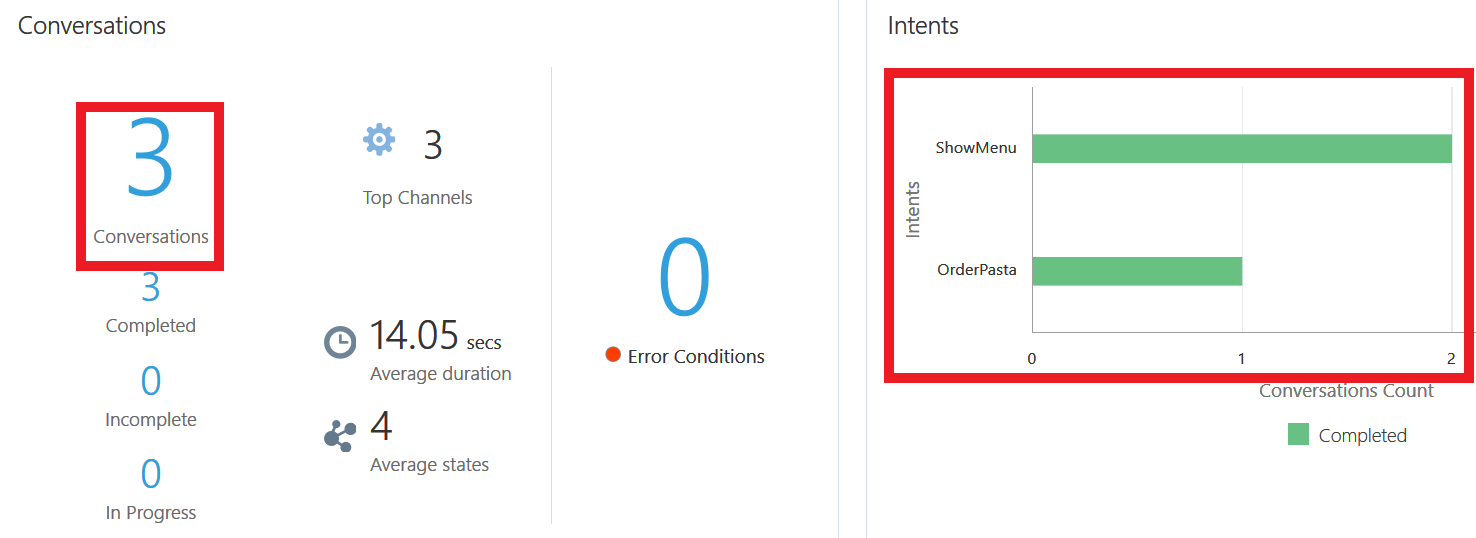
- Click the Overview tab. Because these intents are logged as separate conversations, the total number of conversations has been incremented by two rather than one. The OrderPasta intent has also been added to the Intents chart.
Take a Look at the handleProblems State
In this section, we're going to take a look at the agent
handover enabled by the skill's HandleProblems intent and
initiated through the handleProblems state,
the first stop in this intent's execution path. Configured
as an action list, this state's speakToAgent
and StartOver transitions fork the execution
path:
#################
# Handle problems
#################
handleProblems:
component: "System.List"
properties:
prompt: "I don't seem to be able to help you. Would you like to speak with someone?"
options:
- label: "Yes, I want to speak with someone"
value: "SpeakToAgent"
- label: "No, let's start over"
value: "StartOver"
autoNumberPostbackActions: true
transitions:
actions:
SpeakToAgent: "setupProfileFirstName"
StartOver: "startOver"
Review the Reporting for the Agent Handover Action
Now let's see HandleProblems execution path in action and find out how it's reported in the Conversations report.
- Click
 to open the Skill Tester.
 - Click Reset.
- Enter I have a problem.
- Choose 1. Yes, I want to speak with someone. Because the skill is not integrated with Oracle Service Cloud for this tutorial, it may return an "Error transferring to agent.." message. Ignore it.
- Close the Skill Tester.
- Open the Conversations report and then click Refresh
 to
ensure that the report is updated. The report notes the
HandleProblems as the intent for the entire conversation.
to
ensure that the report is updated. The report notes the
HandleProblems as the intent for the entire conversation.

Add the Conversation Marker to the HandleProblems State
As a business user, you want to view the agent handover
separately from the HandleProblems intent. To separate the
report by the SpeakToAgent transition,
you're going to add the insightsEndConversation:
true conversation marker to the properties
node of the HandleProblems state:
handleProblems:
component: "System.List"
properties:
insightsEndConversation:
                    true
prompt: "I don't seem to be able to help you. Would you like to speak with someone?"
...
The marker should be six spaces from the left margin. Click
Validate to ensure that the indentation is
correct.
View the Conversation Report
- Click
to open the Skill Tester.
- Click Reset.
- Enter I have a problem.
- Choose 1. Yes, I want to speak to someone.
- Close the Skill Tester.
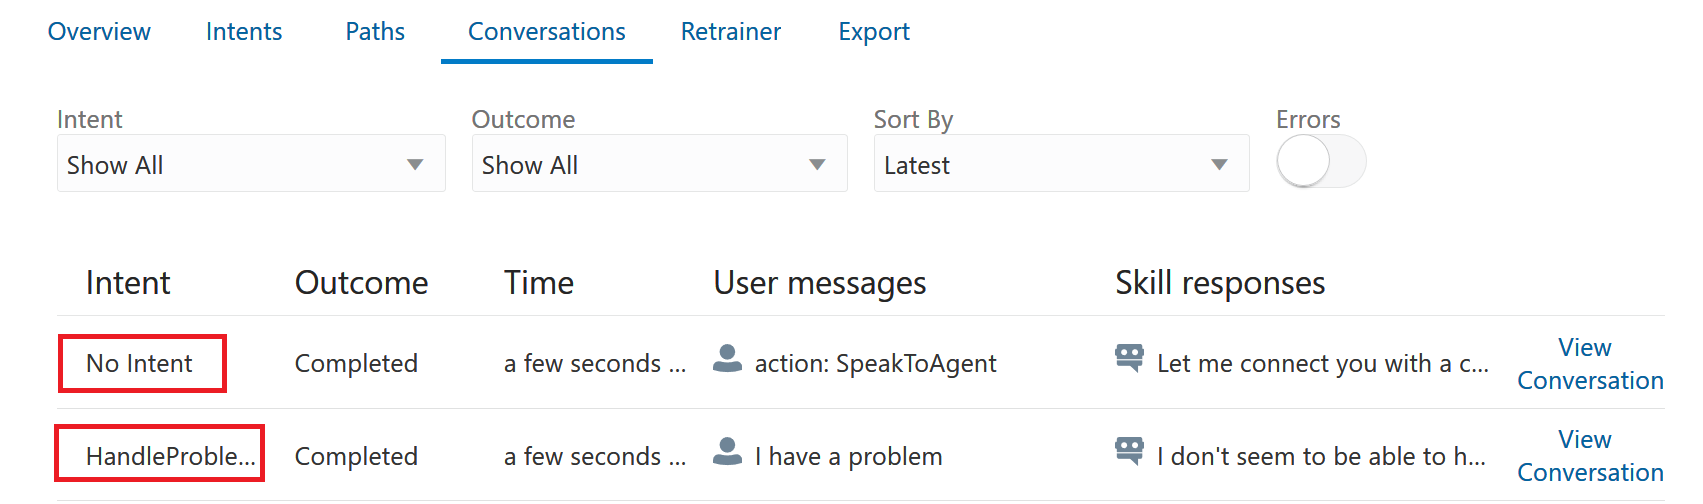
- Open the Conversation report and then click Refresh. Notice that there are now two conversations: one for the HandleProblems intent, and a second called No Intent. The report labels this second conversation as No Intent because you did not enter any text that could be resolved to the LiveChat intent.
 Optimize the OrderPizza Path
In this section, we're going to make the report easier to
read by removing the supporting states for the ordering pizza
execution path. While System.SetVariable states
are vital to functioning of the skill, they may not be of
interest to a business user who focuses on the states that
support the ordering of the pizza.
Before you update the dialog flow to make the paths easier to read, take a look at full execution path for the OrderPizza intent:
- Click
to open the Skill Tester.
- Click Reset.
- Enter I want to order a small cheese basic pizza with onions.
- When the skill prompts you for a delivery address, choose Home. The skill then replies, "Thank you for your order, your Small CHEESE BASIC pizza with Onions will be delivered in 30 minutes at Home!"
- Close the Skill Tester
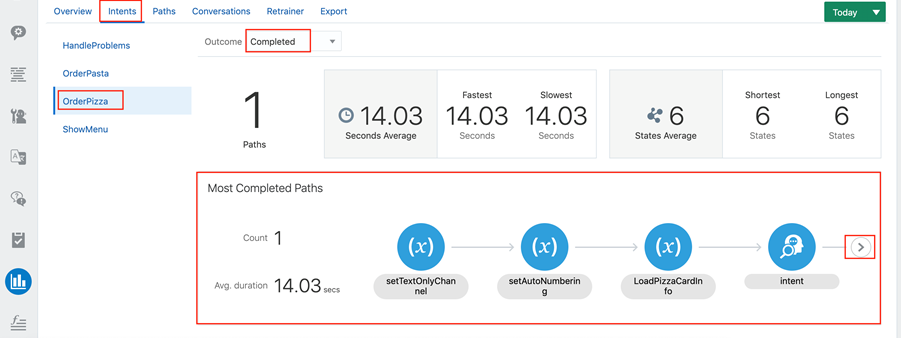
- Open the Intents report.
- Choose OrderPizza. Make sure that Completed is selected in the Outcome field.
- Note that the longest (and shortest, if this is your first invocation of the OrderPizza intent) is 6 states.
- In the Most Completed paths pane, review the path using
the directional arrows (
 and
and  )
to see all of the states that were traversed through the
pizza ordering process. Along with
)
to see all of the states that were traversed through the
pizza ordering process. Along with intent,orderPizza, andconfirmation, the path includes three supporting states that a business user may not be interested in:setTextChannel,setAutoNumbering, andLoadPizzaCardInfo.
Add Conversation Markers to the Supporting States of the OrderPizza Execution Flow
In this section, you're going to narrow the path down to
just the intent, orderPizza, and
confirmation states by adding the insightsInclude:
false conversation marker to the properties
nodes of the setTextChannel, setAutoNumbering,
and LoadPizzaCardInfo states. When you're
done, these states should look like this:
setTextOnlyChannel:
component: "System.SetVariable"
properties:
insightsInclude:
                      false
variable: "textOnly"
value: "${(system.channelType=='webhook')?then('true','false')}"
setAutoNumbering:
component: "System.SetVariable"
properties:
insightsInclude: false
variable: "autoNumberPostbackActions"
value: "${textOnly}"
# Loading additional info for each pizza type so we can use cards with an image and decription to present the various pizza types
# The names of the pizza types must match the value list entries in the PizzaType entity.
LoadPizzaCardInfo:
component: "System.SetVariable"
properties:
insightsInclude: false
variable: "pizzaCardInfo"
Each marker should be six spaces from the left margin. Click Validate to ensure that the indentation is correct.
View the Optimized Path
- Click
to open the Skill Tester.
- Click Reset, then replay the
conversation by entering the following when prompted:
- I would like to order a large cheese basic pizza with onions
- Choose Home.
- Close the Skill Tester.
- Click Refresh in the Intents report.
- Make sure that OrderPizza is selected along with Completed in the Outcome field.
- Notice that the Shortest metric is 3 states. The Longest metric is 6 states.
- Notice that the path now includes the "essential"
states:
intent,orderPizza, andconfirmation.

 Optimize the LiveChat Path
In this step, we're going to optimize the path for the LiveChat intent by excluding the states that collect the user information that's passed to the live agent (if this skill were integrated with Oracle Service Cloud, that is). First, get acquainted with the execution path:
- Click
to open the Skill Tester.
- Click Reset.
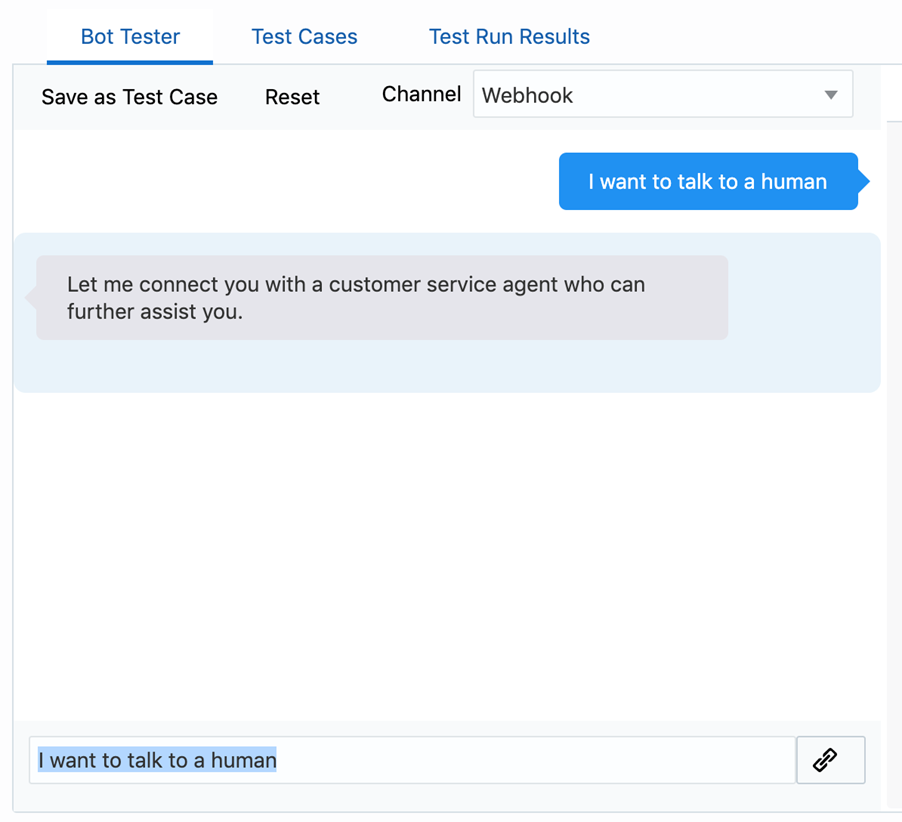
- Enter I want to talk to a human.
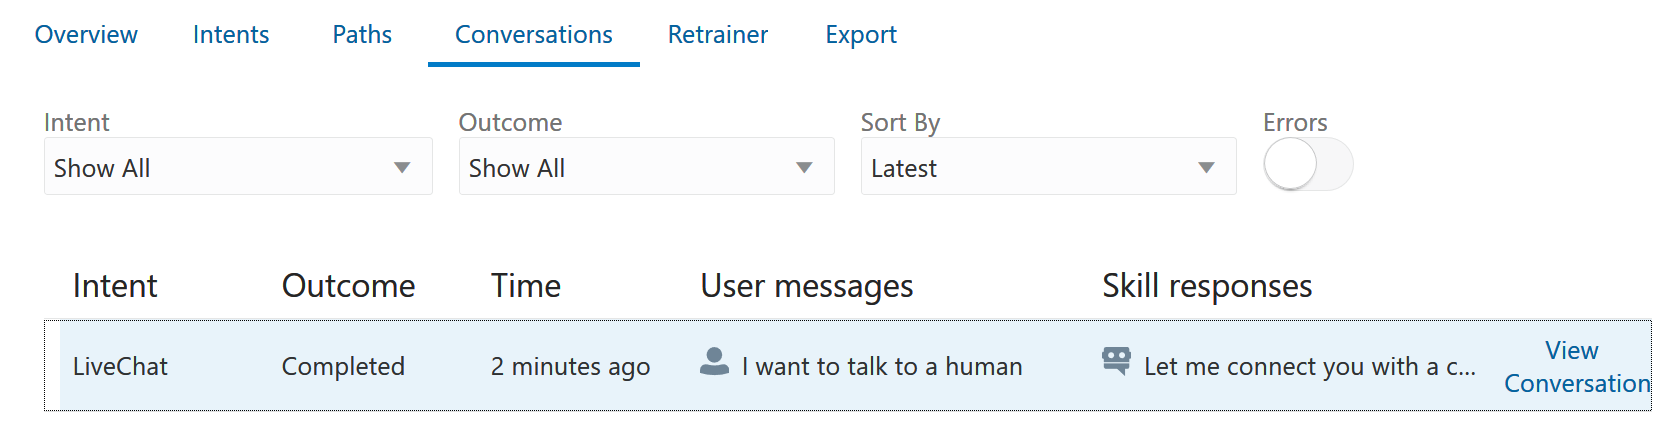
- Close the Skill Tester.
- Open the Conversations report and then click Refresh.
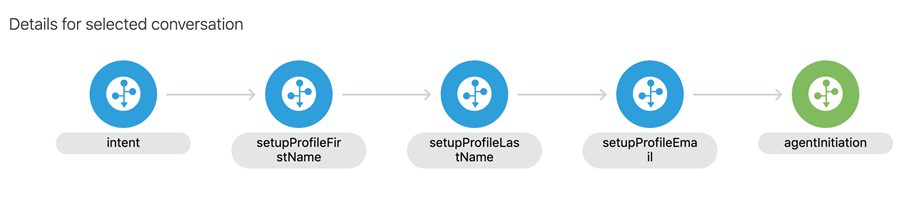
- Select the LiveChat conversation.
- Scroll to the bottom of the page to view the execution
path. It has five states, which include the supporting
states:
setupProfileFirstName,setupProfileLastName, andsetupProfileEmail.
Add Conversation Markers to the Supporting States of the LiveChat Execution Flow
Add insightsInclude: false to the properties
nodes of the setupProfileFirstName, setupProfileLastName,
and setupProfileEmail states. When you're
done, these states should look something like this:
#####################################
# Service Cloud Live Chat Integration
#####################################
  setupProfileFirstName:
    component: "System.SetVariable"
    properties:
      insightsInclude: false
      variable: "profile.firstName"
      value: "your first name" #Set this property
    transitions:
      next: "setupProfileLastName"
  setupProfileLastName:
    component: "System.SetVariable"
    properties:
      insightsInclude: false
      variable: "profile.lastName"
      value: "your last name" #Set this property
    transitions:
      next: "setupProfileEmail"
  setupProfileEmail:
    component: "System.SetVariable"
    properties:
      insightsInclude: false
      variable: "profile.email"
      value: "first.last@example.com" #Set this property
    transitions:
      next: "agentInitiation"
View the Optimized Path
- Click
to open the Skill Tester.
- Click Reset.
- Enter I want to talk to a human.
- After the skill responds, close the Skill Tester.
- Select the most recent LiveChat conversation, then scroll to the path rendered at the bottom of the page.
- Notice that the path now has just two states:
intent, and state that's the focal point for a business user,agentInitiation.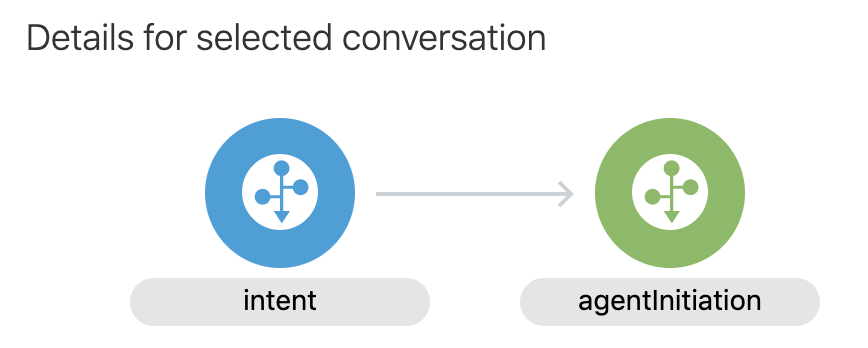
Description of the illustration.
Congratulations! You've just learned how to make Insights reporting easier to read for business users.