 Create
Different Response Types with the System.CommonResponse Component
Create
Different Response Types with the System.CommonResponse Component Before You Begin
This 45-minute tutorial shows you how to create different types
of responses using just the System.CommonResponse
component.
Note: Starting in Release 22.04, the Visual Flow Designer is available, which has a number of advantages over the YAML-based editor, including the ability to create modular flows and to design with much less code. If you are designing a new skill, you should use the Visual Flow Designer. See the Create a Dialog Flow with the Oracle Visual Flow Designer tutorial.
Background
The System.CommonResponse component is your
multi-use tool for building UI components. As you progress
through this tutorial, you'll see how this one component lets
you build simple text prompts and list of values as well as rich
UI like scrolling cards.
What Do You Need?
- Access to an Oracle Digital Assistant instance, Version 19.1.3 or higher.
- The
CRCPizzaBot_Materials.zipfile, which includes the starter skill and a finished version of the skill for your reference. Click here to download this file and then unzip it to your local system.
 Create
the Skill
Create
the Skill
Import the Starter Skill
- Log into Oracle Digital Assistant.
- Click
 in the top left corner to open the side menu.
 - Expand Development and then click Skills.
- Hide the menu by clicking again.
- Locate the CRCPizzaBot starter skill.
- If you can't locate the skill, click Import Skill
(located at the upper right).
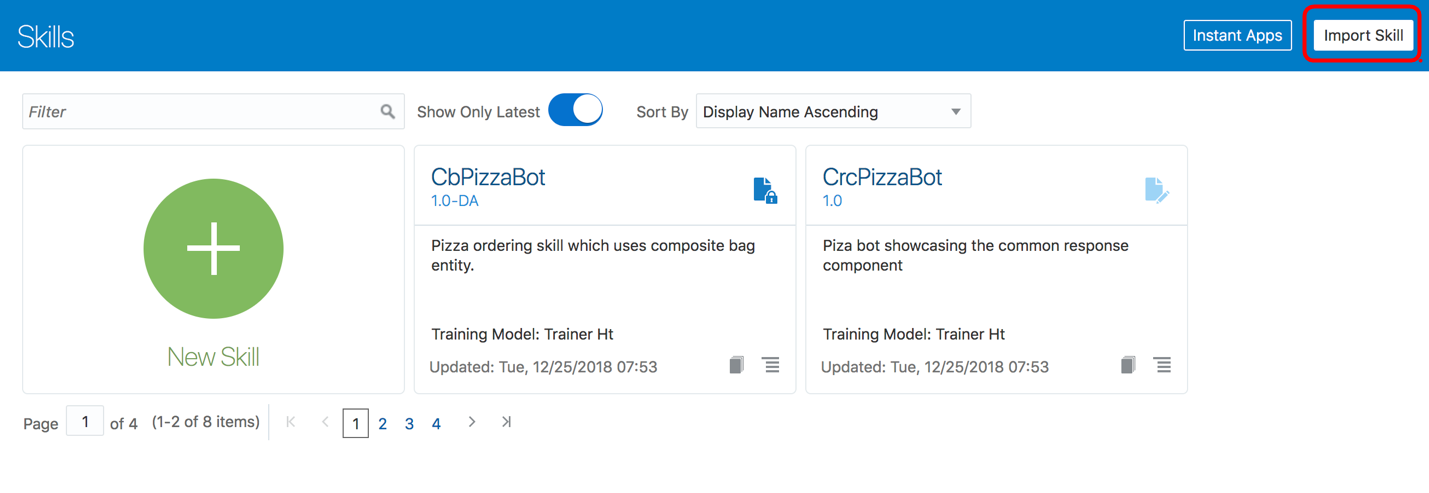
Description of the illustration. - Browse to, and then select,
CRCStarterSkill(1.0).zip. Then click Open.
Explore and Test the Skill
Take a look at the intents and entities.
- In the dashboard, click the CRCStarterSkill tile to open
skill in the Skill Builder. The intent editor should be
selected when this development environment is launched. If
it isn't, click Intents
 in the left navbar.
- Click Entities
 in
the left navbar. Notice the CheeseType, NoToppings,
PizzaCrust, PizzaSize, PizzaToppings, and PizzaType entities
that contribute the information required for a pizza order.
Within the scope of this tutorial, you are just going to
work with the PizzaType and PizzaSize entities.
in
the left navbar. Notice the CheeseType, NoToppings,
PizzaCrust, PizzaSize, PizzaToppings, and PizzaType entities
that contribute the information required for a pizza order.
Within the scope of this tutorial, you are just going to
work with the PizzaType and PizzaSize entities. - Click Intents in the left navbar.
Take a look at the two intents created for this skill:
Welcome and OrderPizza. Notice that OrderPizza is associated
with both the PizzaType and PizzaSize entities.
- Click Train (located on the right side of the top menu).
- Accept the default selections in the Train dialog and then click Submit.
- With the model now built, test it by clicking Try It Out! (located at the upper right).
- Enter I want to order a large pepperoni pizza in the Message field and then click Enter. Note that the returned confidence level for the OrderPizza intent (it's 100%). This time, however, only one of the two entities could be extracted from the user message, meaning that the skill must explicitly ask for the pizza size.
- Close the tester.
- Click Flows
 in the left navbar.
Note the existing dialog flow states to handle the user
intents and unresolved intents.
in the left navbar.
Note the existing dialog flow states to handle the user
intents and unresolved intents.
What you just did: You've imported the basic skill into your instance, trained it, and tested its intent resolution.
 Add
Text Prompt Responses
Add
Text Prompt Responses
In this section, you'll enable the skill to collect the user
input for pizza type and pizza size using a text prompt. You
will create these prompts by configuring the dialog flow with
the System.CommonResponse component. To
print the user choice, you create a confirmation dialog flow
state that uses the System.Output component.
- Click Flows in the left navbar.
- Click + Components (located at the top left) and then choose User Interface.
- Choose Common response - text.
- Choose unresolved in the Insert After menu.
- Switch on the Remove Comments toggle and then click Apply.
- Change the name of the added dialog flow state from
textResponsetoorderPizza. - Define the following
metadataproperties:Property Value variable"pizzaType"nlpResultVariable"iResult"text"What kind of pizza do you want?" - Delete everything between
textandtransitions. - For the
transitionsproperty, replace
      actions:
        someAction:
with
    transitions:
      next: "askSize"
(You'll add theaskSizestate in the next section.) - Delete the unneeded properties, so that the
orderPizzastate looks like this:
  orderPizza:
    component: "System.CommonResponse"
    properties:
      processUserMessage: true
      keepTurn: false
      variable: "pizzaType"
      nlpResultVariable: "iResult"
      maxPrompts:
      autoNumberPostbackActions:
      translate:
      metadata:
        responseItems:
        - type: "text"
          text: "What pizza do you want?"
    transitions:
      next: "askSize"
Click here to find this snippet.
Create the askSize State
- In the dialog flow, click + Components and then choose User Interface.
- Choose Common response - text.
- Choose orderPizza in the Insert After menu.
- Switch on the Remove Comments toggle and then click Apply.
- Change the name of the added dialog flow state from
textResponsetoaskSize. - Update the following properties:
Property Value variable"pizzaSize"nlpResultvariable"iResult"text"What size pizza?" - Delete everything between
textandtransitions. - For the
transitionsproperty, replace
      actions:
        someAction:
with
    transitions:
      next: "confirmOrder"
(You'll add theconfirmOrderstate in the next section.) - Delete any unneeded properties so that the
askSizestate looks like this:
askSize:
    component: "System.CommonResponse"
    properties:
      processUserMessage: true
      keepTurn: false
      variable: "pizzaSize"
      nlpResultVariable: "iResult"
      metadata:
        responseItems:
        - type: "text"
          text: "What size pizza?"
    transitions:
      next: "confirmOrder"
Click here to find this snippet.
Create the confirmOrder State
- In the dialog flow, click + Components (located at the top left) and then choose User Interface.
- Click Output.
- Choose askSize in the Insert After menu, switch on Remove Comments, then click Apply.
- Rename the newly added output state
confirmOrder. - Add the following Apache FreeMarker expression to the text
property:
"Your ${pizzaSize.value?lower_case} ${pizzaType.value?capitalize} pizza is on its way" - Add the following
transitionsproperty:
   transitions:
      return: "done"
When you're done, the
confirmOrderstate should look like this:confirmOrder: component: "System.Output" properties: text: "Your order of a ${pizzaSize.value?lower_case} ${pizzaType.value?capitalize} pizza is on its way" keepTurn: false translate: transitions: return: "done" - Click Validate. If there are syntax errors that you can't resolve, replace the existing dialog flow definition with this one.
Test the Text Prompts
- Click
 (located at the top right) to open the Skill Tester.
 - Enter I want to order a pizza.
- When prompted for the type, enter Pepperoni.
- When prompted for the size, enter large. The skill replies with Your large Pepperoni pizza is on its way.
- Click Reset to clear your input and
then click Close
 .
.

What you just did: You defined the following properties while creating these messages:
variable--The value defined for this property references the dialog flow variable that is updated with the user inputnlpResultVariable--References a dialog flow variable that's of type natural language processing (NLP) result (iResultin this tutorial). The variable reference is used to suppress component rendering if thepizzaType information could be extracted from NLP.processUserMessage--If set totrue, then theSystem.CommonResponsecomponent displays as an input component. If set tofalse, the component behaves like an output component.
 Add
Select List Responses
Add
Select List Responses
Though your pizza skill works, the user experience needs some improvement. So, instead of outputting prompts for the pizza size and type, you're going enable the skill to output a list of values instead.
To build a list of values with the System.CommonResponse
component, you can start from scratch using the dialog flow
builder component templates, or modify the existing text prompt.
In the following section, you're doing both. You'll create the orderPizza
dialog flow using the component template and you'll extend the askSize
state with a list.
Add a List of Values for the orderPizza State
- In the dialog flow, click + Components.
- Choose Common response - text, choose orderPizza in the Insert After menu.
- Choose Remove Comments and then click Apply.
- Delete the
orderPizzastate that you previously created so that thetextResponsestate is directly under the# TUTORIAL STARTcomment:... # TUTORIAL START textResponse: component: "System.CommonResponse" properties: # set processUserMessage to true if the dialog flow should return to this state after receiving user message processUserMessage: true # set keepTurn (true/false) to true if the dialog flow should transition to the next state without waiting for user input. Only applicable when processUserMessage is false ... - Rename the
textResponsestate name toorderPizza. - Set the
variableproperty to"pizzaType". - Set the
nlpResultVariableproperty to"iResult". - The
responseItems element contains twotextresponses: the first is the Simple text sample response and the second (which is the one you're going to define), is the Text with actions sample. Remove the Simple text sample response by deleting the following block of code.- type: "text" text: "Simple text sample" footerText: iteratorVariable: separateBubbles: false visible: expression: channels: include: exclude: onInvalidUserInput: - Edit the remaining text response by adding the following
properties:
Property Value text
"Which pizza do you want?"-label
"${enumValue?capitalize}"
iteratorVariable
"pizzaType.type.enumValues"
- For the
payloadproperty, replace this:
              action: "someAction"
              variables:
                user.someVariable: "someValue"
with this
variables: pizzaType: "${enumValue}" - Edit the transition to navigate to the
askSizestate:transitions: next: "askSize" - Delete the unneeded properties so that the
orderPizzalooks like this:
orderPizza: component: "System.CommonResponse" properties: processUserMessage: true keepTurn: false variable: "pizzaType" nlpResultVariable: "iResult" maxPrompts: metadata: responseItems: - type: "text" text: "What kind of pizze do you want?" actions: - label: "${enumValue?capitalize}" type: "postback" keyword: payload: variables: pizzaType: "${enumValue}" iteratorVariable: "pizzaType.type.enumValues" transitions: next: "askSize" - Click Validate. If you're encountering syntax or spacing errors, paste in this snippet.
What you just did: You defined the following properties to create the content for these messages:
iteratorVariable--List items can be created (stamped) from an iterator. ThePizzaTypeentity is of type value list, which means that it has a list of values defined that can be accessed through thepizzaTypedialog flow variable.label--When the list data is read from a value list entity, then the currently stamped item is accessed through the${enumValue}expression. An Apache FreeMarker expression?capitalizeis used to create a user-friendly message format form the all-uppercase pizza type names in the entity.variables--List item actions (postback actions) can update one or many variables when a user taps on an item in the list. In the pizza skill, there is only one dialog flow variablepizzaTypethat needs to be updated. The stringpizzaType: "${enumValue}"assigns the current iterator value to the variable. So if, for example, a user taps on the Pepperoni list item, thePEPPERONIvalue is saved to the dialog flow variable.
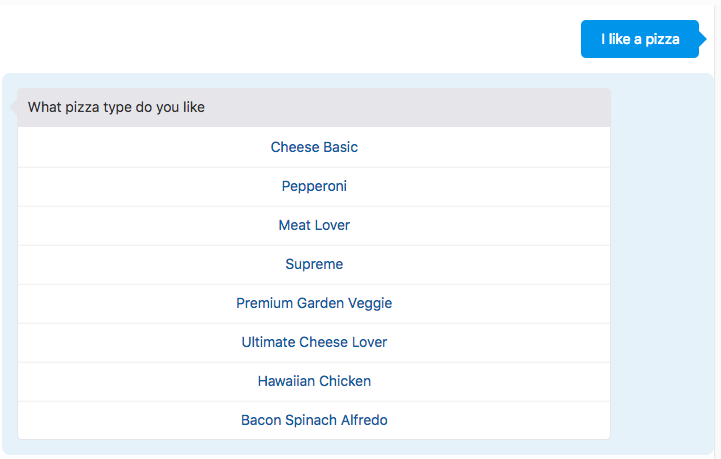
Test the List
- Open the Skill Tester.
- Enter I want to order a pizza.
- Choose a pizza from the list.
- When prompted, for a size, enter large.
- Check the the confirmation messages outputs the correct variable values.
- Click Reset and then click then Close
 to
dismiss the Tester.
to
dismiss the Tester.
Add a List of Values for the askSize State
Right now, the askSize state renders as an
input prompt. In this section, you'll extend this prompt to
be a list of values.
- If it's not still open, click Flows
in the left navbar.
- Update the
metadataproperty of theaskSizestate with the following code:metadata: responseItems: - type: "text" text: "What size pizza?" actions: - label: "${enumValue?capitalize}" type: "postback" keyword: payload: variables: pizzaSize: "${enumValue}" iteratorVariable: "pizzaSize.type.enumValues"When you're done, the state should look like this.askSize: component: "System.CommonResponse" properties: processUserMessage: true keepTurn: false variable: "pizzaSize" nlpResultVariable: "iResult" maxPrompts: metadata: responseItems: - type: "text" text: "What size pizza?" actions: - label: "${enumValue?capitalize}" type: "postback" keyword: payload: variables: pizzaSize: "${enumValue}" iteratorVariable: "pizzaSize.type.enumValues" transitions: next: "confirmOrder" - Click Validate.
What you just did: You extended the
System.CommonResponse component with a list of
values that are defined in these actions. Because the PizzaSize
entity is a value list entity, its values can be read from
the pizzaSize context variable (pizzaSize.type.enumValues).
You added Apache FreeMarker expressions with "?lower_case"
and "?capitalize". Apache FreeMarker is an
open source template language that can be used in Oracle
Digital Assistant to format text messages. In this pizza
example, the message values for pizza type and size are read
from the entity. The pizza type value is defined all upper
case in the entity, while the pizza size is defined with a
capitalized first letter.
Without these expressions, the casing would be incorrect, but through Apache FreeMarker, the entity values are formatted such that the pizza type starts with an uppercase letter, followed by all lowercase letters, and the pizza size is printed in all lowercase.
Note: You could also have used the System.CommonResponse
component in the confirmOrder state to confirm
the pizza order. However, given that you only need to print
a text message as a confirmation, using the System.Output
component is the best choice. Only because the System.CommonResponse
component can build any user interface, it does not mean it
has to be used.
Test the List of Values
- Click
to open the Skill Tester.
- Enter I want to order a pizza.
- Select a pizza size, like Meat Lover.
- When prompted, select a size. The skill then outputs a confirmation message with the pizza type and size.
- Click Reset.
- Enter I want to order pizza with pepperoni.
The skill then prompts you for the pizza size instead of the pizza type because the pizza type information was extracted from the message using NLP. This works because of the
nlpResultVariableproperty, which stores the property iniResult. - Instead of entering the pizza size, enter Hmm, I
want a large pizza. The skill outputs a confirmation
message like Your order of a large Pepperoni pizza is on
its way.
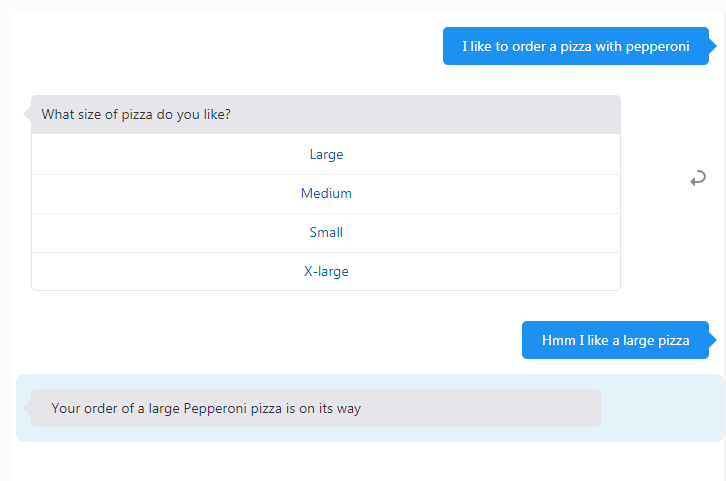
Description of the illustration. The variable property references the
PizzaSizecontext variable, so any value that you provide when prompted for a pizza size is validated against the entity. The text message Hmm, I like a large pizza contains a valid size (large), so the value gets extracted. - Click Reset.
- Enter I want to order a pizza.
- When the skill prompts for a pizza, enter salad
instead.
Again, the value is validated against the list of pizzas in the entity. Because salad is not a valid entity value, the skill displays the list of pizzas again.
- Click Reset and then close the Tester.
Add Keywords to the List Items
The orderPizza and askSize
states both use stamped actions to render the list items.
The action definitions include a keyword
property, which is currently undefined. Keywords let you
define shortcuts that users enter to select an action (a
list item). You can define a single keyword or a
comma-separated sequence of keywords. For example, l,L,grand,max
are keyword shortcuts for a large pizza.
In this tutorial, the value list is dynamically created
from the values provide by the PizzaType and PizzaSize
list value entities. Because these values are created
dynamically, the keywords also need to be created
dynamically as well.
- Navigate to the
askSizestate. - Add the following string to the
keywordproperty:
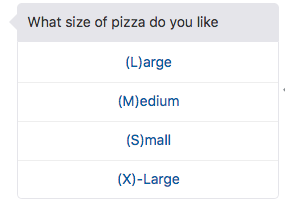
"${enumValue[0]?upper_case},${(enumValue?index)+1}" - Change the
labelproperty to:"(${enumValue[0]?upper_case})${enumValue?keep_after(enumValue[0])}"When your done, the
askSizestate should look like this:askSize: component: "System.CommonResponse" properties: processUserMessage: true keepTurn: false variable: "pizzaSize" nlpResultVariable: "iResult" metadata: responseItems: - type: "text" text: "What size of pizza do you want?" actions: - label: "(${enumValue[0]?upper_case})${enumValue?keep_after(enumValue[0])}" type: "postback" keyword: "${enumValue[0]?upper_case},${(enumValue?index)+1}" payload: variables: pizzaSize: "${enumValue}" iteratorVariable: "pizzaSize.type.enumValues" transitions: next: "confirmOrder" - Click Validate. If you're encountering
syntax errors that you can't fix, replace
askSizewith this snippet
What you just did: You added an Apache FreeMarker expression to define keywords as the first letter of the pizza size (L, or l for large, for example), as well as a numeric value, which matches the position of the item in the list. For example, you can enter 1 for large, 2 for medium.
Test the Keywords
- Click
to open the Skill Tester.
- Enter I want to order a pizza.
- Select a pizza type, like Meat Lover.
- When you're prompted for a pizza, note the label display.
- Instead of selecting one of the options, enter L for large. The skill outputs a confirmation for a large pizza.
- Click Reset.
- Enter I want to order a pizza.
- Select a pizza type.
- When the skill prompts you for a size, enter 2. The skill outputs a confirmation message for a medium pizza.
- Click Reset and then close the Skill
Tester.
Description of the illustration.
Extra Credit
You added keyword support for the pizza size, so now you can do the same for the pizza type. Here's the challenge: Premium and Pepperoni both begin with the same letter, so you need to differentiate between the two by creating two-letter keyword shortcuts. If you need help, click here.
 Add
Card Responses
Add
Card Responses
The Oracle Digital Assistant Client SDK for JavaScript and
Messaging platforms like Facebook support rich user interface
components like cards. These messengers and they can display
cards in a carousel that scrolls vertically or horizontally. In
this section, you're going to update the orderPizza
state to render the pizza types as a carousel of cards, with
each card displaying an image.
- Click Flows in the left navbar.
- Open the
pizza_menu.txtfile and paste its contents under thestatesnode in the dialog flow. - Click Validate.
- Delete the
orderPizzastate. - Click + Components.
- Click User Interface then choose Common
response - card.
- Choose unresolved from the Insert After menu.
- Rename the
cardResponsestate asorderPizza. - In the
propertiesnode, add the following afterprocessUserMessage: true:
Property Value variable"pizzaType"nlpResultVariable"iResult"When you're done, the
propretiesnode should look like this:orderPizza: component: "System.CommonResponse" properties: processUserMessage: true variable: "pizzaType" nlpResultVariable: "iResult" autoNumberPostbackActions: translate: - Update the
metadataproperty of theorderPizzastate:
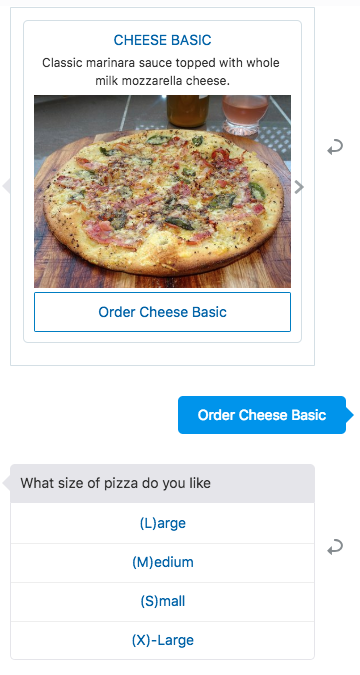
Property Value cardLayout"horizontal"title"${enumValue}"description"${pizzaCardInfo.value[enumValue].description}"imageUrl"${pizzaCardInfo.value[enumValue].image}"iteratorVariable"pizzaType.type.enumValues" - In the
actionsproperty, update thelabelproperty as follows:
- label: "Order ${enumValue?capitalize}" - Replace
payload: action: "someAction" variables: user.someVariable: "someValue"with
payload: action: "selectPizza" variables: pizzaType: "${enumValue}" - Replace the following code
phoneNumber: url: iteratorVariable: visible: expression: channels: include: exclude: skipAutoNumber: actions: [] globalActions: []with
transitions: next: "askSize" actions: selectPizza: "askSize" - Delete the unneeded properties so that
orderPizzastate looks like this:
orderPizza: component: "System.CommonResponse" properties: processUserMessage: true variable: "pizzaType" nlpResultVariable: "iResult" autoNumberPostbackActions: translate: metadata: responseItems: - type: "cards" cardLayout: "horizontal" cards: - title: "${enumValue}" description: "${pizzaCardInfo.value[enumValue].description}" imageUrl: "${pizzaCardInfo.value[enumValue].image}" iteratorVariable: "pizzaType.type.enumValues" rangeStart: rangeSize: actions: - label: "Order ${enumValue?capitalize}" type: "postback" keyword: payload: action: "selectPizza" variables: pizzaType: "${enumValue}" transitions: next: "askSize" actions: selectPizza: "askSize" - Click Validate. If you're encountering syntax errors that you can't resolve, paste in this snippet.
What you just did:
In this section, you changed the skill response rendered by the
System.CommonResponse component from a list type to
a cards layout.
The LoadPizzaCardInfo state you copied from the pizza_menu.txt
file uses Apache FreeMarker expressions to build a pizza menu
object. In a production system, this object would be queried
from a remote service using a custom component and then saved
into a dialog flow variable.
As before, the card layout uses an iterator (the enum values of
the PizzaType entity) to print the individual
cards. The pizza names are used as a key name in the pizza menu
object (pizzaCardInfo) to retrieve the image URL
and description.
The actions element defines the buttons that are placed on a
card. In the tutorial, each card is rendered with a single
button for ordering a pizza. Tapping the button updates the pizzaType
variable with the name of the pizza. At the same time, the selectPizza
custom action is triggered. The selectPizza custom
action is mapped to the askSize state, so
navigation continues to asking for the pizza size.
Why is the next transition set to the same
dialog flow state as the selectPizza transition?
The selectPizza action transition is followed when
a user clicks the button on a card. However, if the initial user
message contained the name of the pizza to order, in which case
natural language processing extracts it, then the next
transition is followed. Selecting a button action may result in
a different dialog flow state to be visited, which is why it is
good practice to define a separate action transition for it.
Test the Cards
- Click
to open the Skill Tester. If needed, click Reset
to clear the prior conversation.
- Enter I want to order a pizza.
- Scroll to the second pizza in the carousel (Pepperoni).
- Click Order.
- Select a pizza size.
- Click Reset.
- Enter I want to order a pepperoni pizza.
In this conversation, you bypass the cards because of the
variableandnlpResultVariableproperties that you set for theSystem.CommonResponsecomponent. - Click Reset and then close the Skill
Tester.
Description of the illustration.
Add Keyword Support to the Cards
When working with card layouts, it is not the card you select to perform a selection, but the button(s) displayed on a card. In this tutorial, each card displays a single button for ordering the displayed pizza. Following the next steps, you will implement keyword support for buttons in the cards.
- In the
actionsproperty of theorderPizzastate, replace the value for thelabelproperty with the following string:
"Order (${enumValue[0]?upper_case}${enumValue[1]?upper_case})${enumValue?keep_after(enumValue[1])}" - Add the following value to the
keywordproperty:
"${enumValue[0]?upper_case}${enumValue[1]?upper_case}"When you're done, the
orderPizzastate should look like this:
  orderPizza:
    component: "System.CommonResponse"
    properties:
      processUserMessage: true
      variable: "pizzaType"
      nlpResultVariable: "iResult"
      metadata:
        responseItems:
        - type: "cards"
          cardLayout: "horizontal"
          cards:
          - title: "${enumValue}"
            description: "${pizzaCardInfo.value[enumValue].description}"
            imageUrl: "${pizzaCardInfo.value[enumValue].image}"
            iteratorVariable: "pizzaType.type.enumValues"
            rangeStart:
            rangeSize:
            actions:
            - label: "Order (${enumValue[0]?upper_case}${enumValue[1]?upper_case})${enumValue?keep_after(enumValue[1])}"
              type: "postback"
              keyword: "${enumValue[0]?upper_case}${enumValue[1]?upper_case}"
              payload:
                action: "selectPizza"
                variables:
                  pizzaType: "${enumValue}"
    transitions:
      next: "askSize"
      actions:
        selectPizza: "askSize"
Test the Keyword Support
- Click
to open the Skill Tester.
- Enter I want to order a pizza.
Note the CH in the Order (CH)EESE Basic card button label.
- Enter CH.
- When prompted, select Large. The skill then outputs a confirmation message for a large cheese pizza.
- Click Reset.
- Enter I want to order a pizza.
- When the Cheese Basic pizza card display, enter pe.
- When the skill prompts you for a size, enter l. The skill
then outputs a confirmation message for a large pepperoni
pizza.
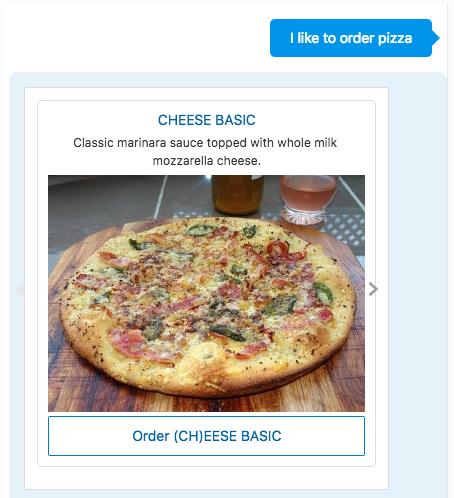
Description of the illustration. There are two observations with this latest exercise. Firstly, the keyword uses two letters to make a pizza selection. This is because two pizzas, Pepperoni and Premium, both start with a "P" as the first character. So a single letter keyword does not work. Secondly, the keyword selection does work even if a card is not displayed. Note, however, that if you use page ranging to reduce the number of cards that are rendered at any one time (some messengers like Facebook require this), then only the cards that can be accessed with a keyword shortcut are the ones that are within the current page range.
 Summary
The System.CommonResponse component is a powerful
system component that skill designers can use to build simple
and complex skill responses. This tutorial provided a basic
overview of the System.CommonResponse component
that gets you started in your skill UI development. The dialog
flow component templates contain pre-defined dialog flow
configurations you can use as starters. The component templates
also provide comments for each System.CommonResponse
component property for you to learn about and try.
Though the System.CommonResponse component is
powerful, it does not mean that it is the only tool in your box.
As you used the System.Output component to confirm
the ordered pizza, you should also spend some time exploring the
other user interface components in Oracle Digital Assistant.