JavaScript must be enabled to correctly display this content
Note:
Starting in Release 22.04, the Visual Flow Designer is available. The Visual Flow Designer has a number of advantages over the YAML-based editor, including the ability to create modular flows and to design with much less code. If you are designing a new skill, you should use the Visual Flow Designer instead of the YAML editor that's documented in this tutorial. See the Create a Dialog Flow with the Oracle Visual Flow Designer tutorial.
Before You Begin
This 70-minute tutorial shows you the structure of the dialog flow definition and how to build one.
What Do You Need?
Access to Oracle Digital Assistant
The WineSKill_Materials.zip file, which
includes the starter skill, reference files, and a finished
version of the skill. Download this file and then
unzip it to your local system.
Explore the Starter Skill
The first thing you need to do is import the starter wine
skill into your Oracle Digital Assistant instance so that you
can see what you're working with.
Import the Skill
Log into Oracle Digital Assistant.
Click
in the top left corner to open the side menu.
Before we begin building the dialog flow, we're going to take a quick look at the intents, entities and the existing nodes in dialog flow that have already been defined.
First, let's take a look at the intents. If it's not already selected, click Intents in the left navbar. This skill uses regular intents (order.wine and tellme.about.wine) and an answer intent which describes this tutorial.Description of the illustration intents_page.png
While order.wine is a transactional intent for ordering wine, both tellme.about.wine and ans.aboutSample answer questions. Although they perform the same role, they use different means to deliver answers. ans.aboutSample is an answer intent that always returns the same answer to the user. Its text is static. The content returned by the tellme.about.wine intent, on the other hand, is dynamic because it returns an answer based on the user input. For example, if a user asks about Chardonnay, this intent returns an answer specific to Chardonnay.
Take a look at the kind of phrases that resolve to each of these intents using the Utterance Tester, which you open by clicking Test Utterances (located at the upper left of the Intents page).
Description of the illustration try_it_out.png
Enter the following phrases in the Utterance field, then click Test. Click Reset after each round. When you're done, click Close.
For this intent...
Enter these phrases
ans.aboutSample
What's this skill about
What will I learn from this tutorial?
What will I learn
order.wine 2
I want to buy wine
I want to buy red wine
I want to buy Chardonnay
tellme.about.wine
I have a question about wine
I have a question about white wine
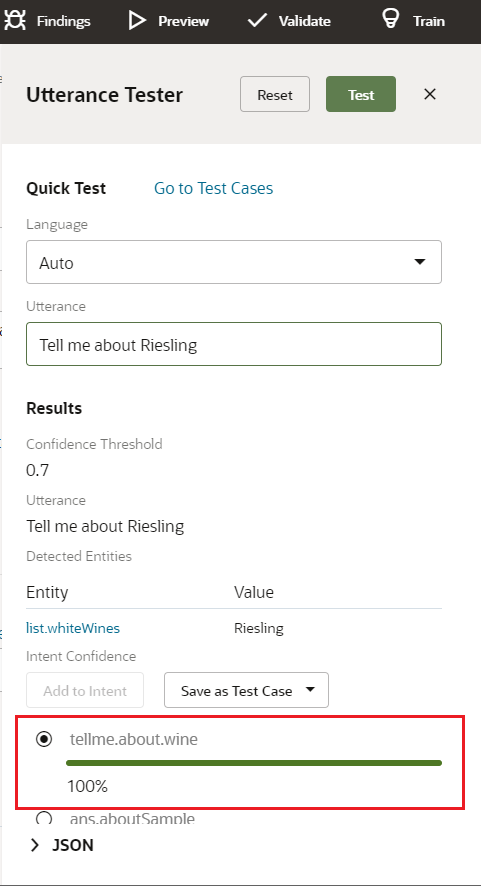
Tell me about Riesling
Description of the illustration intent_tester.png
The dialog flow that you're going to build will branch by intent type (purchasing wines and asking questions about wines) and by entity values (for example, red wines and white wines).
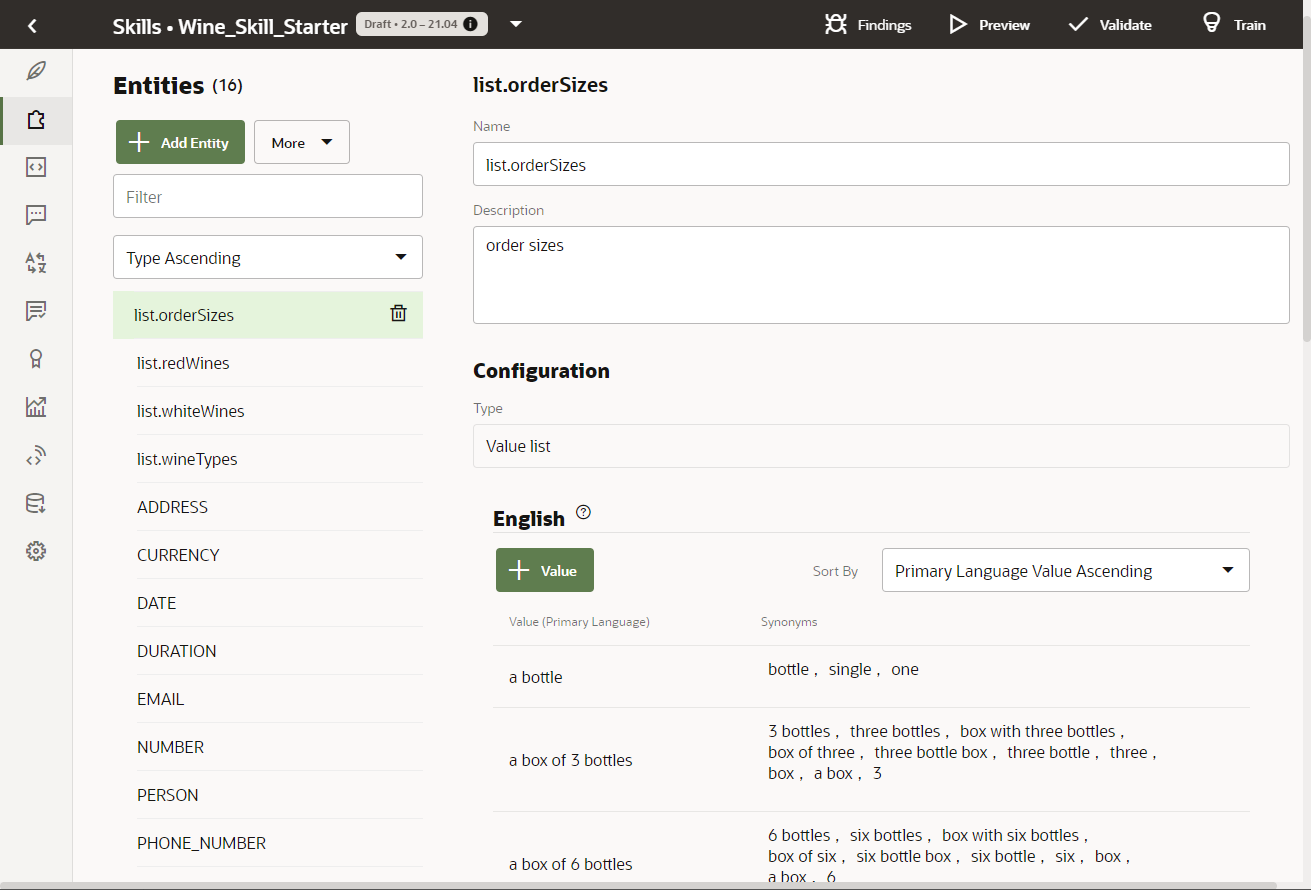
Click Entities in the left navbar to take a look at the entities for matching both the wine category and wine type from the user input.
Description of the illustration entities_page.png
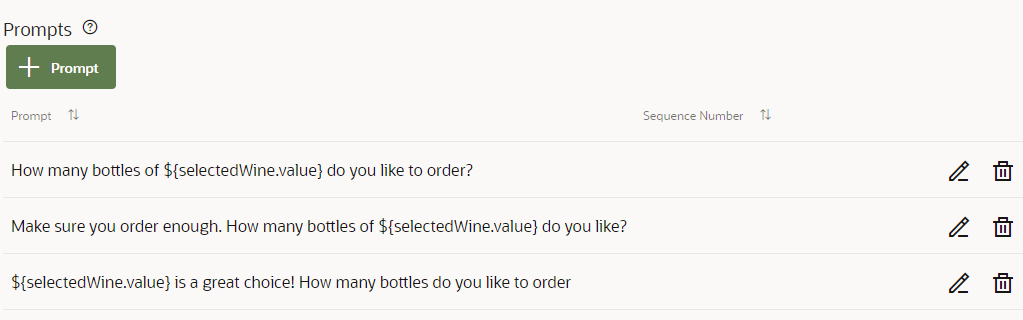
These entities have prompts and error messages defined for them that return variable values using Apache FreeMarker Template Language (FTL) expressions. Before we move on the dialog flow definition (our last stop before we begin creating our dialog flows), let's take a look at a couple of these expressions that have been defined for the list.orderSizes entity:
This prompt references a variable called selectedWine: ${selectedWine.value} is a great choice! How many bottles do you like to order
Take a look at the following variable definitions in the context node. You don't have to memorize these, but you should be aware of them since they're going to be referenced throughout the dialog flow definition that you're going to build:
The orderSizes, wineTypes, redWines, and whiteWines variable definitions for the entities.
The declaration for the selectedWine variable that stores the user input that's referenced in the in the list.order entity prompts that you just looked at.
The redWineCard and whiteWineCard map variables for populating the content of the wine menus on cards (more on them in a minute).
The chatType variable, whose value branches the dialog between the wine-ordering and question-answering dialog flows, which are built around the order.wine and tellme.about.wine intents.
The rb variable, which enables access to the wine description strings defined in resource bundles.
The iResult variable that holds the value that the NLP (Natural Language Processing) framework that's resolved from the user input.
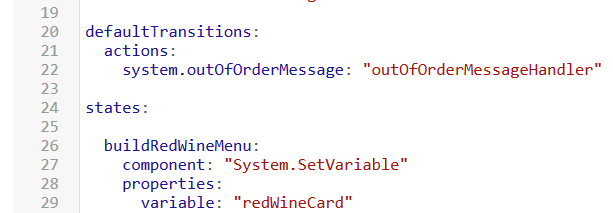
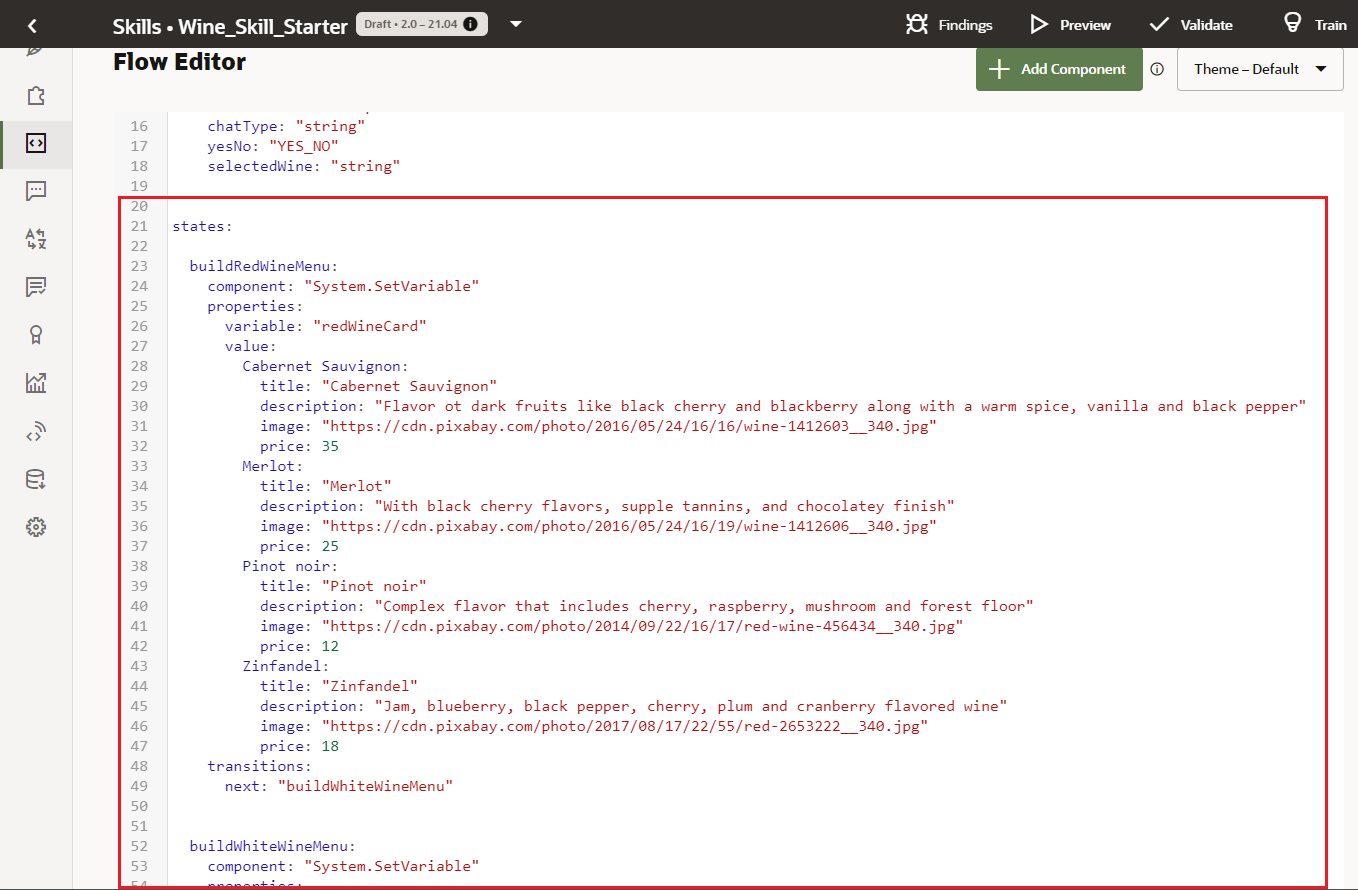
In the states node, take a look at the buildRedWineMenu and buildWhiteWineMenu states that provide the text and images for the red and white wine menus. In the real world, a wine skill would connect users to a vast inventory of wines and would be accessed through a REST call. For the purposes of this tutorial, however, we're using mock data that's managed by Apache FreeMarker expressions.
Description of the illustration states_node.png
The dialog is comprised of a series of states, which generally (though not always) correspond with a step in a conversation. Each state is based on a component that executes a function that supports the conversation in some way. Some components output UI elements like value lists or text messages. Others execute logic based on the varaible values have been set (or not set) from the user input. The component defined for the buildRedWineMenu and buildWhiteWineMenu states, for example, is the System.SetVariable component, which sets the entity value for the wine type so that the appropriate wine list can be loaded.
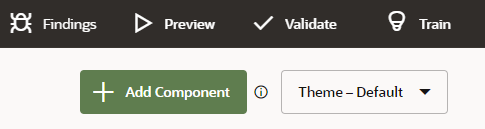
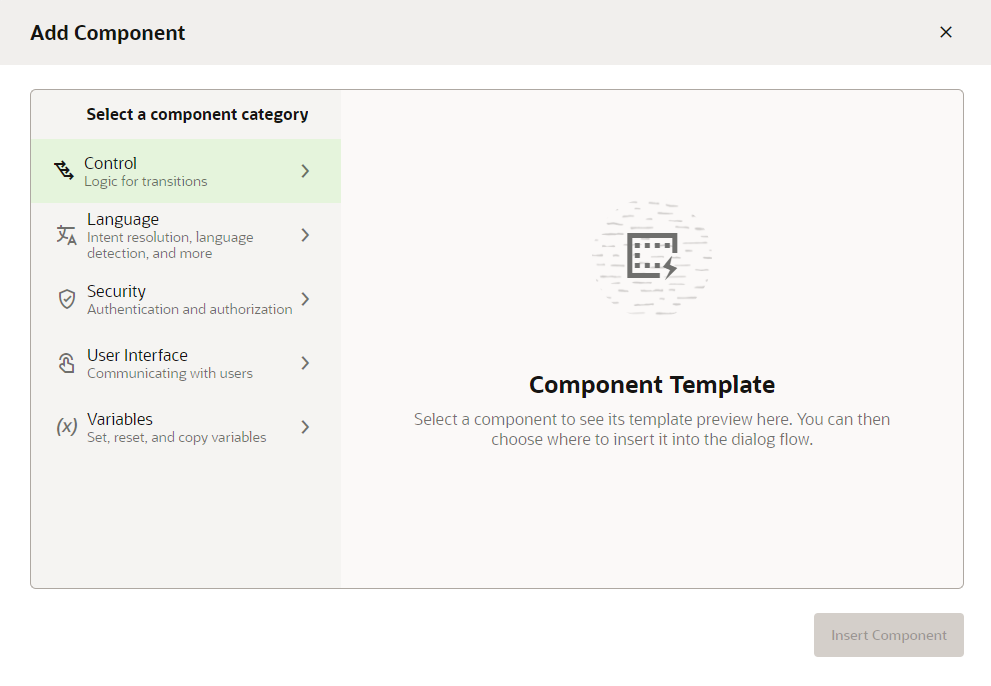
For this tutorial, you'll be focusing on the states node, where you will add states directly after the buildWhiteWineMenu state using the Components menu, which you access by clicking + Add Component (located at the upper right of the editor).
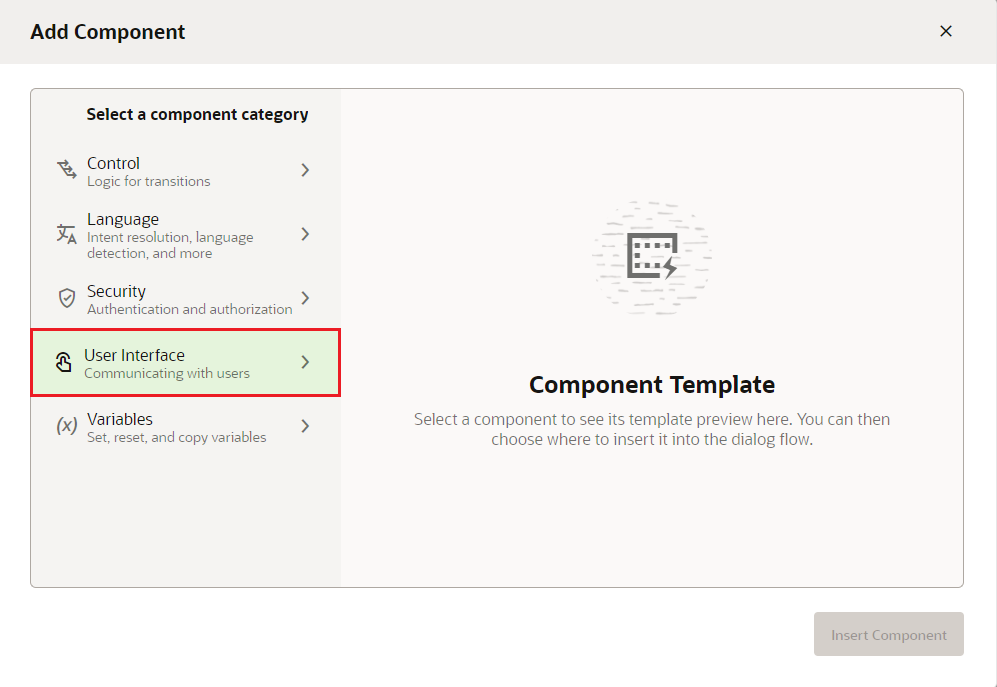
The Add Component dialog populates the dialog flow with templates that contain component-specific properties.
Description of the illustration add_components_button.png You'll choose from different categories of templates, which include the ones used for creating user input forms, outputting messages, and controlling the execution path based on the variable values that have been set.Description of the illustration add_component_menu.png
The indentation from the left margin and spacing are crucial for maintaining valid syntax. While we'll help you maintain the proper alignment with the code snippets that you paste into the editor, you should periodically click Validate to check for errors using the Skill Validator.
Description of the illustration validate_option.png
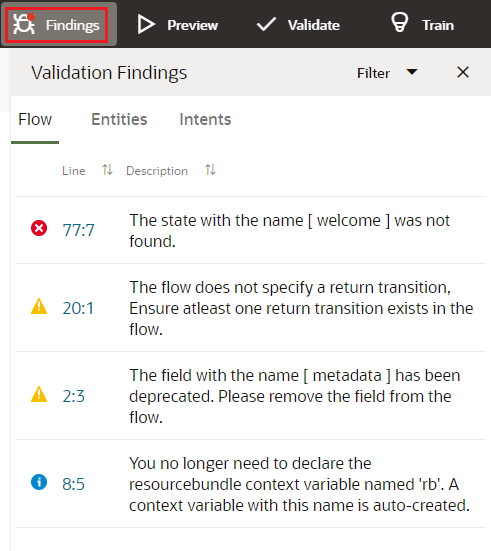
You can access this tool by clicking either View validation results in the error message or by clicking Findings after you click Validate.
Correcting errors may be as simple as adding or deleting a space.
Description of the illustration skill_validator.png
Begin the Conversation
Create the Welcome State
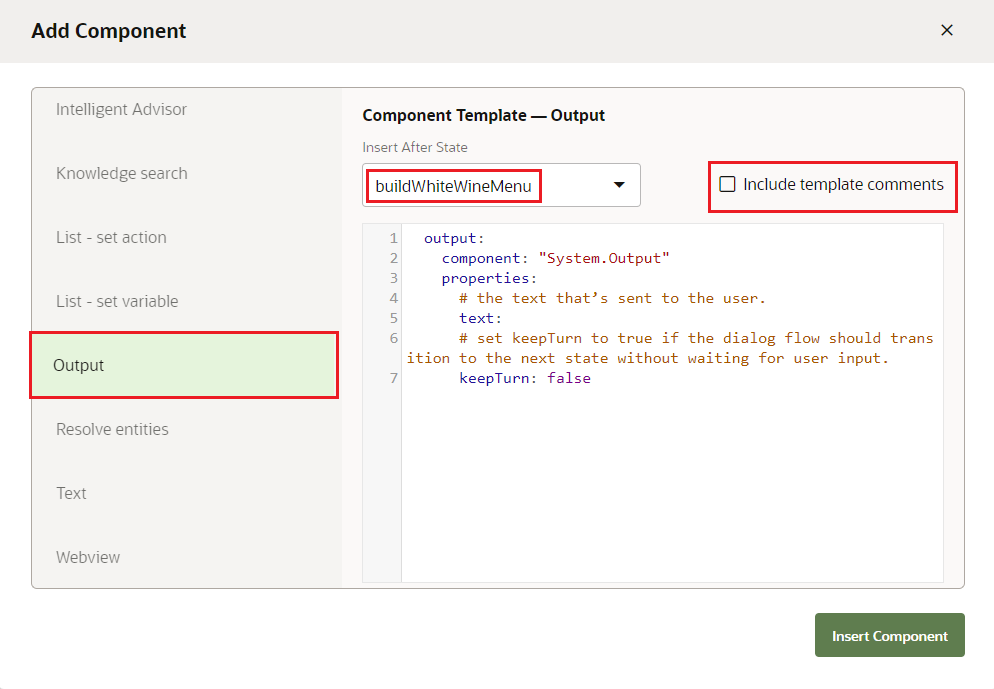
You'll use this state to create a simple string message that displays immediately after users ask a question or begin their orders. You're going to use the System.Output component to output this message.
"Welcome to 'Winery Chats'. I'm 'Grapy', a chatbot with which you can order the best wines in the world or get your wine-specific questions answered. So, let me help you too."
User's are not meant to reply to this message, so set keepTurn to true to prevent users from sending messages before the flow can transition to the next state, getIntent where the user input gets resolved to an intent.
Click Return to insert a new line.
Add the following transitions definition. The transitions: node must align with the properties node (four spaces from the left margin). The next: "getIntent" property should be six spaces from the left margin. You can enter these manually, or copy and paste the following snippet into your dialog flow definition after positioning your cursor at the left margin.
    transitions:
      next: "getIntent"
Tip:
As a rule of thumb, you should position your cursor at the left margin when pasting in the transition code snippets provided in this tutorial.
When you're done, the welcome state should look like this:
  welcome:
    component: "System.Output"
    properties:
      text: "Welcome to 'Winery Chats'. I'm 'Grapy', a chatbot with which you can order the best wines in the world or get your wine-specific questions answered. So, let me help you too."
      keepTurn: true
    transitions:
      next: "getIntent"
Create the NLP State
In this step, you're going to create the NLP (natural langauge processing) state that sets the navigation through the dialog flow based on the intent resolution and entity extraction. To create this state, you'll add the System.Intent component, which evaluates the user input.
Click + Add Component.
Choose Language > Intent.
Choose welcome from the Insert After State menu.
Clear Include template comments.
Click Insert Component.
Update the intent state as follows:
Change intent to getIntent.
Set the variable property to "iResult".
Delete the properties that you don't need: optionsPrompt, botName, botVersion, sourceVariable, autonumberPostbackActions, and footerText. When you're done, you should be left with only the variable and daIntercept properties.
Click Return to create a new line below the actions node.
In the actions node (directly beneath transitions), replace unresolvedIntent with the following actions. These entries should be eight spaces from the left margin. You can enter them manually, or paste them into your dialog defition after positioning your cursor at the left margin.
The branching between the order wine and question execution paths is based on the value matched for the chatType variable (order or question) that has been resolved from the user input in the getIntent state. In this step, you're going add a state that sets the chatType variable to order when the order.wine action is triggered. The component that sets the value as order is the System.setVariable component.
Click + Add Component.
Choose Variables > Set variable.
Choose getIntent from the Insert After State menu.
Clear Include template comments.
Click Insert Component.
Update the setVariable state as follows:
Change setVariable to setChatToOrderType.
Set the variable property to "chatType".
Set the value property to "order" to indicate that wine ordering execution path.
If needed, click Return to add a new line below the value property. On this line, add the following transitions node. The transitions: node should be four spaces from the left margin so that it aligns with the properties node. The next: "startDetermineWineType" property should be six spaces from the left margin. You can enter these manually, or paste the following snippet into your dialog definition after positioning the cursor at the left margin.
    transitions:
      next: "startDetermineWineType"
When you're done, the setChatToOrderType state should look like this:
Although you will create separate execution paths for the tellme.about.wine and order.wine intents, there are states that are common to both. Roughly speaking, the sequence of these common states is:
Detect the wine type
Select a wine type based on wine color or name
Branch the dialog flow based on chat type
Detect the Wine Type
In this step, you'll create the first of the common states, which, based on the NLP results stored in the iResult property, routes to states that output option lists for selecting a specific wine, a wine category, or a wine type. The System.Switch component, which you're going to add next, determines this routing by evaluating the stored results.
Click + Add Component.
Choose Control > Switch.
Choose setChatToOrderType from the Insert After State menu.
Clear Include template comments.
Click Insert Component.
Update the state as follows:
Change switch to startDetermineWineType.
Remove the variable property.
Set the source property to the following FreeMarker epression that evaluates the stored input for entities:
This Apache FreeMarker expression checks if the name of the wine has been included in the user's initial message to the skill. The expression evaluates the NLP results stored in the iResult variable for values matching the list.redWines and list.whiteWines entities. If the name of a red or white wine is present, the redWine or whiteWine actions are triggered and the dialog transitions to the selectRedWine and selectWhiteWine states. If the user's input doesn't specify a wine type, the NONE action is triggered and the dialog flow transitions to the checkForWineColor state.
For the values property, change "option1" to "redWine". Then change "option2" to "whiteWine".
For actions (located in the transitions node) replace "option1" with:
redWine: "selectRedWine"
Then replace "option2" with
whiteWine: "selectWhiteWine"
Define the NONE action as "checkForWineColor":
NONE: "checkForWineColor"
Note:
Each of these actions should be eight spaces from the left margin.
When you're done, the startDetermineWineType state should look like this:
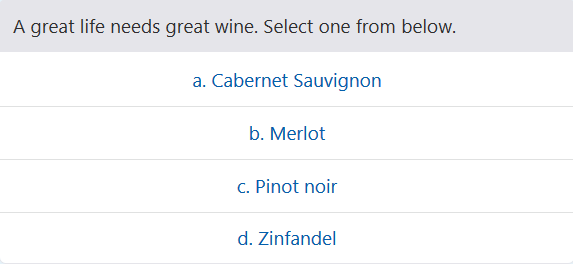
In step, you're going to add a pair of options lists that enable users to select red and white wines. You'll add this UI by defining the System.CommonResponse component because it can render a list of values when multiple values exist. In this case, the displayed values are returned from of values defined for the list.redWines and list.whiteWines entities. The entity values are accessed using the enumValue property. Description of the illustration shortcut_menu.png
Note:
While you can create a simple list of options using the System.List component, the System.CommonResponse component provides greater customization.
Click + Add Component.
Choose User Interface > Common response - composite bag.
Choose startDetermineWineType from the Insert After State menu.
Clear Include template comments.
Click Insert Component.
Change resolveCompositeBag to selectRedWine.
Set the "variable" property to "redWines". (You may need to insert a space before adding this value.) The value for the redWines variable can be set explicitly when the user selects an option or enters the name of the wine, or implicitly when the value is set (or slotted) from the input that's processed by the NLP (natural language processing) framework and stored in the in the iResult variable.
Set the "nlpResultVariable" to "iResult". With this setting, the redWines variable value will be slotted from by the NLP framework if the intial user message contains the name of a red wine.
Set useFullEntityMatches to false. If this were a multi-lingual skill, you'd set this property to true, but for the purposes of this tutorial, it's set to false.
Set maxPrompts to 2, allowing users two attempts to provide a valid value. When the value for the redWines variable has not been set, users can either choose an option, enter text for the wine name, or enter the shortcut (b for Merlot, for example).
When the text doesn't match any of the values or synonyms defined for the list.redWines, the skill outputs the error message defined for the list.redWines entity along with the prompts that have been defined for the entity: I am sorry. "${system.message.messagePayload.text}" does not seem to be a valid option.
After the second attempt, the dialog transitions to the cancelOrder state, ending the conversation.
Delete the following properties:
"transitionAfterMatch"
"cancelPolicy"
"autoNumberPostbackActions"
Under the actions: node (located within the metadata node):
Replace the default definition for the label property with
With this change, the label displays the name of the a wine preceded by leading character that's a shortcut. It's a
customization that the System.CommonResponse component allows you to do that you can't with a regular System.List component, which outputs a simple list.
The keyword allows you to define quick-access short cuts for buttons, so set the keyword property to
In the payload node, change the name of the varName property (which is located under variables property) to redWines. Then define the value as "${enumValue}":
redWines: "${enumValue}"
In the transitions node (located at the bottom of the state):
Click Return to insert a new line below transitions.
Add a next transition that's triggered when users enter valid input. The next transition should be six spaces from the left menu so that it aligns with the actions node directly beneath it.
Define the next transition as "saveSelectedWine". You can add this manually, or paste in the following snippet after positioning your cursor at the left margin.
next: "saveSelectedWine"
In the actions node, remove the match property.
Set the cancel transition to "cancelOrder". This transition is triggered when users enter invalid input or when they tap the Cancel button.
cancel: "cancelOrder"
When you're done, the state should look like this:
Repeat the previous steps to create the selectWhiteWine state, which is where the dialog navigates to when the user input mentions white wine. This state is the same as the selectRedWine state that you just created except for the following:
In the Components dialog, choose selectRedWine from the Insert After menu.
Change
resolveCompositeBag to selectWhiteWine.
Set the variable property to "whiteWines".
Change the varName property name to whiteWines (whiteWines: "${enumValue}").
When you're done, the selectWhiteWine state should look like this:
The dialog transitions to this state when the user's input does not include specifics as to wine type or color. To end up at this state, a user would have entered something like "I want some wine." For this state, you're going add a System.CommonResponse component that displays the values defined for the list.wine.types entity
Click + Add Component.
Choose User Interface > Common response - composite bag.
Choose selectWhiteWine from the Insert After State menu.
Clear Include template comments.
Click Insert Component.
Change resolveCompositeBag to checkForWineColor.
Set the "variable" property to "wineTypes".
Set the "nlpResultVariable" to "iResult". With this setting, the redWines variable value will be slotted from the intent
engine if the intial user message contains the name of a red wine.
Set useFullEntityMatches to false.
Set maxPrompts to 2 (allowing users 2 attempts to provide a valid value).
Delete the following properties:
"transitionAfterMatch"
"cancelPolicy"
"autoNumberPostbackActions"
Under the actions: node (located within the metadata node), replace the label value with "${enumValue}". For example:
- label: "${enumValue}"
In the payload node, change the varName property, which is located under variables property name to wineTypes. Then define the value as "${enumValue}":
wineTypes: "${enumValue}"
In the transitions node (located at the bottom of the state):
Click Return to insert a new line below transitions.
Add the following next transition that's triggered when users enter valid input. This transition must be six spaces from the left margin so that it aligns with the actions node directly beneath it. You can add this manually, or copy and paste the following snippet after positioning your cursor at the left menu.
next: "determineWineMenu"
In the actions node, remove the match property.
Set the cancel transition that's triggered when user enter invalid input or when they tap the Cancel button. Set the transition to "cancelOrder":
cancel: "cancelOrder"
When you're done, the checkForWineColor state should look like this:
If users select a wine color, the value is saved in the wineTypes variable. This state, which is built around the System.Switch component, branches the conversation using this value.
Click + Add Component.
Choose Control > Switch.
Choose checkForWineColor from the Insert After State menu.
Clear Include template comments.
Click Insert Component.
Update the state as follows:
Change switch to determineWineMenu.
Set the variable property to "wineTypes".
Remove the unneeded source property.
In the values node, change "option1" to "red wine". Then change "option2" to "white wine".
      - "red wine"
      - "white wine"
For the actions node (located under transitions), change option1 and option2 to red wine: "selectRedWine" and white wine: "selectWhiteWine", respectively.
Define the NONE transition as "checkForWineColor".
        red wine: "selectRedWine"
        white wine: "selectWhiteWine"
        NONE: "checkForWineColor"
When you're done, the determineWineMenu state should look like this:
The user-selected wine are saved in two separate variables (whiteWines or redWines) becuase they have been declared for two separate value list entities (list.redWines and list.whiteWines). To keep the Apache FreeMarker expressions
simple, we're going to consolidate these values into a single variable called selectedWine where either wine selection can be saved. To set the value, you're going to add a System.SetVariable component.
Click + Add Component.
Choose Variables > Set variable.
Choose determineWineMenu from the Insert After State menu.
Clear Include template comments.
Click Insert Component.
Update the state as follows:
Change setVariable to saveSelectedWine.
In the properties node, set the variable property to "selectedWine".
Define the value property with the following Apache FreeMarker expression:
This expression sets the value for the selectedWine variable by first checking for the redWines variable. If this variable has not been set, the expression sets the whiteWines variable with the name of the wine.
Click Return to create a new line. Then add the following transitions node. The transitions: node should be four spaces from the left margin so that it aligns with the properties node. The next: "branchToOrderOrQuestionFlow" property should be six spaces from the left margin. You can add this manually, or you can paste this snippet into the dialog flow dialog definition after positioning your cursor at the left margin.
    transitions:
      next: "branchToOrderOrQuestionFlow"
When you're done, the state should look like this:
Up to this point, the conversation flows for ordering wine and asking questions about wine are the same. Because they have different outcomes, we need to branch the flow. To do this, we're going base the branching on the value set for the chatType variable (set in the setChatToOrderType state), which can be either order or question.
Note:
No validation is required because both the order and question values are set programatically. It's either one or the other. If the value is not
order, then it must be question.
To perform the branching logic, we're going to define a System.ConditionEquals component to branch the flow by comparing the value set (or not set) for the chatType variable against a value of order. If the two are different, the flow transitions to the tellme.about.wine execution path.
Click + Add Component.
Choose Control > Condition equals.
Choose saveSelectedWine from the Insert After State menu.
Clear Include template comments.
Click Insert Component.
Update the state as follows:
Change statename to branchToOrderOrQuestionFlow.
Set the variable property to "chatType".
Set the value property to "order".
In the actions node, set the equal property to "askShippingSize". Then set the notequal property to "showAnswerToQuestion".
When you're done, the branchToOrderOrQuestionFlow state should look like this:
For users to select the order size, we are using the System.ResolveEntities a component. It's similar to the System.CommonResponse component, but has fewer options. While it's easier to use, its customization options are limited.
Click + Add Component.
Choose User Interface > Resolve entities.
Choose branchToOrderOrQuestionFlow from the Insert After State menu.
Switch on Remove Contents.
Click Insert Component.
Update the state as follows:
Change resolveEntities to askShippingSize.
Set the variable property to "orderSizes".
Remove the following properties:
nlpResultVariable
transitionAfterMatch
cancelPolicy
autoNumberPostbackActions
headerText
footerText
Set useFullEntityMatches to false.
Set the MaxPrompts property to 2 to limit the users' attempts at entering values that match the values or synonyms defined for the list.orderSizes entity to two tries. While this state presents users with a list of options, users may exceed the number of attempts if they instead enter text that is not valid. When the skill receives an invalid value, it returns the value to the user through the system.message.messagePayload.text property in the entity's error message that displays in the prompt dialog:
${system.message.messagePayload.text} is not a valid shipment size.
When users enter an invalid value for the second time, the dialog flow transitions to the askCancelOrder state, which you're going to define as a transition for this state.
In the transitions node, first click Return to insert a line, then add a next transition that's triggered when the skill receives a valid value and moves to the summarizeOrder state. The next: "summarizeOrder" action should be six spaces from the left margin so that it aligns with the actions node directly beneath it. You can add this transition manually, or paste the following snippet into your dialog definition after you position the cursor at the left margin.
next: "summarizeOrder"
In the actions node, remove match.
Define the cancel action as cancel: "askCancelOrder" that's triggered when users enter an incorrect value twice.
When you're done, the state should look like this:
Choose askShippingSize from the Insert After menu.
Clear Include template components.
Click Insert Component.
Update the state as follows:
Change resolveCompositeBag to askCancelOrder.
Set the variable property to "yesNo", the variable declared for the built-in Yes_No entity which validates a yes or a no response.
Remove the nlpResultVariable property.
nlpResultVariable
transitionAfterMatch
cancelPolicy
autoNumberPostbackActions
Set useFullEntityMatches to false.
Set the MaxPrompts property to 2 to limit the users' attempts at entering valid yes or no responses to two tries.
For the text property (located in the metadata node under responseItems), replace the expression defined for the text property with the following string:
"I cannot ship wine without an order Size. Do you want to cancel this order (yes/no)?"
In the actions node (within transitions), set the match property to "checkCancelOrderOrNot".
Set cancel to "cancelOrder".
Because you only need this component to output a prompt, you can delete the following nodes and their contents (which is everything between footerText and transitions):
visible
actions
globalActions
When you're done, the askCancelOrder state should look like this:
  askCancelOrder:
    component: "System.CommonResponse"
    properties:
      processUserMessage: true
      variable: "yesNo"
      useFullEntityMatches: false
      maxPrompts: 2
      metadata:
        responseItems:
        - type: "text"
          text: "I cannot ship wine without an order Size. Do you want to cancel this order (yes/no)?"
          footerText:
    transitions:
      actions:
        match: "checkCancelOrderOrNot"
        cancel: "cancelOrder"
Confirm the Order Status
Create a state that checks whether the user has opted to cancel or continue. For this state, you'll define a System.ConditionEquals component to compare the values.
Click + Add Component.
Choose Control > Condition equals.
Choose askCancelOrder from the Insert After menu.
Clear Include template comments.
Click Insert Component.
Update the state as follows:
Change conditionEquals to checkCancelOrderOrNot.
Delete the unneeded variable variable.
Set the source property to
"${yesNo.value.yesno}"
Set the value property to "YES".
In the actions node, set eqaul to "cancelOrder". Then set notequal to "askShippingSize".
When you're done, the state should look like this:
In this state, we're going to enable the skill to output a simple message by defining a System.Output component.
Click + Add Component.
Choose User Interface > output.
Choose checkCancelOrderOrNot from the Insert After State menu.
Clear Include template comments.
Click Insert Component.
Update the state as follows:
Change output to cancelOrder.
Change the text property to
"Our winery chat just ended here. If you wish, we can start over again. If not, then have a good day, cheers - your friend Grapy"
Add the following transitions node with a return statement to end the conversation and clear all the values. (You may need to click Return to add a new line.) The transitions node should be four spaces from the left margin and should align with the properties node. The return: "done" statement should be six spaces from the left margin. You can either enter it manually, or paste in the following snippet after positioning your cursor at the left margin.
    transitions:
      return: "done"
When you're done, the cancelOrder state should look like this:
  cancelOrder:
    component: "System.Output"
    properties:
      text: "Our winery chat just ended here. If you wish, we can start over again. If not, then have a good day, cheers - your friend Grapy"
      keepTurn: false
    transitions:
      return: "done"
Confirm the Order
To finalize the order conversation, we need to display a confirmation message. This message uses the wine cards to display a picture of the selected wine, the total cost of the order based on the number of bottles, and the the price of an individual bottle. To enable the display of the picture and the calculation for the order, you'll define this state using Apache FreeMarker expressions that evaluate the input and create the display by referencing the properties of the redWineCard and whiteWineCard variables that are populated with the mock data and images. These properties, which include image and price, are set by the buildRedWineMenu and buildWhiteWineMenu states at the beginning of the states node.Description of the illustration wine_menu_properties.png The expression finds the value stored in the selectedWine variable and then reads the image property and price properties:
redWineCard.value[selectedWine].image
redWineCard.value[selectedWine].price
Click + Add Component.
Choose User Interface > Common Response - attachment.
Choose cancelOrder from the Insert After State menu.
Clear Include template comments.
Click Insert Component.
Update the state as follows:
Change attachmentResponse to summarizeOrder.
In the responseItems node, add a row beneath type: "attachment".
Enter headerText: in the blank row. This entry should be ten spaces from the left margin so that it aligns with type in the row above.
Define headerText as "Order Summary":
Define the footerText property with the following Apache FreeMarker expression:
"You ordered ${orderSizes.value} of ${selectedWine.value} for ${redWineCard.value[selectedWine]?has_content?then(redWineCard.value[selectedWine].price, whiteWineCard.value[selectedWine].price)}$ per bottle."
Remove the visible node entirely.
Add the following transitions node with a return statement to end the conversation and clear all the values. The transitions node should be four spaces from the left margin and should align with the properties node. The return: "done" statement should be six spaces from the left margin. You can either enter it manually, or paste in the following snippet after positioning your cursor at the left margin.
    transitions:
      return: "done"
When you're done, the summarizeOrder state should look like this:
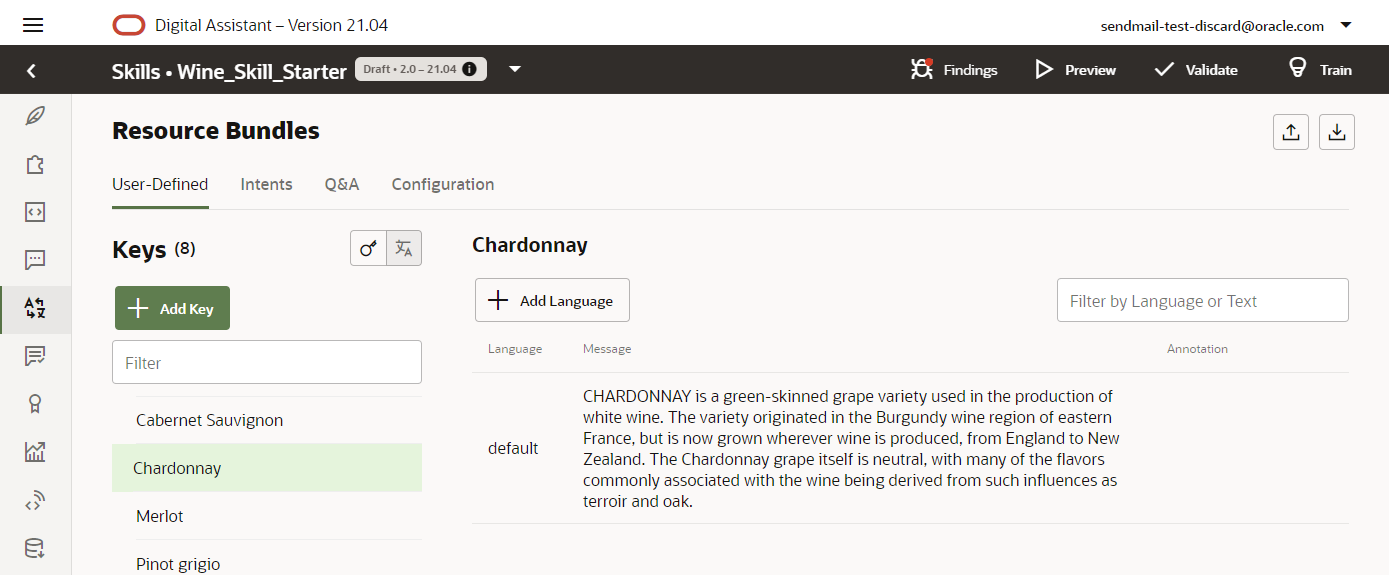
With the ordering flow complete, you're ready to create the question and answer flow. The answers are read from resource bundles strings that use the name
of the wine as a key. These answers are created as resource bundle strings that are referenced in the dialog flow definition, but are not part of the dialog flow. Click Resource Bundles in the left navbar to take a quick look.Description of the illustration resource_bundle_page.png
Note:
To keep this tutorial as simple as possible, we're only using resource bundles for the answer strings. However, when you build production-level skills, we recommend that you use resource bundles for all strings and labels. Resource bundles are not just for multi-lingual skills; they are a best practice because they centralize all of your text strings, making them easier to manage and easier to review for a consistent style and voice.
Set the Chat Type to Question
The state that you're going to create in this step starts the question and answer flow by setting the value of the chatType variable to question using a System.SetVariable component. Similar to the setChatToOrderType state, this state transitions to the startDetermineWineType state that ultimately routes to the branchToOrderOrQuestionFlow state.
Click + Add Component.
Choose Variable > Set variable.
Choose summarizeOrder from the Insert After State menu.
Clear Include template comments.
Click Insert Component.
Update the state as follows:
Change setVariable to setChatToExplainType.
Set the variable property to "chatType".
Set the value property to "question".
Add the following transitions node. transitions: should be four spaces from the left margin so that it aligns with the properties node. (You may need to create a new line by clicking Return.) The next: "confirmQuestion" statement should be six spaces from the left margin. You can enter this manually, or paste the following snippet into your dialog flow definition after positioning your cursor at the left margin.
    transitions:
      next: "confirmQuestion"
When you're done, the state should look like this:
Choose setChatToExplainType from the Insert After State menu.
Clear Include template comments.
Click Insert Components.
Update the state as follows:
Change output to confirmQuestion.
Set the text property to
"Let me get your question answered."
Set keepTurn to true to prevent the user from entering input before the skill can transition to the startDetermineWineType state.
Click Return after the keepTurn node to insert a new line. Then add the following transitions node. transitions: should be four spaces from the left margin so that it aligns with the properties node. The next: "startDeterminWineType" statement should be six spaces from the left margin. You can enter this manually, or paste the following snippet into your dialog flow definition after positioning your cursor at the left margin.
    transitions:
      next: "startDetermineWineType"
When you're done, the state should look like this:
  confirmQuestion:
    component: "System.Output"
    properties:
      text: "Let me get your question answered."
      keepTurn: true
    transitions:
      next: "startDetermineWineType"
Output the Answer
Click + Add Component.
Choose User Interface > Output.
Choose confirmQuestion from the Insert After State menu.
Clear Include template comments.
Click Insert Component.
Update the state as follows:
Change output to showAnswerToQuestion.
Set the text property to
"${rb(selectedWine.value)}"
Set the keepTurn property to true because users are expected (or allowed) to reply to the skill's answer.
Click Return after the keepTurn node to insert a new line. Then add the following transitions node. transitions: should be four spaces from the left margin so that it aligns with the properties node. The next: "goodbye" statement should be six spaces from the left margin. You can enter this manually, or paste the following snippet into your dialog flow definition after positioning your cursor at the left margin.
    transitions:
      next: "goodbye"
When you're done, the state should look like this:
Choose showAnswerToQuestion from the Insert After State menu.
Clear Include template comments.
Click Insert Component.
Update the state as follows:
Change output to goodbye.
Set the text property to
"Hope I could help. If you want, ask another question."
Click Return after the keepTurn node to insert a new line. Then add the following transitions node. transitions: should be four spaces from the left margin so that it aligns with the properties node. The return: "done" statement should be six spaces from the left margin. You can enter this manually, or paste the following snippet into your dialog flow definition after positioning your cursor at the left margin.
    transitions:
      return: "done"
When you're done, the state should look like this:
  goodbye:
    component: "System.Output"
    properties:
      text: "Hope I could help. If you want, ask another question."
      keepTurn: false
    transitions:
      return: "done"
Add Error-Handling
The skill needs to tell the user when it can't understand the input that's stored in getIntent state's iResult variable. When the NLP framework can't resolve the input to either the tellme.about.wine or order.wine intents, it resolves the input to a third intent, unresolvedIntent. This is a built-in intent for input that can't be resolved to any of the intents. When it's resolved, the dialog transitions to a state dedicated to handling errors, which you're creating in this step. For this skill, error handling means outputting a message that the skill can't understand the user input, clearing any variable values, and resetting the dialog flow at the beginning.
Add the Dedicated Error-Handling State
Click + Add Component.
Choose User Interface > Output.
Choose goodbye from the Insert After State menu.
Clear Include template comments.
Click Insert Component.
Update the state as follows:
Change output to handleBotNotUnderstanding.
Set the text property to
"Hmm, seems I did not quite understand. I hope my wine skills are better. You can try my wine skills by sending a message like 'I want to order wine'"
Click Return after the keepTurn node to insert a new line. Then add the following transitions node. transitions: should be four spaces from the left margin so that it aligns with the properties node. The return: "done" statement should be six spaces from the left margin. You can enter this manually, or paste the following snippet into your dialog flow definition after positioning your cursor at the left margin.
    transitions:
      return: "done"
When you're done, the state should look like this:
  handleBotNotUnderstanding:
    component: "System.Output"
    properties:
      text: "Hmm, seems I did not quite understand. I hope my wine skills are better. You can try my wine skills by sending a message like 'I want to order wine'"
      keepTurn: false
    transitions:
      return: "done"
Enable Out-of-Order Message Handling
Because chat messengers don't hide the message history, users can scroll back through the conversation and then select an option in an older message that is no
longer in focus. In our skill, for example, you might scroll back through the prior messages to revise your order. An out-of-order user action of this sort is a typical real-world scenario that our skill needs to support. To enable the skill to handle this gracefully, you're going to implement a global navigation rule that directs the dialog flow to a subflow that defines how the skill should react when it encounters out-of-order input.
You can define a global navigation rule in the defaultTransitions node, which is near the top of the dialog flow definition and use it to set the behavior the next, error, or component action transitions when you don't want an individual state to be handling them.
In this step, we're going to add the defaultTransitions node, but instead of using it for our flow's next and error transitions, we're going to define it for out-of-order message handling using the system.outOfOrderMessage transition. This transition will point to the first state of the message handling subflow, which we're also going to create in this step.
While we want to allow out-of-order messages in the middle of the conversation, we don't want to allow this behavior all of the time. Specifically, we don't allow it after an order has been confirmed or canceled, after a question has been answered, or when no current conversation exists. This state, which is the start of the out-of-order message handling subflow, determines when users can still revise their orders and when they'll have to restart the conversation by referencing the following built-in system variables:
${system.actualState}, which holds the name of the prior state.
${system.expectedState}, which holds the name of the current dialog state. It's referenced in the Apache FreeMarker expression to determine if the conversation is under way. This expression tests if the current state is buildRedWineMenu, the first state of the dialog flow. If so, then no navigation can be performed because an actual skill-user conversation has not begun. "${(system.expectedState == 'buildRedWineMenu')?then('disAllowNavigation','allowNavigation')}"
Click + Add Component.
Choose Control > Conditional equals.
Choose handleBotNotUnderstanding from the Insert After State menu.
Clear Include template components.
Click Insert Component.
Update the state as follows:
Change conditionEquals to outOfOrderMessageHandler.
Choose outOfOrderMessageHandler from the Insert After State menu.
Clear Include template comments.
Click Insert Component.
Update the state as follows:
Change output to navigationNotAllowedMessage.
Set the text property to
"I can't change the direction at this point in the conversation. Please start a new chat for any new orders or questions you have."
Click Return after the keepTurn node to insert a new line. Then add the following transitions node. transitions: should be four spaces from the left margin so that it aligns with the properties node. The return: "done" statement should be six spaces from the left margin. You can enter this manually, or paste the following snippet into your dialog flow definition after positioning your cursor at the left margin.
    transitions:
      return: "done"
When you're done, the state should look like this:
  navigationNotAllowedMessage:
    component: "System.Output"
    properties:
      text: "I can't change the direction at this point in the conversation. Please start a new chat for any new orders or questions you have."
      keepTurn: false
    transitions:
      return: "done"
Test the Skill
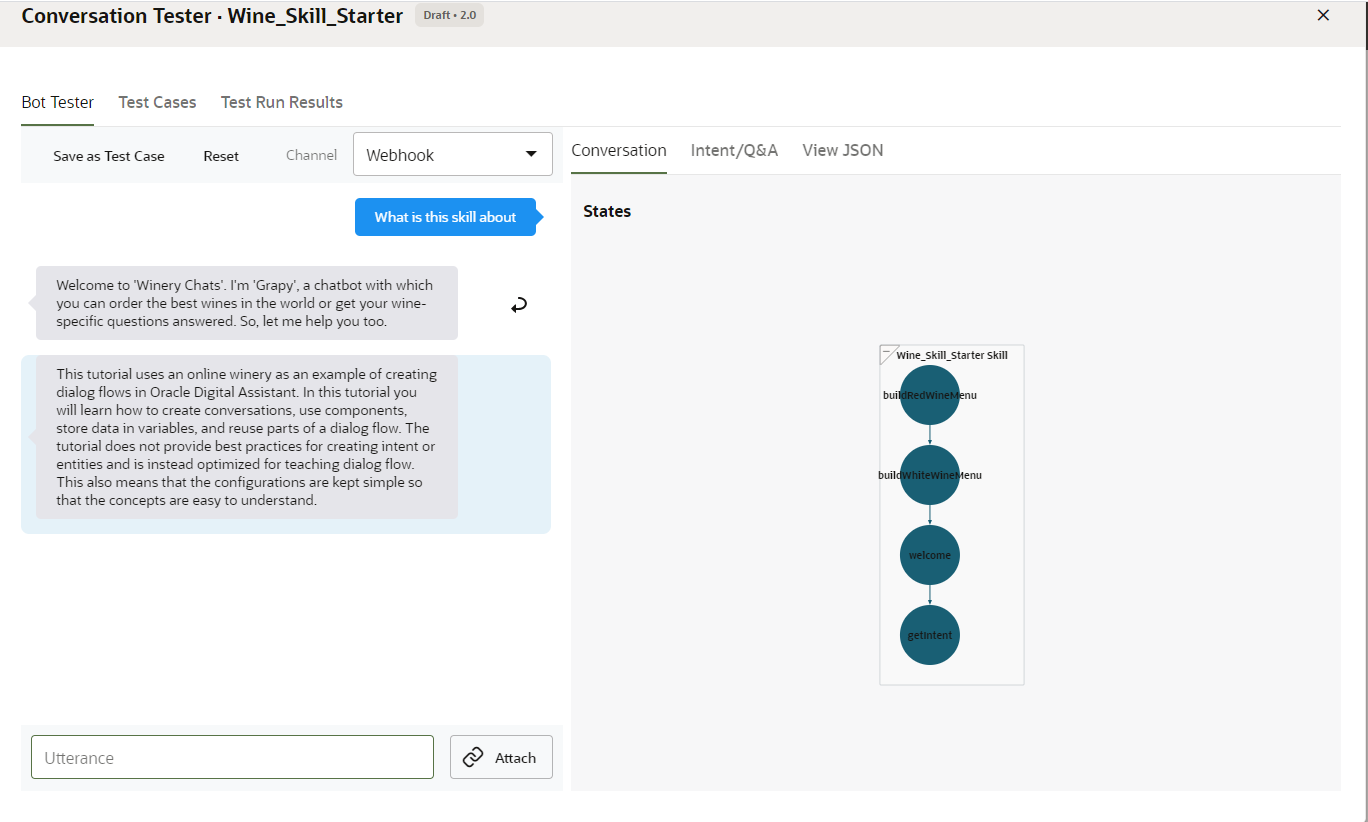
Now that your dialog is complete, you can test it out with the Skill Tester, which you access by clicking Preview
(located at the top right).
Description
of the illustration follows.
The Skill Tester not only lets you chat with your skill, but it also lets you monitor the dialog traversal as the conversations progress using the execution paths rendered in the Conversation tab.
Description of the illustration test_answer_intent.png
Tip:
Before you test out the skill, run Validate one more time. If the validator lists a lot of critical errors , delete the entire definition and replace it with the contesxt in the complete_dialog_flow file.
Test the answer flows. Click Reset after each one:
What is this skill about?
What do I learn in this tutorial?
What will I learn?
I have a question about wine
I have a question about white wine
Tell me about Riesling
Note:
There are two answer execution paths. When you ask about the skill itself, the execution path ends with getIntent state because it's an answer intent, which only needs a System.Intent component -- the getIntent state in our skill. When you ask about a wine, the execution path proceeds to the setChatToExplainType state (the start of the question-and-answer flow) from the getIntent state.
Test the wine ordering flow by starting off conversations with these phrases. Click Reset after each completed conversation:
I want to buy wine
I want to order red wine
I want to buy Chardonnay
Test the out of-order-message handling:
Enter I want to order wine.
Choose red wine.
Choose b (Merlot).
When prompted for the order size, scroll back and enter to the wine menu and choose Cabernet Sauvingnon.
Choose the order size.
After the
confirmation message, scroll back to the order size menu and choose an option.
Test out the error flow:
Enter I want a pizza. Click Reset.
Enter I want red wine.
Instead of choosing an option from the menu, enter e.
This software and related documentation are provided under a license agreement containing restrictions on use and disclosure and are protected by intellectual property laws. Except as expressly permitted in your license agreement or allowed by law, you may not use, copy, reproduce, translate, broadcast, modify, license, transmit, distribute, exhibit, perform, publish, or display any part, in any form, or by any means. Reverse engineering, disassembly, or decompilation of this software, unless required by law for interoperability, is prohibited.
If this is software or related documentation that is delivered to the U.S. Government or anyone licensing it on behalf of the U.S. Government, then the following notice is applicable:
U.S. GOVERNMENT END USERS: Oracle programs (including any operating system, integrated software, any programs embedded, installed or activated on delivered hardware, and modifications of such programs) and Oracle computer documentation or other Oracle data delivered to or accessed by U.S. Government end users are "commercial computer software" or "commercial computer software documentation" pursuant to the applicable Federal Acquisition Regulation and agency-specific supplemental regulations. As such, the use, reproduction, duplication, release, display, disclosure, modification, preparation of derivative works, and/or adaptation of i) Oracle programs (including any operating system, integrated software, any programs embedded, installed or activated on delivered hardware, and modifications of such programs), ii) Oracle computer documentation and/or iii) other Oracle data, is subject to the rights and limitations specified in the license contained in the applicable contract. The terms governing the U.S. Government's use of Oracle cloud services are defined by the applicable contract for such services. No other rights are granted to the U.S. Government.
This software or hardware is developed for general use in a variety of information management applications. It is not developed or intended for use in any inherently dangerous applications, including applications that may create a risk of personal injury. If you use this software or hardware in dangerous applications, then you shall be responsible to take all appropriate fail-safe, backup, redundancy, and other measures to ensure its safe use. Oracle Corporation and its affiliates disclaim any liability for any damages caused by use of this software or hardware in dangerous applications.
Oracle and Java are registered trademarks of Oracle and/or its affiliates. Other names may be trademarks of their respective owners.
Intel and Intel Inside are trademarks or registered trademarks of Intel Corporation. All SPARC trademarks are used under license and are trademarks or registered trademarks of SPARC International, Inc. AMD, Epyc, and the AMD logo are trademarks or registered trademarks of Advanced Micro Devices. UNIX is a registered trademark of The Open Group.
This software or hardware and documentation may provide access to or information about content, products, and services from third parties. Oracle Corporation and its affiliates are not responsible for and expressly disclaim all warranties of any kind with respect to third-party content, products, and services unless otherwise set forth in an applicable agreement between you and Oracle. Oracle Corporation and its affiliates will not be responsible for any loss, costs, or damages incurred due to your access to or use of third-party content, products, or services, except as set forth in an applicable agreement between you and Oracle.
 in the top left corner to open the side menu.
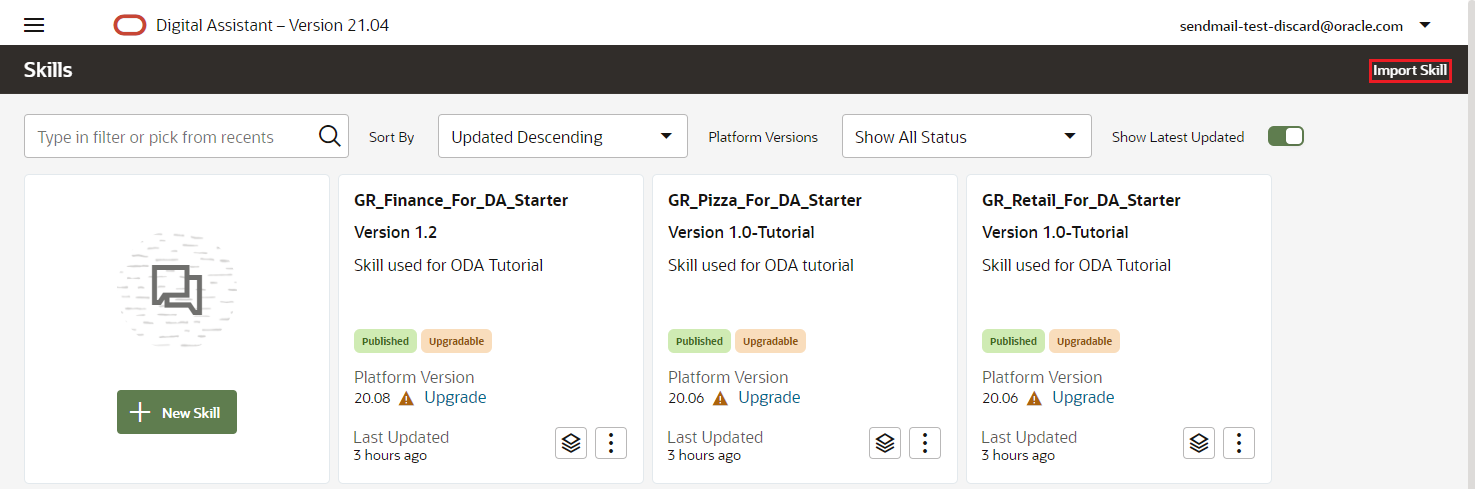

 in the left navbar. This skill uses regular intents (order.wine and tellme.about.wine) and an answer intent which describes this tutorial.
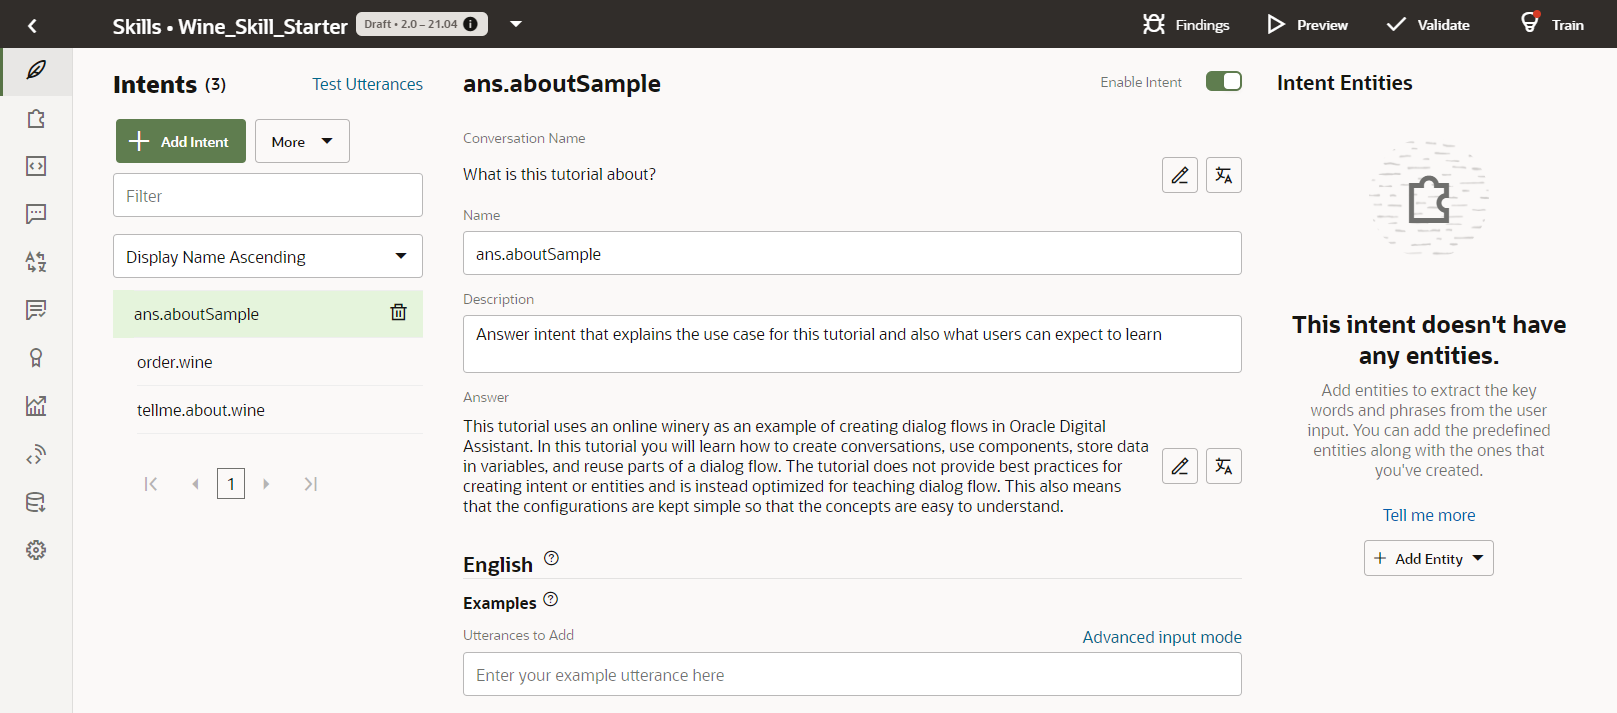

 .
.
 in the left navbar to take a look at the entities for matching both the wine category and wine type from the user input.
 in the left navbar.
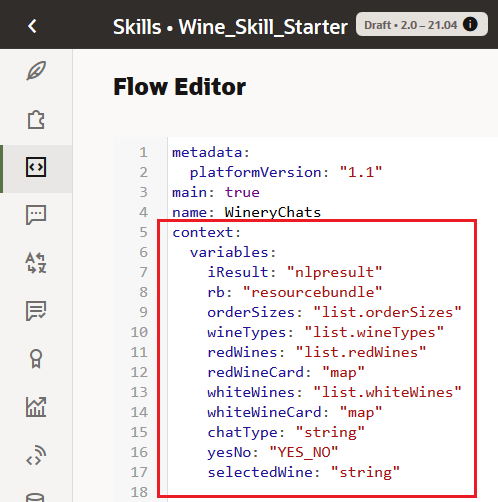


 in the left navbar to take a quick look.