JavaScript must be enabled to correctly display this content
Before You Begin
This 45-minute tutorial shows how you can easily add
value-setting logic using the composite bag entity.
Background
In this tutorial, you're working with a skill for ordering
pizzas that has a basic dialog flow definition along with some
intents and entities for extracting values for the pizza order,
delivery address, and delivery location. By adding a composite
bag entity to these building blocks, you can create a pizza
skill that allows spontaneous, real-world interactions without
having to implement custom code or write a complex and lengthy
dialog flow definition. How and when the composite bag sets the
values for these entities depends on the circumstance. When
customers change their orders midway through the conversation,
for example, the skill can gracefully update the previously
extracted value and continue on without forcing them to begin
their orders all over again. The skill can prompt for values
when they're not included in the customer input and can validate
this input as well, sending context-specific error messages when
it's incorrect.
What Do You Need?
Access to an Oracle Digital Assistant instance.
The PizzaBot_Materials.zip file, which
includes the both the starter version of the skill and a finished
version of the skill. Download this file and then
unzip it to your local system.
Explore the Starter Skill
The first thing you need to do is import the starter pizza
skill into your Oracle Digital Assistant instance so that you can see what you're working with.
Import the Starter Skill
Log into Oracle Digital Assistant.
Click
in the top left corner to open the side menu.
Expand Development and then click Skills.
Hide the menu by clicking again.
Click Import Skill (located at the upper
right).
Browse to, and then select,
CompositeBagTutorial_Starter.zip. Then click Open.
Explore and Test the Skill
Take a look at the intents and entities.
In the dashboard, click the CompositeBagTutorial_Starter
tile to open the skill in the Skill Builder. The intent editor
should be selected when this development environment is
launched. If it isn't, click Intents
in the left navbar.
Click the OrderPizza intent and take a
look at its utterances.
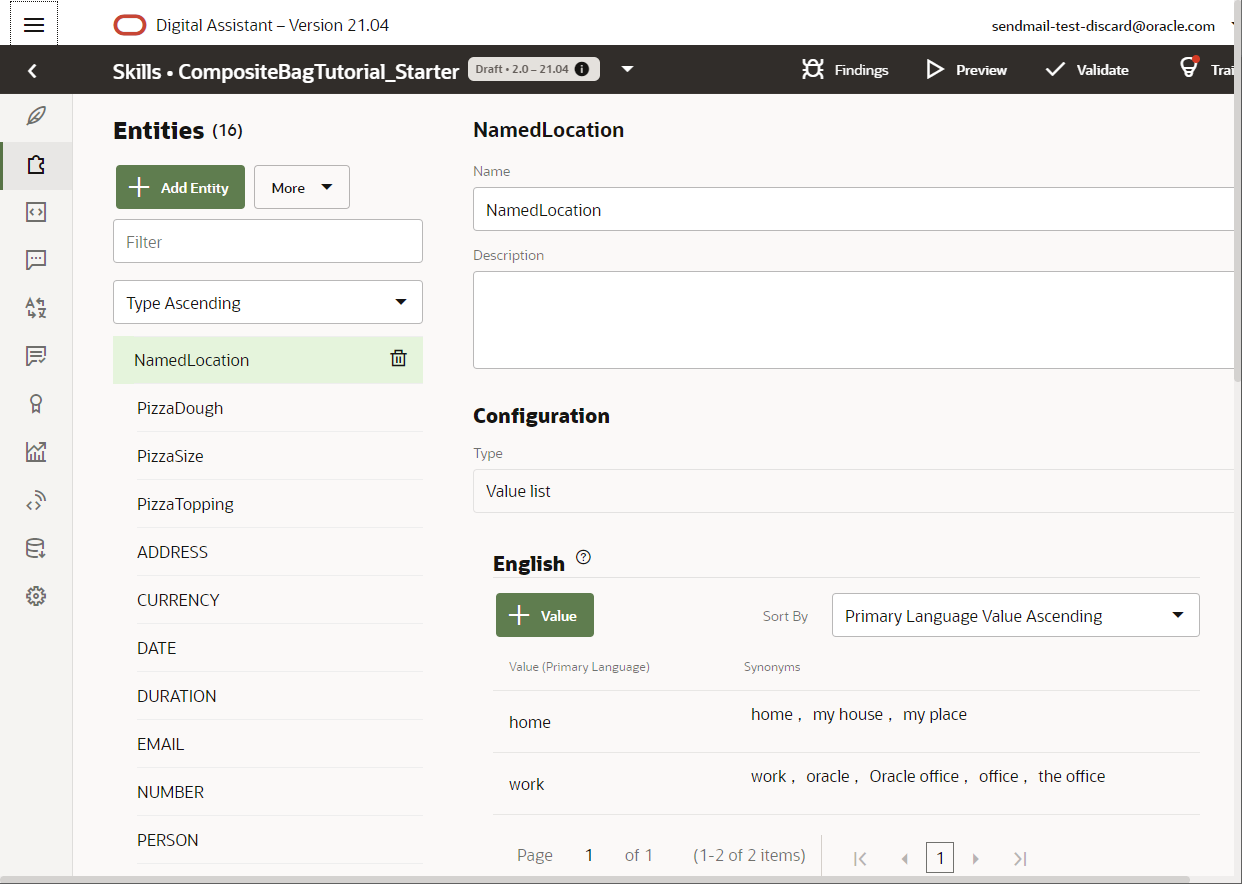
Click Entities in
the left navbar.
Open the PizzaDough, PizzaSize, PizzaTopping, and
NamedLocation entities. Take a look at the values and
synonyms defined for each of these Value List entities.
Notice that PizzaTopping and PizzaSize entities both have
prompts and that the PizzaSize entity also has en error message.
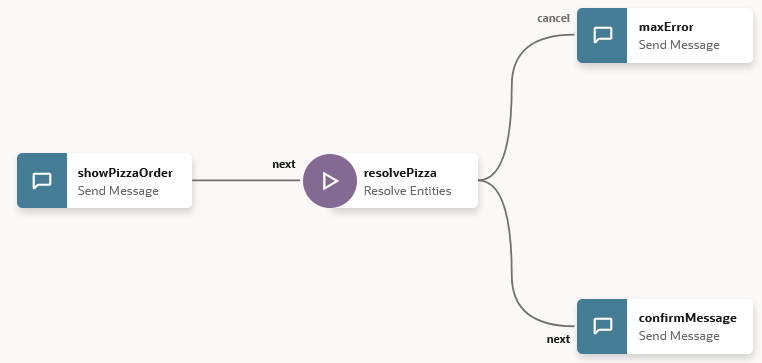
Click Flows in the left navbar, the select the intent.reg.order flow.
Notice, at this point, that it's just a starter flow that outputs a message. We're
going to add the state that resolves the various pizza variables
in a minute.
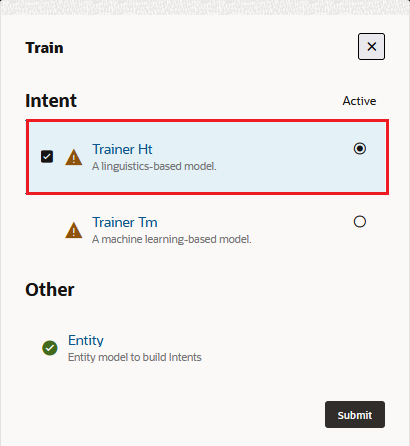
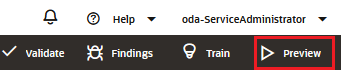
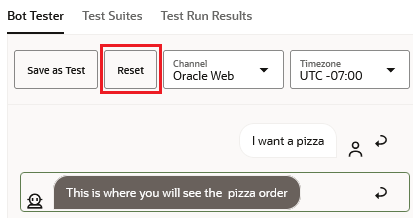
Train the skill:
Click Train (located on the right side
of the top menu).
In the chat window, enter I want a pizza and then
click Enter. The skill replies with a
placeholder message (This is where you will see the
pizza order).
Description of the illustration
Click Reset to clear your input and then Close.
What you just did: You've imported the
basic into your instance, gotten acquainted with its artifacts, and then tested it out.
Create
the Basic Composite Bag Entity
The first step is to create the composite bag itself, add the
PizzaSize and PizzaType entities to it, and then add
context-specific prompts and input validators for these
entities.
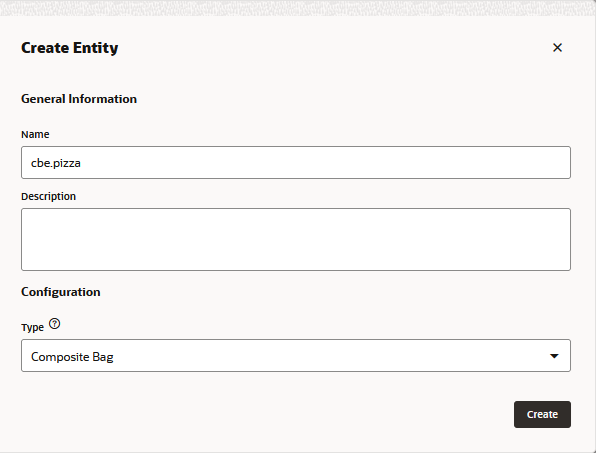
Create the Composite Bag Entity
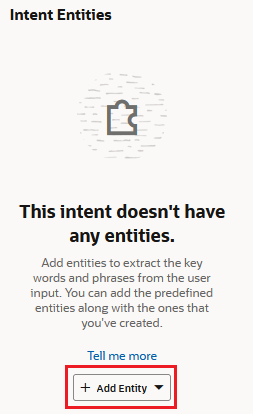
Click Entities in the left navbar and then
click + Add Entity.
In the Name field, replace BagItem1 with
PizzaSize.
Confirm that Entity (the default value) is chosen in the Type list.
Choose PizzaSize from the Entity Name
list.
The PizzaBot Skill needs to resolve the size of a pizza,
but it also needs to output error messages when customers
continually reply with values that can't be resolved by the
PizzaSize entity's list items or synonyms. To do this, click to
increment Maximum User Input Attempts to
3.
In the Error Message field, replace the existing error message (Oops! I didn't
understand, I need a pizza size of small, medium or large)
with Sorry, this is not a valid pizza size.
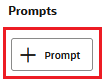
Next, add a sequence of prompt messages that correspond to
the three input attempts allotted to users for choosing a pizza size. Each of these messages becomes
more emphatic as the sequence progresses. The Prompts section of the page includes the first one that already belongs to the PizzaSize entity (What size pizza would you like?)
Description
of the illustration
To add the next prompt, first click + Prompt.
Enter Please choose small, medium, or large.
Click + Prompt again.
Enter OK! Let's have one more go at this. I just need
you to select a pizza size. We offer large, medium, and
small.
Description
of the illustration
Click Close (located at the top right of the Add Bag Item page).
The skill resolves the topping type with its PizzaTopping
entity. In addition to extracting this value, the skill
needs to check that the customer has selected only one
topping. No substitutions allowed! Before you can add this
validation to the PizzaTopping entity, you need to add it to
the composite bag. To get started, click + Bag item.
Replace BagItem1 with PizzaTopping in the Name
field, make sure that Entity is chosen in the Type list, then select PizzaTopping from the
Entity Name list.
In the Disambiguation Prompt field, enter Sorry, you
can only order one topping type.
What you just did: You have created a
composite bag entity that resolves pizza size and pizza
topping through context-specific prompts and error messages.
Associate The Composite Bag Entity to an Intent
In this step, you will add the composite bag entity to the
OrderPizza intent to enable the skill to parse the entity
values with the intent.
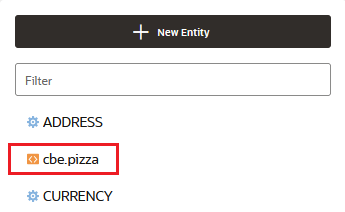
Select the Intent icon in the left navbar.
Select the pizza.reg.orderPizza intent and then click +
Add Entity.
Select cbe.pizza from the list.
Retrain the skill.
Update the Dialog Flow to Reference the Composite Bag Entity
Next, update the dialog flow with the cbe.pizza entity. To do this, you
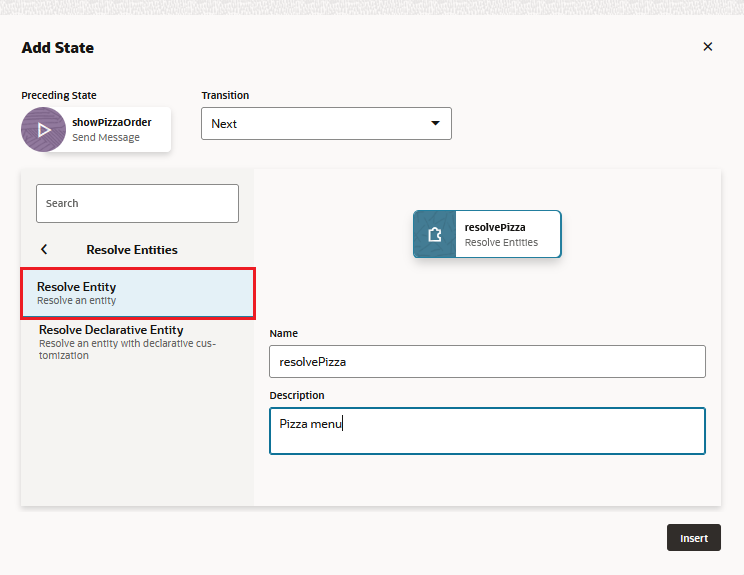
need to declare a flow-level variable for this entity so that it can be referenced only by this flow and then add a Resolve Entity component. This component resolves the composite bag list items. It keeps track of the values that have already been provided in the user input and output prompts for additional values.
Create a Flow-Level Variable
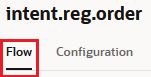
Click Flows in the left navbar.
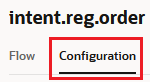
Select intent.reg.order.
Click Configuration.
Click + Add Variable (located under Variables).
For the name, enter pizza.
For the description, enter Resolves the pizza menu.
Select Entity as the variable type, then select cbe.pizza as the entity name.
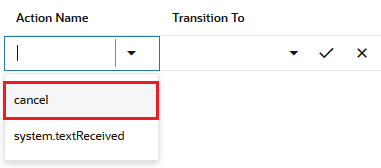
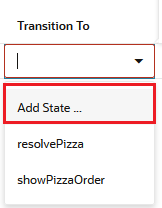
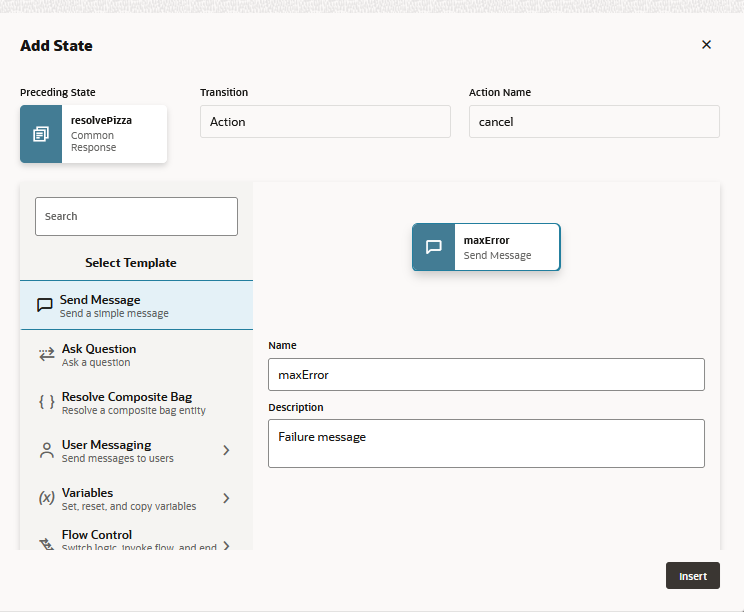
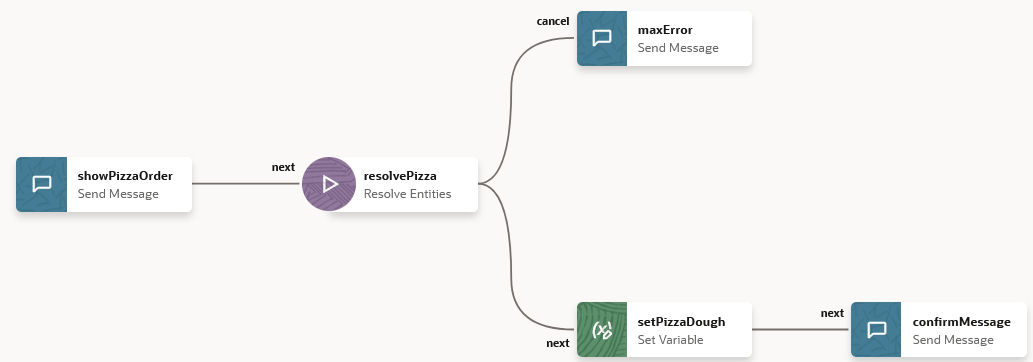
Now that you've enabled the flow to process the composite bag component, you can add two more states that are triggered when an order is complete or when an order is rejected.
Enter Confirmation message as the description. Then click Insert.
In the Component page of the confirmMessage state,
enter the following into Message field. This message returns the entity values using Apache FreeMarker
expressions:
Ok, so we are getting you a ${pizza.value.PizzaSize.value?lower_case} ${pizza.value.PizzaTopping.value?capitalize} pizza.
Let's test the logic that we've configured for the PizzaSize
and PizzaTopping entities and the updated dialog flow.
Click Preview to
open the Skill Tester.
In the chat window, enter I want to order a
medium pizza.
When prompted, enter a pizza type (Meaty, Veggie, etc.) and then confirm that
both this entity value and medium are included in the
confirmation message. Click Reset.
Enter both entity values in the same request by entering I
want to order a large veggie pizza. The skill should
reply with the confirmation message, which includes both of
the entity values. Click Reset.
Try out the error messages by first entering I want
to order a pizza.
When prompted for a pizza size, enter a invalid value like
huge.
Enter massive.
Enter monster. The skill should reply with the
error message and with all three prompt messages. When
you've reached the third attempt (the number you set for the
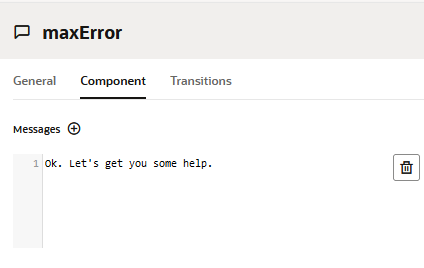
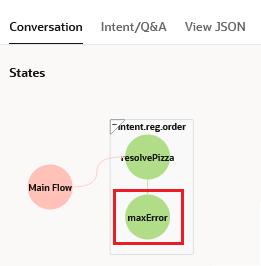
Maximum User Input Attempts property), the Resolve Entities component triggers the cancel
transition, routing you to maxError state. At
this point, the skill outputs "OK, let's connect you with
someone to help." This is just an output message; there's no
skill-human agent integration configured for this skill.
Next, test the value disambiguation by entering two
different topping types in one message. For example, enter I
want to order a meaty veggie pizza. The skill
recognizes the invalid input by replying with "Sorry, you
can only order one topping type."
Click Reset, then close the Tester.
Set a
Default Value
Now that the basic composite bag implementation works, you can
set a default value for the PizzaDough entity. This entity
extracts values for two types of dough: regular and gluten-free.
To speed the ordering process, we'll assume that most customers
prefer regular crust. This will be the default value that's set
for the PizzaDough entity. But when customers request
gluten-free, the skill updates the PizzaDough entity value. The
change is seamless (and invisible) to customers because they
receive no prompts or confirmation messages. The crust request
is noted and the composite bag prompts for the next entity. For
your skill to handle this change, you need to configure the
PizzaDough entity to accept gluten-free as an optional value.
Click Entities in the
left navbar, then select the cbe.pizza entity.
Click + Bag Item, then replace BagItem1
with PizzaDough.
Select PizzaDough from the Entity Name
list.
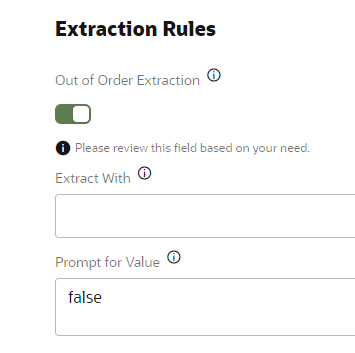
In the Extraction Rules section:
make sure that Out of
Order Extraction is set to Always.
Enter false in the Prompt for Value field to prevent the skill from prompting for a pizza dough preference.
What you just did: You've enabled the
composite bag to accept customer input that overwrites a default
value.
Implement the Default Value Logic in the Dialog Flow
Because gluten-free is the exception, not the rule for most
of the skill's customers, you need to update the dialog flow
that sets the default value, regular.
Click Flows in the left navbar.
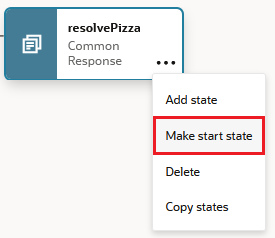
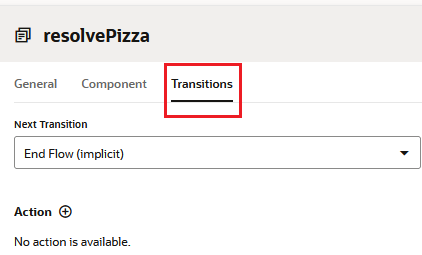
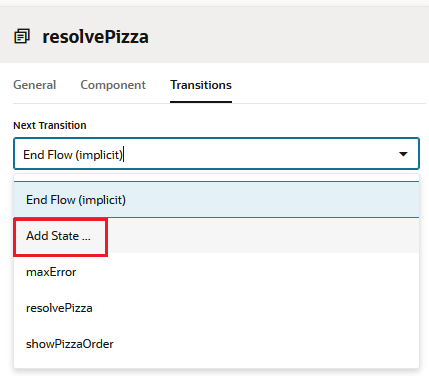
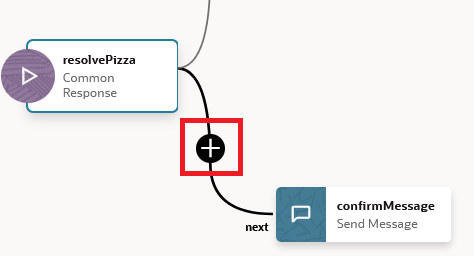
Select the next transition that connects the resolvePizza and confirmMessage states.
Choose Variables from the Add State dialog. Then choose Set Variable.
Name the state setPizzaDough, then click Insert. This state keeps the
valid values for the PizzaDough entity. When these values
aren't valid, or are missing, it volunteers the value for regular crust.
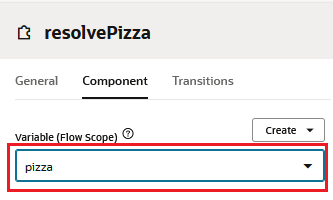
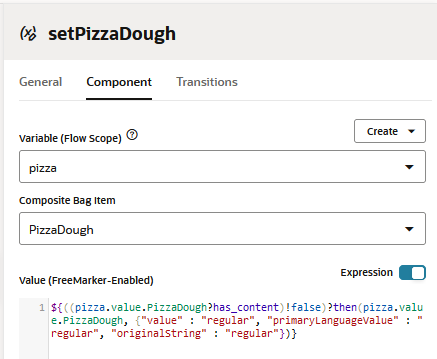
Open the Component page of the setPizzaDough state.
In the Variable field, choose pizza.
Select PizzaDough from the Composite Bag Item field.
Switch on Expression.
Enter the following FreeMarker expression that evaluates the PizzaDough values:
Update the message in the confirmMessage
state to include the dough type by appending the following line to the existing message:
This will be on our ${pizza.value.PizzaDough.value} crust.
When you're done, the message should look like this:
Your ${pizza.value.PizzaSize.value} ${pizza.value.PizzaTopping.value} pizza will be delivered at ${pizza.value.DeliveryTime.value?time.xs?string['hh:mm a']}. This will be on our ${pizza.value.PizzaDough.value} crust.
Enter I want to order a large veggie pizza. The
skill confirms your order with regular crust. Click Reset.
Enter I want to order a large veggie gluten-free pizza.
The skill prompts you for the size. After you select that,
the order confirmation includes gluten-free crust.
Click Reset, then close the tester.
What you just did: You configured the
PizzaDough entity so that it can accept an optional value. In
the dialog flow, you added a Apache FreeMarker expression that
sets regular as default crust type using the ?has_content
and then operators.
Validate
the Delivery Time
Part of the pizza ordering process is allowing customers to
specify their preferred delivery time. But this skill doesn't
offer 24-hour delivery. It must recognize when customers request
a delivery time that's outside of normal business hours and then
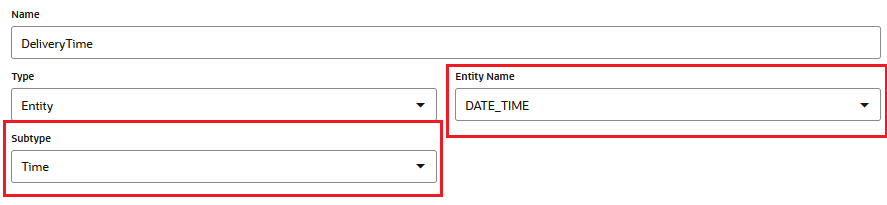
prompt for valid time. There's no existing entity to recognize
time, so you're going to add one to the bag. Unlike the existing
entities, this entity is not a value list. It's based on the
built-in DATE_TIME entity that recognizes hours, minutes and seconds.
Click Entities in the
left navbar, then select the cbe.pizza entity from the entities
list.
Click + Bag Item, then replace BagItem1
with DeliveryTime.
Make sure that Entity is selected in the Type field.
In the Error Message field, enter Sorry, we only offer
delivery up to 9:30 pm.
Click + Prompt and add the following prompt: When can we deliver that for
you?
Click Close.
Click Flows
in the left navbar.
In the confirmMessage state, update the confirmation message to output the customer's
delivery time by adding the following at the end of the message:
Your pizza will be delivered at ${pizza.value.DeliveryTime.value?time.xs?string['hh:mm a']}.
When you're done, the text property
definition should look like this:
OK, so we are getting you a ${pizza.value.PizzaSize.value?lower_case} ${pizza.value.PizzaTopping.value?capitalize}. This will be on our ${pizza.value.PizzaDough.value} crust. Your pizza will be delivered at ${pizza.value.DeliveryTime.value?time.xs?string['hh:mm a']}.
Test the Date Validation
Test how the skill recognizes valid delivery times based on
the FreeMarker expression:
Click Preview to
open the Skill Tester.
Enter I want to order a large veggie pizza. The
skill replies with "When can we deliver that for you?"
Enter 10pm. The skill replies with your error
message, "Sorry, we only offer delivery up to 9:30 pm."
Enter a valid time, like 8pm. The skill notes
the delivery time in the confirmation message.
Click Reset, then close the Skill Tester.
What you just did: You configured the
DeliveryTime entity so that it not only prompts for a delivery
time, but also validates that input because of the comparison
operators in the Apache FreeMarker expression.
Extract
Entity Values When They're Not Entered In Order
Customers shouldn't have to start over when they change their
orders. In this step, you configure the entities and the dialog
flow , you can implement functionality within the entities and
the dialog that will understand if the user re-enters any entity
value and to update that value and acknowledge to the users
input.
Click Entities in the
left navbar, then select the cbe.pizza entity from the entities
list.
Make sure that Out of Order Extraction is
set to Always for both the PizzaSize and PizzaTopping bag items.
Click Edit to verify this setting.
Click Close after you've checked both
entities.
What you just did: By ensuring that the Out
of Order Extraction option is set for both of these
entities, you've given the composite bag the flexibility to
reset values. Here, the Out of Order Extraction
option allows the skill to replace the existing pizza size
value. It can be reset at any point.
Test Out-of-Order Entity Extraction for the Pizza Size and
Pizza Topping Values
Let's test how this functionality works.
Click Preview to
open the Skill Tester.
Enter I want to order a large pizza.
When prompted for pizza topping, enter veggie please,
but can you make it a medium.
Complete the order process. Make sure that the
confirmation message includes medium pizza, not large.
Click Reset, then close the tester.
Configure the Immediate Confirmation of the Value Change
Now that you have configured the logic within the composite
bag entity to update the pizza size value, you need the skill
to immediately acknowledge this change. To do this, you need
to add functionality that confirms the change before prompting
the user for the next item value.
First, add descriptions for the PizzaTopping and PizzaSize
bag items in the PizzaBag:
Click Entities in
the left navbar, then select the PizzaBag entity from the
entities list.
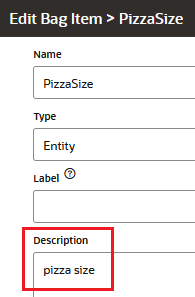
Select the PizzaSize bag item, then click Edit.
Enter pizza size in the Description field.
Then click Close.
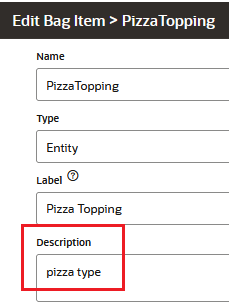
Select the PizzaTopping bag item, then click Edit.
Enter pizza type in the Description field.
Then click Close.
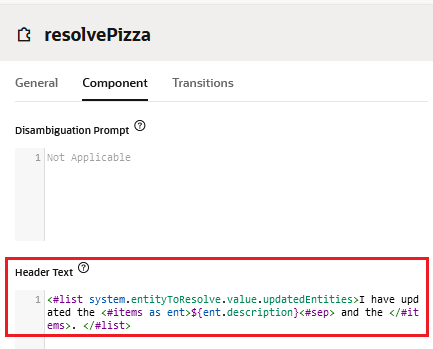
Next, update the resolvePizza state:
Click Flows
in the left navbar.
In the resolvePizza state, paste the following FreeMarker list directive into the Header Text field:
<#list system.entityToResolve.value.updatedEntities>I have updated the <#items as ent>${ent.description}<#sep> and the </#items>. </#list>
What you just did: You added entity
descriptions that are mined by the Apache FreeMarker directive
that defines the message's header text. The list directive iterates through the entities using the system.entityToResolve.value.updatedEntities
system variable. The values extracted from the composite bag item Description field (pizza size, pizza topping) are stored using the ent
loop variable. The skill displays the header message that
confirms the change before it prompts the customer for the
next entity in the composite bag.
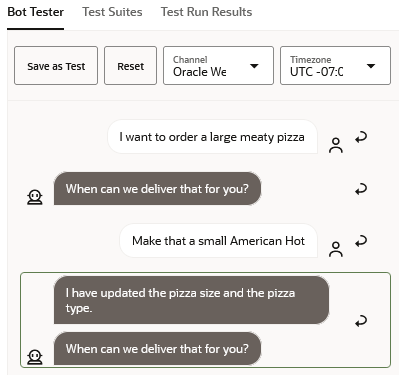
Test the Confirmation Alert
Let's test how this functionality works.
Click Preview to
open the Skill Tester.
Enter I want to order a large pizza.
Enter veggie please, but can you make it a medium.
The skill replies with "I have updated the pizza size."
Click Reset.
Enter I want to order a large veggie pizza. After the skill prompts you for the delivery time, reply with Make that a meaty pizza. The skill replies with "I have updated the pizza type.
Click Reset.
Enter I want to order a large meaty pizza. After the skill prompts you for the delivery time, enter Make that a small American Hot. The skill replies with "I have updated the pizza size and pizza type."
In addition to the delivery time and the pizza itself, the pizza
skill needs to complete the order by prompting for the delivery address. Because users might enter a full address or a stored address like home, the skill needs to combine two different types of entities: a Value list entity for the stored addresses and the built-in ADDRESS entity that reads street addresses.
In this section, you'll update the composite bag with Value List entity with items for the NamedAddress entity, which represents the different ways a user might
realistically refer to an address without actually specifying
the physical address, and the ADDRESS entity that extracts the city, house and road location from user input. Besides adding these related items, you'll configure the composite bag entity to resolve both of them from a single user message: a message
containing home, for example, resolves the ADDRESS entity as well.
First, create list item for the ADDRESS entity:
Click Entities in the
left navbar, then select the PizzaBag entity.
Click + Bag Item.
Replace BagItem1 with DeliveryAddress.
Confirm that Entity is selected in the Type field.
Select ADDRESS from the Entity Name list.
Click Add Prompt and then enter What
address can we send that to?
Click Close.
Next, add the NamedLocation entity to the bag:
Click + Bag Item and then replace BagItem1
with NamedLocation.
Confirm that Entity is selected in the Type field.
Select NamedLocation from the Entity Name
list.
Select DeliveryAddress from the Extract
With list.
Enter false in the Prompt for Value field to prevent the skill from prompting for this value.
What you just did: You've added two related
entities to the composite bag that give customers the
flexibility of entering the same information in two different
formats. You linked these two entities by naming DeliveryAddress
in the NamedLocation's Extract With option.
Implement the Extract With Functionality in the Dialog Flow
You now need to update confirmation message to output a
hard-coded address only when the user enters home.
Click Flows
in the left navbar.
In the confirmMessage state, update
the confirmation message with the delivery address by adding the
following Apache FreeMarker expression to the text
property definition:
We are delivering to ${pizza.value.NamedLocation?has_content?then('Buckingham Palace, The Mall, Westminster, London SW1A 1AA',pizza.value.DeliveryAddress.originalString)}.
When you're done, the message
should look like this:
OK, so we are getting you a ${pizza.value.PizzaSize.value?lower_case} ${pizza.value.PizzaTopping.value?capitalize}. This will be on our ${pizza.value.PizzaDough.value} crust. Your pizza will be delivered at ${pizza.value.DeliveryTime.value?time.xs?string['hh:mm a']}. We are delivering to ${pizza.value.NamedLocation?has_content?then('Buckingham Palace, The Mall, Westminster, London SW1A 1AA',pizza.value.DeliveryAddress.originalString)}.
What you just did: For testing purposes,
you set a hard-coded address of Buckingham Palace that represents the home address. The FreeMarker expression evaluates the input for the NamedAddress entity's home value and prints out this address if it's present. Otherwise, it uses the originalString property to output the actual address that's provided in the user input.
Test the Extract With Functionality
Let's test how this functionality works.
Click Preview to
open the Skill Tester.
Enter I want to order a large veggie pizza for 9pm.
The skill replies with "What address can we send that to?"
(the prompt for the DeliveryAddress entity).
Enter any address. For example, enter 1313
Mockingbird Lane. Note that the confirmation message
includes the address that you entered. Click Reset.
Enter I want to order a large veggie pizza for 9pm
again, but when prompted for an address, enter home. Note that skill maps home to the
hard-coded address. If you replied with something like, My
mate, Dave's (an invalid value, one that's neither a
NamedAddress value or an actual address), the skill prompts
with "What address can we send that to?" until you enter a specific
address or enter home.
Click Reset, then close the Skill Tester.
Enhance
Error Messages
Currently, the error message for the PizzaSize entity is
static. It doesn't let the customer know what's going wrong. To
output messages that reflect the incorrect user input, you need
to update the entity's error message with an Apache FreeMarker
expression.
Click Entities in the
left navbar and then open the cbe.pizza entity.
Select the PizzaSize bag item and then click Edit.
Update the Error Message text with the following Apache
FreeMarker expression:
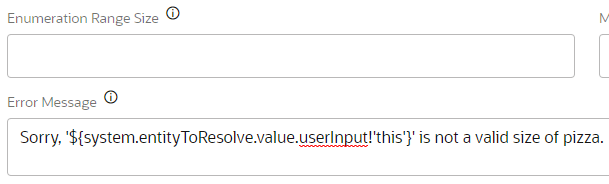
Sorry, '${system.entityToResolve.value.userInput!'this'}' is not a valid size of pizza.
What you just did: You've implemented
"reflective listening" approach by adding the Apache FreeMaker
expression with the system.entityToResolve.value.userInput
property.
Test the Rich Error Messaging
Let's do one final test.
Click Preview to
open the Skill Tester.
Enter I want to order a veggie pizza for 9pm.
When the skill replies with the first prompt in the
sequence ("What size of pizza would you like?"),
enter huge. Because of the userInput
property that's appended to the system.entityToResolve.value
variable in the expression, the skill replies with "Sorry,
huge is not a valid size of pizza. Please choose small,
medium or large pizza."
Click Reset, then close the Skill Tester.
Well done! Your skill can set and reset values. By validating
the customer input, it's also less error-prone.
 in the top left corner to open the side menu.
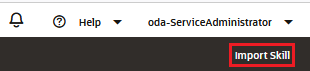
 in the left navbar.
  in
the left navbar.
in
the left navbar. in the left navbar, the select the intent.reg.order flow.
Notice, at this point, that it's just a starter flow that outputs a message. We're
going to add the state that resolves the various pizza variables
in a minute.
in the left navbar, the select the intent.reg.order flow.
Notice, at this point, that it's just a starter flow that outputs a message. We're
going to add the state that resolves the various pizza variables
in a minute. 
 (located at the top right) to open the Skill Tester.
 .
.
 to
increment Maximum User Input Attempts to
3.
to
increment Maximum User Input Attempts to
3.


 in the left navbar.
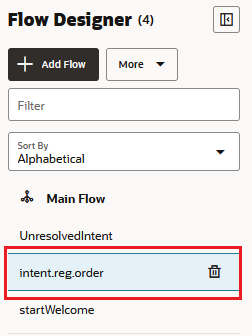


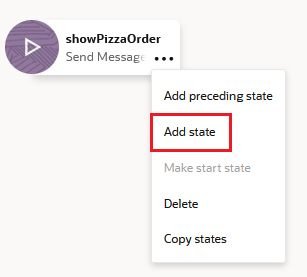
 . Click the menu icon, then click Add state.


 to verify this setting.