Create
a Webview from an Oracle Visual Builder Application
Before You Begin
This 45-minute tutorial shows you how to integrate a
single-page app (SPA) authored in Oracle Visual Builder with
Oracle Digital Assistant.
Background
Adding webviews to your skill allows it support structured data
input through UI elements like forms, date pickers, fields, and
LOVs. In Oracle Digital Assistant, the web apps that are
delivered within the chat as webviews are single-page apps
(SPAs). By completing this 45-minute tutorial, you will learn
how to use Oracle Visual Builder to declaratively build a SPA
and then integrate it with a skill.
The use case for this tutorial is a credit card dispute
service. Digital Bank, a fictitious bank, wants to reduce the
waiting time and effort spent by their customers to settle
credit card disputes. To this end, Digital Bank prefaces its
approach on the following:
Users dispute their credit card transactions through a
skill.
Users log a dispute by completing a web form that's
delivered as a webview.
The skill that supports the webview runs on a web channel,
meaning that the web form will open in a separate browser tab.
The skill collects an initial set of information from the
user before it displays a link to a webform for entering
details about the dispute.
The information captured by the skill is passed to (and
populated in) the dispute form.
Once a user completes the form, the skill conversation
continues.
What Do You Need?
Access to an Oracle Digital Assistant instance, Version
19.1.5 or higher.
Access to Oracle Visual Builder, Version 19.1.3 or higher.
In the tutorial, you'll use node package manager (npm),
which is distributed with Node.js, to run the web messenger
client app from your local machine.
To ensure you have Node.js installed, run the following
command in from a command line in a terminal (Mac) window or
a command (MS Windows) window:
node -v
To ensure that npm has been installed, run:
npm -v
The resources.zip file, which includes the
starter skill and a finished version of the skill for your
reference, along with starter and final versions of the SPA.
Click here
to download this file and then unzip it to your local system.
Prepare
the Skill
Import the Starter Skill
Log into Oracle Digital Assistant.
Click
in the top left corner to open the side menu.
Expand Development and then click Skills.
Hide the menu by clicking again.
Locate the FinancialDisputeBot starter skill. Then click Clone.
If you can't locate the skill, click Import
Skill (located at the upper right).
Instead of opening the URL, click Reset
and then click then Close to dismiss the tester.
What you just did: You just setup and tested the
FinancialDisputeBot starter skill. The skill asks users to
enter basic dispute information and provides a URL for users
to fill the webform.
Right now, the skill has the following drawbacks:
The information captured in the skill could not be sent to
the URL.
The results from dispute web application could not be sent
back to the skill.
In short, the skill and web application are two separate
entities that do not share any contextual information.
Configure the Skill to Call the Web App
In this section, you will configure your skill to call a web
app that is hosted within Oracle Digital Assistant. In this
step, you'll configure the dialog flow.
Click Flows in the left navbar.
In the variables node, add a variable called
outputfromweb that stores data received from
the web app (a string). When you're done, the variables node
should look like this:
Delete the unneeded properties, so that the webview
state looks like this:
webview:
component: "System.Webview"
properties:
sourceVariableList: "fullname, amount"
variable: "outputfromweb"
prompt: "Please tap on the link to proceed"
service: "DisputeFormService"
transitions:
      next: "output"
      actions:
        textReceived: "onCancel"
        cancel: "onCancel"
In the output state, update the text
property as follows:
text: "Thank-you ${fullname.value}, we have noted your response - ${outputfromweb.value.disputeReason}"
After the output, we 're going to add the onCancel
state that handles cancel and textReceived
actions, by clicking + Components, then User
interface, then Output.
Choose output from the Insert After
menu, switch on Remove Comments, then
click Apply.
Rename the state onCancel.
Define the text property as:
"I'm sorry that you have canceled your dispute request."
Add the following transition to end the dialog:
    transitions:
      return: "done"
Delete the keepturn and translate
properties, because they are not needed.
When you're done, the onCancel state should
look like this:
  onCancel:
    component: "System.Output"
    properties:
      text: "I'm sorry that you have canceled your dispute request."
    transitions:
      return: "done"
Click Validate. Oracle Digital Assistant
returns an error because you haven't yet configured the
DisputeFormService Webview Service that connects the skill
to the web app.
Description of the
illustration.
You'll do this in the next section. If you're encountering
errors besides this one, replace your dialog flow with this one.
What you just did: In this section, you updated
FinancialDisputeBot skill to call a Webview Service named
DisputeFormService using the System.Webview
component. The full name and the amount are passed to the web
app. The web application response will be saved in variable
named outputfromweb. Once the web app is done,
the skill confirms that the response from web application has
been noted.
Prepare
the Oracle Visual Builder Web App
In this section, you're going to create Oracle Visual Builder
web app, export it, and then host it in Oracle Digital
Assistant.
To create this app, you'll use the starter application called
FinancialDisputeSPA_starter.zip.
Import the Starter Oracle Visual Builder Application
Explore and Test the Oracle Visual Builder Application
Now let's explore the starter application and run it.
If the Navigator's Web Application's tab is not already
open, click Web Applications. Otherwise, click financialdispute,
and then HTML.
Description of the
illustration.
This HTML file, which is called index.html,
is the main entry point of this web application. In the
following section, you are going to fetch parameters sent
by the System.Webview component that you
configured in the FinancialDispute skill.
In the left pane, expand main and then
click main-start. This is the Financial
Dispute page design layout that will appear once the
application is launched.
Note: The Design option should
be selected by default, but if it isn't, select it.
Next, click main-thanks to view the
design layout. This page appears after a user submits or
cancels the dispute.
Description of the
illustration.
Next, click main and then open the
Functions editor by clicking Functions. Take a
look at the function that's invoked when a user clicks the
Submit or Cancel buttons. It makes a POST call to the
callback URL that's received from the skill. This call
includes the parameters that were received from the Submit
or Cancel buttons.
Description of the
illustration.
When a customer clicks the Submit button, the dispute
option that they have chosen gets passed to the submitDisputeInfoToDA
call module function. Similarly, when users click the
Cancel button, the cancel information is passed to the submitDisputeInfoToDA
call module function. It makes a POST call to the skill to
send the payload in following format:
Click Submit Dispute. At this point, the
submitDisputeInfoToDA function is called,
enabling navigation to the next page:
Description of the
illustration.
Prepare the Oracle Visual Builder Application So That It Can
Be Called by the Skill
You need to update FinancialDispute application to receive
the input parameters and callback URL injected by the
FinacialDisputeBot skill, but before we do that, let's take a
look back at the webview state in the dialog
flow.
In the sourceVariableList variable, the skill
passes fullname and amount to the
calling application. Along with these parameters, a third
parameter, webview.onDone gets added
automatically to pass the callback URL. The data is added to
the web app’s index.html file.
  webview:
    component: "System.Webview"
    properties:
      sourceVariableList: "fullname,amount"
      variable: "outputfromweb"
      prompt: "Please tap on the link to proceed"
      service: "DisputeFormService"
    transitions:
      next: "output"
      actions:
        textReceived: "onCancel"
        cancel: "onCancel"
You need to code the web app to take these input parameters
and the callback URL that are sent from the System.Webview
component. You can configure the app to access the incoming
payload in various ways, but to make things easy, we're going
to add placeholders that match the names of the source
variables to the <script> block and prefix
each of them with webview. At runtime, these
placeholders will be replaced by the respective data and the
callback URL (webview.onDone), which is a
JSON-encoded string.
To make this change in the FinancialDispute application:
Select financialdispute in the left
navigation pane and then click HTML .
Description of
the illustration.
Take a look at the following code in script block:
What you just did: In this section, we updated the
Oracle Visual Builder web application, so that it should be
able to fetch the input variables and callback URL from the
FinancialDisputeBot skill. The Oracle Visual Builder
application is now ready. In the next step we will export and
optimize this app so that it can be hosted in Oracle Digital
Assistant local container.
Export
and Build the Oracle Visual Builder Application
To deploy the Oracle Visual Builder application to Oracle
Digital assistant, you need to export it and build it with
Grunt. As part of the build process, you'll compile the app into
a format that can be consumed by the Oracle Digital Assistant
local container.
Export the Oracle Visual Builder Application
To export the app:
Go to Oracle Visual Builder Home page by clicking the Home
icon located
at the upper left and then click All Applications
from the left menu.
Locate the row for your app, and then expand the
Application Options menu .
The application will be downloaded on your local machine.
Build the Oracle Visual Builder Application
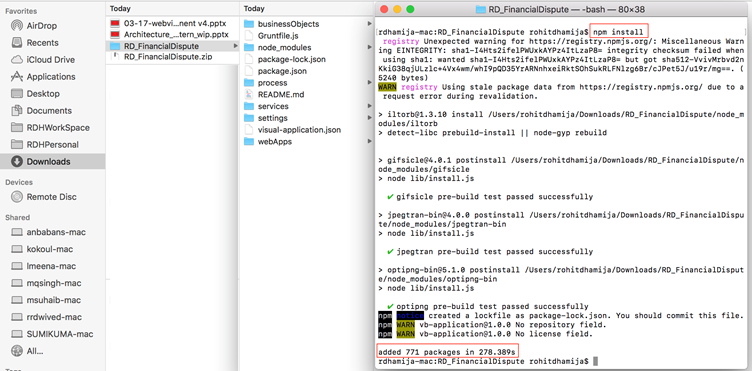
Unzip your application and then run npm install
on the root folder. This will install the node dependencies
required to build the application. The install command
retrieves the grunt-vb-build NPM package
defined in the package.json file.
Description of
the illustration.
Navigate to build > optimized
> webapps >
financialdispute. The index.html
file and the version_* folder are both in this
directory:
Description of
the illustration.
Open your command prompt and then navigate to the financialdispute
directory (build > optimized
> webapps > financialdispute).
An archived file named financial_dispute_form.tgz
is created. Your Oracle Visual Builder application has
been exported and optimized, and at this point, it can be
consumed by Oracle Digital Assistant.
Create
the Webview Service
In this step, you'll create the Webview Service that
registers the Oracle Visual Builder app. To complete this task,
you'll need the financial_dispute_form.tgz
file.
In Oracle Digital Assistant, open your
FinancialDisputeBot skill (if it's not already open).
Click Create. The service will be listed
under Webview tab. If Oracle Digital Assistant can't create
the service with your TGZ, upload the version financial_dispute_form.tgz
that we provide, which is located in the resources folder. Description
of the illustration.
Click Flows in the left navbar and then
click Validate. There should be no more
errors now since the service is created.
Test
the Skill
Click
to open the Skill Tester.
Enter hi.
Enter your first and last name.
Enter the dispute amount. For example, enter 100
USD.
When prompted, select Tap to Continue.
The Financial Dispute application opens in another browsers
tab. Note that the fullname and amount
values are passed to the web application.
Description of the
illustration.
Complete the form (the main page of the app) by first
choosing an option and then by clicking Submit
Dispute. Description of the illustration.
Click Submit. The screen will be
redirected to next page and a call will be made back to the
skill.
Description of the
illustration.
Summary
Through this tutorial, you found out how a skill can pass
values to, and receive values from, a web app by configuring the
dialog flow with the System.Webview component. You
also learned how to configure the Oracle Visual Builder SPA to
receive values and pass them back to the skill and how to build
an optimize the app so that it can be hosted within Oracle
Digital Assistant.
 Create
a Webview from an Oracle Visual Builder Application
Create
a Webview from an Oracle Visual Builder Application Before You Begin
 Prepare
the Skill
Prepare
the Skill in the top left corner to open the side menu.
 (located at the top right) to open the Skill Tester.
 to dismiss the tester.

 in the left navbar.

 Prepare
the Oracle Visual Builder Web App
Prepare
the Oracle Visual Builder Web App


 . Otherwise, click financialdispute,
and then HTML
. Otherwise, click financialdispute,
and then HTML  .
.


 . Take a
look at the function that's invoked when a user clicks the
Submit or Cancel buttons. It makes a POST call to the
callback URL that's received from the skill. This call
includes the parameters that were received from the Submit
or Cancel buttons.
. Take a
look at the function that's invoked when a user clicks the
Submit or Cancel buttons. It makes a POST call to the
callback URL that's received from the skill. This call
includes the parameters that were received from the Submit
or Cancel buttons.


 Export
and Build the Oracle Visual Builder Application
Export
and Build the Oracle Visual Builder Application located
at the upper left and then click All Applications
from the left menu.
located
at the upper left and then click All Applications
from the left menu. .
.


 Create
the Webview Service
Create
the Webview Service  in the left navbar and then
select the Webview tab.
in the left navbar and then
select the Webview tab.


 Test
the Skill
Test
the Skill


 Summary