Before you Begin
This 30-minute tutorial shows you how to create a SQL dialog with Oracle Digital Assistant.
Background
SQL Dialogs are skills that enable users to interact with databases using natural language, not SQL queries. Users don't need to know SQL or anything about the database schema to retrieve information. Instead, they can query the database using a conceptual understanding of the information. A SQL dialog skill can translate a user's natural language utterances into SQL queries, send the queries to a backend data source, and display the response. For the scenario presented in this tutorial, you're going to query an employee database through a skill to find out individual employee information, office location, and head count by location.
What Do You Need?
- Access to Oracle Digital Assistant
- Access to Oracle Database Cloud Service Enterprise Edition
Tip:
You can request a free trial of Oracle Cloud Service Enterprise Edition instance if you don't already have access to one. To complete this tutorial, you must also provision ATP (Oracle Autonomous Transaction Processing) on your trial instance.Create the Employee Database
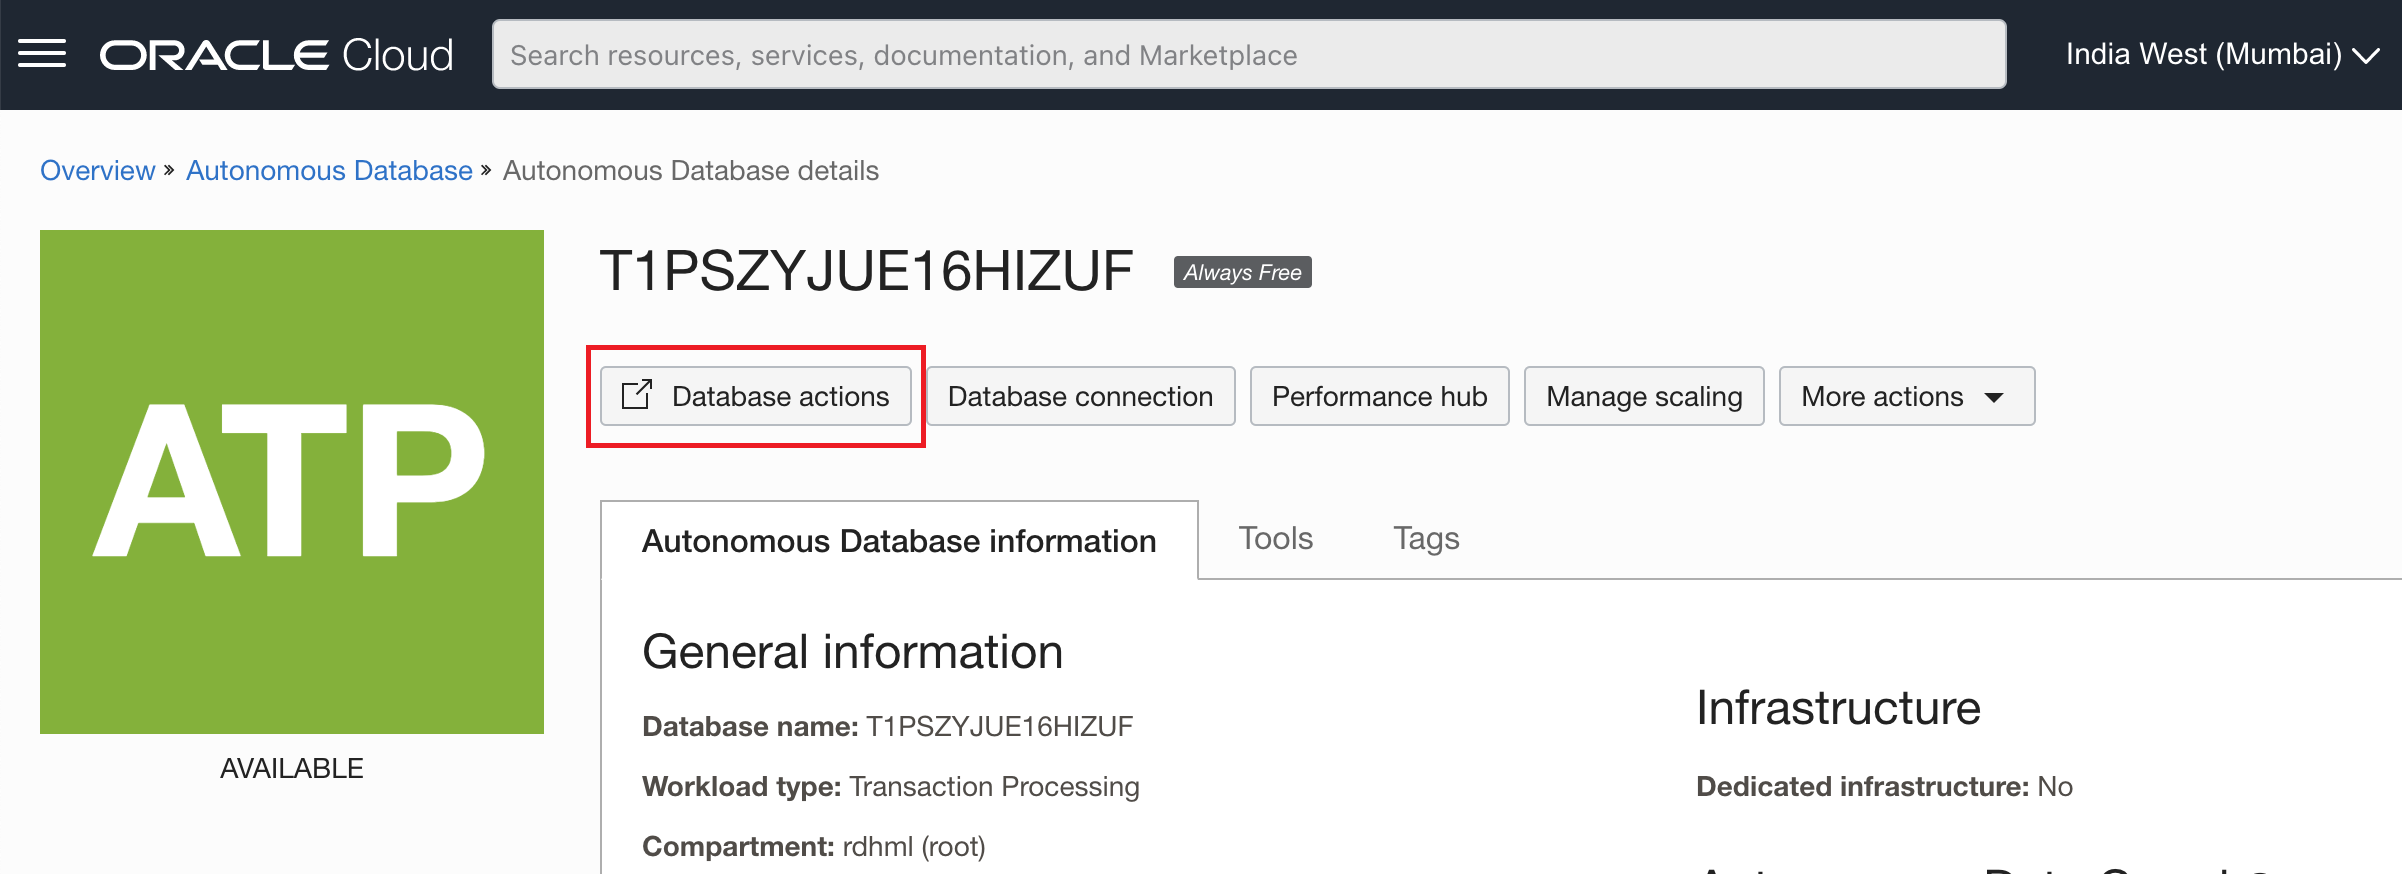
To create the database tables, you need to execute a SQL script from your Oracle Database Cloud Service Enterprise Edition instance (workload type Oracle Autonomous Transaction Processing).
- Go to your Autonomous Database instance and then click Database Actions.
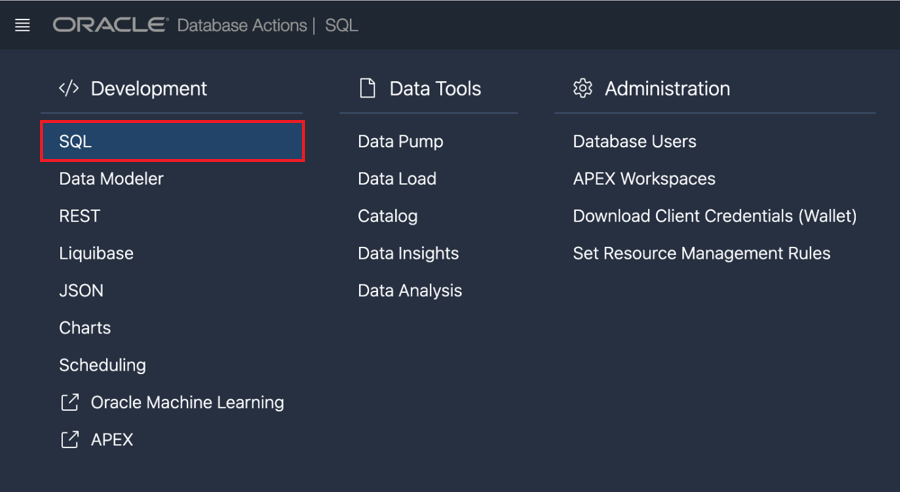
- Select SQL.
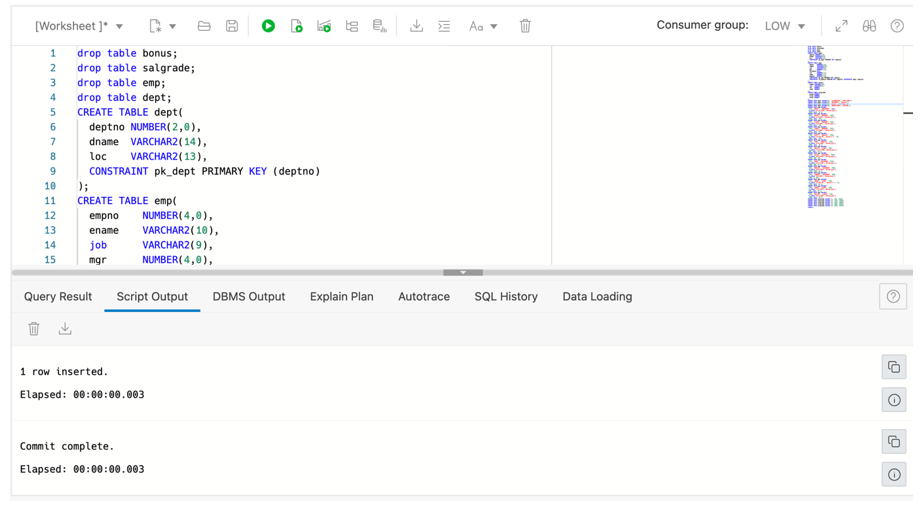
- Select New File and then select Worksheet.
- Paste this script into the worksheet.
- Click Run Script and then select Run as SQL.
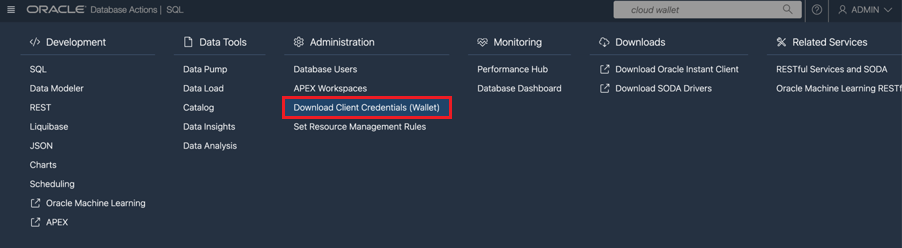
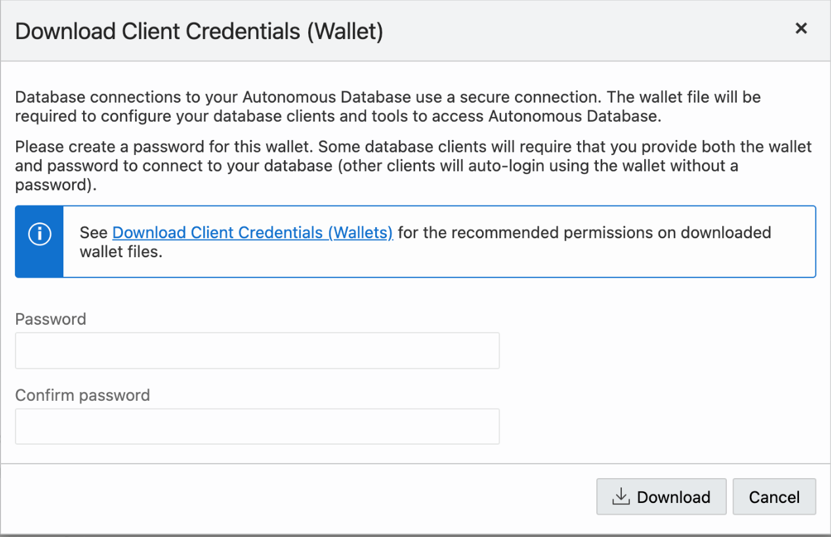
- Click Download Client Connections (Wallet).
- Download the cloud wallet file.
Note:
For Oracle Digital Assistant integration, a wallet password must be at least 15 characters, but no more than 64 characters. It must contain at least one uppercase character, one lowercase character, one special character, and one number. It also can't start with a digit. Remember the user name and the user password. You will need them to connect the database to Oracle Digital Assistant.
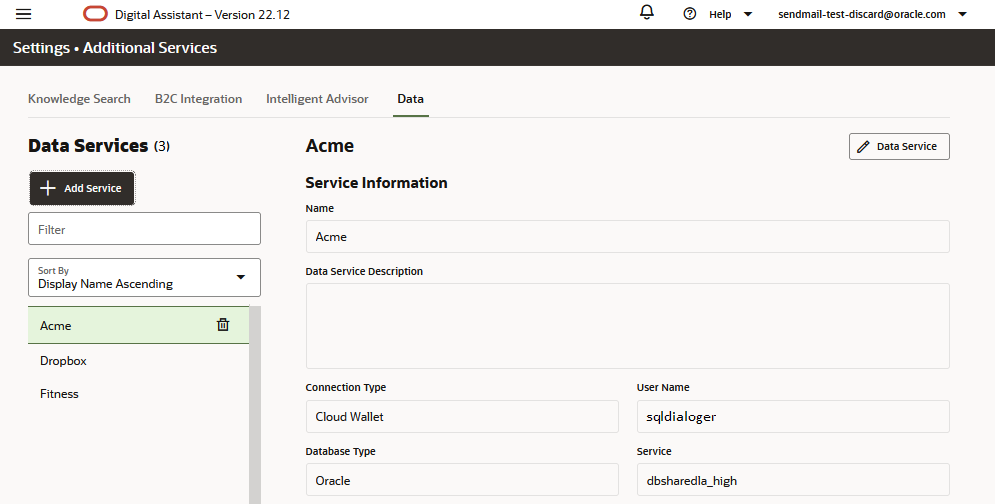
Connect Digital Assistant to the Data Service
Before you can access a data service from any SQL Skill, you need to add a data service integration that enables Oracle Digital Assistant to access the data service. You only need one integration per data service.
Note:
After you create the service, you can't change it. Should the password change, you'll need to delete and recreate the data service integration.- Log into Oracle Digital Assistant.
- Click
 in the top left corner to open the side menu.
 - Expand Settings and then choose Additional Services.
- Open the Data tab then click + Add Service to open the New Data Service dialog.
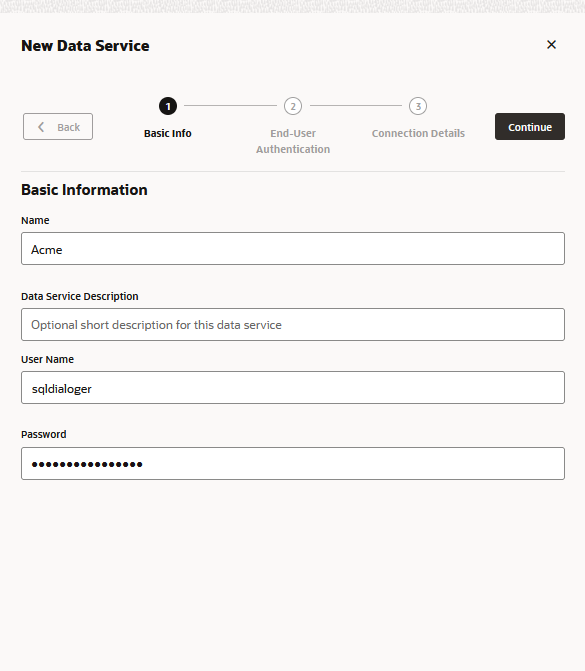
- Enter the following into the Basic Info page:
Property Value Name Enter a unique name for the service. Data Service Description An optional description of the data service integration such as a description of the database or the purpose. User Name Ask your database administrator for the user name and password. Password The user password. For Oracle Digital Assistant integration, a password must be at least 14 characters but no more than 64 characters. It must contain at least one upper case character, one lowercase character and one number. It also can't start with a digit. - Click Continue to skip past the End User Authentication page and navigate to the Connection Details page.
-
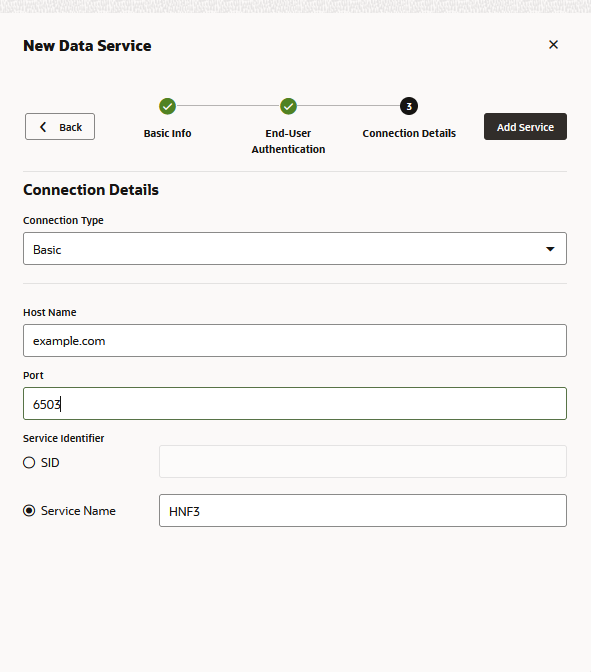
Select Basic or Cloud Wallet Connection for the authentication service.>
- For the Basic connections:
Name Value Host Name Enter the host for the data service. Do not include the scheme ( https://). For example, just enterexample.com.Port The port that allows client connections to the database. Service Name Do one of the following: - Select SID and enter the Oracle system identifier of the database instance.
- Select Service Name and enter the service name for the database.
- For Cloud Wallet connections:
Name Value Wallet File Navigate to, and select, the cloud wallet file that contains the client credentials, or drag and drop it into the field. Wallet Password Enter the password that was provided when the wallet file was downloaded. For Oracle Digital Assistant integration, a wallet password must be at least 15 characters, but no more than 64 characters. It must contain at least one uppercase character, one lowercase character, one special character, and one number. It also can't start with a digit. Service Select the name of the database service.
Description of the illustration 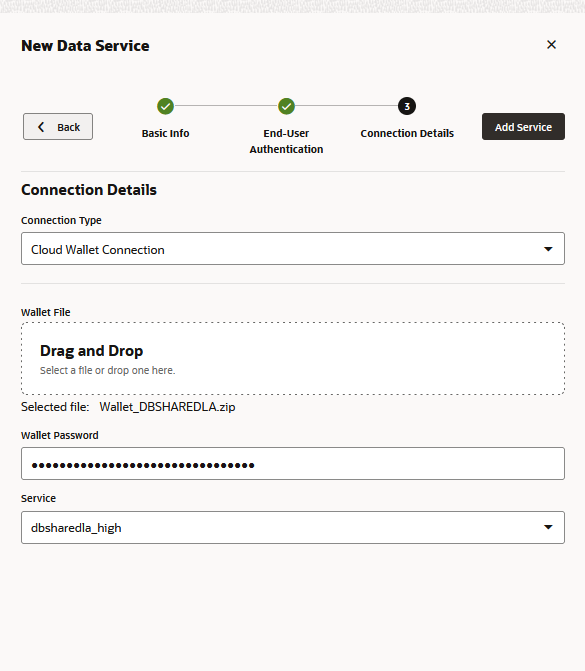
Description of the illustration - For the Basic connections:
- Click Add Service. With the connection complete, you can import the database schema into SQL skills to create query entities, which enable users to query the database using natural language.


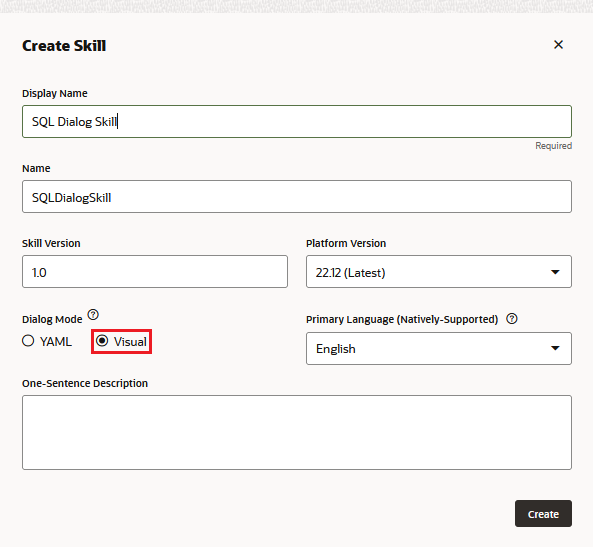
Create the SQL Dialog Skill
Create a skill with the dialog mode set to Visual (the default setting).
- In the left menu, click Development, then choose Skills.
- Click + New Skill.
- Hide the side menu by clicking again.
- Name the skill.
- Ensure that Visual (the default setting) is selected as the Dialog Mode. You can only create SQL dialogs for skills written in visual mode.
- Click Create. You are now ready to import the database schema, which, in turn, creates query entities that model the data service.

Import the Database Schema
You enable data service queries in an SQL skill by creating a logical model that's based on the data service's physical model (the tables and columns). You create the base logical model by importing information about the tables from the data service. During the import, the skill adds query entities, which represent the tables, to the logical model.
When you train your skill, it uses the information from the query entities to build a model for the natural language parser, which enables the skill to translate user utterances into OMRQL (Oracle Meaning Representation Query Language). OMRQL is a query language that's like SQL but is based on object models, which, in this case, are the query entities.
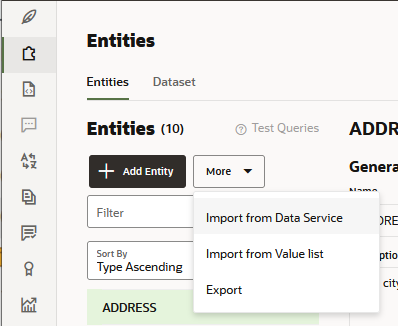
To create query entities for the desired tables in your data service:
- Click Entities
 in the left navbar.
 - Click More, then select Import from Data Service.
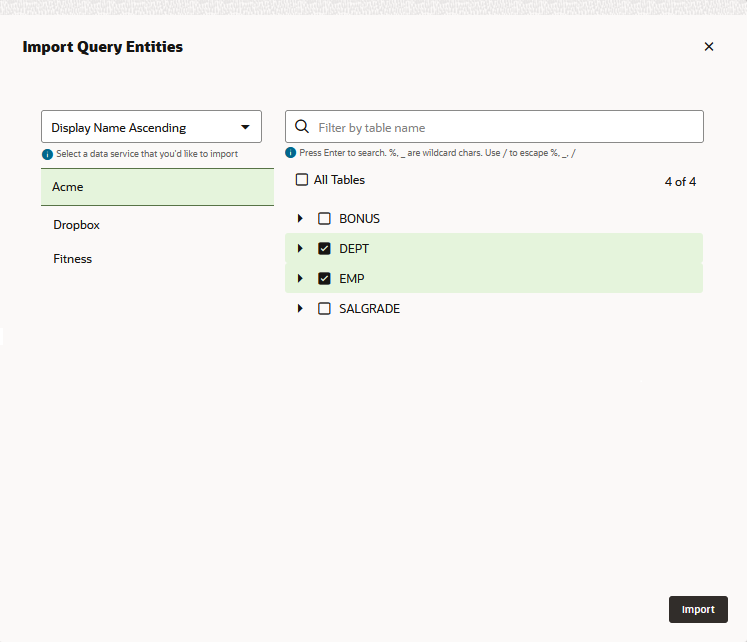
- Select the data service that you created, and then select the
EMPandDEPTtables. - Click Import. The skill adds EMP and DEPT query entities for the selected tables.
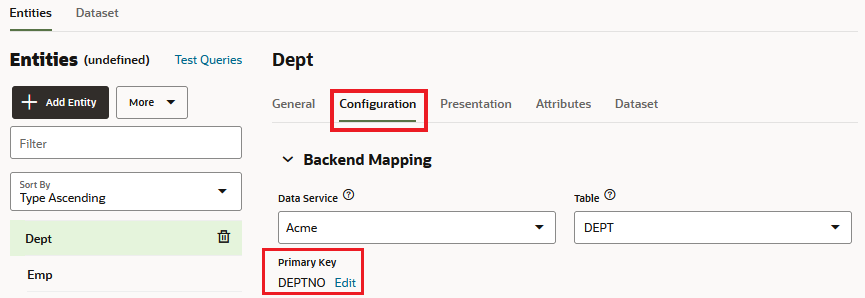
- Open the Configuration tab and then select both entities to verify that primary keys were set.
- (Optional) For each query entity, set the default order on the General tab, and set the default and minimum attributes on the Configuration tab.
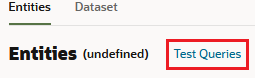
- Test the queries:
- Click Train and then select Trainer Tm.
- After training completes, click Test Queries to open the Query Tester.
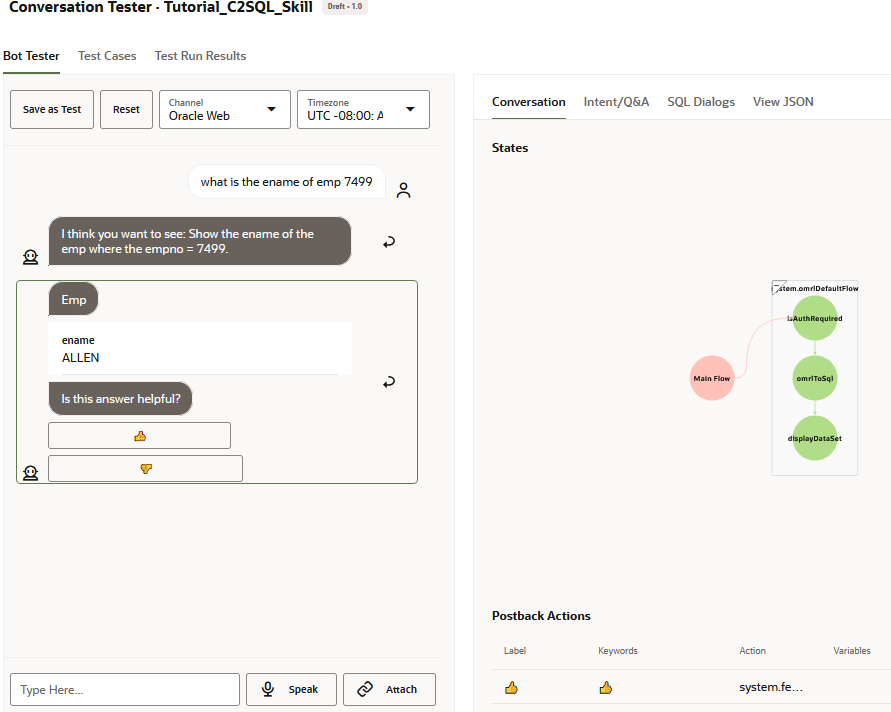
- Try out utterances, such as "show all emp", "how many emp are there", "show all dept", and "what is the ename of emp 7499" to review the OMRQL query generated by the skill.

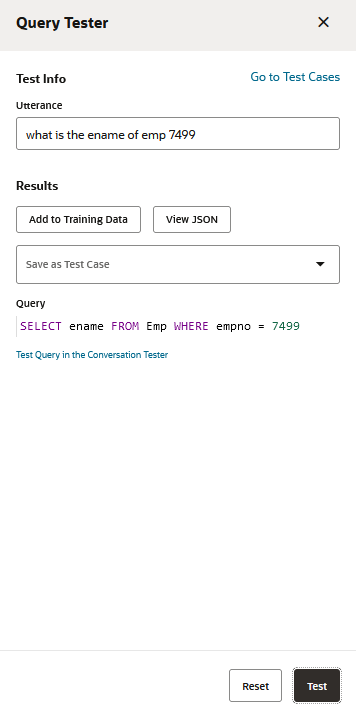
Description of the illustration - Click Test Query in the Conversation Tester.
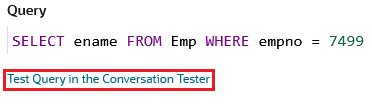
Review the data returned by the query.
Add Natural Language Names and Synonyms for the Query Entities
In this step, you're going to help the skill associate natural language names with the underlying data structure (the physical model) by identifying common names for each query entity and by identifying other ways (synonyms) that people may refer to the query entities.
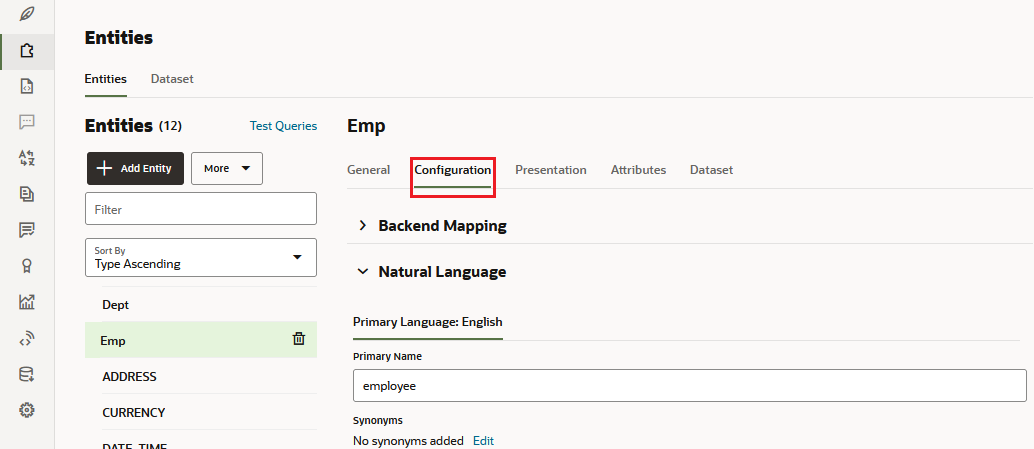
- Select the Emp entity.
- Open the Configuration tab. If needed, expand Natural Language.
- In the Primary Name field, change the value to employee.
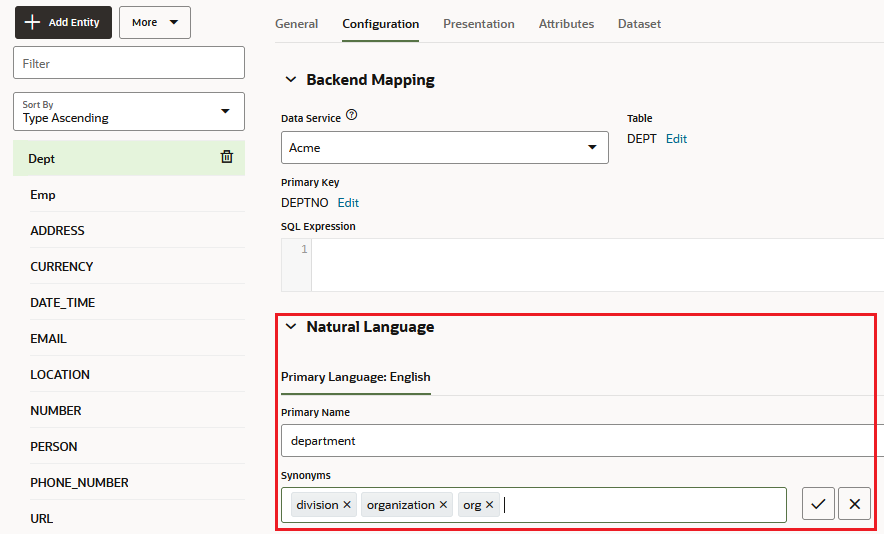
- Select the Dept entity.
- Enter department in the Primary Name field.
- Click Edit (located beneath Synonyms).

- For the Dept Query entity, enter the following synonyms:
- division
- organization
- org
Note:
Click Enter after each entry. - To save your changes and close the editor, click
 .
.
Add Natural Language Names and Synonyms for the Attributes
In this step, you're going to identify the commonly used names for each attribute.
To add natural language names and synonyms:
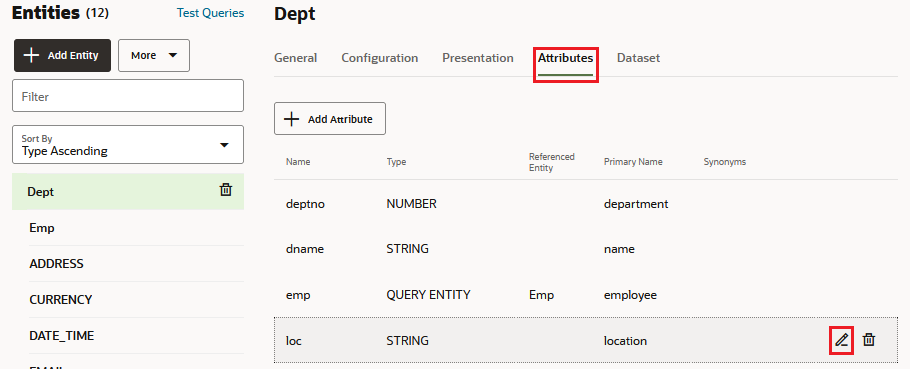
- Select the Dept query entity.
- Open the Attributes tab.
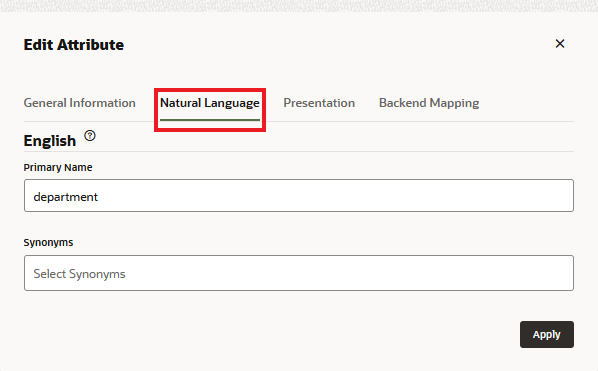
- Select the deptno attribute.
- Click Edit
 to open the Edit Attribute dialog.
 - Open the Natural Language tab.
- Enter department in the Primary Name field.
- Click Apply.
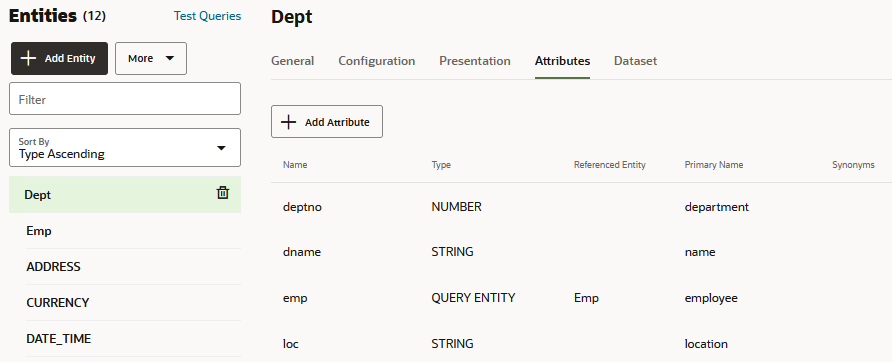
- Repeat these steps to complete the primary name values for the remaining Dept query entity attributes and to add new primary names Emp query entity attributes.
- For the Dept query entity, update the primary values as follows:
For This Attribute... Update the Primary Name Using This Value dname name emp employee loc location - For the Emp query entity attributes, update the primary values as follows:
For this Attribute... ...Update the Primary Name Using This Value comm commission dept department name empno employee number
- For the Dept query entity, update the primary values as follows:
Associate Attributes with Value Lists
To improve accuracy, you can create value lists that contain sample values from the data service. The skill automatically associates these lists with their respective attributes, which helps the natural language parser understand the kinds of values those attributes can hold.
To create a value list entity from an attribute:
- Select the DEPT query entity.
- Open the Attributes tab.
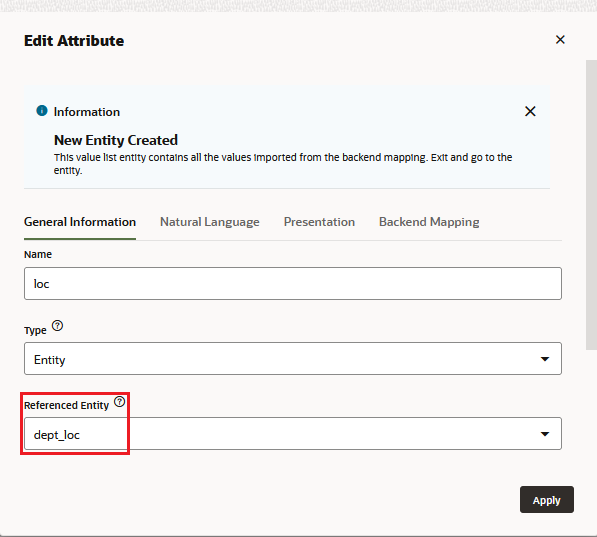
- Select the loc attribute and then click Edit to open the Edit Attribute dialog.
- Open the General Information tab.
- Select Entity from the Type menu to change the attribute's type.
- Click the If the desired entity doesn't exist, you can generate a value-list entity based on the backend mapping by clicking here link to create a value list entity based on the values found in the data service's schema.

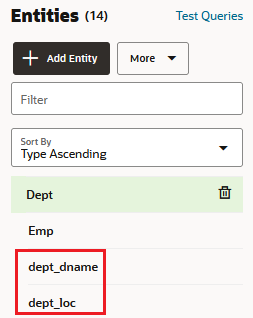
After a few seconds, a new value list is created named<query entity_name>_<attribute_name>and is automatically selected in the Referenced Entity field. For the loc attribute, the value is dept_loc. - Click Apply.
- Repeat these steps to create value list entities for the dname attribute. The value list entities generated for the attributes display in the entities list.

Add Synonyms to the Value Lists
In this step, you'll add synonyms to the value list entities so that users can refer to the values in different ways.
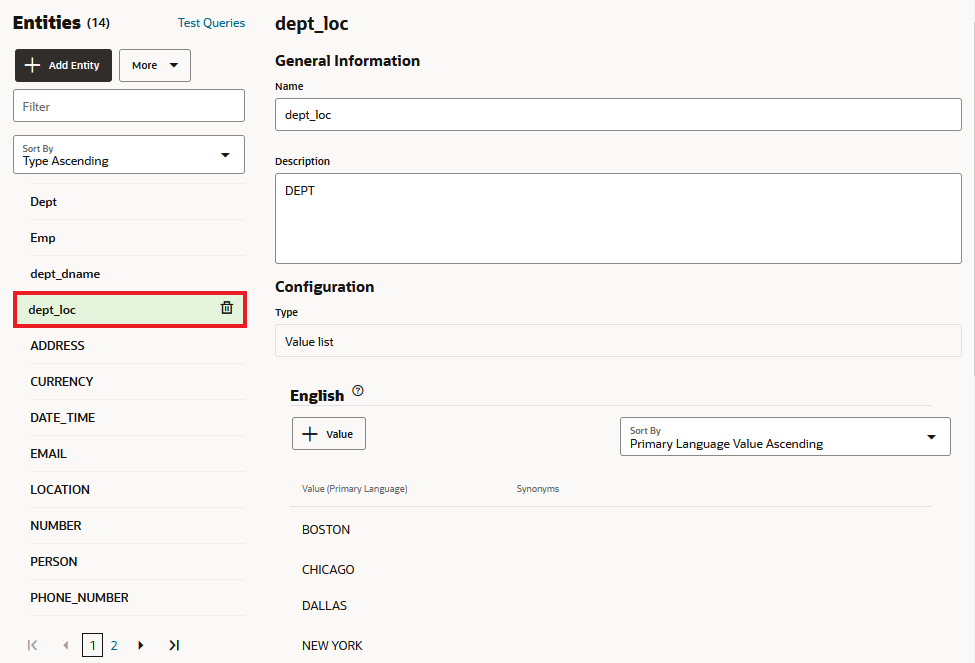
- Select the dept_loc value list entity from the entities list.
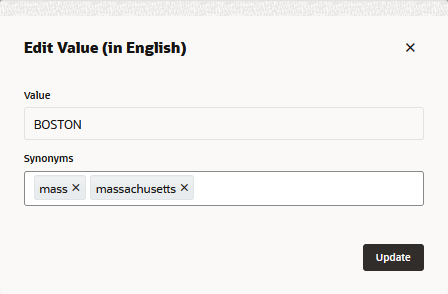
- In the Value (Primary Language) section, select BOSTON, then click Edit to open the Edit Value dialog.
- Enter mass in the Synonyms field and then click Enter. Then enter massachusetts and click Enter.
- Click Update.
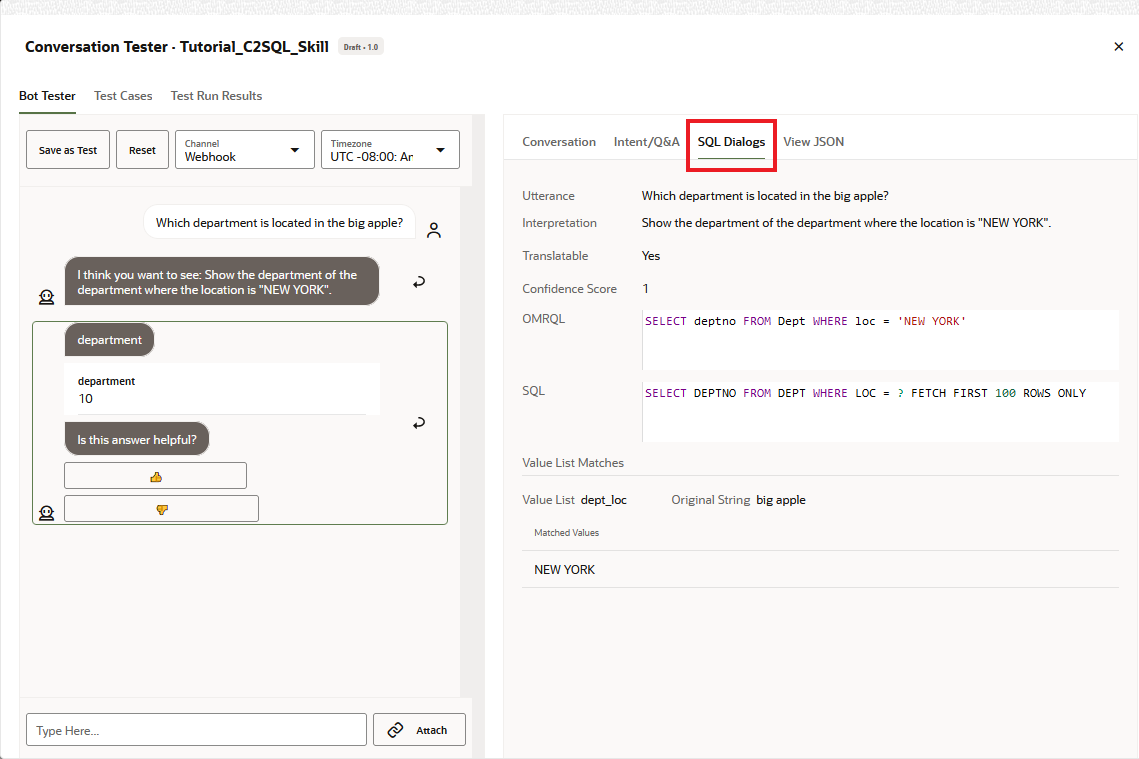
- Repeat these steps to add synonyms to the CHICAGO, DALLAS, and NEW YORK values.
For This Value... ...Add This Synonym CHICAGO illinois DALLAS texas NEW YORK big apple 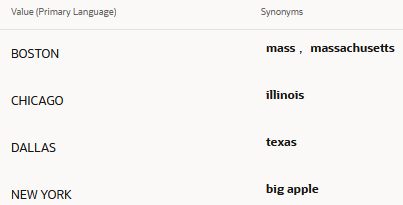
Description of the illustration

Test Queries Using the Primary Names, Synonyms, and Value List Values
After you add the primary names, synonyms, and value lists, re-train the skill, and then click Preview and test how these help users make queries using a more natural language. Here are some example queries you can try in the tester:
- Click Train and then select Trainer Tm.
- After training completes, click Preview to open conversation tester.
- Enter the following queries into the tester. Click Reset after each conversation.
- List the organizations
- How many orgs are there?
- How many divisions are there?
- Show me department 10
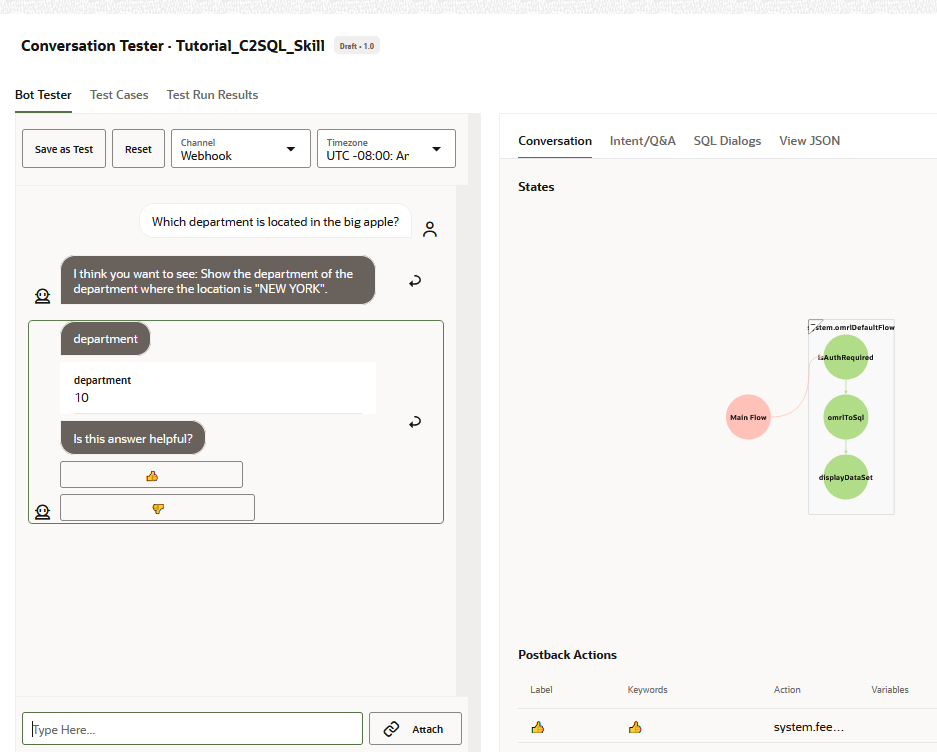
- Which department is located in the big apple?
- How many orgs are there in Texas?
- How many employees work in the big apple?
- Close the Conversation Tester.

Notice that on the SQL Dialogs tab, you can see the generated OMRQL and SQL for the utterance.
Optional Step: Train with Custom Data
There may be natural language utterances that the skill can't translate to OMRQL. It might be a misinterpretation, or perhaps the model can't handle the domain-specific synonyms that don't seem to be closely related to the primary name. Another example is when the model is not able to distinguish between two similar entities. When this happens, you can use the query entity dataset to teach the skill how to correctly parse the utterance.
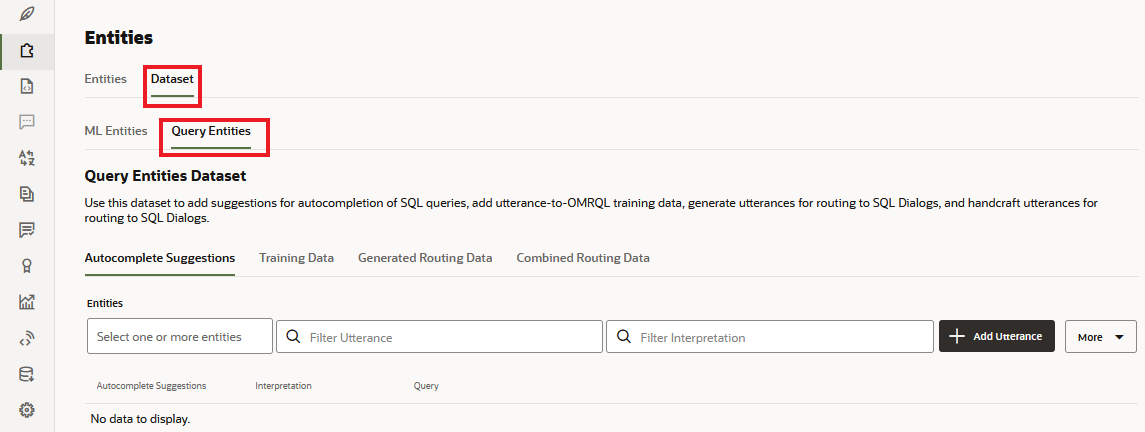
For any of these scenarios, we recommend that you start with 20 utterances and add more as needed. Because too many examples might cause the model to over predict attributes and operators, you should focus on a smaller set of diverse utterances rather than a large set of similar, lesser quality ones.To add custom data from the Dataset tab:
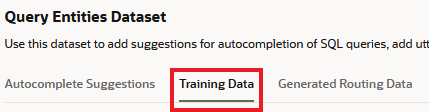
- On the Entities page, click the Dataset tab, and click the Query Entities tab.
- Open the Training Data tab.
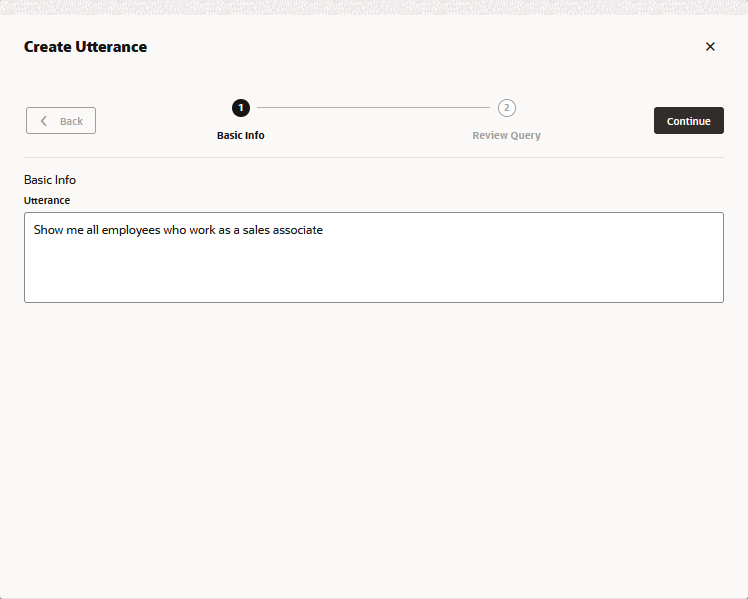
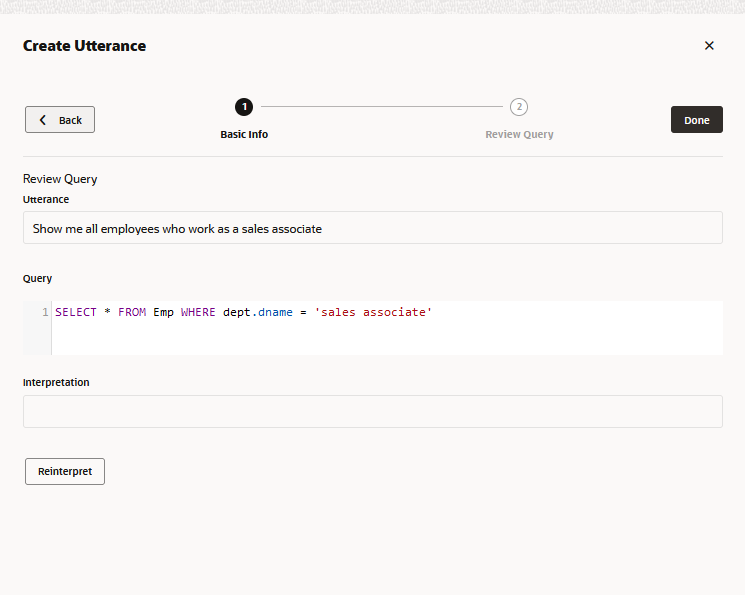
- Click Add Utterance to open the Create Utterance dialog.
- Enter the utterance and then click Continue.
- Review the generated OMRQL query. For example, try the following utterances:
- show the average commission that a salesperson earns
- For employees who have the salesperson job, what is the average commission
- tell me what the average commission is for a person in the salesperson role
- what is the average commission of people with the role of salesman
- what's the avg salesperson's commission
- Which employee has the highest salary?
- Show employee name and department name ordered by the salary in ascending order
- Click Done to add the utterance to the dataset.
- When you're done, retrain the skill and then try these queries -- along with similar ones -- in the Query Tester or the Conversation Tester.
OMRQL Keyword Reference
Here are the OMRQL keywords that you can use when you define OMRQL queries for the utterances for the data query entities dataset.
Note:
You can use the canonical names from the database schema. You cannot use primary names and synonyms.| Component | OMRQL Keywords | OMRQL Example |
|---|---|---|
| Basic Components |
|
SELECT * FROM emp |
| Filtering | WHERE Currently, you can't add custom training data that filters by date or date-time. |
SELECT * FROM emp WHERE comm > 0 |
| Linking entities (link to attributes) | . (period) |
SELECT * FROM emp WHERE dept.loc = 'NYC' |
| Ordering |
|
SELECT name FROM emp ORDER BY hiredate DESC LIMIT 10 |
| Aggregate Functions |
|
SELECT AVG(sal) from emp |
| Grouping |
|
SELECT COUNT(*) FROM emp GROUP BY dept.loc HAVING dept.loc = 'NYC' |
| Comparison Operators |
|
SELECT * from dept WHERE name IN ('SALES', 'HR') |
| Logical Operators |
|
SELECT name FROM emp WHERE sal > 100000 AND role = 'VP' |
With the exception of linking entities, the OMRQL components are similar to SQL. Instead of an SQL JOIN, you use a pair of link attributes to link one entity to another. Attribute links have primary names and synonyms that define the relationship between the entities. For example an employee/department attribute link with a one-to-one relationship can have a primary name, department, and synonyms works in, belongs to, and team. A department/employees attribute link with a one-to-many relationship can have a primary name employees and synonyms members, and workers.
Besides the typical primary key/foreign key link attributes, you also can have these types of link attributes:
- Multiple link attributes from one entity to another that define multiple semantic relationships.
- A link attribute from an entity to itself that implies a self join.
Here are some examples of how to write OMRQL for your utterances:
| Utterance | SQL | OMRQL | Comments |
|---|---|---|---|
| Show me all employees who work as a sales associate | SELECT * FROM emp WHERE job = 'SALESMAN' |
SELECT * FROM emp WHERE job = 'SALESMAN' |
OMRQL is identical to SQL. |
| Show me all employees who work in sales department | SELECT * FROM emp AS T1 JOIN dept AS T2 ON T1.deptno = T2.deptno WHERE T2.dname = 'SALES' |
SELECT * FROM emp WHERE dept.name = 'SALES' |
Instead of a JOIN, use "link_attribute.attribute_name" to refer to an attribute from another entity. |
| Adams is a member of what department? | SELECT * FROM dept AS T1 JOIN emp AS T2 ON T1.deptno = T2.deptno WHERE T2.ename = 'ADAMS' |
SELECT * FROM dept WHERE emp.name = 'ADAMS' |
Instead of a JOIN, use "link_attribute.attribute_name" to refer to an attribute from another entity. |
| What is the department location and job role of employee Adams | SELECT T1.LOC, T2.JOB FROM DEPT T1 JOIN EMP T2 ON T1.DEPTNO = T2.DEPTNO WHERE T2.ENAME = 'ADAMS' |
SELECT loc, emp.job FROM dept WHERE emp.ename = 'ADAMS' |
Note how the OMRQL is simpler to write than the SQL. |
| How many employees are there for every job role? | SELECT COUNT(*), job FROM Emp GROUP BY job |
SELECT COUNT(*), job FROM Emp GROUP BY job |
The OMRQL is identical to SQL. |
| Which employee has the highest salary? | SELECT * FROM emp ORDER BY salary DESC LIMIT 1 |
SELECT * FROM emp ORDER BY salary DESC LIMIT 1 |
The OMRQL is identical to SQL. |
| Show employee name and department name ordered by the salary in ascending order | SELECT T1.ename, T2.dname FROM Emp AS T1 JOIN Dept AS T2 ON T1.deptno = T2.deptno ORDER BY T1.sal ASC |
SELECT ename, dept.name FROM Emp ORDER BY salary ASC |
Note how the OMRQL is simpler to write than the SQL. |
Learn More
Get Started with SQL Dialogs
F75359-01
January 2023
Copyright © 2023, Oracle and/or its affiliates.
Shows you how to create a SQL dialog for Oracle Digital Assistant skills.
This software and related documentation are provided under a license agreement containing restrictions on use and disclosure and are protected by intellectual property laws. Except as expressly permitted in your license agreement or allowed by law, you may not use, copy, reproduce, translate, broadcast, modify, license, transmit, distribute, exhibit, perform, publish, or display any part, in any form, or by any means. Reverse engineering, disassembly, or decompilation of this software, unless required by law for interoperability, is prohibited.
If this is software or related documentation that is delivered to the U.S. Government or anyone licensing it on behalf of the U.S. Government, then the following notice is applicable:
U.S. GOVERNMENT END USERS: Oracle programs (including any operating system, integrated software, any programs embedded, installed or activated on delivered hardware, and modifications of such programs) and Oracle computer documentation or other Oracle data delivered to or accessed by U.S. Government end users are "commercial computer software" or "commercial computer software documentation" pursuant to the applicable Federal Acquisition Regulation and agency-specific supplemental regulations. As such, the use, reproduction, duplication, release, display, disclosure, modification, preparation of derivative works, and/or adaptation of i) Oracle programs (including any operating system, integrated software, any programs embedded, installed or activated on delivered hardware, and modifications of such programs), ii) Oracle computer documentation and/or iii) other Oracle data, is subject to the rights and limitations specified in the license contained in the applicable contract. The terms governing the U.S. Government's use of Oracle cloud services are defined by the applicable contract for such services. No other rights are granted to the U.S. Government.
This software or hardware is developed for general use in a variety of information management applications. It is not developed or intended for use in any inherently dangerous applications, including applications that may create a risk of personal injury. If you use this software or hardware in dangerous applications, then you shall be responsible to take all appropriate fail-safe, backup, redundancy, and other measures to ensure its safe use. Oracle Corporation and its affiliates disclaim any liability for any damages caused by use of this software or hardware in dangerous applications.
Oracle and Java are registered trademarks of Oracle and/or its affiliates. Other names may be trademarks of their respective owners.
Intel and Intel Inside are trademarks or registered trademarks of Intel Corporation. All SPARC trademarks are used under license and are trademarks or registered trademarks of SPARC International, Inc. AMD, Epyc, and the AMD logo are trademarks or registered trademarks of Advanced Micro Devices. UNIX is a registered trademark of The Open Group.
This software or hardware and documentation may provide access to or information about content, products, and services from third parties. Oracle Corporation and its affiliates are not responsible for and expressly disclaim all warranties of any kind with respect to third-party content, products, and services unless otherwise set forth in an applicable agreement between you and Oracle. Oracle Corporation and its affiliates will not be responsible for any loss, costs, or damages incurred due to your access to or use of third-party content, products, or services, except as set forth in an applicable agreement between you and Oracle.