Before you Begin
This 45-minute tutorial shows you how to use the Oracle Digital Assistant Native Client SDK for Web (also known as the ODA Web SDK) to add a chat window that communicates with an Oracle Digital Assistant skill to your website. You'll start with a basic web interface and then learn how to use the SDK to customize and enhance the look and feel.
This is the first tutorial in a series:
- Access a Skill from Your Website
- Secure Your Web App Chat with Client Authentication
Background
While your customers can access your skills through many platforms, such as Android apps, Twilio SMS, Facebook Messenger, WeChat, and Slack, they also can access skills directly from your website through the ODA Web SDK. This feature gives your customers the opportunity to ask questions, complete transactions, resolve problems, and so on, as they browse your web pages.
The SDK's features include:
- Configurable components, such as
- Timestamp display
- Chat bubble size and padding
- Font color and size
- Custom buttons and icons
- Chat widget size
- Multi-lingual chat
- Draggable launch button
- TTS support/Message narration
- Autocompletion of text
- JWT client authentication
- Voice recognition/Voice messages
What Do You Need?
- Firefox
- Chrome
- Safari
- Edge
Set Up Folders
Let's start by creating a folder and adding the necessary artifacts.
- The chat-page.zip contains the starter files for the web page and chat widget. Download this file and then extract it to your local system. The downloaded chat-page file contains an
index.htmlfile and thecss,images, andscriptssubfolders. In this tutorial, your work will focus on theindex.htmlfile and thescriptssubfolders. - Download and extract the latest ODA Web SDK to your system. Copy the
web-sdk.jsfile (located innative-client-sdk-js<version number>/native-client-sdk-js) to thescriptssubfolder ofchat-page(chat-page/scripts). - In the top folder (
chat-page), openindex.html(chat-page/index.html) in a browser to take a look at the initial web page.
Set Up Your Skill
We've provided a pizza ordering skill. Follow these steps to import it into your instance and then train it.
- In your Oracle Digital Assistant instance, click the hamburger icon
 to open the side menu, and
then click Development > Skills.
to open the side menu, and
then click Development > Skills.
-
Search for
Web SDK Order Pizza. - If your instance doesn't have this skill, then do these steps:
- Download Web_Tutorial_1.zip to your system.
- On the Skills page in your Digital Assistant instance, click
Import Skill and import the downloaded ZIP file.
Tip:
If you don't see the imported skill, try reloading the page.
- On the
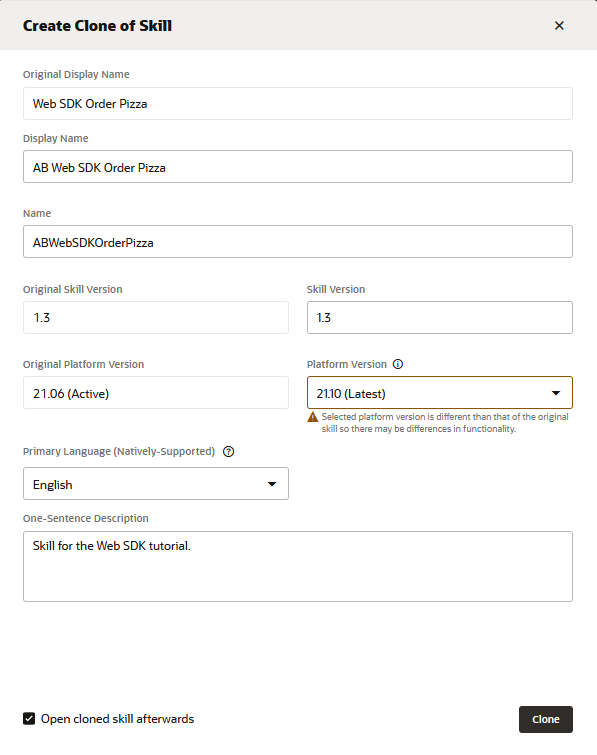
Web SDK Order Pizzacard, click Options and then click Clone.
 - Give the cloned skill a unique name. For example, prepend
WebSDKOrderPizzawith your initials, such asABWebSDKOrderPizza.Note:
The name must begin with a letter and can contain only letters, numbers, periods, and underscores. It can't exceed 100 characters. -
Provide a display name, such as
AB Web SDK Order Pizza, and leave all other values as they are. - Select Open cloned skill afterwards.
- Click Clone.
-
Click Train (located at the upper right). Ensure that Trainer Ht is selected, and then click Submit to train the skill.

Note:
For this tutorial, you're going to use Trainer HT because of its fast training. For production work, use the deep learning model, Trainer Tm. -
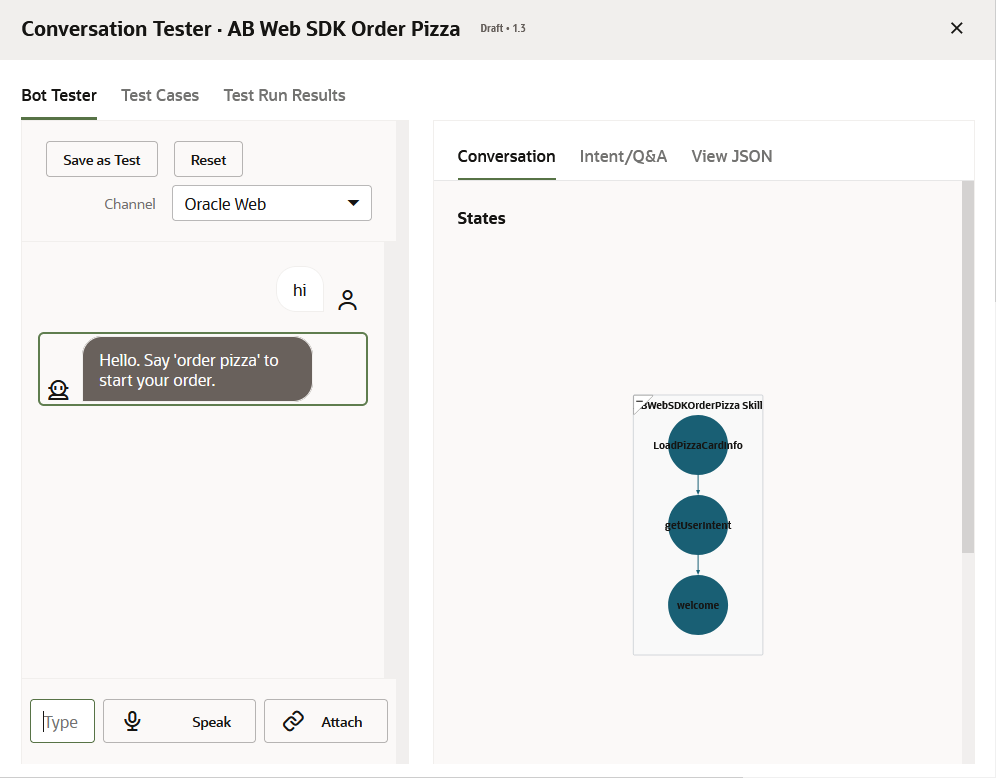
Optionally, click Preview to open the Skill Tester.
Select the Oracle Web channel, and then enter
hito try out the skill.When you are done, close the tester.
Create an Oracle Web Channel
You use an Oracle Web channel to enable an Oracle Web chat widget to connect to your skill.
For the purposes of this tutorial, you won't restrict the allowed domains, nor will you enable client authentication. For production work, however, you should do both, as described in Secure Your Web App Chat with Client Authentication.
- In the left Navigation menu, click Channels. Ensure that the Users page is open.
- Click + Add Channel.
- Set these values:
- Name: A unique name for the channel, such as
ABOracleWebChannel - Description:
Channel for the Web SDK tutorial. - Channel Type:
Oracle Web - Allowed Domains:
*(asterisk) - Client Authentication Enabled: Switch to off.
- Session Expiration (minutes): Use the default value.
- Name: A unique name for the channel, such as
- Click Create.
- Select the channel that you just created. Then, from the Route To drop-down list, choose the skill that you just created.
-
Switch Channel Enabled to on.

- Make a note of the Channel ID because you will need it when you configure your chat widget.
- The chat widget configuration also needs the Oracle Digital Assistant host and domain name from the instance's URL, which appears in the browser's address field, so make a note of that too.
Your instance is now set up for you to connect the pizza ordering skill to a web page's chat bot.
Add a Chat Widget to the Web Page
To get started, you'll create settings.js, add add a chat widget to the file, and set some essential configurations.
-
In the
scriptsfolder (chat-page/scripts), create a file namedsettings.js. Then open it in an editor. - Copy and paste the following code into the
settings.jsfile.'use strict'; /** * Initializes the SDK and sets a global field with passed name for it the can * be referred later * * @param {string} name Name by which the chat widget should be referred */ function initSdk(name) { // Retry initialization later if WebSDK is not available yet if (!document || !WebSDK) { setTimeout(function () { initSdk(name); }, 2000); return; } if (!name) { name = 'Bots'; // Set default reference name to 'Bots' } var Bots; setTimeout(function () { var chatWidgetSettings = { URI: 'XXXXXXXXXXXXXXXXXXXXXXXXX', // ODA URI, pass the hostname. Do not include the protocol (https://). channelId: 'XXXXXXXXXXXXXXXXXXXXXXXXX', // Channel ID, available in channel settings in ODA UI //Add settings here }; Bots = new WebSDK(chatWidgetSettings); Bots.connect(); //Add Bots.setUserInputMessage('Order pizza'); here. Comment out for voice recognition. // Create global object to refer Bots window[name] = Bots; }, 0); } Set these
chatWidgetSettingsproperties:-
URI: This is the host and domain name that you noted when you created
the Oracle Web channel. For example:
xxxx.xxx.digitalassistant.xxx.xxx.com.Note:
Do not include the protocol (https://). Add the path from the host name to the.comextension.
For example:xxxx.xxx.digitalassistant.xxx.xxx.com -
channelId: This is the channel ID that you noted when you created
the Oracle Web channel. For example:
12a45b92-2c85-88aa-810d-1dc0d1cfe472.
For example:
let chatWidgetSettings = { URI: 'xxxx.xxx.digitalassistant.xxx.xxx.com', channelId: '12a45b92-2c85-88aa-810d-1dc0d1cfe472' };-
URI: This is the host and domain name that you noted when you created
the Oracle Web channel. For example:
-
Save your changes.
-
In an editor, open the
index.htmlfile (chat-page/index.html). -
Add the references to the
settings.jsandweb-sdk.jsfiles by copying and pasting this code just before the</head>tag.<script src="scripts/settings.js"></script> <script src="scripts/web-sdk.js" onload="initSdk('Bots')"></script> -
Save your changes.
-
Let's try out the chat widget. Open your
index.htmlfile in a browser. -
Click the chat-widget icon to open the chat window.

-
Type
hito start a conversation with the Web SDK Order Pizza skill.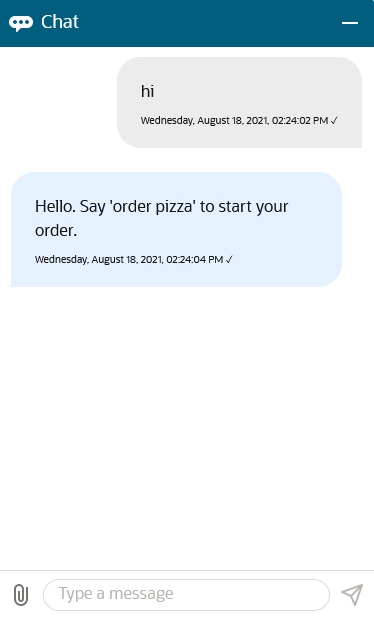
-
Type
order pizzato verify that you get a response. -
(Optional) Continue the conversation until you complete the order.
Modify the Widget's Behavior
Now that you've seen the widget's default behavior, let's modify settings.js to make some minor customizations, such as:
- Automatically opening the chat window
- Repositioning the window
You'll also modify the behavior so that the user doesn't have to type anything to initiate the conversation.
Note:
Throughout this tutorial, you'll make changes by adding properties to thechatWidgetSettings object in the settings.js file.-
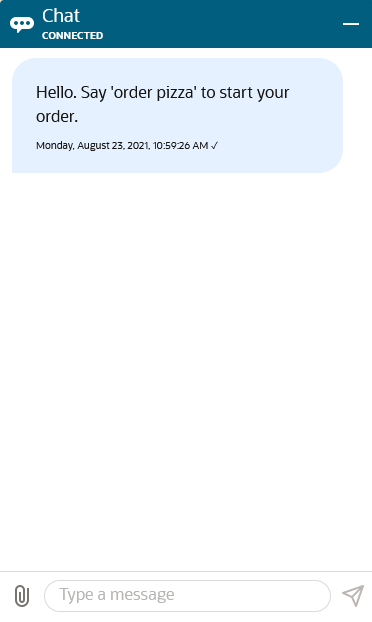
To show the connection status in the chat window, add this property to the
chatWidgetSettingsobject:showConnectionStatus: true, -
To
automatically open the chat window and to position the bottom right corner of the chat window 2 pixels from the bottom and 2 pixels from the right side of the browser window, add the following just below
showConnectionStatus: true:openChatOnLoad: true, position: {bottom: '2px', right: '2px'}, - The user has to type something to initiate the conversation with the skill. You
can avoid that by passing a hidden message to the skill. Add this property:
initUserHiddenMessage: 'Hello',After this change, your
chatWidgetSettingsobject should look like this (with your own URL and channel ID):var chatWidgetSettings = { URI: 'XXXXXXXXXXXXXXXXXXXXXXXXXXXXXXXXXXX', channelId: 'XXXXXXXXXXXXXXXXXXXXXXXXXXXXX', showConnectionStatus: true, openChatOnLoad: true, position: { bottom: '2px', right: '2px' }, initUserHiddenMessage: 'Hello', } - Save your changes.
-
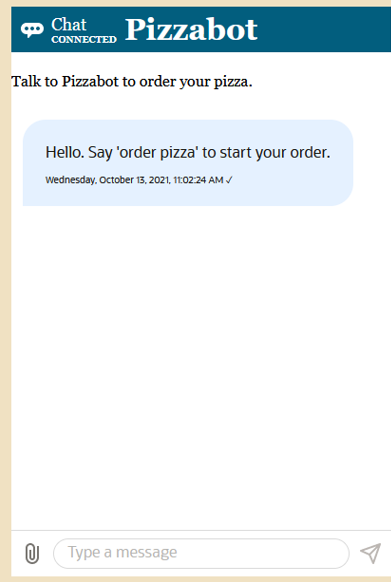
To see your changes, Shift+Reload
index.htmlin your browser.Notice that the chat window opens and displays the skill's first response automatically. Also notice that it shows the connected status.
Embed the Widget in an HTML Container
By default, the chat window appears as a fixed position element on the bottom-right corner of the page. To have more control over how the chat window appears, you'll activate the embedded mode and place the widget in a DOM element that serves as the container.
The embedded widget occupies the full width and height of the container be default. To accommodate the widget, you'll need to specify the container's height and width.
You'll also learn how to display the contents of a container at the top of the chat window.
-
To add containers for your custom header and the text that you want to display at the top of the chat, insert this HTML just below the
<body>tag:<div id="custom-header" style="padding: 0; text-align: initial"> <h1>Pizzabot</h1> </div> <div id="top-text" style="padding: 0; text-align: initial"> <p>Talk to Pizzabot to order your pizza.</p> </div> -
Now let's add the container for your widget. In your
index.htmlfile, insert this HTML just before<footer class="footer">:<div id="chat-container" class="chatbox" style="height: 600px; width: 400px; padding: 0; text-align: initial"> </div> -
Save your changes.
-
Open
scripts/settings.jsif it isn't already open. -
Directly below
initUserHiddenMessage: 'Hello', insert this code to activate the embedded mode and to tell the widget into which containers to put the embedded widget, the custom header, and the top text.embedded: true, targetElement: 'chat-container', embedTopStickyId: 'top-text', customHeaderElementId: 'custom-header', -
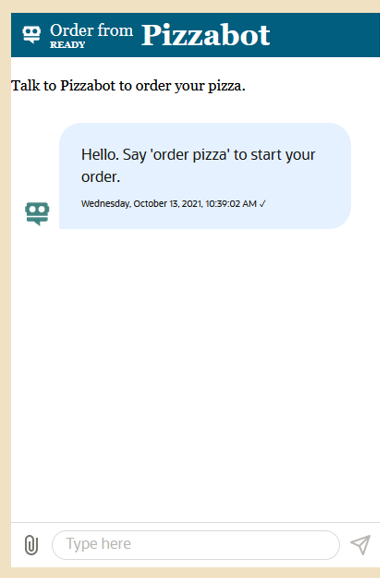
Save your file, and then Shift+Reload
index.htmlin your browser.As shown here, the chat window now appears within the beige box. The window has a title and has text at the top of the chat.
-
Complete a pizza order. Notice how
Talk to Pizzabot to order your pizzadoesn't scroll up. You'll change this in the next step. -
Your customers don't need to keep seeing the
Talk to Pizzabot...message, so change theembedTopStickyIdproperty toembedTopScrollIdas follows.embedTopScrollId: 'top-text', -
Save
index.html, and then refresh your browser (Shift+Reload).Now, when you converse with the skill, the text scrolls up.
See embedded-widget.txt for the completed HTML for this section.
Customize the Look and Feel of the Chat Window
Typically, you'll want to add your own branding to the chat window, and change the fonts and colors to match your web site. We'll show you some of the ways that you can do that.
-
We'll start by changing the icons by inserting the following definition for the icons property. Insert the following
iconsobject just belowcustomHeaderElementId: 'custom-header',: -
To change the text for the widget's chat title, connected text, input placeholder, and send icon, insert the
il18nobject below theiconsobject:i18n: { en: { chatTitle: 'Order from', // Replaces Chat connected: 'Ready', // Replaces Connected inputPlaceholder: 'Type here', // Replaces Type a message send: 'Send (Enter)' // Replaces Send tool tip } },The text properties must be wrapped in sub-objects within an
i18nobject, and there must be a sub-object for the locale that's specified by thelocaleproperty, which isenby default.The chat widget first looks for text for the locale that's specified by the
localeproperty (the default isen). If there isn't any, it then looks for text for the browser's locale. If that text doesn't exist, it then uses theentext. You can add sub-objects for additional languages, such ases,fr, andzh-cnin the sub-object for the browser's default locale. -
To change the font size and type for the messages, insert this property after the
il8nobject.fontFamily: 'Oracle Sans, Helvetica Neue, Helvetica, Arial, sans-serif', - Save your changes.
-
To see your changes, Shift+Reload
index.htmlin your browser.Your chat window should look like this.
-
(Optional) By default, the chat widget users a dark blue theme. To change it to a light blue theme, insert the following property below the
fontFamilyproperty:theme: 'classic',Save your changes and reload
index.htmlto see the new theme. Then try theredwood-darktheme (theme: 'redwood-dark').Remove, or comment out (
//theme: 'classic',), thethemeproperty when done.
         icons: {
            avatarBot: 'images/bot-green.png',
            avatarUser: 'images/user-icon.png',
            logo: 'images/bot-white.png',
            launch: 'images/bot-button.png'
          },
Add Autocompletion, Profile Values, and Audio Response
In this section, you'll learn about these advanced features:
- Autocompletion: In your skill, you can enter some suggested utterances for each intent. Then, you can configure the widget to display autocompletion suggestions when the user starts typing one of those utterances.
- Profile information settings: You can configure the widget to pass profile values to the skill.
- Audio response: You can configure the widget to read the skill's responses aloud.
Note that for audio response, you'll need to use a Chrome, Edge, Firefox, or Safari browser.
- To get started, you'll need to make some changes to your skill to test the passing of profile values. In your Digital Assistant instance, open your clone of the Web SDK Order Pizza skill.
-
Click Flows
 and scroll down to the
 welcomestate (the state appears after# TUTORIAL START). -
Replace the
textproperty with the following:text: "Hello ${profile.firstName}. You last ordered ${profile.properties.value.lastOrderedItems}. Say 'order pizza' to start an order."These
profilevalues will be set by theinitUserProfileproperty that you'll soon add to theindex.htmlfile. -
Click Intents
 , select the Order Pizza intent, and then scroll down to the Auto-Complete Suggestions section.
- Click Advanced input mode that's next to the Suggestions to Add field.
A multi-line text box appears.
-
Copy these suggestions, paste them into the text box, and then click + Create:
can I get a pizza
I want pizza
order pizza
what kinds of pizza do you have
The Auto-Complete Suggestions section should look like this:

-
Click Train to add the autocompletion suggestions to the natural language parser.
If you forget to retrain the skill, you won't see the suggestions when you next test the chat widget.
-
In your
scripts/settings.jsfile, just after thefontFamilyproperty, insert the following properties to set the profile values and to turn on autocompletion and audio response:initUserProfile: { profile: { firstName: 'First', lastName: 'Last', email: 'first.last@example.com', properties: { lastOrderedItems: '1 medium pepperoni' } } }, enableAutocomplete: true, enableAutocompleteClientCache: true, // Minimizes server calls when user uses autocomplete feature enableBotAudioResponse: true,You can substitute any name for
'First','Last'and'first.last@example.com'.Note that while you can use either the
initUserProfileproperty or theBots.updateUserfunction to set profile values, you must use theinitUserProfileproperty whenever you useinitUserHiddenMessage. Otherwise, the profile values aren't set until after the welcome message displays. -
In the
ensub-object in thei18nproperty, insert these properties just above thechatTitleproperty:audioResponseOff: 'Click to turn audio response on', // Tool tip for the speaker off button audioResponseOn: 'Click to turn audio response off', // Tool tip for the speaker on button - To populate the message box with the most typically used utterance, add the following below
Bots.connect();Bots.setUserInputMessage('Order pizza');When you're done, Yoursettings.jsfile should look like this:'use strict'; /** * Initializes the SDK and sets a global field with passed name for it the can * be referred later * * @param {string} name Name by which the chat widget should be referred */ function initSdk(name) { // Retry initialization later if WebSDK is not available yet if (!document || !WebSDK) { setTimeout(function () { initSdk(name); }, 2000); return; } if (!name) { name = 'Bots'; // Set default reference name to 'Bots' } var Bots; setTimeout(function () { var chatWidgetSettings = { URI: 'XXXXXXXXXX', // ODA URI, only the hostname part should be passed, without the https:// channelId: 'XXXXXXXX', // Channel ID, available in channel settings in ODA UI //Add settings here showConnectionStatus: true, openChatOnLoad: true, position: { bottom: '2px', right: '2px' }, initUserHiddenMessage: 'Hello', embedded: true, targetElement: 'chat-container', embedTopScrollId: 'top-text', customHeaderElementId: 'custom-header', icons: { avatarBot: 'images/bot-green.png', avatarUser: 'images/user-icon.png', logo: 'images/bot-white.png', launch: 'images/bot-button.png' }, i18n: { en: { audioResponseOff: 'Click to turn audio response on', // Tool tip for the speaker off button audioResponseOn: 'Click to turn audio response off', // Tool tip for the speaker on button chatTitle: 'Order from', // Replaces Chat connected: 'Ready', // Replaces Connected inputPlaceholder: 'Type here', // Replaces Type a message send: 'Send (Enter)' // Replaces Send tool tip } }, fontFamily: 'Oracle Sans, Helvetica Neue, Helvetica, Arial, sans-serif', //theme: 'redwood-dark', initUserProfile: { profile: { firstName: 'Chris', lastName: 'Smith', email: 'chris.smith@example.com', properties: { lastOrderedItems: '1 medium pepperoni' } } }, enableAutocomplete: true, enableAutocompleteClientCache: true, // Minimizes server calls when user uses autocomplete feature enableBotAudioResponse: true, }; Bots = new WebSDK(chatWidgetSettings); Bots.connect(); //Add Bots.setUserInputMessage('Order pizza'); here Bots.setUserInputMessage('Order pizza'); // Create global object to refer Bots window[name] = Bots; }, 0); } - Save your changes.
-
To see your changes, Shift+Reload
index.htmlin your browser.Notice that the welcome message now displays some of the values that you set in the
initUserProfileproperty. Also notice that it seeds the message box withOrder pizza. -
Click the speaker icon
 to turn audio response on.
-
Clear the message box, and then type
I wantand see the autocomplete suggestions that pop up.
-
Complete an order. The chat bot speaks its responses.
Note: When the widget is expanded by default and
initUserHiddenMessageis set, some browsers don't utter the first response.
Add Voice Recognition
Your skill can speak to you, but you can't speak to it...yet. In this section, you're going to enable voice recognition. But before you do this:
- Comment out
Bots.setUserInputMessage('Order pizza');to remove the seeded message to prevent it from interfering with your voice commands.//Bots.setUserInputMessage('Order pizza'); - To quickly reset the conversation, add the following property below
enableBotAudioResponse: true:enableClearMessage: true,
- Add the following to enable voice recognition:
enableSpeech: true,
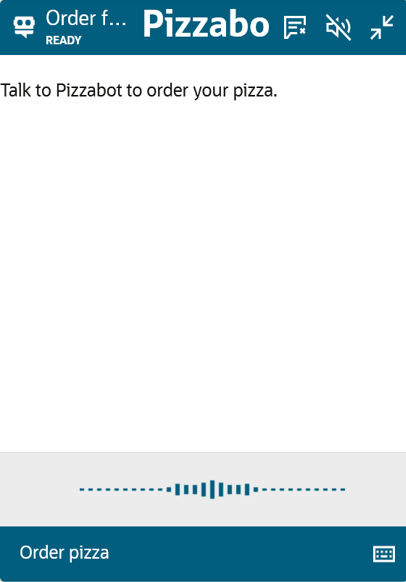
- Refresh your browser and note that the widget now has a microphone
 at the bottom right of the input field and the Clear Conversation
  option in header.
 - Click the microphone and say something like, "Order pizza" or "Get me a pizza". Complete the order using only voice commands. The voice indicator tells you if your voice commands are loud enough to be captured. The skill will also understand shortcuts -- the (CH) in (CH)eese Basic. Utter the two-letter shortcuts as separate letters ("C-H") to order Cheese Basic, for example.
Get User Feedback
In this step, you're going to give users the option of rating the skill and leaving feedback by adding a System.Feedback component to the dialog flow.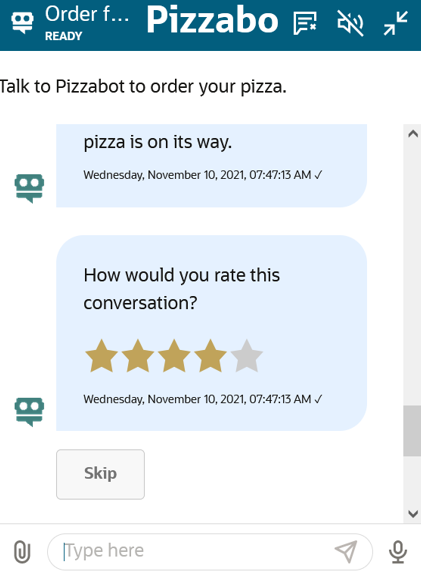
- Click Flows in the left navbar.
- In the
confirmOrderstate:- Set
keepTurntotrue(keepTurn: true) to allow the skill to retain control of the conversation. - In the
transitionsnode, replacereturn: "done"withnext: "getUserFeedback"
. When you're done, theconfirmOrderstate should look like this:confirmOrder: component: "System.Output" properties: text: "Your ${pizzaSize.value?lower_case} ${pizzaType.value?capitalize} pizza is on its way." keepTurn: true translate: transitions: next: "getUserFeedback"
- Set
- Add the following sequence after the
confirmOrderstate:getUserFeedback: component: "System.Feedback" properties: threshold: 2 maxRating: 5 enableTextFeedback: true transitions: actions: above: "positiveFeedback" below: "negativeFeedback" cancel: "cancelFeedback" positiveFeedback: component: "System.Output" properties: text: "Thank you for your ${system.userFeedbackRating.value}-star rating." transitions: return: "done" negativeFeedback: component: "System.Output" properties: text: "Thank you for providing your feedback." transitions: return: "done" cancelFeedback: component: "System.Output" properties: text: "Feedback cancelled." transitions: return: "done"Note the values set for the
maxRatingandthresholdproperties, which set the highest rating that users can submit (five stars in this case) and the threshold for evaluating positive and negative feedback (two stars). When users give the skill a negative review, the skill prompts them for comments. - Click Validate to check the indentation.
- Type, or say, "Order Pizza", then complete the order.
- Choose a positive rating (3, 4 or 5) using a voice command or text input.
- Click Reset.
- Order the pizza again, but this time, choose a negative rating (1 or 2).
- When prompted, enter your feedback. By default, all voice messages are sent automatically after the voice capture. However, if you misspoke, or if the skill's recognition is incorrect, you may want to edit a voice message before sending it. To disable the autosend for voice messages, add the following property to
settings.jsdirectly afterenableSpeech: true:enableSpeechAutoSend: false,
With autosend disabled, you need to click Send after each of your messages.
You've completed the ODA Web SDK tutorial, which gives you an idea of the things that you can do with the SDK.
Access a Skill from Your Website
F36260-04
February 2023
Copyright © 2023, Oracle and/or its affiliates.
Learn how to use the ODA Web SDK to access a digital assistant or skill from your website.
This software and related documentation are provided under a license agreement containing restrictions on use and disclosure and are protected by intellectual property laws. Except as expressly permitted in your license agreement or allowed by law, you may not use, copy, reproduce, translate, broadcast, modify, license, transmit, distribute, exhibit, perform, publish, or display any part, in any form, or by any means. Reverse engineering, disassembly, or decompilation of this software, unless required by law for interoperability, is prohibited.
If this is software or related documentation that is delivered to the U.S. Government or anyone licensing it on behalf of the U.S. Government, then the following notice is applicable:
U.S. GOVERNMENT END USERS: Oracle programs (including any operating system, integrated software, any programs embedded, installed or activated on delivered hardware, and modifications of such programs) and Oracle computer documentation or other Oracle data delivered to or accessed by U.S. Government end users are "commercial computer software" or "commercial computer software documentation" pursuant to the applicable Federal Acquisition Regulation and agency-specific supplemental regulations. As such, the use, reproduction, duplication, release, display, disclosure, modification, preparation of derivative works, and/or adaptation of i) Oracle programs (including any operating system, integrated software, any programs embedded, installed or activated on delivered hardware, and modifications of such programs), ii) Oracle computer documentation and/or iii) other Oracle data, is subject to the rights and limitations specified in the license contained in the applicable contract. The terms governing the U.S. Government's use of Oracle cloud services are defined by the applicable contract for such services. No other rights are granted to the U.S. Government.
This software or hardware is developed for general use in a variety of information management applications. It is not developed or intended for use in any inherently dangerous applications, including applications that may create a risk of personal injury. If you use this software or hardware in dangerous applications, then you shall be responsible to take all appropriate fail-safe, backup, redundancy, and other measures to ensure its safe use. Oracle Corporation and its affiliates disclaim any liability for any damages caused by use of this software or hardware in dangerous applications.
Oracle and Java are registered trademarks of Oracle and/or its affiliates. Other names may be trademarks of their respective owners.
Intel and Intel Inside are trademarks or registered trademarks of Intel Corporation. All SPARC trademarks are used under license and are trademarks or registered trademarks of SPARC International, Inc. AMD, Epyc, and the AMD logo are trademarks or registered trademarks of Advanced Micro Devices. UNIX is a registered trademark of The Open Group.
This software or hardware and documentation may provide access to or information about content, products, and services from third parties. Oracle Corporation and its affiliates are not responsible for and expressly disclaim all warranties of any kind with respect to third-party content, products, and services unless otherwise set forth in an applicable agreement between you and Oracle. Oracle Corporation and its affiliates will not be responsible for any loss, costs, or damages incurred due to your access to or use of third-party content, products, or services, except as set forth in an applicable agreement between you and Oracle.