Oracle Database Exadata Cloud Service Quick Start
 Before You Begin
Purpose
In this tutorial, you learn how to create and manage an Exadata Cloud Service instance and database deployment. You will also learn how to use SQL Developer to perform operations on the data in your Exadata Cloud Service database, and use Enterprise Manager to monitor and manage your database.
Last Updated
June 2017, Release 17.2.3
Please note that Oracle develops its cloud services in an agile manner and makes rapid changes to meet our users' needs. Therefore this tutorial may not reflect all of the changes since the last update to this service. For the very latest information see Exadata Cloud Service on Oracle Help Center.
Time to Complete
Approximately 90 minutes, plus waiting time to create the Exadata Cloud Service instance and the starter database.
Background
Oracle Database Exadata Cloud Service enables you to leverage the power of Exadata inside the Oracle Cloud. You have full access to the features and operations available with Oracle Database, but with Oracle owning and managing the Exadata infrastructure.
Each Exadata Cloud Service instance is based on an Exadata system configuration that contains a predefined number of compute nodes (database servers) and a predefined number of Exadata Storage Servers, all tied together by a high-speed, low-latency InfiniBand network and intelligent Exadata software.
Exadata Cloud Service uses Oracle Database Enterprise Edition Extreme Performance, which includes all the features of Oracle Database Enterprise Edition, plus all the database enterprise management packs and all the Enterprise Edition options, such as Oracle Database In-Memory and Oracle Real Application Clusters (RAC). Exadata Cloud Service also comes with cloud-specific capabilities that assist with automated backup, patching and upgrade operations.
Within each Exadata Cloud Service instance you can create numerous database deployments. Apart from the inherent storage and processing capacity of your Exadata Cloud Service instance, there is no set maximum for the number of database deployments that you can create.
When you provision a database deployment, it is configured according to best-practices, with your Oracle Database already running, and with default backup jobs already scheduled. You have full administrative privileges for your database, and you can connect to your database by using Oracle Net Services from outside the Oracle Cloud. You are responsible for database administration tasks such as creating tablespaces and managing database users. You can also customize the default automated maintenance set up.
Scenario
In this tutorial, you create an Exadata Cloud Service instance and starter database deployment using wizard interfaces, use SQL Developer to access your cloud database, and use Enterprise Manager to monitor and manage your database.
What Do You Need?
Before starting this tutorial, you should:
- Have already procured a subscription for Oracle Database Exadata Cloud Service.
- Have installed the latest version of Oracle SQL Developer from http://www.oracle.com/technetwork/developer-tools/sql-developer/downloads/index.html
- Have one of the supported browsers:
- Microsoft Internet Explorer: version 9, 10, or 11; set Browser Mode to IE9 or IE10
- Mozilla Firefox: version 24 and later
- Google Chrome: version 29 and later
- Apple Safari: version 6 and 7
 Creating an Exadata Cloud Service Instance
Invoking the Create New Oracle Database Exadata Cloud Service Instance Wizard
-
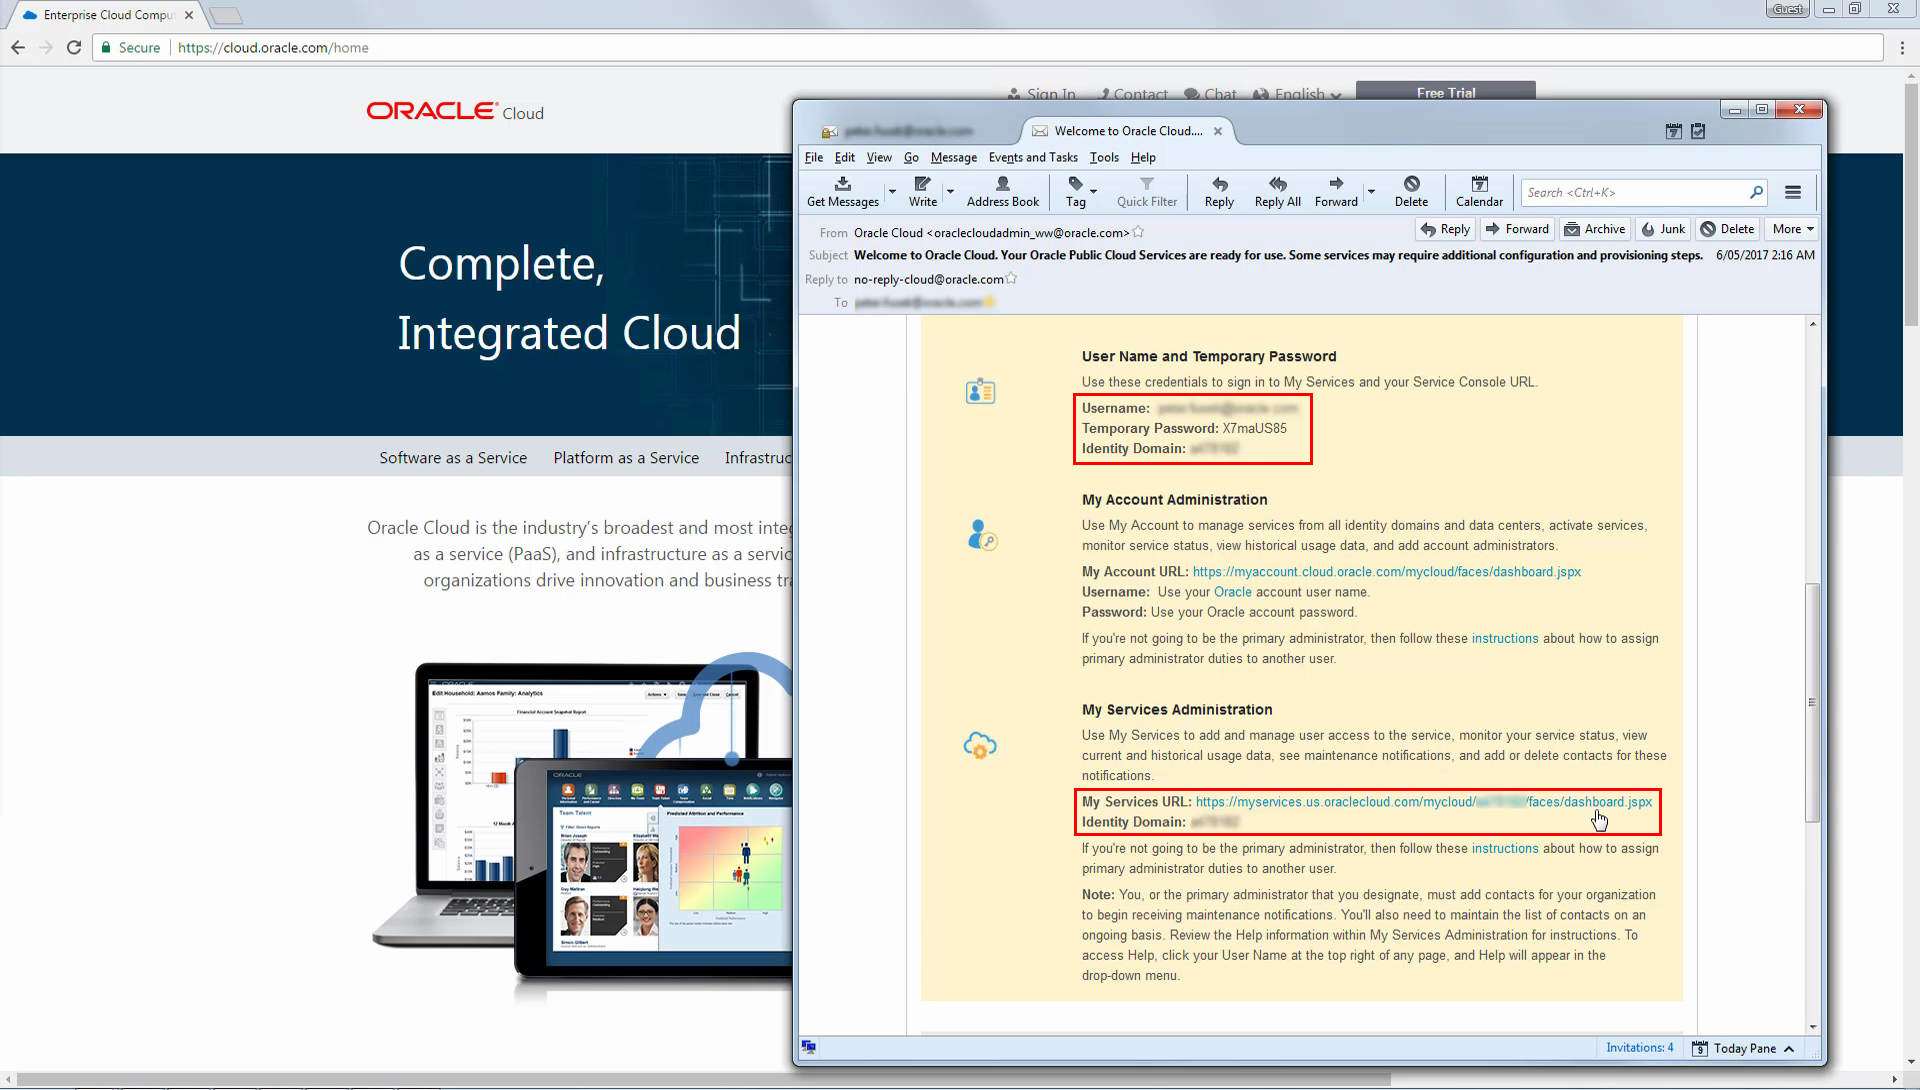
Log in to the My Services dashboard using the credentials provided in your Welcome email, or provided to you by your Oracle Cloud account administrator. For details about accessing the console, see Accessing the Oracle Database Cloud Service Console.
-
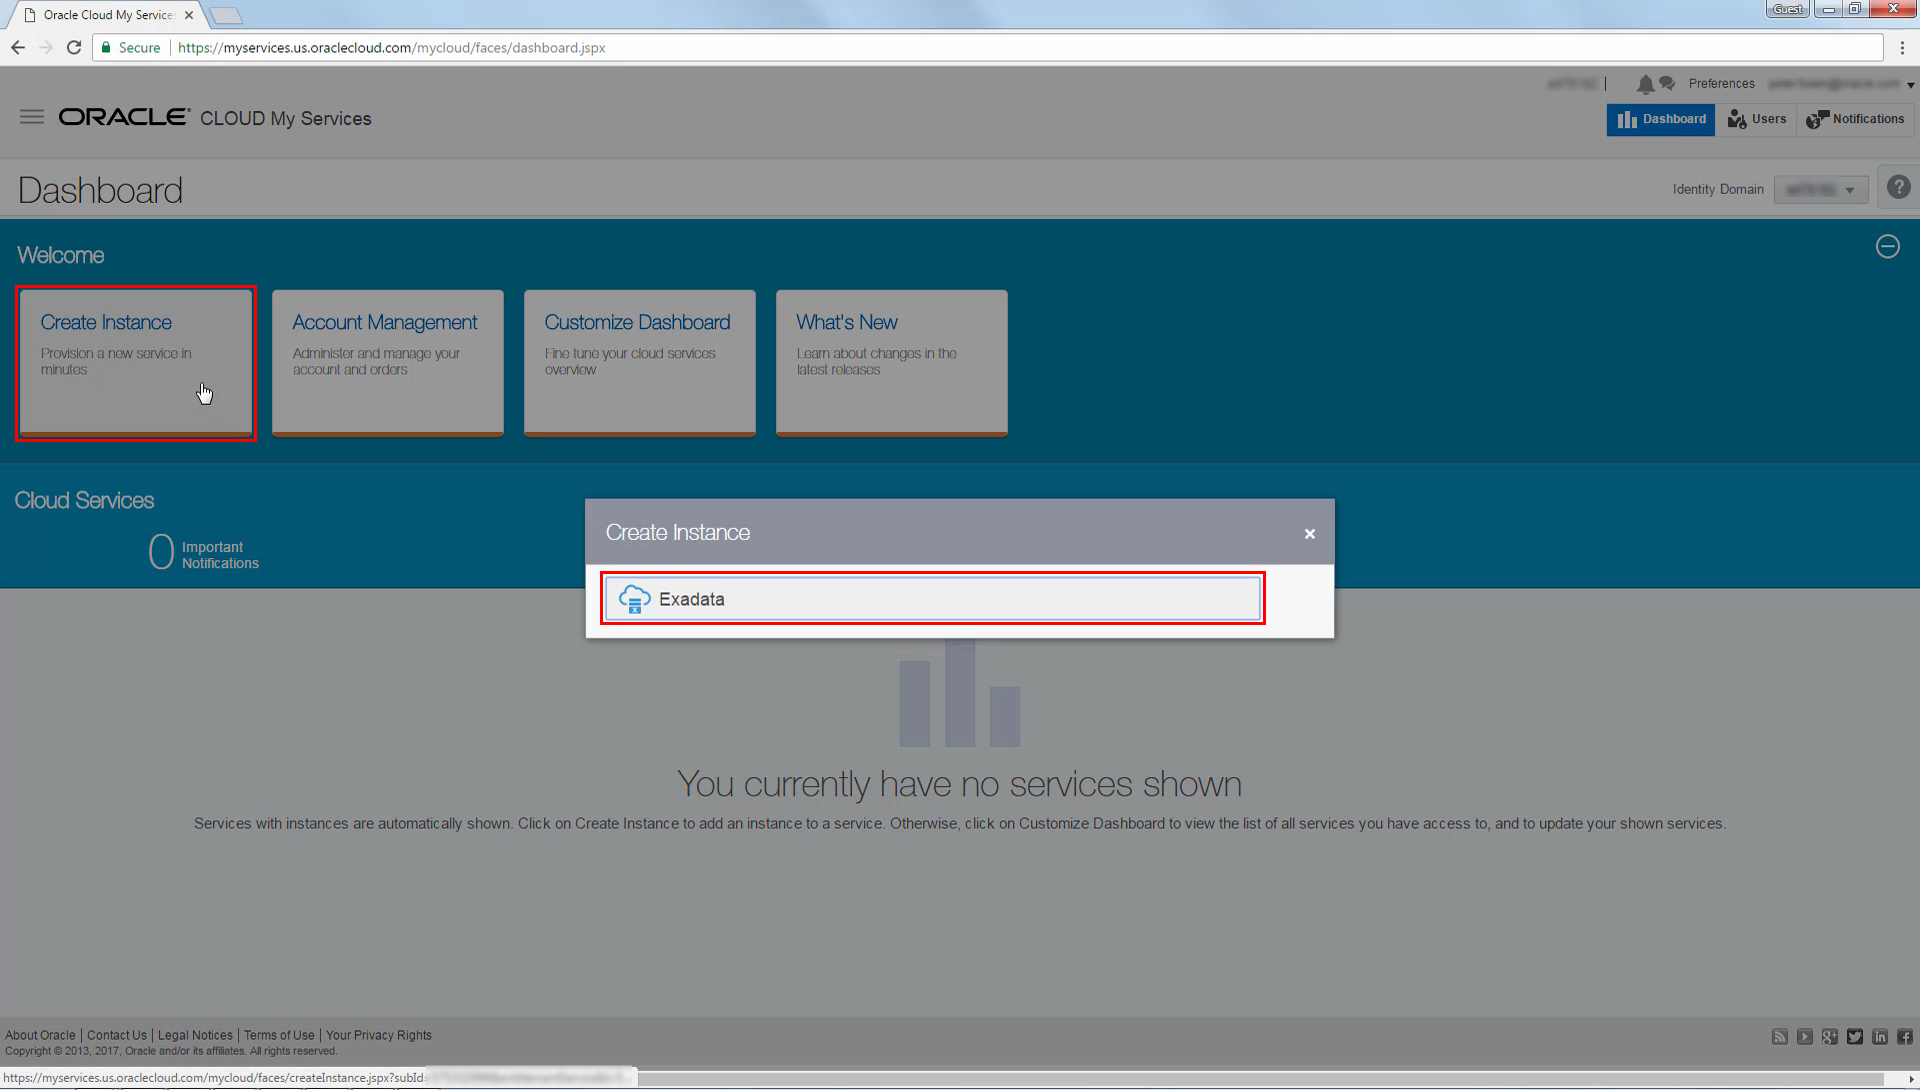
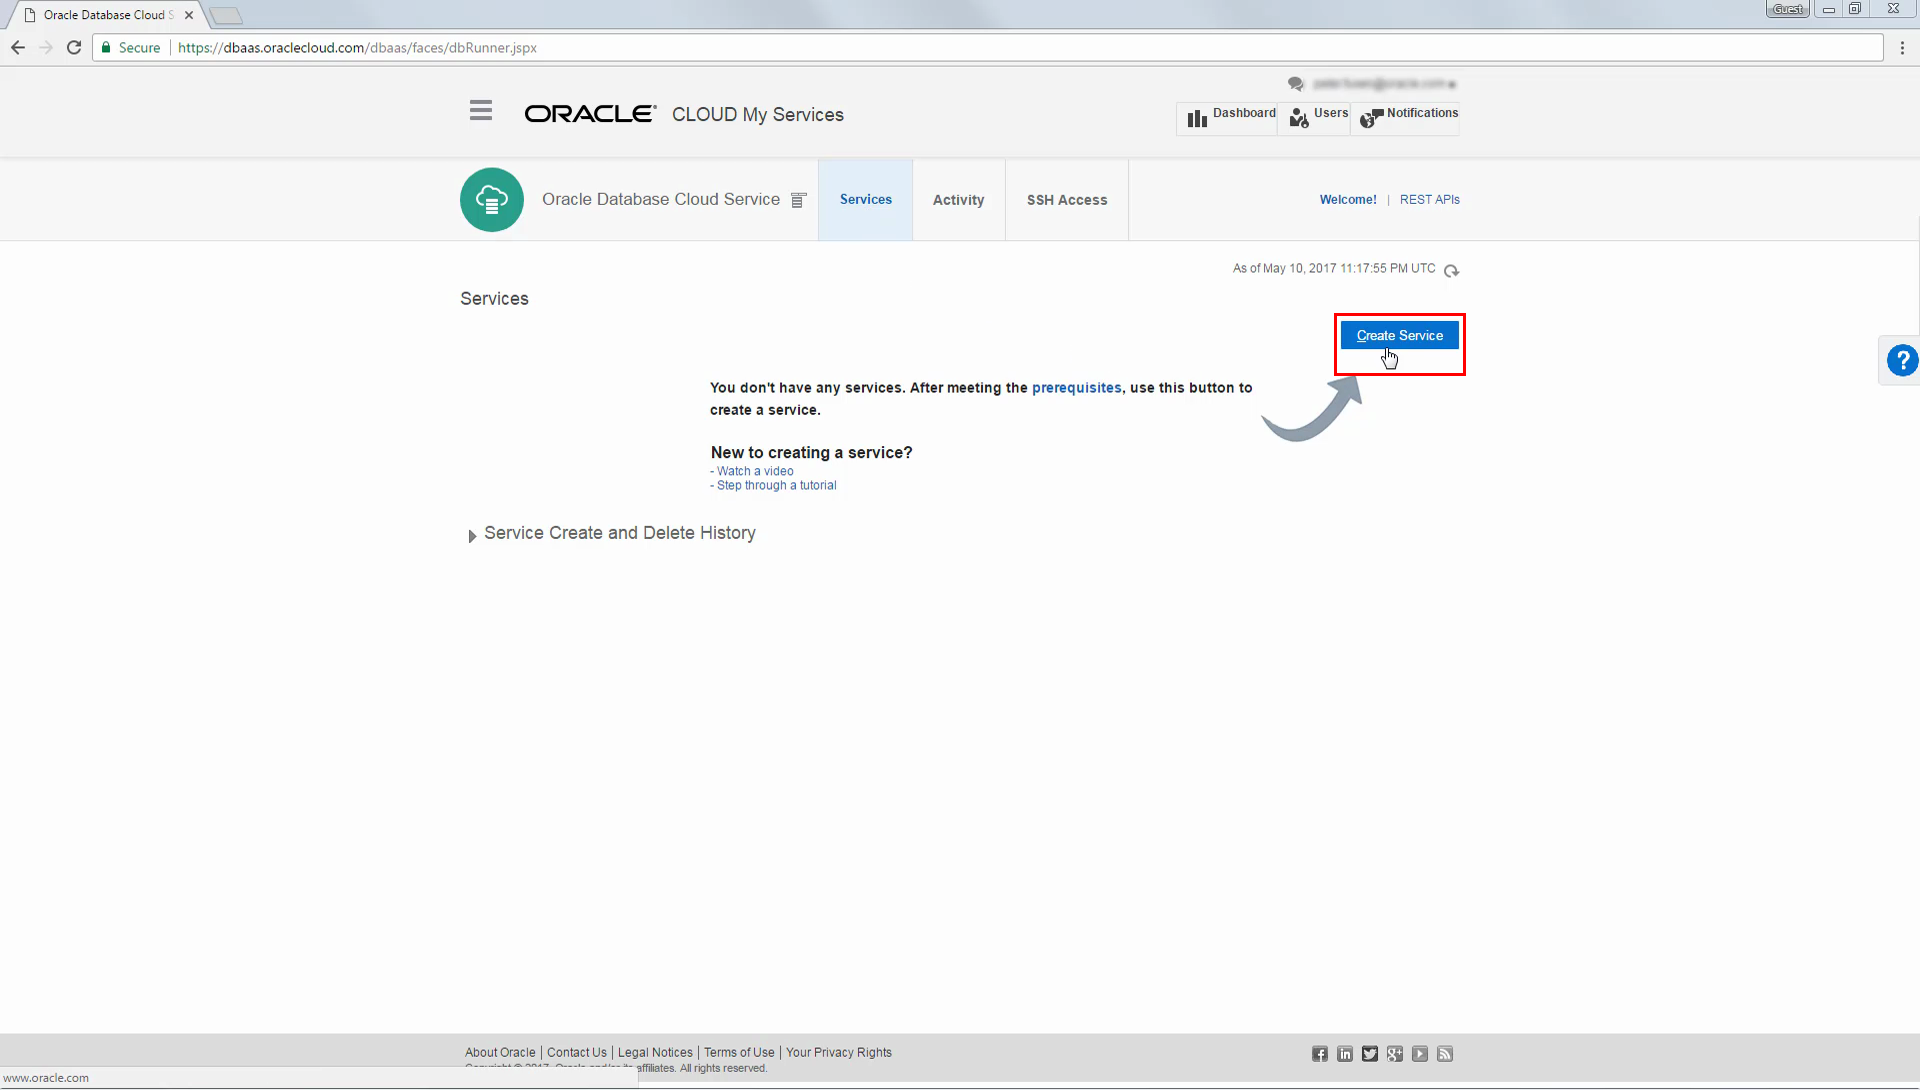
To create a new Exadata Cloud Service instance, in the My Services dashboard click Create Instance and then select Exadata from the list of options.
-
The Create New Oracle Database Database Cloud Service Instance wizard is invoked, displaying the Instance Details page.
Configuring the Exadata Cloud Service Instance
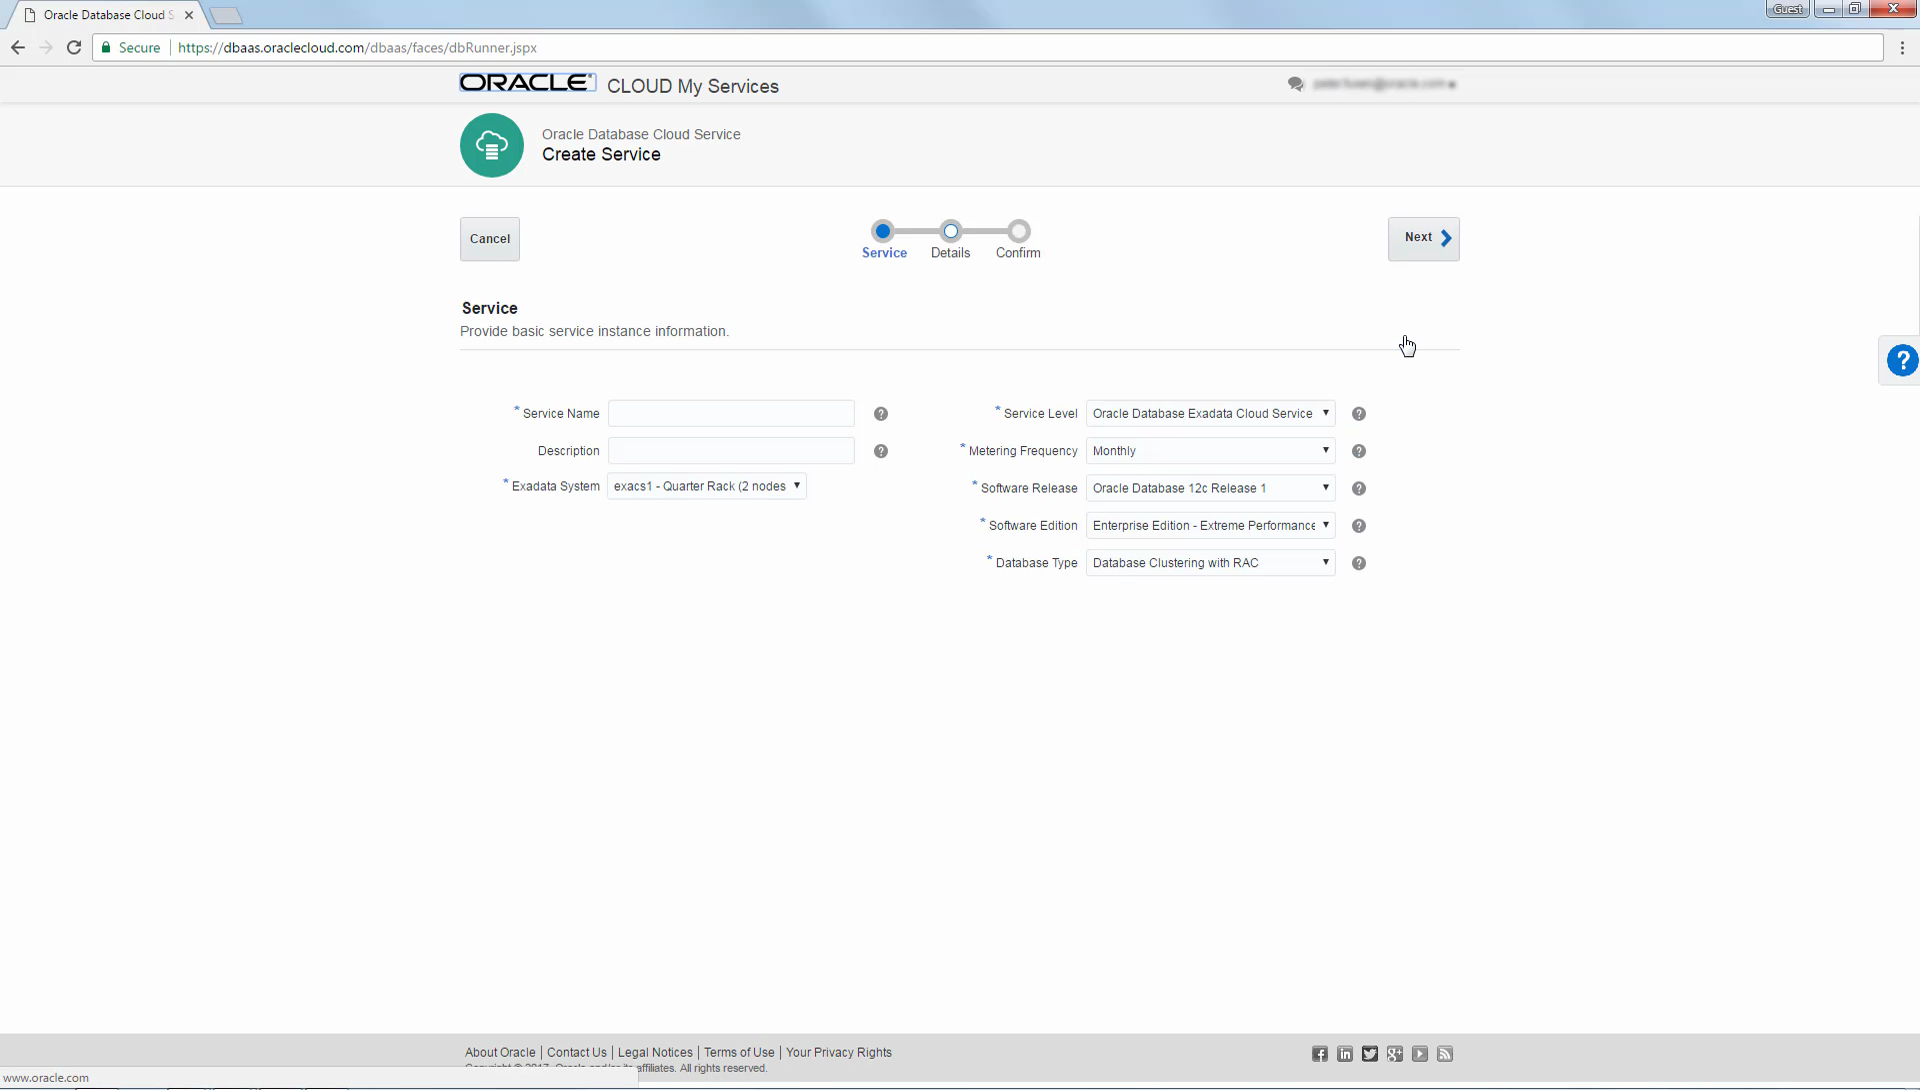
-
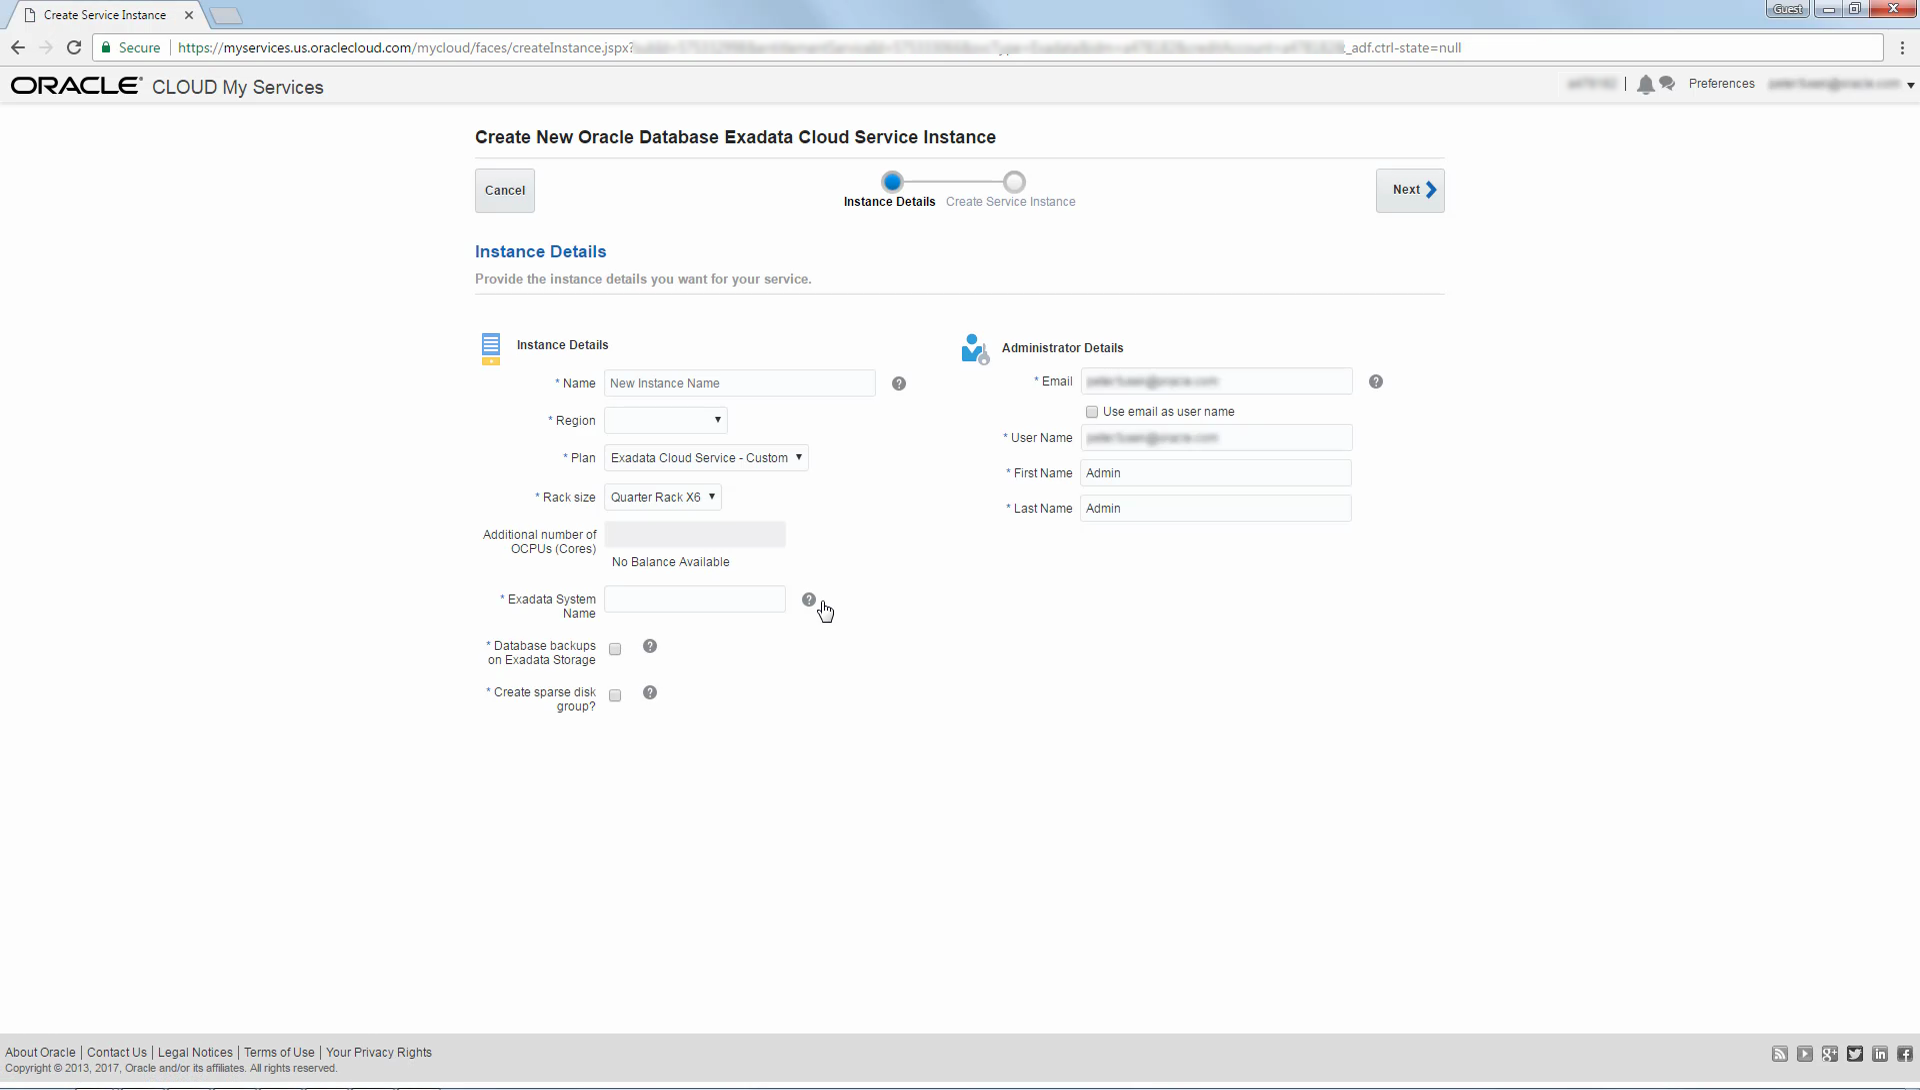
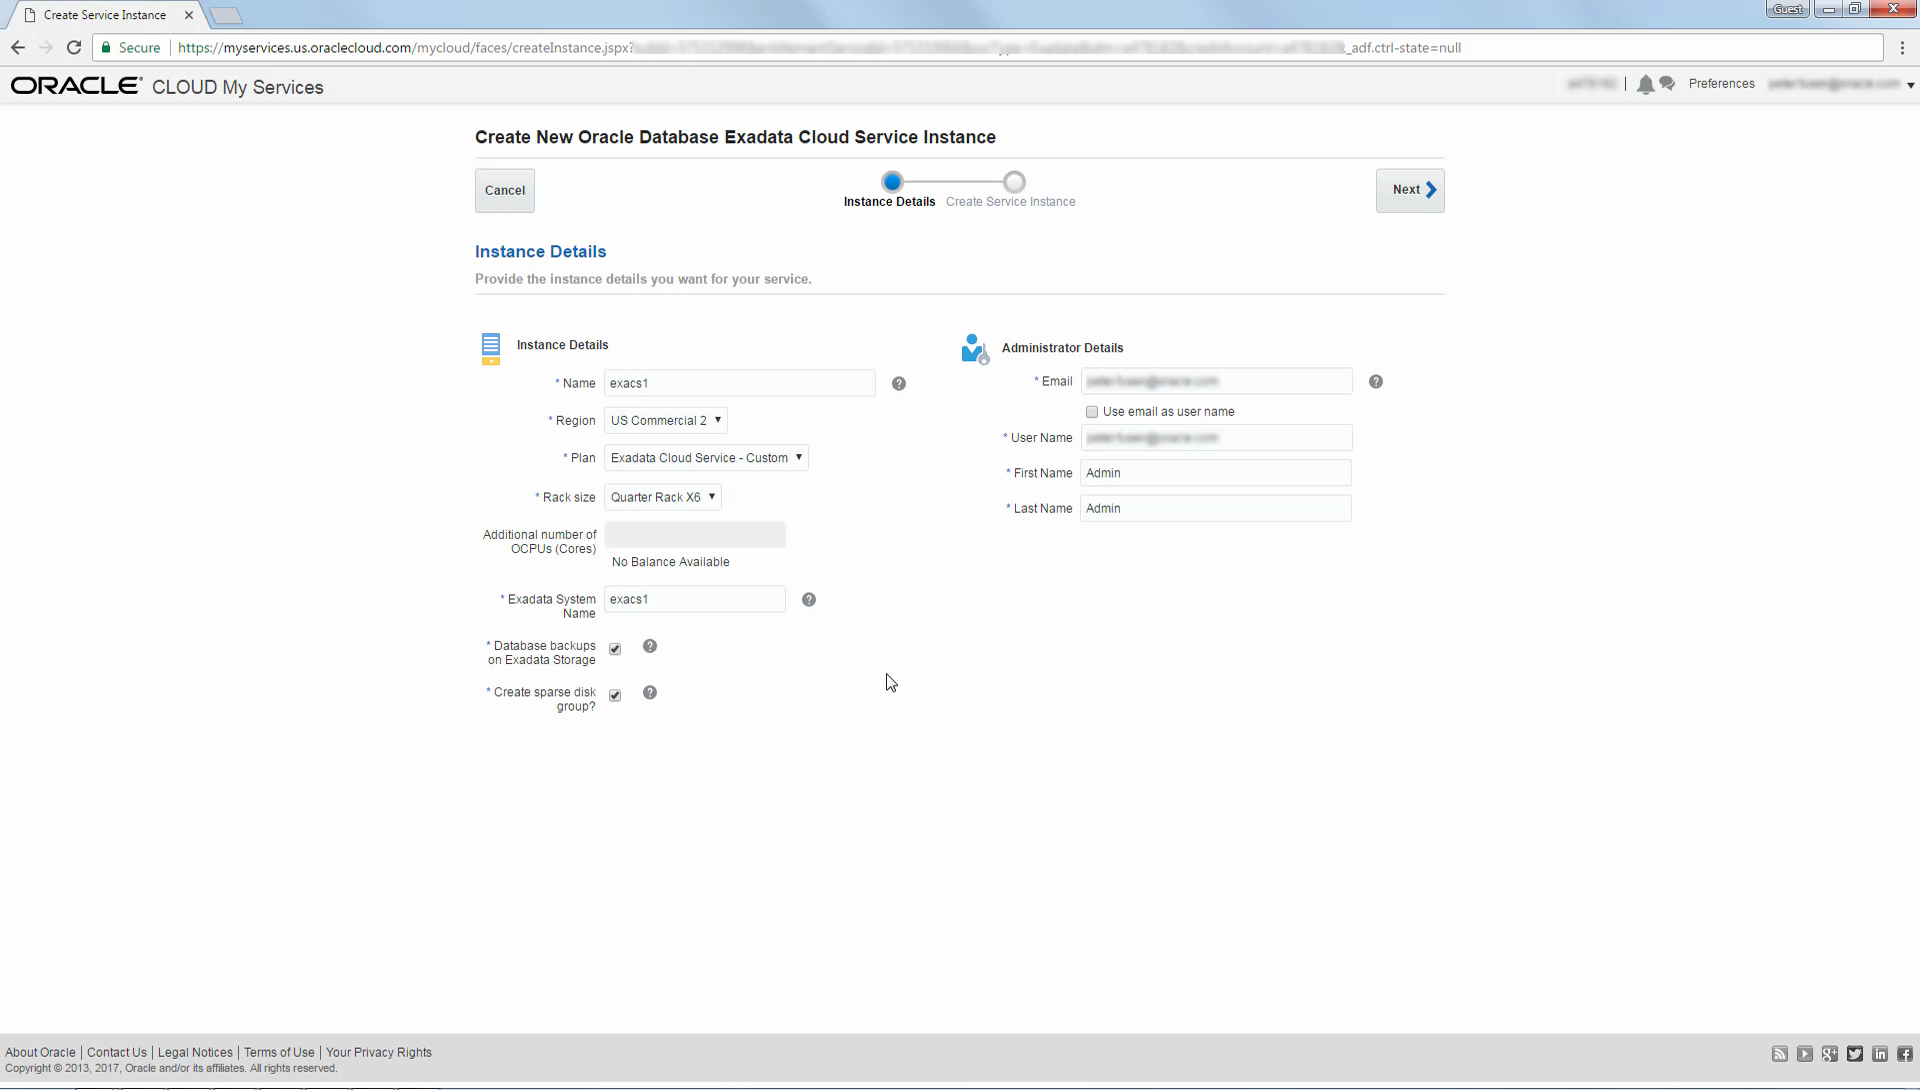
Use the Instance Details page to configure the attributes of the Exadata Cloud Service instance. Then click Next.
The example shows an Exadata Cloud Service instance named exacs1 configured on a Quarter Rack X6 system in the US Commercial 2 data center. The storage is configured to support backups to local Exadata storage, and the configuration includes a sparse disk group to support Exadata snapshots.
For further details, see Creating an Exadata Cloud Service Instance.
-
On the Confirmation page, review the configuration settings and if you are satisfied click Create Service Instance.
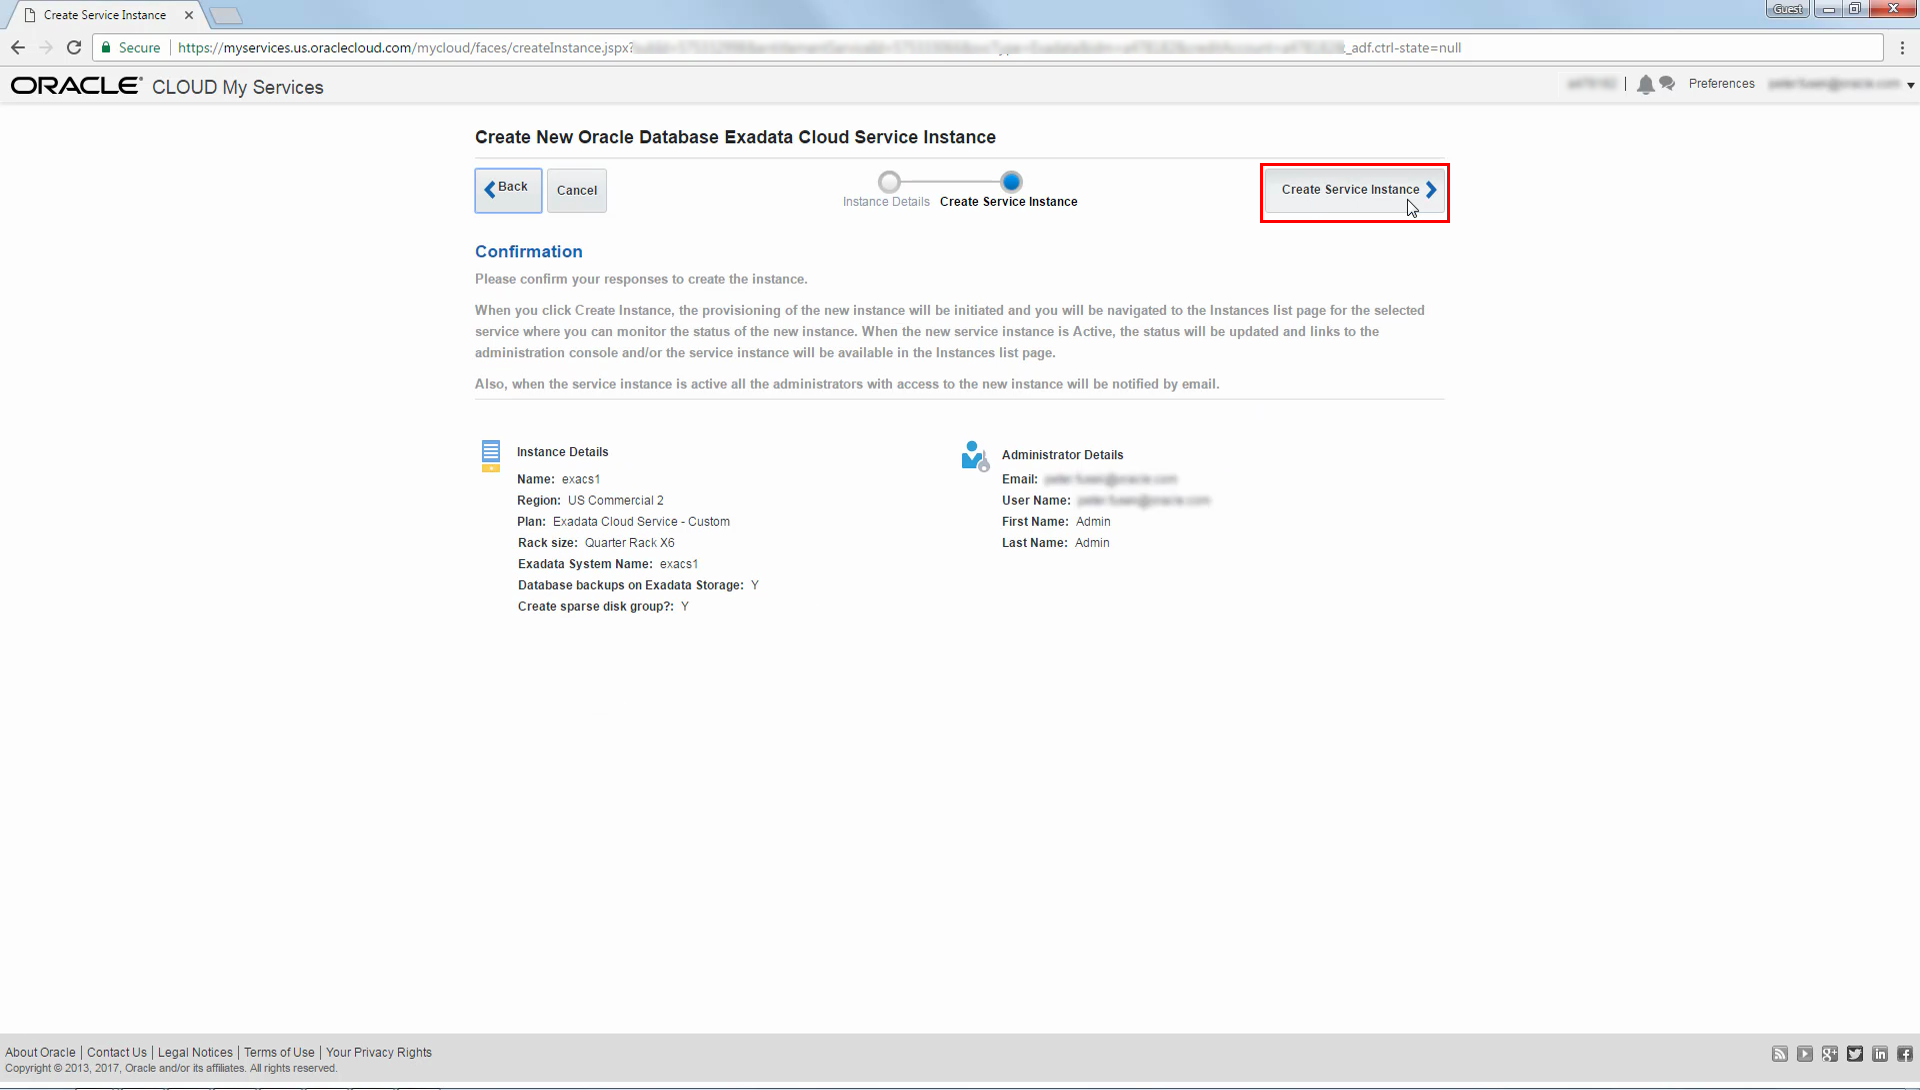
Confirming the Exadata Cloud Service Instance
-
Clicking Create Service Instance starts the process to create the service instance. The process is fully automated and takes approximately one to two hours to complete. Initially you will return to the Service Details page and a message will show that the service instance creation process has been initiated.
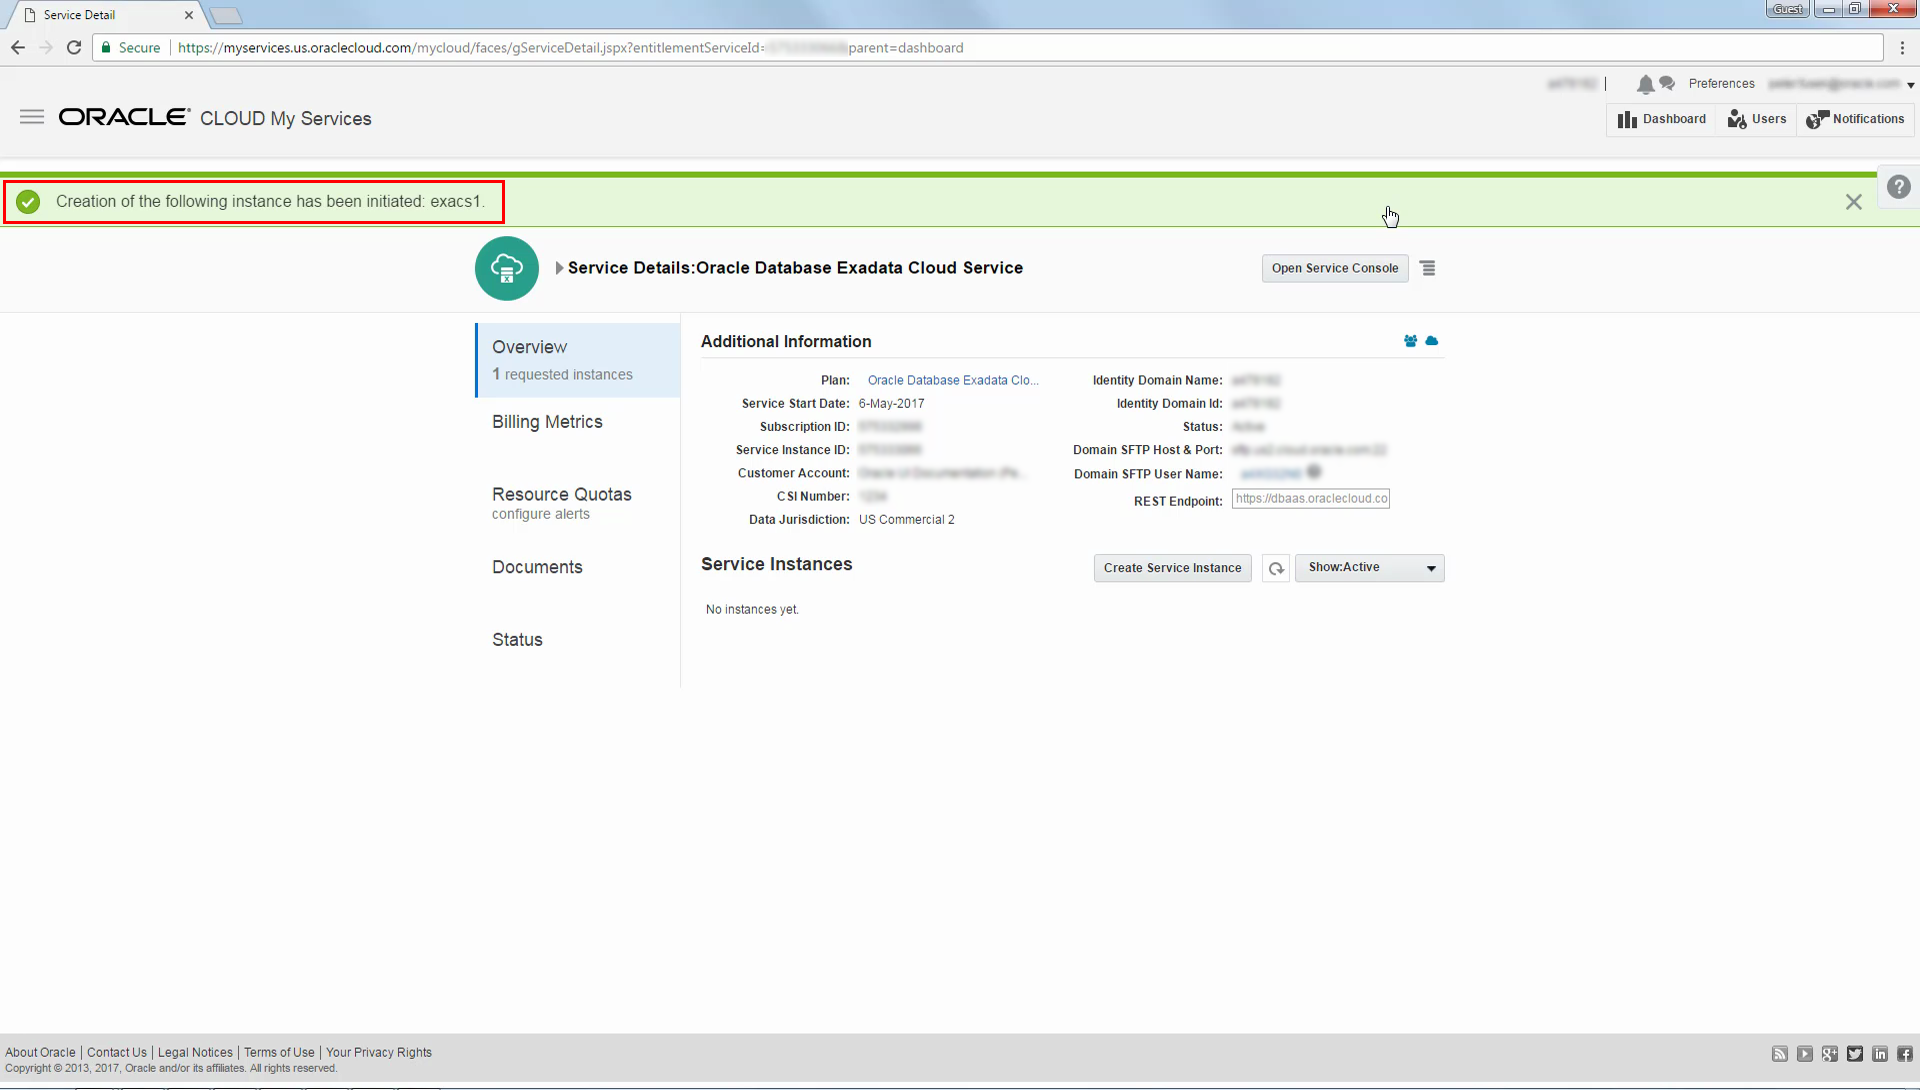
-
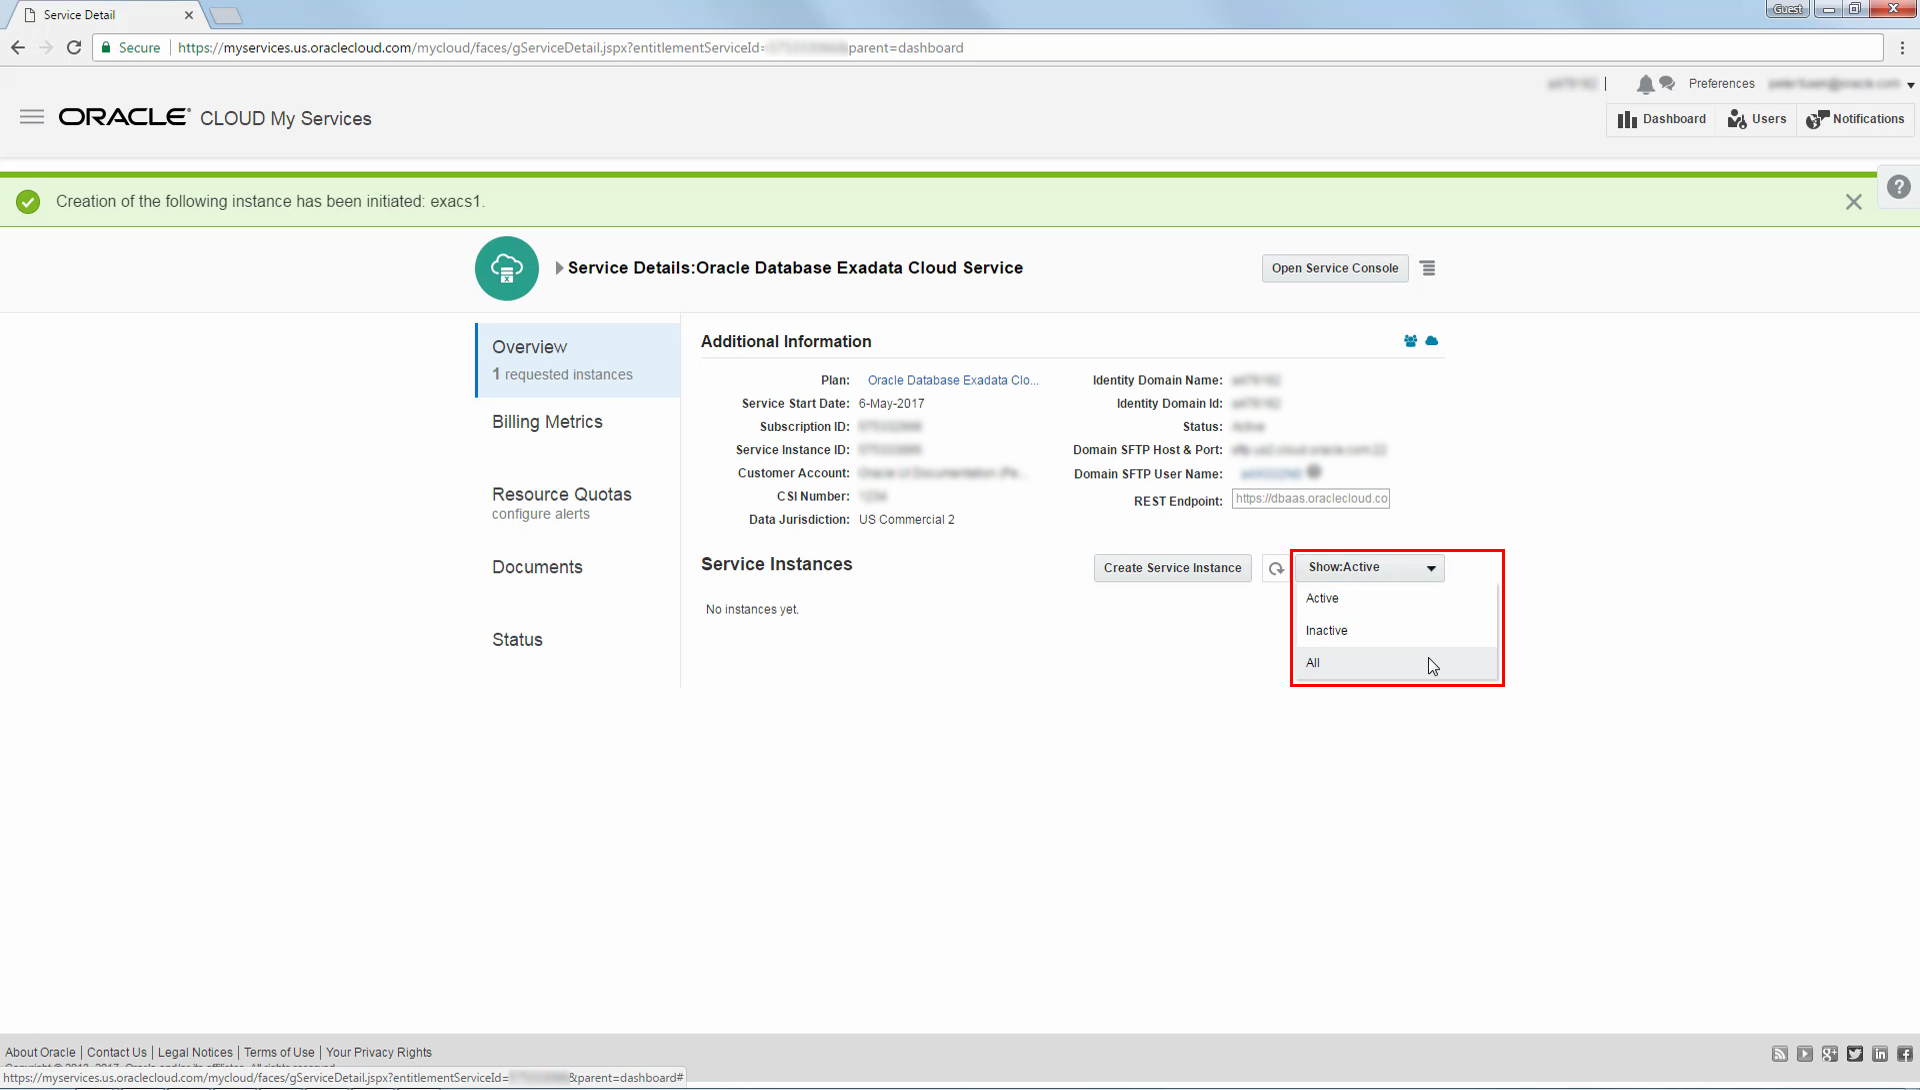
You can monitor the progress of the service instance creation process by selecting the option to show all service instances.
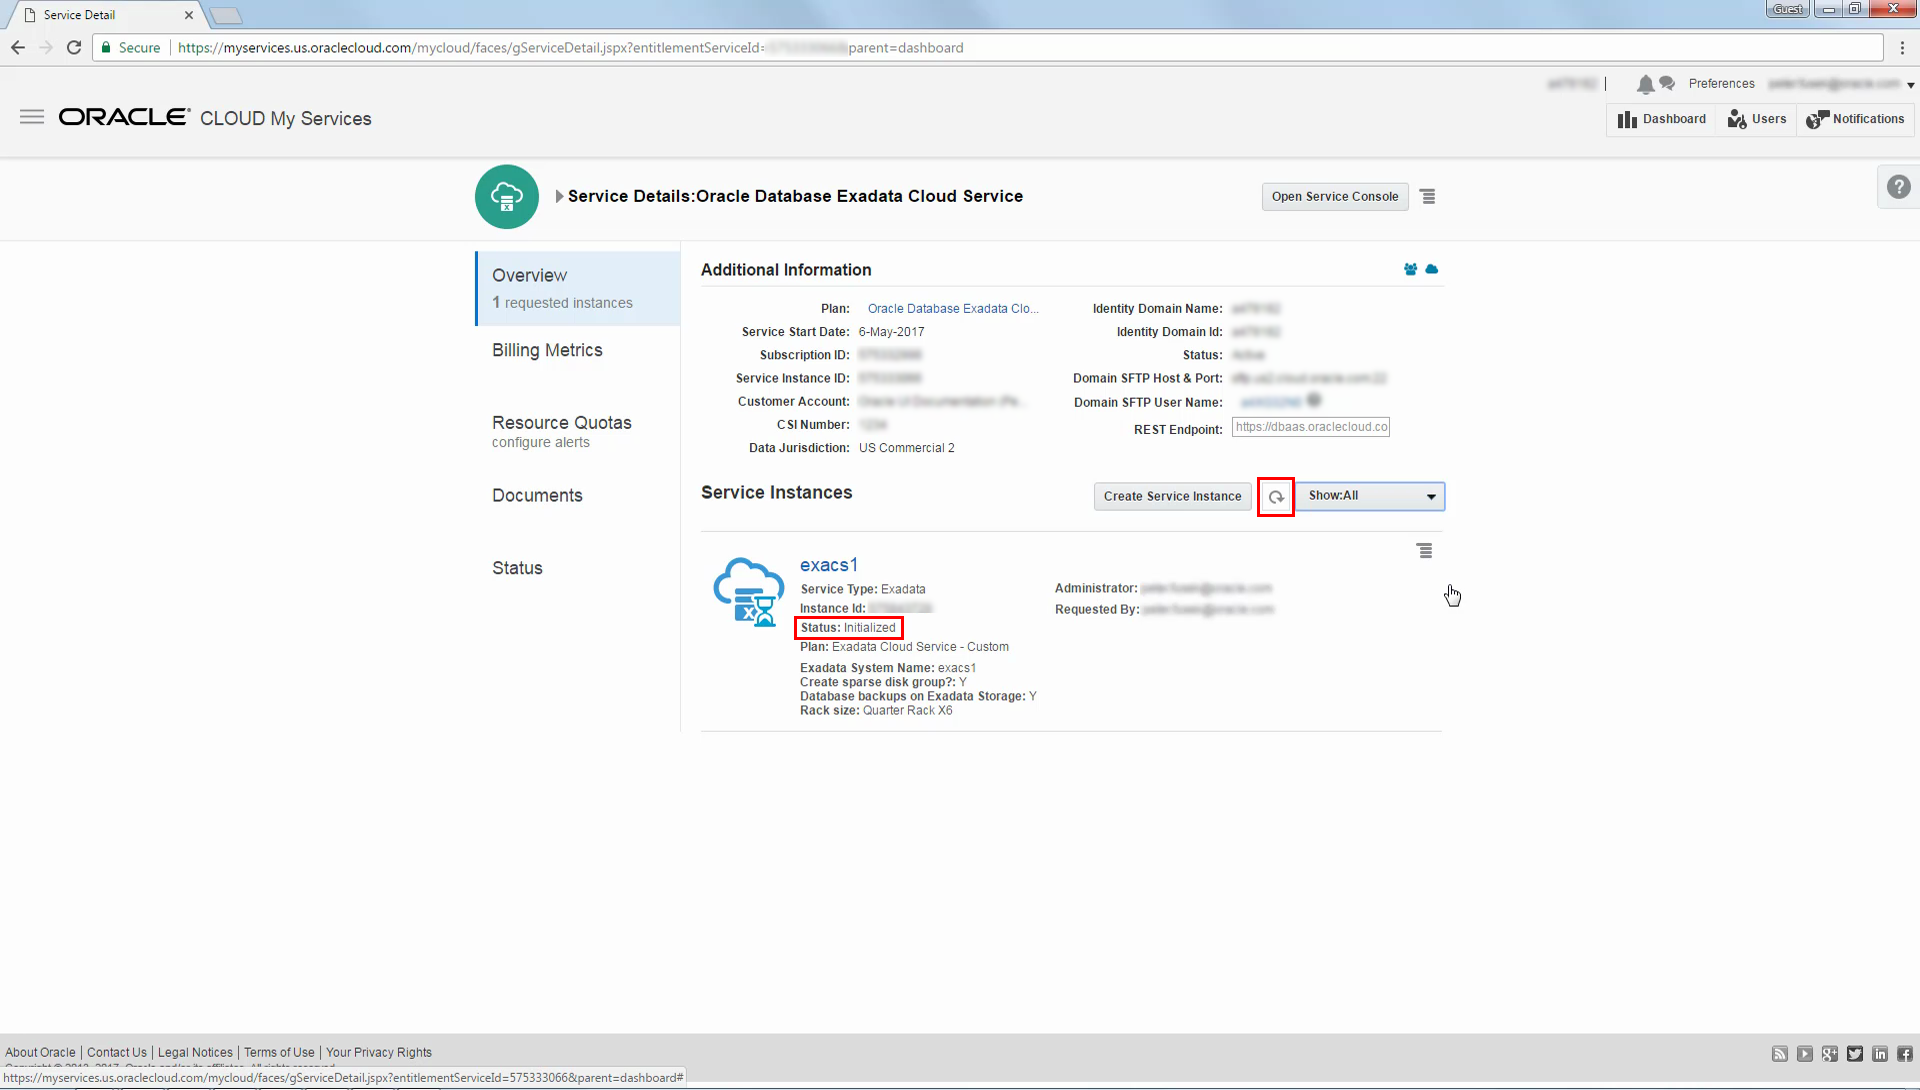
-
While the Exadata Cloud Service instance is being created the instance Status will display Initialized. You can use the refresh button (with the circular icon) to periodically refresh the page.
-
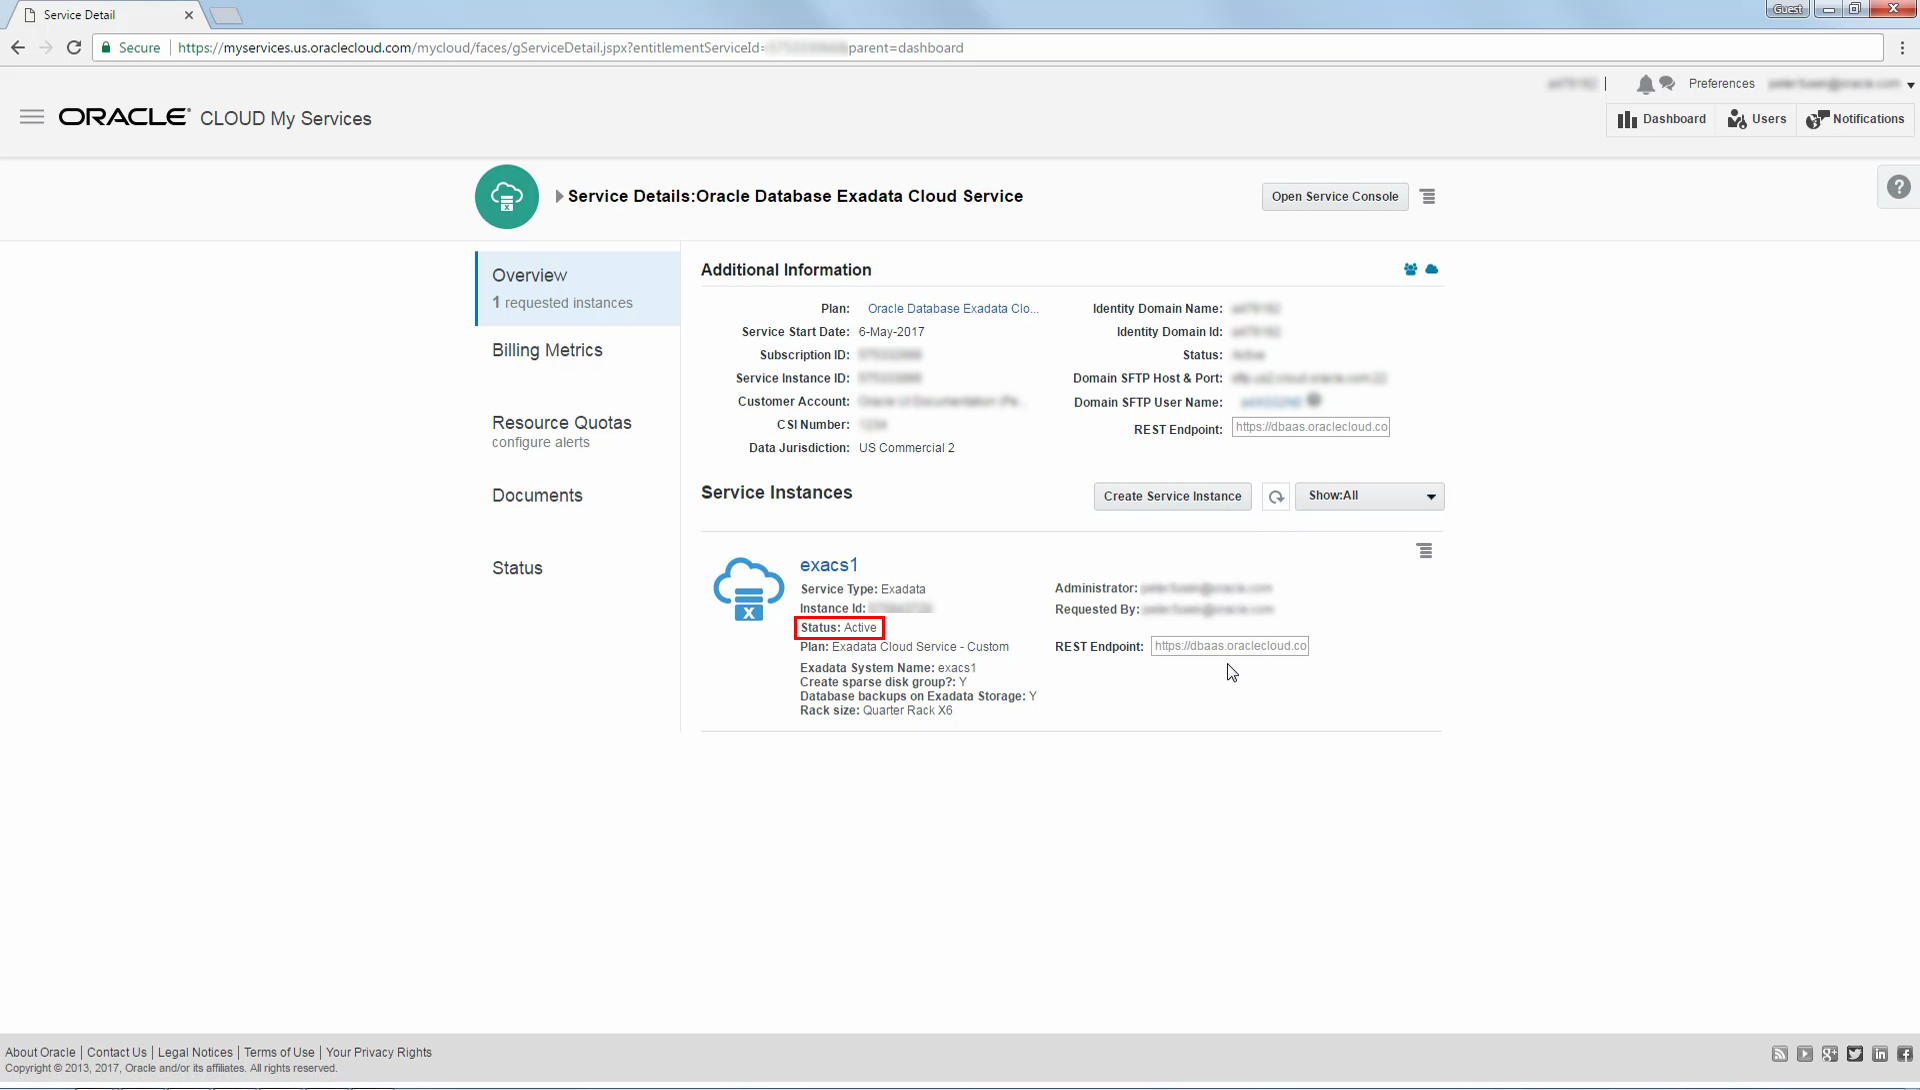
After the creation process completes the Status changes to Active and the Exadata Cloud Service instance becomes fully operational.
-
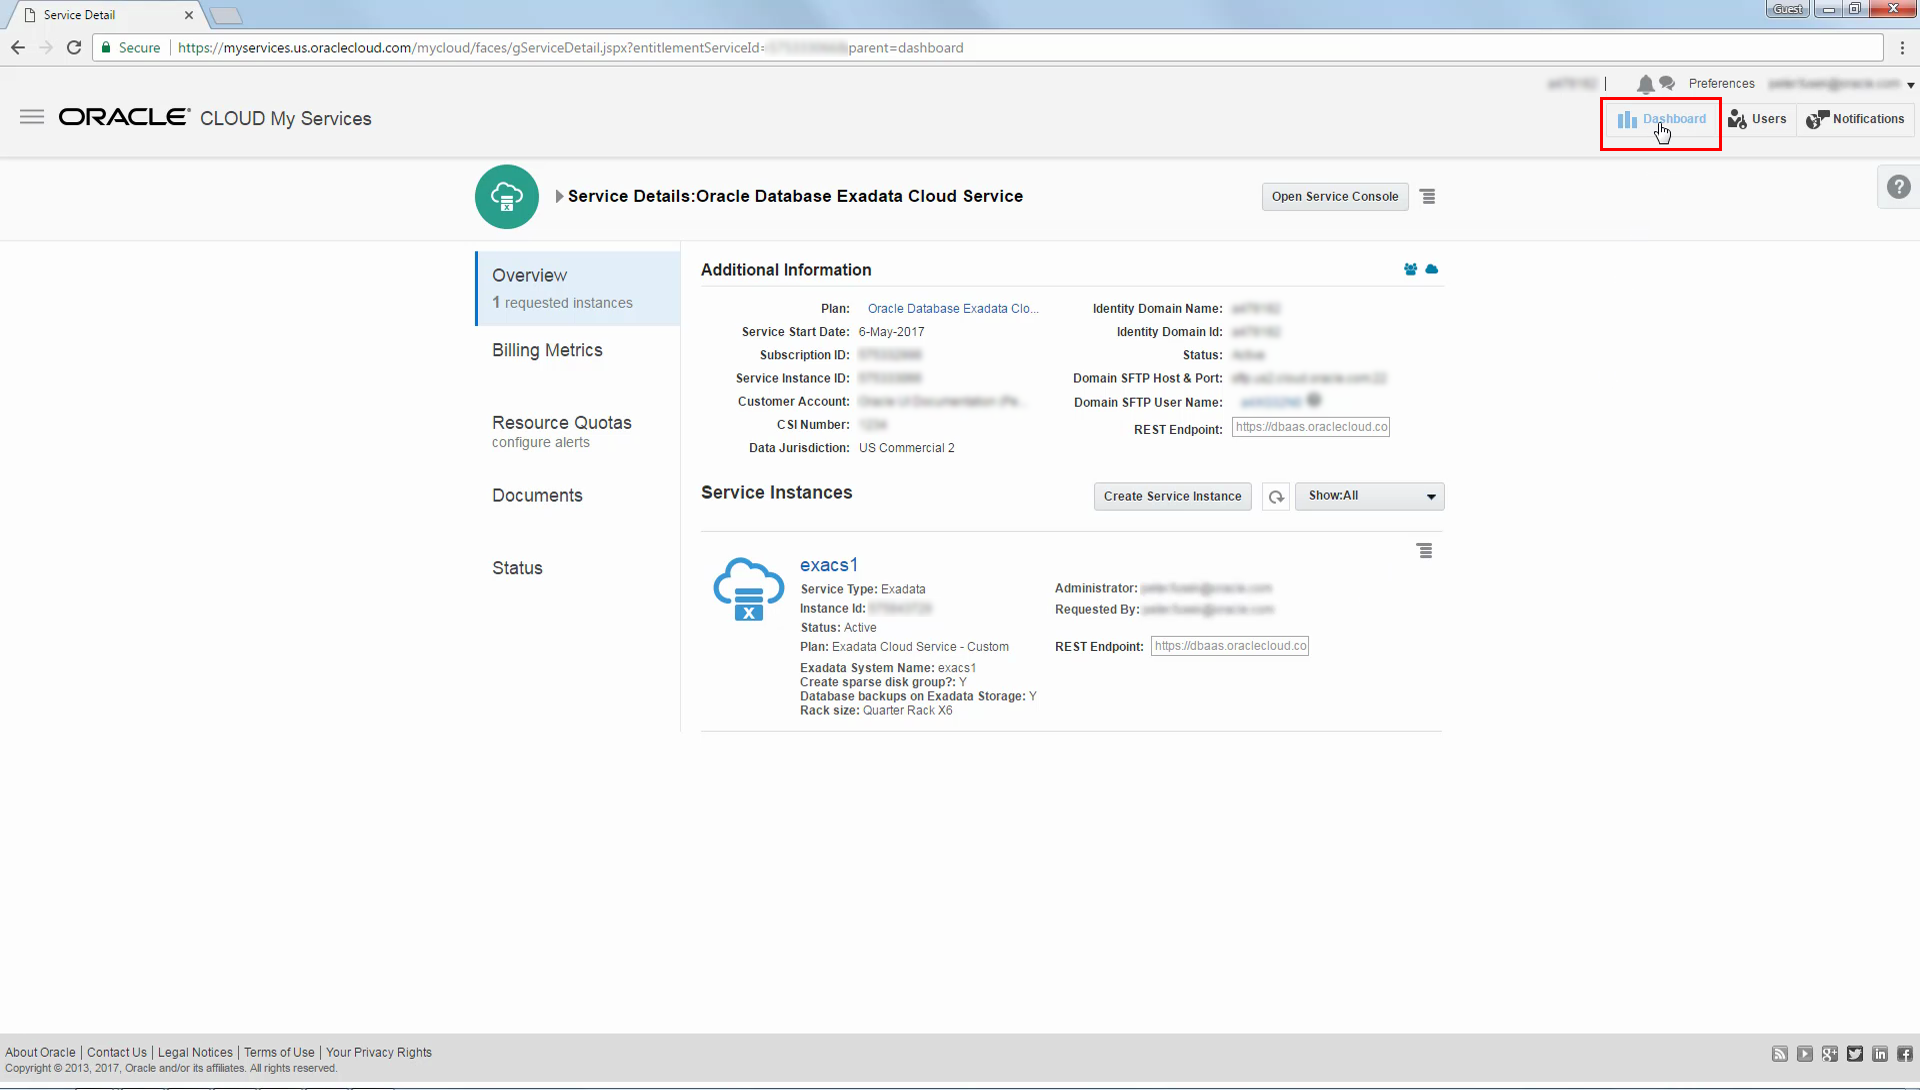
At this point you are ready to create a database deployment. To start this process, navigate back to the My Services dashboard.
 Creating a Database Deployment
Invoking the Create Service Wizard to Create a Database Deployment
-
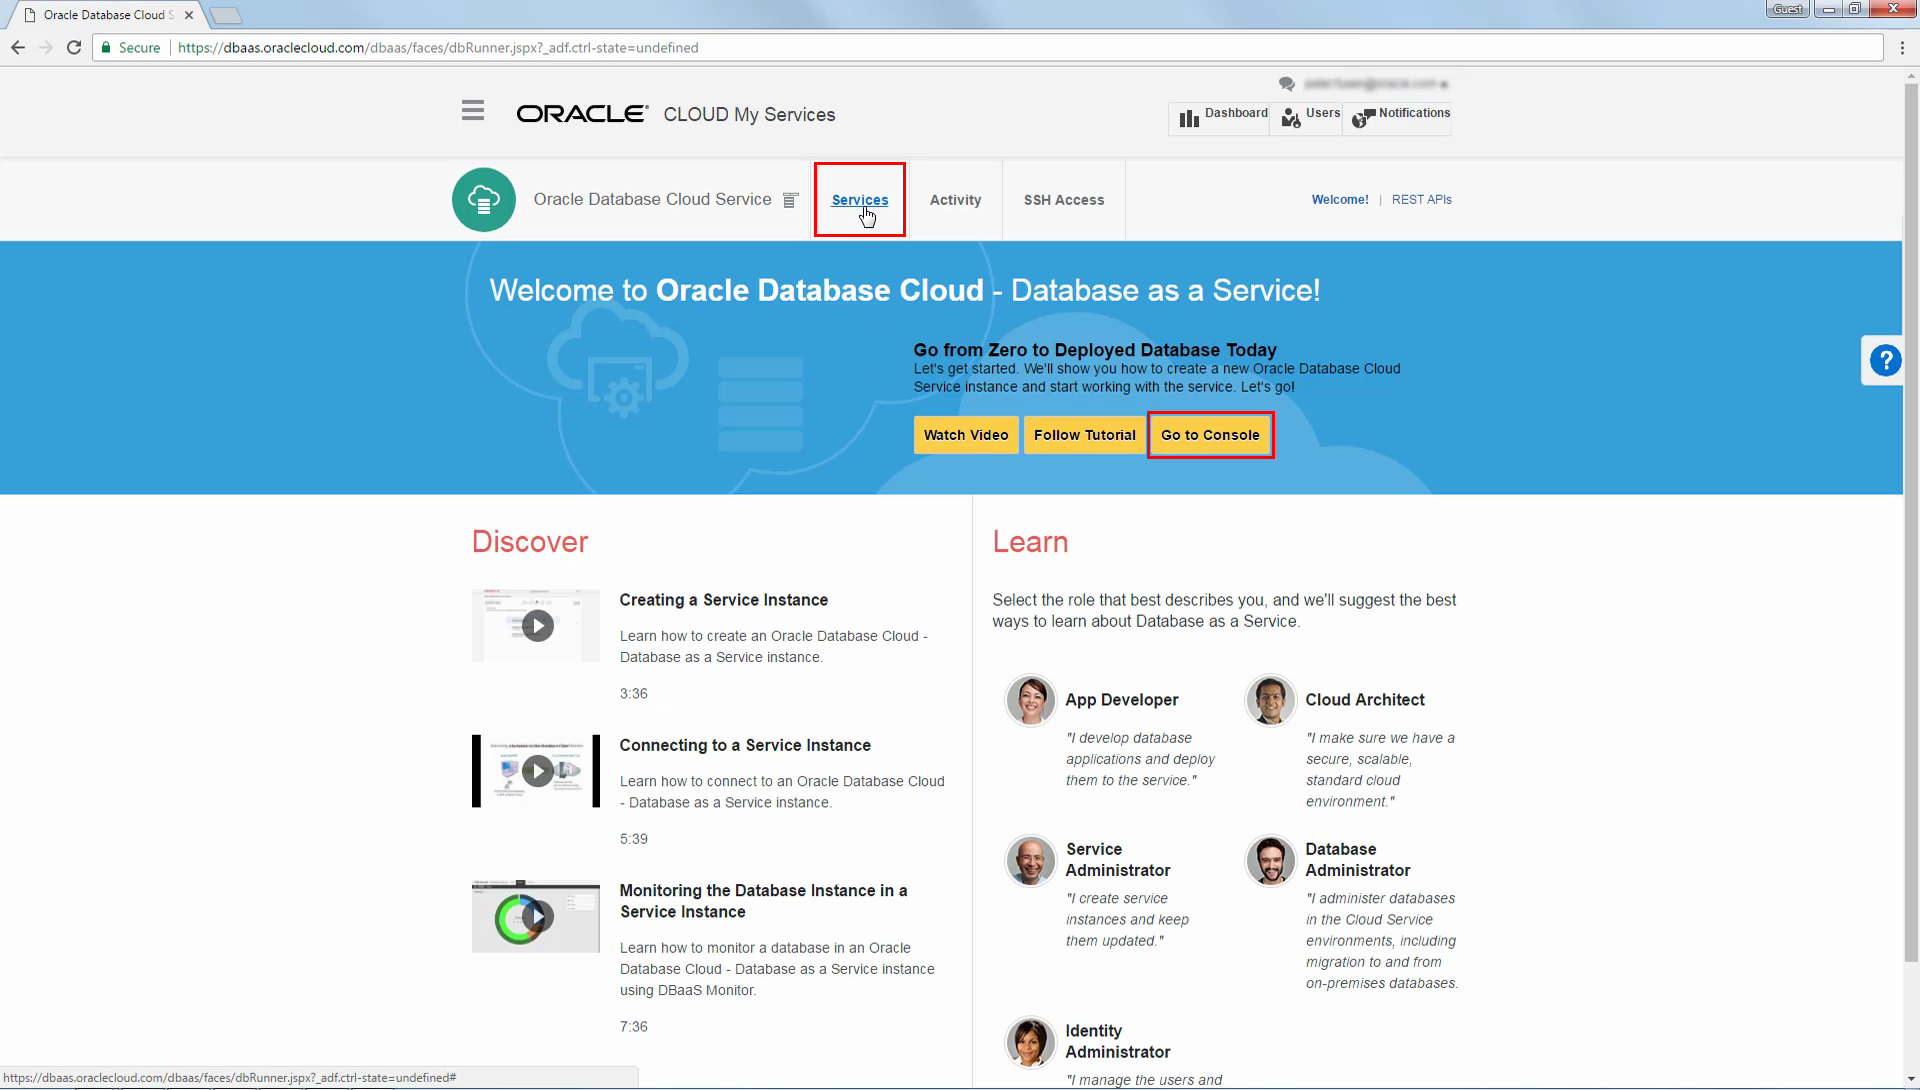
In the My Services dashboard, select Open Service Console from the menu in the Exadata tile.

-
The welcome page provides new users with links to various learning resources. However, to create a database deployment you must navigate to the Services page by clicking Services or Go to Console.
-
Click Create Service.
-
The Create Service wizard is invoked, displaying the Service page.
Configuring the Database Deployment
Use the Create Service wizard to configure the Exadata Cloud Service database deployment.
-
Use the Service page to configure the basic attributes of the deployment. Then click Next.
The example shows a database deployment named starter12c that is deployed on the Exadata Cloud Service instance named exacs1, and which is configured to use Oracle Database 12c Release 2.
For further details, see Creating a Database Deployment.

-
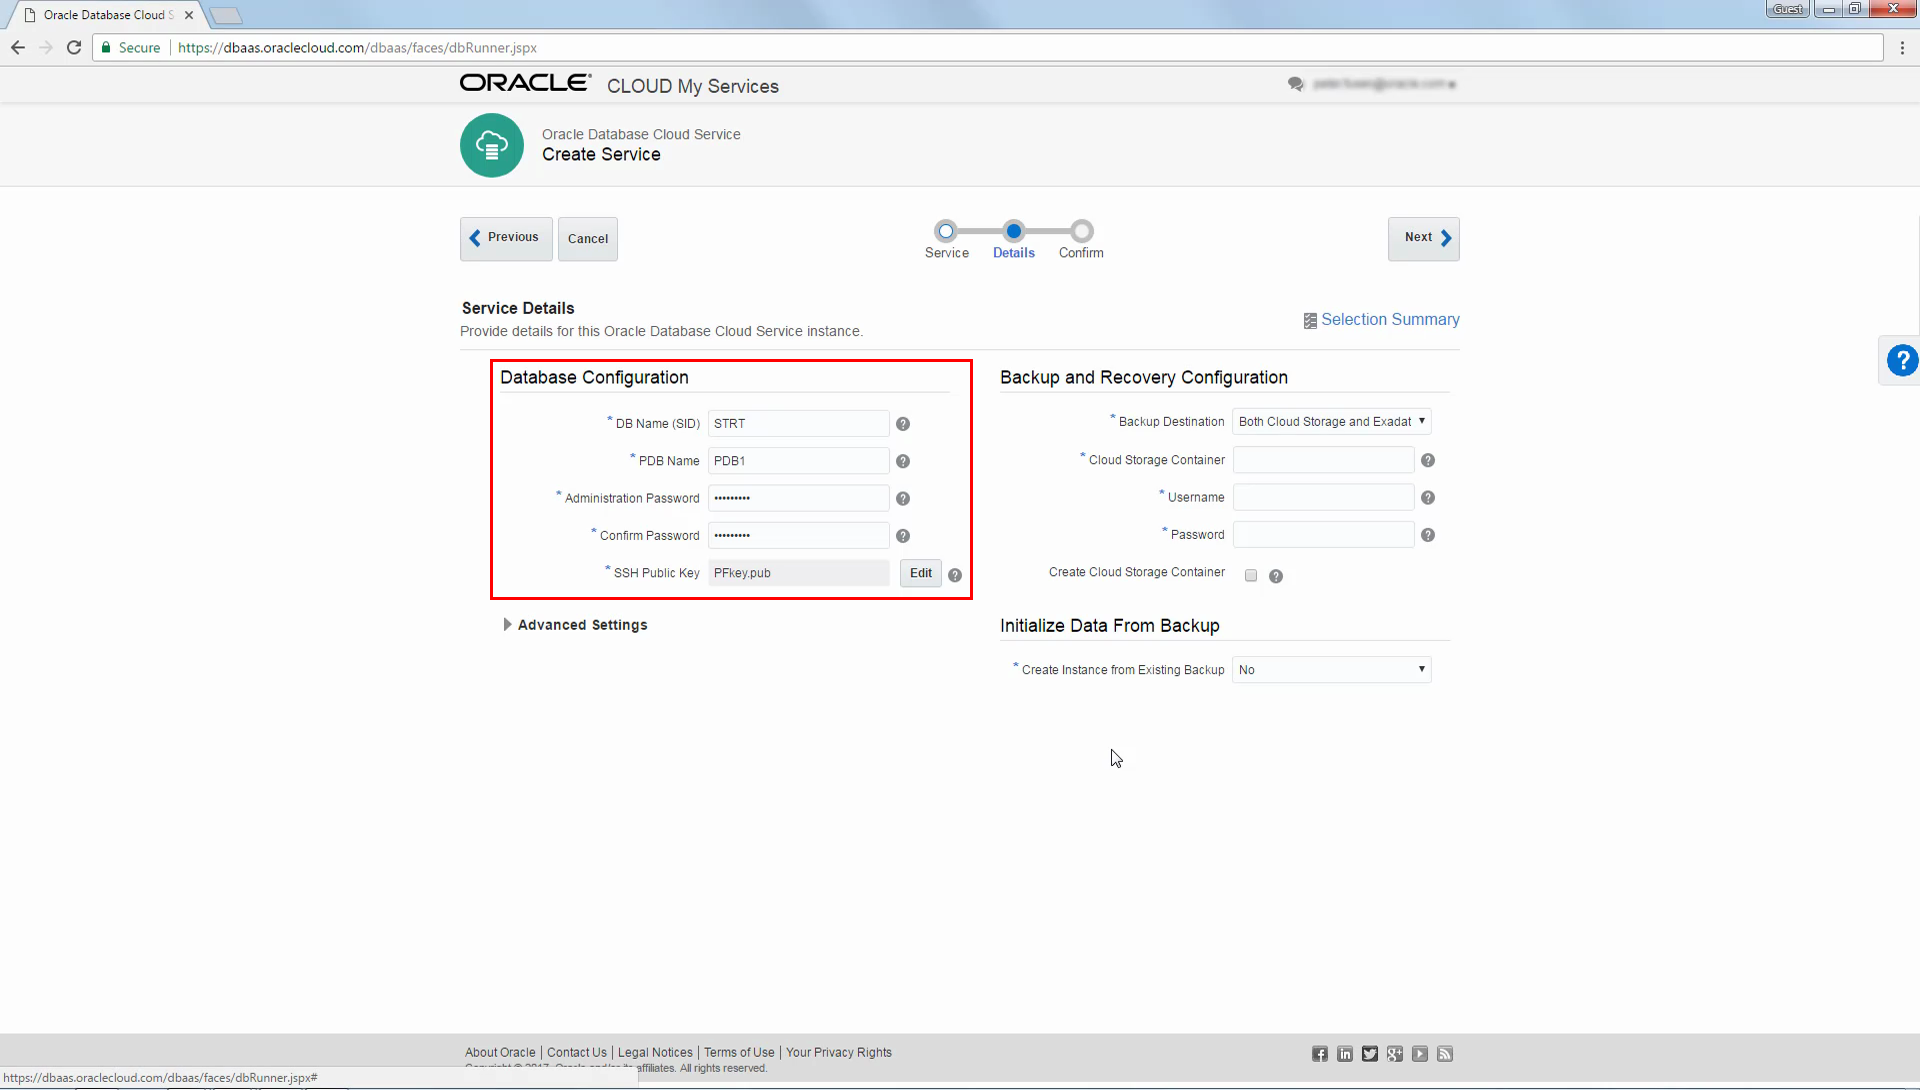
Use the Database Configuration section of the Service Details page to specify vital configuration options for the database deployment.
Note that the SSH Public Key field is not displayed if the selected Exadata Cloud Service environment already contains a previously specified SSH key.
For further details, see Creating a Database Deployment.
-
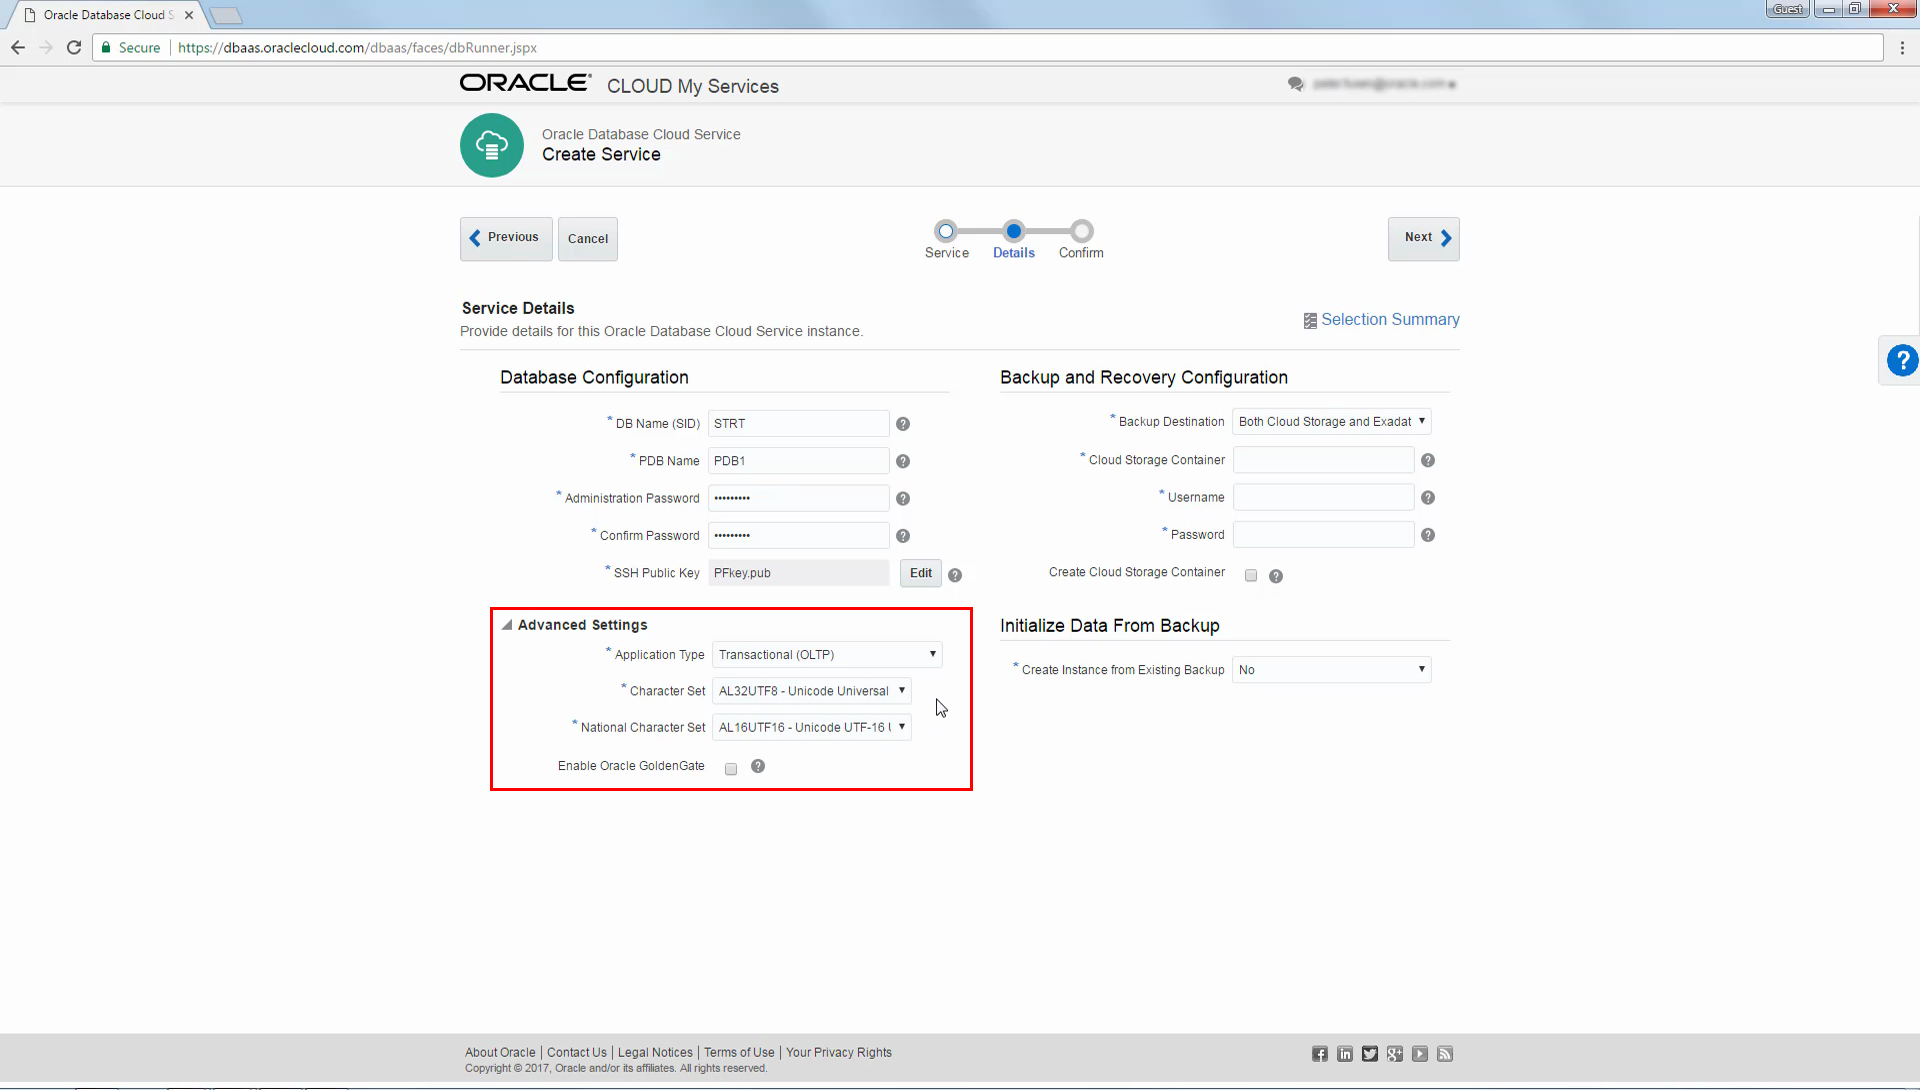
Optionally, expand the Advanced Settings subsection and specify additional database configuration options for the database deployment:
Note that the Application Type field is only displayed when you create the starter database, which is the very first database deployment that you create after the creation of your Exadata Cloud Service instance. Subsequent database deployments are created with a standardized database configuration.
For further details, see Creating a Database Deployment.
-
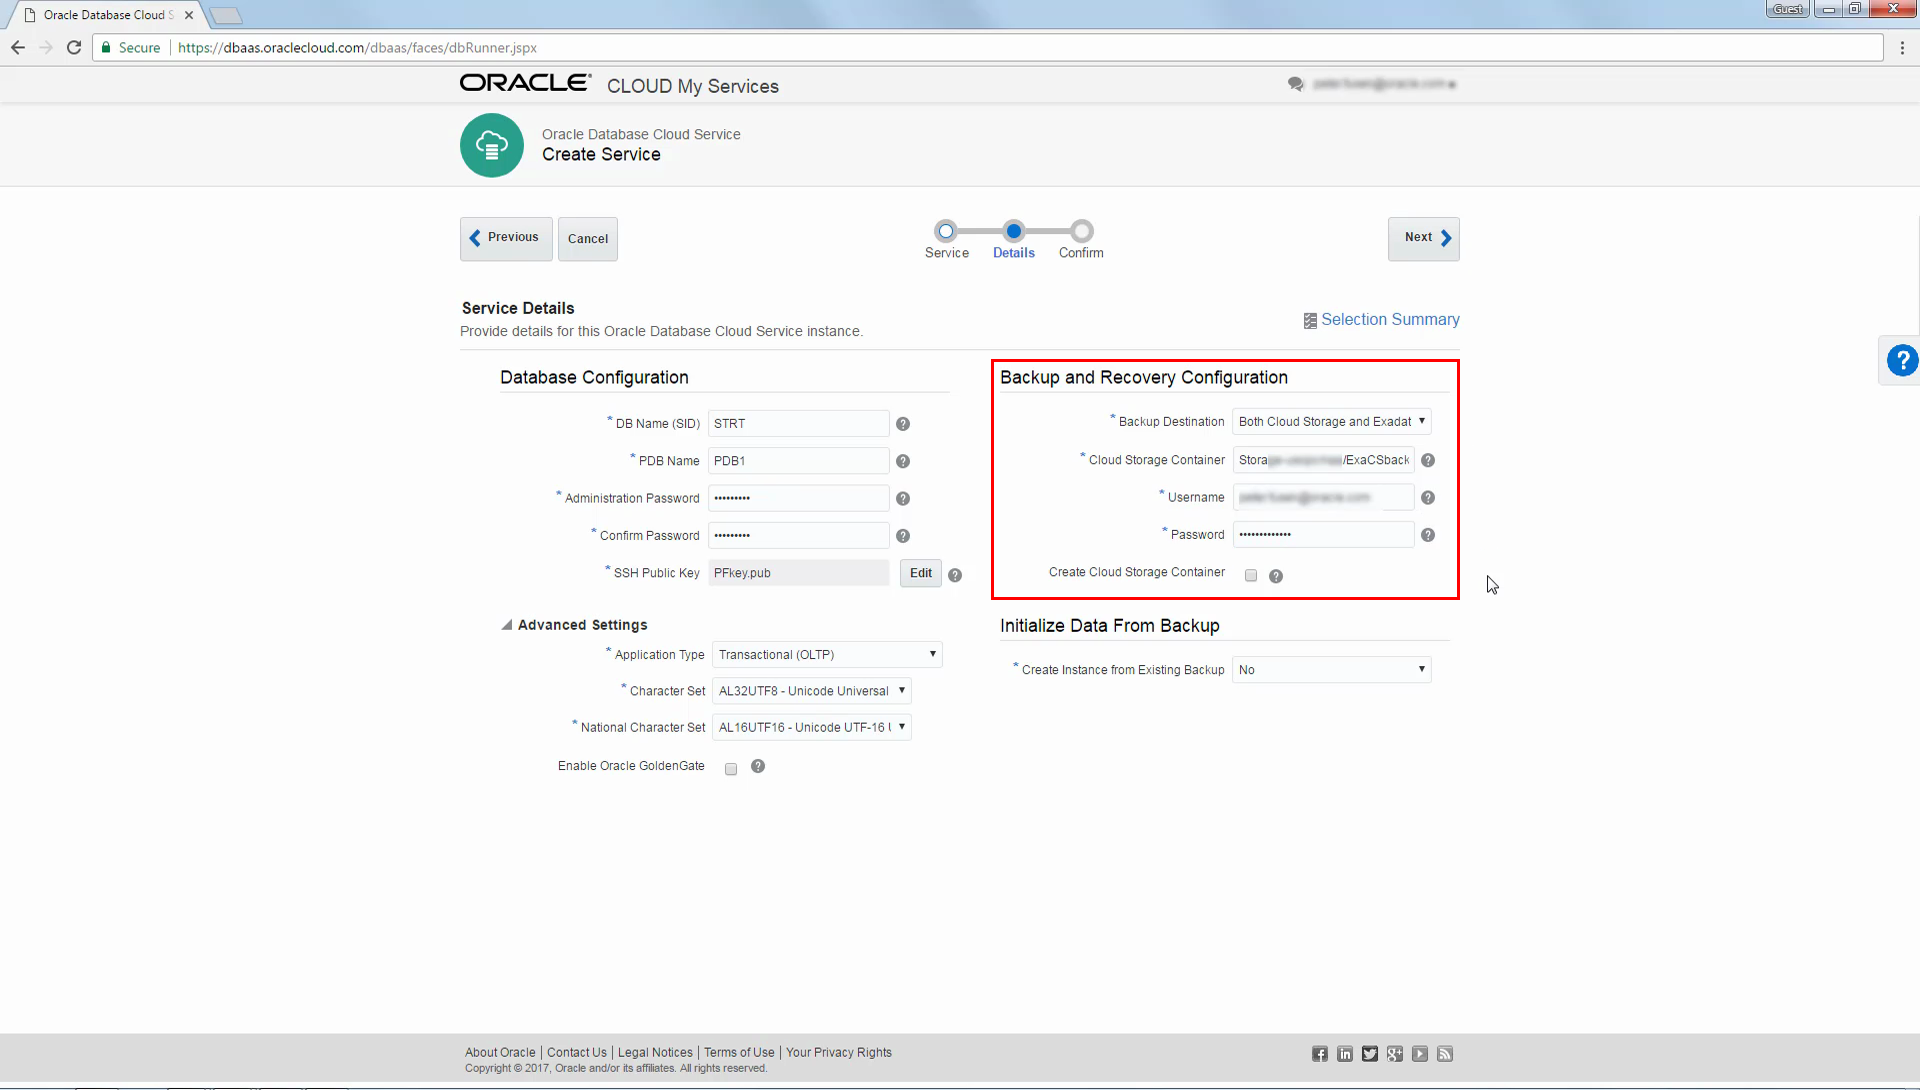
Use the Backup and Recovery Configuration section of the Service Details page to choose an automatic backup destination and associated backup settings for the database deployment
Note that the Backup Destination option Both Cloud Storage and Exadata Storage is only available if you checked Database backups on Exadata Storage when you created the Exadata Cloud Service instance.
Note also that automatic backups cannot be configured later if you select None as the Backup Destination.
For further details, see Creating a Database Deployment.
-
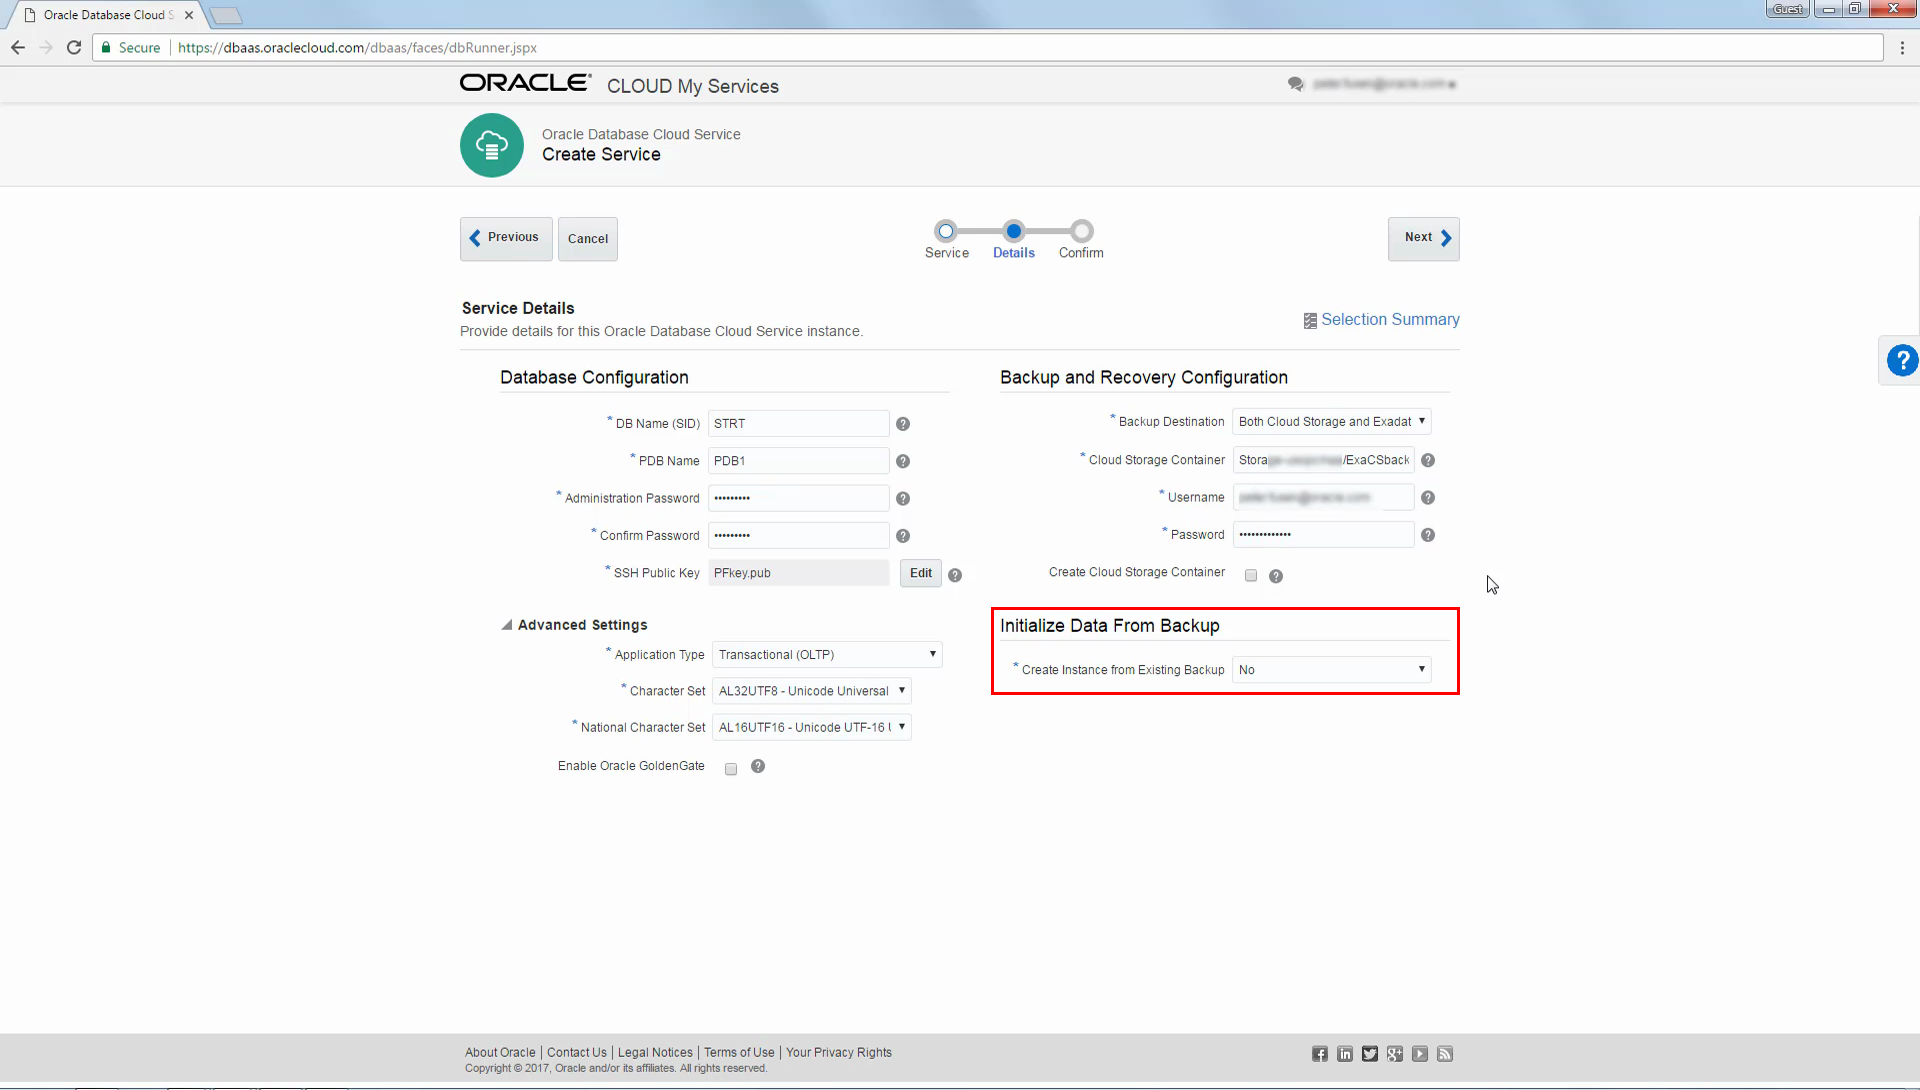
Optionally, use the Initialize Data From Backup section of the Service Details page to have the new database populated, or instantiated, from the data stored in a Database Backup Cloud Service backup. Then click Next.
If you select Yes for Initialize Data From Backup you are prompted to supply the details for the source database backup. The origin of the backup may be another Exadata Cloud Service database deployment in the same identity domain or another database that was backed up to cloud storage using Database Backup Cloud Service.
For further details, see Creating a Database Deployment Using a Cloud Backup.
-
On the Confirmation page, review the configuration settings and if you are satisfied click Create.
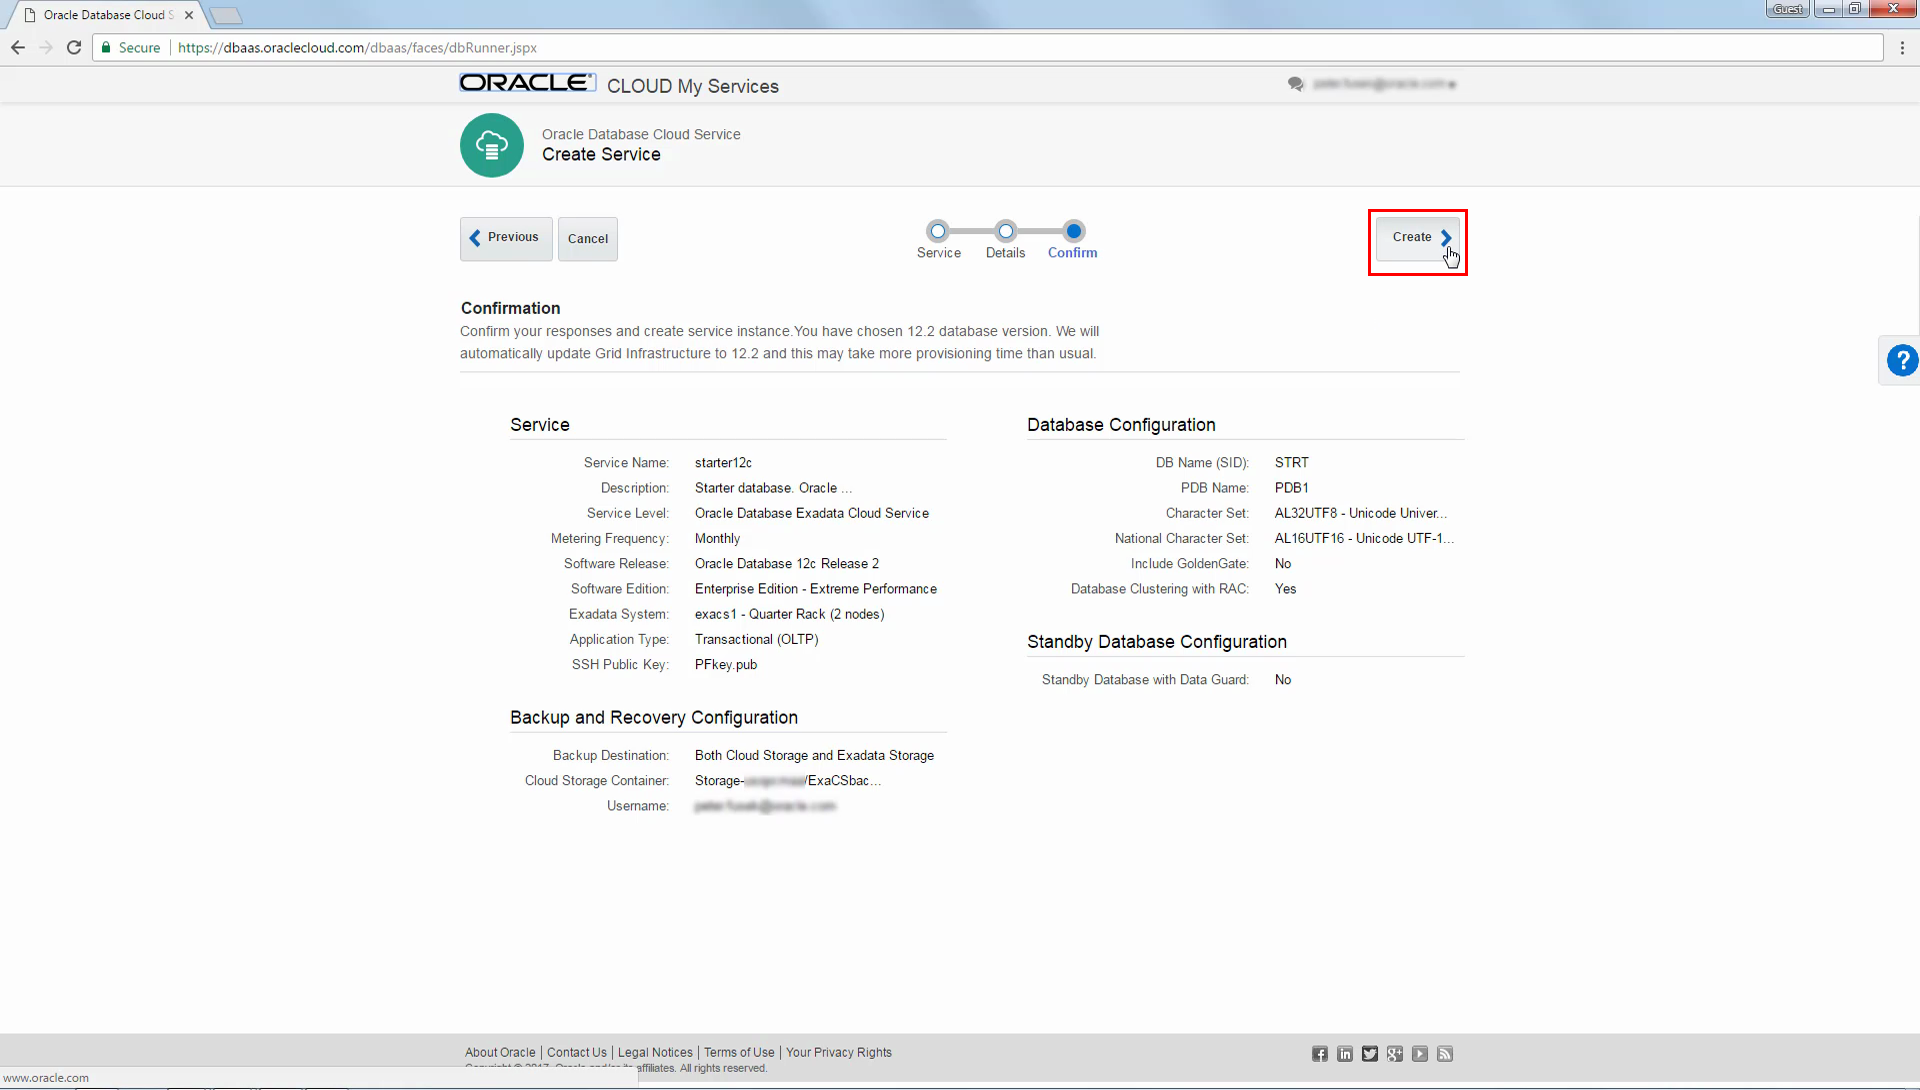
Confirming the Database Deployment
-
Clicking Create starts the process to create the database deployment. The process is fully automated and takes some time to complete. Initially you will return to the Service Console and a message will show that the creation process has been initiated.
While the database deployment is being created the Status will display Creating service and the icon beside the deployment name contains an hourglass. You can use the refresh button (with the circular icon) to periodically refresh the page.
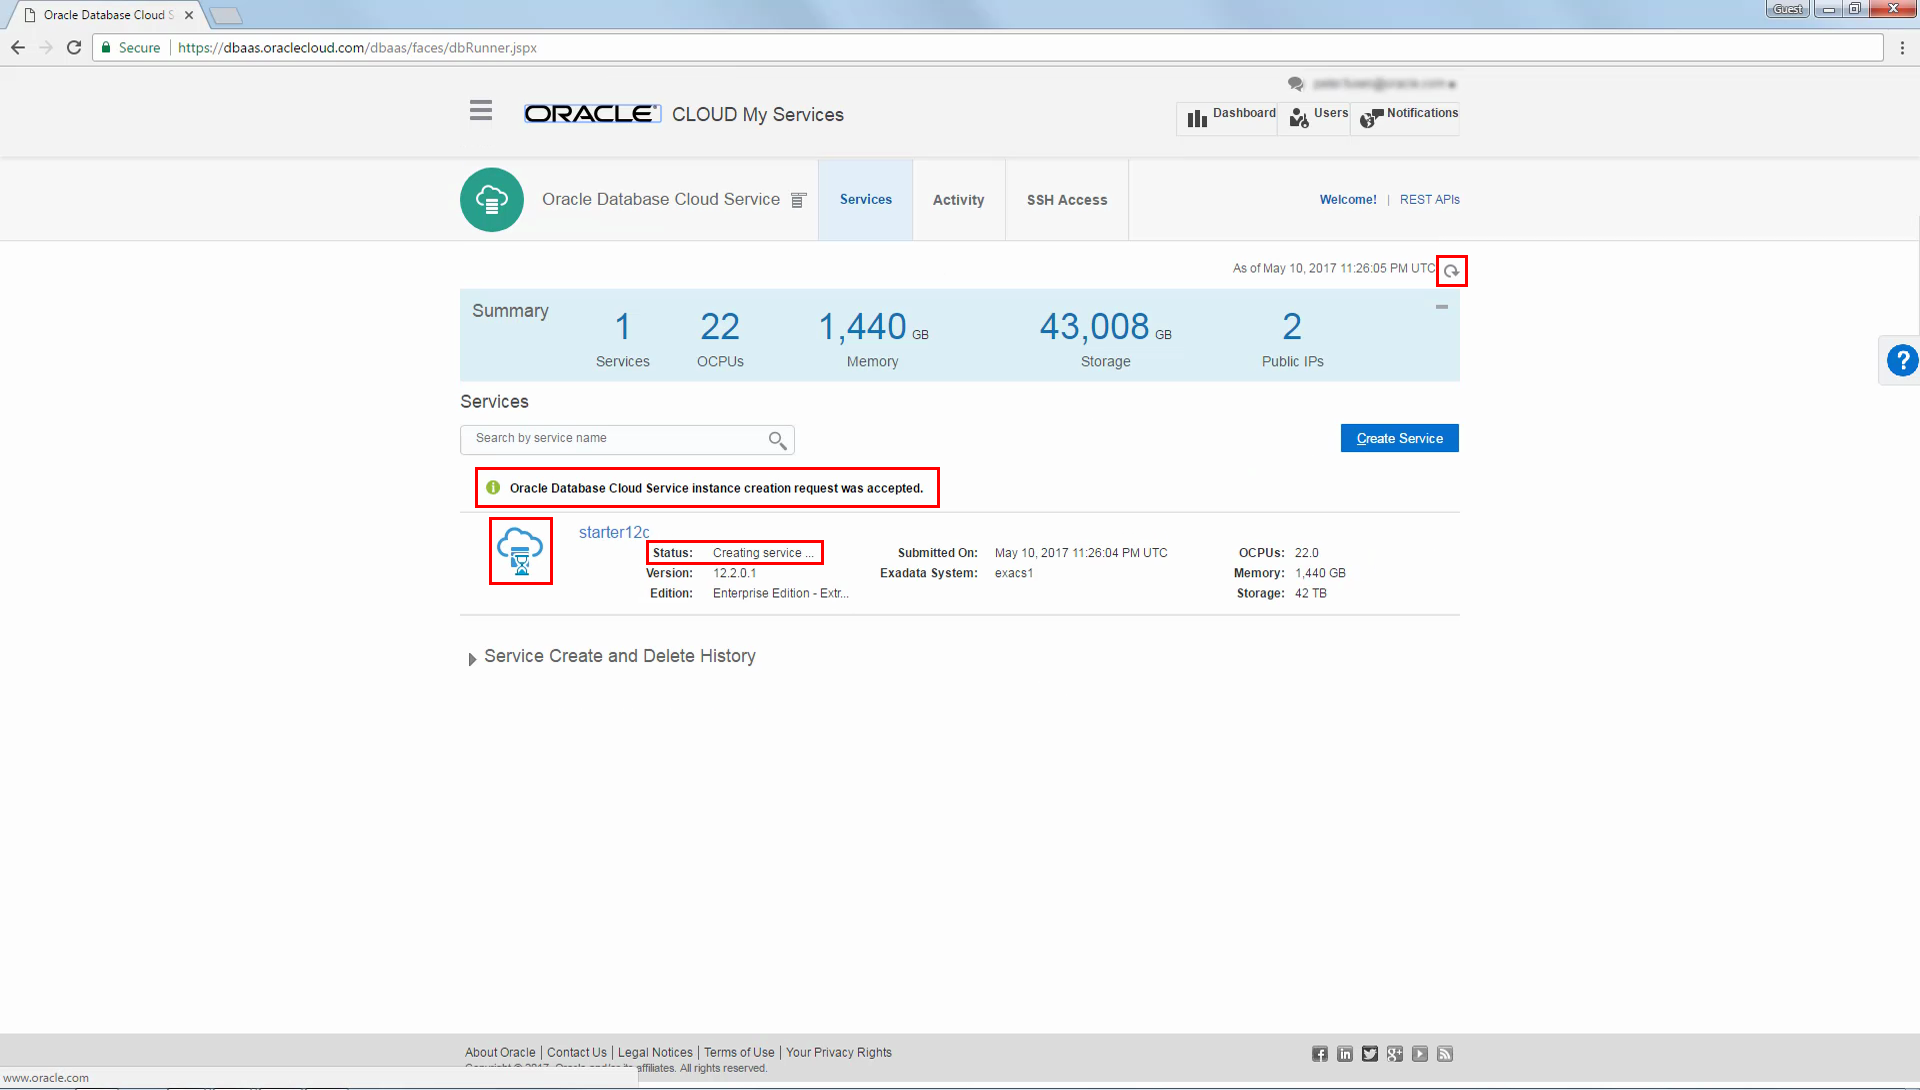
-
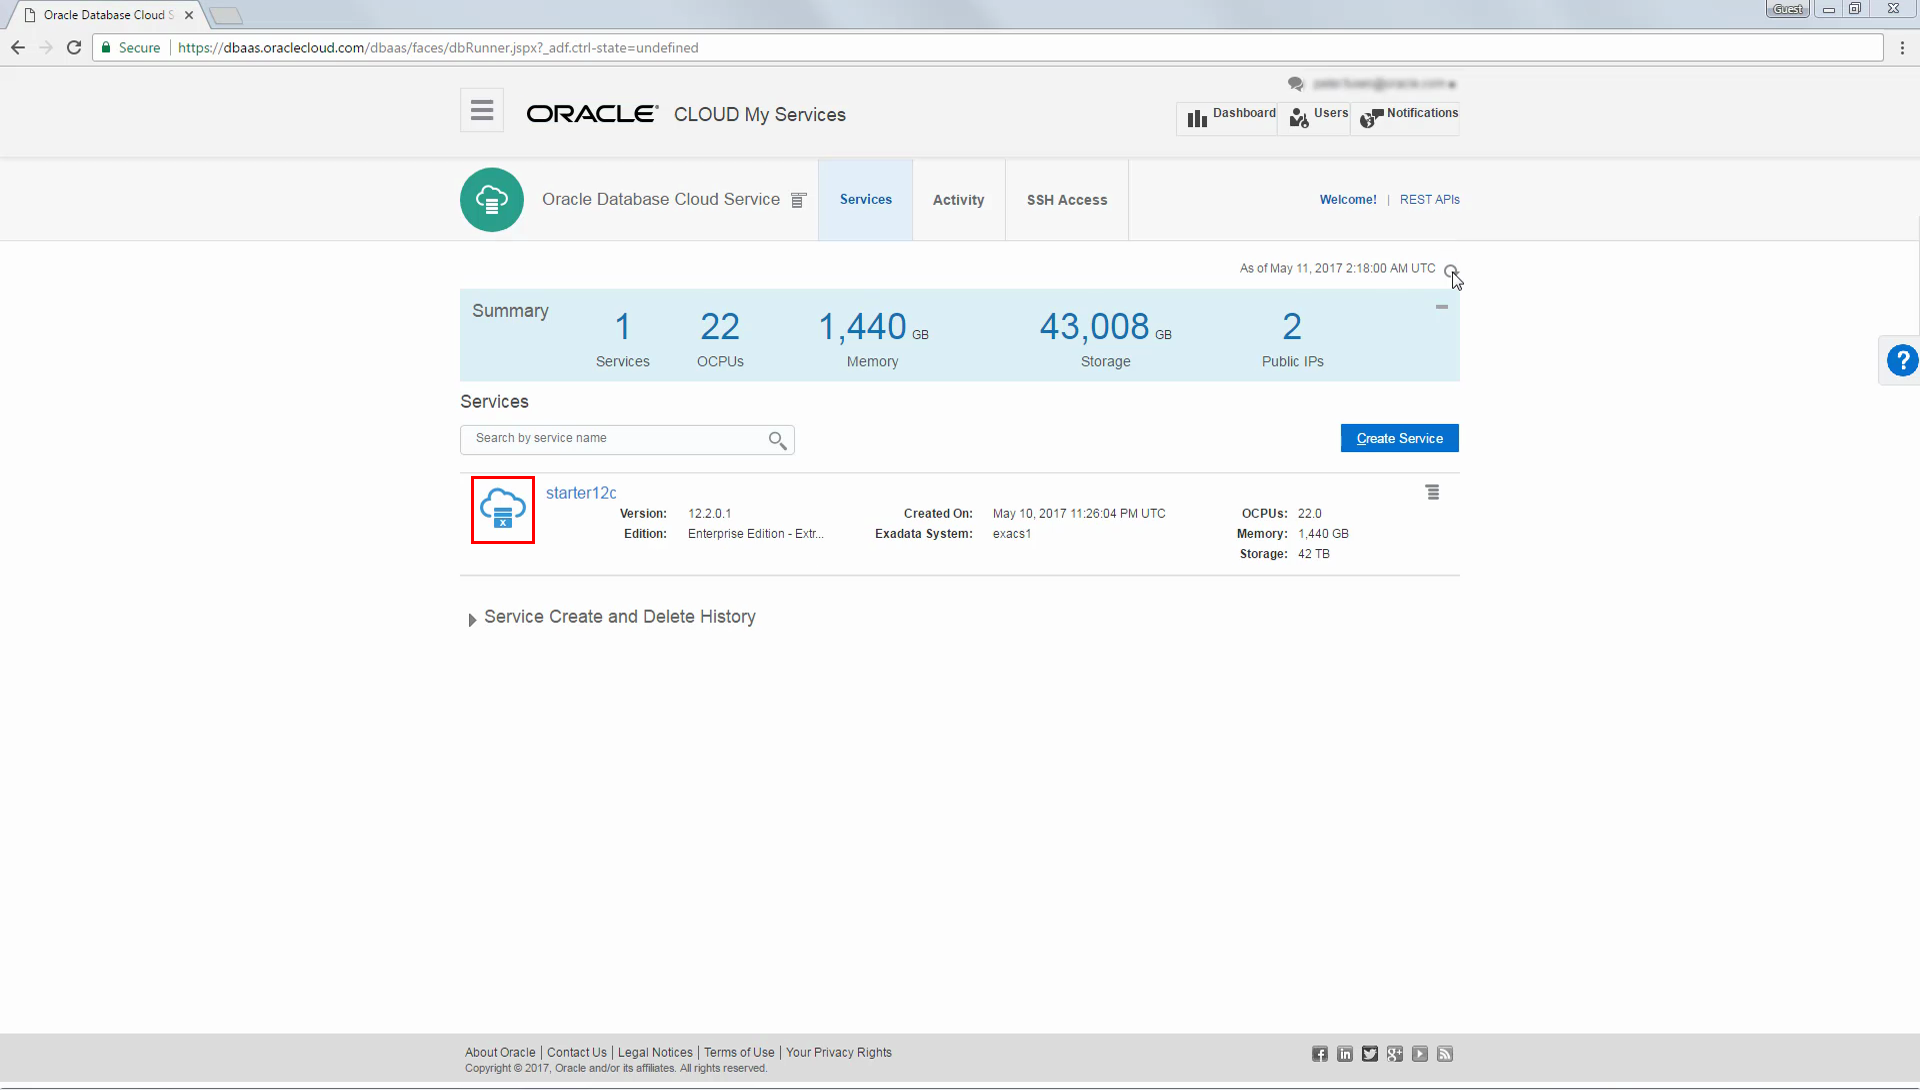
After the creation process completes the Status message disappears and the icon changes to remove the hourglass. At this point the database deployment is completely operational and ready for use.
-
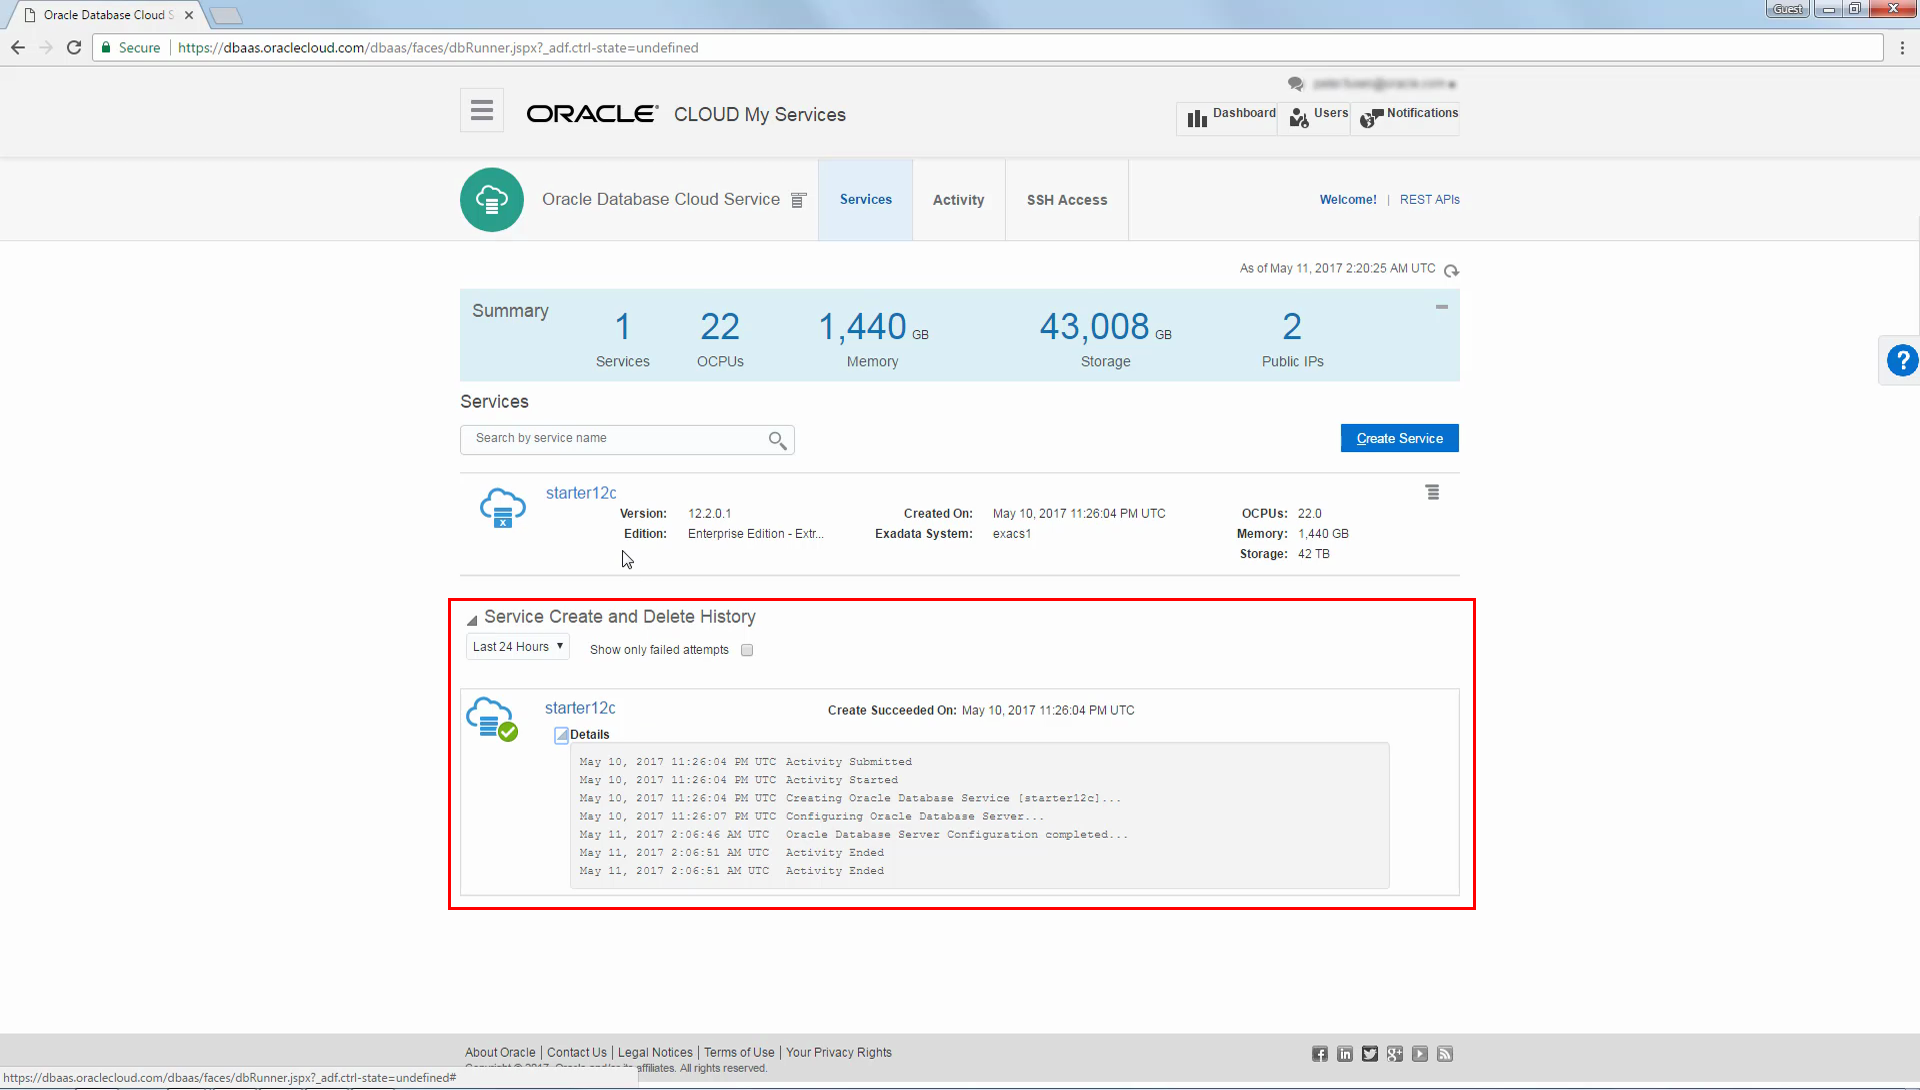
You can expand the Service Create and Delete History to view a log associated with the database deployment.
-
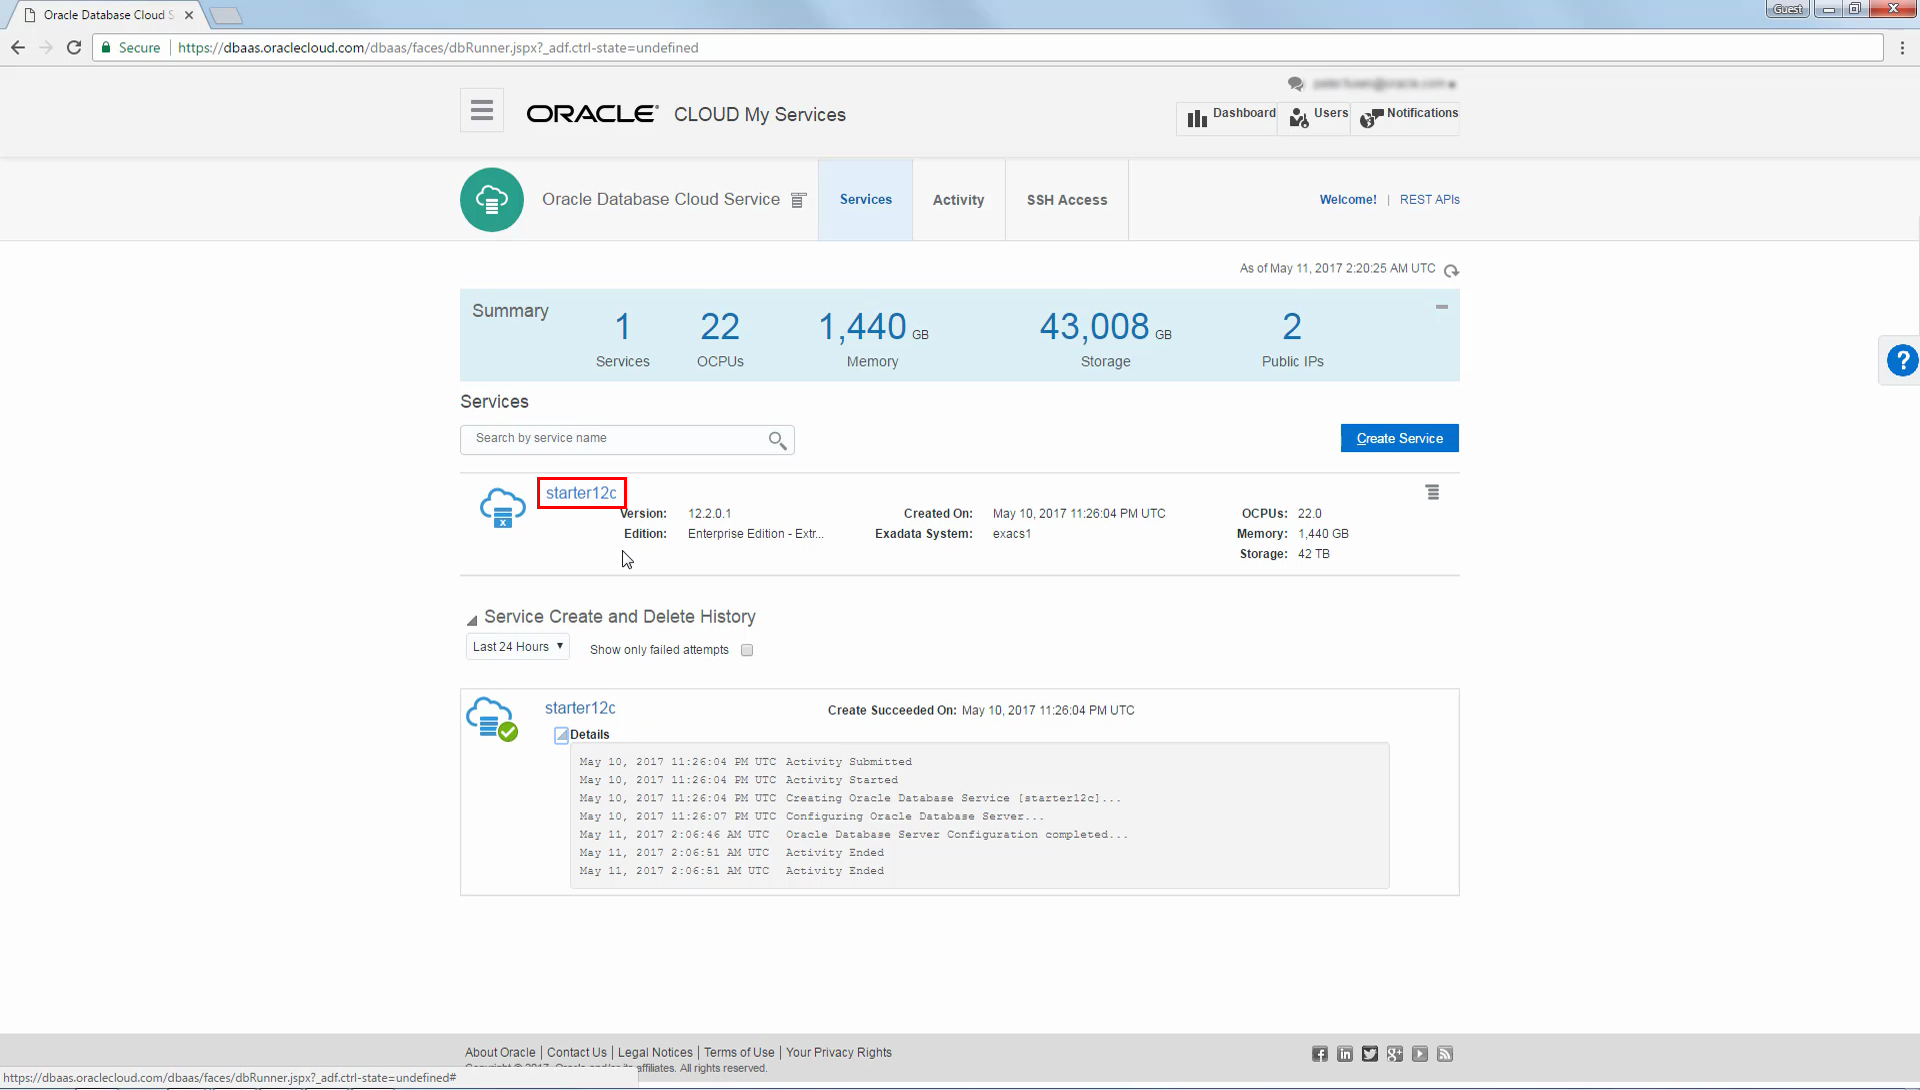
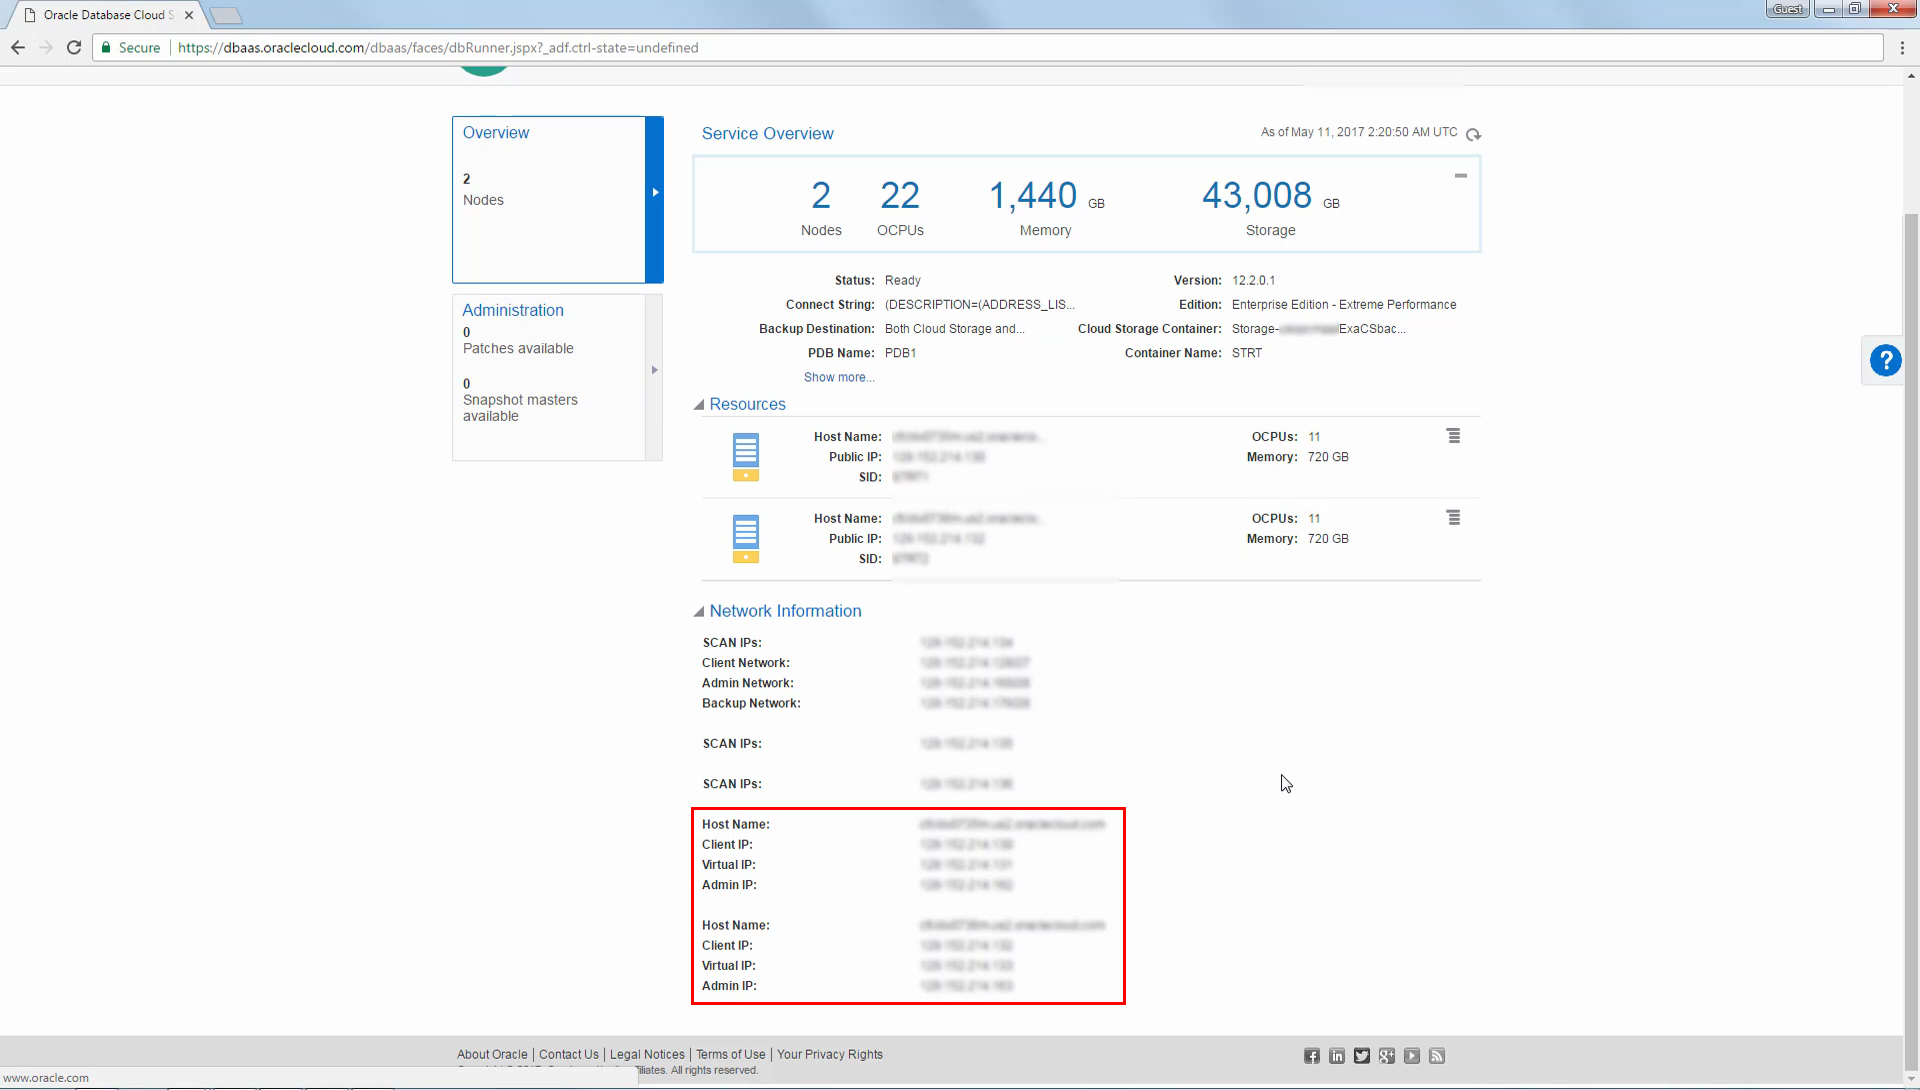
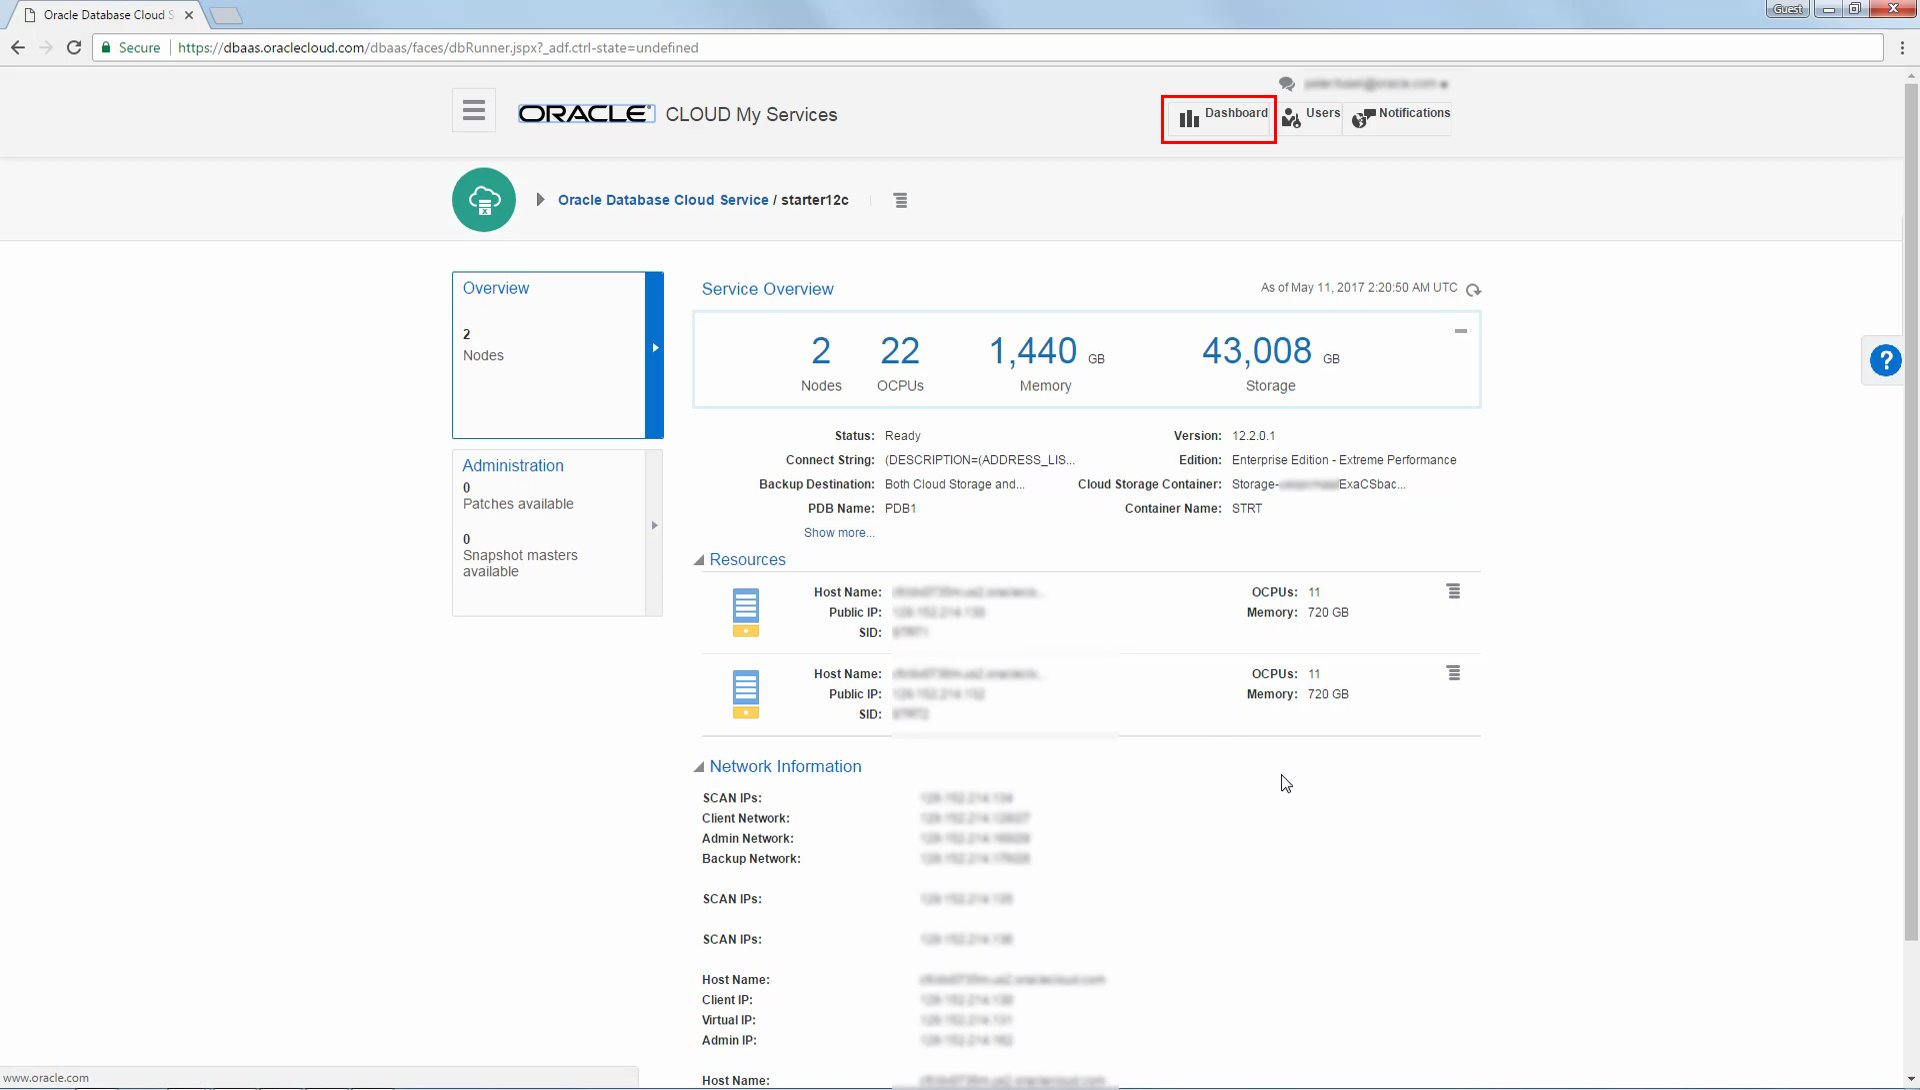
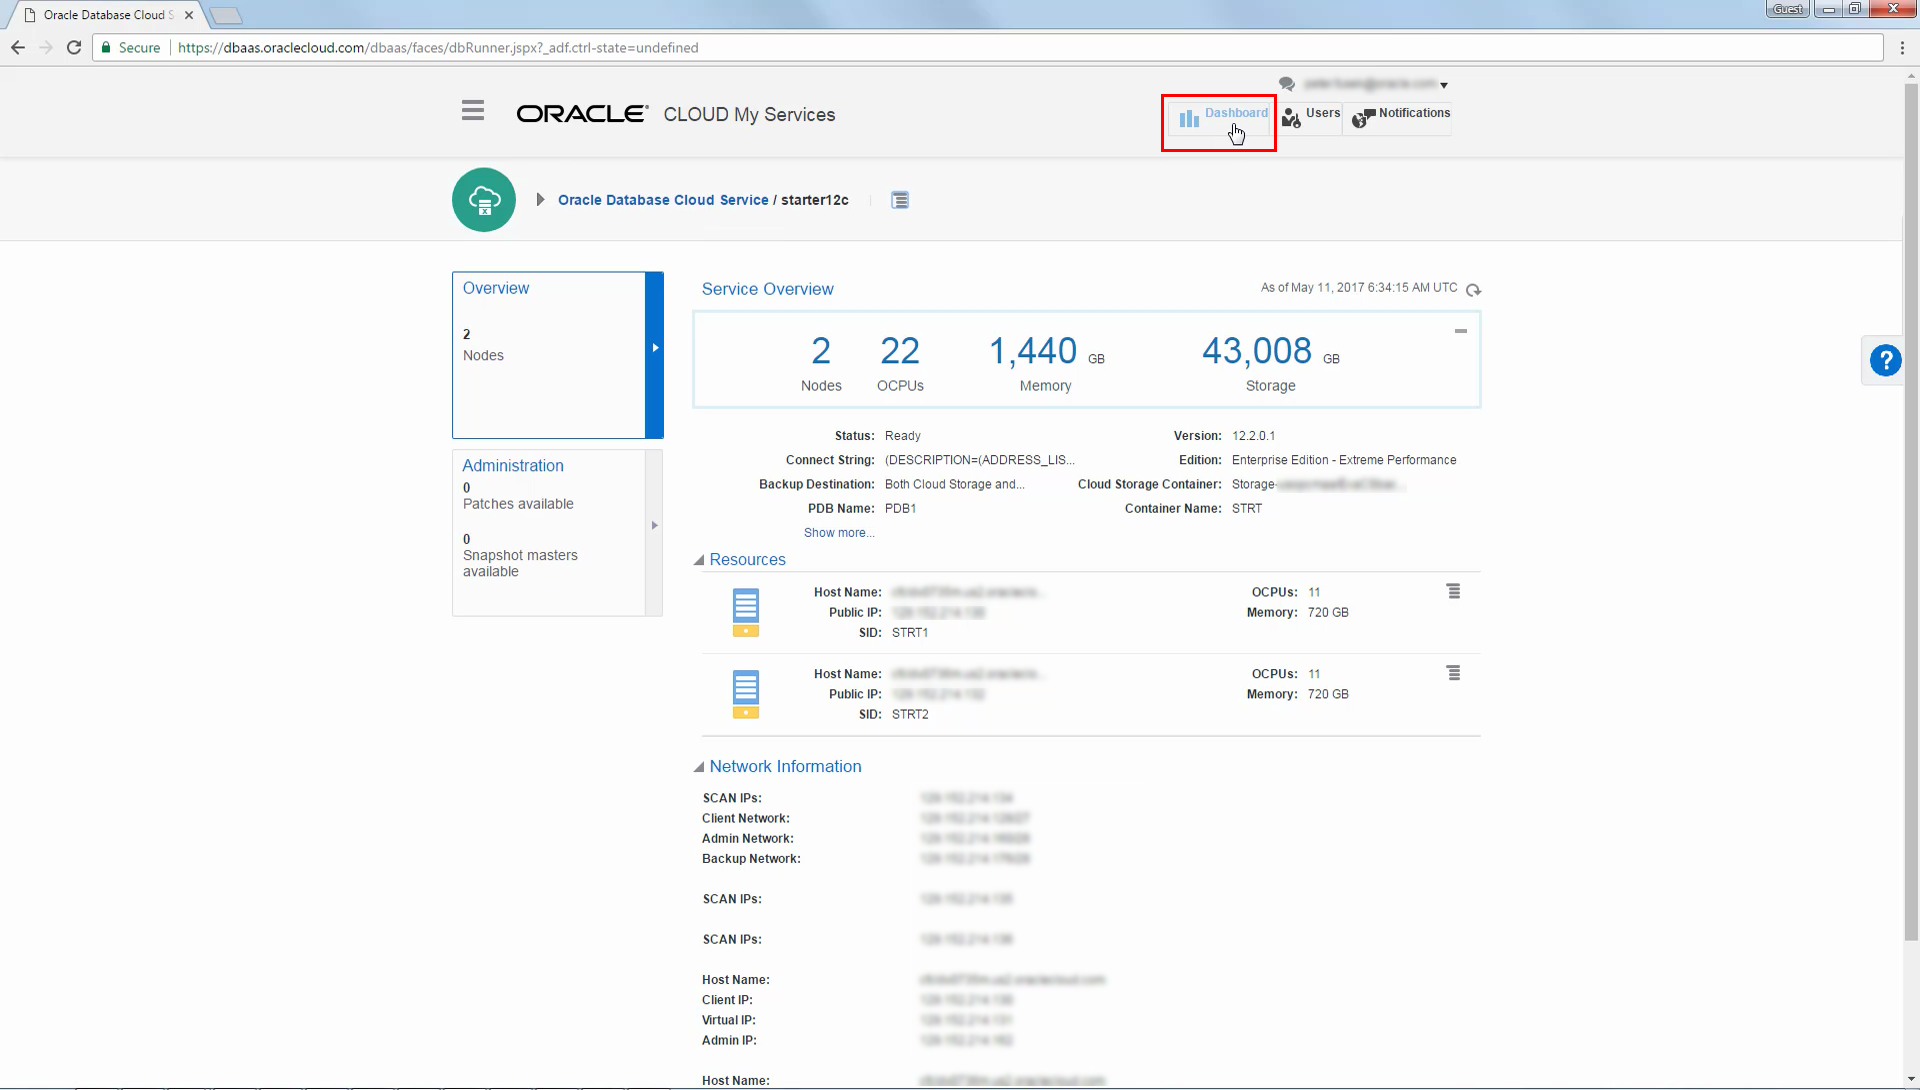
Click the deployment name to view details associated with the database deployment.
-
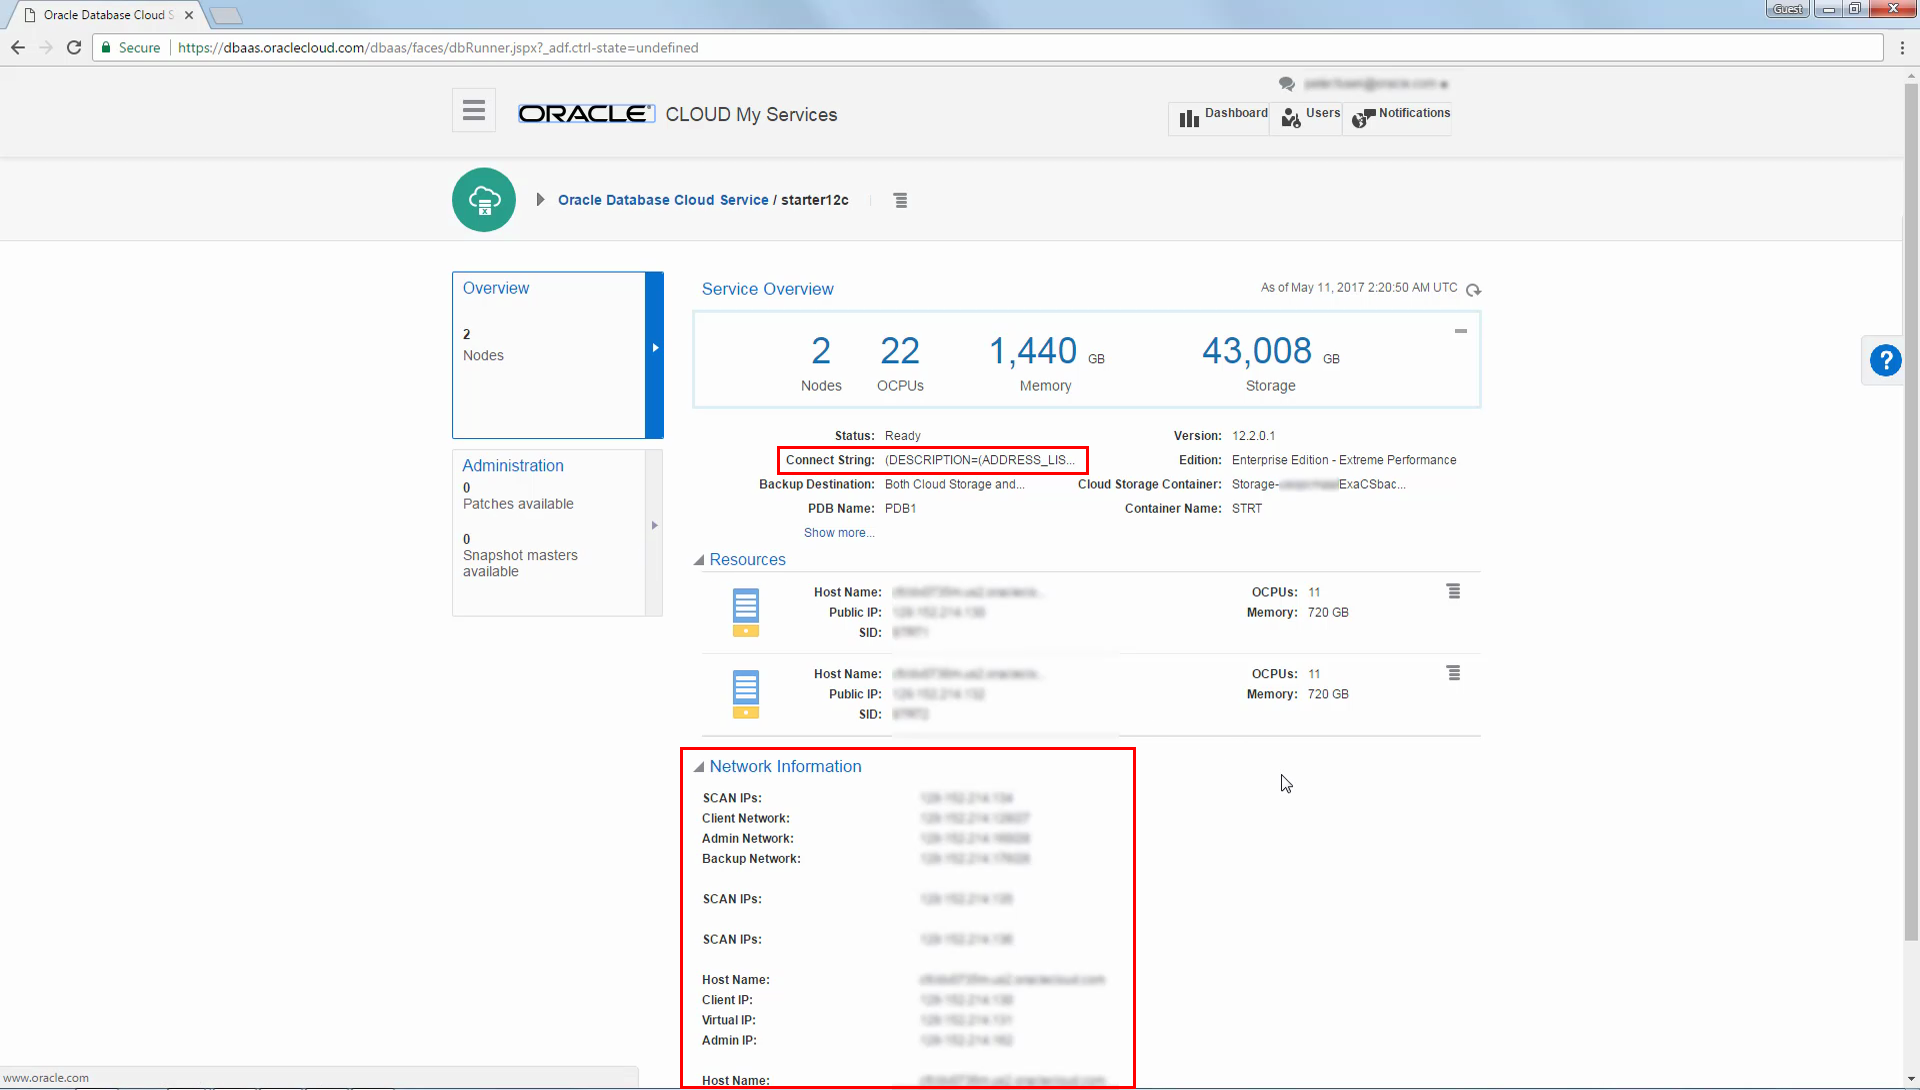
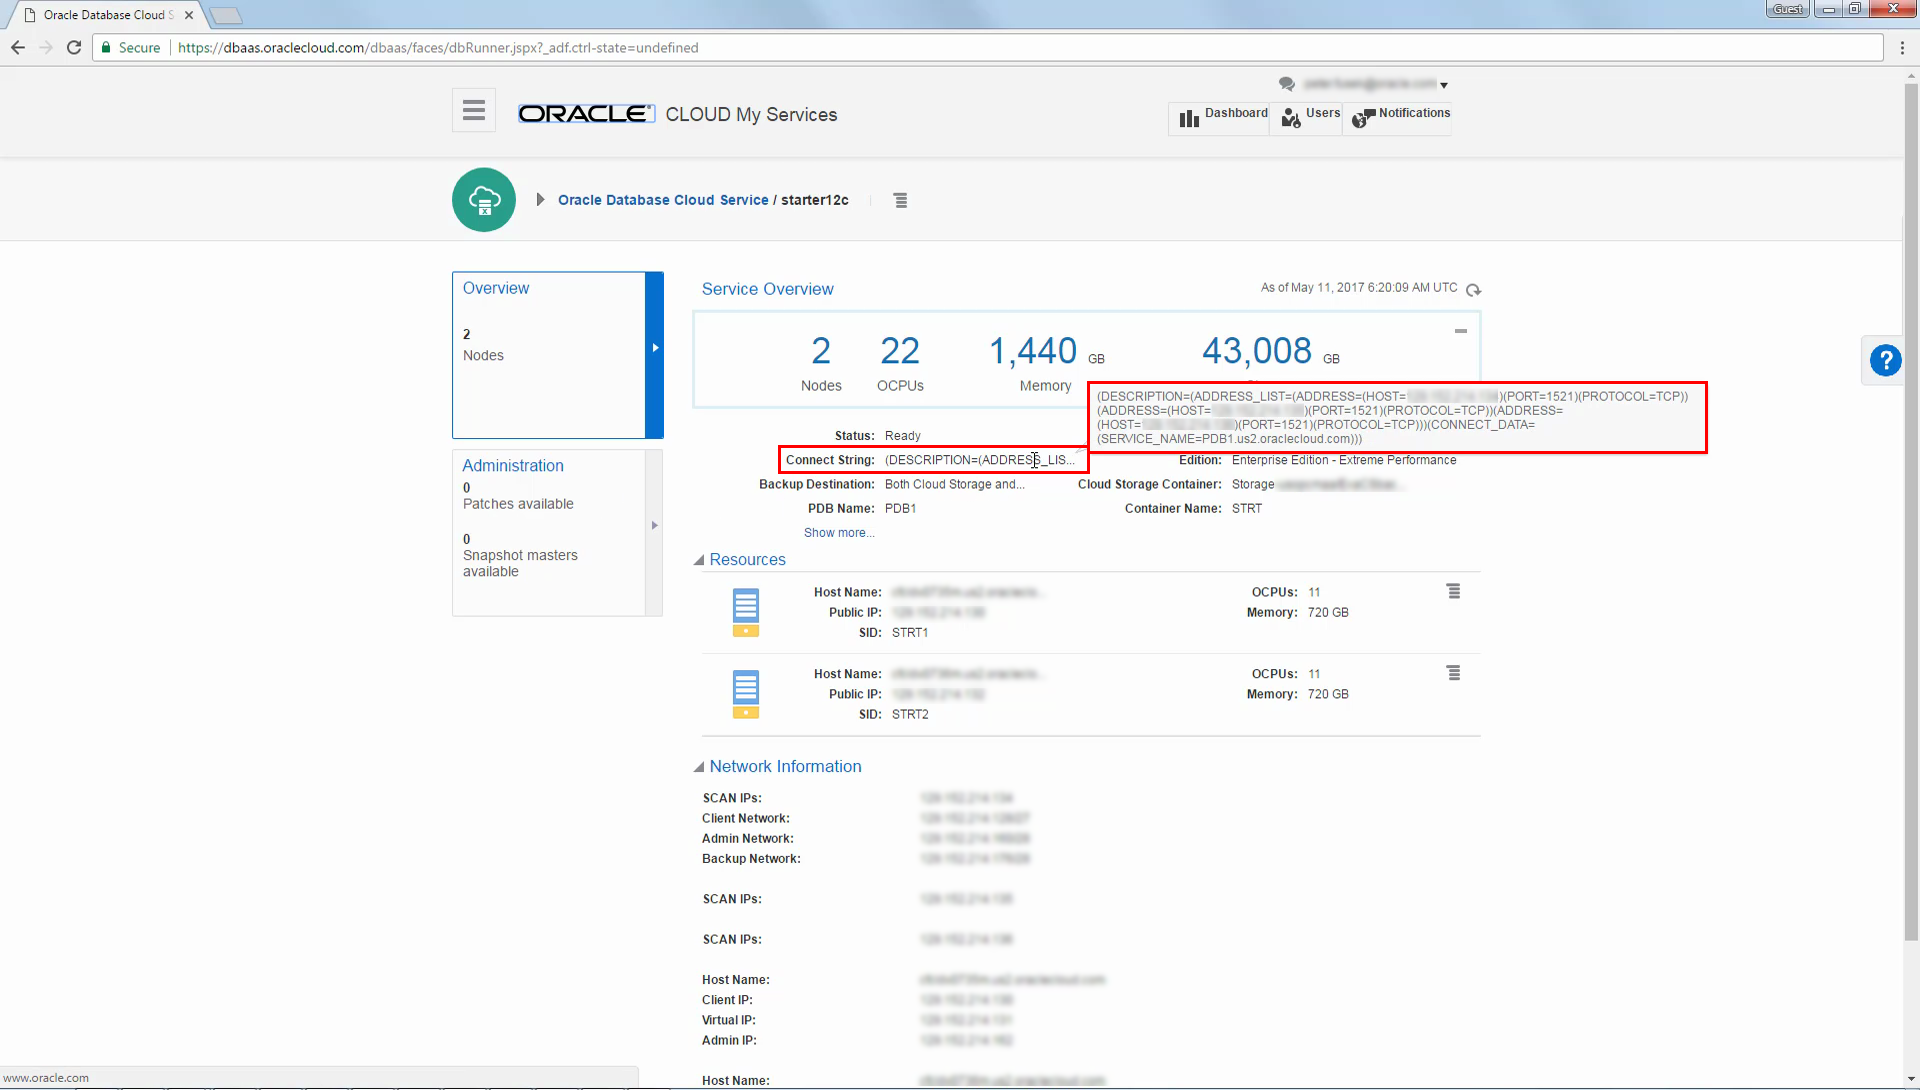
The resulting page displays details associated with the database deployment. This includes a database connect string and network information that you can use to access the database deployment.
 Accessing Exadata Cloud Service Compute Nodes Using SSH
-
Using SSH, access to a compute node associated with Exadata Cloud Service is typically performed for administration purposes, but sometimes client applications also use SSH. To gain access using SSH you require the network address of the compute node, which can be found on the details page associated with each database deployment. Depending on your access requirements, you may use the Client IP, Virtual IP or Admin IP to access the compute node.
-
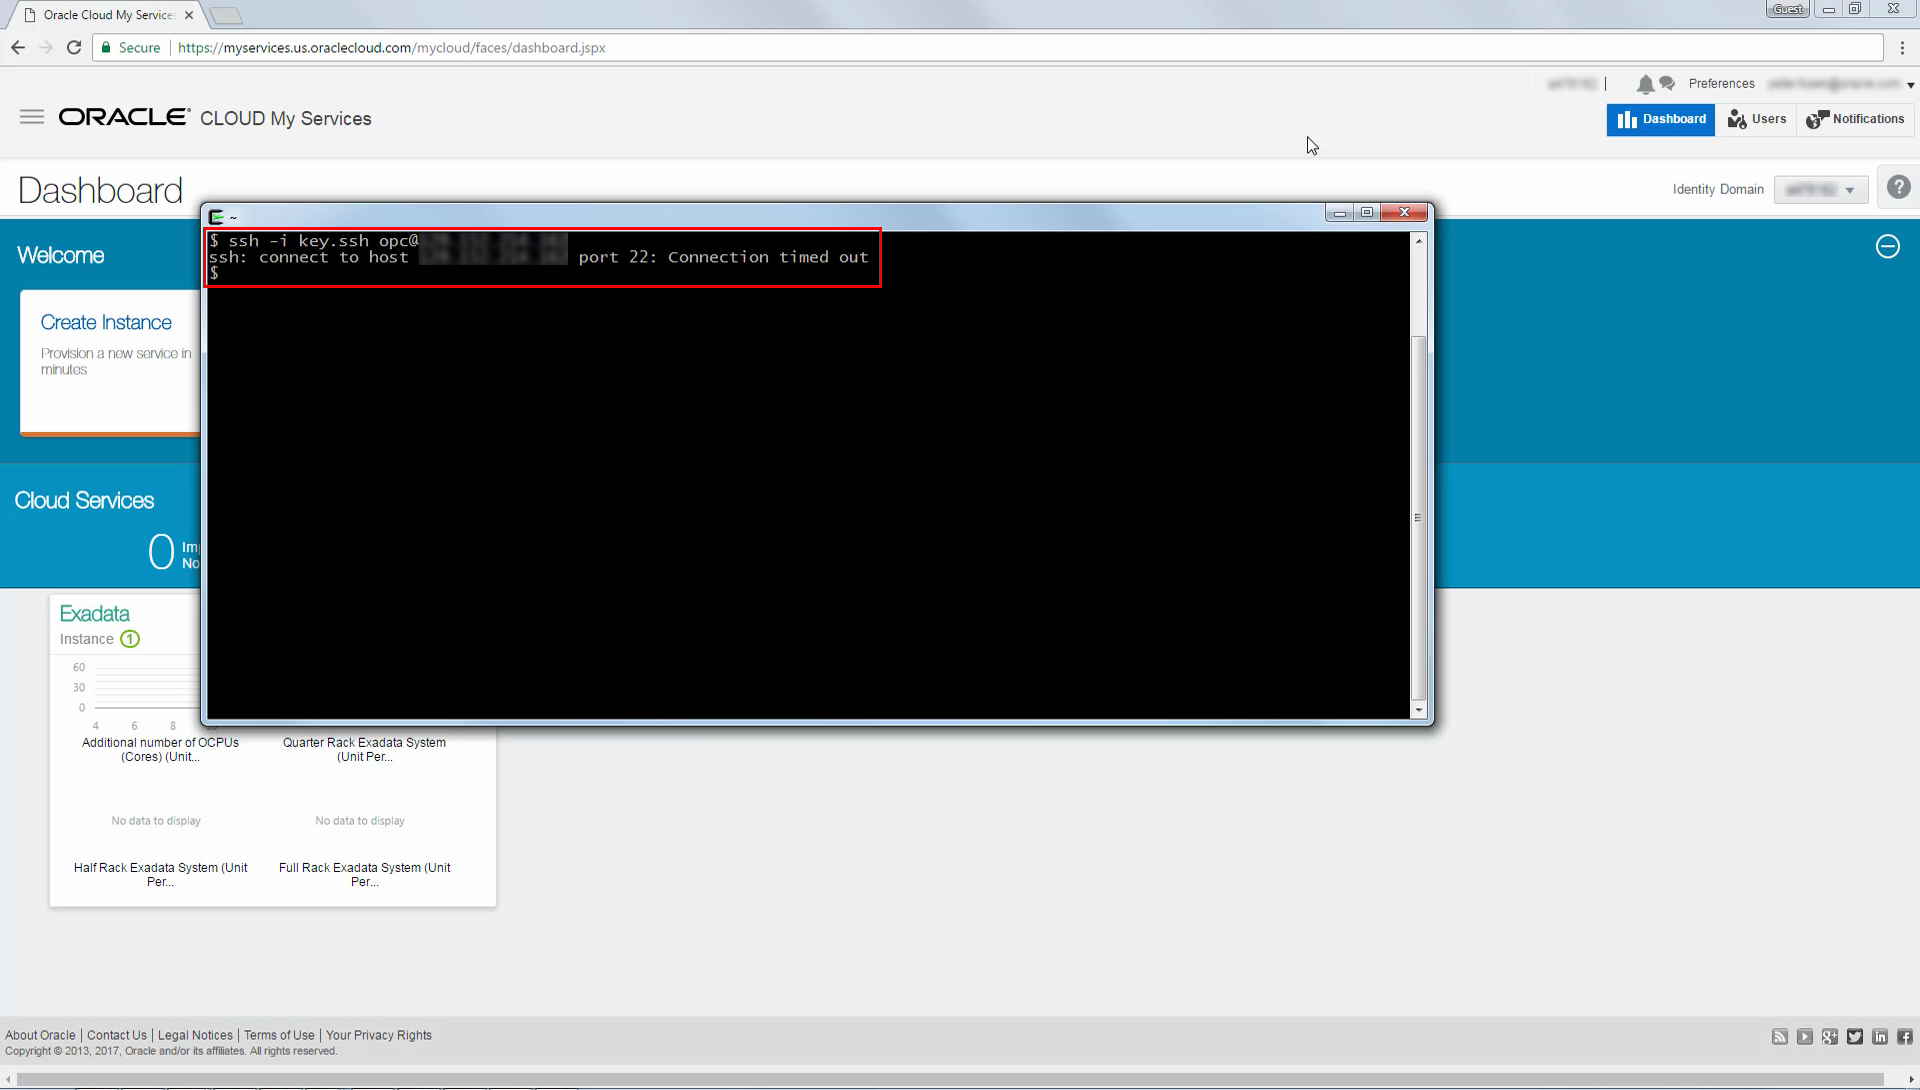
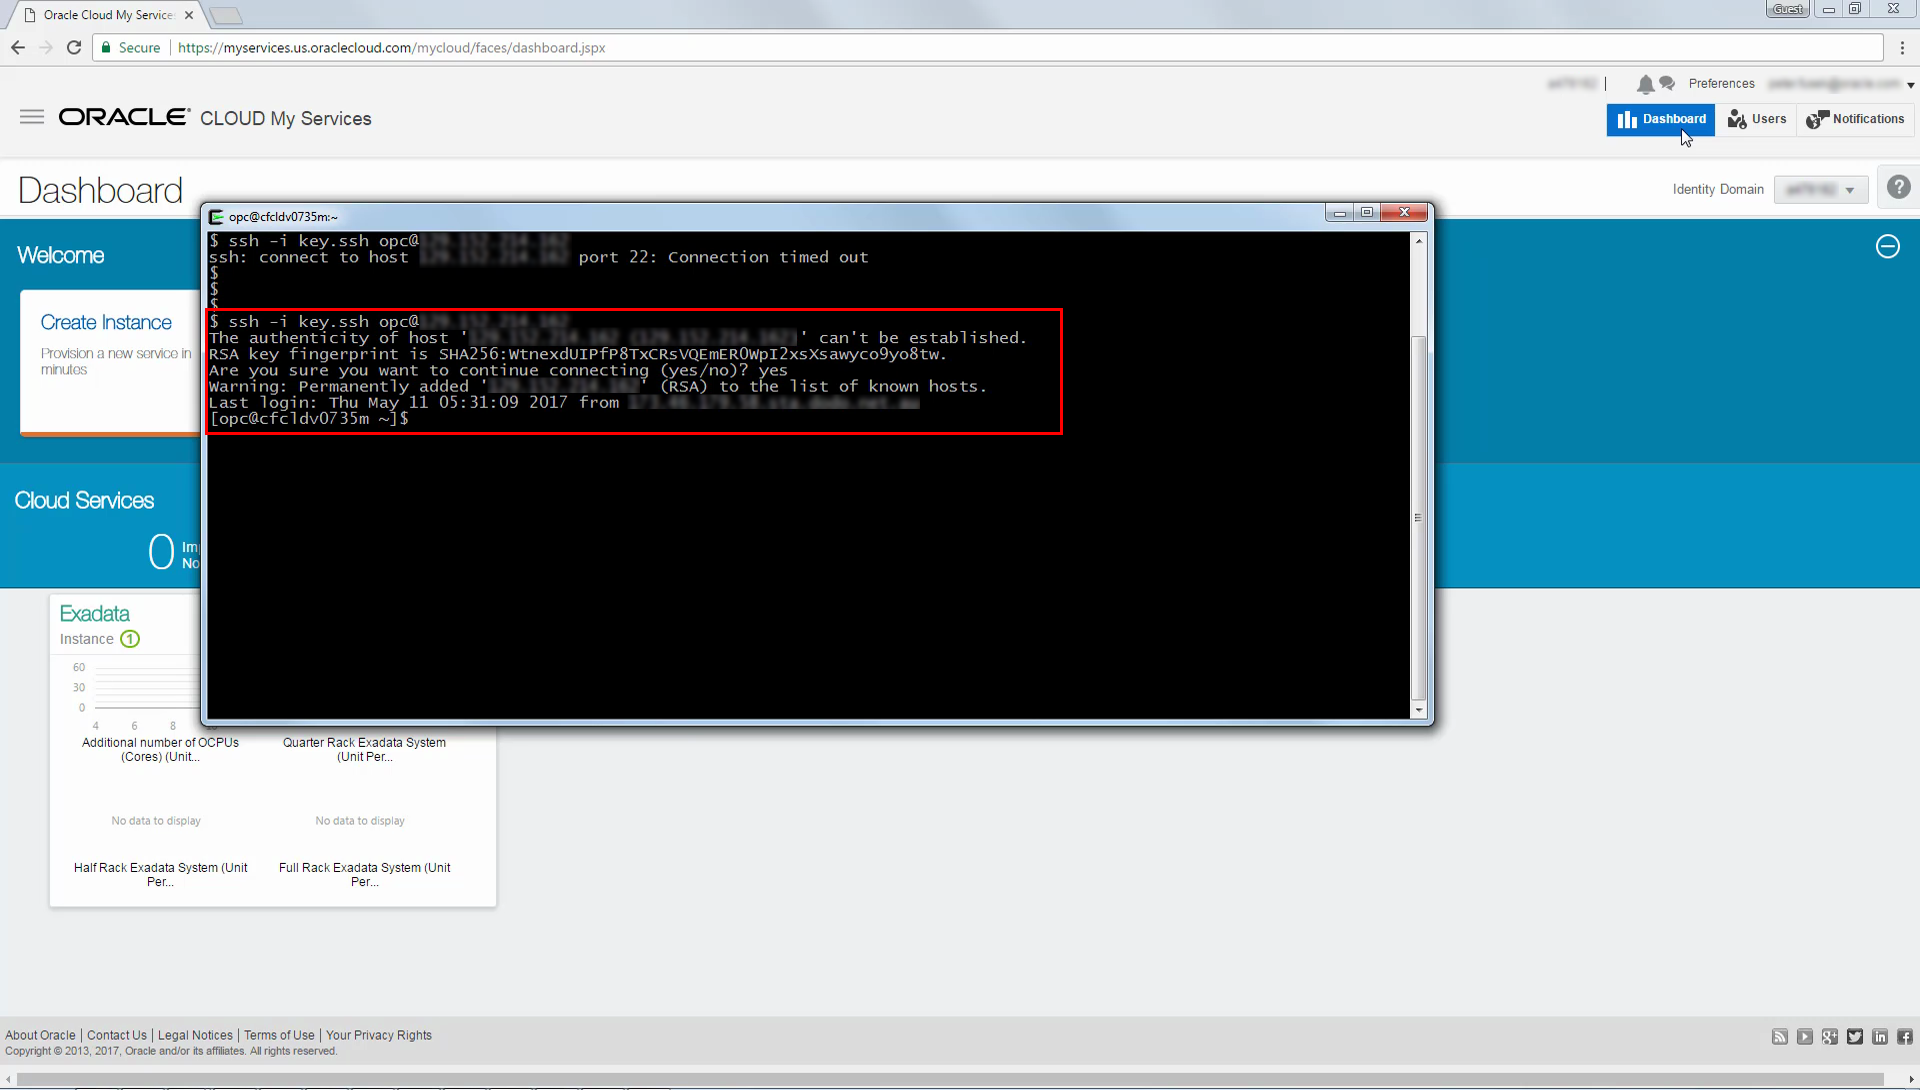
To access a compute node using SSH you must ensure that the SSH port (22) is accessible to your SSH client. This configuration is performed using the My Services dashboard. Click Dashboard to navigate to the My Services dashboard.
-
By default, access to the SSH port (22) is restricted, and attempting an SSH connection fails with a Connection timed out error message.
-
To enable SSH access, start in the My Services dashboard and select View Details from the menu in the Exadata tile.

-
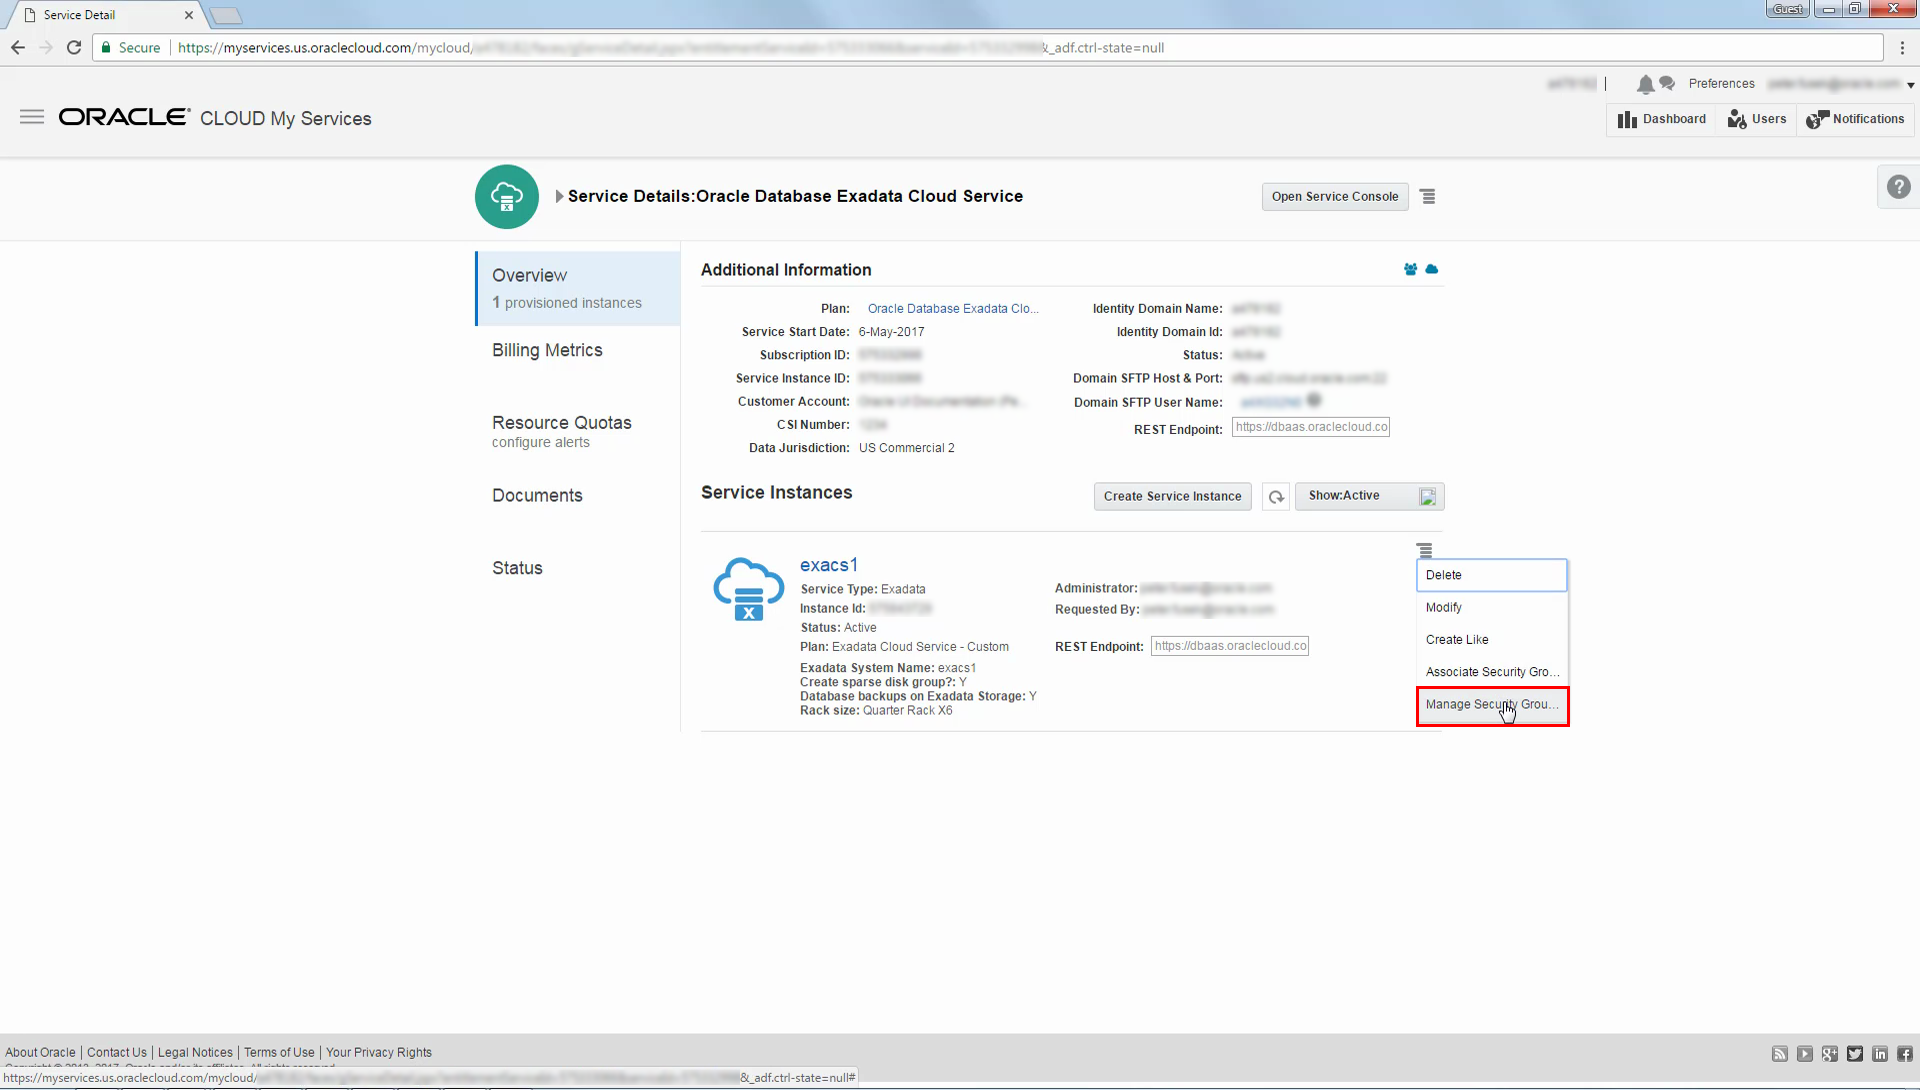
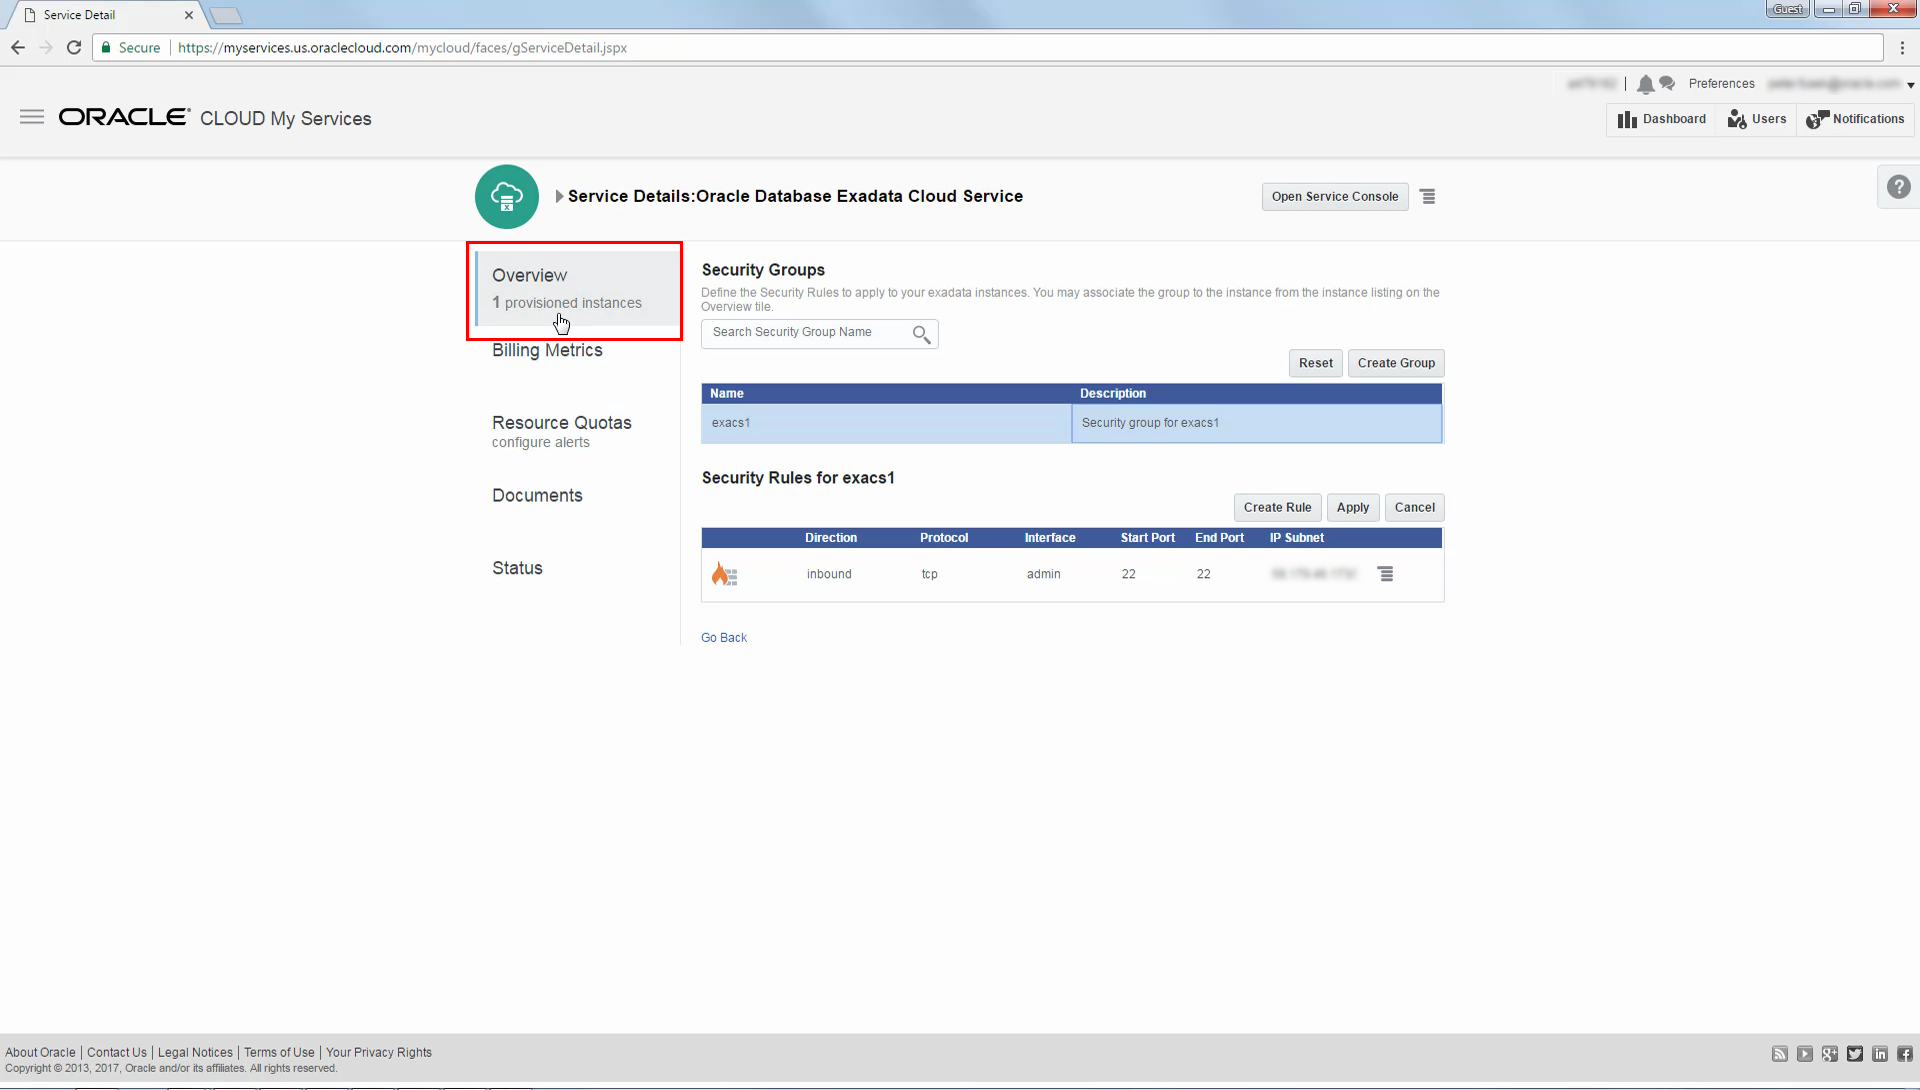
Select Manage Security Groups from the menu located beside the Exadata Cloud Service instance name.
-
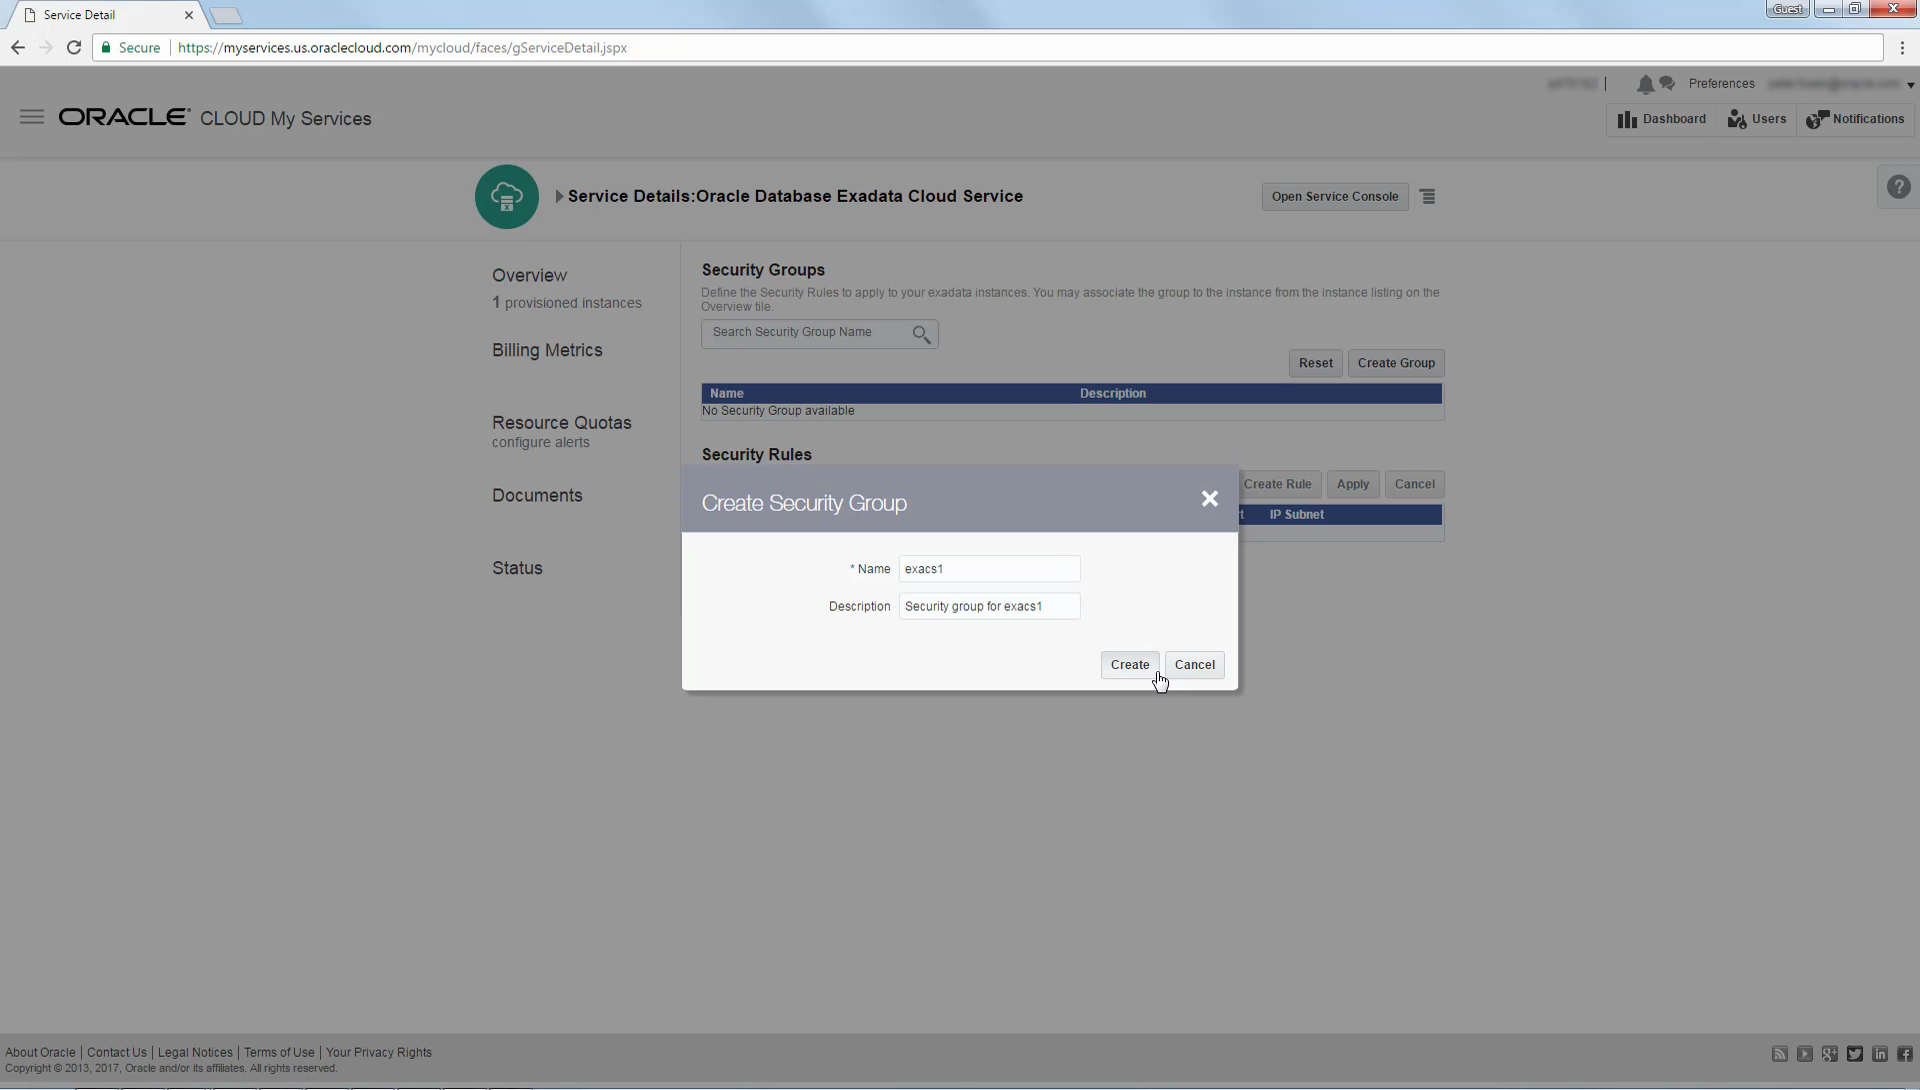
Click Create Group.
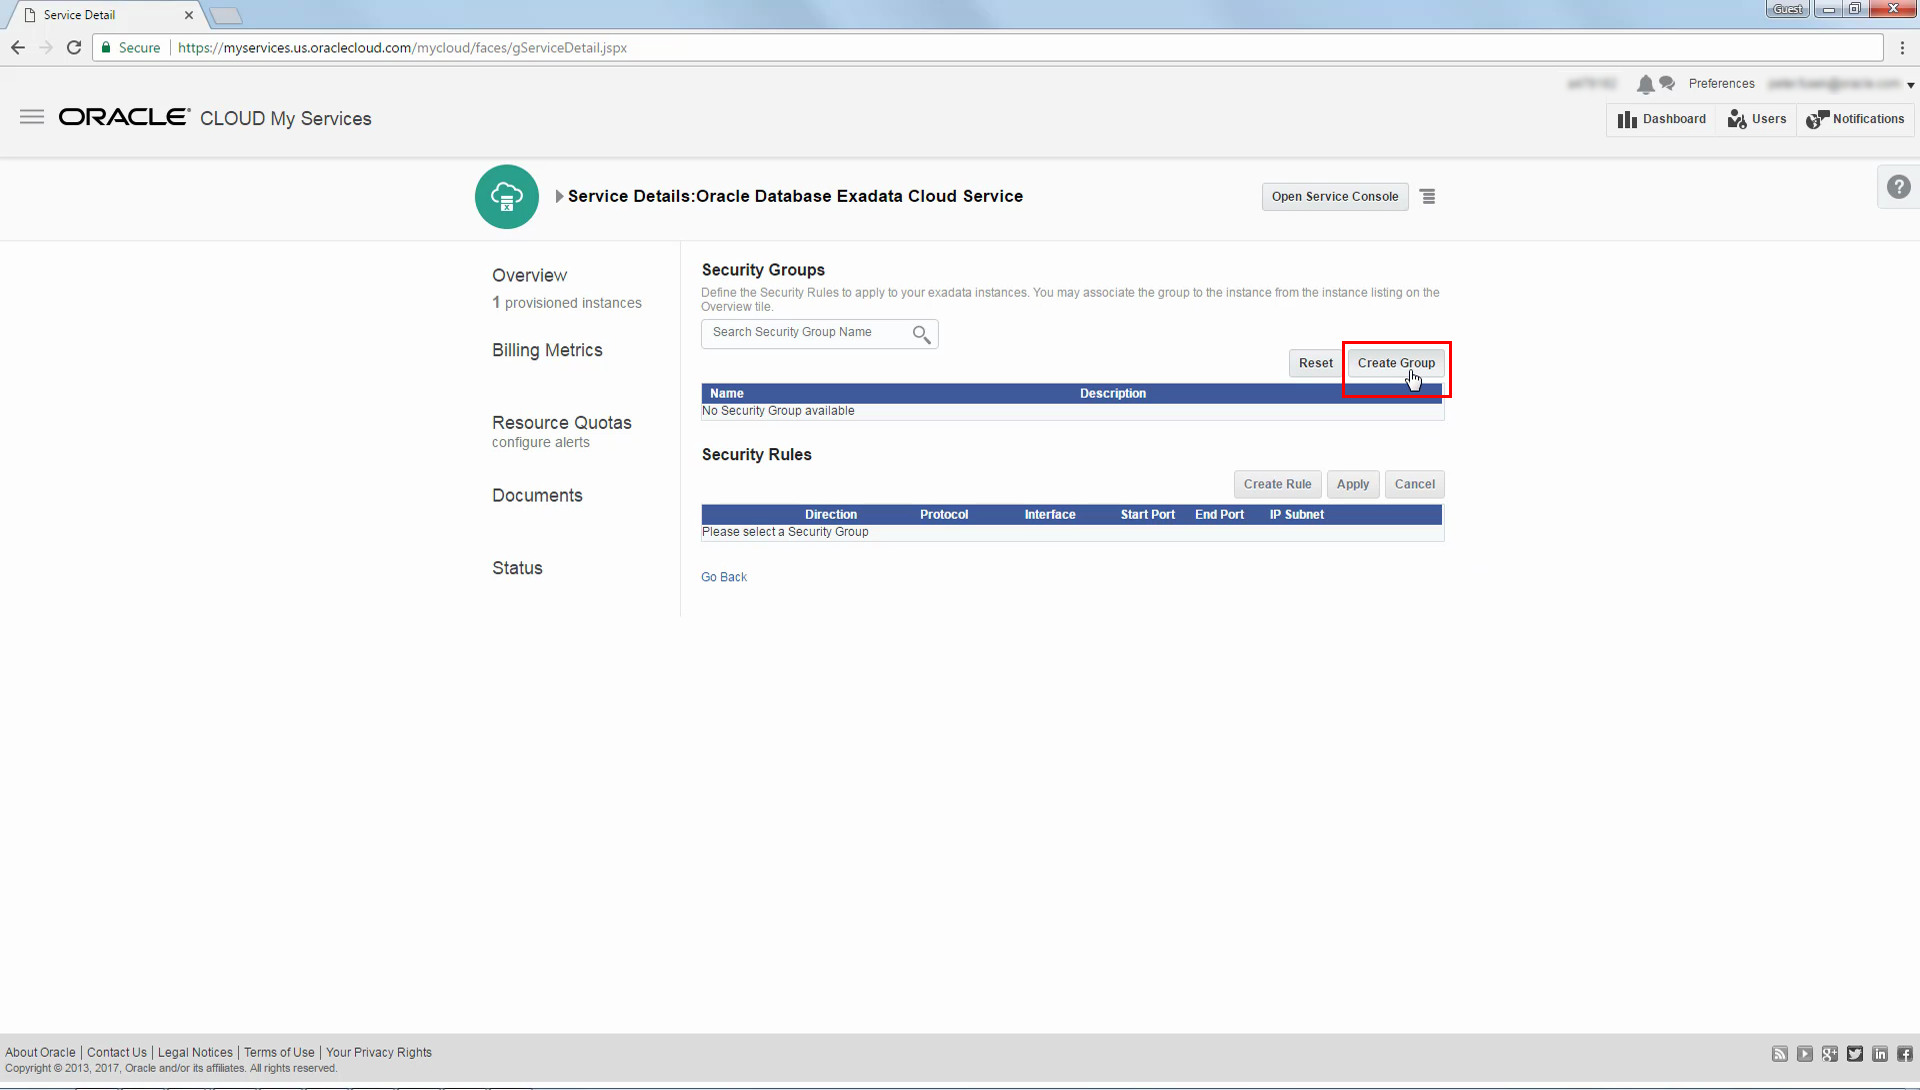
-
Specify a Name and a Description for the new security group. Then, click Create.
-
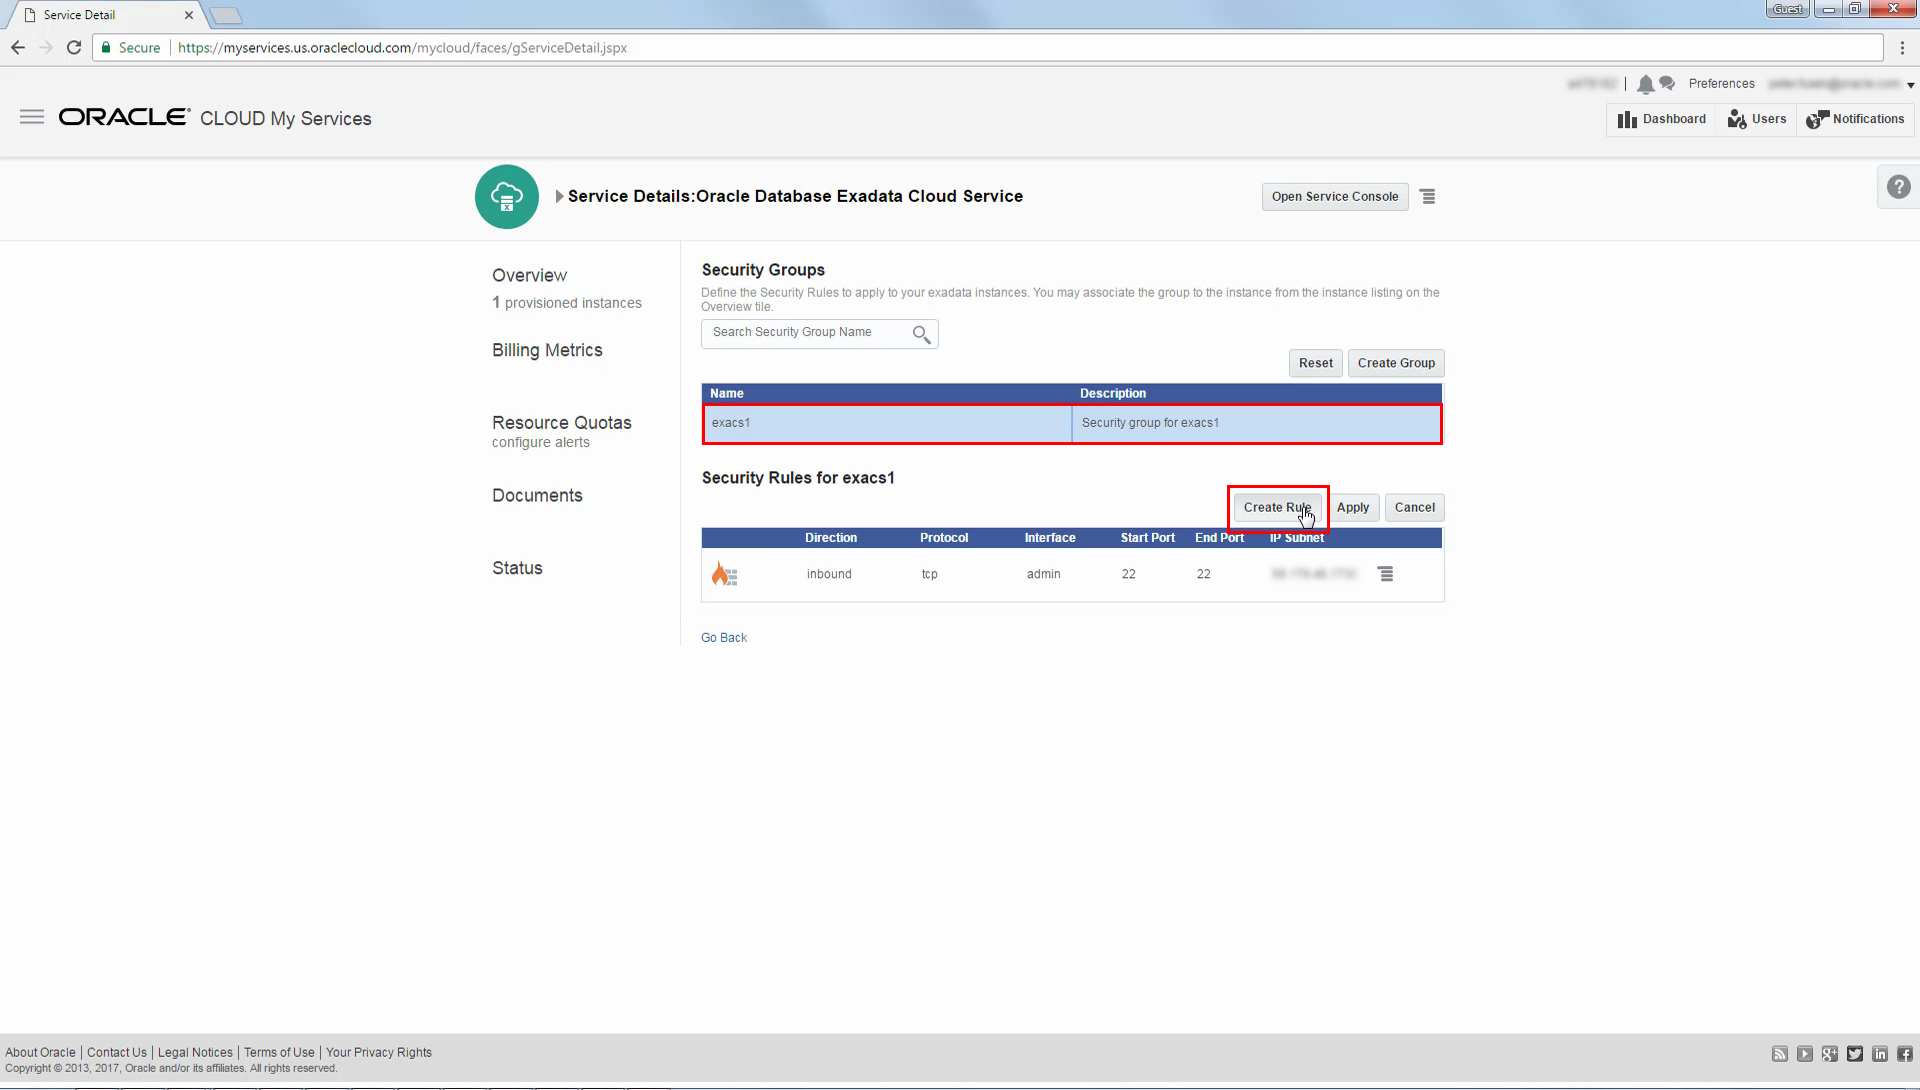
Select the newly created security group and click Create Rule.
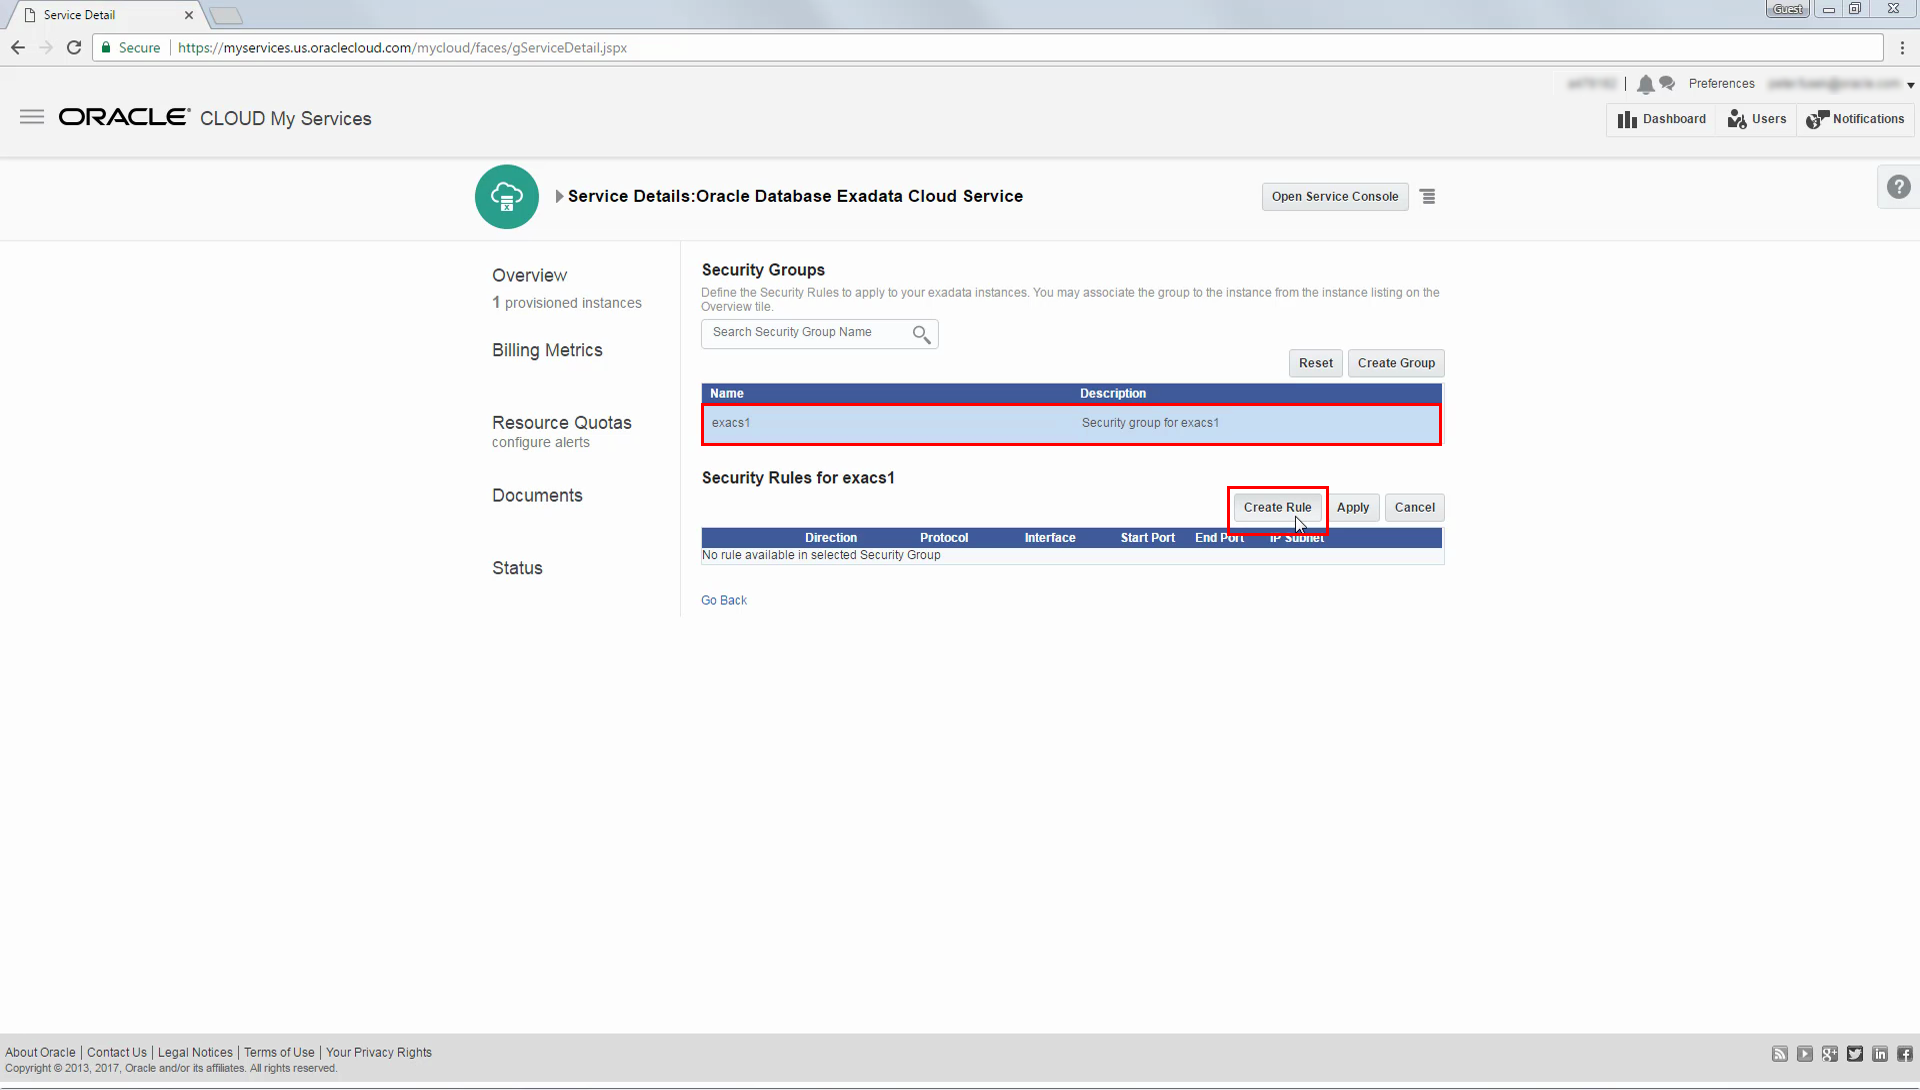
-
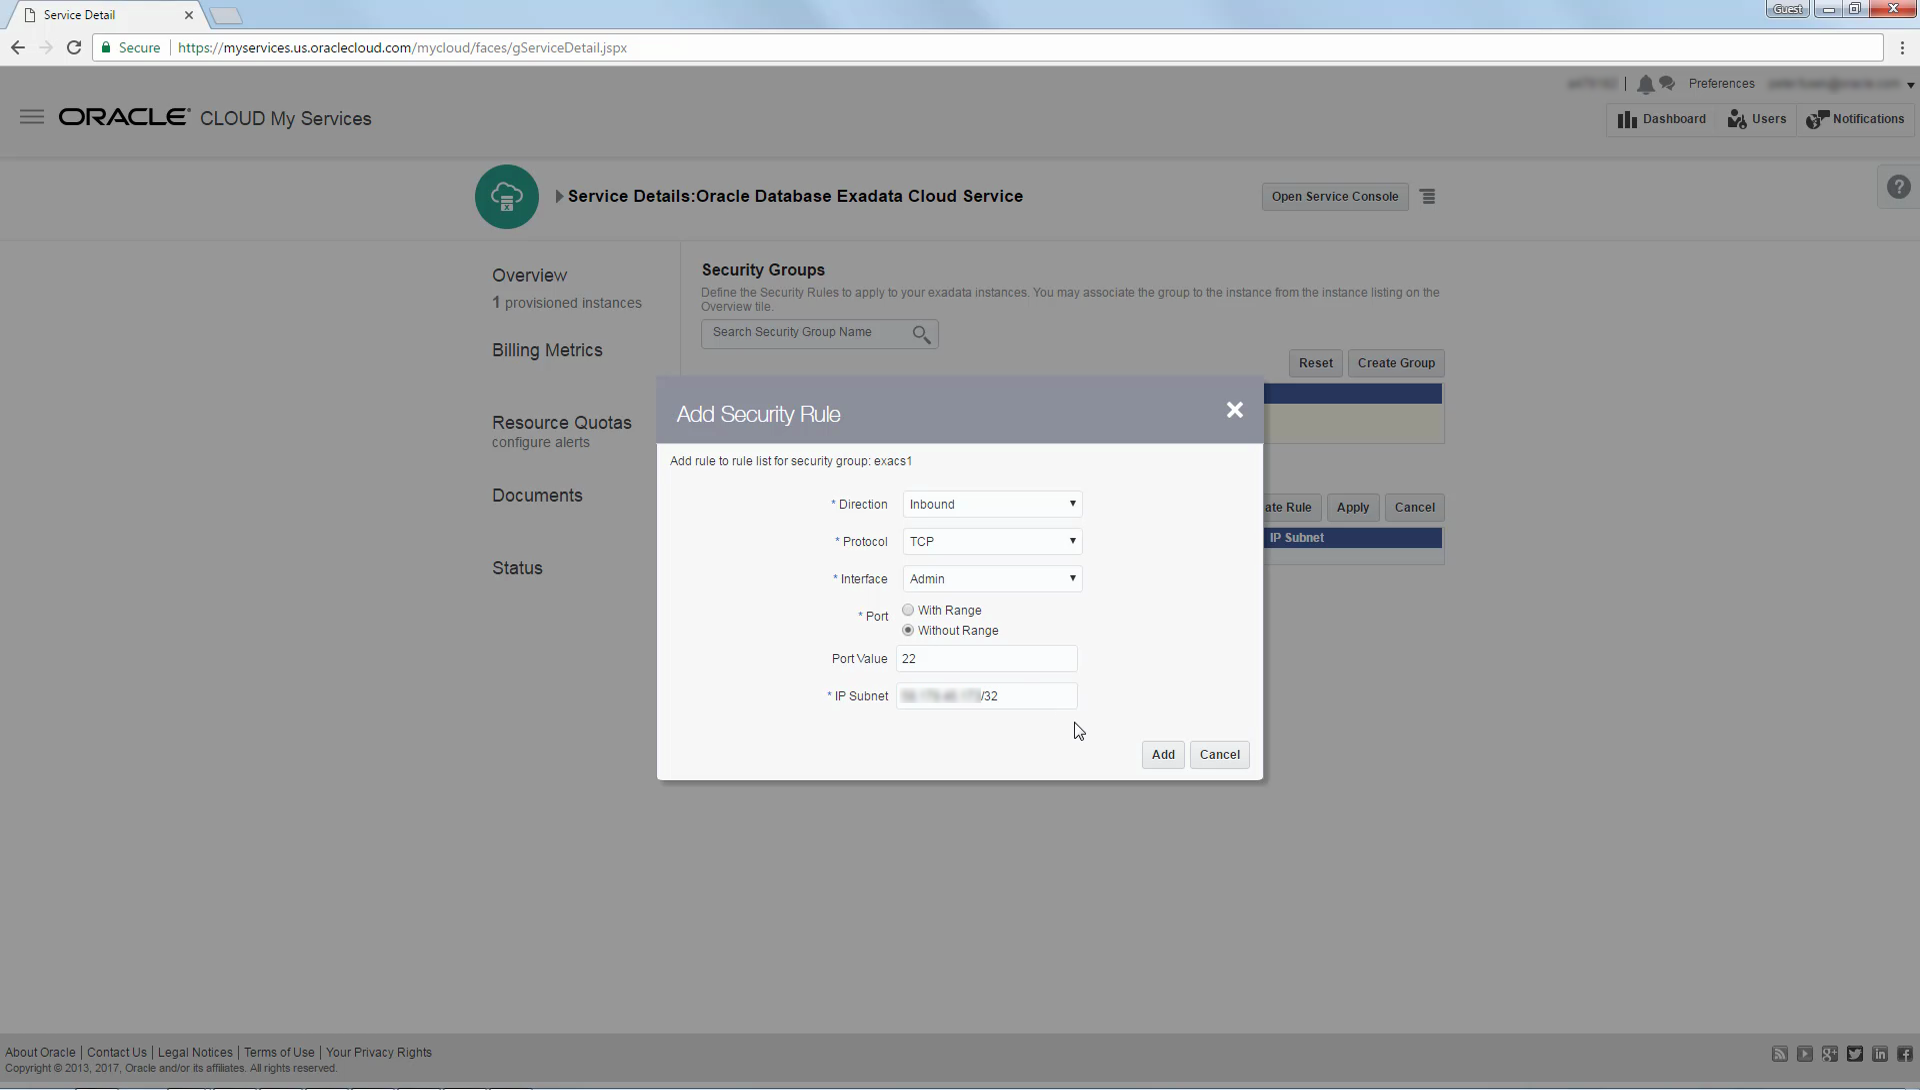
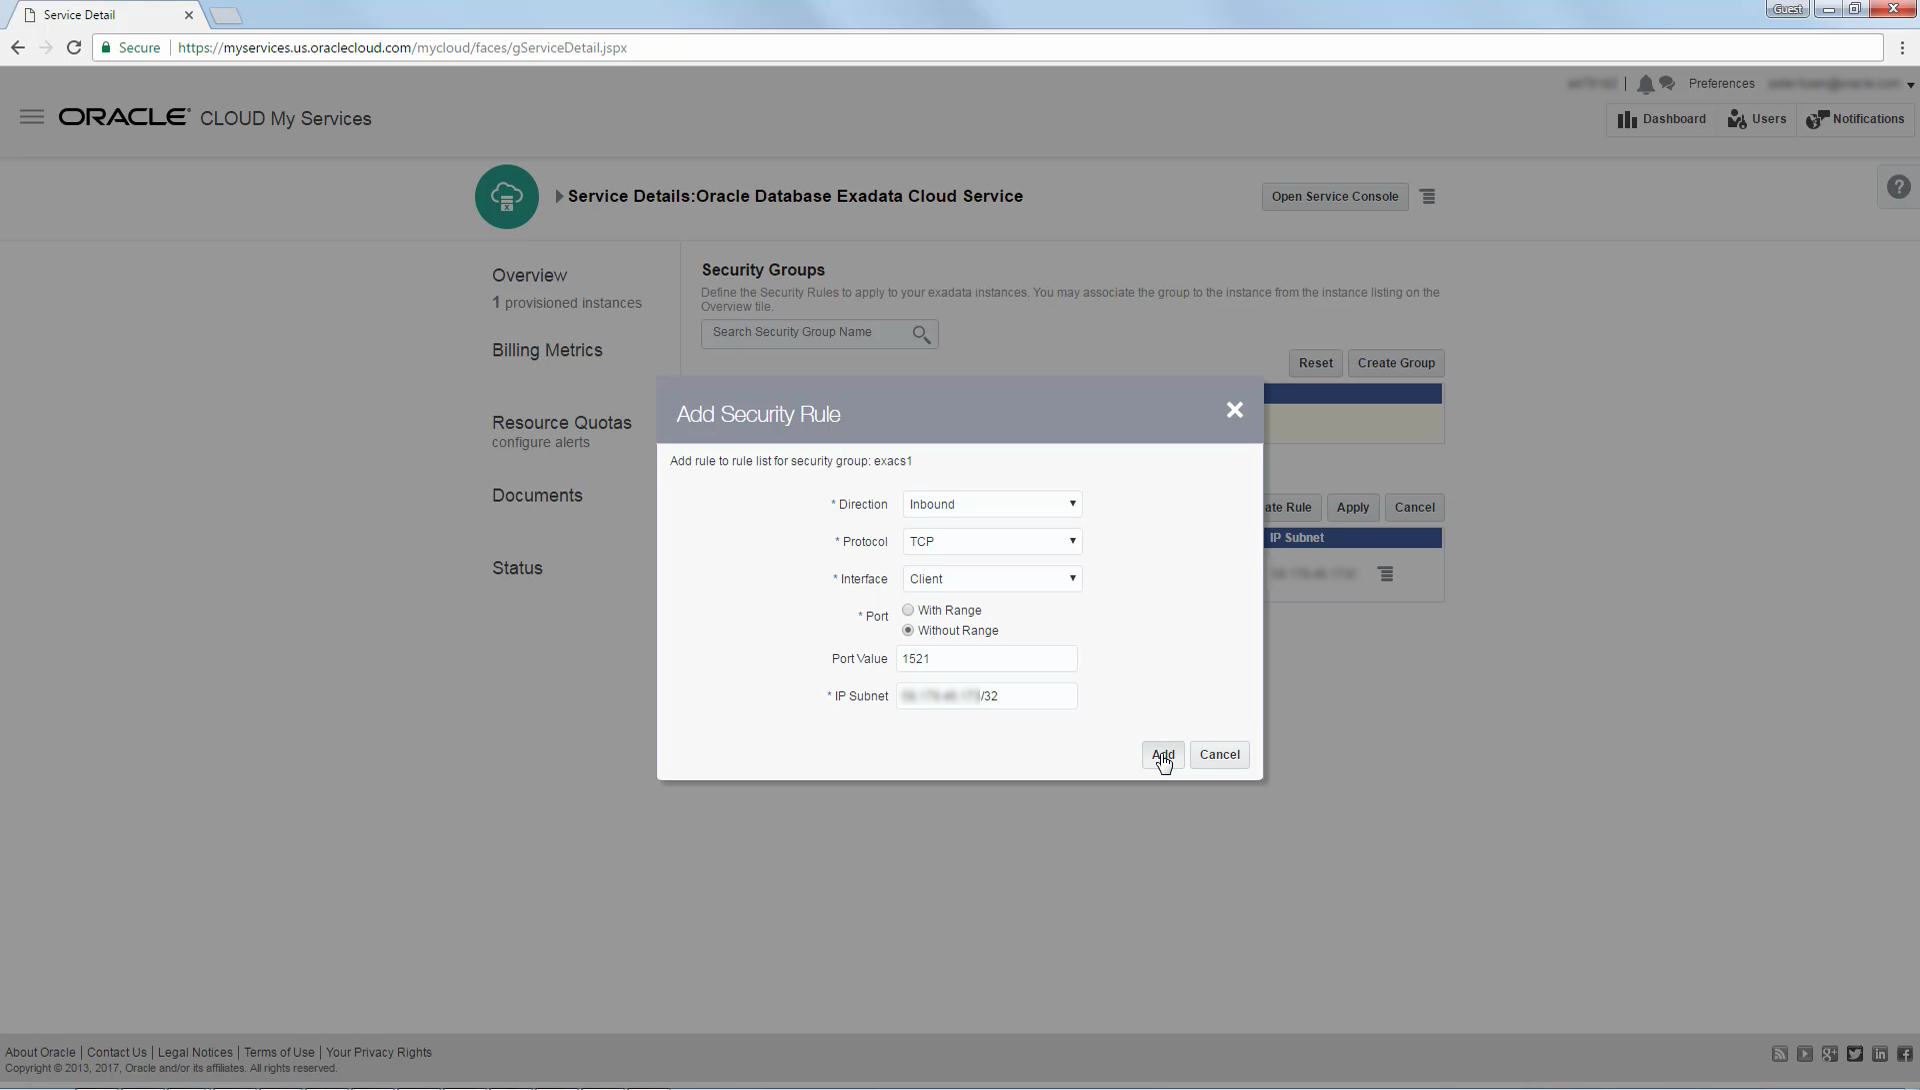
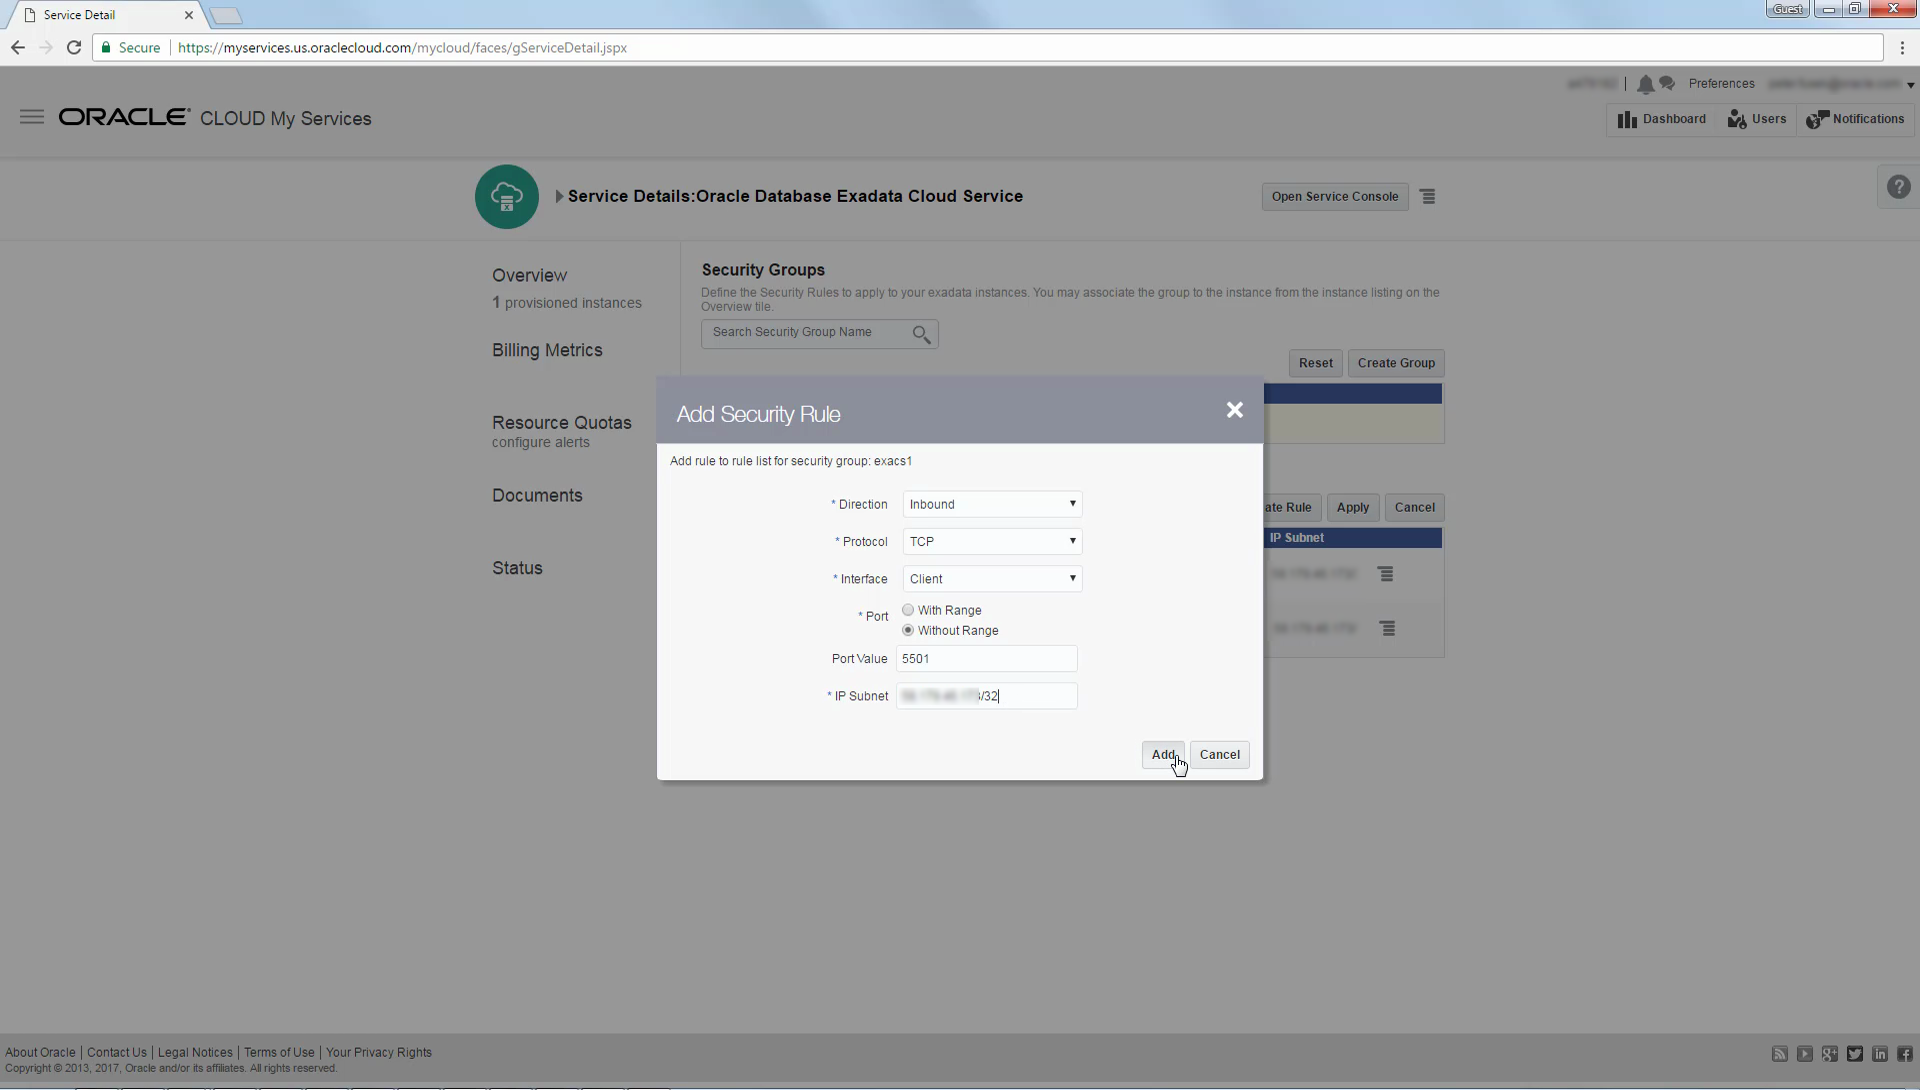
Use the Add Security Rule dialog to create a new security rule. Then click Add.
The example shows a security rule definition that allows inbound TCP traffic from a specific IP subnet to port 22 (the SSH server port) over the administration network.
For further details, see Enabling Access to a Compute Node Port.
-
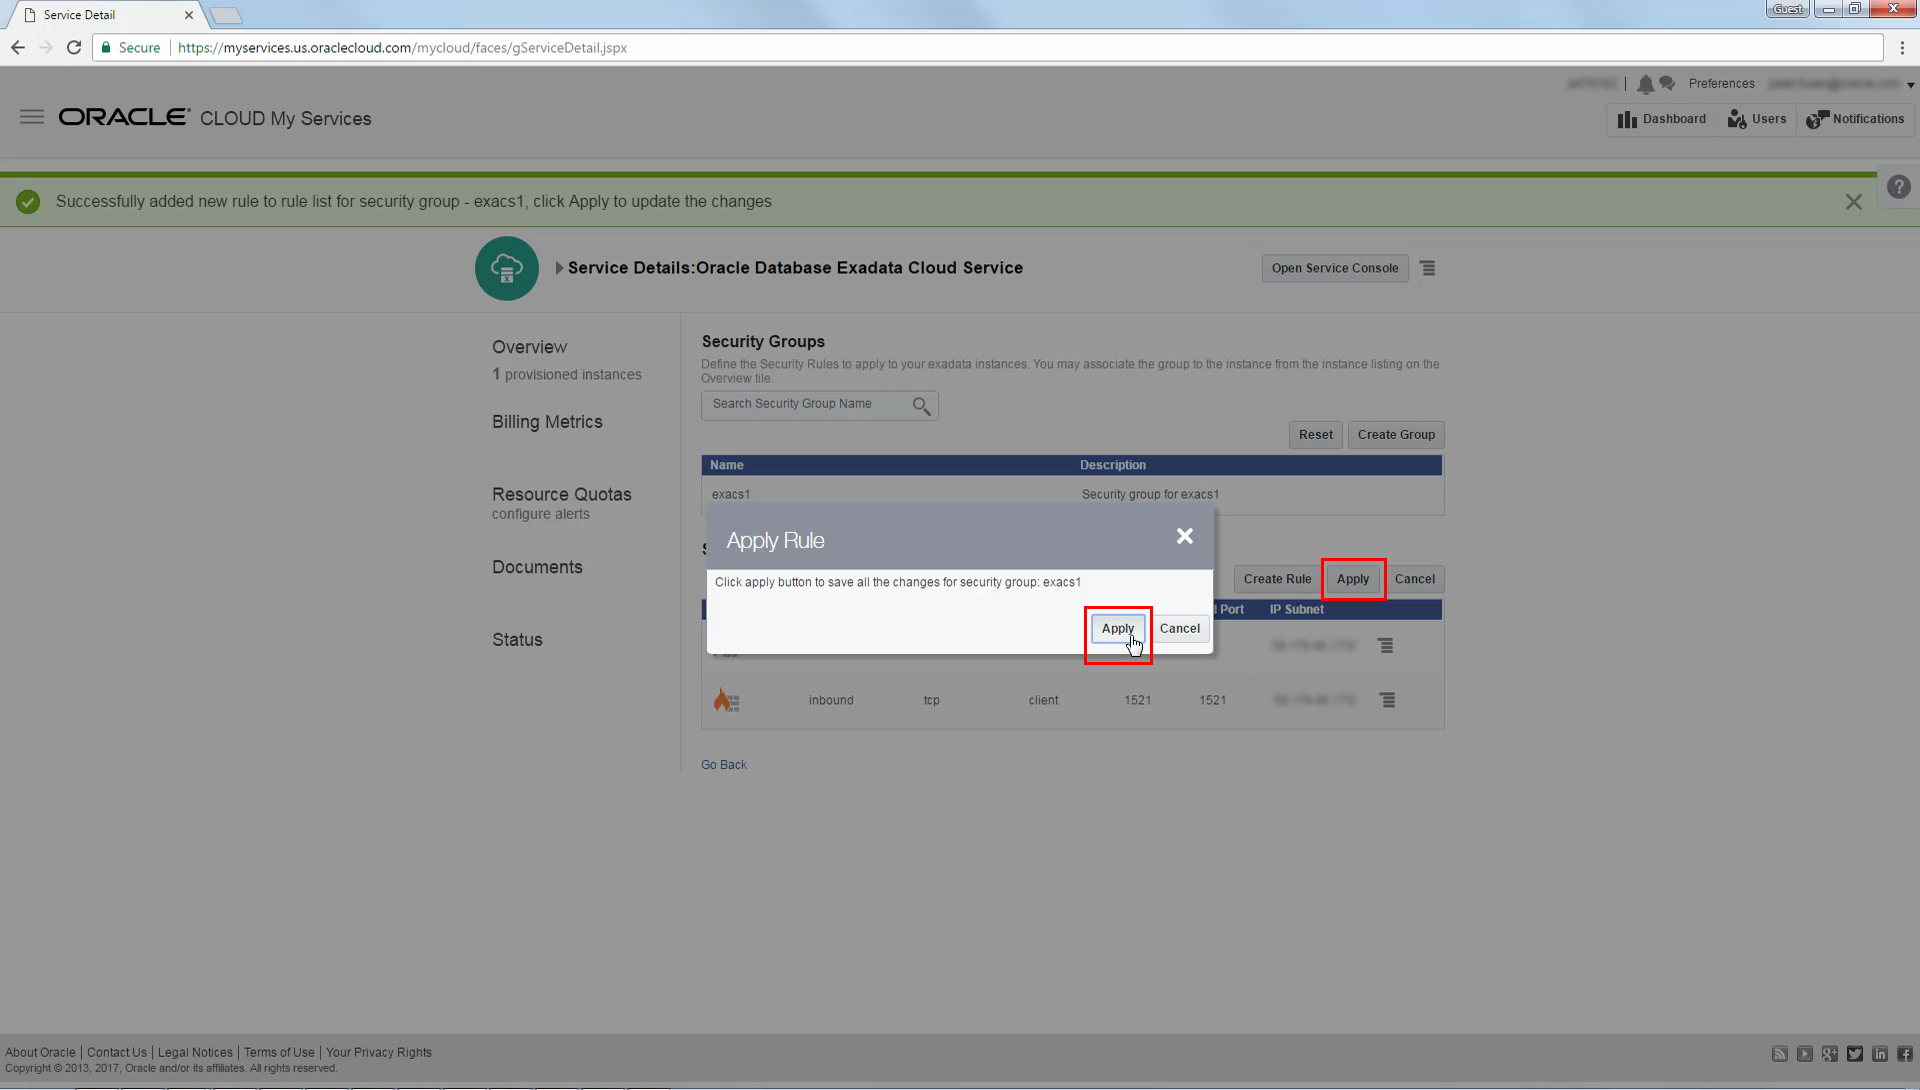
Click Apply on the security page and also in the resulting dialog to update the changes.

-
Click Overview to navigate back to the list of service instances.
-
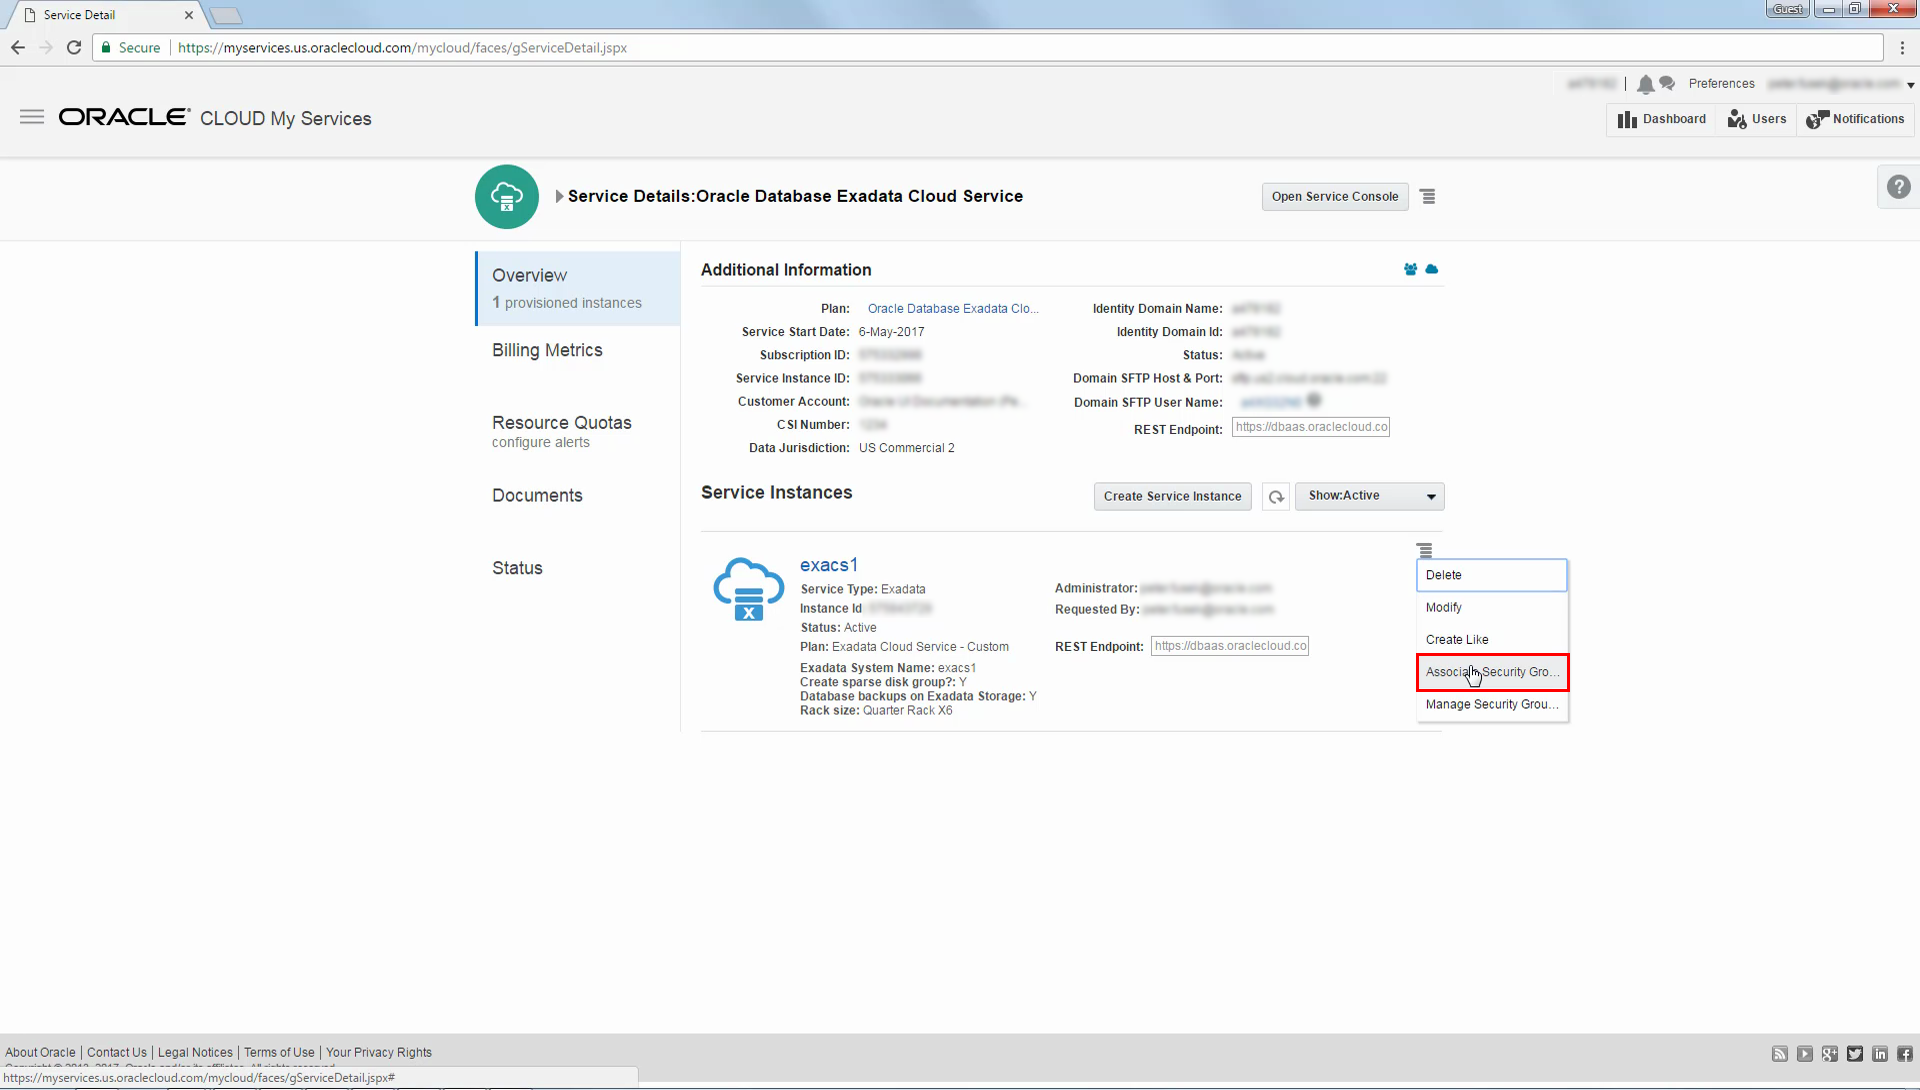
At this point, a new security group is defined, which contains one security rule that enables access to SSH. To make use of the security group, it must be associated with the Exadata Cloud Service instance. Select Associate Security Groups from the menu located beside the Exadata Cloud Service instance name.
-
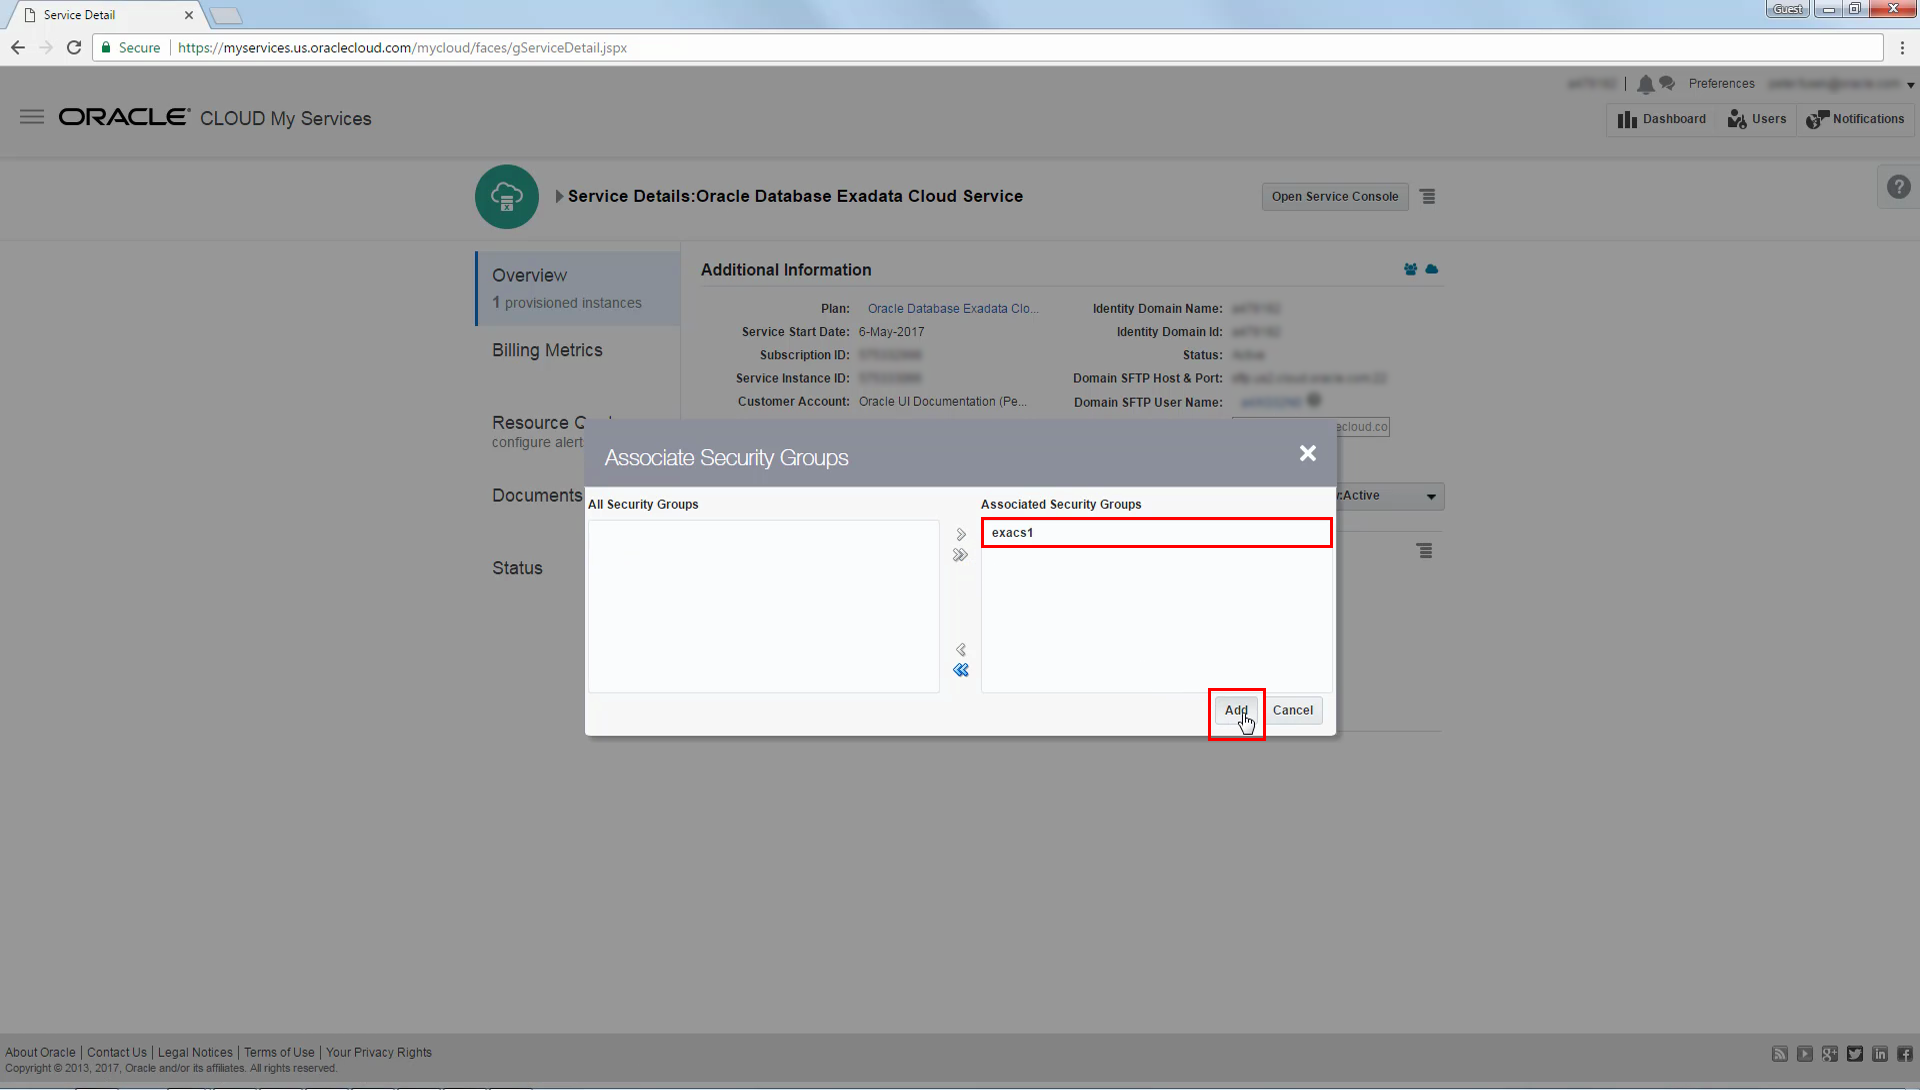
Use the Associate Security Groups dialog to move the newly created security group to the Associated Security Groups list. Then click Add.
-
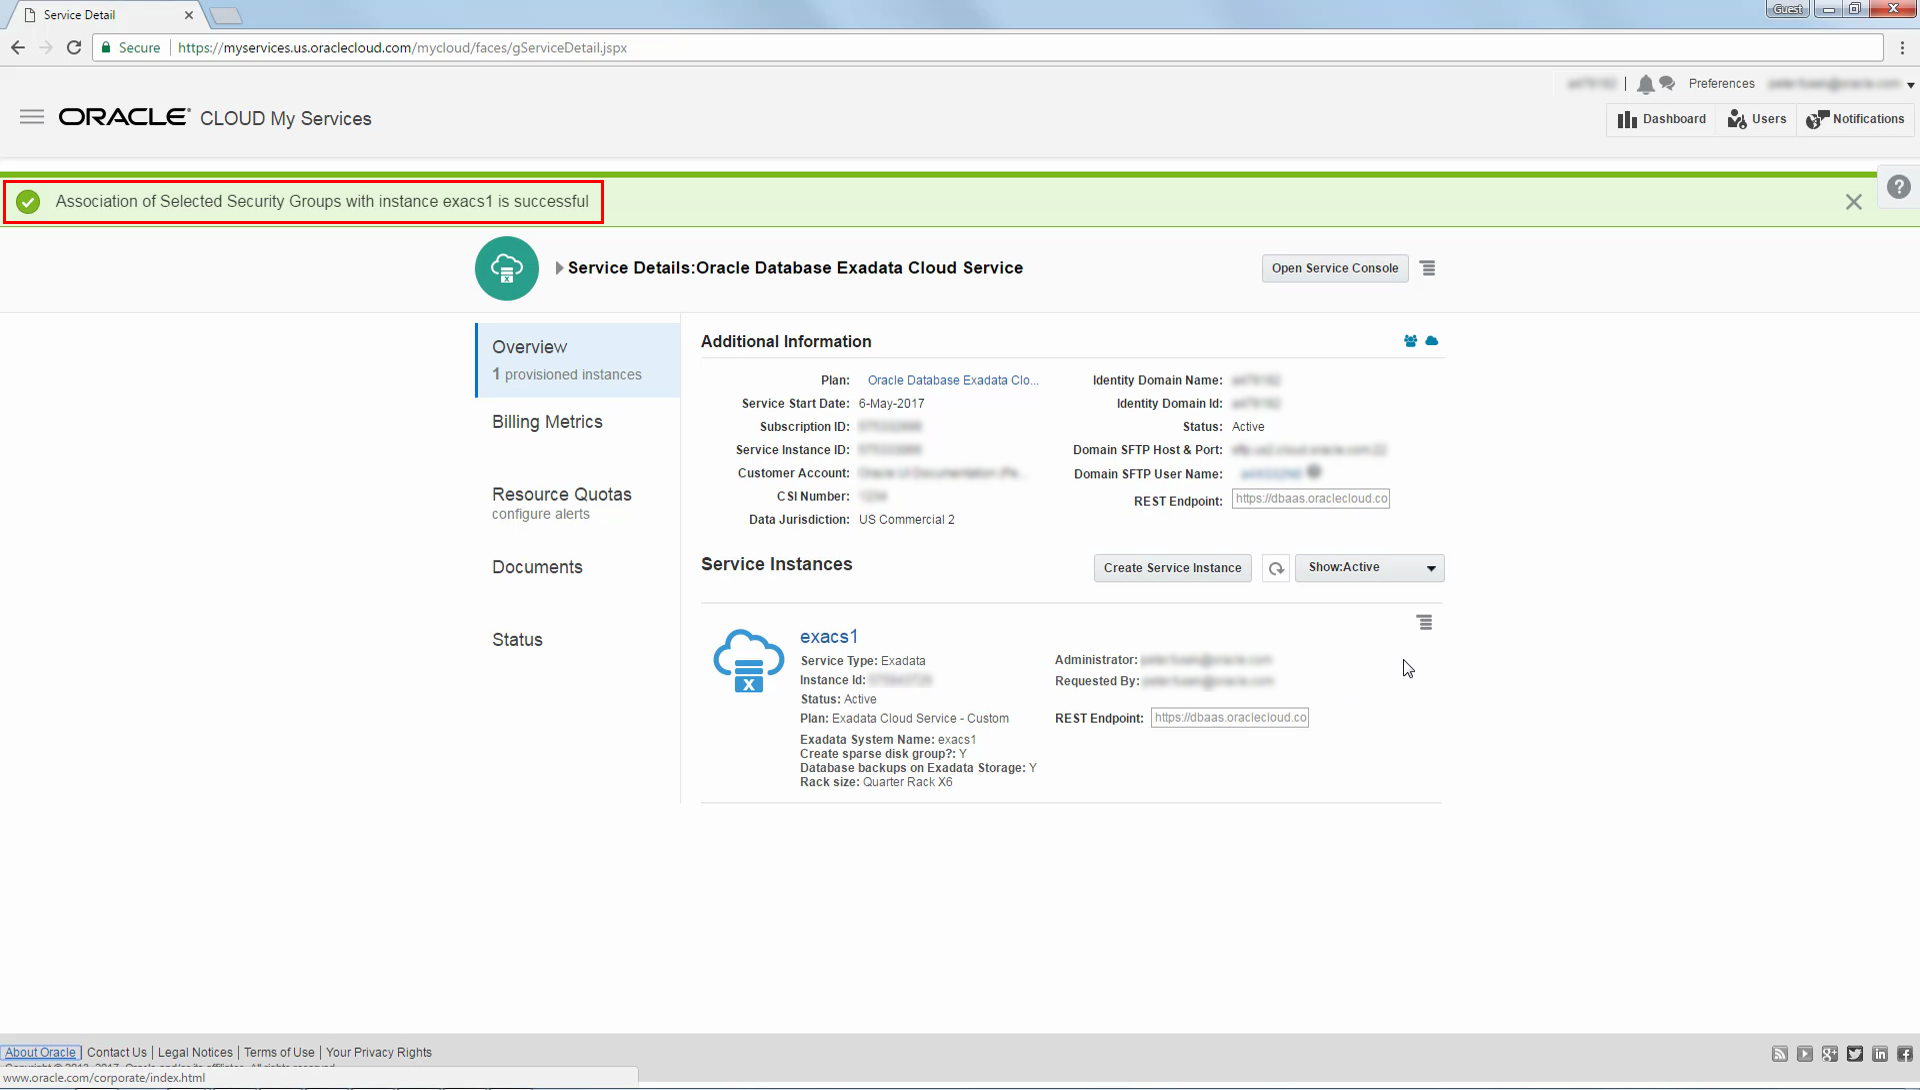
Now the security group and related security rule are associated with the Exadata Cloud Service instance, which means that the compute nodes are now accessible using SSH.
-
Confirm that the compute nodes are accessible by using SSH. To connect, you must supply the private key that matches the public key that was registered in the system as part of the process to create the database deployment.
 Accessing an Exadata Cloud Service Database Using Oracle Net
-
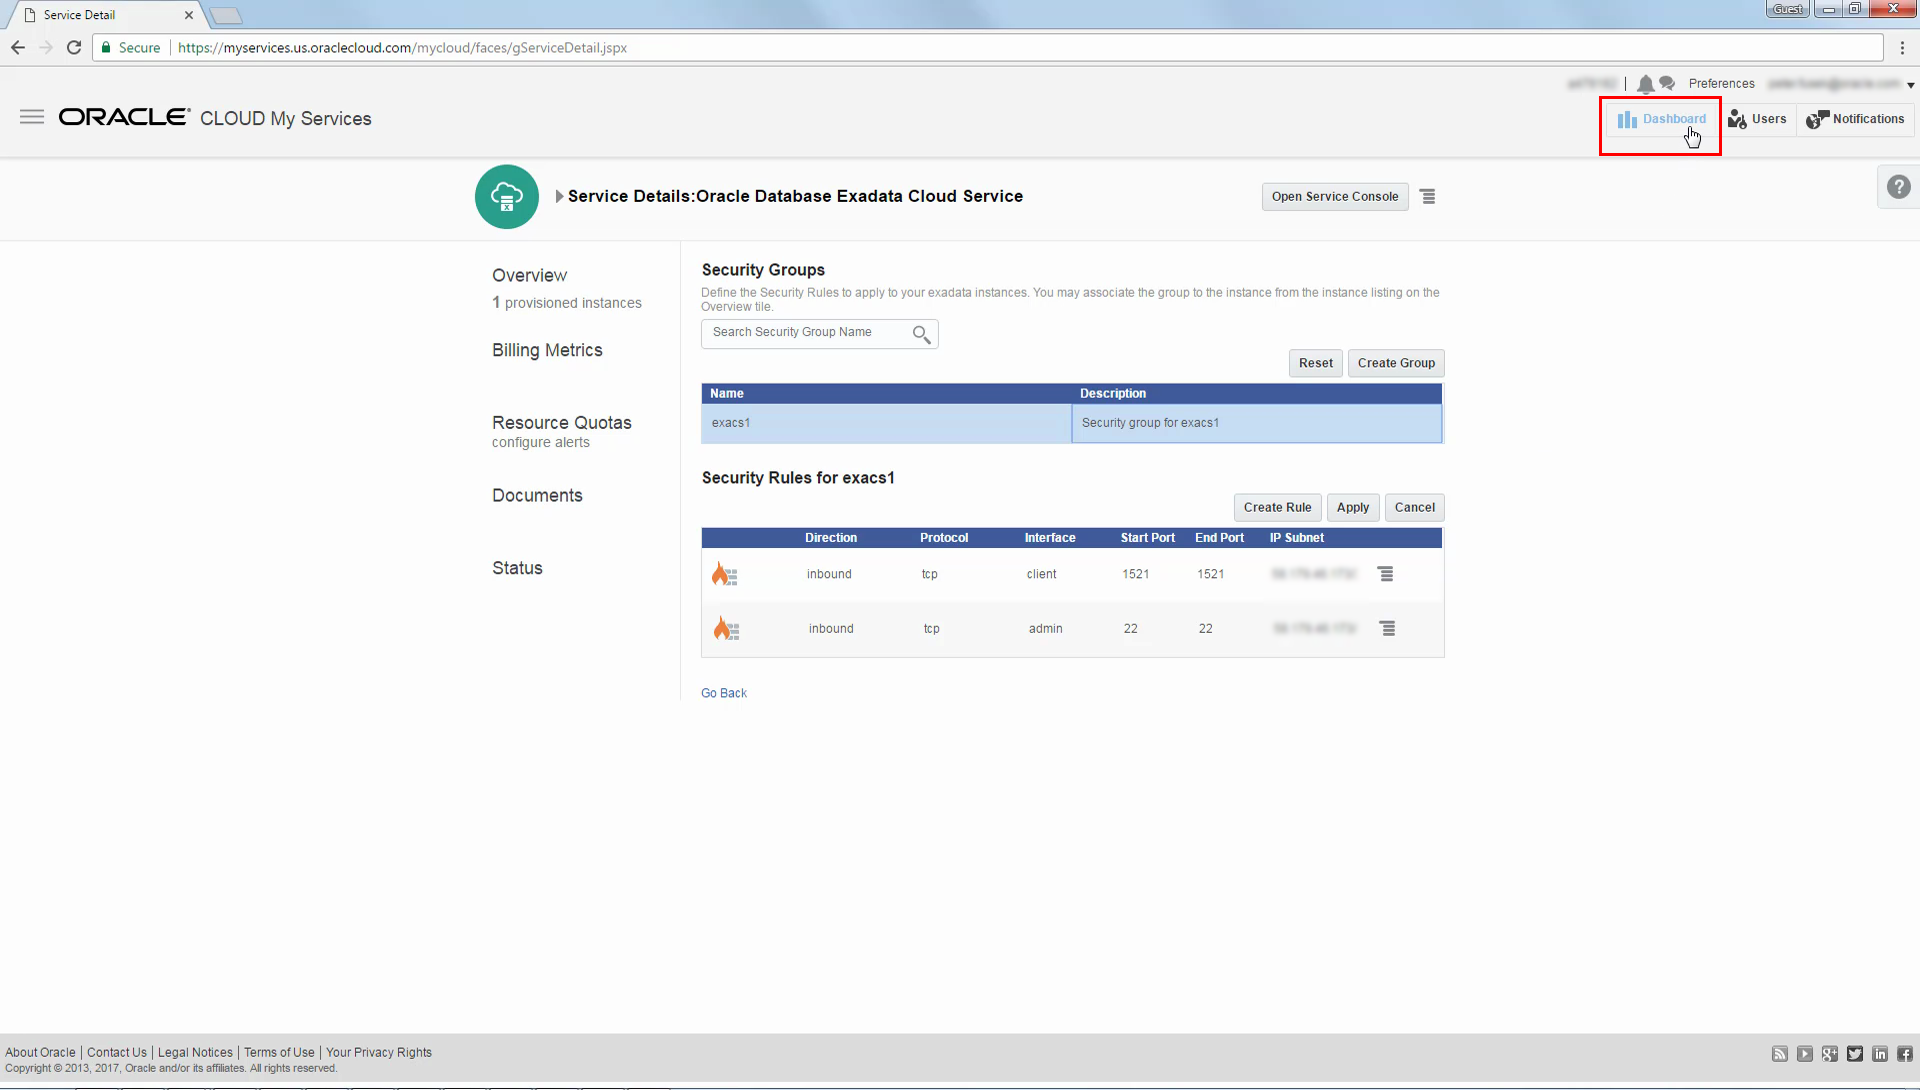
Before you can access an Exadata Cloud Service Database using Oracle Net, you must create a new security rule to open the Oracle Net port (1521). Start in the My Services dashboard and select View Details from the menu in the Exadata tile.
-
Select Manage Security Groups from the menu located beside the Exadata Cloud Service instance name.
-
In this example we will add a new security rule to the existing security group. Select the security group and click Create Rule.
-
Use the Add Security Rule dialog to create a new security rule. Then click Add.
The example shows a security rule definition that allows inbound TCP traffic from a specific IP subnet to port 1521 (the Oracle Net listener port) over the client network.
For further details, see Enabling Access to a Compute Node Port.
-
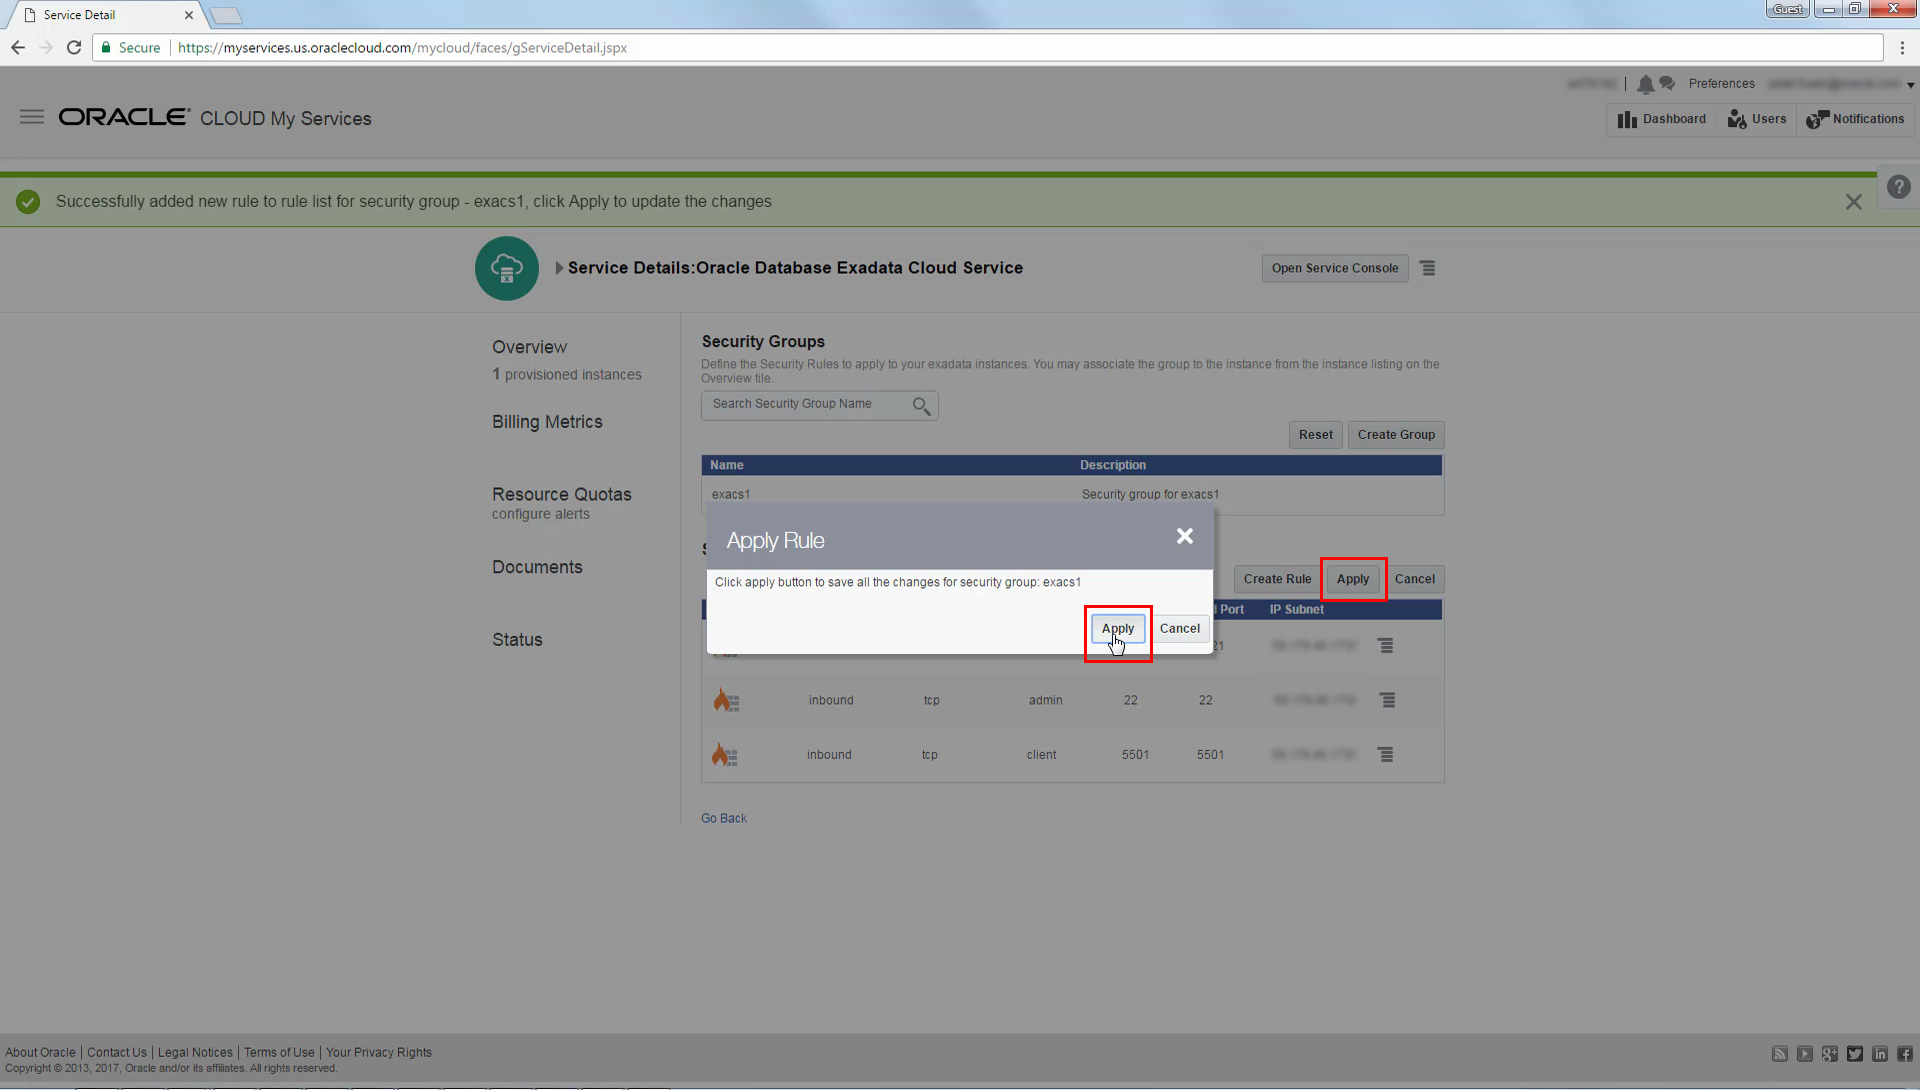
Click Apply on the security page and also in the resulting dialog to update the changes. Because the security group is already associated with the Exadata Cloud Service instance, the Oracle Net port (1521) is opened immediately.
-
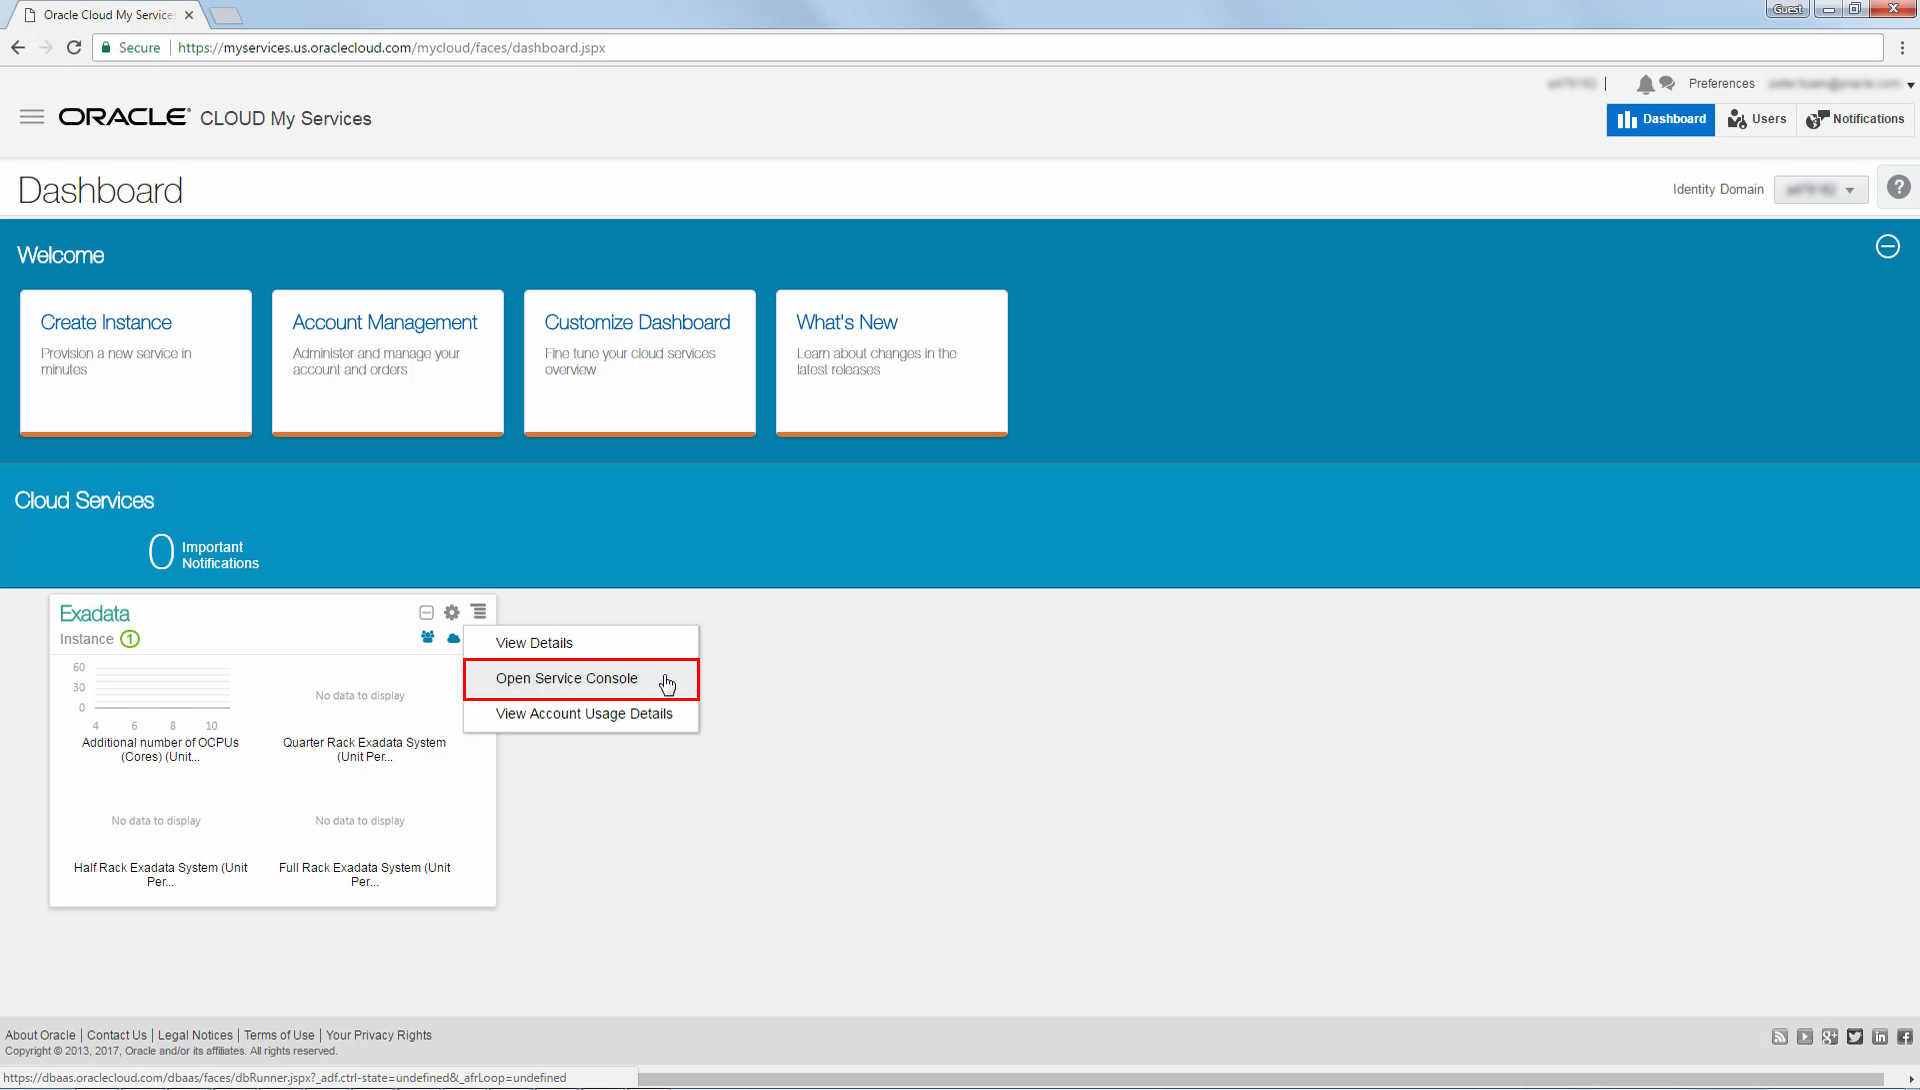
Next, we will identify the Oracle Net connect string that will be used to connect to the database. Click Dashboard to navigate back to the My Services dashboard.
-
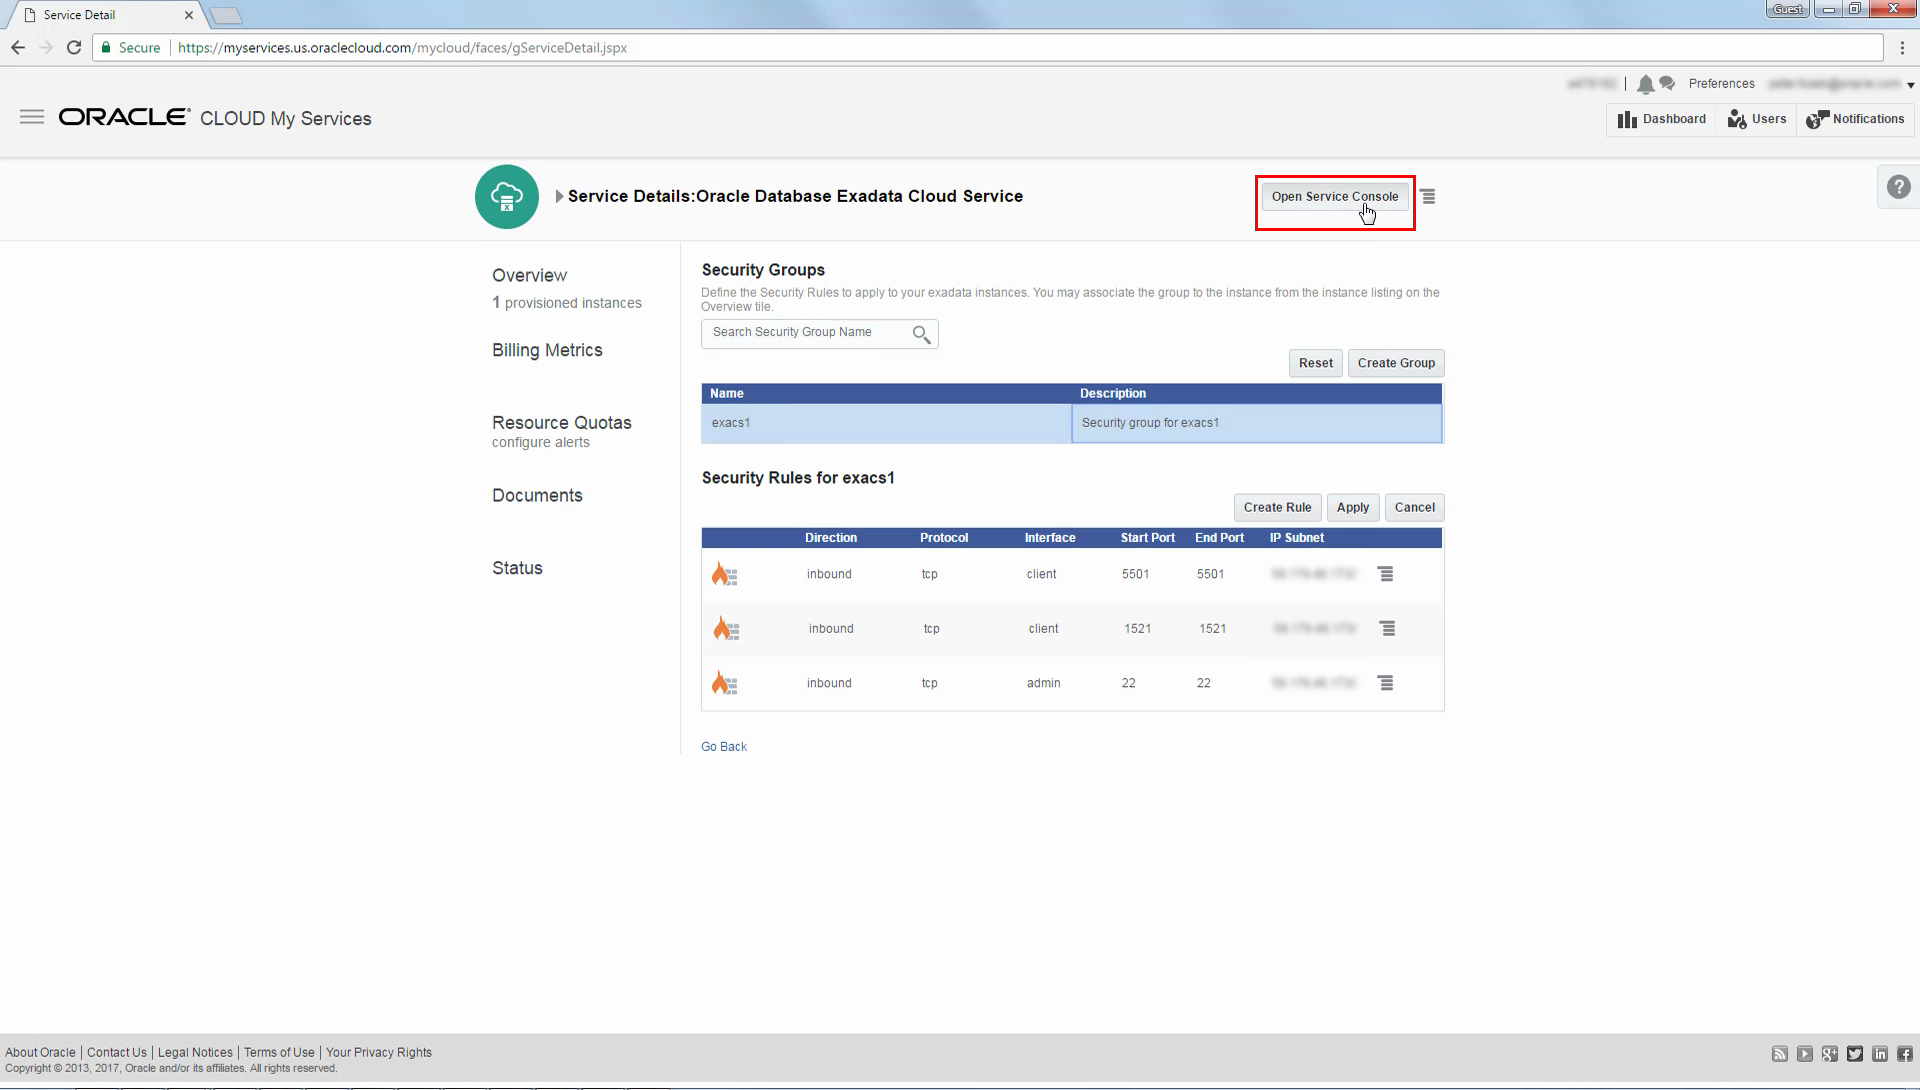
In the My Services dashboard, select Open Service Console from the menu in the Exadata tile.
-
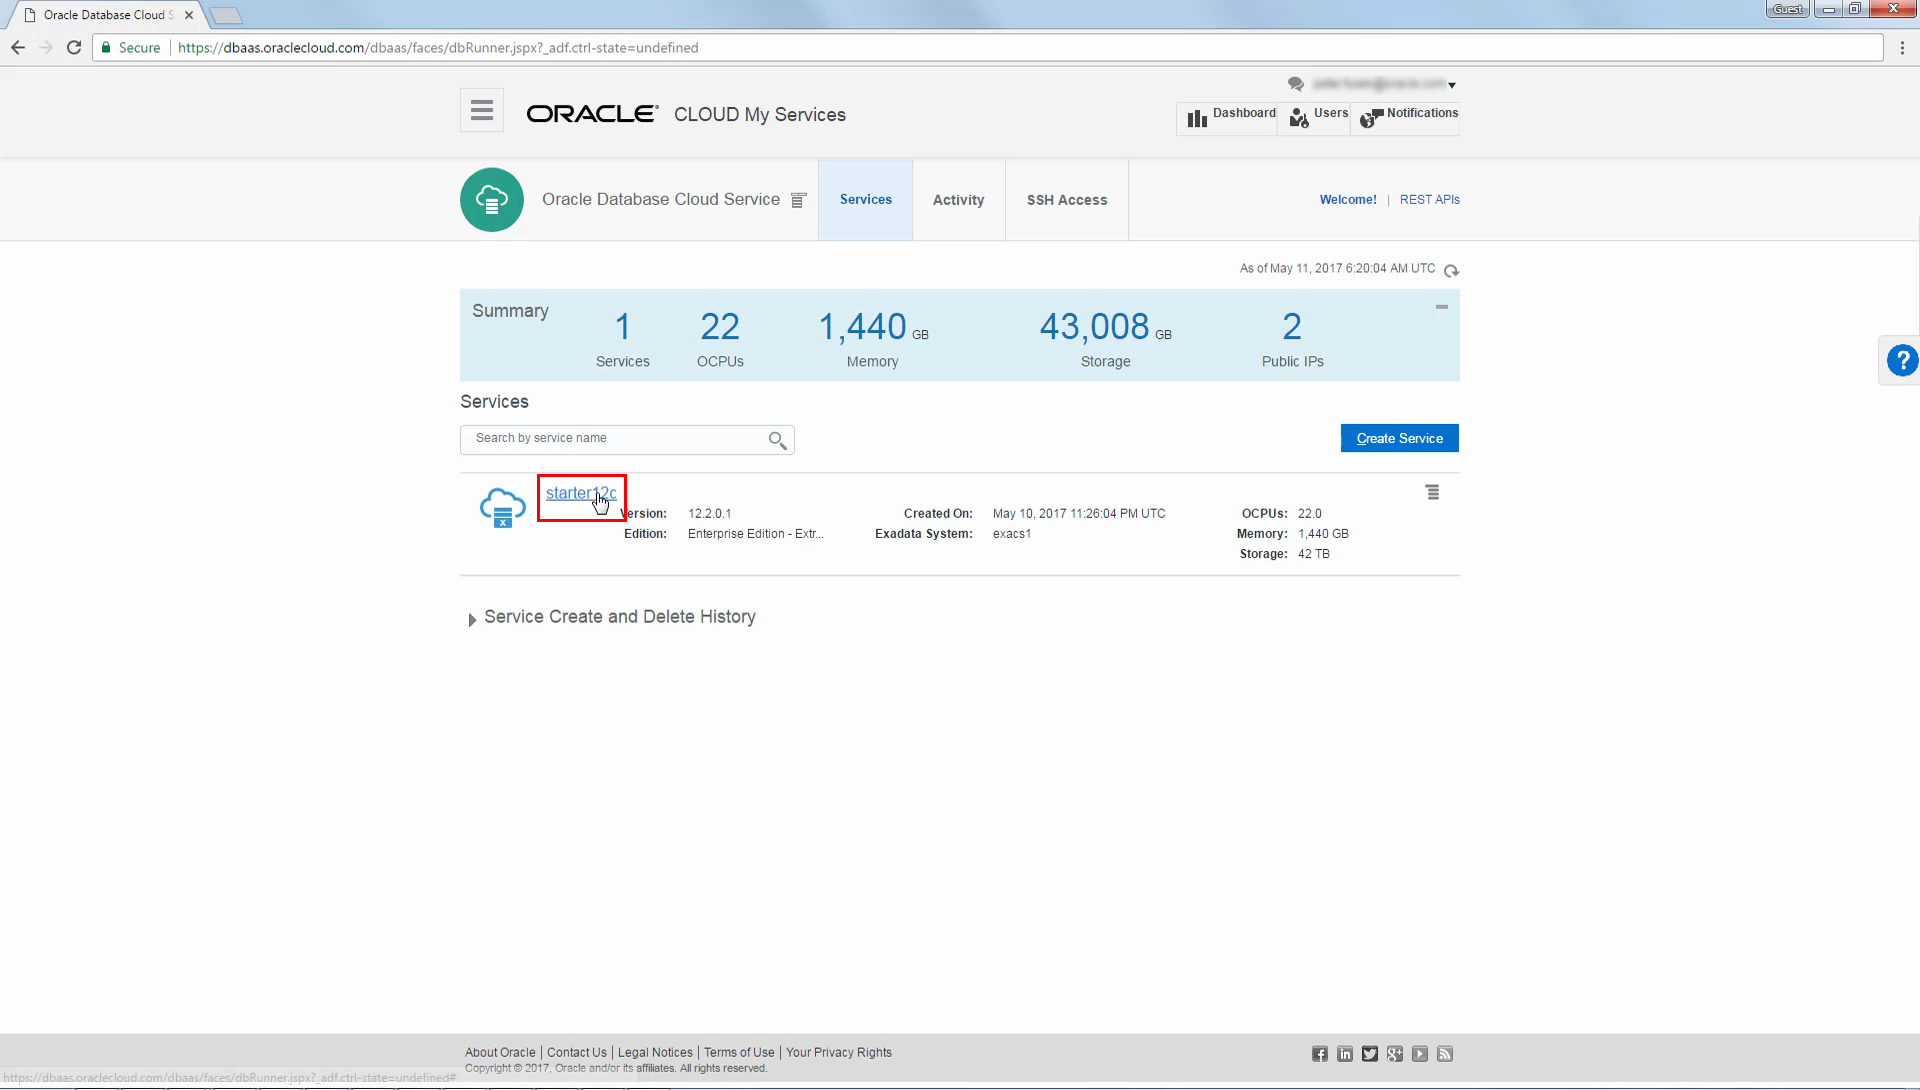
Click the deployment name to view details associated with the database deployment, including the database connect string.
-
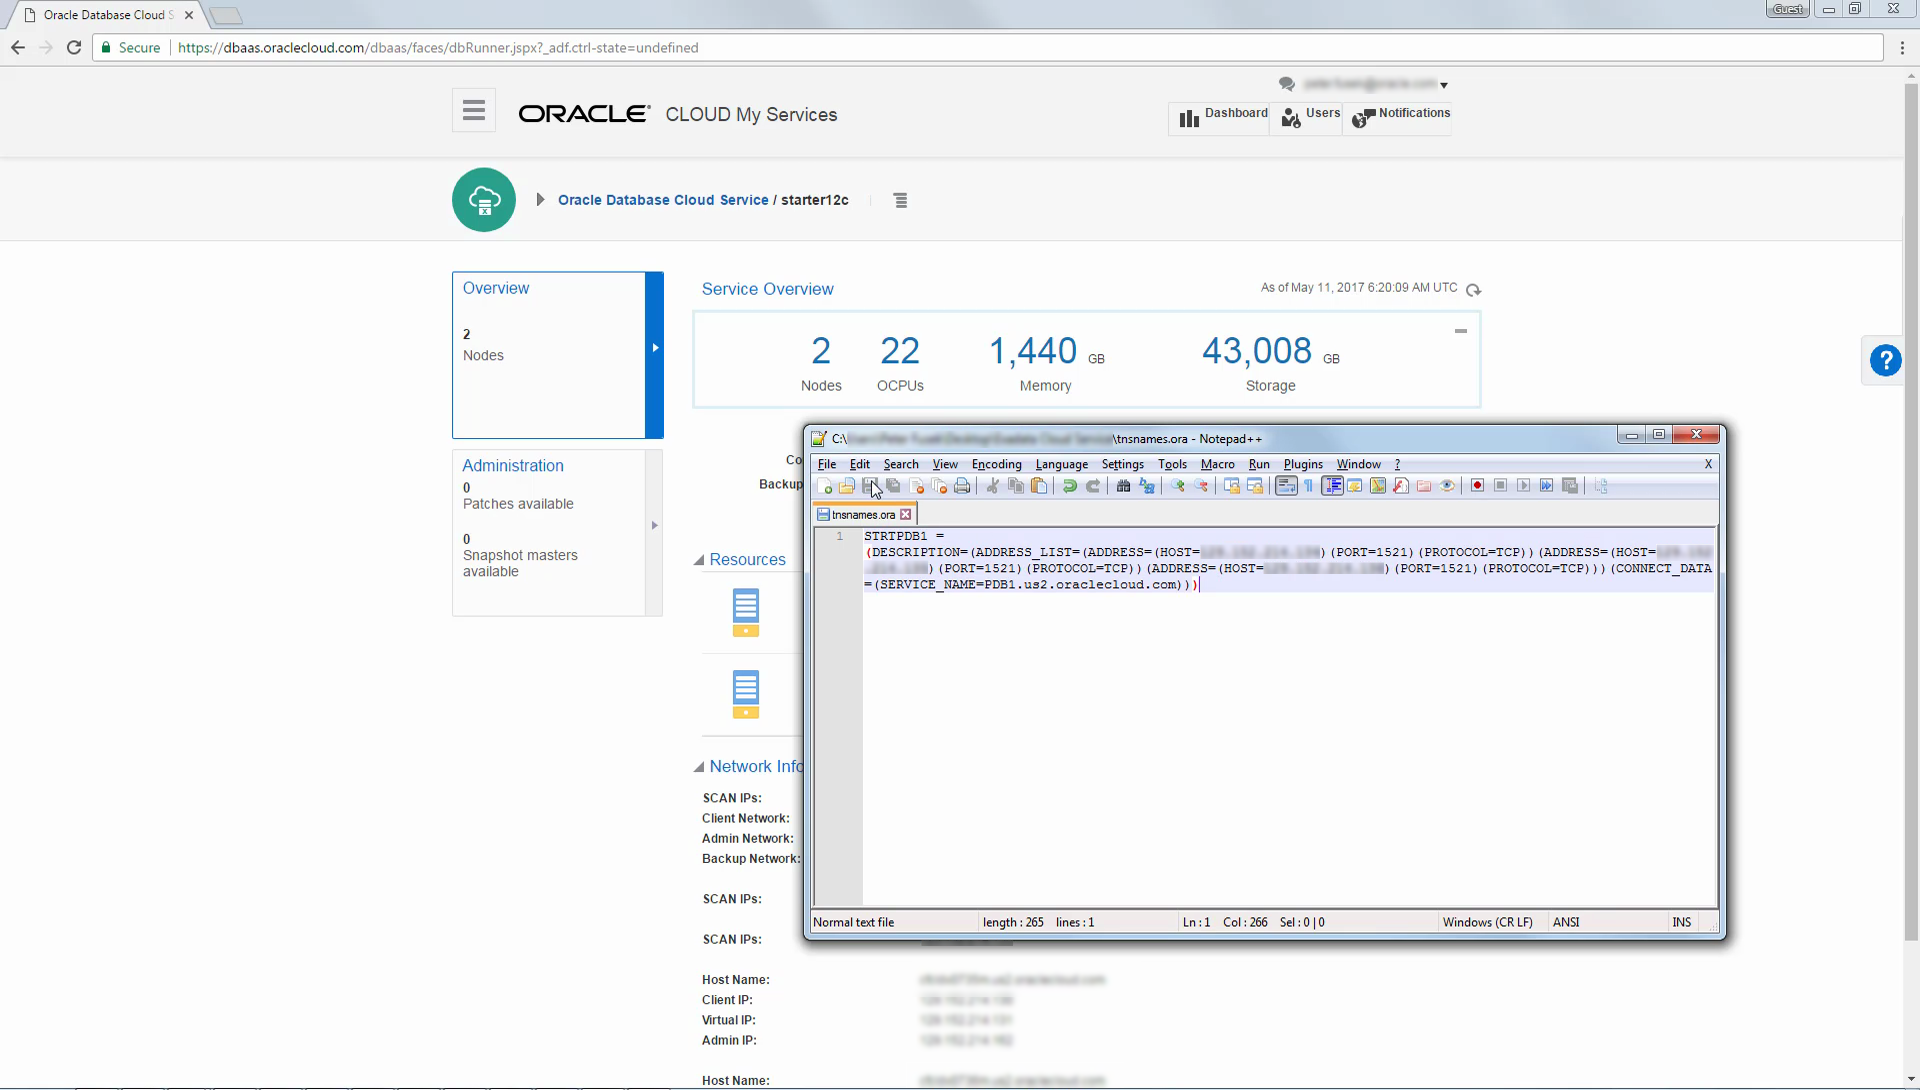
You can use the Connect String to connect to the database. Display the full value by hovering the mouse pointer over the Connect String field.
-
Use the connect string to create an alias in a client TNS names file (tnsnames.ora).
-
Use a client tool, such as SQL*Plus or SQL Developer, to confirm database connectivity using Oracle Net. This example shows a successful connection test with SQL Developer, which uses the alias that was defined in the previous step.

 Accessing Enterprise Manager Database Express
-
Enterprise Manager Database Express is a Web-based monitoring and management console that is built into Oracle Database 12c. A similar console, known as Enterprise Manager Database Control, exists in Oracle Database 11g. You can access the Enterprise Manager console by selecting Open EM Console from the menu located beside the database deployment name on the database deployment details page.

-
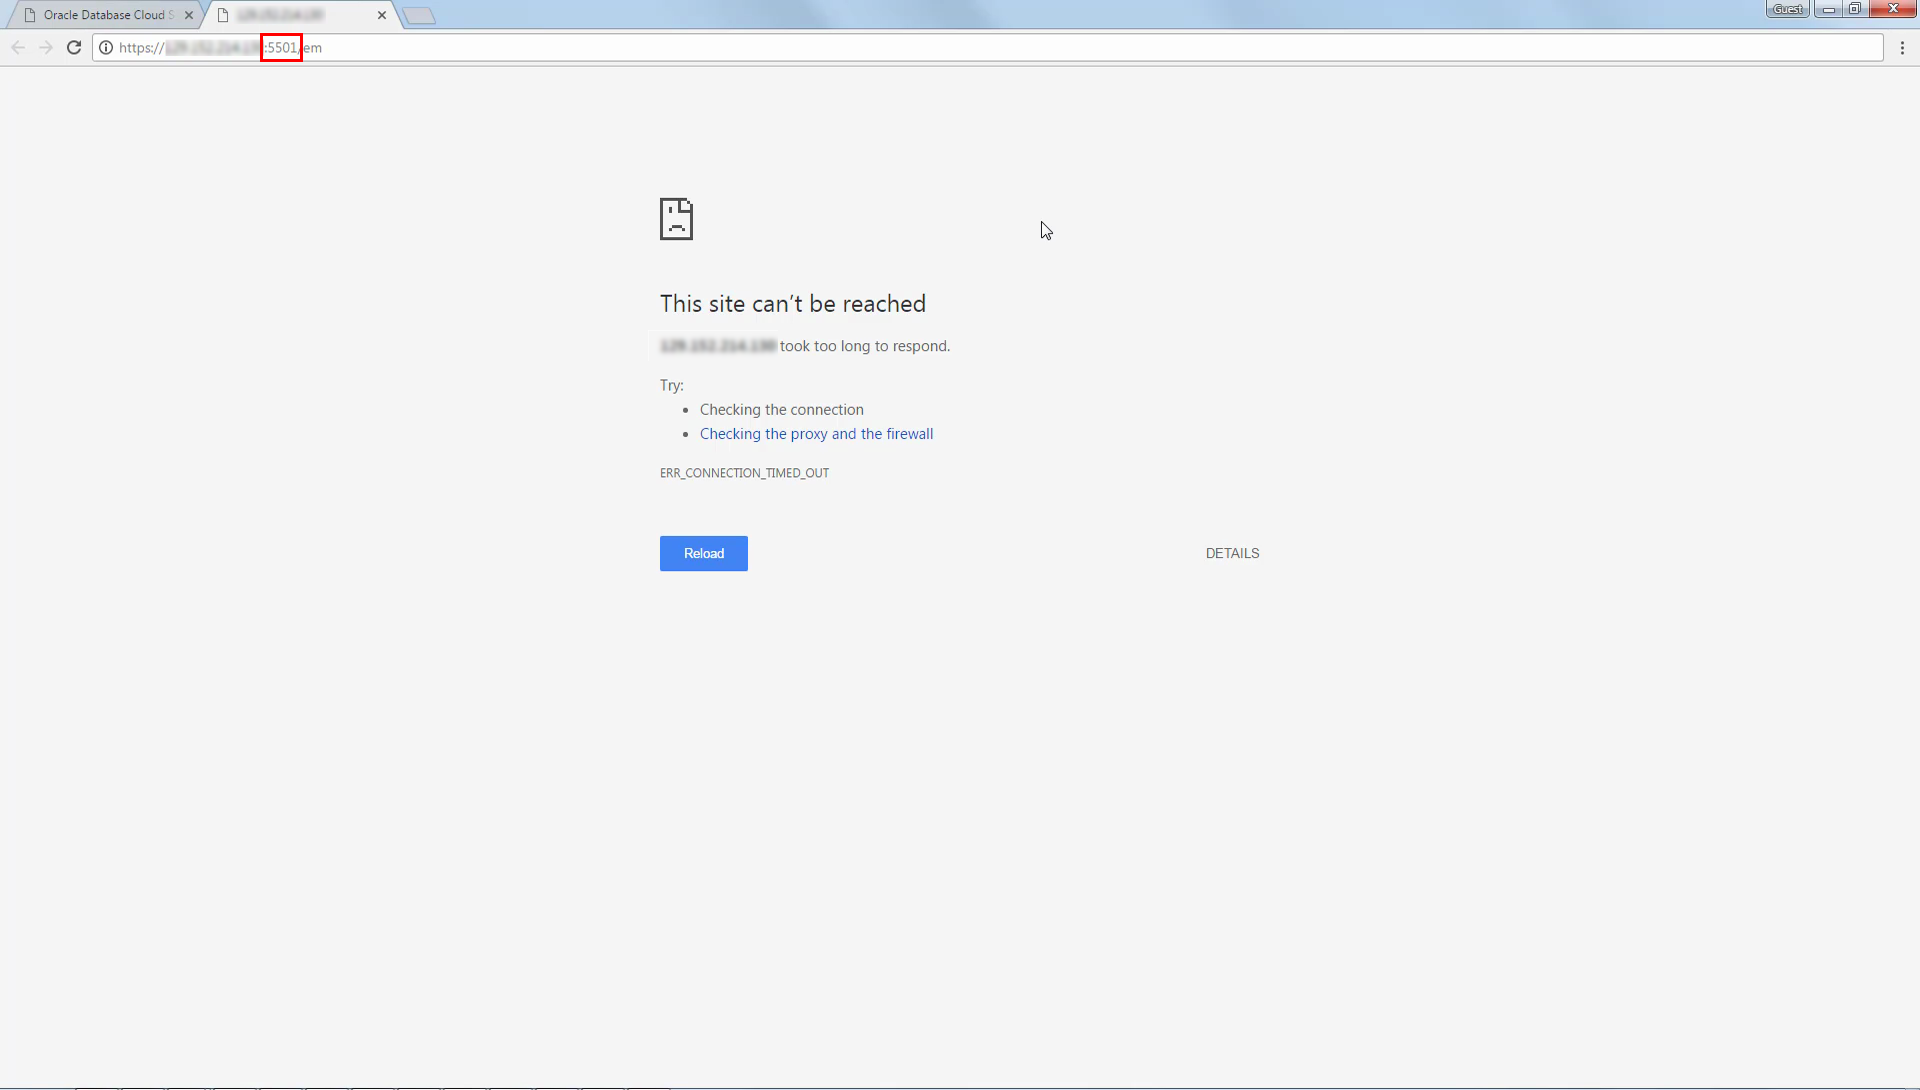
By default, network access to the Enterprise Manager console port is restricted. If you attempt to open the Enterprise Manager console before you enable access to the port the browser will simply time-out.

-
You can examine the browser URL to determine the network port number associated with the Enterprise Manager console. In this example the port number is 5501. Take note of the port number because it is different for each database.
For further details, see Accessing Enterprise Manager Database Express 12c.
-
Before you can access the Enterprise Manager console, you must create a new security rule to open the Enterprise Manager console port (5501). Start by navigating to the My Services dashboard.
-
Select View Details from the menu in the Exadata tile.
-
Select Manage Security Groups from the menu located beside the Exadata Cloud Service instance name.
-
In this example we will add a new security rule to the existing security group. Select the security group and click Create Rule.

-
Use the Add Security Rule dialog to create a new security rule. Then click Add.
The example shows a security rule definition that allows inbound TCP traffic from a specific IP subnet to port 5501 (the Enterprise Manager console port) over the client network.
For further details, see Enabling Access to a Compute Node Port.
-
Click Apply on the security page and also in the resulting dialog to update the changes. Because the security group is already associated with the Exadata Cloud Service instance, the Enterprise Manager console port (5501) is opened immediately.
-
Next, we will try again to access the Enterprise Manager console. Click Open Service Console.
-
Click the deployment name to view details associated with the database deployment.
-
Select Open EM Console from the menu located beside the database deployment name on the database deployment details page.
-
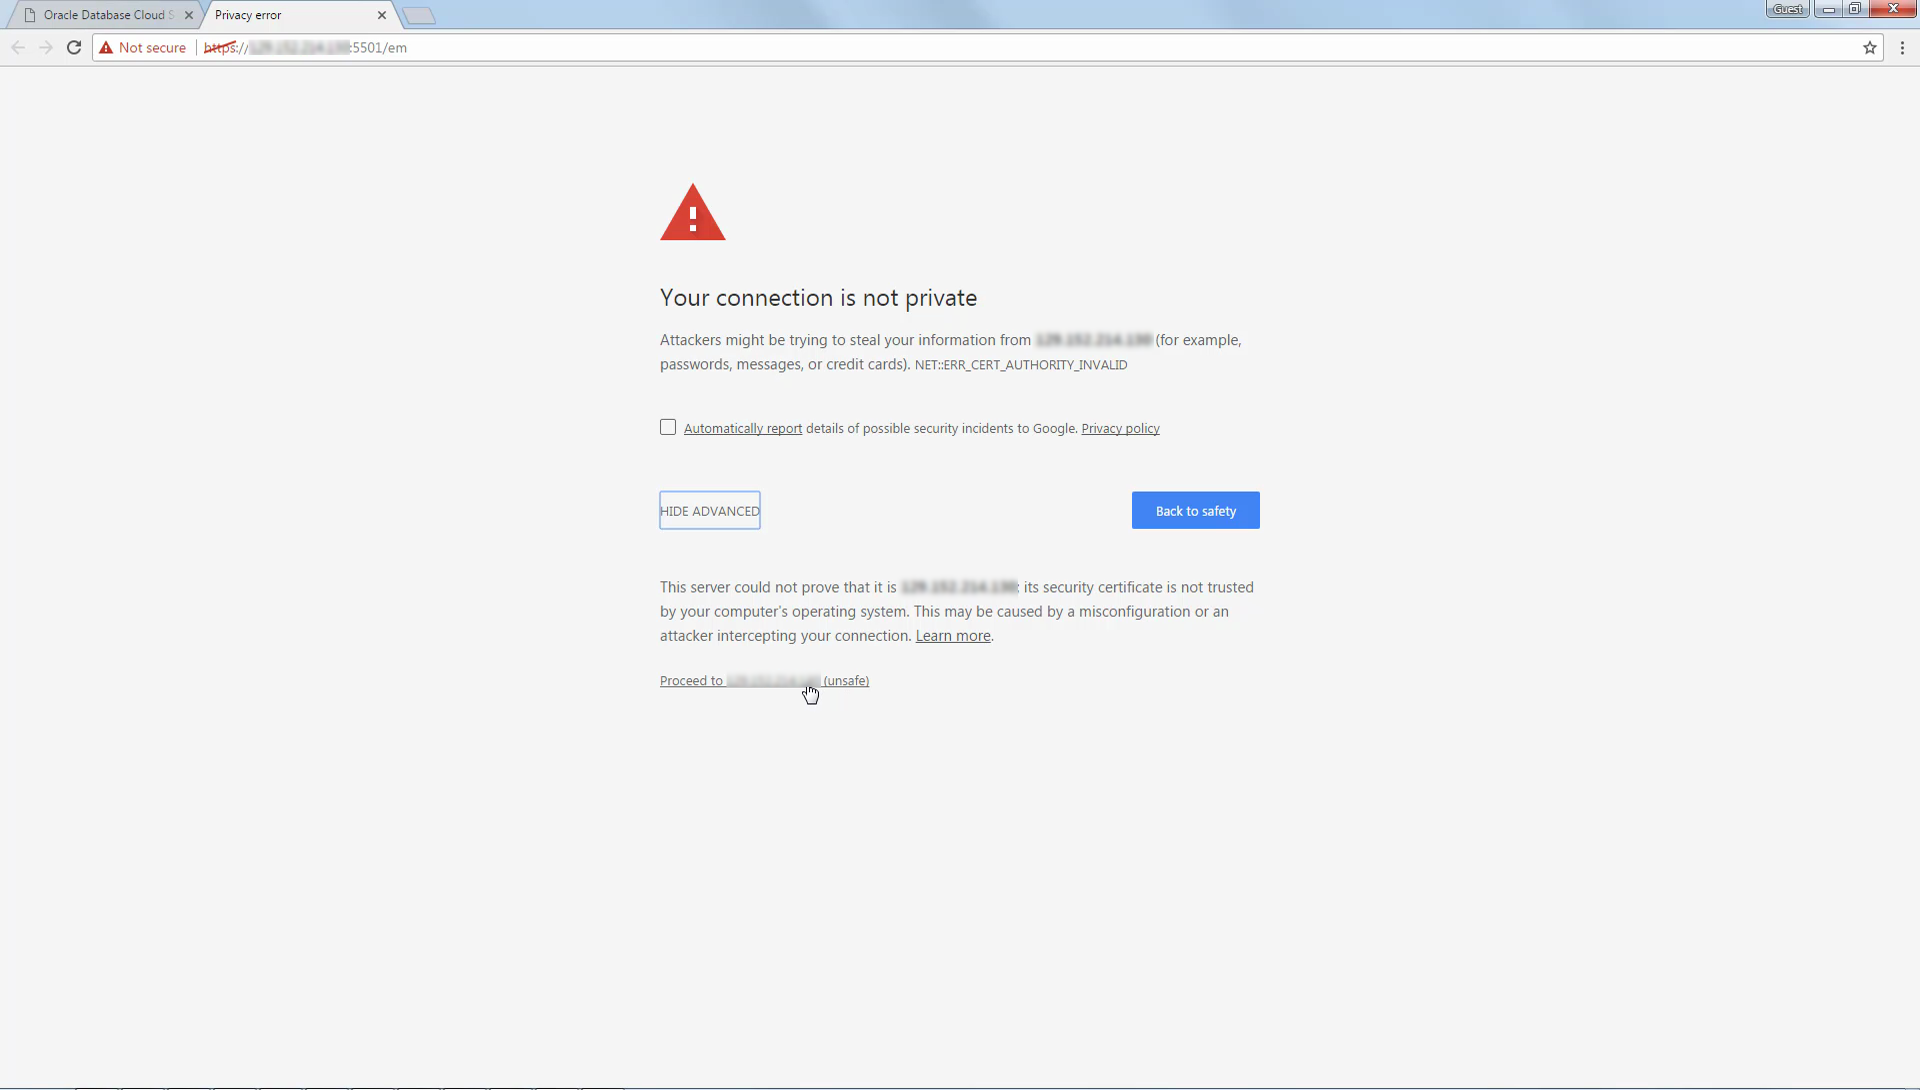
You may see a certificate warning when you first connect to the Enterprise Manager console. This is because the Enterprise Manager console uses a self-signed certificate by default. However, the self-signed certificate still ensures security and is used to encrypt communications between the browser and the Enterprise Manager console. To proceed, enter a security exception in the web browser.
-
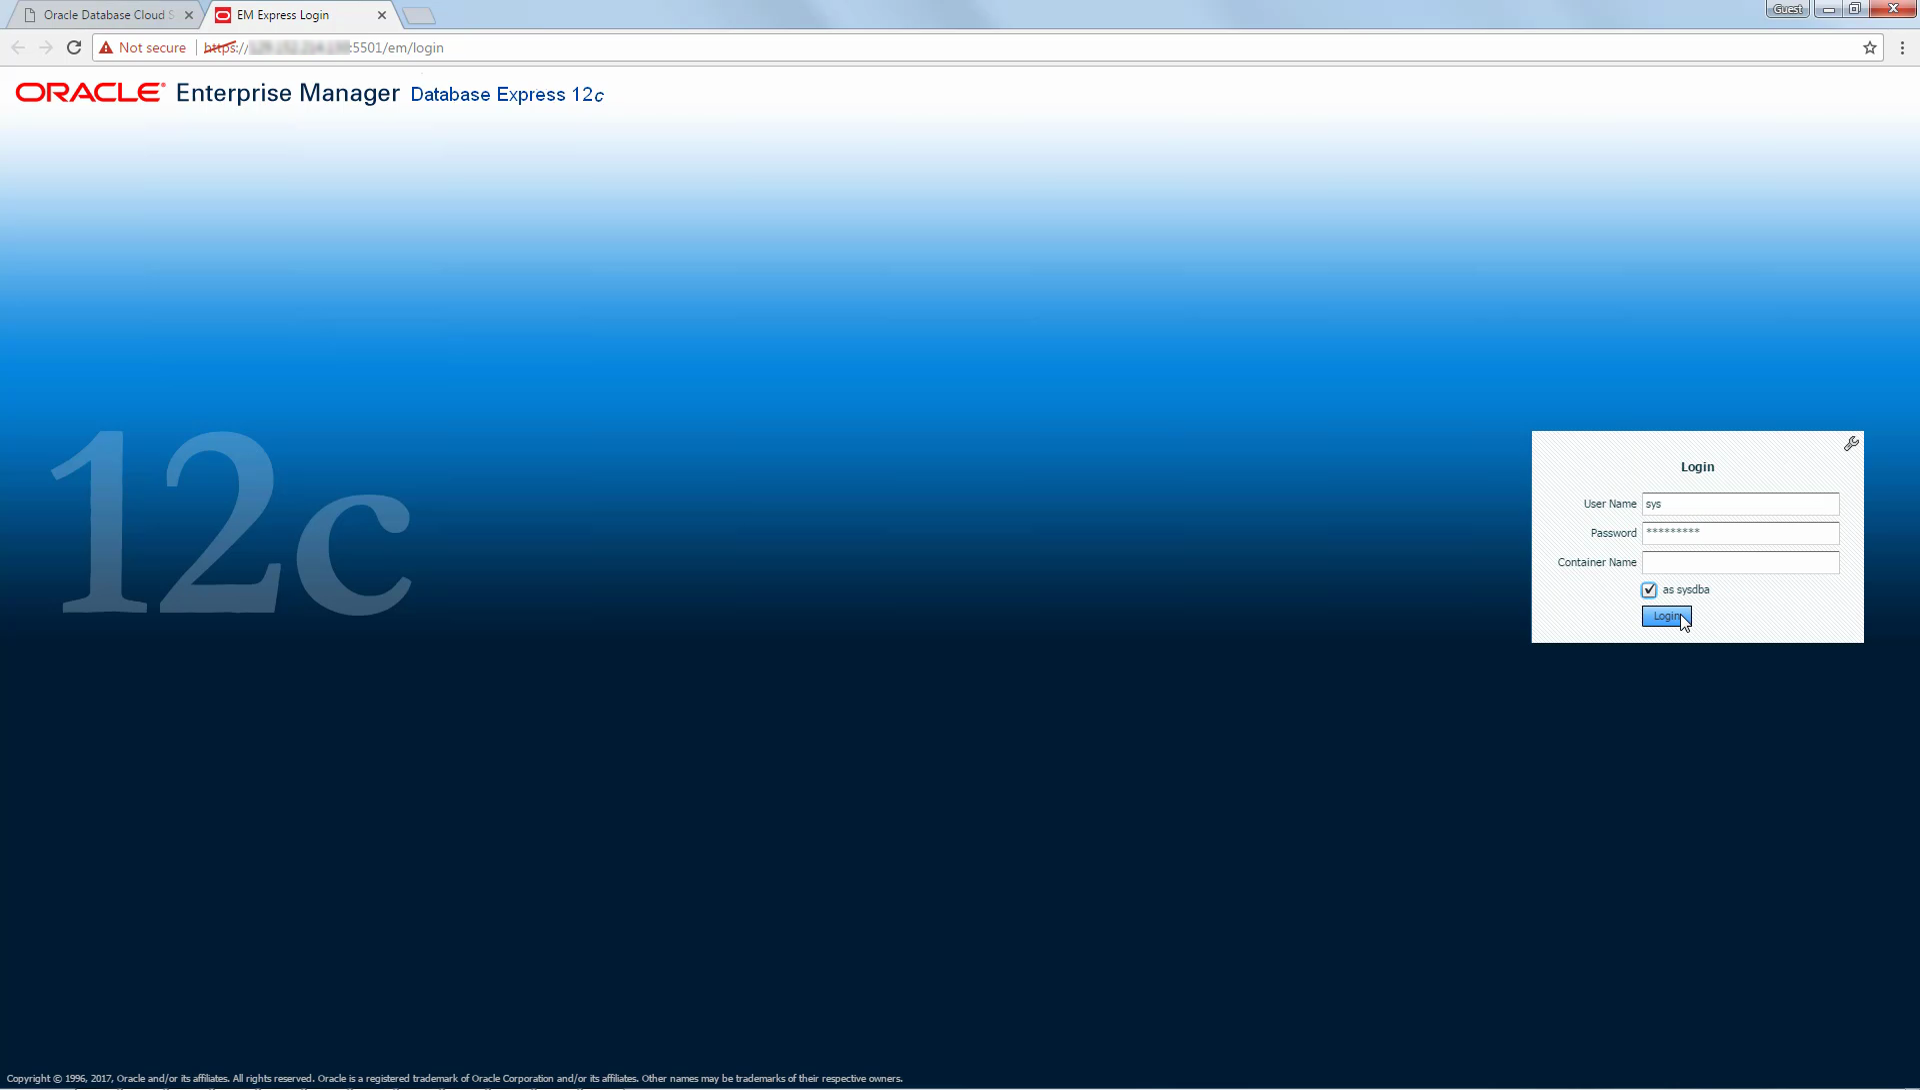
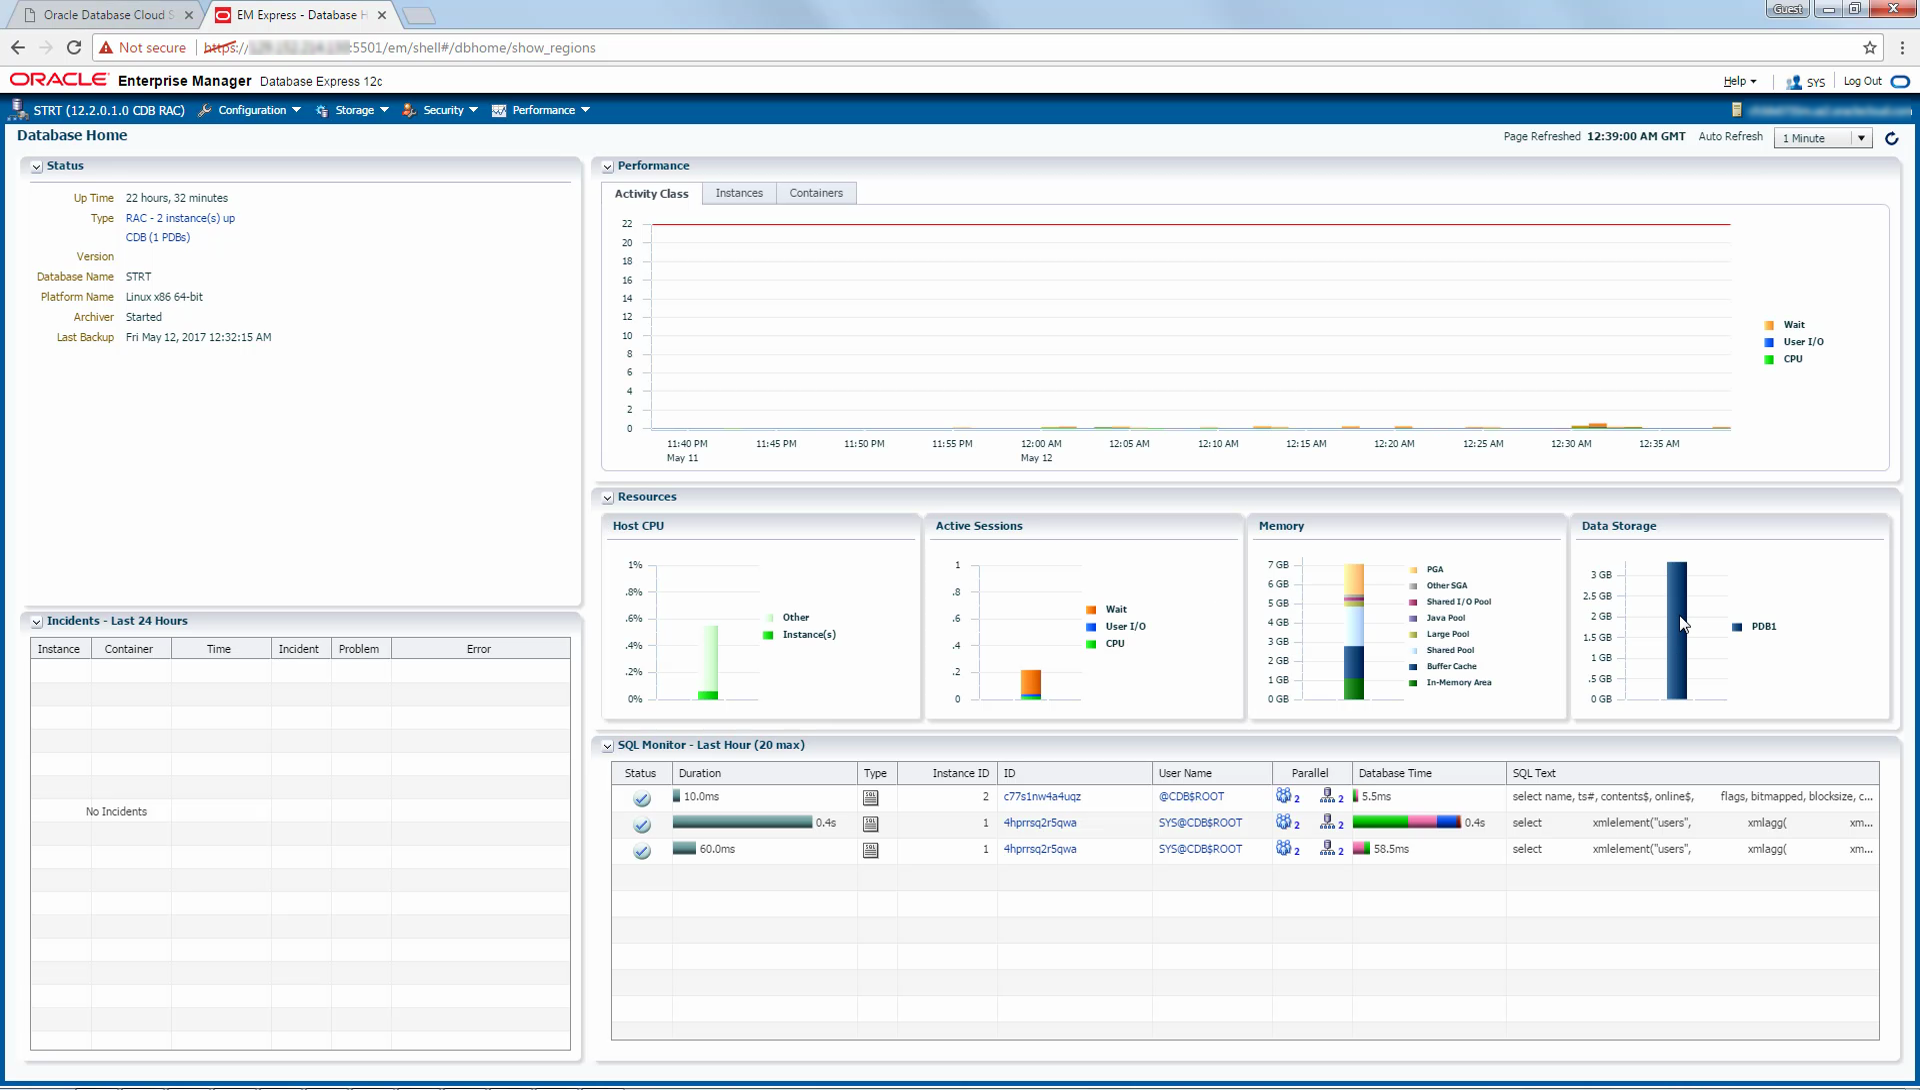
Use the Enterprise Manager Login page to connect to the database. The example shows a connection to the container database (CDB) as the SYS DBA user.
For further details, see Accessing Enterprise Manager Database Express 12c.
-
Once you are connected, you can use the Enterprise Manager console to monitor and manage various aspects of the database.
For further details about Enterprise Manager Database Express, see Oracle Database 2 Day DBA.
 Performing a Database Backup
When you create a database deployment you can specify an automatic backup destination and associated backup settings for the database. As a result of this configuration, an automatic database backup job is run daily. In addition, you can perform an on-demand backup using the Service Console.
-
In the My Services dashboard, select Open Service Console from the menu in the Exadata tile.
-
Click the deployment name associated with the database that you want to back up.
-
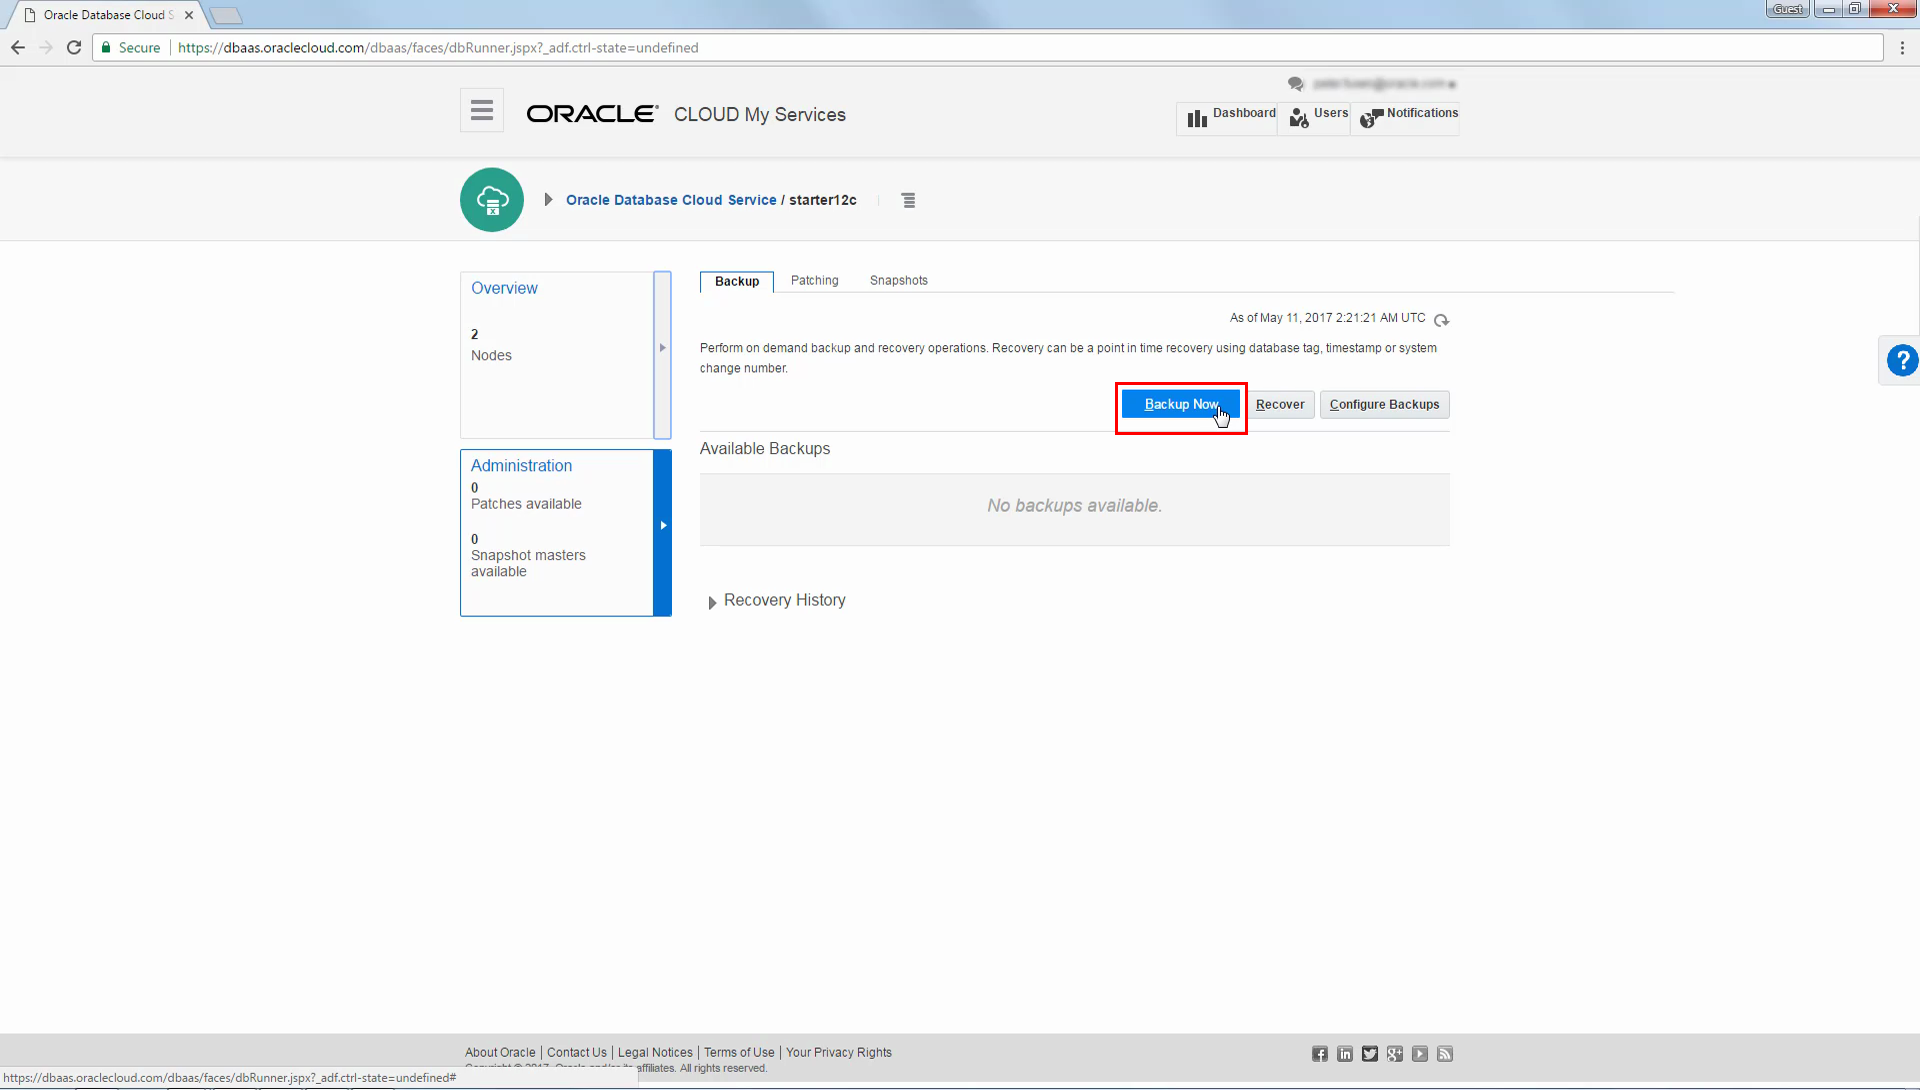
Click the Administration tile.
-
The Administration page is displayed, with the Backup tab highlighted. Click Backup Now to perform an on-demand backup.
-
Use the Backup Now dialog to submit the on-demand backup request. Select Yes for the Backup Forever option if you want the backup to remain beyond the default backup retention period. Otherwise, the backup is managed as part of the default backup cycle. Finally, click Backup.
For further details, see About Backing Up Database Deployments on Exadata Cloud Service.

-
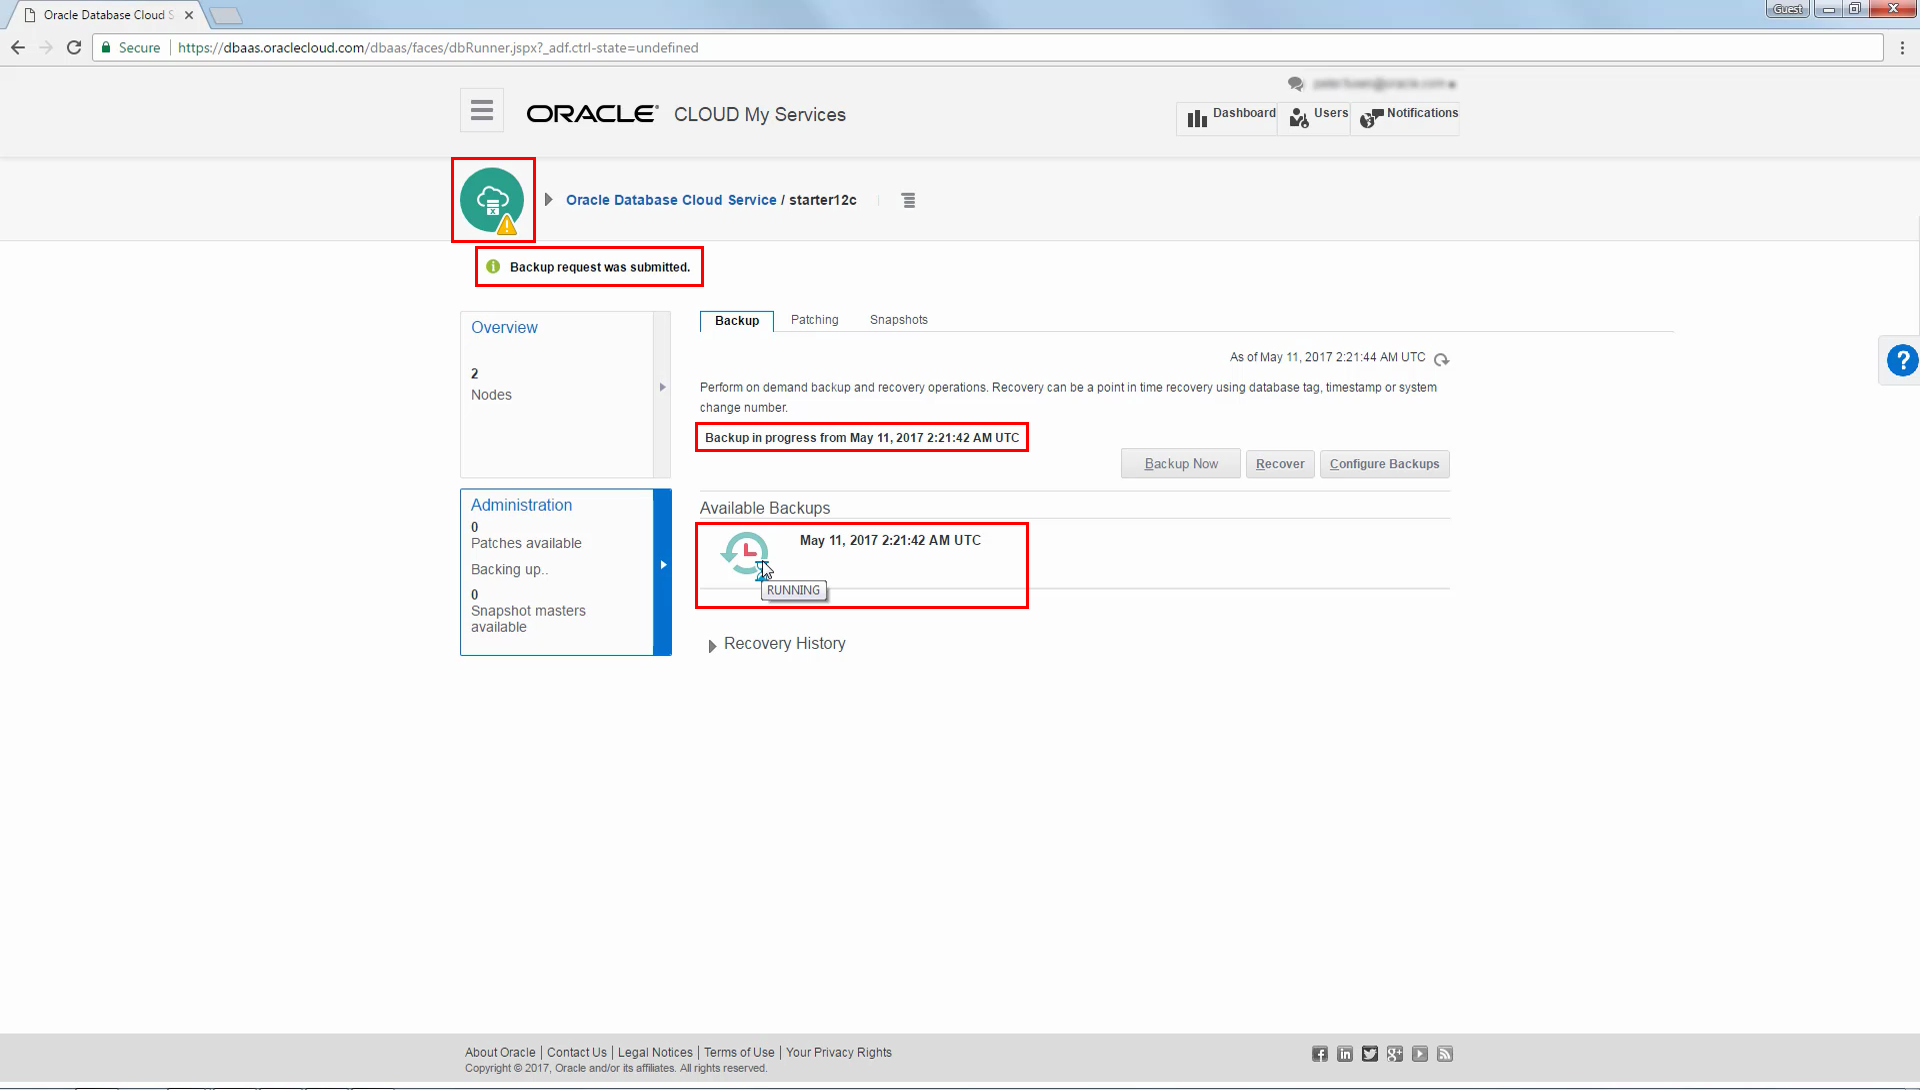
The Administration page now shows a message confirming submission of the backup request. The page also shows other indicators that the backup is running. While the backup is running the database deployment is placed in a maintenance state, as indicated by the icon beside the service name. You can use the circular refresh button to periodically refresh the page
-
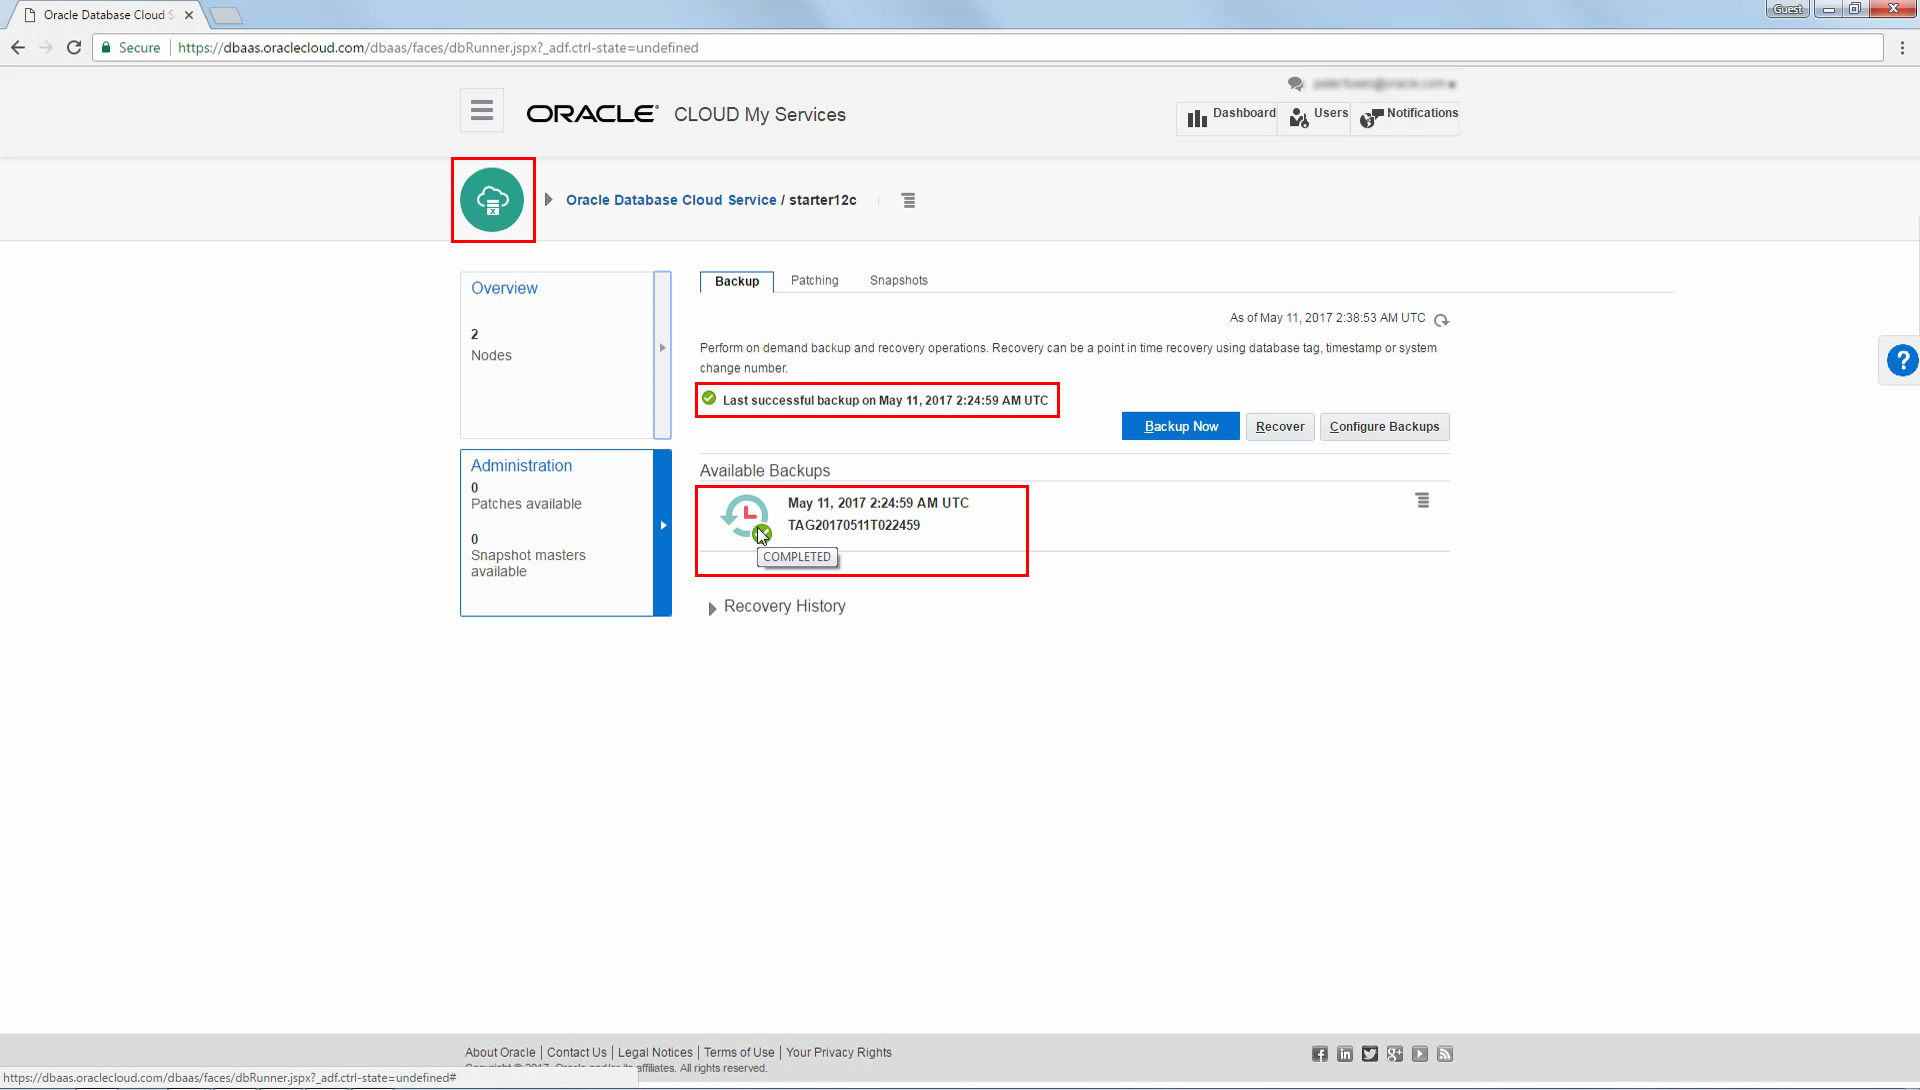
When the backup is completed, the Administration page adjusts accordingly and the database deployment comes out of the maintenance state, as indicated by the icon beside the service name.
-
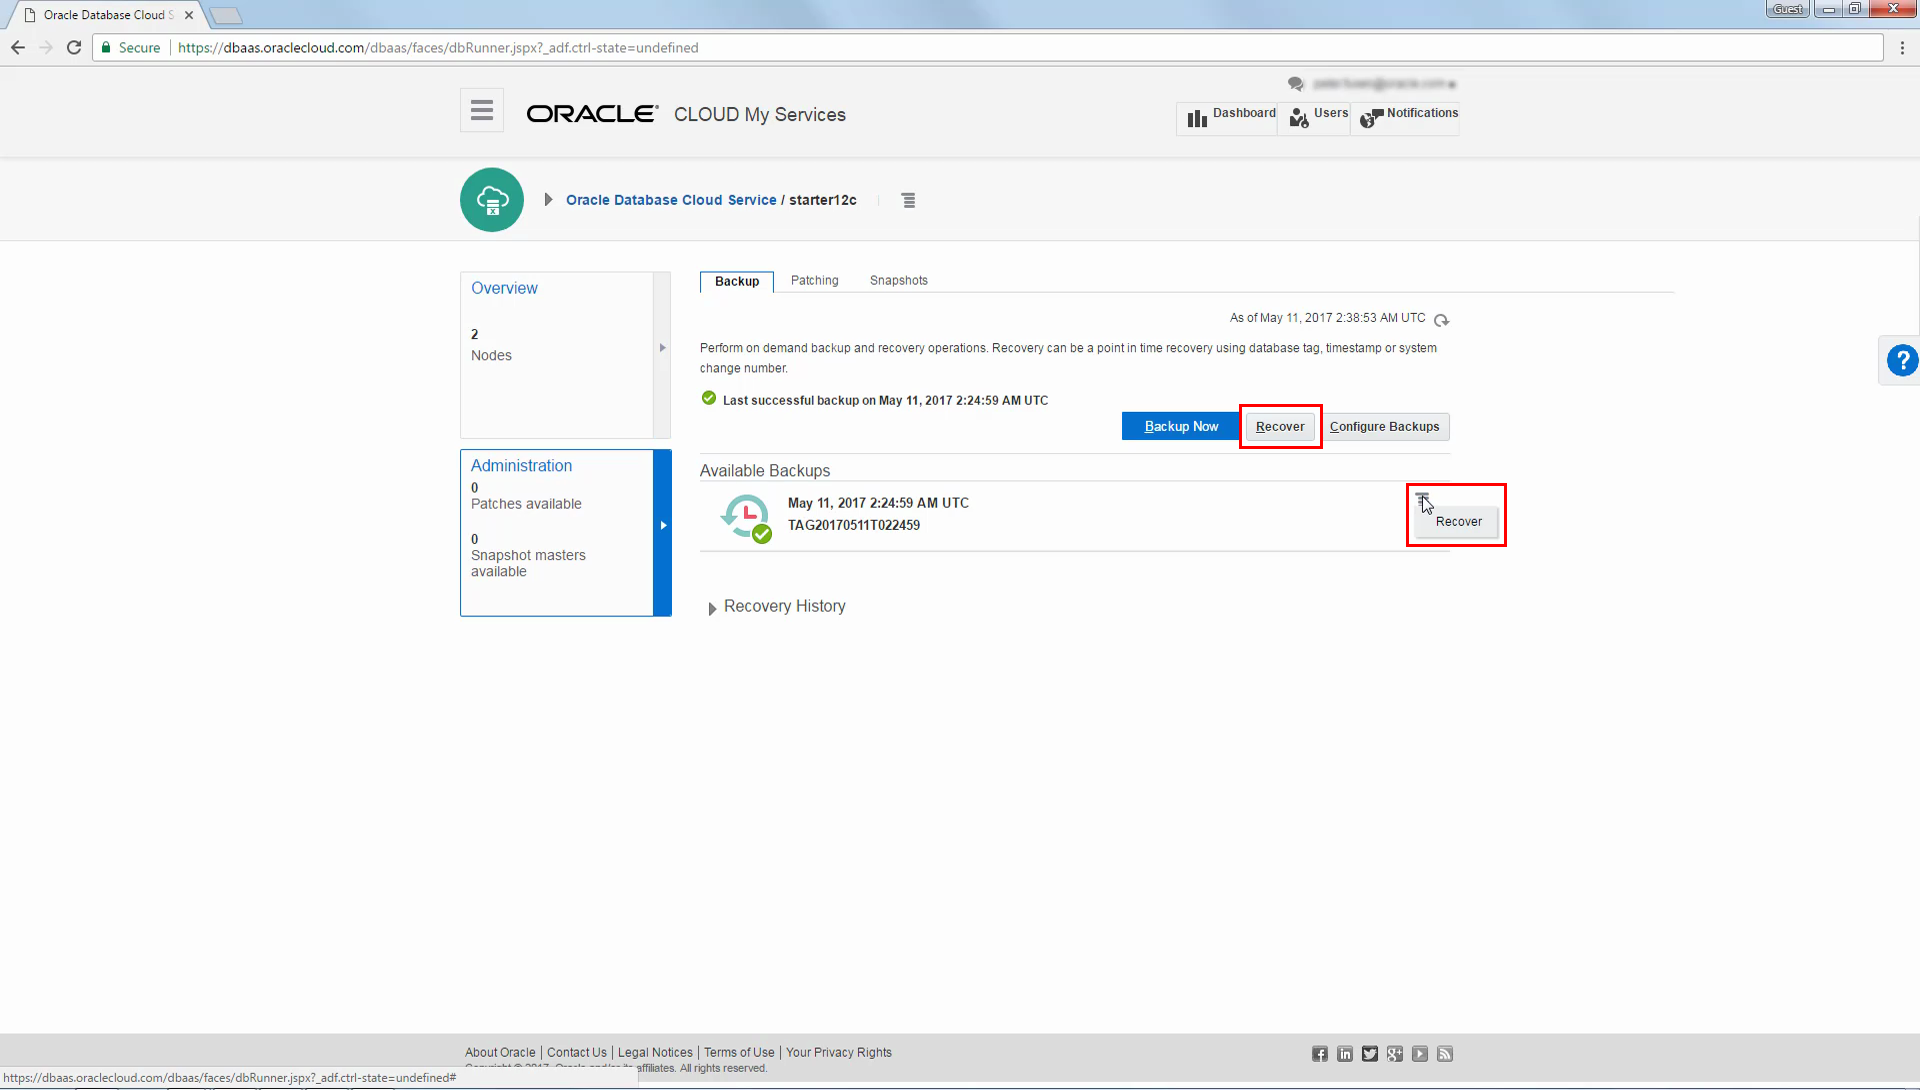
Now, the menu associated with the backup provides the Recover option, which you can use when necessary to recover the database by using the specified backup. You can also recover using the latest available backup, or to a specific point-in-time, by using the Recover button located beside Backup Now.
For further details, see Backing Up and Restoring Databases on Exadata Cloud Service.