Send data from Oracle GoldenGate to OCI GoldenGate
Learn to create a trusted connection and send data from an on-premises or Marketplace Oracle GoldenGate to Oracle Cloud Infrastructure GoldenGate
Note: This quickstart applies only to Oracle GoldenGate Microservices because OCI GoldenGate only allows SSL-based communication. If you’re looking for how to replicate data from Oracle GoldenGate Classic to OCI GoldenGate, see Connecting GoldenGate Classic to GoldenGate Microservices and OCI GoldenGate.
Overview
Oracle Cloud Infrastructure GoldenGate enables you to send data from an on-premises or Marketplace Oracle GoldenGate to OCI GoldenGate using a Distribution Path. The following steps guide you through how to set up and run this replication model using the latest Oracle GoldenGate version for OCI Marketplace.
This quickstart is also available as a LiveLab: View the workshop.
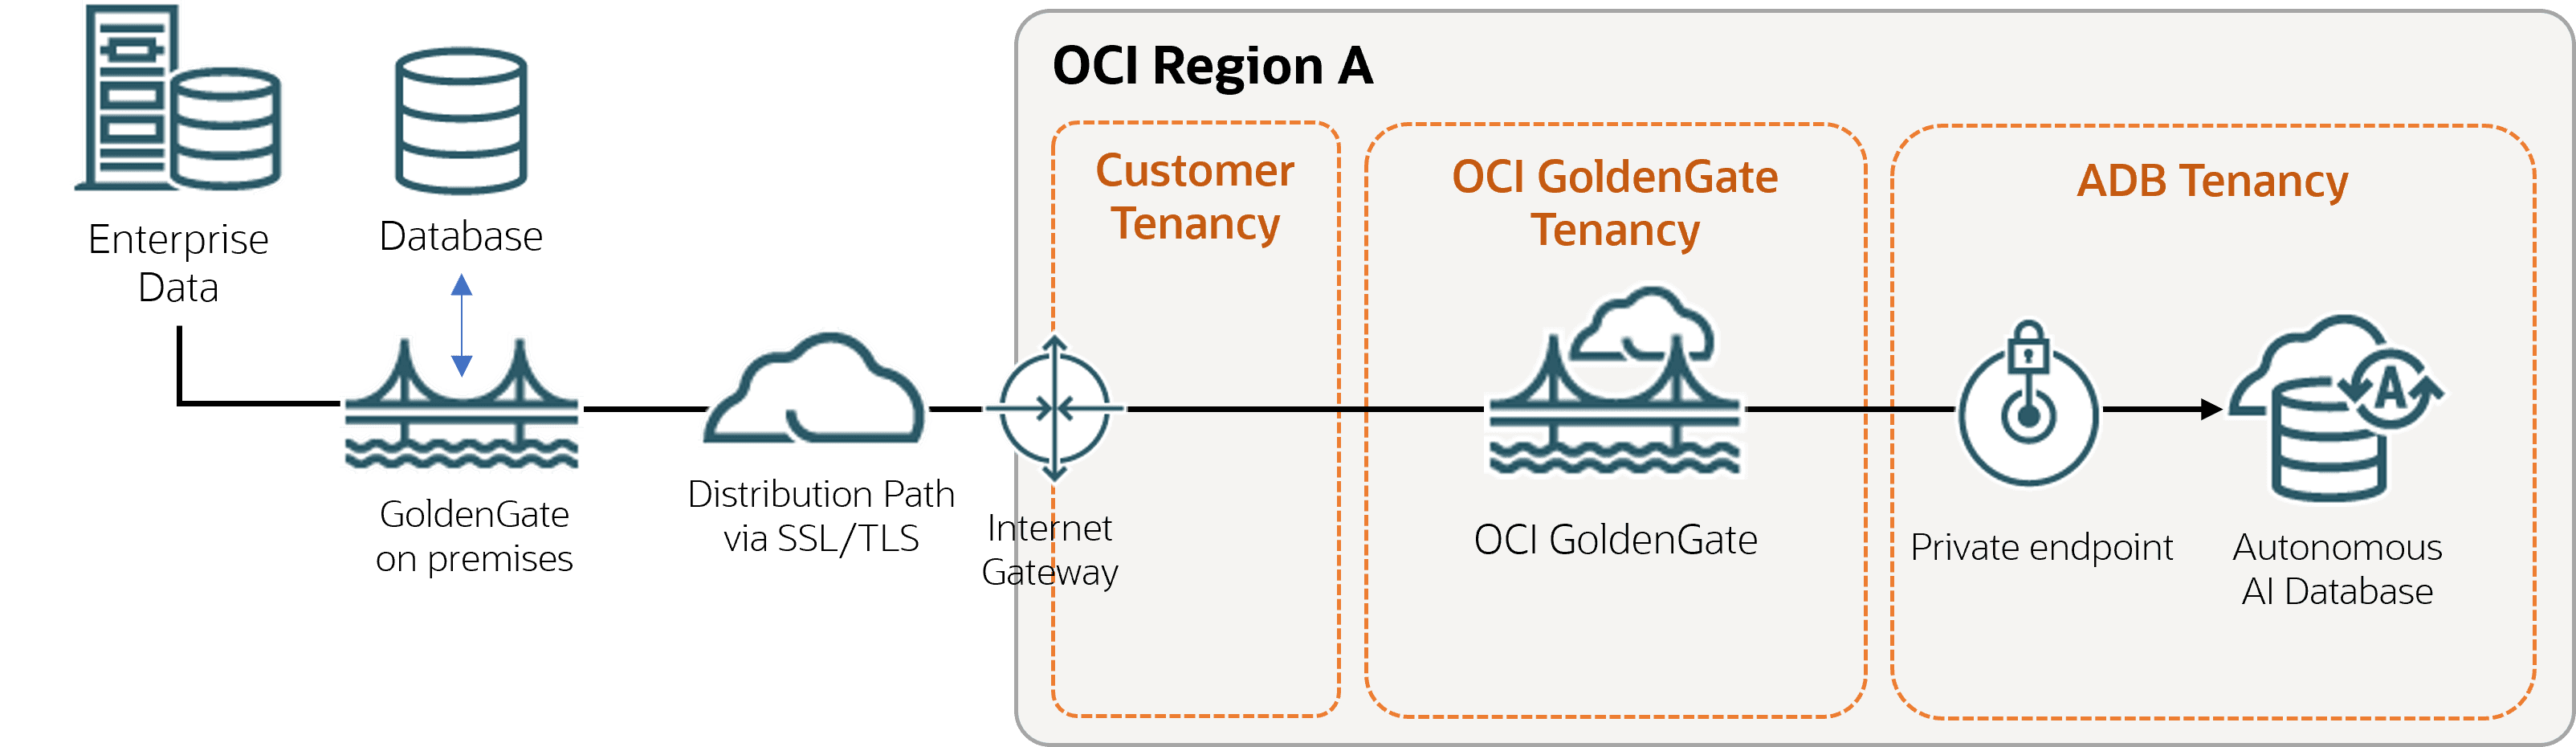
Description of the illustration oggtoggs.png
Before you begin
To successfully complete this quickstart, you must have:
-
An existing on-premises or Marketplace Oracle GoldenGate deployment
-
An existing target database
Note: Download and load the sample data, if needed.
Task 1: Create OCI GoldenGate resources
-
Create connections to your source and target databases.
-
Assign connections to the deployment.
Task 2: Create a trusted connection between Oracle GoldenGate and OCI GoldenGate
Take care in distinguishing the Oracle GoldenGate Service Manager from the OCI GoldenGate deployment console while you complete this task.
-
Download the root certificate for the OCI GoldenGate deployment console.
Note: You can download the root certificate from any browser. The following steps describe how to download the root certificate from a Chrome browser.
-
In your Chrome browser address bar, select the padlock icon, and then select Connection is secure.
-
Select Certificate is valid. A Certificate window opens.
-
In the Certificate window, select Certification Path, select DigiCert, and then select View Certificate.
-
Ensure that Issued reads DigiCert Global Root G2, select Details, and then Copy to File.
-
In the Certificate Export Wizard, select Next, select Base-64 encoded X.509 (.CER), and then select Next.
-
Select Browse to save the file to your local drive.
-
Select Next, and then select Finish.
-
-
Upload the certificate to the on-premises or Marketplace Oracle GoldenGate Service Manager:
-
Open the on-premises or Marketplace Oracle GoldenGate Service Manager in a browser window.
-
In the navigation menu (hamburger icon), select Certificate Management.
-
On the Certificate Management page, select Add CA Certificates (plus icon).
-
In the Add CA Certificate dialog, enter a Unique Name.
-
For Certificate PEM, copy and paste the contents of the certificate file you downloaded from Chrome, and then select Add.
-
-
Add a user with which Oracle GoldenGate can use to connect to OCI GoldenGate.
-
Launch the OCI GoldenGate deployment console from the deployment Details page.
-
In the navigation menu and then select User Administration.
-
Select Add New User (plus icon), complete the fields as follows, and then select Submit:
-
For Authenticated By, select Password from the dropdown.
-
For Role, select Operator from the dropdown.
-
For Username, enter a name.
-
For Password, enter the password associated with this user. Verify the password.
-
-
Open the on-premises or Marketplace Oracle GoldenGate Administration Service, and then navigate to the Path Connections page.
-
Select Add Path Connection (plus icon), complete the fields as follows, and then select Submit:
-
Credential Alias: Enter an alias.
-
User ID: Enter the name of the user created in the previous step.
-
Password and Verify Password: Enter the password associated with this user.
-
-
Task 3: Send data from Oracle GoldenGate to OCI GoldenGate
-
On the on-premises or Marketplace Oracle GoldenGate, add and run an Extract.
-
On the on-premises or Marketplace Oracle GoldenGate, add a Distribution Path with the following values, and then select Create and Run:
-
On the Source Options page:
-
For Source Extract, select the Extract created in Task 2.
-
For Trail Name: Enter a two-character name for the trail when it's received by OCI GoldenGate.
-
-
On the Target Options page:
-
For Target Host: Enter the OCI GoldenGate hostname in the following format,
<domain>.deployment.goldengate.<region>.oci.oraclecloud.com:443. -
For Port Number: Enter the port number of the target deployment.
-
For Trail Name: Enter a two-character name for the trail when it's received by Oracle GoldenGate.
-
For Alias, enter the Credential Alias created in Task 2.
-
-
-
In the OCI GoldenGate deployment console, add a Nonintegrated Replicat.